turn signal bulb HYUNDAI IX35 2014 Owners Manual
[x] Cancel search | Manufacturer: HYUNDAI, Model Year: 2014, Model line: IX35, Model: HYUNDAI IX35 2014Pages: 1534, PDF Size: 39.76 MB
Page 163 of 1534
491
Features of your vehicle
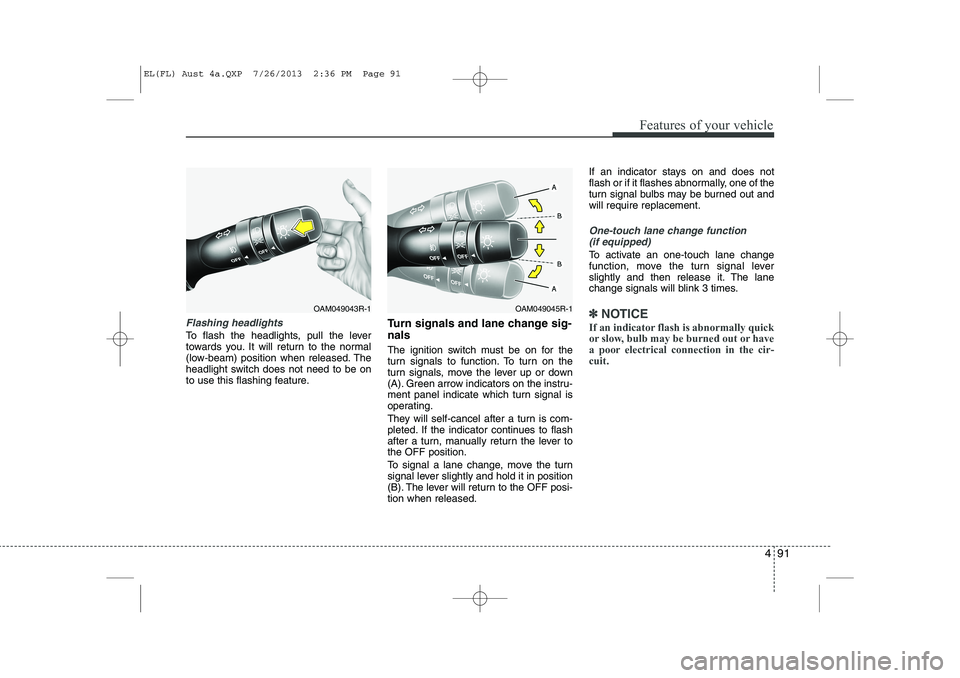
Flashing headlights
To flash the headlights, pull the lever
towards you. It will return to the normal
(low-beam) position when released. The
headlight switch does not need to be on
to use this flashing feature.Turn signals and lane change sig- nals
The ignition switch must be on for the
turn signals to function. To turn on the
turn signals, move the lever up or down
(A). Green arrow indicators on the instru-
ment panel indicate which turn signal is
operating.
They will self-cancel after a turn is com-
pleted. If the indicator continues to flash
after a turn, manually return the lever tothe OFF position.
To signal a lane change, move the turn
signal lever slightly and hold it in position
(B). The lever will return to the OFF posi-tion when released.If an indicator stays on and does not
flash or if it flashes abnormally, one of the
turn signal bulbs may be burned out andwill require replacement.
One-touch lane change function
(if equipped)
To activate an one-touch lane change
function, move the turn signal lever
slightly and then release it. The lane
change signals will blink 3 times.
✽✽ NOTICE
If an indicator flash is abnormally quick
or slow, bulb may be burned out or have
a poor electrical connection in the cir-cuit.OAM049045R-1OAM049043R-1
EL(FL) Aust 4a.QXP 7/26/2013 2:36 PM Page 91
Page 269 of 1534
Driving your vehicle
64
5
Following distance
Stay at least twice as far behind the vehi-
cle ahead as you would when driving
your vehicle without a trailer. This can
help you avoid situations that require
heavy braking and sudden turns.
Passing
You’ll need more passing distance up
ahead when you’re towing a trailer. And,
because of the increased vehicle length,
you’ll need to go much farther beyond the
passed vehicle before you can return to
your lane.
Backing up
Hold the bottom of the steering wheel
with one hand. Then, to move the trailer
to the left, just move your hand to the left.
To move the trailer to the right, move your
hand to the right. Always back up slowly
and, if possible, have someone guide
you.
Making turns
When you’re turning with a trailer, make
wider turns than normal. Do this so your
trailer won’t strike soft shoulders, kerbs,
road signs, trees, or other objects. Avoid
jerky or sudden manoeuvres. Signal well
in advance.
Turn signals when towing a trailer
When you tow a trailer, your vehicle has
to have a different turn signal flasher and
extra wiring. The green arrows on your
instrument panel will flash whenever you
signal a turn or lane change. Properly
connected, the trailer lights will also flash
to alert other drivers you’re about to turn,
change lanes, or stop.
When towing a trailer, the green arrows
on your instrument panel will flash for
turns even if the bulbs on the trailer are
burned out. Thus, you may think drivers
behind you are seeing your signals
when, in fact, they are not. It’s important
to check occasionally to be sure the trail-
er bulbs are still working. You must also
check the lights every time you discon-
nect and then reconnect the wires.
Do not connect a trailer lighting system
directly to your vehicle’s lighting system.
Use only an approved trailer wiring har-
ness.
An authorised HYUNDAI dealer can
assist you in installing the wiring har-
ness.WARNING
Failure to use an approved trailer wiring harness could result in dam-
age to the vehicle electrical system
and/or personal injury.
EL(FL) Aust 5.QXP 7/26/2013 2:10 PM Page 64
Page 358 of 1534
Maintenance
64
7
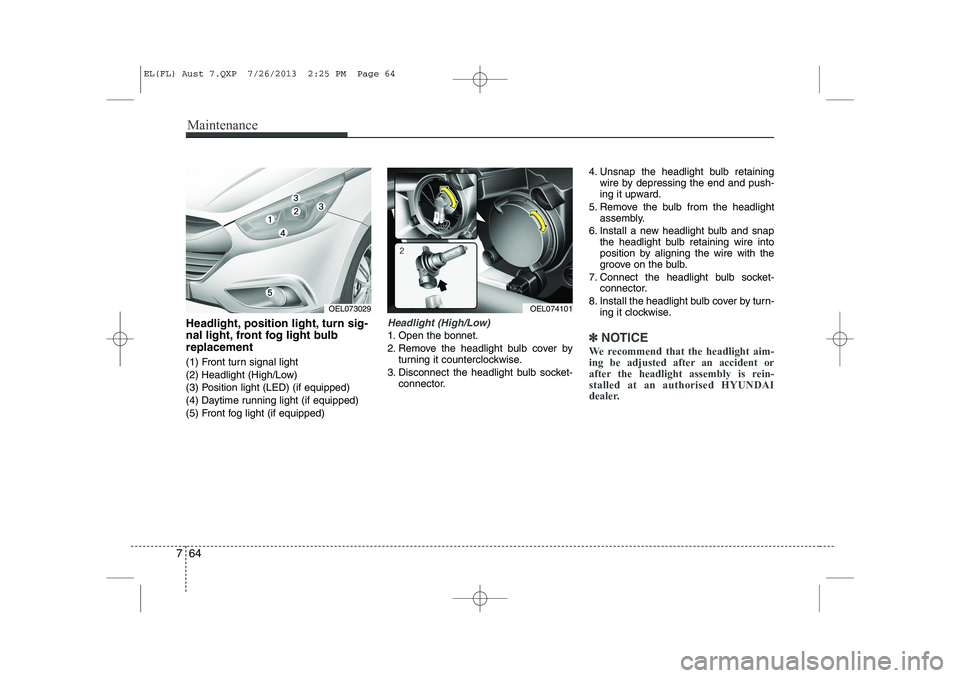
Headlight, position light, turn sig-
nal light, front fog light bulbreplacement
(1) Front turn signal light
(2) Headlight (High/Low)
(3) Position light (LED) (if equipped)
(4) Daytime running light (if equipped)
(5) Front fog light (if equipped)Headlight (High/Low)
1. Open the bonnet.
2. Remove the headlight bulb cover by
turning it counterclockwise.
3. Disconnect the headlight bulb socket- connector. 4. Unsnap the headlight bulb retaining
wire by depressing the end and push-
ing it upward.
5. Remove the bulb from the headlight assembly.
6. Install a new headlight bulb and snap the headlight bulb retaining wire into
position by aligning the wire with the
groove on the bulb.
7. Connect the headlight bulb socket- connector.
8. Install the headlight bulb cover by turn- ing it clockwise.✽✽ NOTICE
We recommend that the headlight aim-
ing be adjusted after an accident or
after the headlight assembly is rein-stalled at an authorised HYUNDAI
dealer.
OEL073029OEL074101
EL(FL) Aust 7.QXP 7/26/2013 2:25 PM Page 64
Page 360 of 1534
Maintenance
66
7
Turn signal light/Position light
Turn signal light
1. Turn off the engine and open the bon-
net.
2. Remove the socket from the assembly by turning the socket counterclockwise
until the tabs on the socket align with
the slots on the assembly.
3. Remove the bulb from the socket by pressing it in and rotating it counter-
clockwise until the tabs on the bulb
align with the slots in the socket. Pull
the bulb out of the socket
4. Insert a new bulb by inserting it into the socket and rotating it until it locks
into place.
5. Install the socket in the assembly by aligning the tabs on the socket with the
slots in the assembly. Push the socket
into the assembly and turn the socket
clockwise. Position light
If the light bulb does not operate, we rec-
ommend that the system be checked by
an authorised HYUNDAI dealer.(Continued)
If a bulb becomes damaged or
cracked, replace it immediately
and carefully dispose of it.
Wear eye protection when chang- ing a bulb. Allow the bulb to cool
down before handling it.
EL(FL) Aust 7.QXP 7/26/2013 2:25 PM Page 66
Page 366 of 1534
Maintenance
72
7
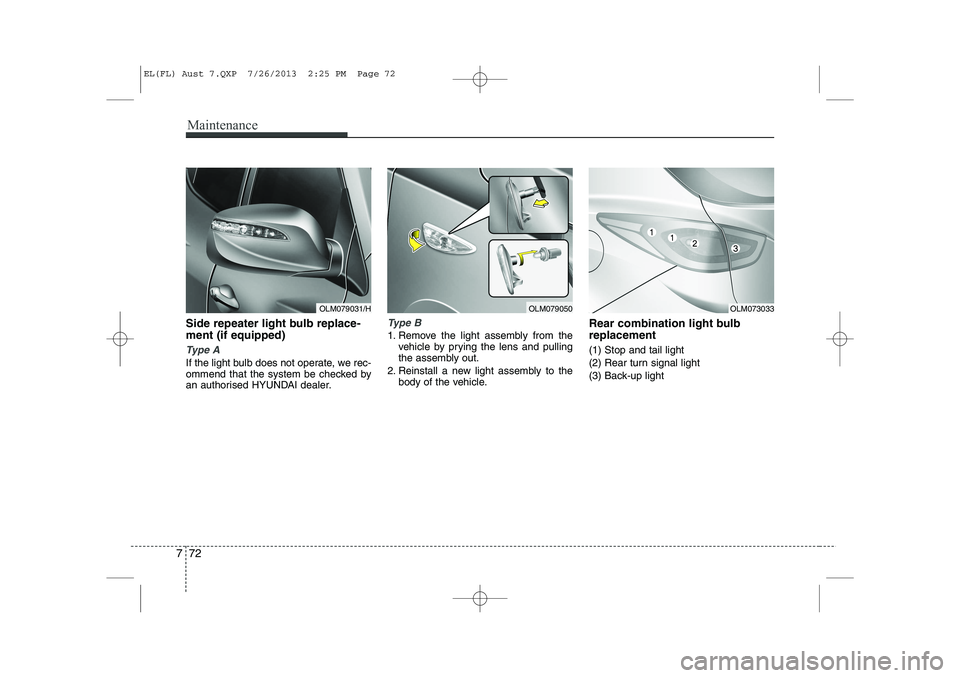
Side repeater light bulb replace- ment (if equipped)
Type A
If the light bulb does not operate, we rec-
ommend that the system be checked by
an authorised HYUNDAI dealer.
Type B
1. Remove the light assembly from the
vehicle by prying the lens and pulling
the assembly out.
2. Reinstall a new light assembly to the body of the vehicle. Rear combination light bulb replacement (1) Stop and tail light
(2) Rear turn signal light
(3) Back-up light
OLM079031/HOLM079050OLM073033
EL(FL) Aust 7.QXP 7/26/2013 2:25 PM Page 72
Page 383 of 1534
83
Specifications & Consumer information
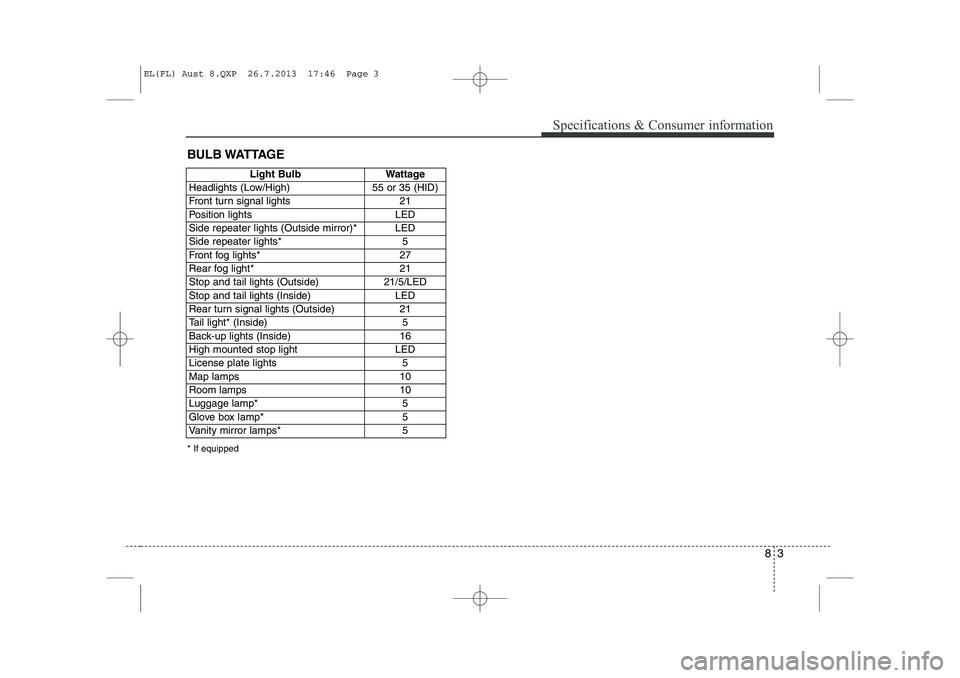
BULB WATTAGE
* If equipped
Light BulbWattage
Headlights (Low/High)55 or 35 (HID)
Front turn signal lights21
Position lightsLED
Side repeater lights (Outside mirror)*LED
Side repeater lights* 5
Front fog lights* 27
Rear fog light*21
Stop and tail lights (Outside)21/5/LED
Stop and tail lights (Inside)LED
Rear turn signal lights (Outside)21
Tail light* (Inside)5
Back-up lights (Inside)16
High mounted stop lightLED
License plate lights5
Map lamps10
Room lamps10
Luggage lamp*5
Glove box lamp*5
Vanity mirror lamps*5
EL(FL) Aust 8.QXP 26.7.2013 17:46 Page 3
Page 404 of 1534
I7
Index
Label
Air bag warning label ................................................3-59
Air conditioner compressor label ..............................8-10
Tyre sidewall labeling ................................................7-46
Tyre specification and pressure label ........................8-10
Vehicle certification label ............................................8-9
Lap/shoulder belt ............................................................3-19
LCD display ....................................................................4-53 Information Mode ......................................................4-54
LCD modes ................................................................4-53
User Settings Mode ....................................................4-55
Warning Messages......................................................4-57
LCD Display Control ......................................................4-47
LCD modes ......................................................................4-53
Light bulbs ......................................................................7-63
Lighting ............................................................................4-88 Auto light position......................................................4-90
Battery saver function ................................................4-88
Daytime running light ................................................4-93
Front fog light ............................................................4-92
Headlight (Headlamp) escort function ......................4-88
Headlight levelling device..........................................4-93
Headlight position ......................................................4-89
High-beam operation ..................................................4-90
Parking light position ................................................4-89
Rear fog light..............................................................4-92 Turn signals ................................................................4-91
Lubricants and capacities ..................................................8-6
Luggage net (holder) ......................................................4-130
Luggage room lamp ......................................................4-100
Luggage volume ................................................................8-5 Maintenance Explanation of scheduled maintenance items ............7-19
Maintenance services ..................................................7-5
Owner maintenance ......................................................7-7
Scheduled maintenance service....................................7-9
Tyre maintenance ......................................................7-46
Maintenance schedule ......................................................7-10
Maintenance services ........................................................7-5
Manual climate control system ......................................4-104 Air conditioning........................................................4-110
Climate control air filter ..........................................4-111
Heating and air conditioning ....................................4-105
Manual transaxle ..............................................................5-15
Map lamp ........................................................................4-99
Mirrors ............................................................................4-39 Day/night rearview mirror..........................................4-39
Electric chromic mirror (ECM) with compass ..........4-40
Electric chromic mirror (ECM)..................................4-39
Inside rearview mirror ................................................4-39
Outside rearview mirror ............................................4-43
M
L
EL(FL) Aust Index.qxp 7/26/2013 2:14 PM Page 7
Page 592 of 1534
Features of your vehicle
102
4
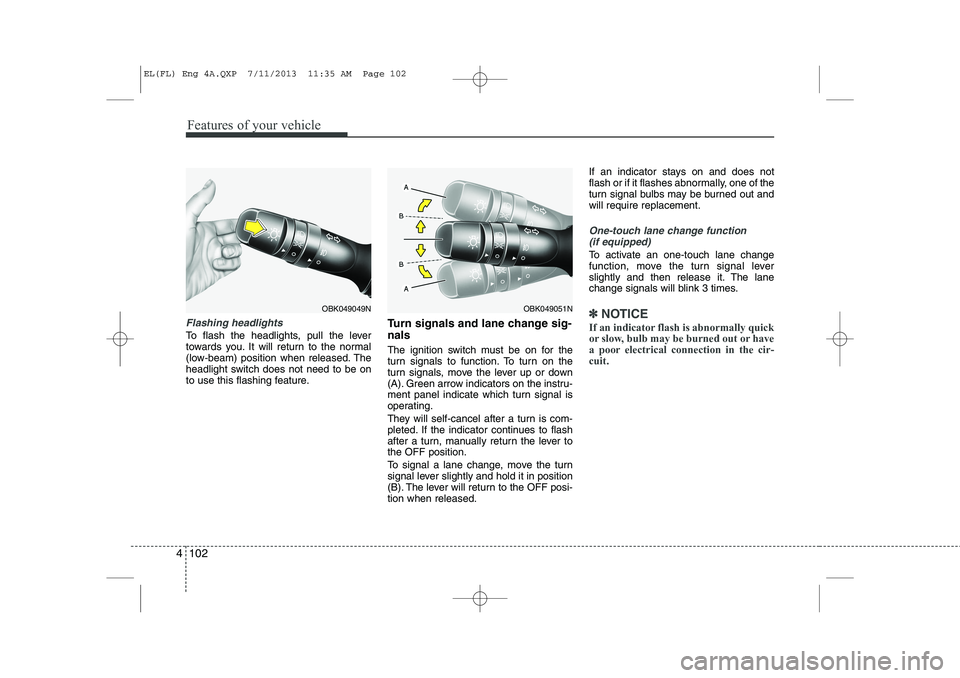
Flashing headlights
To flash the headlights, pull the lever
towards you. It will return to the normal
(low-beam) position when released. The
headlight switch does not need to be on
to use this flashing feature. Turn signals and lane change sig- nals
The ignition switch must be on for the
turn signals to function. To turn on the
turn signals, move the lever up or down
(A). Green arrow indicators on the instru-
ment panel indicate which turn signal is
operating.
They will self-cancel after a turn is com-
pleted. If the indicator continues to flash
after a turn, manually return the lever tothe OFF position.
To signal a lane change, move the turn
signal lever slightly and hold it in position
(B). The lever will return to the OFF posi-tion when released.If an indicator stays on and does not
flash or if it flashes abnormally, one of the
turn signal bulbs may be burned out andwill require replacement.
One-touch lane change function
(if equipped)
To activate an one-touch lane change
function, move the turn signal lever
slightly and then release it. The lane
change signals will blink 3 times.
✽✽ NOTICE
If an indicator flash is abnormally quick
or slow, bulb may be burned out or have
a poor electrical connection in the cir-cuit.OBK049049NOBK049051N
EL(FL) Eng 4A.QXP 7/11/2013 11:35 AM Page 102
Page 822 of 1534
Driving your vehicle
68
5
Following distance
Stay at least twice as far behind the vehi-
cle ahead as you would when driving
your vehicle without a trailer. This can
help you avoid situations that require
heavy braking and sudden turns.
Passing
You’ll need more passing distance up
ahead when you’re towing a trailer. And,
because of the increased vehicle length,
you’ll need to go much farther beyond the
passed vehicle before you can return to
your lane.
Backing up
Hold the bottom of the steering wheel
with one hand. Then, to move the trailer
to the left, just move your hand to the left.
To move the trailer to the right, move your
hand to the right. Always back up slowly
and, if possible, have someone guide
you.
Making turns
When you’re turning with a trailer, make
wider turns than normal. Do this so your
trailer won’t strike soft shoulders, curbs,
road signs, trees, or other objects. Avoid
jerky or sudden maneuvers. Signal well
in advance.
Turn signals when towing a trailer
When you tow a trailer, your vehicle has
to have a different turn signal flasher and
extra wiring. The green arrows on your
instrument panel will flash whenever you
signal a turn or lane change. Properly
connected, the trailer lights will also flash
to alert other drivers you’re about to turn,
change lanes, or stop.
When towing a trailer, the green arrows
on your instrument panel will flash for
turns even if the bulbs on the trailer are
burned out. Thus, you may think drivers
behind you are seeing your signals
when, in fact, they are not. It’s important
to check occasionally to be sure the trail-
er bulbs are still working. You must also
check the lights every time you discon-
nect and then reconnect the wires.
Do not connect a trailer lighting system
directly to your vehicle’s lighting system.
Use only an approved trailer wiring har-
ness.
An authorized HYUNDAI dealer can
assist you in installing the wiring harness.
EL(FL) Eng 5.QXP 7/11/2013 11:05 AM Page 68
Page 958 of 1534
793
Maintenance
Headlight, position light, turn sig-
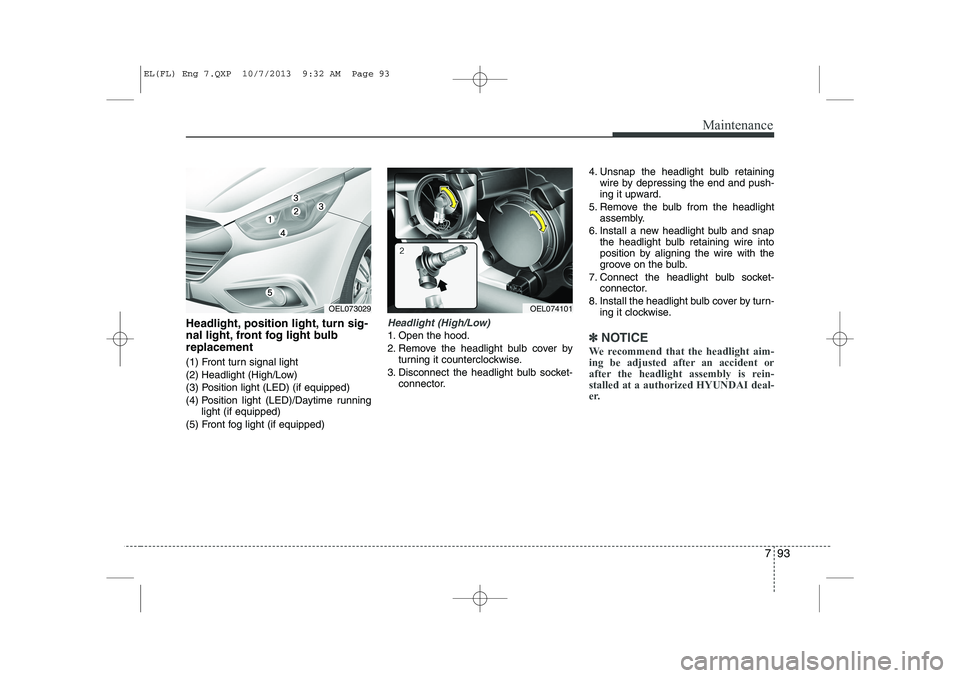
nal light, front fog light bulbreplacement
(1) Front turn signal light
(2) Headlight (High/Low)
(3) Position light (LED) (if equipped)
(4) Position light (LED)/Daytime runninglight (if equipped)
(5) Front fog light (if equipped)Headlight (High/Low)
1. Open the hood.
2. Remove the headlight bulb cover by turning it counterclockwise.
3. Disconnect the headlight bulb socket- connector. 4. Unsnap the headlight bulb retaining
wire by depressing the end and push-
ing it upward.
5. Remove the bulb from the headlight assembly.
6. Install a new headlight bulb and snap the headlight bulb retaining wire into
position by aligning the wire with the
groove on the bulb.
7. Connect the headlight bulb socket- connector.
8. Install the headlight bulb cover by turn- ing it clockwise.✽✽ NOTICE
We recommend that the headlight aim-
ing be adjusted after an accident or
after the headlight assembly is rein-stalled at a authorized HYUNDAI deal-
er.
OEL073029OEL074101
EL(FL) Eng 7.QXP 10/7/2013 9:32 AM Page 93