wheel Hyundai Kona 2019 Manual Online
[x] Cancel search | Manufacturer: HYUNDAI, Model Year: 2019, Model line: Kona, Model: Hyundai Kona 2019Pages: 485, PDF Size: 15.75 MB
Page 366 of 485
6-24
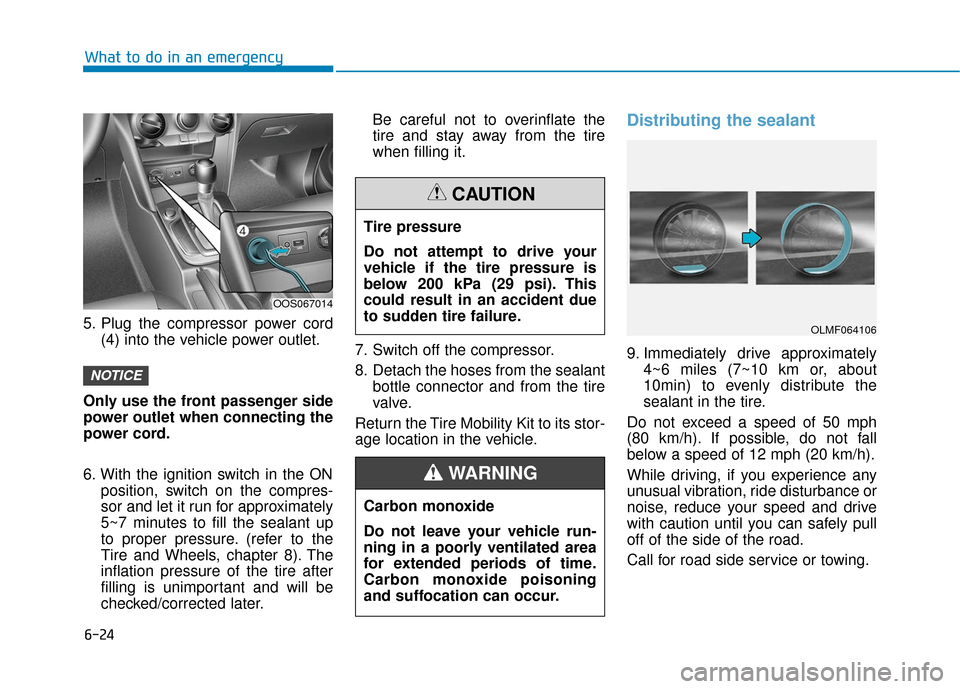
5. Plug the compressor power cord(4) into the vehicle power outlet.
Only use the front passenger side
power outlet when connecting the
power cord.
6. With the ignition switch in the ON position, switch on the compres-
sor and let it run for approximately
5~7 minutes to fill the sealant up
to proper pressure. (refer to the
Tire and Wheels, chapter 8). The
inflation pressure of the tire after
filling is unimportant and will be
checked/corrected later. Be careful not to overinflate the
tire and stay away from the tire
when filling it.
7. Switch off the compressor.
8. Detach the hoses from the sealant bottle connector and from the tire
valve.
Return the Tire Mobility Kit to its stor-
age location in the vehicle.
Distributing the sealant
9. Immediately drive approximately 4~6 miles (7~10 km or, about
10min) to evenly distribute the
sealant in the tire.
Do not exceed a speed of 50 mph
(80 km/h). If possible, do not fall
below a speed of 12 mph (20 km/h).
While driving, if you experience any
unusual vibration, ride disturbance or
noise, reduce your speed and drive
with caution until you can safely pull
off of the side of the road.
Call for road side service or towing.
NOTICE
What to do in an emergency
OOS067014
Tire pressure
Do not attempt to drive your
vehicle if the tire pressure is
below 200 kPa (29 psi). This
could result in an accident due
to sudden tire failure.
CAUTION
Carbon monoxide
Do not leave your vehicle run-
ning in a poorly ventilated area
for extended periods of time.
Carbon monoxide poisoning
and suffocation can occur.
WARNING
OLMF064106
Page 368 of 485
6-26
Information
When reinstalling the repaired or
replaced tire and wheel on the vehicle,
tighten the wheel lug nut to 79~94
lbf·ft (11~13kgf·m).
i
What to do in an emergency
Tire pressure sensor
(if equipped with TPMS)
The sealant on the tire pressure
sensor and wheel should be
removed when you replace the
tire with a new one and inspect
the tire pressure sensors at an
authorized dealer.
CAUTION
The tire inflation pressure must
be at least 32 psi (220 kPa). If it
is not, do not continue driving.
Call for road side service or
towing.
WARNING
Page 369 of 485
![Hyundai Kona 2019 Manual Online 6-27
What to do in an emergency
6
Towing Service
[A] : Dollies
If emergency towing is necessary,
we recommend having it done by an
authorized HYUNDAI dealer or a
commercial tow-truck service.
Proper l](/img/35/16224/w960_16224-368.png "Hyundai Kona 2019 Manual Online 6-27
What to do in an emergency
6
Towing Service
[A] : Dollies
If emergency towing is necessary,
we recommend having it done by an
authorized HYUNDAI dealer or a
commercial tow-truck service.
Proper l")
6-27
What to do in an emergency
6
Towing Service
[A] : Dollies
If emergency towing is necessary,
we recommend having it done by an
authorized HYUNDAI dealer or a
commercial tow-truck service.
Proper lifting and towing procedures
are necessary to prevent damage to
the vehicle. The use of wheel dollies
or flatbed is recommended.On 2WD vehicles, it is acceptable to
tow the vehicle with the rear wheels
on the ground (without dollies) and
the front wheels off the ground. If any
of the loaded wheels or suspension
components are damaged or the
vehicle is being towed with the front
wheels on the ground, use a towing
dolly under the front wheels.
When being towed by a commercial
tow truck and wheel dollies are not
used, the front of the vehicle should
always be lifted, not the rear.
If your vehicle is an AWD vehicle, it
must be towed with a wheel lift and
dollies or flatbed equipment with all
the wheels off the ground.
T T
O
O W
W I
IN
N G
G
Do not tow the vehicle with the
front wheels on the ground as
this may cause damage to the
vehicle.
Do not tow with sling-type
equipment. Use a wheel lift or
flatbed equipment.
CAUTION
OOS067007L
An AWD vehicle should never
be towed with the wheels on the
ground. This can cause serious
damage to the transaxle or the
AWD system.
CAUTION
OOS067022
OOS067021
Page 370 of 485
When towing your vehicle in an
emergency without wheel dollies:
1. Place the ignition switch in theACC position.
2. Place the shift lever in N (Neutral).
3. Release the parking brake.
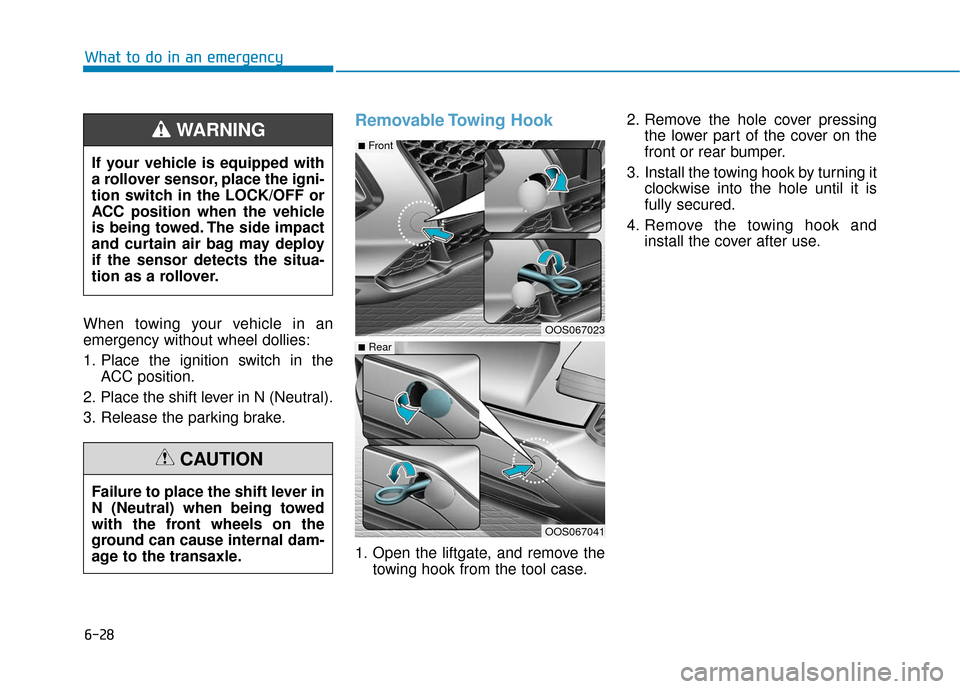
Removable Towing Hook
1. Open the liftgate, and remove the towing hook from the tool case. 2. Remove the hole cover pressing
the lower part of the cover on the
front or rear bumper.
3. Install the towing hook by turning it clockwise into the hole until it is
fully secured.
4. Remove the towing hook and install the cover after use.
If your vehicle is equipped with
a rollover sensor, place the igni-
tion switch in the LOCK/OFF or
ACC position when the vehicle
is being towed. The side impact
and curtain air bag may deploy
if the sensor detects the situa-
tion as a rollover.
WARNING
Failure to place the shift lever in
N (Neutral) when being towed
with the front wheels on the
ground can cause internal dam-
age to the transaxle.
CAUTION
OOS067023
OOS067041
■Front
■Rear
What to do in an emergency
6-28
Page 371 of 485
Emergency Towing
If towing is necessary, we recom-
mend you have it done by an author-
ized HYUNDAI dealer or a commer-
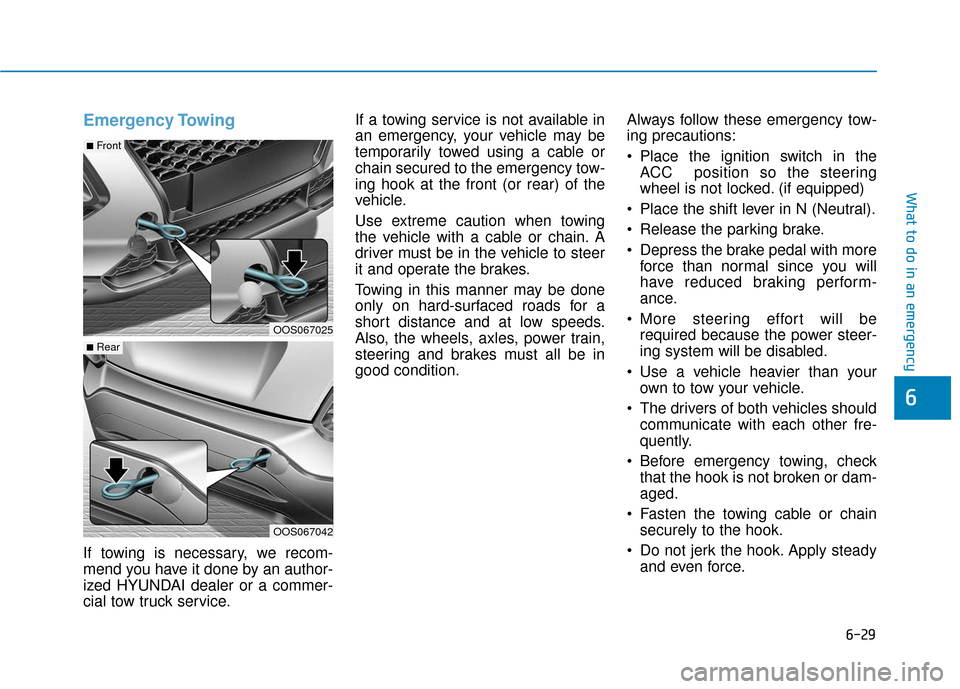
cial tow truck service.If a towing service is not available in
an emergency, your vehicle may be
temporarily towed using a cable or
chain secured to the emergency tow-
ing hook at the front (or rear) of the
vehicle.
Use extreme caution when towing
the vehicle with a cable or chain. A
driver must be in the vehicle to steer
it and operate the brakes.
Towing in this manner may be done
only on hard-surfaced roads for a
short distance and at low speeds.
Also, the wheels, axles, power train,
steering and brakes must all be in
good condition.
Always follow these emergency tow-
ing precautions:
Place the ignition switch in the
ACC position so the steering
wheel is not locked. (if equipped)
Place the shift lever in N (Neutral).
Release the parking brake.
Depress the brake pedal with more force than normal since you will
have reduced braking perform-
ance.
More steering effort will be required because the power steer-
ing system will be disabled.
Use a vehicle heavier than your own to tow your vehicle.
The drivers of both vehicles should communicate with each other fre-
quently.
Before emergency towing, check that the hook is not broken or dam-
aged.
Fasten the towing cable or chain securely to the hook.
Do not jerk the hook. Apply steady and even force.
OOS067025
OOS067042
■Front
■Rear
What to do in an emergency
6-29
6
Page 374 of 485

7
Tires and wheels ..................................................7-38
Tire Care ........................................................................\
....7-38
Recommended Cold Tire Inflation Pressures ...........7-39
Check Tire Inflation Pressure ......................................7-40
Tire Rotation...................................................................\
..7-40
Wheel Alignment and Tire Balance ............................7-41
Tire Replacement ............................................................7-42
Wheel Replacement ........................................................7-43
Tire Traction .....................................................................7-4\
3
Tire Maintenance ............................................................7-43
Tire Sidewall Labeling ....................................................7-43
Tire Terminology and Definitions................................7-47
All Season Tires ...............................................................7-50
Summer Tires ...................................................................7-50
Snow Tires ........................................................................\
7-51
Radial-Ply Tires ...............................................................7-51
Low Aspect Ratio Tires..................................................7-51
Fuses ......................................................................7-\
53
Instrument Panel Fuse Replacement..........................7-54
Engine Compartment Panel Fuse Replacement.......7-55
Fuse/Relay Panel Description ......................................7-57
Light bulbs.............................................................7-69
Headlamp, Parking Lamp, Daytime Running Light,
Turn Signal Lamp and Side Marker,
Cornering lamp..........................................................\
.......7-69
Front fog lamp .................................................................7-74
Side Repeater Lamp Replacement ..............................7-74
Rear Combination Light Bulb Replacement ..............7-75
High Mounted Stop Lamp Replacement ....................7-77
License Plate Light Bulb Replacement ......................7-78
Interior Light Bulb Replacement .................................7-78
Appearance care ..................................................7-80
Exterior Care ....................................................................7-80\
Interior Care .....................................................................7-8\
4
Emission control system .....................................7-87
Crankcase Emission Control System ..........................7-87
Evaporative Emission Control System Including
Onboard Refueling Vapor Recovery (ORVR)............7-87
Exhaust Emission Control System ..............................7-88
California perchlorate notice .............................7-91
Page 378 of 485
7-6
Maintenance
Owner Maintenance Schedule
When you stop for fuel:
• Check the engine oil level.
Check the coolant level in theengine coolant reservoir.
Check the windshield washer fluid level.
Check the for low or under-inflated tires.
While operating your vehicle:
Note any changes in the sound ofthe exhaust or any smell of
exhaust fumes in the vehicle.
Check for vibrations in the steering wheel. Notice if there is any
increased steering effort or loose-
ness in the steering wheel, or
change in its straight-ahead posi-
tion.
Notice if your vehicle constantly turns slightly or "pulls" to one side
when traveling on smooth, level
road.
When stopping, listen and check for unusual sounds, pulling to one
side, increased brake pedal travel
or "hard-to-push" brake pedal.
If any slipping or changes in the operation of your transmission
occurs, check the transmission
fluid level.
Check the automatic transmission/ dual clutch transmission P (Park)
function. Check the parking brake.
Check for fluid leaks under your
vehicle (water dripping from the air
conditioning system during or after
use is normal).
At least monthly:
Check coolant level in the enginecoolant reservoir.
Check the operation of all exterior lights, including the brake lights,
turn signals and hazard warning
flashers.
Check the inflation pressures of all tires including the spare for tires
that are worn, show uneven wear,
or are damaged.
Check for loose wheel lug nuts.
Be careful when checking your
engine coolant level when the
engine is hot. This may result in
coolant being blown out of the
opening and cause serious
burns and other injuries.
WARNING
Page 392 of 485
7-20
Maintenance
Brake Hoses and Lines
Visually check for proper installation,
chafing, cracks, deterioration and
any leakage. Replace any deteriorat-
ed or damaged parts immediately.
Brake Fluid
Check the brake fluid level in the
brake fluid reservoir. The level should
be between the MIN and the MAX
marks on the side of the reservoir.
Use only hydraulic brake fluid con-
forming to DOT 3 or DOT 4 specifi-
cation.
Parking Brake
Inspect the parking brake system
including the parking brake pedal
and cables.
Brake Discs, Pads, Calipers
and Rotors
Check the pads for excessive wear,
discs for run out and wear, and
calipers for fluid leakage.
Exhaust Pipe and Muffler
Visually inspect the exhaust pipes,
muffler and hangers for cracks, dete-
rioration, or damage. Start the engine
and listen carefully for any exhaust
gas leakage. Tighten connections or
replace parts as necessary.
Suspension Mounting Bolts
Check the suspension connections
for looseness or damage. Retighten
to the specified torque.
Steering Gear Box, Linkage &
Boots/Lower Arm Ball Joint
With the vehicle stopped and the
engine off, check for excessive free-
play in the steering wheel. Check the
linkage for bends or damage. Check
the dust boots and ball joints for
deterioration, cracks, or damage.
Replace any damaged parts.
Drive Shafts and Boots
Check the drive shafts, boots and
clamps for cracks, deterioration, or
damage. Replace any damaged
parts and, if necessary, repack the
grease.
Air Conditioning Refrigerant
Check the air conditioning lines and
connections for leakage and dam-
age.
Page 393 of 485
7-21
7
Maintenance
E
EN
N G
GI
IN
N E
E
O
O I
IL
L
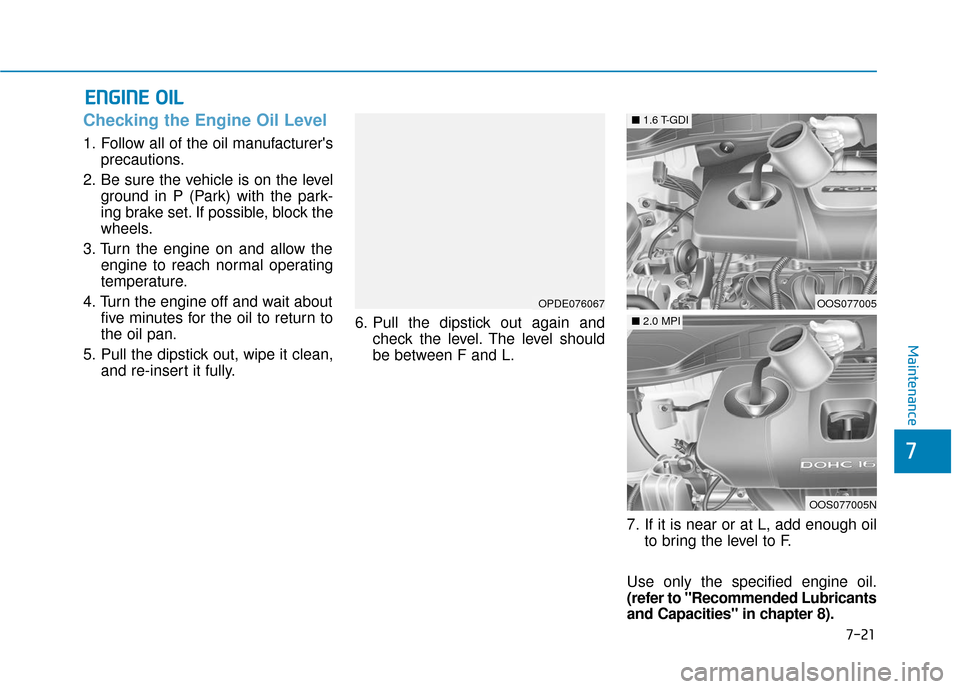
Checking the Engine Oil Level
1. Follow all of the oil manufacturer's
precautions.
2. Be sure the vehicle is on the level ground in P (Park) with the park-
ing brake set. If possible, block the
wheels.
3. Turn the engine on and allow the engine to reach normal operating
temperature.
4. Turn the engine off and wait about five minutes for the oil to return to
the oil pan.
5. Pull the dipstick out, wipe it clean, and re-insert it fully. 6. Pull the dipstick out again and
check the level. The level should
be between F and L.
7. If it is near or at L, add enough oilto bring the level to F.
Use only the specified engine oil.
(refer to "Recommended Lubricants
and Capacities" in chapter 8).
OPDE076067OOS077005
OOS077005N
■ 1.6 T-GDI
■2.0 MPI
Page 410 of 485
7-38
Maintenance
T
TI
IR
R E
ES
S
A
A N
N D
D
W
W H
HE
EE
EL
LS
S
Tire Care
For proper maintenance, safety, and
maximum fuel economy, you must
always maintain recommended tire
inflation pressures and stay within
the load limits and weight distribution
recommended for your vehicle.
All specifications (sizes and pres-
sures) can be found on a label
attached to the driver's side center
pillar.Replace tires that are worn,
show uneven wear, or are dam-
aged. Worn tires can cause
loss of braking effectiveness,
steering control, or traction.
ALWAYS replace tires with the
same size as each tire that
was originally supplied with
this vehicle. Using tires and
wheels other than the recom-
mended sizes could cause
unusual handling characteris-
tics, poor vehicle control, or
negatively affect your vehi-
cle's Anti-Lock Brake System
(ABS) resulting in a serious
accident.
Tire failure may cause loss of
vehicle control resulting in an
accident. To reduce risk of
SERIOUS INJURY or DEATH,
take the following precautions:
Inspect your tires monthly for
proper inflation as well as
wear and damage.
The recommended cold tire
pressure for your vehicle can
be found in this manual and on
the tire label located on the dri-
ver's side center pillar. Always
use a tire pressure gauge to
measure tire pressure. Tires
with too much or too little
pressure wear unevenly caus-
ing poor handling.
Check the pressure of the
spare every time you check
the pressure of the other tires
on your vehicle.
WARNING
OOS087003