interior light Hyundai Kona 2019 Owner's Manual
[x] Cancel search | Manufacturer: HYUNDAI, Model Year: 2019, Model line: Kona, Model: Hyundai Kona 2019Pages: 485, PDF Size: 15.75 MB
Page 85 of 485
Convenient features of your vehicle
Accessing Your Vehicle .........................................3-3
Remote Key........................................................................\
.3-3
Smart Key ........................................................................\
....3-6
Immobilizer System .........................................................3-11
Door Locks ............................................................3-13
Operating Door Locks from Outside the Vehicle ....3-13
Operating Door Locks from Inside the Vehicle .......3-14
Automatic Door Lock and Unlock Features .............3-17
Child-Protector Rear Door Locks ...............................3-17
Theft-Alarm System ............................................3-18
Steering Wheel .....................................................3-19
Electric Power Steering (EPS) .....................................3-19
Tilt Steering / Telescope Steering ..............................3-20
Horn ........................................................................\
............3-20
Heated Steering Wheel (for Canada) .........................3-21
Mirrors ...................................................................3-21
Inside Rearview Mirror ..................................................3-21
Side View Mirrors ...........................................................3-31
Windows ................................................................3-33
Power Windows ...............................................................3-34
Sunroof..................................................................3-37
Sunroof opening and closing .......................................3-38
Sliding the sunroof .........................................................3-38
Tilting the sunroof ..........................................................3-38
Sunshade ........................................................................\
...3-39Resetting the sunroof ....................................................3-39
Sunroof Open Warning ..................................................3-40
Exterior Features .................................................3-41
Hood ........................................................................\
...........3-41
Liftgate ........................................................................\
......3-42
Fuel Filler Door ................................................................3-44
Instrument Cluster ...............................................3-47
Instrument Cluster Control............................................3-48
Gauges and Meters ........................................................3-49
Transmission shift indicator .........................................3-52
Warning and Indicator Lights .......................................3-53
LCD Display Messages ...................................................3-65
LCD Display ...........................................................3-70
LCD Display Control ........................................................3-70
LCD Display Modes .........................................................3-71
Trip Computer .......................................................3-81
Head Up Display (HUD) .......................................3-85
Lighting..................................................................3-88
Exterior Lights .................................................................3-88
Smart cornering lamp ....................................................3-95
Interior Lights...................................................................3-96
Welcome System .............................................................3-98
3
Page 132 of 485
3-48
Convenient features of your vehicle
Instrument Cluster Control
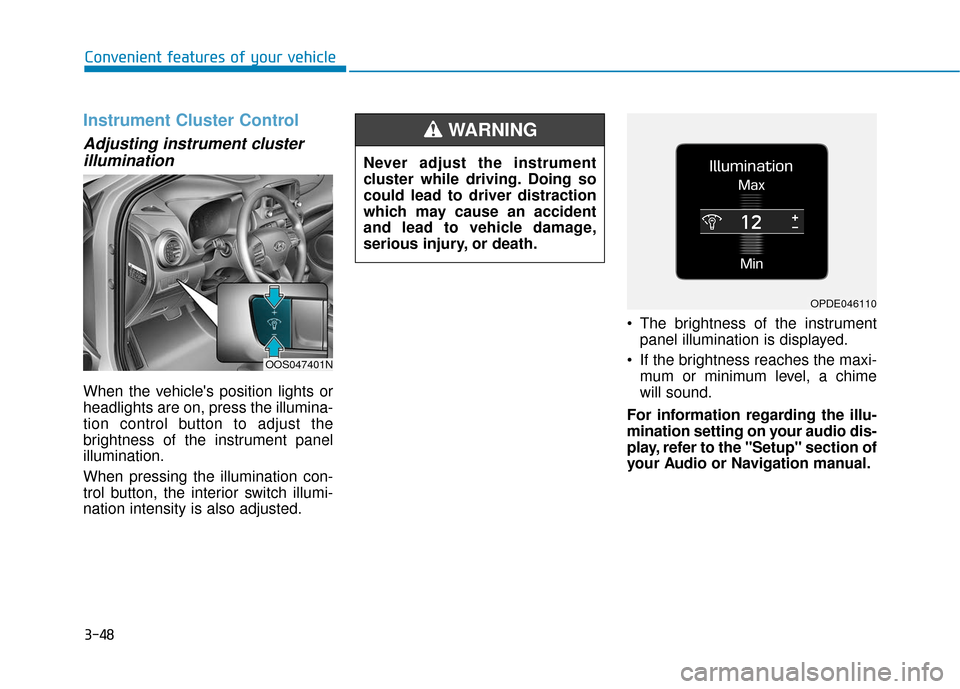
Adjusting instrument clusterillumination
When the vehicle's position lights or
headlights are on, press the illumina-
tion control button to adjust the
brightness of the instrument panel
illumination.
When pressing the illumination con-
trol button, the interior switch illumi-
nation intensity is also adjusted. The brightness of the instrument
panel illumination is displayed.
If the brightness reaches the maxi- mum or minimum level, a chime
will sound.
For information regarding the illu-
mination setting on your audio dis-
play, refer to the "Setup" section of
your Audio or Navigation manual.
Never adjust the instrument
cluster while driving. Doing so
could lead to driver distraction
which may cause an accident
and lead to vehicle damage,
serious injury, or death.
WARNING
OOS047401N
OPDE046110
Page 180 of 485
3-96
Convenient features of your vehicle
Interior Lights
Do not use the interior lights for
extended periods when the vehi-
cle is turned off or the battery will
discharge.
Interior lamp AUTO cut
The interior lamps will automatically
go off approximately 20 minutes after
the engine is turned off and the
doors are closed. If a door is opened,
the lamp will go off 40 minutes after
the engine is turned off. If the doors
are locked by the remote key or
smart key and the vehicle enters the
armed stage of the theft alarm sys-
tem, the lamps will go off five sec-
onds later.
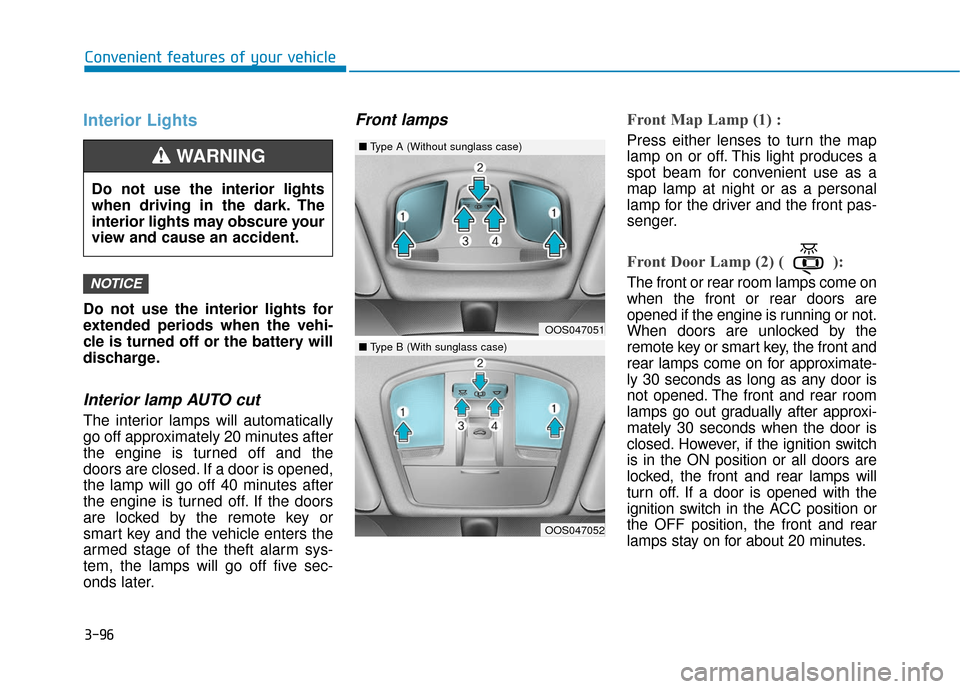
Front lampsFront Map Lamp (1) :
Press either lenses to turn the map
lamp on or off. This light produces a
spot beam for convenient use as a
map lamp at night or as a personal
lamp for the driver and the front pas-
senger.
Front Door Lamp (2) ( ):
The front or rear room lamps come on
when the front or rear doors are
opened if the engine is running or not.
When doors are unlocked by the
remote key or smart key, the front and
rear lamps come on for approximate-
ly 30 seconds as long as any door is
not opened. The front and rear room
lamps go out gradually after approxi-
mately 30 seconds when the door is
closed. However, if the ignition switch
is in the ON position or all doors are
locked, the front and rear lamps will
turn off. If a door is opened with the
ignition switch in the ACC position or
the OFF position, the front and rear
lamps stay on for about 20 minutes.NOTICE
OOS047051
OOS047052
■Type A (Without sunglass case)
■Type B (With sunglass case)
Do not use the interior lights
when driving in the dark. The
interior lights may obscure your
view and cause an accident.
WARNING
Page 182 of 485
3-98
Convenient features of your vehicle
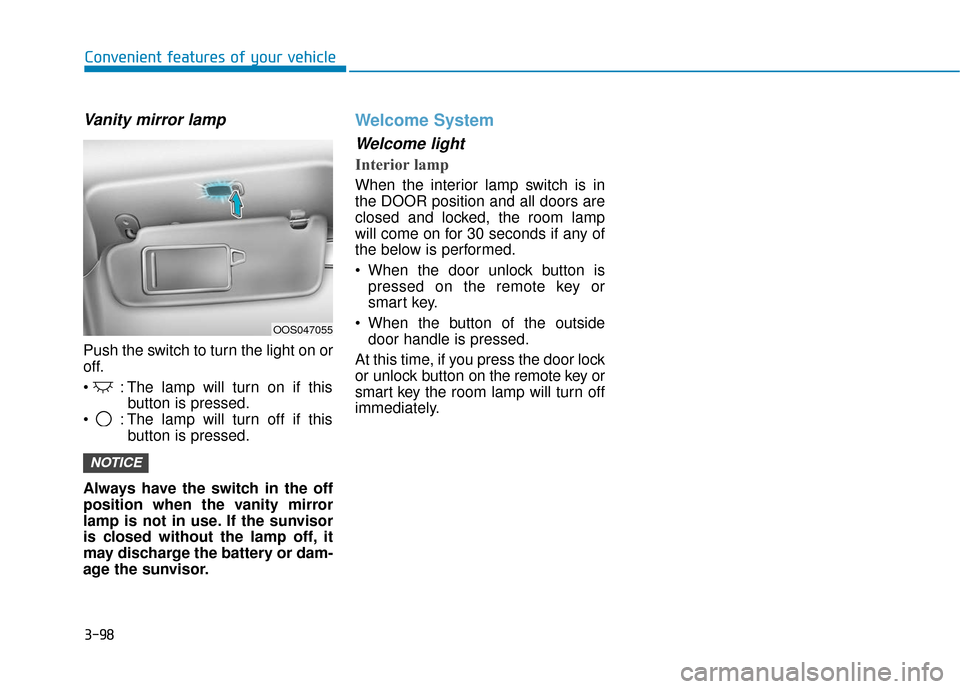
Vanity mirror lamp
Push the switch to turn the light on or
off.
: The lamp will turn on if thisbutton is pressed.
: The lamp will turn off if this button is pressed.
Always have the switch in the off
position when the vanity mirror
lamp is not in use. If the sunvisor
is closed without the lamp off, it
may discharge the battery or dam-
age the sunvisor.
Welcome System
Welcome light
Interior lamp
When the interior lamp switch is in
the DOOR position and all doors are
closed and locked, the room lamp
will come on for 30 seconds if any of
the below is performed.
When the door unlock button is pressed on the remote key or
smart key.
When the button of the outside door handle is pressed.
At this time, if you press the door lock
or unlock button on the remote key or
smart key the room lamp will turn off
immediately.
NOTICE
OOS047055
Page 201 of 485
3-117
Convenient features of your vehicle
3
Automatic Temperature
Control Mode
The Automatic Climate Control
System is controlled by setting the
desired temperature.
1. Press the AUTO button (3).
The modes, fan speeds, air intake
and air-conditioning will be controlled
automatically by the temperature set-
ting you select.
2. Turn the temperature control knob(1) to the desired temperature. If
the temperature is set to the low-
est setting (Lo), the air condition-
ing system will operate continu-
ously. After the interior has cooled
sufficiently, adjust the knob to a
higher temperature set point
whenever possible.
To turn the automatic operation off,
select any button of the following: - Mode selection button
- Front windshield defroster button(Press the button one more time
to deselect the front windshield
defroster function. The 'AUTO'
sign will illuminate on the infor-
mation display once again.)
- Fan speed control button The selected function will be con-
trolled manually while other functions
operate automatically.
For your convenience and to improve
the efficiency of the climate control,
use the AUTO button and set the
temperature to 73°F (23°C).
To change the temperature unit from
°F to °C or °C to °F:
Press and hold the AUTO and OFF
buttons on the climate control unit for
3 seconds.
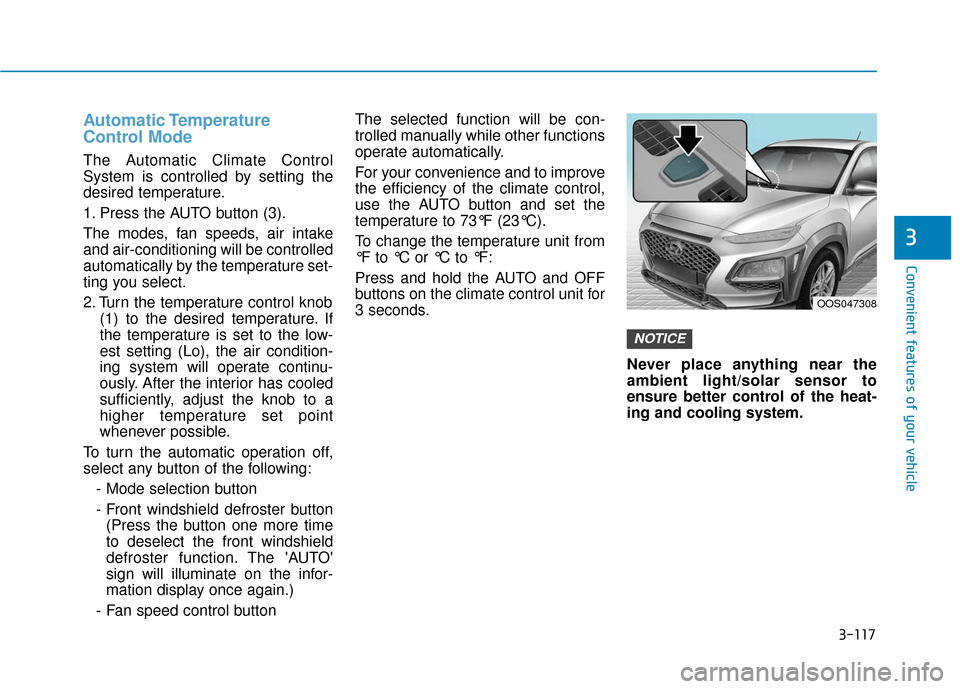
Never place anything near the
ambient light/solar sensor to
ensure better control of the heat-
ing and cooling system.
NOTICE
OOS047308
Page 236 of 485
5-4
Driving your vehicle
Before Entering the Vehicle
• Be sure all windows, outside mir-ror(s), and outside lights are clean
and unobstructed.
Remove frost, snow, or ice.
Visually check the tires for uneven wear and damage.
Check under the vehicle for any sign of leaks.
Be sure there are no obstacles behind you if you intend to back up.
Before Starting
Make sure the hood, the liftgate,and the doors are securely closed
and locked.
Adjust the position of the seat and steering wheel.
Adjust the inside and outside rearview mirrors.
Verify all the lights work.
Fasten your seatbelt. Check that all passengers have fastened their
seatbelts.
Check the gauges and indicators in the instrument panel and the mes-
sages on the instrument display
when the ignition switch is in the
ON position.
Check that any items you are car- rying are stored properly or fas-
tened down securely.
CALIFORNIA PROPOSITION 65
WARNING
Engine exhaust and a wide vari-
ety of automobile components
including components found in
the interior furnishings in a
vehicle, contain or emit harmful
chemicals known to the State of
California to cause cancer and
birth defects and reproductive
harm. In addition, certain fluids
contained in vehicles and cer-
tain products of components
contain or emit chemicals
known to the State of California
to cause cancer and birth
defects or other reproductive
harm.WARNING
B B
E
EF
FO
O R
RE
E
D
D R
RI
IV
V I
IN
N G
G
Page 345 of 485
6-3
What to do in an emergency
If you Have a Flat Tire While
Driving
If a tire goes flat while you are driving:
Take your foot off the acceleratorpedal and let the vehicle slow down
while driving straight ahead. Do not
apply the brakes immediately or
attempt to pull off the road as this
may cause loss of vehicle control
resulting in an accident. When the
vehicle has slowed to such a speed
that it is safe to do so, brake care-
fully and pull off the road. Drive off
the road as far as possible and park
on firm, level ground. If you are on
a divided highway, do not park in
the median area between the two
traffic lanes.
When the vehicle is stopped, press the hazard warning flasher button,
move the shift lever into P (Park),
and apply the parking brake, and
place the ignition switch in the
LOCK/OFF position.
Have all passengers get out of the vehicle. Be sure they all get out on
the side of the vehicle that is away
from traffic.
When changing a flat tire, follow the instructions provided later in
this chapter.
If the Engine Doesn't Turn
Over or Turns Over Slowly
Be sure the shift lever is in N
(Neutral) or P (Park). The engine
starts only when the shift lever is in
N (Neutral) or P (Park).
Check the battery connections to be sure they are clean and tight.
Turn on the interior light. If the light dims or goes out when you operate
the starter, the battery is drained.
Do not push or pull the vehicle to
start it. This could cause damage to
your vehicle. See instructions for
"Jump Starting" provided in this
chapter.
If the Engine Turns Over
Normally but Doesn't Start
Check the fuel level and add fuel if
necessary.
If the engine still does not start, have
your vehicle checked by an author-
ized HYUNDAI dealer.
6
I I F
F
T
T H
H E
E
E
E N
N G
GI
IN
N E
E
W
W I
IL
L L
L
N
N O
O T
T
S
S T
T A
A R
RT
T
Push or pull starting the vehicle
may cause the catalytic con-
verter to overload which can
lead to damage to the emission
control system.
CAUTION
Page 374 of 485
7
Tires and wheels ..................................................7-38
Tire Care ........................................................................\
....7-38
Recommended Cold Tire Inflation Pressures ...........7-39
Check Tire Inflation Pressure ......................................7-40
Tire Rotation...................................................................\
..7-40
Wheel Alignment and Tire Balance ............................7-41
Tire Replacement ............................................................7-42
Wheel Replacement ........................................................7-43
Tire Traction .....................................................................7-4\
3
Tire Maintenance ............................................................7-43
Tire Sidewall Labeling ....................................................7-43
Tire Terminology and Definitions................................7-47
All Season Tires ...............................................................7-50
Summer Tires ...................................................................7-50
Snow Tires ........................................................................\
7-51
Radial-Ply Tires ...............................................................7-51
Low Aspect Ratio Tires..................................................7-51
Fuses ......................................................................7-\
53
Instrument Panel Fuse Replacement..........................7-54
Engine Compartment Panel Fuse Replacement.......7-55
Fuse/Relay Panel Description ......................................7-57
Light bulbs.............................................................7-69
Headlamp, Parking Lamp, Daytime Running Light,
Turn Signal Lamp and Side Marker,
Cornering lamp..........................................................\
.......7-69
Front fog lamp .................................................................7-74
Side Repeater Lamp Replacement ..............................7-74
Rear Combination Light Bulb Replacement ..............7-75
High Mounted Stop Lamp Replacement ....................7-77
License Plate Light Bulb Replacement ......................7-78
Interior Light Bulb Replacement .................................7-78
Appearance care ..................................................7-80
Exterior Care ....................................................................7-80\
Interior Care .....................................................................7-8\
4
Emission control system .....................................7-87
Crankcase Emission Control System ..........................7-87
Evaporative Emission Control System Including
Onboard Refueling Vapor Recovery (ORVR)............7-87
Exhaust Emission Control System ..............................7-88
California perchlorate notice .............................7-91
Page 450 of 485
7-78
Maintenance
License Plate Light Bulb
Replacement
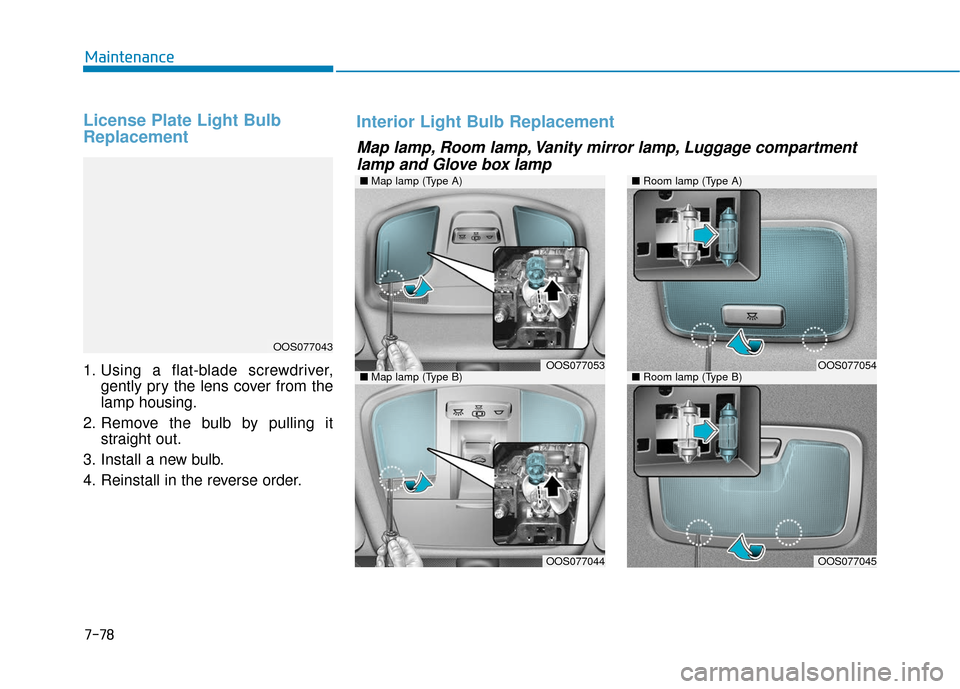
1. Using a flat-blade screwdriver,gently pry the lens cover from the
lamp housing.
2. Remove the bulb by pulling it straight out.
3. Install a new bulb.
4. Reinstall in the reverse order.
OOS077043
Map lamp, Room lamp, Vanity mirror lamp, Luggage compartment lamp and Glove box lamp
Interior Light Bulb Replacement
■ Map lamp (Type A)
OOS077053
OOS077044
■Room lamp (Type A)
■Room lamp (Type B)OOS077054
OOS077045
■Map lamp (Type B)
Page 451 of 485
7-79
7
Maintenance
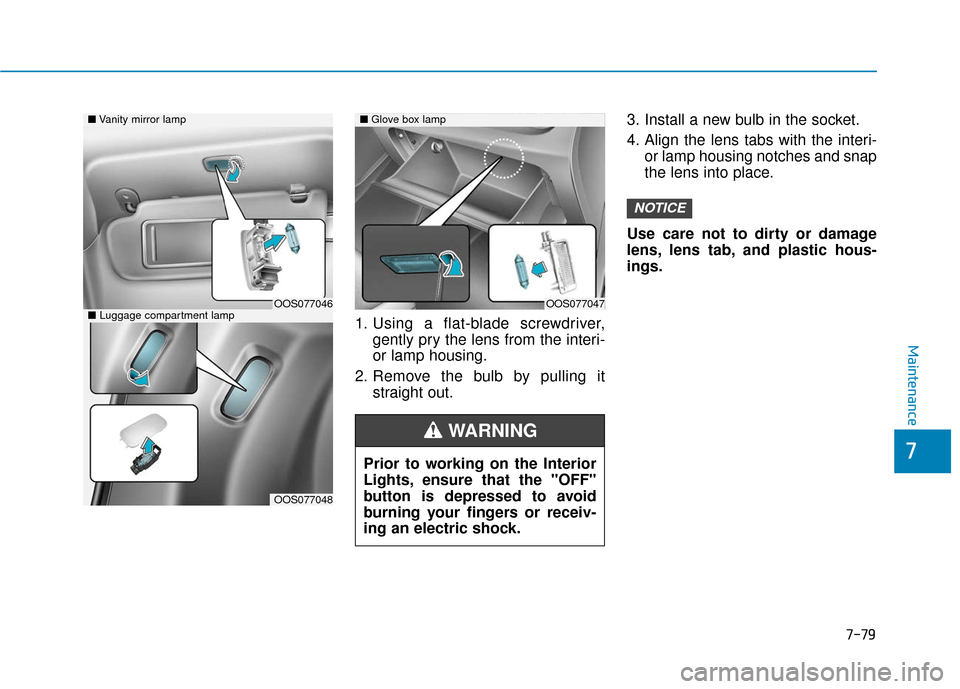
1. Using a flat-blade screwdriver,gently pry the lens from the interi-
or lamp housing.
2. Remove the bulb by pulling it straight out. 3. Install a new bulb in the socket.
4. Align the lens tabs with the interi-
or lamp housing notches and snap
the lens into place.
Use care not to dirty or damage
lens, lens tab, and plastic hous-
ings.
NOTICE
Prior to working on the Interior
Lights, ensure that the "OFF"
button is depressed to avoid
burning your fingers or receiv-
ing an electric shock.
WARNING
■ Vanity mirror lamp
■ Luggage compartment lampOOS077046
OOS077048
■Glove box lamp
OOS077047