door lock Hyundai Kona 2020 Owner's Guide
[x] Cancel search | Manufacturer: HYUNDAI, Model Year: 2020, Model line: Kona, Model: Hyundai Kona 2020Pages: 505, PDF Size: 13.47 MB
Page 120 of 505
3-36
Convenient features of your vehicle
Power Windows
The ignition switch must be in the ON
position to be able to raise or lower
the windows. Each door has a Power
Window switch to control that door’s
window. The driver has a Power
Window Lock switch which can block
the operation of passenger windows.
The power windows will operate for
approximately 30 seconds after the
ignition switch is placed in the ACC
or LOCK/OFF position. However, if
the front doors are opened, the
Power Windows will not operate even
within the 30 second period.
Information
• In cold and wet climates, power win-dows may not work properly due to
freezing conditions.
• While driving with the rear win- dows down or with the sunroof (if
equipped) opened (or partially
opened), your vehicle may demon-
strate a wind buffeting or pulsation
noise. This noise is normal and can
be reduced or eliminated by taking
the following actions. If the noise
occurs with one or both of the rear
windows down, partially lower both
front windows approximately one
inch. If you experience the noise
with the sunroof open, slightly close
the sunroof.
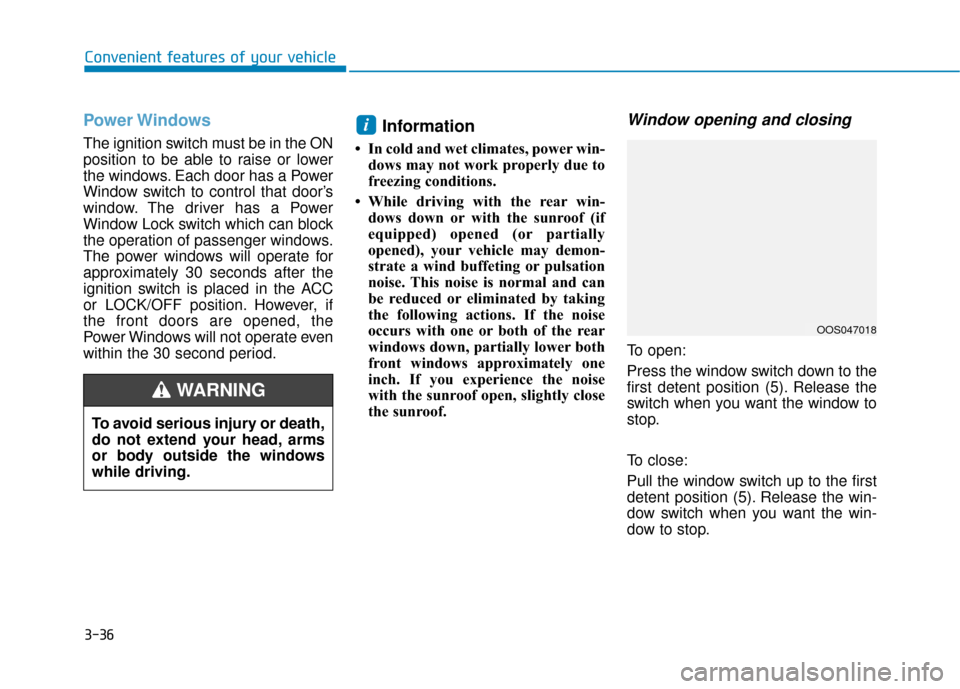
Window opening and closing
To open:
Press the window switch down to the
first detent position (5). Release the
switch when you want the window to
stop.
To close:
Pull the window switch up to the first
detent position (5). Release the win-
dow switch when you want the win-
dow to stop.
i
To avoid serious injury or death,
do not extend your head, arms
or body outside the windows
while driving.
WARNING
OOS047018
Page 122 of 505
3-38
Convenient features of your vehicle
Information
The automatic reverse feature is only
active when the "Auto Up" feature is
used by fully pulling up the switch to
the second detent.
Do not install any accessories on
the windows. The automatic reverse
feature may not operate.
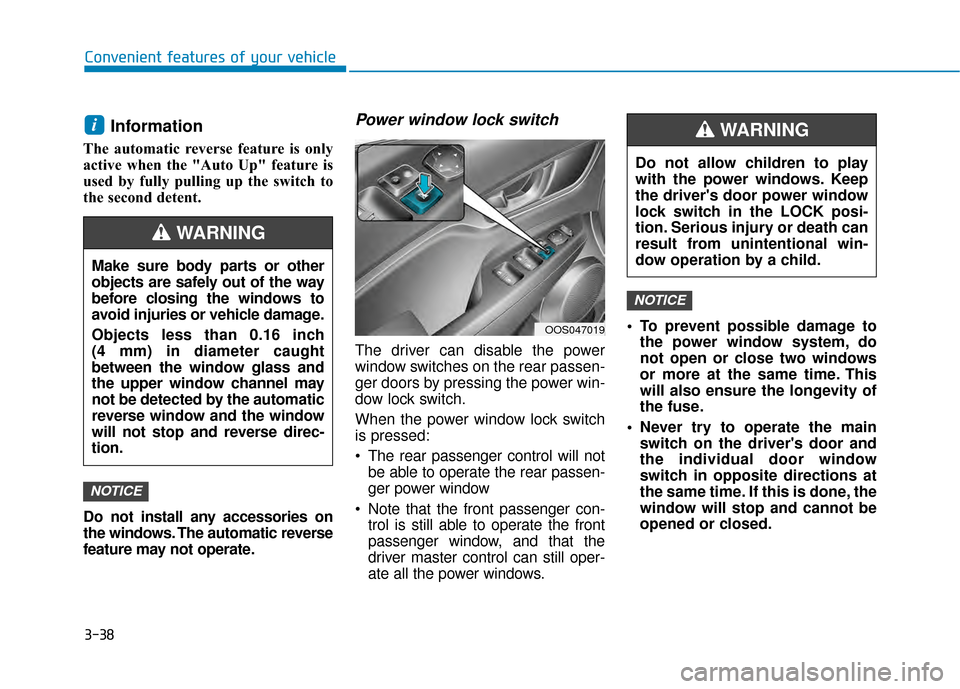
Power window lock switch
The driver can disable the power
window switches on the rear passen-
ger doors by pressing the power win-
dow lock switch.
When the power window lock switch
is pressed:
The rear passenger control will notbe able to operate the rear passen-
ger power window
Note that the front passenger con- trol is still able to operate the front
passenger window, and that the
driver master control can still oper-
ate all the power windows. To prevent possible damage to
the power window system, do
not open or close two windows
or more at the same time. This
will also ensure the longevity of
the fuse.
Never try to operate the main switch on the driver's door and
the individual door window
switch in opposite directions at
the same time. If this is done, the
window will stop and cannot be
opened or closed.
NOTICE
NOTICE
i
Do not allow children to play
with the power windows. Keep
the driver's door power window
lock switch in the LOCK posi-
tion. Serious injury or death can
result from unintentional win-
dow operation by a child.
WARNING
Make sure body parts or other
objects are safely out of the way
before closing the windows to
avoid injuries or vehicle damage.
Objects less than 0.16 inch
(4 mm) in diameter caught
between the window glass and
the upper window channel may
not be detected by the automatic
reverse window and the window
will not stop and reverse direc-
tion.
WARNING
OOS047019
Page 129 of 505
3-45
Convenient features of your vehicle
3
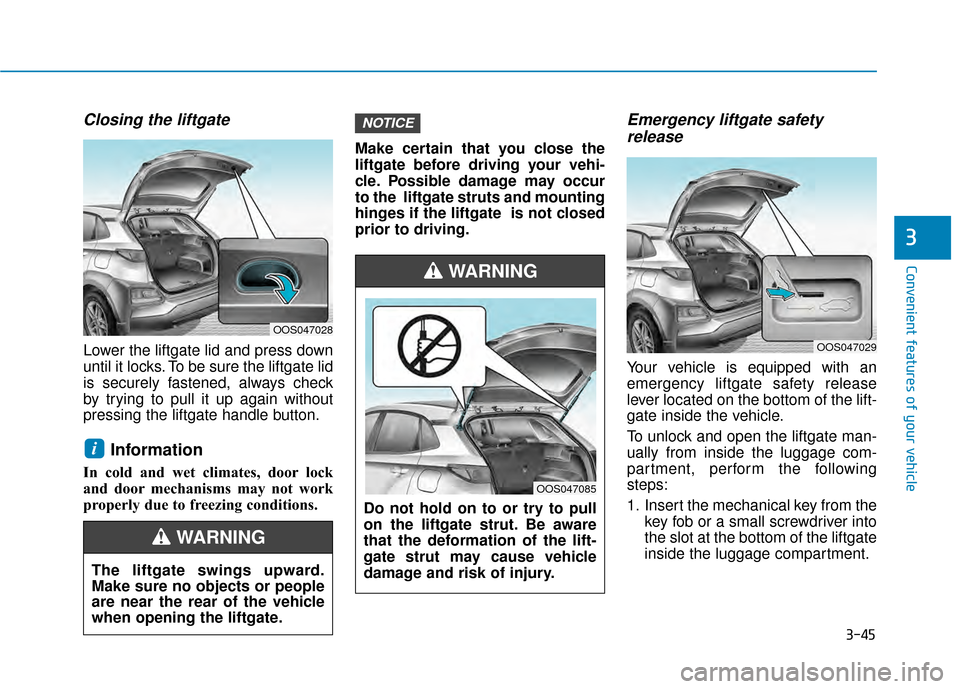
Closing the liftgate
Lower the liftgate lid and press down
until it locks. To be sure the liftgate lid
is securely fastened, always check
by trying to pull it up again without
pressing the liftgate handle button.
Information
In cold and wet climates, door lock
and door mechanisms may not work
properly due to freezing conditions.Make certain that you close the
liftgate before driving your vehi-
cle. Possible damage may occur
to the liftgate struts and mounting
hinges if the liftgate is not closed
prior to driving.
Emergency liftgate safety
release
Your vehicle is equipped with an
emergency liftgate safety release
lever located on the bottom of the lift-
gate inside the vehicle.
To unlock and open the liftgate man-
ually from inside the luggage com-
partment, perform the following
steps:
1. Insert the mechanical key from the
key fob or a small screwdriver into
the slot at the bottom of the liftgate
inside the luggage compartment.
NOTICE
i
OOS047029
OOS047028
The liftgate swings upward.
Make sure no objects or people
are near the rear of the vehicle
when opening the liftgate.
WARNING
Do not hold on to or try to pull
on the liftgate strut. Be aware
that the deformation of the lift-
gate strut may cause vehicle
damage and risk of injury.
WARNING
OOS047085
Page 130 of 505
3-46
Convenient features of your vehicle
2. Slide the key or screwdriver to the right to engage the safety release
lever.
3. Push the liftgate outward and upward.
Fuel Filler Door
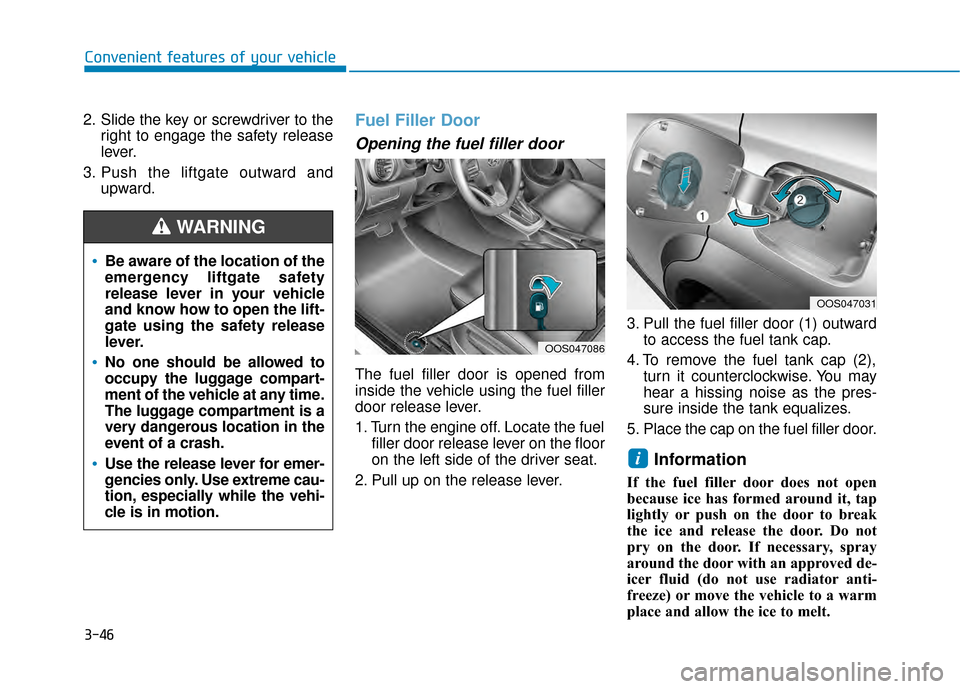
Opening the fuel filler door
The fuel filler door is opened from
inside the vehicle using the fuel filler
door release lever.
1. Turn the engine off. Locate the fuelfiller door release lever on the floor
on the left side of the driver seat.
2. Pull up on the release lever. 3. Pull the fuel filler door (1) outward
to access the fuel tank cap.
4. To remove the fuel tank cap (2), turn it counterclockwise. You may
hear a hissing noise as the pres-
sure inside the tank equalizes.
5. Place the cap on the fuel filler door.
Information
If the fuel filler door does not open
because ice has formed around it, tap
lightly or push on the door to break
the ice and release the door. Do not
pry on the door. If necessary, spray
around the door with an approved de-
icer fluid (do not use radiator anti-
freeze) or move the vehicle to a warm
place and allow the ice to melt.
i
Be aware of the location of the
emergency liftgate safety
release lever in your vehicle
and know how to open the lift-
gate using the safety release
lever.
No one should be allowed to
occupy the luggage compart-
ment of the vehicle at any time.
The luggage compartment is a
very dangerous location in the
event of a crash.
Use the release lever for emer-
gencies only. Use extreme cau-
tion, especially while the vehi-
cle is in motion.
WARNING
OOS047086
OOS047031
Page 131 of 505
3-47
Convenient features of your vehicle
3
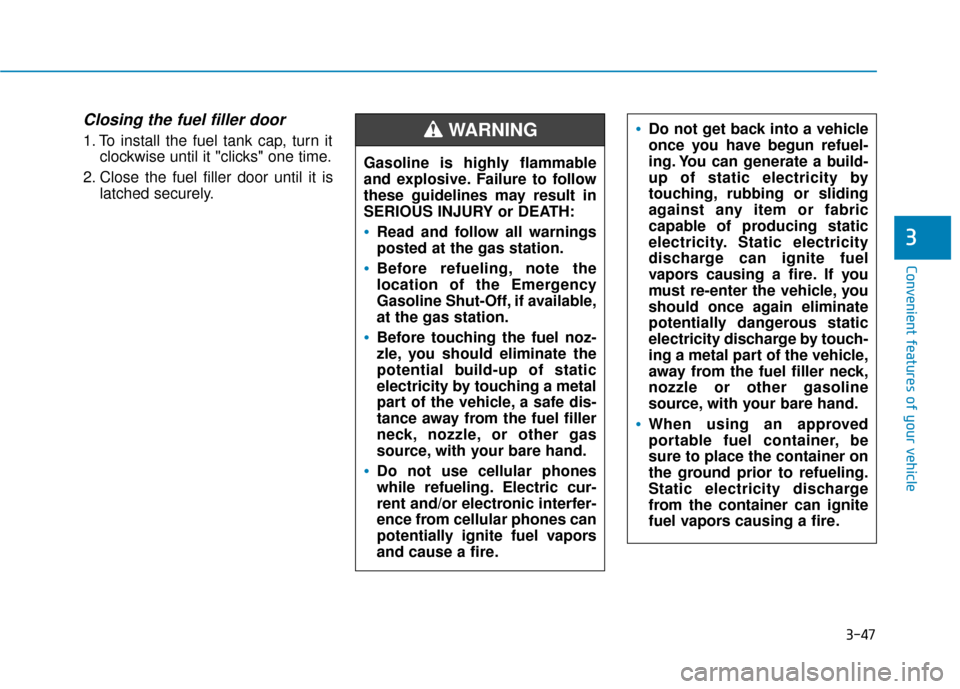
Closing the fuel filler door
1. To install the fuel tank cap, turn itclockwise until it "clicks" one time.
2. Close the fuel filler door until it is latched securely.Do not get back into a vehicle
once you have begun refuel-
ing. You can generate a build-
up of static electricity by
touching, rubbing or sliding
against any item or fabric
capable of producing static
electricity. Static electricity
discharge can ignite fuel
vapors causing a fire. If you
must re-enter the vehicle, you
should once again eliminate
potentially dangerous static
electricity discharge by touch-
ing a metal part of the vehicle,
away from the fuel filler neck,
nozzle or other gasoline
source, with your bare hand.
When using an approved
portable fuel container, be
sure to place the container on
the ground prior to refueling.
Static electricity discharge
from the container can ignite
fuel vapors causing a fire.
Gasoline is highly flammable
and explosive. Failure to follow
these guidelines may result in
SERIOUS INJURY or DEATH:
Read and follow all warnings
posted at the gas station.
Before refueling, note the
location of the Emergency
Gasoline Shut-Off, if available,
at the gas station.
Before touching the fuel noz-
zle, you should eliminate the
potential build-up of static
electricity by touching a metal
part of the vehicle, a safe dis-
tance away from the fuel filler
neck, nozzle, or other gas
source, with your bare hand.
Do not use cellular phones
while refueling. Electric cur-
rent and/or electronic interfer-
ence from cellular phones can
potentially ignite fuel vapors
and cause a fire.
WARNING
Page 157 of 505
3-73
Convenient features of your vehicle
3
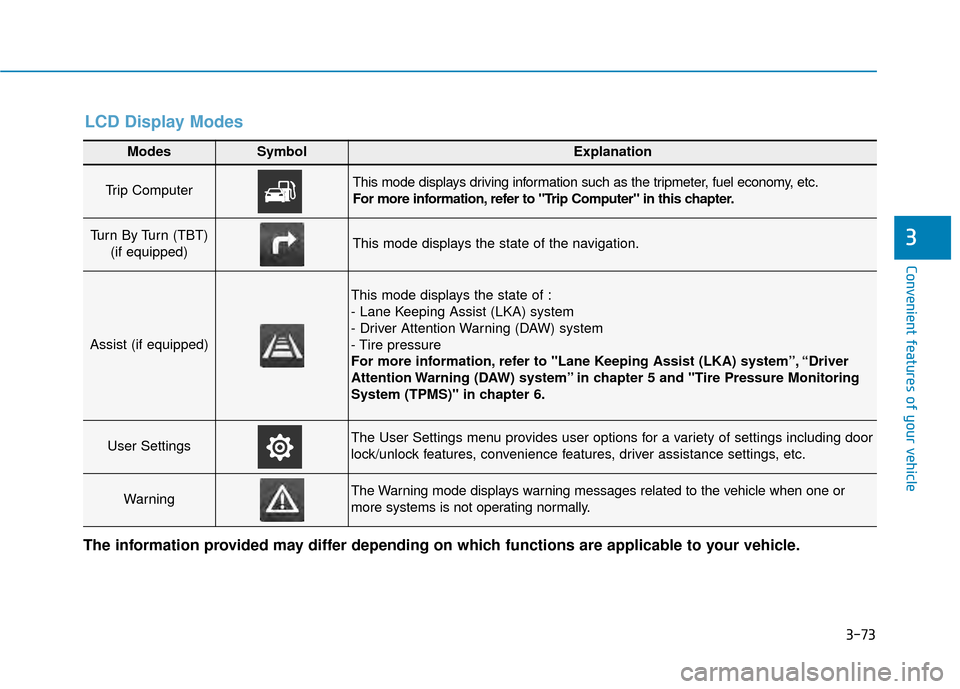
Modes SymbolExplanation
Trip Computer This mode displays driving information such as the tripmeter, fuel economy, etc.
For more information, refer to "Trip Computer" in this chapter.
Turn By Turn (TBT) (if equipped)This mode displays the state of the navigation.
Assist (if equipped)
This mode displays the state of :
- Lane Keeping Assist (LKA) system
- Driver Attention Warning (DAW) system
- Tire pressure
For more information, refer to "Lane Keeping Assist (LKA) system”, “Driver
Attention Warning (DAW) system” in chapter 5 and "Tire Pressure Monitoring
System (TPMS)" in chapter 6.
User SettingsThe User Settings menu provides user options for a variety of settings including door
lock/unlock features, convenience features, driver assistance settings, etc.
WarningThe Warning mode displays warning messages related to the vehicle when one or
more systems is not operating normally.
The information provided may differ depending on which functions are applicable to your vehicle.
LCD Display Modes
Page 162 of 505
3-78
Convenient features of your vehicle
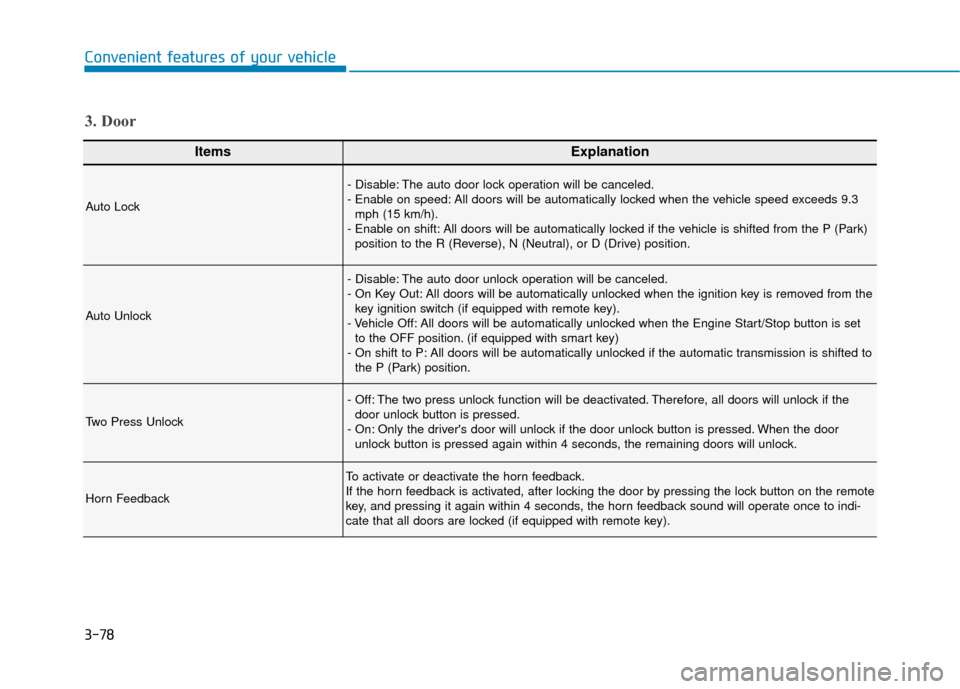
ItemsExplanation
Auto Lock
- Disable: The auto door lock operation will be canceled.
- Enable on speed: All doors will be automatically locked when the vehicle speed exceeds 9.3mph (15 km/h).
- Enable on shift: All doors will be automatically locked if the vehicle is shifted from the P (Park) position to the R (Reverse), N (Neutral), or D (Drive) position.
Auto Unlock
- Disable: The auto door unlock operation will be canceled.
- On Key Out: All doors will be automatically unlocked when the ignition key is removed from thekey ignition switch (if equipped with remote key).
- Vehicle Off: All doors will be automatically unlocked when the Engine Start/Stop button is set to the OFF position. (if equipped with smart key)
- On shift to P: All doors will be automatically unlocked if the automatic transmission is shifted to the P (Park) position.
Two Press Unlock
- Off: The two press unlock function will be deactivated. Therefore, all doors will unlock if thedoor unlock button is pressed.
- On: Only the driver's door will unlock if the door unlock button is pressed. When the door unlock button is pressed again within 4 seconds, the remaining doors will unlock.
Horn Feedback
To activate or deactivate the horn feedback.
If the horn feedback is activated, after locking the door by pressing the lock button on the remote
key, and pressing it again within 4 seconds, the horn feedback sound will operate once to indi-
cate that all doors are locked (if equipped with remote key).
3. Door
Page 172 of 505
3-88
Convenient features of your vehicle
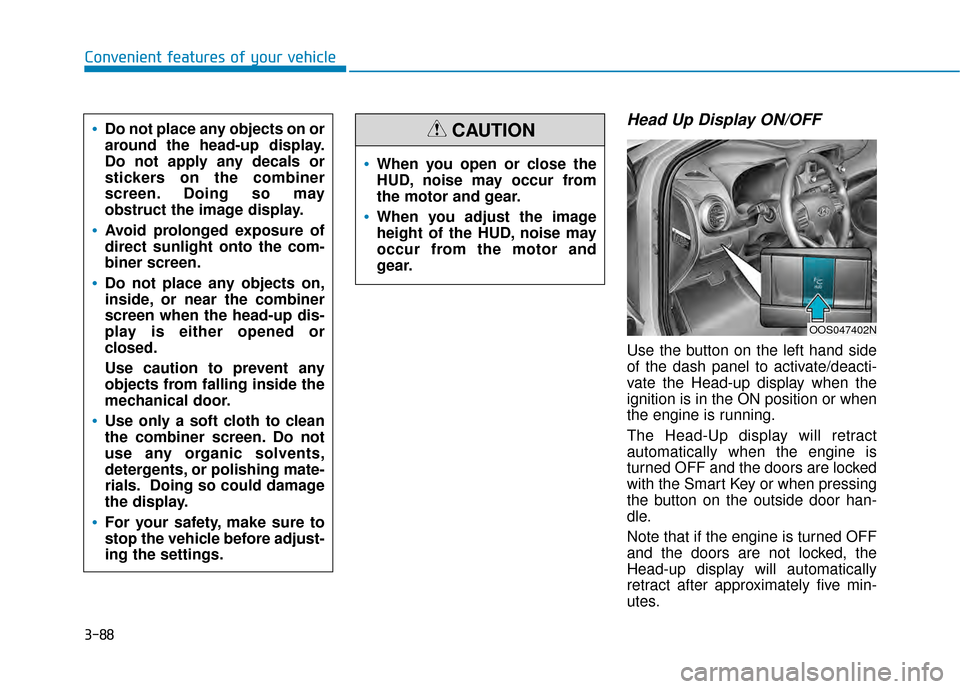
Head Up Display ON/OFF
Use the button on the left hand side
of the dash panel to activate/deacti-
vate the Head-up display when the
ignition is in the ON position or when
the engine is running.
The Head-Up display will retract
automatically when the engine is
turned OFF and the doors are locked
with the Smart Key or when pressing
the button on the outside door han-
dle.
Note that if the engine is turned OFF
and the doors are not locked, the
Head-up display will automatically
retract after approximately five min-
utes.
When you open or close the
HUD, noise may occur from
the motor and gear.
When you adjust the image
height of the HUD, noise may
occur from the motor and
gear.
CAUTIONDo not place any objects on or
around the head-up display.
Do not apply any decals or
stickers on the combiner
screen. Doing so may
obstruct the image display.
Avoid prolonged exposure of
direct sunlight onto the com-
biner screen.
Do not place any objects on,
inside, or near the combiner
screen when the head-up dis-
play is either opened or
closed.
Use caution to prevent any
objects from falling inside the
mechanical door.
Use only a soft cloth to clean
the combiner screen. Do not
use any organic solvents,
detergents, or polishing mate-
rials. Doing so could damage
the display.
For your safety, make sure to
stop the vehicle before adjust-
ing the settings.
OOS047402N
Page 181 of 505
3-97
Convenient features of your vehicle
3
Headlamp delay function
If the key is removed from the ignition
switch or placed in the ACC position
or the LOCK/OFF position with the
headlamps ON, the headlamps
(and/or parking lamps) remain on for
about 5 minutes. However, if the dri-
ver’s door is opened and closed, the
headlights are turned off after 15
seconds. Also, with the engine off if
the driver's door is opened and
closed, the headlamps (and/or park-
ing lamps) are turned off after 15
seconds.
The headlamps (and/or parking
lamps) can be turned off by pressing
the lock button on the remote key or
smart key twice or turning the head-
lamp switch to the OFF or AUTO
position.
You can activate or deactivate the
Headlamp Delay function from the
User Settings Mode in the LCD dis-
play.
For more information, refer to the
"LCD Display" section in this
chapter.If the driver exits the vehicle
through another door besides the
driver door, the battery saver func-
tion does not operate and the
headlamp delay function does not
turn OFF automatically.
This may cause the battery to dis-
charge. To avoid battery dis-
charge, turn OFF the headlamps
manually from the headlamp
switch before exiting the vehicle.
Smart cornering lamp
(if equipped)
As an optional safety feature, your
vehicle may be equipped with a
smart cornering lamp. The cornering
lamp turns ON automatically while
driving when the vehicle enters into a
cornering maneuver.
The system will operate under the
following conditions:
When the headlamps are turned
ON
When the steering angle is above 25 to 35 degrees (depending on
vehicle speed)
When the vehicle speed is under 25 mph (40 kph)
When the smart cornering lamp
turns on, the front fog lamp turns off.
(if equipped)
NOTICE
Page 182 of 505
3-98
Convenient features of your vehicle
Interior Lights
Do not use the interior lights for
extended periods when the vehi-
cle is turned off or the battery will
discharge.
Interior lamp AUTO cut
The interior lamps will automatically
go off approximately 20 minutes after
the engine is turned off and the
doors are closed. If a door is opened,
the lamp will go off 40 minutes after
the engine is turned off. If the doors
are locked by the remote key or
smart key and the vehicle enters the
armed stage of the theft alarm sys-
tem, the lamps will go off five sec-
onds later.
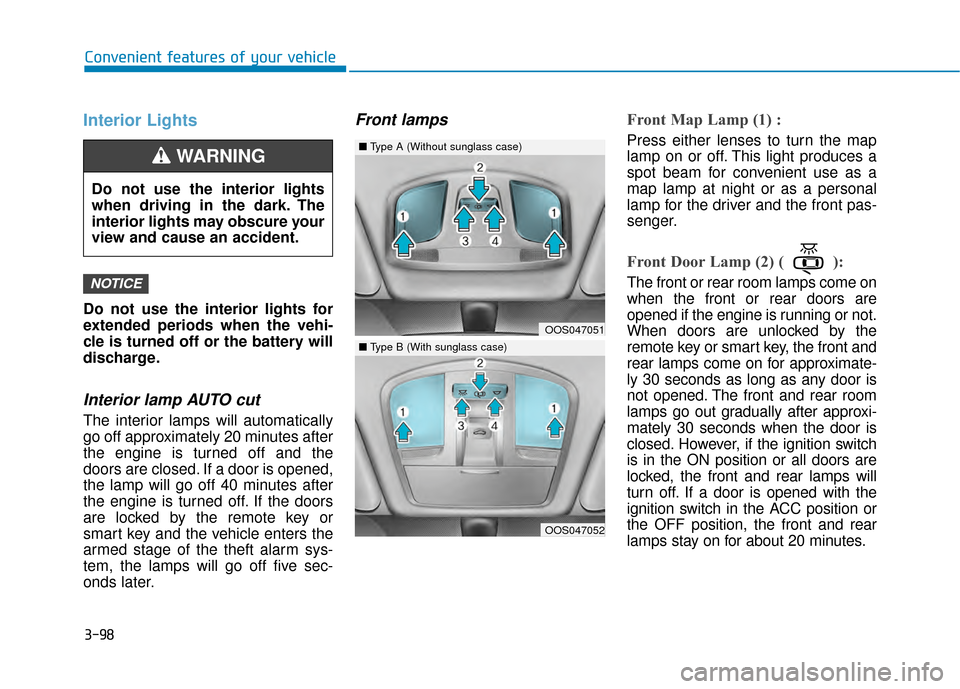
Front lampsFront Map Lamp (1) :
Press either lenses to turn the map
lamp on or off. This light produces a
spot beam for convenient use as a
map lamp at night or as a personal
lamp for the driver and the front pas-
senger.
Front Door Lamp (2) ( ):
The front or rear room lamps come on
when the front or rear doors are
opened if the engine is running or not.
When doors are unlocked by the
remote key or smart key, the front and
rear lamps come on for approximate-
ly 30 seconds as long as any door is
not opened. The front and rear room
lamps go out gradually after approxi-
mately 30 seconds when the door is
closed. However, if the ignition switch
is in the ON position or all doors are
locked, the front and rear lamps will
turn off. If a door is opened with the
ignition switch in the ACC position or
the OFF position, the front and rear
lamps stay on for about 20 minutes.NOTICE
OOS047051
OOS047052
■Type A (Without sunglass case)
■Type B (With sunglass case)
Do not use the interior lights
when driving in the dark. The
interior lights may obscure your
view and cause an accident.
WARNING