stop start Hyundai Matrix 2004 User Guide
[x] Cancel search | Manufacturer: HYUNDAI, Model Year: 2004, Model line: Matrix, Model: Hyundai Matrix 2004Pages: 317, PDF Size: 5.12 MB
Page 112 of 317
DRIVING YOUR HYUNDAI
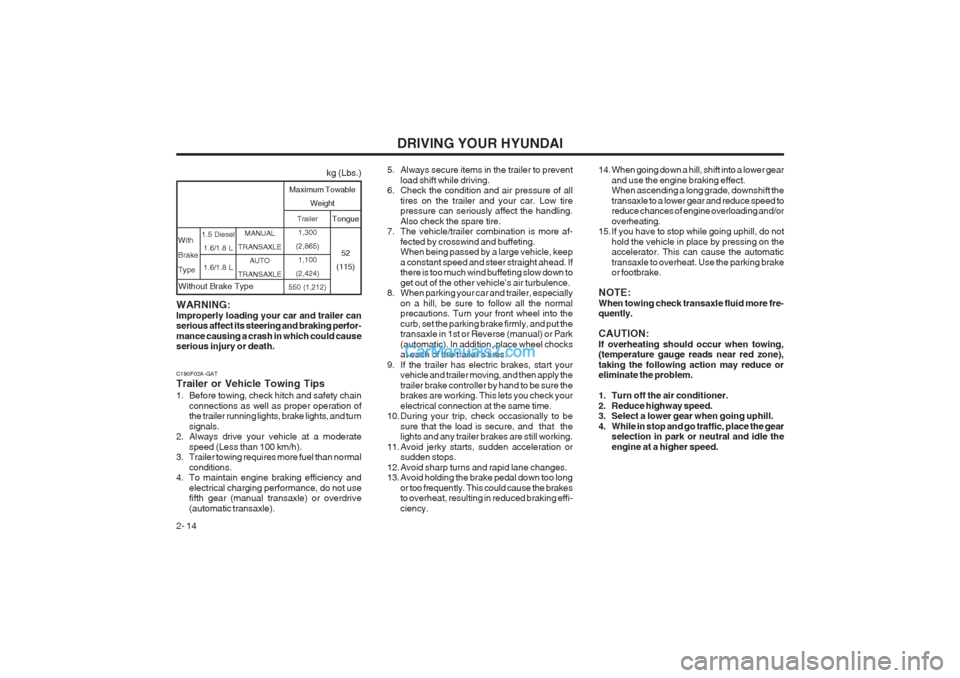
2- 14 MANUAL
TRANSAXLE AUTO
TRANSAXLE Trailer
1,300
(2,865) 1,100
(2,424)
550 (1,212) Tongue
52
(115)
kg (Lbs.)
Maximum Towable Weight
With BrakeType
1.5 Diesel 1.6/1.8 L 1.6/1.8 L
WARNING: Improperly loading your car and trailer can serious affect its steering and braking perfor- mance causing a crash in which could cause serious injury or death.
Without Brake Type
5. Always secure items in the trailer to prevent load shift while driving.
6. Check the condition and air pressure of all
tires on the trailer and your car. Low tire pressure can seriously affect the handling. Also check the spare tire.
7. The vehicle/trailer combination is more af-
fected by crosswind and buffeting. When being passed by a large vehicle, keep a constant speed and steer straight ahead. If there is too much wind buffeting slow down to get out of the other vehicle’s air turbulence.
8. When parking your car and trailer, especially
on a hill, be sure to follow all the normal precautions. Turn your front wheel into the curb, set the parking brake firmly, and put the transaxle in 1st or Reverse (manual) or Park (automatic). In addition, place wheel chocks at each of the trailer’s tires.
9. If the trailer has electric brakes, start your vehicle and trailer moving, and then apply the trailer brake controller by hand to be sure the brakes are working. This lets you check your electrical connection at the same time.
10. During your trip, check occasionally to be
sure that the load is secure, and that the lights and any trailer brakes are still working.
11. Avoid jerky starts, sudden acceleration or sudden stops.
12. Avoid sharp turns and rapid lane changes.
13. Avoid holding the brake pedal down too long or too frequently. This could cause the brakesto overheat, resulting in reduced braking effi- ciency. 14. When going down a hill, shift into a lower gear
and use the engine braking effect. When ascending a long grade, downshift the transaxle to a lower gear and reduce speed to reduce chances of engine overloading and/or overheating.
15. If you have to stop while going uphill, do not
hold the vehicle in place by pressing on the accelerator. This can cause the automatic transaxle to overheat. Use the parking brake or footbrake.
NOTE: When towing check transaxle fluid more fre- quently. CAUTION: If overheating should occur when towing, (temperature gauge reads near red zone), taking the following action may reduce or eliminate the problem.
1. Turn off the air conditioner.
2. Reduce highway speed.
3. Select a lower gear when going uphill.
4. While in stop and go traffic, place the gear selection in park or neutral and idle theengine at a higher speed.
C190F02A-GAT Trailer or Vehicle Towing Tips
1. Before towing, check hitch and safety chain
connections as well as proper operation of the trailer running lights, brake lights, and turn signals.
2. Always drive your vehicle at a moderate
speed (Less than 100 km/h).
3. Trailer towing requires more fuel than normal
conditions.
4. To maintain engine braking efficiency and
electrical charging performance, do not use fifth gear (manual transaxle) or overdrive (automatic transaxle).
Page 114 of 317
WHAT TO DO IN AN EMERGENCY
3-2
When jump starting, wear protective glasses and be careful not to get acid on yourself, your clothing or on the car.
o If you should accidentally get acid on your
skin or in your eyes, immediately remove any contaminated clothing and flush the area with clear water for at least 15 minutes. Then promptly obtain medical attention. If you must be transported to an emergency facility, con- tinue to apply water to the affected area with a sponge or cloth.
o The gas produced by the battery during the
jump-start operation is highly explosive. Do not smoke or allow a spark or an open flame in the vicinity.
o The battery being used to provide the jump
start must be 12-volt. If you cannot determine that it is a 12-volt battery, do not attempt to use it for the jump start.
o To jump start a car with a discharged battery,
follow this procedure exactly:
1. If the booster battery is installed in another vehicle, be sure the two vehicles are nottouching.
2. Turn off all unnecessary lights and acces-
sories in both vehicles. 3. Attach the clamps of the jumper cable in the
exact location shown. First, attach one clamp of the jumper cable to the positive (+) post or cable of the discharged battery. Then attach the other end of the same cable to the positive (+) post or cable of the booster battery. Next, using the other cable, attach one clamp to the negative (-) post or cable of the booster battery. Then attach the other end of that cable to a solid metal part of the engine away from the battery. Do not connect the cable to any moving part.
4. Start the engine in the car with the booster
battery and let it run for a few minutes. This will help to assure that the booster battery is fully charged. During the jumping operation, run the engine in this vehicle at about 2,000 rpm.
5. Start the engine in the car with the discharged
battery using the normal starting procedure. After the engine starts, leave the jumper cables connected and let the engine run at fast idle or about 2,000 rpm for several min- utes.
6. Carefully remove the jumper cables in the
reverse order of attachment.
If you do not know why your battery became discharged (because the lights were left on, etc.), have the charging system checked by your Hyundai dealer. D030A02A-AAT IF THE ENGINE OVERHEATS If your temperature gauge indicates overheating, you experience a loss of power, or hear loud pinging or knocking, the engine is probably too hot. If this happens to you, you should:
1. Pull off the road and stop as soon as it is safe
to do so.
2. Place the gear selector lever in "P" (auto- matic), or neutral (manual transaxle) and set the parking brake. If the air conditioning is on, turn it off.
3. If engine coolant is running out under the car or steam is coming out from the hood, stop the engine. Do not open the hood until the engine coolant has stopped running or the steaming has stopped. If there is no visible loss of engine coolant and no steam, leave the engine running and check to be sure the engine cooling fan is operating. If the fan is not running, turn the engine off.
4. Check to see if the water pump drive belt is
missing. If it is not missing, check to see that it is tight. If the drive belt seems to be satis- factory, check for coolant leaking from the radiator, hoses or under the car. (If the air conditioning had been in use, it is normal for cold water to be draining from it when you stop).
Page 132 of 317
VEHICLE MAINTENANCE REQUIREMENTS
5- 6
F060A01A-AAT EXPLANATION OF SCHEDULED MAINTENANCE ITEMS F060M01A-AAT o Engine Oil and FilterThe engine oil and filter should be changed at
the intervals specified in the maintenance sched- ule. If the car is being driven in severe condi- tions, more frequent oil and filter changes are required. F060B01A-AAT
o Drive BeltsInspect all drive belts for evidence of cuts, cracks, excessive wear or oil saturation andreplace if necessary. Drive belts should be checked periodically for proper tension and adjusted as necessary. F060C01A-AAT
o Fuel FilterA clogged filter can limit the speed at which the vehicle may be driven, damage the emission system and cause hard starting. If an exces- sive amount of foreign matter accumulates in the fuel tank, the filter may require replacement more frequently. After installing a new filter, run the engine forseveral minutes, and check for leaks at the connections. Fuel filters should be installed by trained technicians.
F060D01TB-AAT
o Fuel Lines, Fuel Hoses and
Connections
Check the fuel lines, fuel hoses and connec- tions for leakage and damage. Replace any damaged or leaking parts immediately. WARNING (Diesel only): Never work on injection system with engine running or within 30 seconds after shutting off engine. High pressure pump, rail, injec- tors and high pressure pipes are subject to high pressure even after the engine stopped. The fuel jet produced by fuel leaks may cause serious injury, if it touch the body. People using pacemakers should not move than 30cm closer to the ECU or wiring har- ness within the engine room while engine is running, since the high currents in the Com- mon Rail system produce considerable mag- netic fields. F060E01A-AAT
o Timing BeltInspect all parts related to the timing belt for damage and deformation. Replace any dam- aged parts immediately. F060G01A-AAT
o Vapor Hose and Fuel Filler Cap The vapor hose and fuel filler cap should be
inspected at those intervals specified in themaintenance schedule. Make sure that a new vapor hose or fuel filler cap is correctly re- placed.
F060F01A-AAT
o Vacuum, Crankcase Ventilation
Hoses
Inspect the surface of hoses for evidence of
heat and/or mechanical damage. Hard and brit-tle rubber, cracking, tears, cuts, abrasions, and excessive swelling indicate deterioration. Par- ticular attention should be paid to examining those hose surfaces nearest to high heat sourc- es, such as the exhaust manifold.
Inspect the hose routing to assure that the
hoses do not come in contact with any heatsource, sharp edges or moving component which might cause heat damage or mechanical wear. Inspect all hose connections, such as clamps and couplings, to make sure they are secure, and that no leaks are present. Hoses should be replaced immediately if there is any evidence of deterioration or damage.
Page 140 of 317
DO-IT-YOURSELF MAINTENANCE
6-6 If the oil level is close to or below the "L" mark,
add oil until it reaches the "F" mark. To add oil:
1. Remove the oil filler cap by turning it counter- clockwise.
2. Add oil, then check the level again. Do not overfill.
3. Replace the cap by turning it clockwise.
The distance between the "F" and "L" marks is
equal to about 1 liter(Gasoline Engine)/1.2 liter(Diesel Engine) of oil.
G350A01A-GAT
ENGINE OIL CONSUMPTION Function of Engine Oil
Engine oil has the primary function of lubricat-
ing and cooling the inside of the engine.
Engine oil consumption It is normal that an engine should consume
some engine oil while normal driving. The cause of oil consumption in a normal engine are asfollows;
o Engine oil is used to lubricate pistons, piston rings and cylinders. A thin film of oil is left on the cylinder wall when a piston moves downwards in thecylinder. High negative pressure generated
during engine operation sucks some of theoil into the combustion chamber. This oil with some oil of the cylinder wall is burned by the high temperature combustion gases during the combustion process.
o The engine oil consumption is strongly ef- fected by the viscosity and quality of oil,engine rpm and driving condition etc. Theengine oil is more consumed under severedriving conditions such as high speeds and
frequent acceleration and deceleration thannormal driving condition.
G040A03FC-GAT
CHANGING THE OIL AND FILTER (GASOLINE ENGINE)
The engine oil and filter should be changed at
those intervals specified in the maintenance schedule in Section 5. If the car is being drivenin severe conditions, more frequent oil and filterchanges are required.
The procedure for changing the oil and filter is
as follows: 1. Park the car on level ground and set the
parking brake. Start the engine and let itwarm up until the needle on the coolanttemperature gauge moves above the lowestmark. Turn the engine off and place the gearselector lever in "P" (automatic) or reversegear (manual transaxle).
2. Open the hood and remove the engine oil filler cap.
3. Slide underneath the car and loosen the oil pan drain plug by turning it counterclock-wise with a wrench of the proper size. Besure that a drain pan is in position to catchthe oil as it drains out, then remove the drainplug.
WARNING:Be very careful when draining the engine oilas it may be hot enough to burn you!
4. When the oil has stopped draining, replace the drain plug using a new washer andretighten by turning it clockwise. Oil pan drain plug tightening torque: 1.6DOHC (European Community only: 4.0 ~4.5
kgf.m, Except European Comunity: 3.5 ~4.5 kgf.m) 1.8DOHC: 4.0 ~4.5 kgf.m
5. Remove the oil filter by turning it counter- clockwise with a oil filter wrench of the proper size. A certain amount of oil willcome out when you remove the filter. So besure to have your drain pan in place under-neath it.
SSA6040A
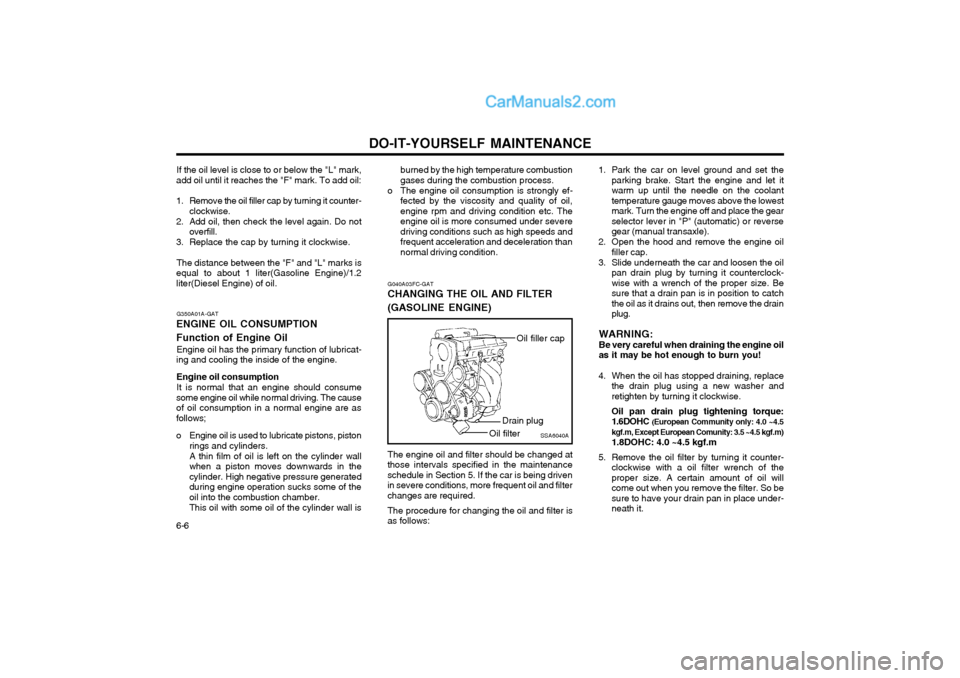
Oil filler cap
Drain plug
Oil filter
Page 141 of 317
DO-IT-YOURSELF MAINTENANCE 6-7
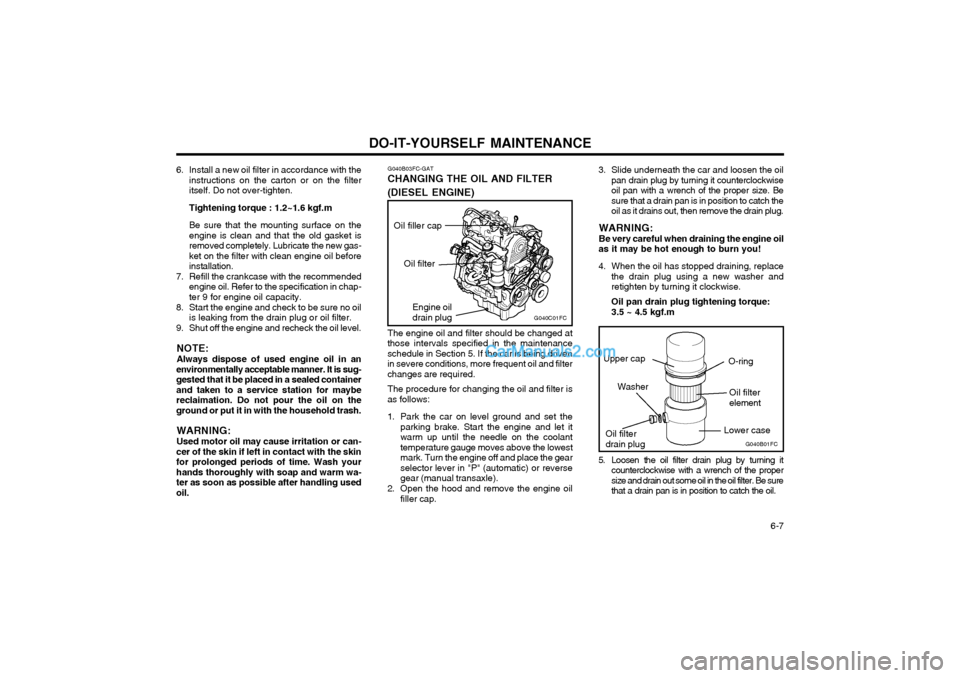
G040C01FCEngine oil drain plug
Oil filter
G040B03FC-GAT
CHANGING THE OIL AND FILTER (DIESEL ENGINE)
The engine oil and filter should be changed at
those intervals specified in the maintenance schedule in Section 5. If the car is being drivenin severe conditions, more frequent oil and filterchanges are required.
The procedure for changing the oil and filter is
as follows:
1. Park the car on level ground and set the parking brake. Start the engine and let it warm up until the needle on the coolanttemperature gauge moves above the lowestmark. Turn the engine off and place the gearselector lever in "P" (automatic) or reversegear (manual transaxle).
2. Open the hood and remove the engine oil filler cap. 3. Slide underneath the car and loosen the oil
pan drain plug by turning it counterclockwiseoil pan with a wrench of the proper size. Besure that a drain pan is in position to catch theoil as it drains out, then remove the drain plug.
WARNING: Be very careful when draining the engine oil
as it may be hot enough to burn you!
4. When the oil has stopped draining, replace the drain plug using a new washer and retighten by turning it clockwise. Oil pan drain plug tightening torque: 3.5 ~ 4.5 kgf.m
6. Install a new oil filter in accordance with the
instructions on the carton or on the filter itself. Do not over-tighten. Tightening torque : 1.2~1.6 kgf.mBe sure that the mounting surface on the engine is clean and that the old gasket isremoved completely. Lubricate the new gas-ket on the filter with clean engine oil beforeinstallation.
7. Refill the crankcase with the recommended engine oil. Refer to the specification in chap-ter 9 for engine oil capacity.
8. Start the engine and check to be sure no oil is leaking from the drain plug or oil filter.
9. Shut off the engine and recheck the oil level.
NOTE: Always dispose of used engine oil in an
environmentally acceptable manner. It is sug- gested that it be placed in a sealed containerand taken to a service station for maybereclaimation. Do not pour the oil on theground or put it in with the household trash.
WARNING: Used motor oil may cause irritation or can-
cer of the skin if left in contact with the skin for prolonged periods of time. Wash yourhands thoroughly with soap and warm wa-ter as soon as possible after handling usedoil. 5. Loosen the oil filter drain plug by turning it
counterclockwise with a wrench of the propersize and drain out some oil in the oil filter. Be surethat a drain pan is in position to catch the oil.
G040B01FCOil filter drain plug O-ring
Oil filterelement
Washer
Upper cap
Lower case
Oil filler cap
Page 144 of 317
DO-IT-YOURSELF MAINTENANCE
6-10
CHAMPION NGK RC10YC BKR5ES
Unleaded
engine Leaded
engine
RC10YC4 BKR5ES-11
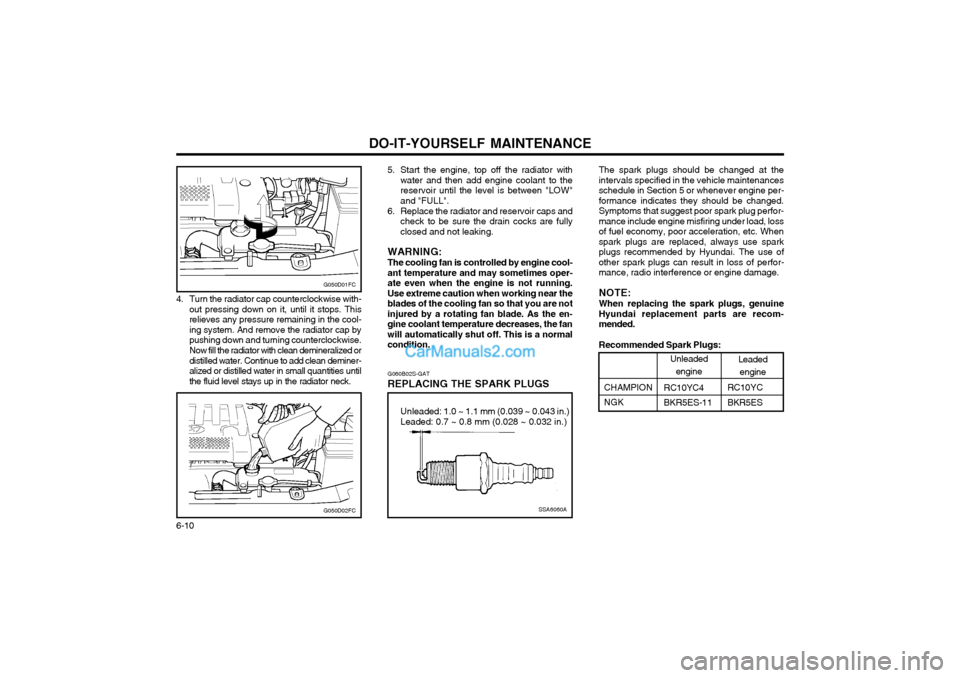
4. Turn the radiator cap counterclockwise with-
out pressing down on it, until it stops. This relieves any pressure remaining in the cool-ing system. And remove the radiator cap bypushing down and turning counterclockwise. Now fill the radiator with clean demineralized or distilled water. Continue to add clean deminer-alized or distilled water in small quantities untilthe fluid level stays up in the radiator neck. G060B02S-GAT
REPLACING THE SPARK PLUGS The spark plugs should be changed at theintervals specified in the vehicle maintenancesschedule in Section 5 or whenever engine per-formance indicates they should be changed.Symptoms that suggest poor spark plug perfor-mance include engine misfiring under load, lossof fuel economy, poor acceleration, etc. Whenspark plugs are replaced, always use sparkplugs recommended by Hyundai. The use ofother spark plugs can result in loss of perfor-mance, radio interference or engine damage. NOTE: When replacing the spark plugs, genuine Hyundai replacement parts are recom-mended. Recommended Spark Plugs:
SSA6060A
Unleaded: 1.0 ~ 1.1 mm (0.039 ~ 0.043 in.) Leaded: 0.7 ~ 0.8 mm (0.028 ~ 0.032 in.)
G050D01FC
5. Start the engine, top off the radiator with
water and then add engine coolant to the reservoir until the level is between "LOW"and "FULL".
6. Replace the radiator and reservoir caps and check to be sure the drain cocks are fullyclosed and not leaking.
WARNING: The cooling fan is controlled by engine cool- ant temperature and may sometimes oper-ate even when the engine is not running.Use extreme caution when working near theblades of the cooling fan so that you are notinjured by a rotating fan blade. As the en-gine coolant temperature decreases, the fanwill automatically shut off. This is a normalcondition.
G050D02FC
Page 151 of 317

DO-IT-YOURSELF MAINTENANCE 6-17
G140B01A-AAT
Checking the Air Conditioning Operation
1. Start the engine and let it run at a fast idle for
several minutes with the air conditioning set at the maximum cold setting.
2. If the air coming out of the in-dash vents is not cold, have the air conditioning systeminspected by your Hyundai dealer.
CAUTION: Running the air conditioning system for extended periods of time with a low refriger-ant level may damage the compressor. G140C01A-AAT
Lubrication To lubricate the compressor and the seals in the system, the air conditioning should be runfor at least 10 minutes each week. This isparticularly important during cool weather whenthe air conditioning system is not otherwise inuse.
G150A01A-GAT
CHECKING STEERING WHEEL FREEPLAY
To check the steering wheel freeplay, stop the
car with the wheels pointed straight ahead and gently move the steering wheel back and forth.Use very light finger pressure and be sensitiveto changes in resistance that mark the limits ofthe freeplay. If the freeplay is greater thanspecified, have it inspected by your Hyundaidealer and adjusted or repaired if necessary.
G150A01FC
G140D01S-GAT
Checking the Compressor Drive Belt
When the air conditioning is being used regular- ly, the compressor drive belt tension should bechecked at least once a month. To check the drive belt tension, press down on the belt halfway between the engine crankshaftand compressor pulleys. Pressing with yourfinger, you should not be able to deflect this beltanymore than 8.0 mm. If you have the instru-ments to check it with a force of 98N (22 lb.),the deflection should be approx. 8.0 mm (0.315in.). If the belt is too loose, have it adjusted byyour Hyundai dealer.
G140D01A
A/C
CRANK PULLEY
TENSION PULLEY
30 mm (1.18 in.)
8mm(0.315 in.)
Page 156 of 317
DO-IT-YOURSELF MAINTENANCE
6-22
G240A01A-AAT
POWER STEERING HOSES
It is suggested that you check the power steer-
ing hose connections for fluid leakage at regular intervals. The power steering hoses should bereplaced if there is severe surface cracking,scuffing or worn spots. Deterioration of thehose could cause premature failure. NOTE: Grinding noise from the power steering
pump may be heard immediately after the engine is started in extremely cold condi-tions (below - 20°C). If the noise stops dur-ing warm up, there is no abnormal functionin the system. It is due to a power steeringfluid characteristic in extremely cold condi-tions.
Recommended Fluid Use PSF-3 type fluid NOTE: Do not start the engine when the power
steering oil reservoir is empty. G300A01B-GAT
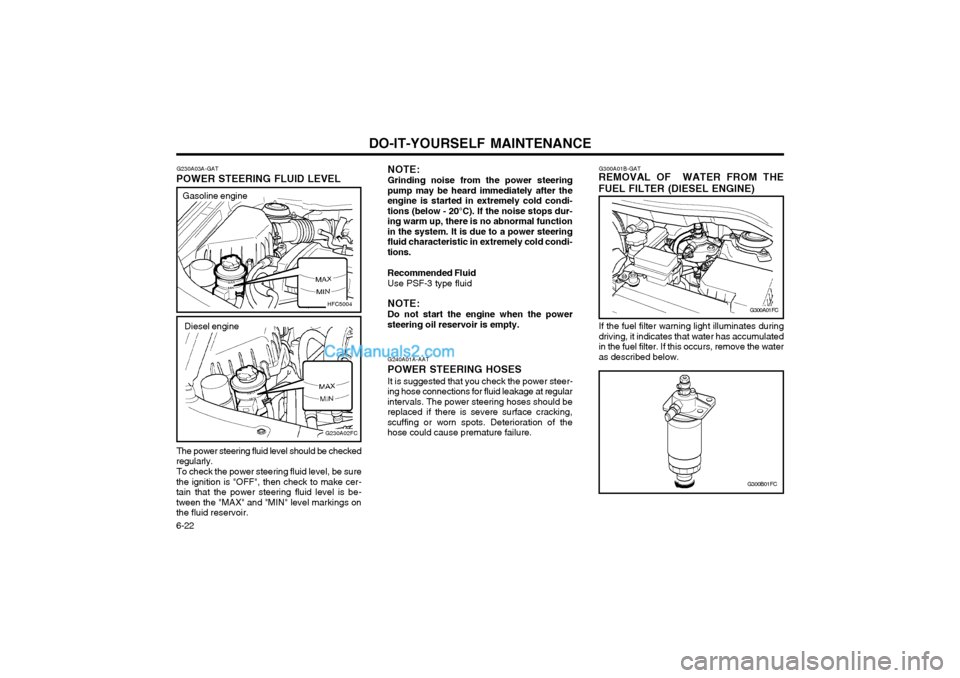
REMOVAL OF WATER FROM THE FUEL FILTER (DIESEL ENGINE)
If the fuel filter warning light illuminates during driving, it indicates that water has accumulatedin the fuel filter. If this occurs, remove the wateras described below.
G300A01FC
G300B01FC
G230A03A-GAT
POWER STEERING FLUID LEVEL
HFC5004
Gasoline engine
The power steering fluid level should be checked
regularly.
To check the power steering fluid level, be sure
the ignition is "OFF", then check to make cer- tain that the power steering fluid level is be-tween the "MAX" and "MIN" level markings onthe fluid reservoir.
G230A02FC
Diesel engine
Page 160 of 317
DO-IT-YOURSELF MAINTENANCE
6-26
G200C02FC-GAT
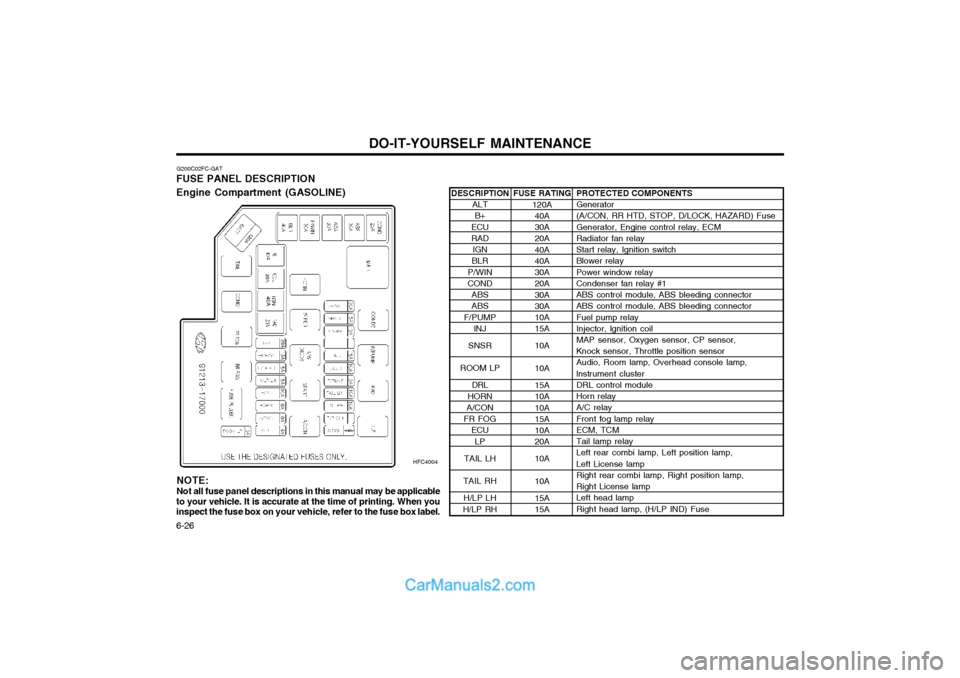
FUSE PANEL DESCRIPTION Engine Compartment (GASOLINE)
HFC4004
PROTECTED COMPONENTS Generator (A/CON, RR HTD, STOP, D/LOCK, HAZARD) Fuse Generator, Engine control relay, ECM Radiator fan relay Start relay, Ignition switch Blower relay Power window relay Condenser fan relay #1 ABS control module, ABS bleeding connector ABS control module, ABS bleeding connector Fuel pump relay Injector, lgnition coilMAP sensor, Oxygen sensor, CP sensor, Knock sensor, Throttle position sensor Audio, Room lamp, Overhead console lamp, lnstrument cluster DRL control module Horn relay A/C relay Front fog lamp relay ECM, TCM Tail lamp relay Left rear combi lamp, Left position lamp, Left License lamp Right rear combi lamp, Right position lamp, Right License lamp Left head lamp Right head lamp, (H/LP IND) Fuse
FUSE RATING
120A40A30A 20A 40A 40A 30A 20A 30A 30A 10A 15A 10A 10A 15A 10A 10A 15A 10A 20A 10A 10A 15A 15A
DESCRIPTION
ALTB+
ECU RAD IGN
BLR
P/WINCOND ABSABS
F/PUMP INJ
SNSR
ROOM LP DRL
HORN
A/CON
FR FOG ECU
LP
TAIL LH
TAIL RH H/LP LH
H/LP RH
NOTE:
Not all fuse panel descriptions in this manual may be applicable
to your vehicle. It is accurate at the time of printing. When you inspect the fuse box on your vehicle, refer to the fuse box label.
Page 161 of 317
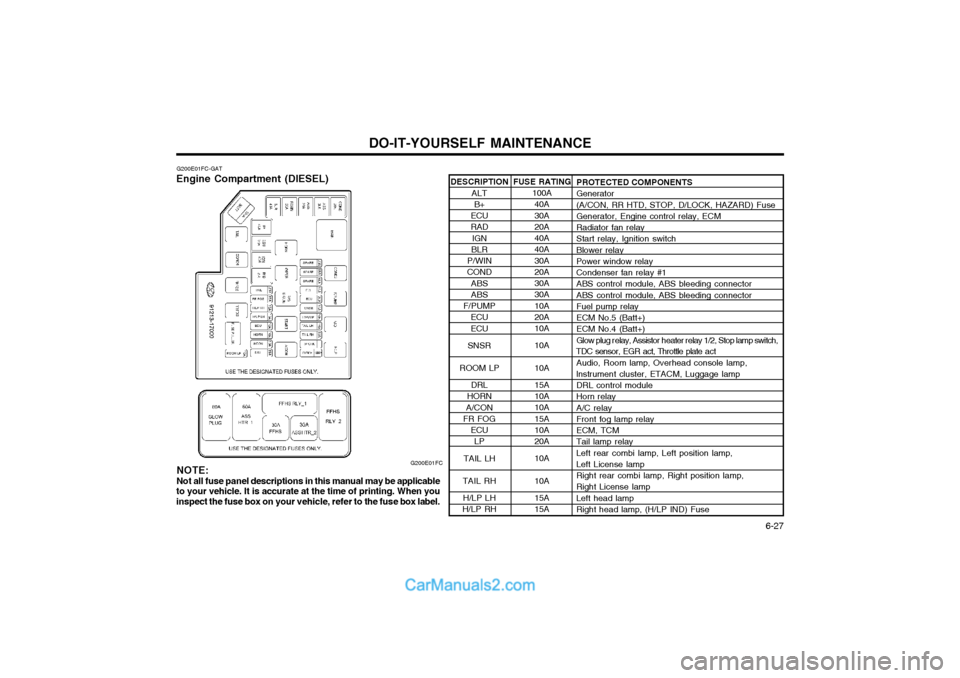
DO-IT-YOURSELF MAINTENANCE 6-27
DESCRIPTION
ALTB+
ECU RAD IGN
BLR
P/WINCOND ABSABS
F/PUMP ECU ECU
SNSR
ROOM LP DRL
HORN
A/CON
FR FOG
ECULP
TAIL LH
TAIL RH H/LP LH
H/LP RH
G200E01FC-GAT
Engine Compartment (DIESEL)
G200E01FCPROTECTED COMPONENTS Generator (A/CON, RR HTD, STOP, D/LOCK, HAZARD) Fuse Generator, Engine control relay, ECM Radiator fan relay Start relay, Ignition switch Blower relay Power window relay Condenser fan relay #1 ABS control module, ABS bleeding connector ABS control module, ABS bleeding connector Fuel pump relay ECM No.5 (Batt+) ECM No.4 (Batt+)
Glow plug r elay, Assistor h eater relay 1/2, Stop lamp switch,
TDC sensor, EGR act, Throttle plate a ct
Audio, Room lamp, Overhead console lamp, lnstrument cluster, ETACM, Luggage lamp DRL control module Horn relay A/C relay Front fog lamp relay ECM, TCM Tail lamp relay Left rear combi lamp, Left position lamp, Left License lamp Right rear combi lamp, Right position lamp, Right License lamp Left head lamp Right head lamp, (H/LP IND) Fuse
FUSE RATING
100A40A 30A 20A 40A 40A 30A 20A 30A 30A 10A 20A 10A 10A 10A 15A 10A 10A 15A 10A 20A 10A 10A 15A 15A
NOTE:
Not all fuse panel descriptions in this manual may be applicable
to your vehicle. It is accurate at the time of printing. When you inspect the fuse box on your vehicle, refer to the fuse box label.