oil temperature Hyundai Matrix 2007 User Guide
[x] Cancel search | Manufacturer: HYUNDAI, Model Year: 2007, Model line: Matrix, Model: Hyundai Matrix 2007Pages: 490, PDF Size: 12.81 MB
Page 264 of 490
10
INDEX
3
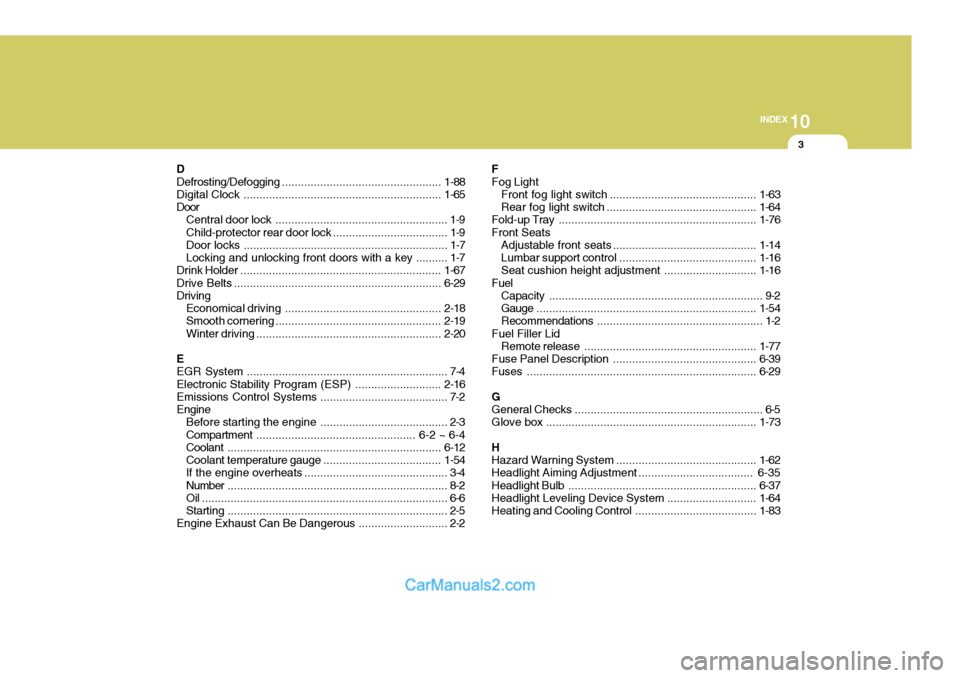
D Defrosting/Defogging .................................................. 1-88
Digital Clock .............................................................. 1-65
Door Central door lock ...................................................... 1-9
Child-protector rear door lock .................................... 1-9
Door locks ................................................................ 1-7
Locking and unlocking front doors with a key .......... 1-7
Drink Holder ............................................................... 1-67
Drive Belts ................................................................. 6-29
Driving
Economical driving ................................................. 2-18
Smooth corneri ng .................................................... 2-19
Winter driving .......................................................... 2-20
E
EGR System ............................................................... 7-4 Electronic Stability Program (ESP) ...........................2-16
Emissions Control Systems ........................................ 7-2Engine Before starting the engine ........................................ 2-3Compartment .................................................. 6-2 ~ 6-4
Coolant ................................................................... 6-12
Coolant temperature gauge .....................................1-54
If the engine overheats ............................................. 3-4
Number ..................................................................... 8-2
Oil ............................................................................. 6-6Starting ..................................................................... 2-5
Engine Exhaust Can Be Dangerous ............................ 2-2 FFog Light
Front fog light switch .............................................. 1-63
Rear fog light switch ............................................... 1-64
Fold-up Tray .............................................................. 1-76
Front Seats Adjustable front seats ............................................. 1-14
Lumbar support control ........................................... 1-16
Seat cushion height adjustment ............................. 1-16
Fuel Capacity ................................................................... 9-2
Gauge ..................................................................... 1-54
Recommendations .................................................... 1-2
Fuel Filler Lid Remote release ...................................................... 1-77
Fuse Panel Description ............................................. 6-39
Fuses ........................................................................ 6-29
GGeneral Checks ........................................................... 6-5
Glove box .................................................................. 1-73
HHazard Warning System ............................................ 1-62
Headlight Aiming Adjustm ent .................................... 6-35
Headlight Bulb ........................................................... 6-37
Headlight Leveling Device S ystem ............................1-64
Heating and Cooling Control ......................................1-83
Page 320 of 490

1
CONTROLS AND EQUIPMENT
41
1. Temperature Gauge
2. Tachometer
3. Speedometer
4. Digital Clock
5. Odometer/Trip Odometer/Trip Computer (Not all models)
6. Fuel Gauge
7. Turn Signal Indicator Light
8. Automatic Transaxle Position Indicator Light (Auto T/A only)
9. Immobiliser Warning Indicator Light
10. SRS (Airbag) Warning Light
11. Electronic Stability Program (ESP) Indicator Light (Not all models)/Traction Control Indicator Light (Not all models) 12. Overdrive off Indicator Light (Not all models)
13. Parking Brake/Low Brake Fluid Level Warning Light
14. Charging System Warning Light
15. Low Fuel Warning Light
16. High Beam Indicator Light
17. Tail Gate Open Warning Light
18. Door Open (Ajar) Warning Light
19. Oil Pressure Warning Light
20. Malfunction Indicator Light (MIL)
21. ABS Warning Light (Not all models)
fcuk-1.p65
12/27/2006, 10:12 AM
41
Page 322 of 490

1
CONTROLS AND EQUIPMENT
43
1. Temperature Gauge
2. Tachometer
3. Speedometer
4. Digital Clock
5. Odometer/Trip Odometer/Trip Computer (Not all models)
6. Fuel Gauge
7. Fuel Filter Warning Light
8. Turn Signal Indicator Light
9. Immobiliser Warning Indicator Light
10. SRS (Airbag) Warning Light
11. Diesel Pre-heat Indicator Light
12. Electronic Stability Program (ESP) Indicator Light (Not all models)/Traction Control Indicator Light (Not all models) 13. Parking Brake/Low Brake Fluid Level Warning Light
14. Charging System Warning Light
15. Low Fuel Warning Light
16. High Beam Indicator Light
17. Tail Gate Open Warning Light
18. Door Open (Ajar) Warning Light
19. Oil Pressure Warning Light
20. Malfunction Indicator Light (MIL)
21. ABS Warning Light (Not all models)
fcuk-1.p65
12/27/2006, 10:12 AM
43
Page 404 of 490

3
IN CASE OF EMERGENCY
5
!
!
!WARNING:
Whilst the engine is running, keep hands and clothing away from mov- ing parts such as the fan and drive belts to prevent injury. 5. If the water pump drive belt is broken
or coolant is leaking out, stop theengine immediately and call the near- est Hyundai authorised repairer for assistance.
WARNING (Diesel only):
Never work on injection system with engine running or within 30 seconds after shutting off engine. High pres-sure pump, rail, injectors and high pressure pipes are subject to high pressure even after the enginestopped. The fuel jet produced by fuel leaks may cause serious injury, if it touches the body. People usingpacemakers should not move closer than 30cm etc. to the ECU or wiring harness within the engine roomwhilst engine is running, since the high currents in the Common Rail system produce considerable mag-netic fields.
!
WARNING:
Do not remove the radiator cap when the engine is hot since steam and boiling water may be ejected fromthe radiator resulting in burns or scalding.
6. If the cause of the overheating can- not be found, wait until the engine temperature has returned to normal. Then, if coolant has been lost, care-fully remove the radiator cap and add water to bring the fluid level in the reservoir up to the base of the radia-tor fill opening. Fill the coolant ex- pansion tank to the halfway mark. To ensure the correct water to cool-ant mix is obtained after top up, testing by an authorised repairer is required. 7. Proceed with caution until it is estab-
lished that the engine is operatingnormally. If the engine overheats repeatedly, the advice of a Hyundai authorised repairer should be sought.
CAUTION:
Serious loss of coolant indicatesthere is a leak in the cooling systemand this should be checked as soon as possible by a Hyundai authorised repairer.
fcuk-3.p65 12/27/2006, 10:15 AM
5
Page 416 of 490

4
CORROSION PREVENTION AND APPEARANCE CARE
3
4
APPEARANCE CARE
3VALETING
SE040A2-E Regular cleaning of the exterior paintwork serves two important func- tions. Firstly, the removal of abrasive dirt and contaminants will maintain thelustre of the paintwork and will prevent discolouration and dulling due to pro- longed contact.Secondly, the presence of damage through impact or abrasion will be ap- parent allowing early rectification to bemade thus preventing corrosion from becoming established and spreading beneath the paint film. To avoid "waterspotting" the vehicle should not be washed in direct sunlight particularly in the case of vehicles having dark bodycolours. The heat from the sun rays is absorbed by the paint film increasing the surface temperature. This actioncauses water used for washing to evaporate quickly leaving behind the deposits from the water and the sham-poo used. Use only a shampoo intended for the purpose and ensure that the body workis thoroughly wet to soften the dirt film prior to attempting to remove this. After removing the dirt film with a soft sponge, the body work should be thor-oughly rinsed and then dried with a good quality chamois leather to prevent streak- ing or spotting of the paint work.Household detergents, solvents and abra- sive cleaning materials should not be used in order to avoid damaging the paint film.Plastic wheel covers should be cleaned using a sponge and water. Cast alloy wheels should be cleaned using a mildsoap or neutral detergent. Abrasive compounds must not be used since in the event of these damaging the lac-
quer coating, oxidization of the aluminium wheel will occur, spoiling the appearance. The use of a toothbrush will facilitatecleaning between the wheel "spokes".
CAUTION:
!
o Water washing in the engine com- partment including high pressure water washing may cause the fail- ure of electrical circuits located in the engine compartment.
o Never allow water or other liquids to come in contact with electrical/electronic components inside thevehicle as this may damage them.
OJB037800
fcuk-4.p65 12/27/2006, 10:15 AM
3
Page 424 of 490
5VEHICLE MAINTENANCE REQUIREMENTS
6
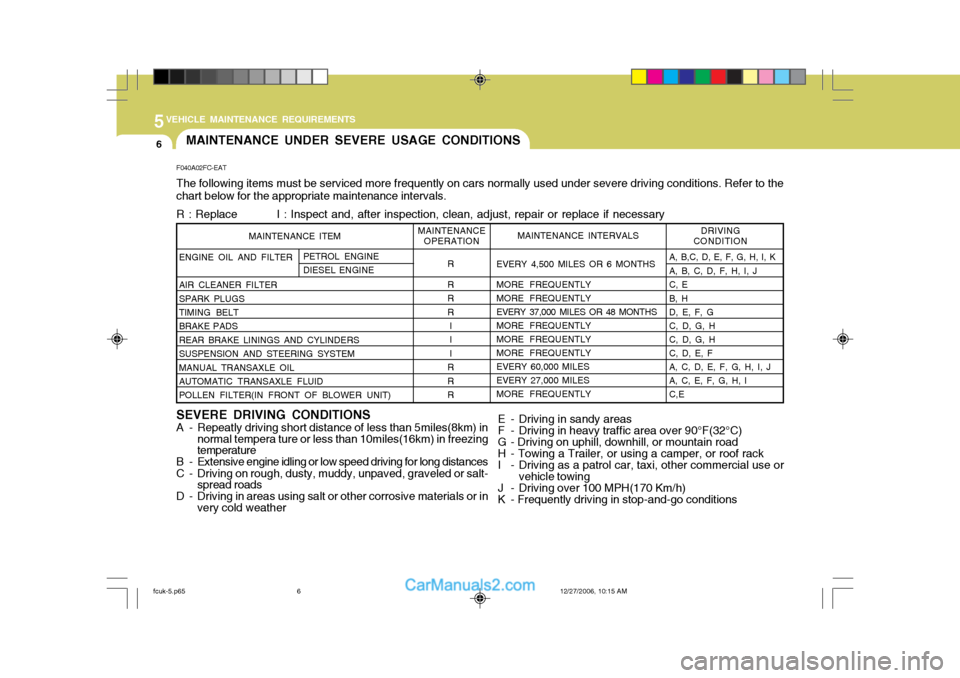
ENGINE OIL AND FILTER AIR CLEANER FILTER SPARK PLUGS TIMING BELT BRAKE PADSREAR BRAKE LININGS AND CYLINDERSSUSPENSION AND STEERING SYSTEMMANUAL TRANSAXLE OIL AUTOMATIC TRANSAXLE FLUID POLLEN FILTER(IN FRONT OF BLOWER UNIT) A, B,C, D, E, F, G, H, I, KA, B, C, D, F, H, I, JC, EB, HD, E, F, G C, D, G, HC, D, G, HC, D, E, FA, C, D, E, F, G, H, I, JA, C, E, F, G, H, IC,E
R R RR
I I I
RRR DRIVING
CONDITION
EVERY 4,500 MILES OR 6 MONTHS MORE FREQUENTLY MORE FREQUENTLY
EVERY 37,000 MILES OR 48 MONTHSMORE FREQUENTLYMORE FREQUENTLYMORE FREQUENTLYEVERY 60,000 MILESEVERY 27,000 MILESMORE FREQUENTLY MAINTENANCE INTERVALS
F040A02FC-EAT The following items must be serviced more frequently on cars normally used under severe driving conditions. Refer to the chart below for the appropriate maintenance intervals.
R : Replace I : Inspect and, after inspection, clean, adjust, repair or replace if necessary
SEVERE DRIVING CONDITIONS
A - Repeatly driving short distance of less than 5miles(8km) in
normal tempera ture or less than 10miles(16km) in freezing temperature
B - Extensive engine idling or low speed driving for long distances
C - Driving on rough, dusty, muddy, unpaved, graveled or salt- spread roads
D - Driving in areas using salt or other corrosive materials or in very cold weather
MAINTENANCEOPERATION
MAINTENANCE ITEM
E - Driving in sandy areas
F - Driving in heavy traffic area over 90°F(32°C)
G - Driving on uphill, downhill, or mountain road
H - Towing a Trailer, or using a camper, or roof rack
I - Driving as a patrol car, taxi, other commercial use orvehicle towing
J - Driving over 100 MPH(170 Km/h)
K - Frequently driving in stop-and-go conditions
MAINTENANCE UNDER SEVERE USAGE CONDITIONS
PETROL ENGINE DIESEL ENGINE
fcuk-5.p65
12/27/2006, 10:15 AM
6
Page 427 of 490
5
VEHICLE MAINTENANCE REQUIREMENTS
9
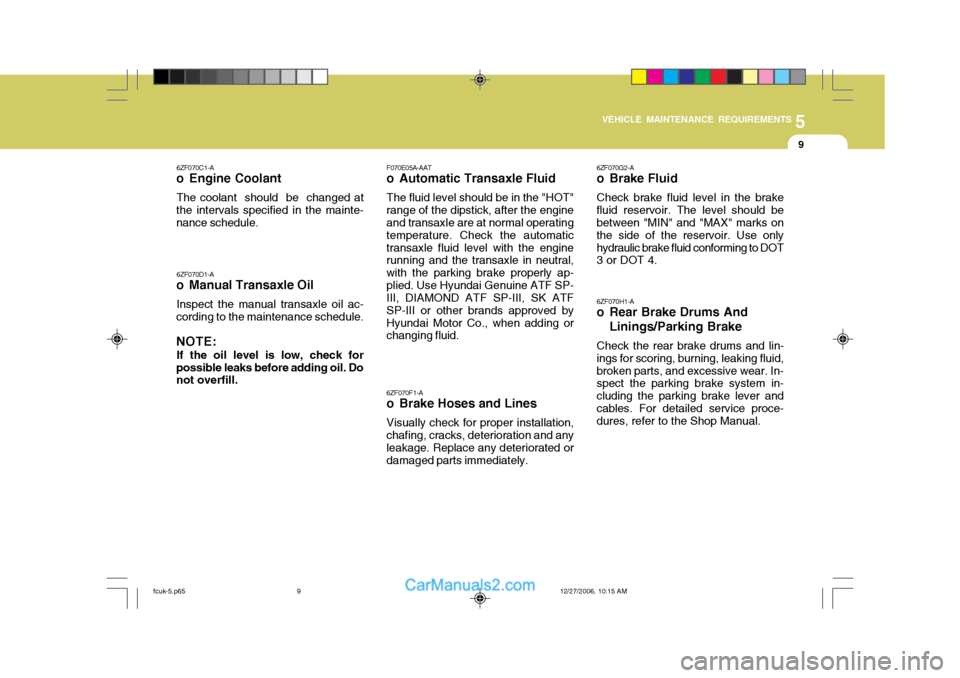
6ZF070F1-A
o Brake Hoses and Lines Visually check for proper installation, chafing, cracks, deterioration and any leakage. Replace any deteriorated or damaged parts immediately. 6ZF070G2-A
o Brake Fluid Check brake fluid level in the brake fluid reservoir. The level should be between "MIN" and "MAX" marks on the side of the reservoir. Use onlyhydraulic brake fluid conforming to DOT 3 or DOT 4.
6ZF070H1-A
o Rear Brake Drums And
Linings/Parking Brake
Check the rear brake drums and lin-
ings for scoring, burning, leaking fluid, broken parts, and excessive wear. In- spect the parking brake system in- cluding the parking brake lever andcables. For detailed service proce- dures, refer to the Shop Manual.
6ZF070D1-A
o Manual Transaxle Oil
Inspect the manual transaxle oil ac-
cording to the maintenance schedule. NOTE:
If the oil level is low, check for
possible leaks before adding oil. Do not overfill. F070E05A-AAT
o Automatic Transaxle Fluid The fluid level should be in the "HOT" range of the dipstick, after the engine and transaxle are at normal operating temperature. Check the automatictransaxle fluid level with the engine running and the transaxle in neutral, with the parking brake properly ap-plied. Use Hyundai Genuine ATF SP- III, DIAMOND ATF SP-III, SK ATF SP-III or other brands approved byHyundai Motor Co., when adding or changing fluid.
6ZF070C1-A
o Engine Coolant
The coolant should be changed at
the intervals specified in the mainte-nance schedule.
fcuk-5.p65 12/27/2006, 10:15 AM
9
Page 434 of 490

6 OWNER MAINTENANCE
6
G030B03FC-EAT
Recommended Oil Diesel Engine
NOTE: SAE 5W-20 (5W-30), ILSAC GF-3 engine oil is preferred regardless ofregional option and engine varia- tion. If SAE 5W-20, ILSAC GF-3 en- gine oil is not available, secondaryrecommended engine oil for corre- sponding temperature range can be used.
G030B01A
The correct engine oil level is of para- mount importance. An excessively high or low oil level may result in irreparable damage being sustained by the engine. The engineoil level must be checked on a daily basis, whenever the vehicle is refu- elled or before starting a long trip,whichever occurs sooner. In addition, it is imperative that only an
approved grade and specification of oilis used to avoid the possibility of serious engine damage and premature wear. The use of "budget price" oil isa false economy that must be avoided if the maximum reliability and useful life is to be obtained from the vehicle.
The engine oil quality should meet the
following classification:
API class: CH-4 or ABOVE ACEA class: B4 or ABOVE NOTE: SAE 0W-30 oil is for use in very cold
zones. Its use should therefore be restricted only to driving in these type of sub-zero conditions. (Espe-cially, not recommended for sus- tained high engine load and high speed operation.)
fcuk-6.p65 12/27/2006, 10:16 AM
6
Page 435 of 490

6
OWNER MAINTENANCE
7
!
SG030C2-E
Engine Oil Level
HFC5007
Petrol engine
G030C02FC
Diesel engine SG030D3-E
Engine Oil Replenishment
HFC5009
Petrol engine
Diesel engine
The engine oil level should be checked with the engine at normal operating temperature and the vehicle parkedupon level ground. If the indicated oil level is at or below the lower mark of the dipstick, oil should be added until the level is at orbelow the upper mark.
WARNING:
Be very careful not to touch the
radiator hose when checking the engine oil as it may be hot enough to burn you. Prior to checking the level, the vehicle
should be allowed to stand for severalminutes after the engine has been switched off to allow the oil to drain back to the sump.
Withdraw the dipstick and wipe it with
a clean rag. Replace the dipstick fullyand withdraw again when the oil levelmay be read from the stick. Normal oil level is indicated when the oil is present between the two marks on the stick. Itis not necessary to add oil if the level is above the lower mark and in any case, oil must not be added to thedegree that the level exceeds the up- per mark. Replace the dipstick fully after checking the level.
G030D03FC
fcuk-6.p65 12/27/2006, 10:16 AM
7
Page 437 of 490

6
OWNER MAINTENANCE
9ENGINE OIL AND FILTER REPLACEMENT
SSA6040A
1.6 DOHC
Oil filler cap
Drain plug
Oil filler
G040A03E
Oil filler cap
Drain plug
Oil filler
1.8 DOHC
SG040A2-E
Petrol engine The engine oil and filter must be changed at the time or mileage inter-val specified in the maintenance sched- ule. If the vehicle is operated under severe or adverse conditions, the oiland filter must be replaced more fre- quently. To replace the oil and filter, proceed as follows:
1. Ensure that the engine is at normal operating temperature and park the vehicle on level ground with the parking brake securely applied andthe engine turned off.
2. Open the bonnet and remove the oil filler cap.
3. Prepare a suitable receptacle to collect the displaced oil and re-move the drain plug from the sump.
CAUTION:
The oil being drained from the en-gine will be hot. Care should beexercised to prevent scalding. 4. When the oil has drained from the
sump, replace the drain plug usinga new gasket ensuring that the plug is not over tightened.
5. Remove the oil filter by rotating counterclockwise, using a propri-etary oil filter removal tool if neces- sary. Note that the oil filter willcontain approximately 0.5 litres of oil and this should be collected in a suitable receptacle.
6. Install a new oil filter having smeared
the sealing ring with clean oil androtating clockwise until the filter contacts the mounting and then a further one half turn. Do not over-tighten Tightening torque: 2.3 ~ 2.5 kgf.m
7. Remove the engine oil level dip- stick.
8. Pour the specified quantity of the
recommended oil into the engine and replace the filler cap. Start the engine and ensure that no oil leaksexist. Turn off the engine and after a couple minutes, recheck the oil level.
!
fcuk-6.p65 12/27/2006, 10:16 AM
9