brake fluid Hyundai Matrix 2007 Owner's Guide
[x] Cancel search | Manufacturer: HYUNDAI, Model Year: 2007, Model line: Matrix, Model: Hyundai Matrix 2007Pages: 490, PDF Size: 12.81 MB
Page 279 of 490

YOUR VEHICLE AT A GLANCE
F10
B255A02FC-EAT INDICATOR SYMBOLS ON THE INSTRUMENT PANEL * More detailed explanations of these items will be found beginning on page 1-44.
SRS (Airbag) Service Reminder
Indicator (Not all models)Turn Signal Indicator Lights
Malfunction Indicator Light
Traction Control Indicator Light (Not all models)
O/D OFF Indicator Light (Not all models)
Parking Brake/Low Brake Fluid Level Warning Light
Charging System Warning LightFuel Filter Warning Light (Diesel) Diesel Pre-heat Indicator Light (Diesel)
Immobilizer Warning Indicator Light (Not all models)
ABS Service Reminder Indicator Light (SRI) (Not all models) High Beam Indicator Light Low Oil Pressure Warning Light
Hatchback Door Open Warning Light
Door Open (Ajar) Warning Light
Low Fuel Level Warning Light
Electronic Stability Program Indicator Lights (Not all models)
fcuk-0.p65 12/27/2006, 10:10 AM
10
Page 320 of 490

1
CONTROLS AND EQUIPMENT
41
1. Temperature Gauge
2. Tachometer
3. Speedometer
4. Digital Clock
5. Odometer/Trip Odometer/Trip Computer (Not all models)
6. Fuel Gauge
7. Turn Signal Indicator Light
8. Automatic Transaxle Position Indicator Light (Auto T/A only)
9. Immobiliser Warning Indicator Light
10. SRS (Airbag) Warning Light
11. Electronic Stability Program (ESP) Indicator Light (Not all models)/Traction Control Indicator Light (Not all models) 12. Overdrive off Indicator Light (Not all models)
13. Parking Brake/Low Brake Fluid Level Warning Light
14. Charging System Warning Light
15. Low Fuel Warning Light
16. High Beam Indicator Light
17. Tail Gate Open Warning Light
18. Door Open (Ajar) Warning Light
19. Oil Pressure Warning Light
20. Malfunction Indicator Light (MIL)
21. ABS Warning Light (Not all models)
fcuk-1.p65
12/27/2006, 10:12 AM
41
Page 322 of 490

1
CONTROLS AND EQUIPMENT
43
1. Temperature Gauge
2. Tachometer
3. Speedometer
4. Digital Clock
5. Odometer/Trip Odometer/Trip Computer (Not all models)
6. Fuel Gauge
7. Fuel Filter Warning Light
8. Turn Signal Indicator Light
9. Immobiliser Warning Indicator Light
10. SRS (Airbag) Warning Light
11. Diesel Pre-heat Indicator Light
12. Electronic Stability Program (ESP) Indicator Light (Not all models)/Traction Control Indicator Light (Not all models) 13. Parking Brake/Low Brake Fluid Level Warning Light
14. Charging System Warning Light
15. Low Fuel Warning Light
16. High Beam Indicator Light
17. Tail Gate Open Warning Light
18. Door Open (Ajar) Warning Light
19. Oil Pressure Warning Light
20. Malfunction Indicator Light (MIL)
21. ABS Warning Light (Not all models)
fcuk-1.p65
12/27/2006, 10:12 AM
43
Page 324 of 490

1
CONTROLS AND EQUIPMENT
45
!
SB210L2-E
Parking Brake/Low Brake Fluid Level Warning Light WARNING:
In the event of problems being sus- pected with the braking system, the advice of the nearest Hyundai authorised repairer must be soughtbefore the vehicle is driven. Driving the vehicle with either an electrical or hydraulic braking system defectmay be dangerous, resulting in acci- dent or personal injury. Warning light operation The parking brake/low brake fluid level warning light will be illuminated when-ever the ignition switch is turned to the "ON" position irrespective of whether or not the parking brake is applied andmust be extinguished when the engine starts and the parking brake released. If the warning light fails to extinguish orilluminates at any other time, the ve- hicle must be brought to rest in a safe location and the level of brake fluid inthe reservoir checked. If the fluid level is incorrect, fluid con- forming to DOT 3 or DOT 4 specifica-tions should be added. If, after correct- ing the brake fluid level, the warning light continues to be illuminated, theadvice of the nearest Hyundai authorised repairer must be sought before the ve- hicle is driven again.The Hyundai Matrix is equipped with a diagonally split dual braking system which will ensure that in the event ofone of the brake circuits becoming defective, approximately fifty per cent of the normal braking performance willbe available.
SB210E1-E
Overdrive Off Indicator
Light (Not all models)
When the overdrive (4th gear) switch is turned off and the operation of overdrive(4th gear) is cancelled, the overdrive warning light (O/D OFF) will be illumi- nated. When the switch is at the onposition, the gearbox will operate in the normal fully automatic mode and the warning light will be extinguished. If failure of one of the circuits occurs,the required amount of pedal effort,pedal travel and stopping distance will be increased. Use of the gearbox is recommended to assist in bringing thevehicle to rest. The vehicle must not be driven once brake failure has occurred until the system has been repaired andis functioning normally. The braking system employs a vacuum servo in order that the pedal efforts arereduced. Power for the servo is derived from the engine and therefore, in the event of the engine stopping or thevehicle being towed, pedal efforts will be substantially increased.
fcuk-1.p65
12/27/2006, 10:12 AM
45
Page 326 of 490

1
CONTROLS AND EQUIPMENT
47
Under normal circumstances, the light will illuminate when the ignition is turned"on" and will be extinguished when the engine is started. If the oil pressure warning light illumi-nates whilst the engine is running, stop the engine immediately and check the engine oil level. If the level is insuffi-cient, add the required amount of oil as indicated by the engine oil dipstick. If the light fails to extinguish when theengine is restarted, do not continue to operate the vehicle. If the oil pressure light illuminates dur-ing normal operation and the cause is not an insufficient oil level, or the light fails to illuminate when the ignition isturned "on", contact the nearest Hyundai authorised repairer before further oper- ating the vehicle. B260N02FC-EAT
Malfunction Indicator
Light
This light illuminates when there is amalfunction of an exhaust gas relatedcomponent, and the system is not func- tioning properly so that the exhaust gas regulation values are not satisfied. Thislight will illuminate when the ignition key is tuned to the "ON" position, and then it will go out after the engine start. If itilluminates whilst driving, or does not illuminate when the ignition key is turned to the "ON" position, take your car toyour nearest Hyundai authorised re- pairer and have the system checked.
!
B260P02Y-EAT ABS Service Reminder Indicator (SRI)(Not all models)
When the key is turned to the "ON" position, the Anti-Lock Brake System SRI will come on and then go off in a approximately seconds. If the ABS SRI remains on, comes on whilst driving, or does not come on when the key is turned to the "ON" position, this indi- cates that there may be a problem with the ABS. If this occurs, have your vehicle checked by your Hyundai authorised repairer as soon as possible. The nor- mal braking system will still be opera- tional, but without the assistance of the anti-lock brake system.
CAUTION:
If the both ABS SRI and Parking Brake/Brake fluid level warning lights re- main "ON" or come on whilst driving,there may be a problem with E.B.D.
(Electronic Brake Force Distribution). If this occurs, avoid sudden stopsand have your vehicle checked by your Hyundai authorised repairer as soon as possible.
fcuk-1.p65 12/27/2006, 10:12 AM
47
Page 385 of 490

2
DRIVING YOUR HYUNDAI
11
DC110G2-E o L (Low Gear): With the selector in this position, first gear will be engaged from rest. Noupshift will occur regardless of vehicle speed and throttle opening. The engine may not be started with the selector inthis position. C090I02A-EAT
CAUTION:
o Shift into "R" and "P" only when the vehicle has completelystopped.
o Do not accelerate the engine in reverse or any of the forward
positions with the brakes applied.
o Always apply the footbrake when shifting from "P" or "N", to "R","D", "2" or "L" position.
o Do not use the "P" (Park) position in place of the parking brake. Al-ways set the parking brake, shiftthe transaxle into "P" (Park) and turn off the ignition when you leave the vehicle, even momentarily.Never leave the vehicle unattend- ed whilst the engine is running.
o Check the automatic transaxle fluid level regularly, and add fluid asnecessary. See the maintenance schedule forthe proper fluid recommendation.
!
DC110E1-E o D (Drive): With the selector in this position, first gear will be engaged from rest and thetransmission will automatically upshift to second, third and fourth depending upon the vehicle speed, throttle posi-tion and the position of the overdrive switch. The engine may not be started with the selector in this position. DC110F1-E o 2 (Second Gear): With the selector in this position, first gear will be engaged from rest. Thetransmission will upshift to second gear depending upon the vehicle speed and throttle position. No upshift to third orfourth will occur. The engine may not be started with the selector in this position.
!
CAUTION:
Do not move the selector to the 2 position when the vehicle speed is in excess of 60 m.p.h.
! CAUTION:
Do not move the selector to the "L" position when the vehicle speed is inexcess of 50 m.p.h. C090H01A-EAT NOTE:
o The brake pedal should be de- pressed when shifting from NEU- TRAL to a forward or reverse gear.
o The brake pedal fully depressed in order to move the shift lever fromthe "P" (Park) position to any of the other posi-tions.
o It is always possible to shift from "R", "N", "D", "2", "L" position.
fcuk-2.p65 12/27/2006, 10:14 AM
11
Page 399 of 490

2
DRIVING YOUR HYUNDAI
25
15. If you have to stop whilst going uphill, do not hold the vehicle in place by pressing on the accelera- tor. This can cause the automatic transaxle to overheat. Use the park-ing brake or footbrake.
NOTE: When towing check transaxle fluid more frequently.
! CAUTION:
If overheating should occur when towing, (temperature gauge readsnear the red zone), taking the follow- ing actions may reduce or eliminate the problem.
1. Turn off the air conditioner.
2. Reduce highway speed.
3. Select a lower gear when going uphill.
4. Whilst in stop and go traffic, place the gear selection in park or neu- tral and idle the engine at a higher speed.
fcuk-2.p65 12/27/2006, 10:14 AM
25
Page 412 of 490

3
IN CASE OF EMERGENCY
13
HFC004!
CAUTION:
o When towing the vehicle, take care not to cause damage to the bumper or underbody of the vehicle.
!
o Do not tow with sling type truck as this may cause damage to the bumper or underbody of the ve- hicle.
1) If the vehicle is being towed with the rear wheels on the ground, be sure the parking brake is released. NOTE: Before towing, check the level of the automatic transaxle fluid. If it is be- low the "HOT" range on the dipstick,add fluid. If you cannot add fluid, a towing dolly must be used.
2) If any of the loaded wheels or sus-
pension components are damaged or the vehicle is being towed with thefront wheels on the ground, use a towing dolly under the front wheels.
o Manual Transaxle: If you do not use a towing dolly, placethe ignition key in the "ACC" position and put the transaxle in "N (Neutral)".
HFC006
CAUTION:
Do not tow with the key removed or in the "LOCK" position when towingfrom the rear without a towing dolly.
o Automatic Transaxle: Be sure to use a towing dolly under the front wheels.
! CAUTION:
A vehicle with an automatic transaxle should never be towed from the rear with the front wheels on the ground. This can cause serious damage tothe transaxle.
3) It is recommended that your vehicle be towed with all the wheels off the ground.
fcuk-3.p65 12/27/2006, 10:15 AM
13
Page 413 of 490
3 IN CASE OF EMERGENCY
14IF YOU LOSE YOUR KEYS
NOTE: Before towing, check the level of the automatic transaxle fluid. If it is be- low the "HOT" range on the dipstick,add fluid. If you cannot add fluid, a towing dolly must be used. D120A01A-EAT Information about the key of immobiliser system will be found on page 1-4.
!
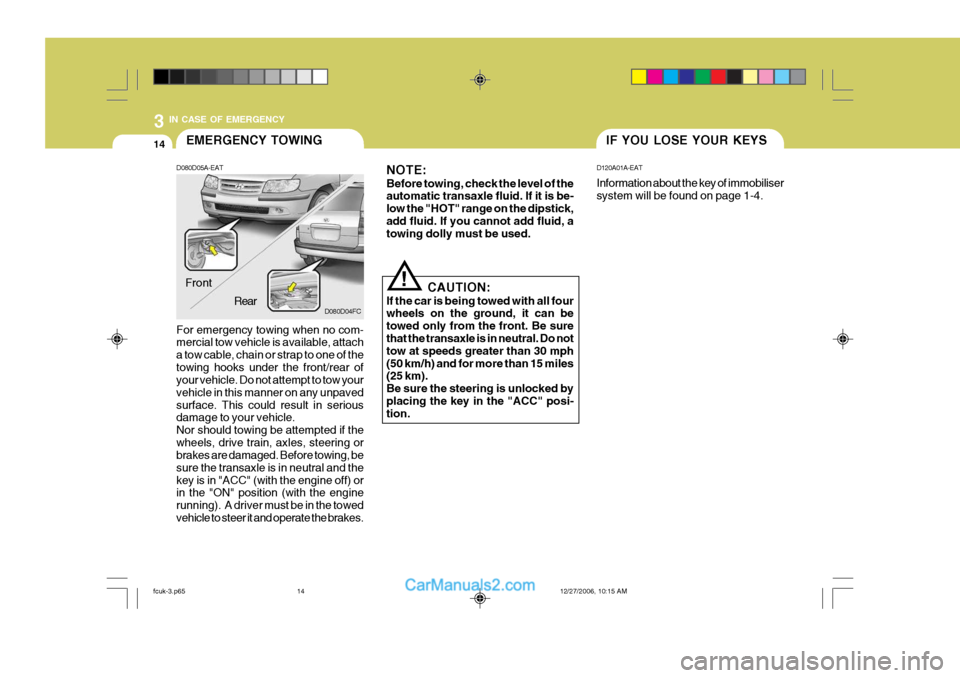
EMERGENCY TOWING
D080D05A-EAT For emergency towing when no com- mercial tow vehicle is available, attach a tow cable, chain or strap to one of thetowing hooks under the front/rear of your vehicle. Do not attempt to tow your vehicle in this manner on any unpavedsurface. This could result in serious damage to your vehicle. Nor should towing be attempted if thewheels, drive train, axles, steering or brakes are damaged. Before towing, be sure the transaxle is in neutral and thekey is in "ACC" (with the engine off) or in the "ON" position (with the engine running). A driver must be in the towedvehicle to steer it and operate the brakes. D080D04FC
Front
Rear CAUTION:
If the car is being towed with all four wheels on the ground, it can be towed only from the front. Be sure that the transaxle is in neutral. Do not tow at speeds greater than 30 mph(50 km/h) and for more than 15 miles (25 km). Be sure the steering is unlocked byplacing the key in the "ACC" posi- tion.
fcuk-3.p65 12/27/2006, 10:15 AM
14
Page 417 of 490

44APPEARANCE CARE
4BUMPER MAINTENANCE
SE040F1-E In the event of the body work sustaining damage, the following points should be noted prior to repairs being undertaken. If body panels are replaced or repaired,anti corrosion treatment must be ap- plied to the repair area. The product used must be compatible with thoseused in manufacture. It is recommended that repairs are entrusted to a Hyundai authorised repairer to ensure that re-placement parts used are of the same high quality as those used in manufac- ture of the vehicle and that the correctrepair methods and materials will en- sure adequate levels of corrosion pro- tection and the continued validity of theAnti Perforation Warranty.
SE040E1-E The special material from which the bumpers are manufactured warrants special attention to preserve the ap- pearance of the bumpers. Avoid con-tact with battery electrolyte or brake fluid and ensure that accidental spill- ages are immediately flushed with wa-ter. Do not use abrasive cleaning materials which may damage the bumpers.Avoid subjecting the bumpers to high temperatures E.g encountered in high bake paint ovens.
BODY WORK REPAIRS
SE040C1-E Polishing The exterior paint work should be pol- ished with a proprietary wax polish when water no longer collects in bead form onthe paint work. The instructions of the product manufacturer should be ad- hered to.
SE040B1-E Stain/Spot Removal Should tree sap, dead insects or tar prove to be difficult to remove from thepaint film, turpentine or a proprietary paint cutting compound may be used. Ensure that the area to be cleaned isnot rubbed intensively to prevent break- ing through the colour coat and expos- ing the under coat.
fcuk-4.p65
12/27/2006, 10:15 AM
4