Hyundai Palisade 2020 Owner's Manual
Manufacturer: HYUNDAI, Model Year: 2020, Model line: Palisade, Model: Hyundai Palisade 2020Pages: 611, PDF Size: 18.86 MB
Page 221 of 611
3-125
Convenient features of your vehicle
3
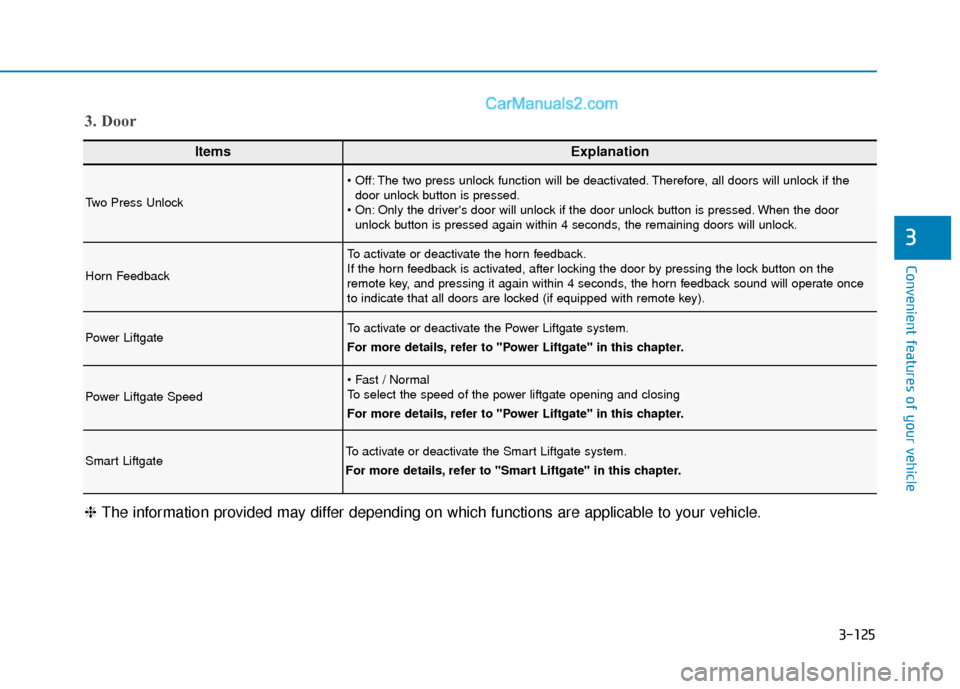
ItemsExplanation
Two Press Unlock
The two press unlock function will be deactivated. Therefore, all doors will unlock if thedoor unlock button is pressed.
Only the driver's door will unlock if the door unlock button is pressed. When the door unlock button is pressed again within 4 seconds, the remaining doors will unlock.
Horn Feedback
To activate or deactivate the horn feedback.
If the horn feedback is activated, after locking the door by pressing the lock button on the
remote key, and pressing it again within 4 seconds, the horn feedback sound will operate once
to indicate that all doors are locked (if equipped with remote key).
Power LiftgateTo activate or deactivate the Power Liftgate system.
For more details, refer to "Power Liftgate" in this chapter.
Power Liftgate Speed
To select the speed of the power liftgate opening and closing
For more details, refer to "Power Liftgate" in this chapter.
Smart LiftgateTo activate or deactivate the Smart Liftgate system.
For more details, refer to "Smart Liftgate" in this chapter.
❈ The information provided may differ depending on which functions are applicable to your vehicle.
3. Door
Page 222 of 611
3-126
Convenient features of your vehicle
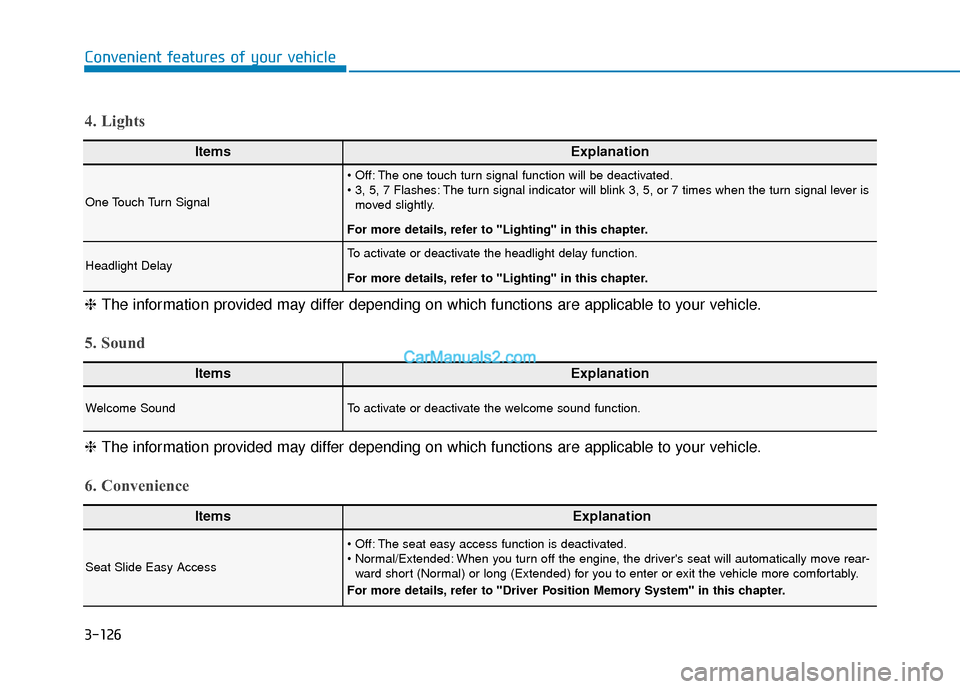
ItemsExplanation
One Touch Turn Signal
The one touch turn signal function will be deactivated.
The turn signal indicator will blink 3, 5, or 7 times when the turn signal lever ismoved slightly.
For more details, refer to "Lighting" in this chapter.
Headlight DelayTo activate or deactivate the headlight delay function.
For more details, refer to "Lighting" in this chapter.
4. Lights
6. Convenience
❈ The information provided may differ depending on which functions are applicable to your vehicle.
5. Sound
ItemsExplanation
Welcome SoundTo activate or deactivate the welcome sound function.
❈The information provided may differ depending on which functions are applicable to your vehicle.
ItemsExplanation
Seat Slide Easy Access
The seat easy access function is deactivated.
When you turn off the engine, the driver's seat will automatically move rear-
ward short (Normal) or long (Extended) for you to enter or exit the vehicle more comfortably.
For more details, refer to "Driver Position Memory System" in this chapter.
Page 223 of 611
3-127
Convenient features of your vehicle
3
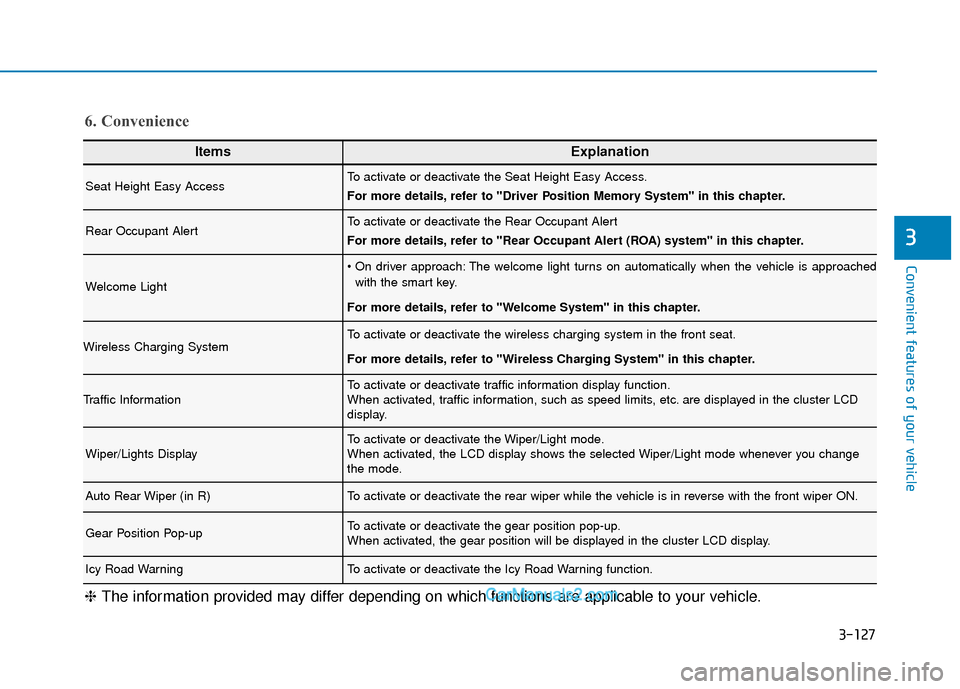
ItemsExplanation
Seat Height Easy AccessTo activate or deactivate the Seat Height Easy Access.
For more details, refer to "Driver Position Memory System" in this chapter.
Rear Occupant AlertTo activate or deactivate the Rear Occupant Alert
For more details, refer to "Rear Occupant Alert (ROA) system" in this chapter.
Welcome Light
The welcome light turns on automatically when the vehicle is approachedwith the smart key.
For more details, refer to ''Welcome System'' in this chapter.
Wireless Charging SystemTo activate or deactivate the wireless charging system in the front seat.
For more details, refer to "Wireless Charging System" in this chapter.
Traffic InformationTo activate or deactivate traffic information display function.
When activated, traffic information, such as speed limits, etc. are displayed in the cluster LCD
display.
Wiper/Lights DisplayTo activate or deactivate the Wiper/Light mode.
When activated, the LCD display shows the selected Wiper/Light mode whenever you change
the mode.
Auto Rear Wiper (in R)To activate or deactivate the rear wiper while the vehicle is in reverse with the front wiper ON.
Gear Position Pop-upTo activate or deactivate the gear position pop-up.
When activated, the gear position will be displayed in the cluster LCD display.
Icy Road WarningTo activate or deactivate the Icy Road Warning function.
6. Convenience
❈ The information provided may differ depending on which functions are applicable to your vehicle.
Page 224 of 611
3-128
Convenient features of your vehicle
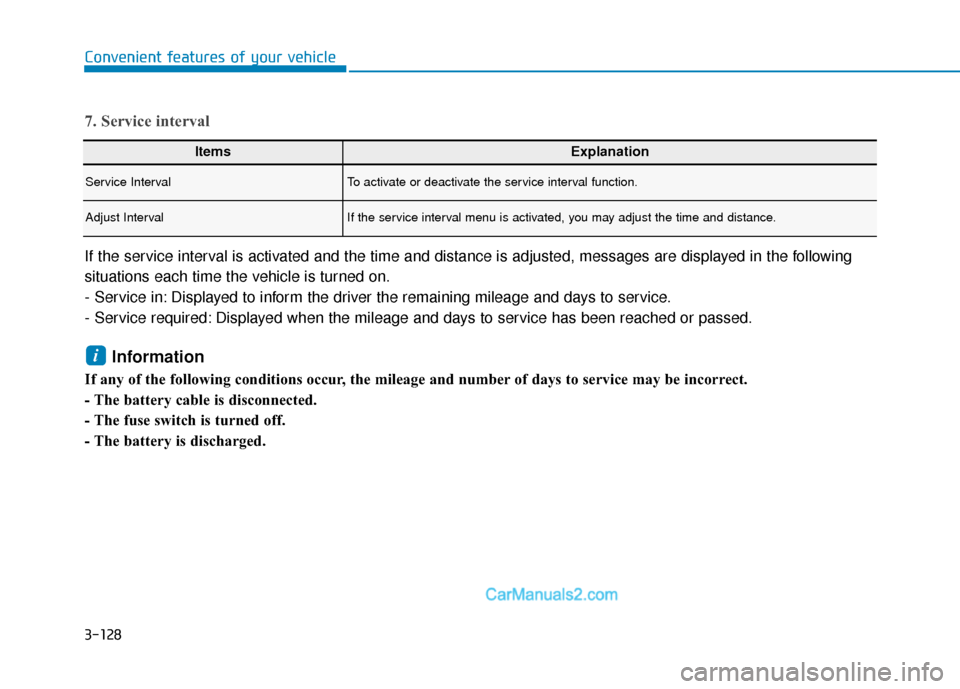
7. Service interval
If the service interval is activated and the time and distance is adjusted, messages are displayed in the following
situations each time the vehicle is turned on.
- Service in: Displayed to inform the driver the remaining mileage and days to service.
- Service required: Displayed when the mileage and days to service has been reached or passed.
Information
If any of the following conditions occur, the mileage and number of days to service may be incorrect.
- The battery cable is disconnected.
- The fuse switch is turned off.
- The battery is discharged.
i
ItemsExplanation
Service IntervalTo activate or deactivate the service interval function.
Adjust IntervalIf the service interval menu is activated, you may adjust the time and distance.
Page 225 of 611
3-129
Convenient features of your vehicle
3
ItemsExplanation
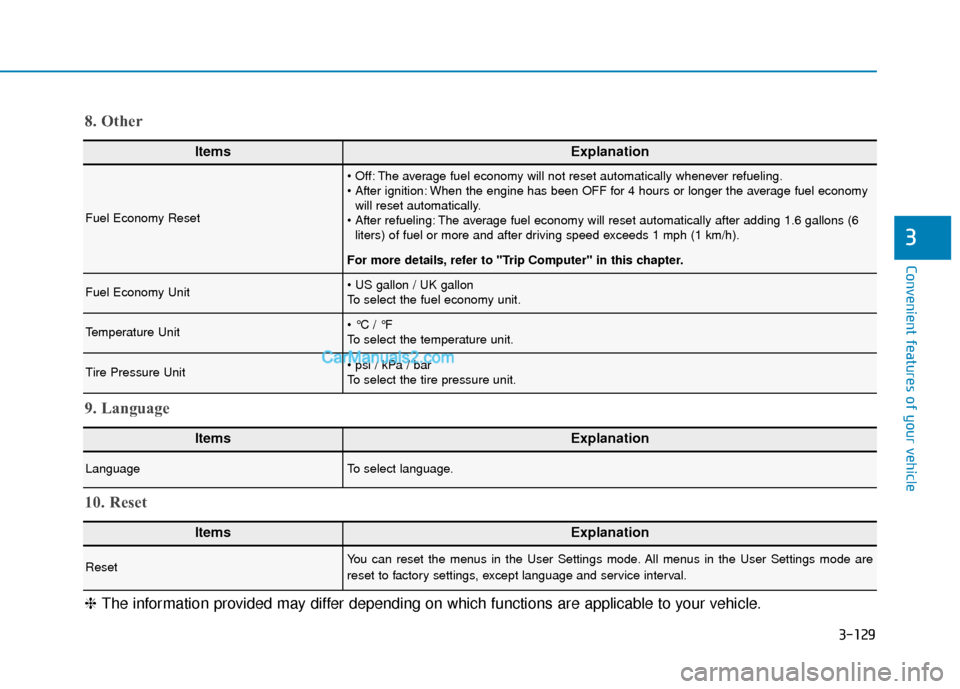
Fuel Economy Reset
The average fuel economy will not reset automatically whenever refueling.
When the engine has been OFF for 4 hours or longer the average fuel economywill reset automatically.
The average fuel economy will reset automatically after adding 1.6 gallons (6 liters) of fuel or more and after driving speed exceeds 1 mph (1 km/h).
For more details, refer to "Trip Computer" in this chapter.
Fuel Economy Unit
To select the fuel economy unit.
Temperature Unit
To select the temperature unit.
Tire Pressure Unit
To select the tire pressure unit.
8. Other
ItemsExplanation
LanguageTo select language.
9. Language
ItemsExplanation
ResetYou can reset the menus in the User Settings mode. All menus in the User Settings mode are
reset to factory settings, except language and service interval.
10. Reset
❈ The information provided may differ depending on which functions are applicable to your vehicle.
Page 226 of 611
3-130
Convenient features of your vehicle
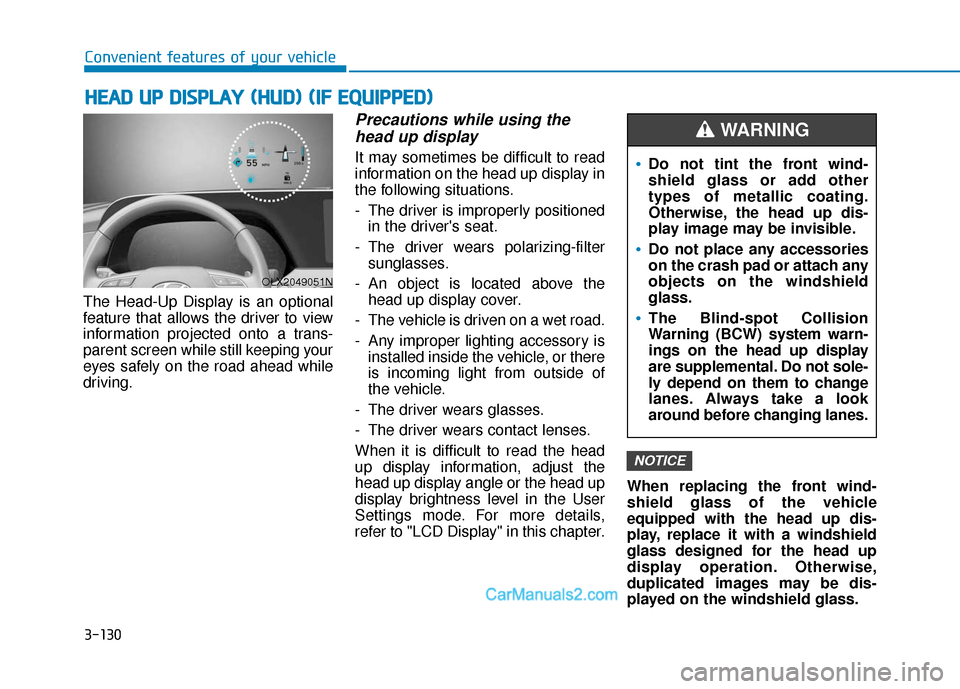
The Head-Up Display is an optional
feature that allows the driver to view
information projected onto a trans-
parent screen while still keeping your
eyes safely on the road ahead while
driving.
Precautions while using the head up display
It may sometimes be difficult to read
information on the head up display in
the following situations.
- The driver is improperly positioned
in the driver's seat.
- The driver wears polarizing-filter sunglasses.
- An object is located above the head up display cover.
- The vehicle is driven on a wet road.
- Any improper lighting accessory is installed inside the vehicle, or there
is incoming light from outside of
the vehicle.
- The driver wears glasses.
- The driver wears contact lenses.
When it is difficult to read the head
up display information, adjust the
head up display angle or the head up
display brightness level in the User
Settings mode. For more details,
refer to "LCD Display" in this chapter. When replacing the front wind-
shield glass of the vehicle
equipped with the head up dis-
play, replace it with a windshield
glass designed for the head up
display operation. Otherwise,
duplicated images may be dis-
played on the windshield glass.
NOTICE
H H
E
EA
A D
D
U
U P
P
D
D I
IS
S P
P L
LA
A Y
Y
(
( H
H U
U D
D)
)
(
( I
IF
F
E
E Q
Q U
UI
IP
P P
PE
ED
D )
)
OLX2049051N
Do not tint the front wind-
shield glass or add other
types of metallic coating.
Otherwise, the head up dis-
play image may be invisible.
Do not place any accessories
on the crash pad or attach any
objects on the windshield
glass.
The Blind-spot Collision
Warning (BCW) system warn-
ings on the head up display
are supplemental. Do not sole-
ly depend on them to change
lanes. Always take a look
around before changing lanes.
WARNING
Page 227 of 611
3-131
Convenient features of your vehicle
3
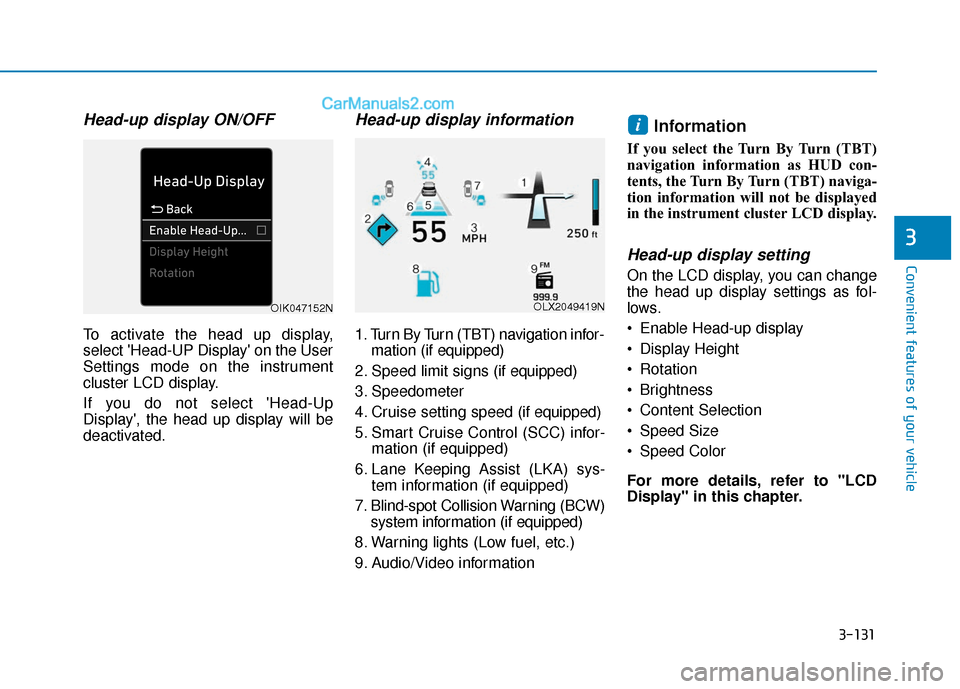
Head-up display ON/OFF
To activate the head up display,
select 'Head-UP Display' on the User
Settings mode on the instrument
cluster LCD display.
If you do not select 'Head-Up
Display', the head up display will be
deactivated.
Head-up display information
1. Turn By Turn (TBT) navigation infor-mation (if equipped)
2. Speed limit signs (if equipped)
3. Speedometer
4. Cruise setting speed (if equipped)
5. Smart Cruise Control (SCC) infor- mation (if equipped)
6. Lane Keeping Assist (LKA) sys- tem information (if equipped)
7. Blind-spot Collision Warning (BCW) system information (if equipped)
8. Warning lights (Low fuel, etc.)
9. Audio/Video information
Information
If you select the Turn By Turn (TBT)
navigation information as HUD con-
tents, the Turn By Turn (TBT) naviga-
tion information will not be displayed
in the instrument cluster LCD display.
Head-up display setting
On the LCD display, you can change
the head up display settings as fol-
lows.
Enable Head-up display
Display Height
Rotation
Brightness
Content Selection
Speed Size
Speed Color
For more details, refer to "LCD
Display" in this chapter.
i
OLX2049419NOIK047152N
Page 228 of 611
3-132
Convenient features of your vehicle
L
LI
IG
G H
H T
TI
IN
N G
G
Exterior Lights
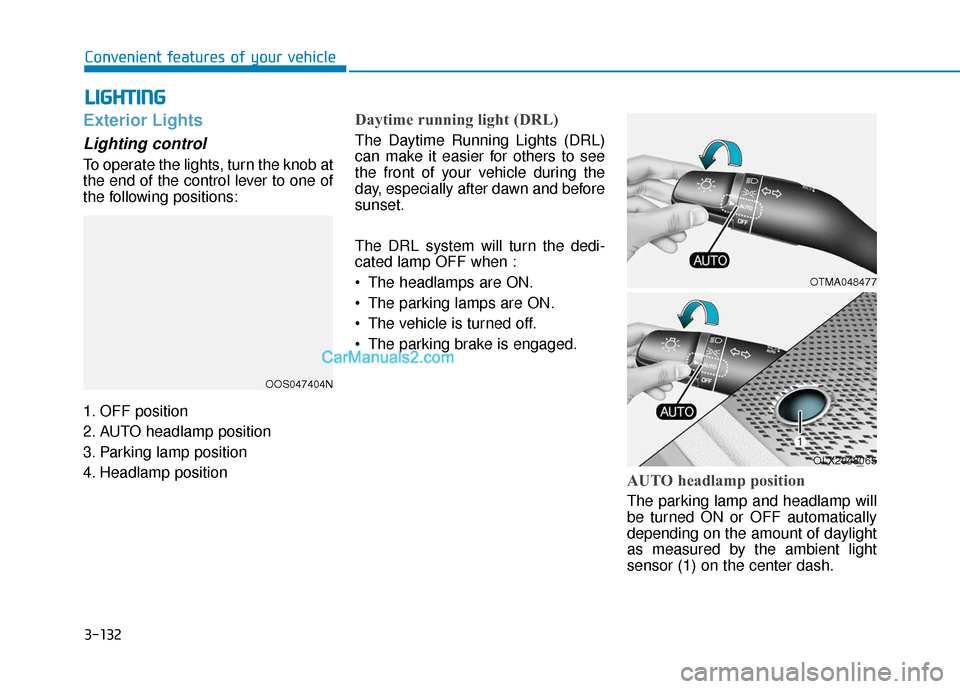
Lighting control
To operate the lights, turn the knob at
the end of the control lever to one of
the following positions:
1. OFF position
2. AUTO headlamp position
3. Parking lamp position
4. Headlamp position
Daytime running light (DRL)
The Daytime Running Lights (DRL)
can make it easier for others to see
the front of your vehicle during the
day, especially after dawn and before
sunset.
The DRL system will turn the dedi-
cated lamp OFF when :
• The headlamps are ON.
The parking lamps are ON.
The vehicle is turned off.
The parking brake is engaged.
AUTO headlamp position
The parking lamp and headlamp will
be turned ON or OFF automatically
depending on the amount of daylight
as measured by the ambient light
sensor (1) on the center dash.
OOS047404N
OTMA048477
OLX2048065
Page 229 of 611
3-133
Convenient features of your vehicle
3
Even with the AUTO headlamp fea-
ture in operation, it is recommended
to manually turn ON the headlamps
when driving at night or in a fog, driv-
ing in the rain, or when you enter
dark areas, such as tunnels and
parking facilities.
• Do not cover or spill anything onthe sensor (1) located in front of
the instrument panel.
Do not clean the sensor using a window cleaner, the cleanser may
leave a light film which could
interfere with sensor operation.
If your vehicle has window tint or other types of metallic coat-
ing on the front windshield, the
AUTO headlamp system may not
work properly.
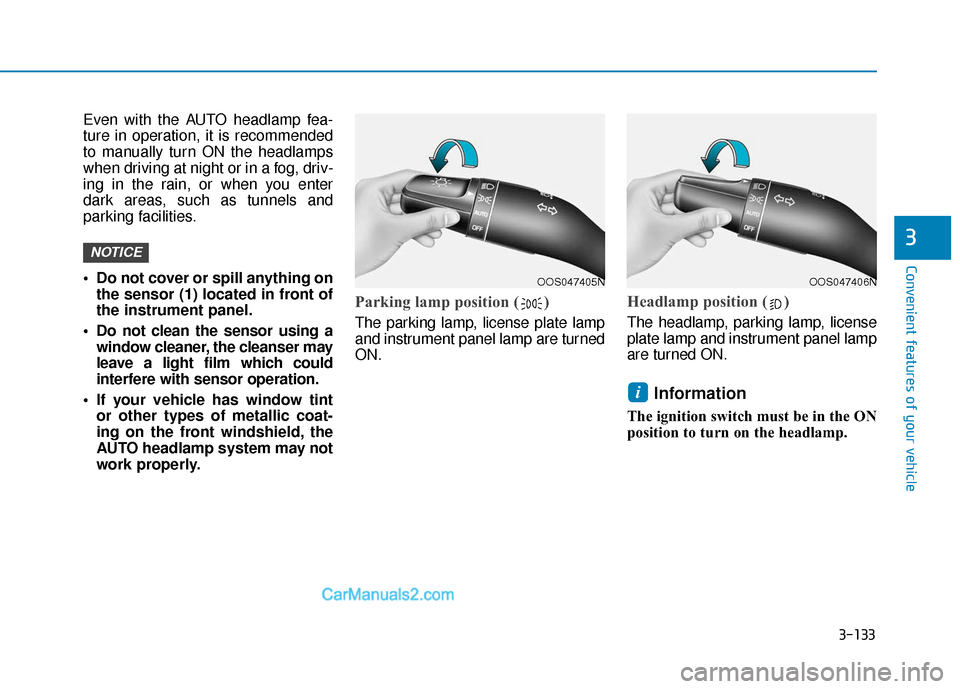
Parking lamp position ( )
The parking lamp, license plate lamp
and instrument panel lamp are turned
ON.
Headlamp position ( )
The headlamp, parking lamp, license
plate lamp and instrument panel lamp
are turned ON.
Information
The ignition switch must be in the ON
position to turn on the headlamp.
i
NOTICE
OOS047405NOOS047406N
Page 230 of 611
3-134
Convenient features of your vehicle
High beam operation
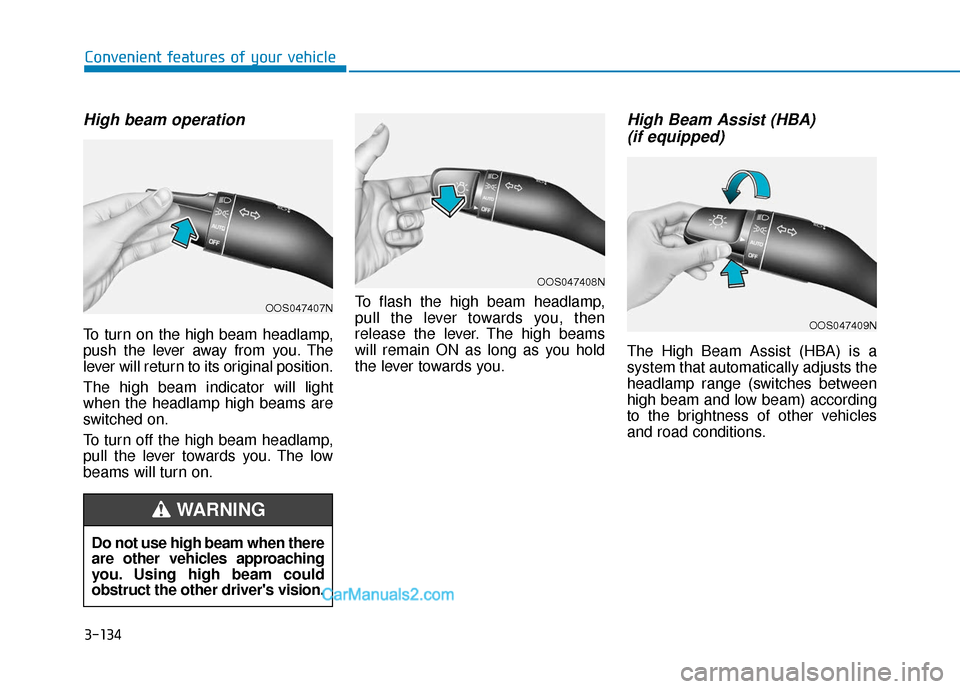
To turn on the high beam headlamp,
push the lever away from you. The
lever will return to its original position.
The high beam indicator will light
when the headlamp high beams are
switched on.
To turn off the high beam headlamp,
pull the lever towards you. The low
beams will turn on.To flash the high beam headlamp,
pull the lever towards you, then
release the lever. The high beams
will remain ON as long as you hold
the lever towards you.
High Beam Assist (HBA)
(if equipped)
The High Beam Assist (HBA) is a
system that automatically adjusts the
headlamp range (switches between
high beam and low beam) according
to the brightness of other vehicles
and road conditions.
Do not use high beam when there
are other vehicles approaching
you. Using high beam could
obstruct the other driver's vision.
WARNING
OOS047407N
OOS047408N
OOS047409N