reset HYUNDAI PALISADE 2021 Owners Manual
[x] Cancel search | Manufacturer: HYUNDAI, Model Year: 2021, Model line: PALISADE, Model: HYUNDAI PALISADE 2021Pages: 612, PDF Size: 33.36 MB
Page 36 of 612
2-19
Safety system of your vehicle
2
Detection of object caught
While folding or unfolding the 3rd row
seat, when a consistent force is
detected, the seat returns to its orig-
inal position or stops operation.
However, this function may not work
when the detected resistance is
below a specific level or the seat is
almost folded or unfolded. When a
strong impact is applied to the seat,
the object detection function may be
activated even if no obstacle is pres-
ent.
When any object caught is detected
multiple times while operating the
seat once, folding and unfolding are
repeated consecutively and then the
operation may stop. In this case,
check that any object is caught and
then operate the switch again to
check for abnormality.
When the object detection is
enabled, the angle of the seat back
may be changed. When you operate
the seat once by pressing the folding
button, the angle of the seat back is
reset.Do not place any part of your
body or anything in the operat-
ing area to intentionally check
the detection of any object
caught.
For safety, when folding or
unfolding the 3rd row seat,
make sure that there is no part
of body or object. To prevent
damage to the seatbelt, insert it
into its holder and store it in the
retractor inside a seat.
When the child restraint system
(CRS) is installed on the 3rd row
seat, remove the CRS and then
operate the seat.
When there is any object on the
cushion of the 3rd row seat,
remove it and then operate the
seat.
To avoid interference with a
front seat, keep the backrest of
the front seat straight and move
it forward for smooth operation.WARNING
Without starting the engine, the
3rd row seat can be folded or
unfolded. When this is attempt-
ed more than 10 times, the bat-
tery may discharge premature-
ly.
Do not apply excessive force to
the 3rd row seat while in opera-
tion. It may damage the seat.
When you operate the seat over
5 times with no rest, the electric
motor may be overloaded. In
this case, the seat changes to
overheat prevention mode.
Then you cannot operate the
seat by pressing the switch.
Leave the seat for over 1 minute
for later operation.
CAUTION
Page 97 of 612
Convenient features of your vehicle
Accessing your vehicle .........................................3-4
Remote Key.........................................................................3-4
Smart Key ............................................................................3-8
Immobilizer System .........................................................3-14
Door locks .............................................................3-15
Operating Door Locks from Outside the Vehicle ....3-15
Operating Door Locks from Inside the Vehicle .......3-16
Automatic Door Lock and Unlock Features .............3-19
Child-Protector Rear Door Locks ...............................3-20
Electronic Child Safety Lock System .........................3-20
Safe Exit Assist (SEA) System .....................................3-21
Rear Occupant Alert (ROA) System ...........................3-23
Theft-alarm system.............................................3-26
Driver position memory system .........................3-27
Storing Positions into Memory ....................................3-27
Recalling Positions from Memory...............................3-28
Resetting the Driver's Seat Memory System...........3-28
Easy Access Function ....................................................3-29
Steering wheel......................................................3-30
Electric Power Steering (EPS) .....................................3-30
Tilt Steering / Telescopic Steering .............................3-31
Horn ....................................................................................3-31
Heated Steering Wheel ..................................................3-32
Mirrors ...................................................................3-33
Inside Rearview Mirror ..................................................3-33
Side View Mirrors ...........................................................3-39
Reverse Parking Aid Function......................................3-41
Windows ................................................................3-42
Power Windows ...............................................................3-43
Sunroof..................................................................3-46
Sunroof ..............................................................................3-46
Dual wide sunroof...........................................................3-46
Sunshade ...........................................................................3-47
Sunroof Opening and Closing ......................................3-48
Sliding the Sunroof .........................................................3-48
Tilting the Sunroof (Front) ...........................................3-49
Resetting the Sunroof ...................................................3-50
Resetting the rear sunshade........................................3-51
Sunroof Open Warning ..................................................3-52
Exterior features .................................................3-53
Hood ...................................................................................3-53
Non-Powered Liftgate ...................................................3-54
Power Liftgate .................................................................3-56
Smart Liftgate ..................................................................3-62
Fuel Filler Door ................................................................3-66
3
Page 122 of 612
3-26
Convenient features of your vehicle
This system helps to protect your vehi-
cle and valuables.The horn will
sound and the hazard warning lights
will blink continuously if any of the
following occur:
- A door is opened without using the
remote key or smart key.
- The liftgate is opened without
using the remote key or smart key.
- The engine hood is opened.
The alarm continues for 30 seconds
(repeats 2 times unless the system is
disarmed), then the system resets.
To turn off the alarm, unlock the
doors with the remote key or smart
key.
The Theft Alarm System automati-
cally sets 30 seconds after you lock
the doors and the liftgate. For the
system to activate, you must lock the
doors and the liftgate from outside
the vehicle with the remote key or
smart key or by pressing the button
on the outside of the door handle
with the smart key in your posses-
sion.
The hazard warning lights will blink
and the chime will sound once to
indicate the system is armed.Once the security system is set,
opening any door, the liftgate, or the
hood without using the remote key or
smart key will cause the alarm to
activate.
The Theft Alarm System will not set if
the hood, the liftgate, or any door is
not fully closed. If the system will not
set, check the hood, the liftgate, or
the doors are fully closed.
Do not attempt to alter this system or
add other devices to it.
Information
• Do not lock the doors until all pas-
sengers have left the vehicle. If the
remaining passenger leaves the
vehicle when the system is armed,
the alarm will be activated.
• If the vehicle is not disarmed with the
remote key or smart key, open the
doors by using the mechanical key
and place the ignition switch in the
ON position (for remote key) or start
the engine (for smart key) by direct-
ly pressing the ignition switch with
the smart key.
• If the system is disarmed by unlock-
ing the vehicle, but neither a door or
the liftgate is opened within 30 sec-
onds, the doors will relock and the
system will rearm automatically.
i
T TH
HE
EF
FT
T-
-A
AL
LA
AR
RM
M
S
SY
YS
ST
TE
EM
M
Page 124 of 612
3-28
Convenient features of your vehicle
Recalling Positions from
Memory
1. Shift to P (Park) while the ignition
switch is in the ON position.
2. Press the desired memory button
(1 or 2). The system will beep
once, and then the driver's seat
position, side view mirror position,
instrument panel illumination
intensity and head-up display
height/brightness will automatical-
ly adjust to the stored positions.
3. "Driver 1 (or 2) settings applied"
will appear on the cluster LCD dis-
play.
Information
• While recalling the "1" memory
position, pressing the SET or 1 but-
ton temporarily stops the adjust-
ment of the recalled memory posi-
tion. Pressing the 2 button recalls
the "2" memory position.
• While recalling the "2" memory
position, pressing the SET or 2 but-
ton temporarily stops the adjust-
ment of the recalled memory posi-
tion. Pressing the 1 button recalls
the "1" memory position.• While recalling the stored positions,
pressing one of the control buttons
for the driver's seat, side view mir-
ror, instrument panel illumination
or head-up display will cause the
movement of that component to stop
and move in the direction that the
control button is pressed.
Resetting the Driver's Seat
Memory System
Take the following procedures to reset
the driver's seat memory system,
when it does not operate properly.
To reset the driver's seat memo-
ry system
1. Place the ignition switch to the ON
position, shift to P (Park), and
open the driver's door.
2. Operate the control switch to set
the driver's seat and seatback to
the foremost position.
3. Simultaneously press the SET
button and push forward the seat
movement switch over 2 seconds.
While resetting the driver's seat
memory system
1. It starts with the notification sound.
2. The driver's seat and seatback is
adjusted to the rearward position
with the notification sound.
3. The driver's seat and seatback is
re-adjusted to the default position
(central position) with the notifica-
tion sound.
However, in the following cases, the
resetting procedure and the notifica-
tion sound may stop.
- The memory button is pressed.
- The control switch is operated.
- The driving speed exceeds 2 mph
(3 km/h).
- The driver's door is closed.
i
Page 125 of 612
3-29
Convenient features of your vehicle
3
Reattempt to do the resetting
procedure again, when the
resetting procedure incomplete-
ly stops or the notification
sound do not stop.
Make sure that there is no obsta-
cle around the driver's seat in
advance of resetting the driver's
seat memory system.
Easy Access Function
The system will move the driver's
seat automatically as follows:
With remote key
- It will move the driver's seat rear-
ward and downward when the igni-
tion key is removed.
- It will move the driver's seat for-
ward and upward when the ignition
key is inserted.
With smart key
- It will move the driver's seat rear-
ward and downward when the
Engine Start/Stop button is
pressed to the OFF position.
- It will move the driver's seat forward
and upward when the Engine
Start/Stop button is pressed to the
ACC or START position.
You can activate or deactivate the
Easy Access Function from the User
Settings mode in the cluster LCD dis-
play.
'Convenience →Seat Slide Easy
Access →Off/Normal/Extended'.
'Convenience→Seat Height Easy
Access'.❈"Seat (upward/downward) Easy
Access" function may not operate
below the specific seat height for
preventing injury of the passenger.
For more details, refer to "LCD
Display" in this chapter.
NOTICE
Driver should be cautious when
using this function to assure no
injury to passenger or child in
the back seat. In case of emer-
gency the driver has to stop
movement of front seat (when
easy access feature is activat-
ed) by pressing SET button or
any of the driver seat control
switches.
CAUTION
If the reset is failed, initialize
the system once again.
Initialize the system after
cleaning the obstacles sur-
rounding of seat.
After completing the initializa-
tion, adjust the driver position
memory system again.
CAUTION
Page 140 of 612
3-44
Convenient features of your vehicle
Auto up/down window
(if equipped)
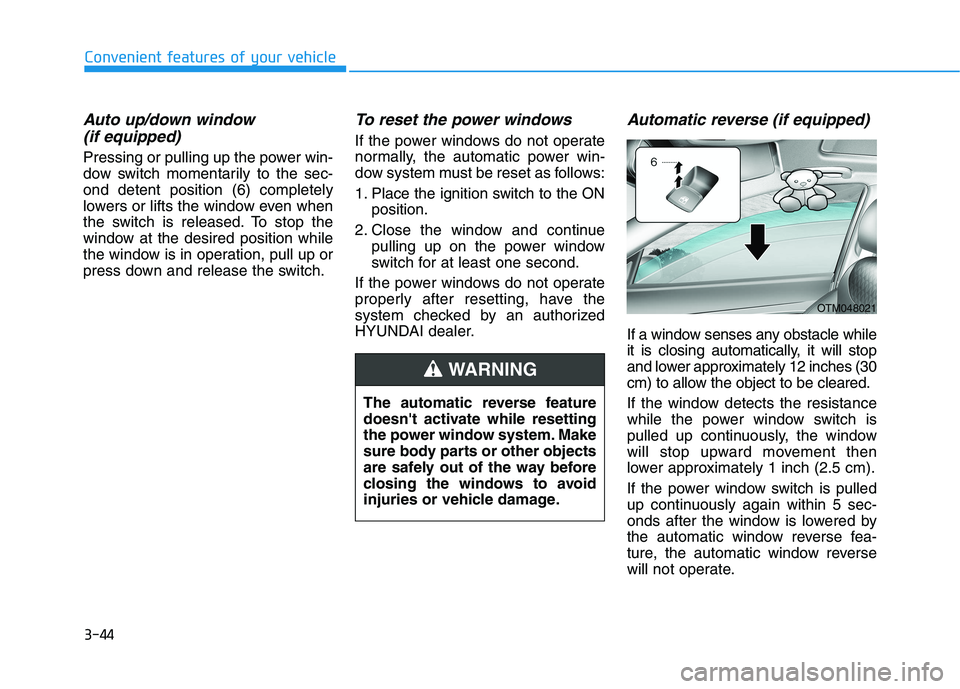
Pressing or pulling up the power win-
dow switch momentarily to the sec-
ond detent position (6) completely
lowers or lifts the window even when
the switch is released. To stop the
window at the desired position while
the window is in operation, pull up or
press down and release the switch.
To reset the power windows
If the power windows do not operate
normally, the automatic power win-
dow system must be reset as follows:
1. Place the ignition switch to the ON
position.
2. Close the window and continue
pulling up on the power window
switch for at least one second.
If the power windows do not operate
properly after resetting, have the
system checked by an authorized
HYUNDAI dealer.
Automatic reverse (if equipped)
If a window senses any obstacle while
it is closing automatically, it will stop
and lower approximately 12 inches (30
cm) to allow the object to be cleared.
If the window detects the resistance
while the power window switch is
pulled up continuously, the window
will stop upward movement then
lower approximately 1 inch (2.5 cm).
If the power window switch is pulled
up continuously again within 5 sec-
onds after the window is lowered by
the automatic window reverse fea-
ture, the automatic window reverse
will not operate. The automatic reverse feature
doesn't activate while resetting
the power window system. Make
sure body parts or other objects
are safely out of the way before
closing the windows to avoid
injuries or vehicle damage.
WARNING
OTM048021
Page 146 of 612
3-50
Convenient features of your vehicle
Periodically remove any dirt that
may accumulate on the sunroof
guide rail or between the sun-
roof and roof panel which can
make a noise.
Do not try to open the sunroof
when the temperature is below
freezing or when the sunroof is
covered with snow or ice, other-
wise the motor could be dam-
aged. In cold and wet climates, the
sunroof may not work properly.
Resetting the Sunroof
The sunroof may need to be reset if
the following conditions occur:
The battery is discharged or dis-
connected or the sunroof fuse has
been replaced or disconnected The sunroof control lever is not
operating correctly
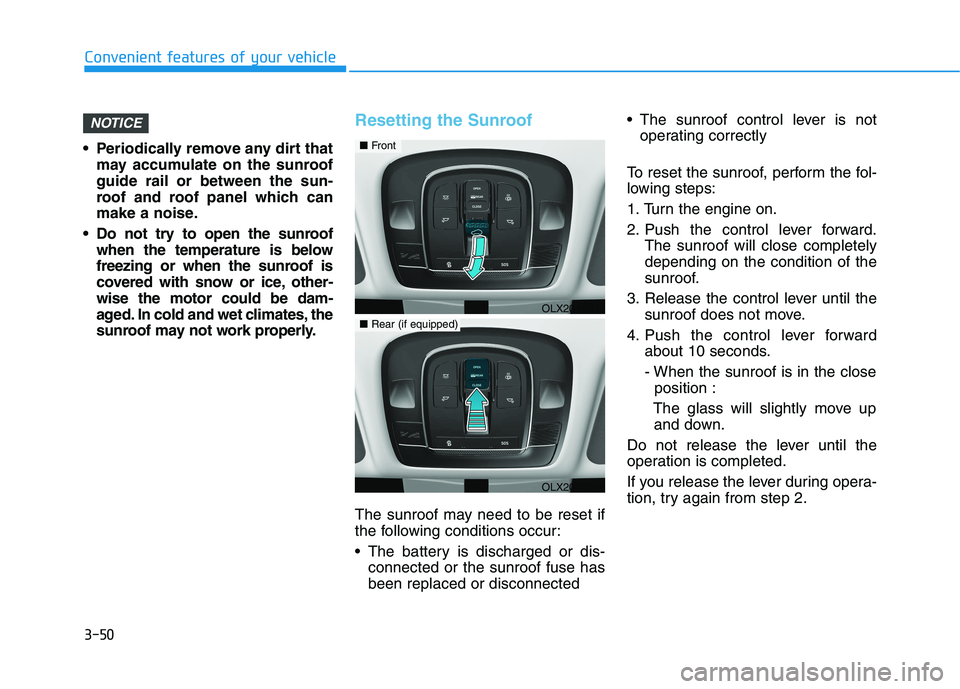
To reset the sunroof, perform the fol-
lowing steps:
1. Turn the engine on.
2. Push the control lever forward.
The sunroof will close completely
depending on the condition of the
sunroof.
3. Release the control lever until the
sunroof does not move.
4. Push the control lever forward
about 10 seconds.
- When the sunroof is in the close
position :
The glass will slightly move up
and down.
Do not release the lever until the
operation is completed.
If you release the lever during opera-
tion, try again from step 2.
NOTICE
OLX2048032
■Front
■Rear (if equipped)
OLX2048098
Page 147 of 612
3-51
Convenient features of your vehicle
5. Within 3 seconds, push the control
lever forward until the sunroof
operates as follows:
Slide Open →Slide Close.
Do not release the lever until the
operation is completed.
If you release the lever during opera-
tion, try again from step 2.
6. Release the sunroof control lever
after all operation has completed.
The sunroof system has been
reset.
Information
If you do not reset the sunroof, it may
not work properly.
Resetting the rear sunshade
(if equipped)
The rear sunshade may need to be
reset if the following conditions
occur:
- Battery is discharged or discon-
nected or the related fuse has been
replaced or disconnected
- The rear sunshade does not nor-
mally operate
To reset the rear sunshade, perform
the following steps:
1. Turn the engine on.
2. Push the rear sunshade CLOSE
button. The rear sunshade will
close completely.
3. Push the rear sunshade CLOSE
button about 10 seconds.The rear sunshade will slightly move.
Do not release the CLOSE button
until the operation is completed.
If you release the CLOSE button, try
again from step 2.
4. Within 3 seconds, push the
CLOSE button until the rear sun-
shade operates as follows :
Open →Close
Do not release the CLOSE button
until the operation is completed.
If you release the CLOSE button dur-
ing operation, try again from step 2.
5. Release the CLOSE button after
all operation has completed.
The rear sunshade system has been
reset.
i
3
Page 157 of 612
3-61
Convenient features of your vehicle
3
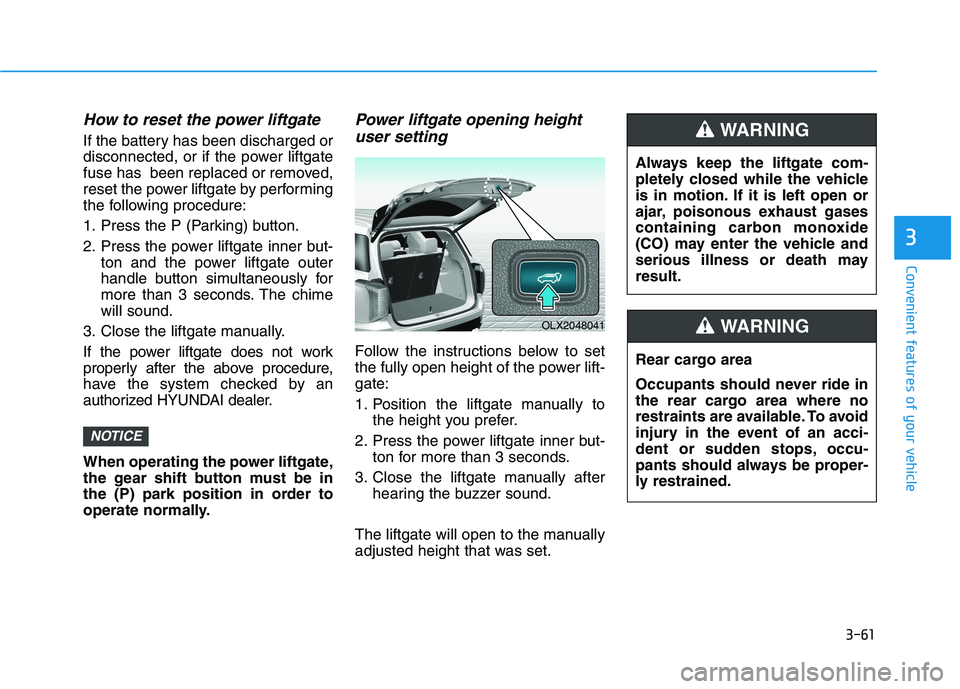
How to reset the power liftgate
If the battery has been discharged or
disconnected, or if the power liftgate
fuse has been replaced or removed,
reset the power liftgate by performing
the following procedure:
1. Press the P (Parking) button.
2. Press the power liftgate inner but-
ton and the power liftgate outer
handle button simultaneously for
more than 3 seconds. The chime
will sound.
3. Close the liftgate manually.
If the power liftgate does not work
properly after the above procedure,
have the system checked by an
authorized HYUNDAI dealer.
When operating the power liftgate,
the gear shift button must be in
the (P) park position in order to
operate normally.
Power liftgate opening height
user setting
Follow the instructions below to set
the fully open height of the power lift-
gate:
1. Position the liftgate manually to
the height you prefer.
2. Press the power liftgate inner but-
ton for more than 3 seconds.
3. Close the liftgate manually after
hearing the buzzer sound.
The liftgate will open to the manually
adjusted height that was set.
NOTICE
Always keep the liftgate com-
pletely closed while the vehicle
is in motion. If it is left open or
ajar, poisonous exhaust gases
containing carbon monoxide
(CO) may enter the vehicle and
serious illness or death may
result.
WARNING
Rear cargo area
Occupants should never ride in
the rear cargo area where no
restraints are available. To avoid
injury in the event of an acci-
dent or sudden stops, occu-
pants should always be proper-
ly restrained.
WARNING OLX2048041
Page 192 of 612
3-96
Convenient features of your vehicle
L LC
CD
D
D
DI
IS
SP
PL
LA
AY
Y
(
(C
CL
LU
US
ST
TE
ER
R
T
TY
YP
PE
E
A
A
A
AN
ND
D
T
TY
YP
PE
E
B
B)
)
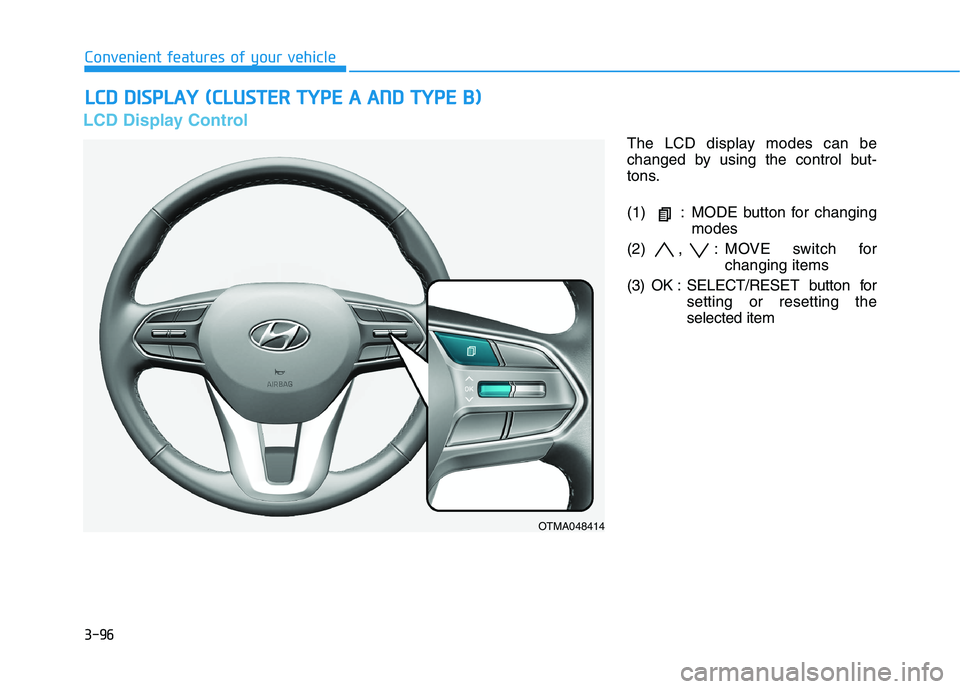
LCD Display Control
The LCD display modes can be
changed by using the control but-
tons.
(1) : MODE button for changing
modes
(2) , : MOVE switch for
changing items
(3) OK : SELECT/RESET button for
setting or resetting the
selected item
OTMA048414