fuel cap HYUNDAI PALISADE 2022 Owners Manual
[x] Cancel search | Manufacturer: HYUNDAI, Model Year: 2022, Model line: PALISADE, Model: HYUNDAI PALISADE 2022Pages: 663, PDF Size: 15.74 MB
Page 7 of 663
F7
Introduction
F FU U E EL L R R E EQ Q U UI IR R E EM M E EN N T TS S
NOTICE indicates a situation
which, if not avoided, could result
in vehicle damage. Your new vehicle is designed to
obtain maximum performance with
UNLEADED FUEL, as well as mini-
mize exhaust emissions and spark
plug fouling.
Your new vehicle is designed to use
only unleaded fuel having an octane
number ((R+M)/2) of 87 (Research
Octane Number 91) or higher. (Do not
use methanol blended fuels)
To prevent damage to the engine
and engine components, never
add any fuel system cleaning
agents to the fuel tank other than
what has been specified.
Consult an authorized HYUNDAI
dealer for additional information.
Gasoline containing alcohol or
methanol
Gasohol, a mixture of gasoline and
ethanol (also known as grain alco-
hol) are being marketed along with or
instead of leaded or unleaded gaso-
line. For example, "E15" is a gasohol
comprised of 15% ethanol and 85%
gasoline.
Do not use gasohol containing more
than 15% ethanol, and do not use
gasoline or gasohol containing any
methanol. Either of these fuels may
cause drivability problems and dam-
age to the fuel system, engine con-
trol system and emission control sys-
tem.
Discontinue using gasohol of any
kind if drivability problems occur.
NOTICE
NOTICE
CAUTION indicates a hazardous
situation which, if not avoided,
could result in minor or moder-
ate injury.
CAUTION
•Do not "top off" after the noz-
zle automatically shuts off
when refueling.
Always check that the fuel cap
is installed securely to pre-
vent fuel spillage in the event
of an accident.
WARNING
Page 175 of 663
3-79
Convenience Features
3
Fuel Filler Door
Opening the fuel filler door
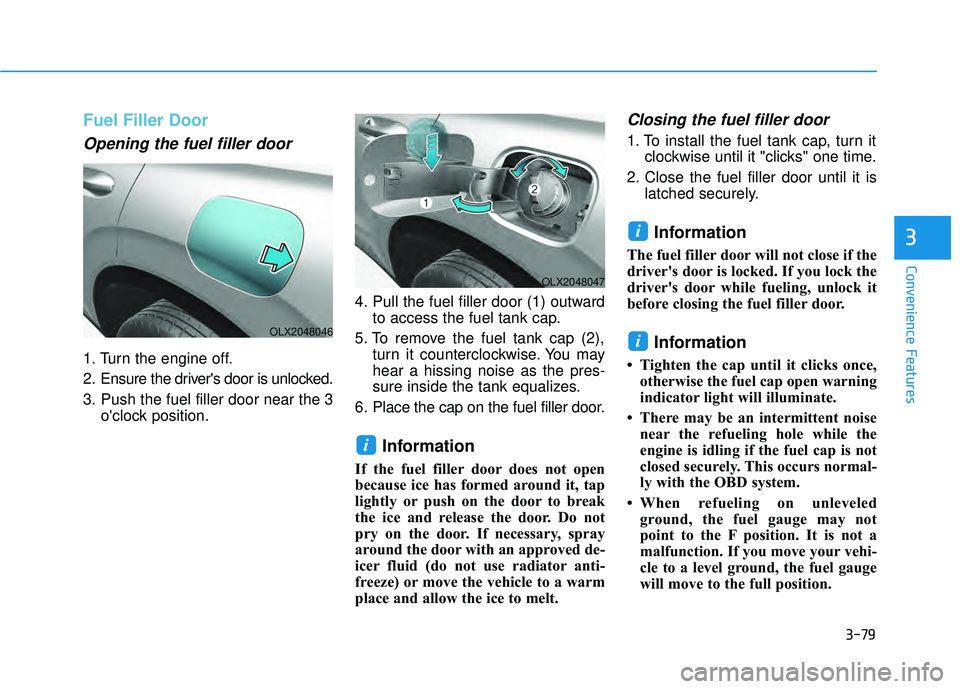
1. Turn the engine off.
2. Ensure the driver's door is unlocked.
3. Push the fuel filler door near the 3o'clock position. 4. Pull the fuel filler door (1) outward
to access the fuel tank cap.
5. To remove the fuel tank cap (2), turn it counterclockwise. You may
hear a hissing noise as the pres-
sure inside the tank equalizes.
6. Place the cap on the fuel filler door.
Information
If the fuel filler door does not open
because ice has formed around it, tap
lightly or push on the door to break
the ice and release the door. Do not
pry on the door. If necessary, spray
around the door with an approved de-
icer fluid (do not use radiator anti-
freeze) or move the vehicle to a warm
place and allow the ice to melt.
Closing the fuel filler door
1. To install the fuel tank cap, turn it clockwise until it "clicks" one time.
2. Close the fuel filler door until it is latched securely.
Information
The fuel filler door will not close if the
driver's door is locked. If you lock the
driver's door while fueling, unlock it
before closing the fuel filler door.
Information
• Tighten the cap until it clicks once,otherwise the fuel cap open warning
indicator light will illuminate.
• There may be an intermittent noise near the refueling hole while the
engine is idling if the fuel cap is not
closed securely. This occurs normal-
ly with the OBD system.
• When refueling on unleveled ground, the fuel gauge may not
point to the F position. It is not a
malfunction. If you move your vehi-
cle to a level ground, the fuel gauge
will move to the full position.
i
i
i
OLX2048046
OLX2048047
Page 176 of 663
3-80
Convenience Features
Do not get back into a vehicle
once you have begun refuel-
ing. You can generate a build-
up of static electricity by
touching, rubbing or sliding
against any item or fabric
capable of producing static
electricity. Static electricity
discharge can ignite fuel
vapors causing a fire. If you
must re-enter the vehicle, you
should once again eliminate
potentially dangerous static
electricity discharge by touch-
ing a metal part of the vehicle,
away from the fuel filler neck,
nozzle or other gasoline
source, with your bare hand.
When using an approved
portable fuel container, be
sure to place the container on
the ground prior to refueling.
Static electricity discharge
from the container can ignite
fuel vapors causing a fire.
Once refueling has begun,
contact between your bare
hand and the vehicle should
be maintained until the filling
is complete.
Use only approved portable
plastic fuel containers designed
to carry and store gasoline.
When refueling, always move
the shift button to the P (Park)
position, set the parking
brake, and place the ignition
switch to the LOCK/OFF posi-
tion. Sparks produced by
electrical components related
to the engine can ignite fuel
vapors causing a fire.
Do not use matches or a
lighter and do not smoke or
leave a lit cigarette in your
vehicle while at a gas station,
especially during refueling.
Gasoline is highly flammable
and explosive. Failure to follow
these guidelines may result in
SERIOUS INJURY or DEATH:
Read and follow all warnings
posted at the gas station.
Before refueling, note the
location of the Emergency
Gasoline Shut-Off, if available,
at the gas station.
Before touching the fuel noz-
zle, you should eliminate the
potential build-up of static
electricity by touching a metal
part of the vehicle, a safe dis-
tance away from the fuel filler
neck, nozzle, or other gas
source, with your bare hand.
Do not use cellular phones
while refueling. Electric cur-
rent and/or electronic interfer-
ence from cellular phones can
potentially ignite fuel vapors
and cause a fire.
WARNING
Page 177 of 663
3-81
Convenience Features
3
Information
Make sure to refuel your vehicle
according to the "Fuel Requirements"
suggested in the Introduction chapter.
Do not spill fuel on the exteriorsurfaces of the vehicle. Any type
of fuel spilled on painted sur-
faces may damage the paint.
If the fuel filler cap requires replacement, use only a genuine
HYUNDAI cap or the equivalent
specified for your vehicle. An
incorrect fuel filler cap can
result in a serious malfunction
of the fuel system or emission
control system.
NOTICE
iDo not over-fill or top-off your
vehicle tank, which can cause
gasoline spillage.
If a fire breaks out during refu-
eling, leave the vicinity of the
vehicle, and immediately con-
tact the manager of the gas
station and then contact the
local fire department. Follow
any safety instructions they
provide.
If pressurized fuel sprays out,
it can cover your clothes or
skin and thus subject you to
the risk of fire and burns.
Always remove the fuel cap
carefully and slowly. If the cap
is venting fuel or if you hear a
hissing sound, wait until the
condition stops before com-
pletely removing the cap.
Always check that the fuel cap
is installed securely to pre-
vent fuel spillage in the event
of an accident.
Page 182 of 663
3-86
Convenience Features
If the gauge pointer moves
beyond the normal range area
toward the "H" position, it indi-
cates overheating that may dam-
age the engine.
Do not continue driving with an
overheated engine. If your vehicle
overheats, refer to "If the Engine
Overheats" in chapter 6.
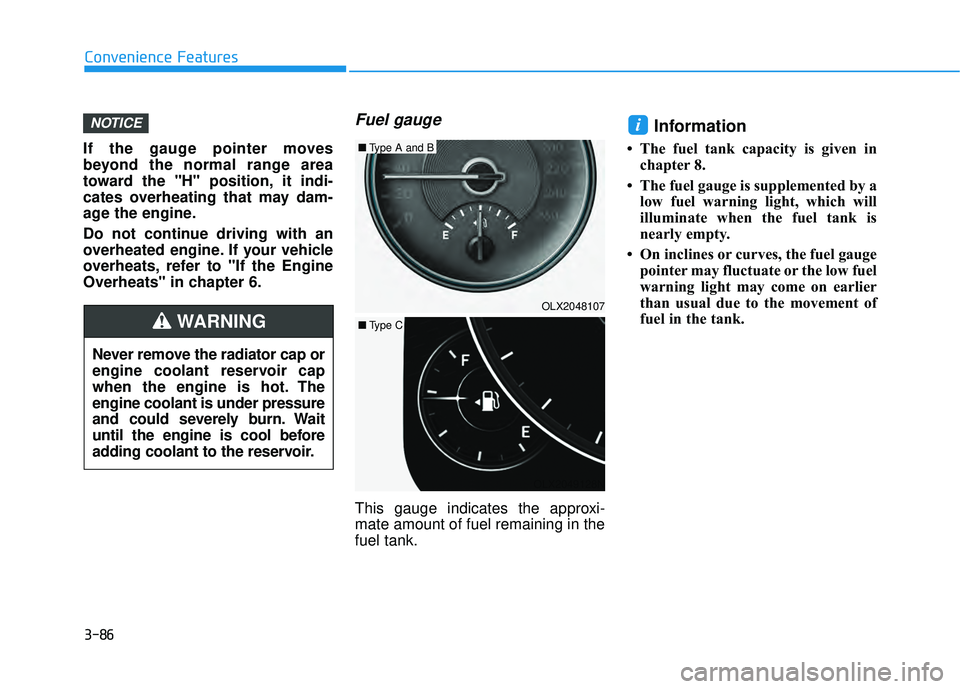
Fuel gauge
This gauge indicates the approxi-
mate amount of fuel remaining in the
fuel tank.
Information
• The fuel tank capacity is given in chapter 8.
• The fuel gauge is supplemented by a low fuel warning light, which will
illuminate when the fuel tank is
nearly empty.
• On inclines or curves, the fuel gauge pointer may fluctuate or the low fuel
warning light may come on earlier
than usual due to the movement of
fuel in the tank.
iNOTICE
Never remove the radiator cap or
engine coolant reservoir cap
when the engine is hot. The
engine coolant is under pressure
and could severely burn. Wait
until the engine is cool before
adding coolant to the reservoir.
WARNING
OLX2049128NOLX2048107
■
Type A and B
■ Type C
Page 515 of 663
5-181
Driving your vehicle
5
Fuel, engine coolant and engineoil
Driving at higher speeds on the high-
way consumes more fuel and is less
efficient than driving at a slower,
more moderate speed. Maintain a
moderate speed in order to conserve
fuel when driving on the highway.
Be sure to check both the engine
coolant level and the engine oil
before driving.
Drive belt
A loose or damaged drive belt may
overheat the engine.
Reducing the Risk of a
Rollover
Your multi-purpose passenger vehi-
cle is defined as a Sports Utility
Vehicle (SUV). SUV's have higher
ground clearance and a narrower
track to make them capable of per-
forming in a wide variety of off-road
applications. The specific design
characteristics give them a higher
center of gravity than ordinary vehi-
cles making them more likely to roll
over if you make abrupt turns. Utility
vehicles have a significantly higher
rollover rate than other types of vehi-
cles. Due to this risk, driver and pas-
sengers are strongly recommended
to buckle their seat belts. In a rollover
crash, an unbelted person is signifi-
cantly more likely to die than a per-
son wearing a seat belt.
There are steps that a driver can
make to reduce the risk of a rollover.
If at all possible, avoid sharp turns or
abrupt maneuvers, do not load your
vehicle with heavy cargo on the roof,
and never modify your vehicle in any
way. Utility vehicles have a signifi-
cantly higher rollover rate than
other types of vehicles. To pre-
vent rollovers or loss of control:
Take corners at slower speeds
than you would with a passen-
ger vehicle.
Avoid sharp turns and abrupt
maneuvers.
Do not modify your vehicle in
any way that you would raise
the center of gravity.
Keep tires properly inflated.
Do not carry heavy cargo on
the roof.
WARNING
Page 532 of 663
5-198
Driving your vehicle
Certification label
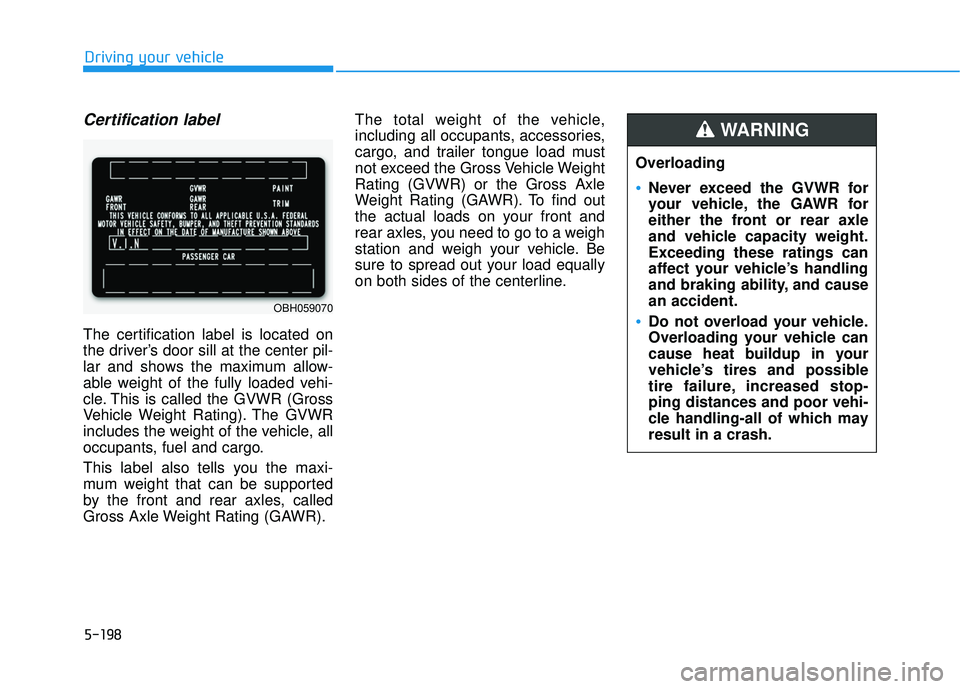
The certification label is located on
the driver’s door sill at the center pil-
lar and shows the maximum allow-
able weight of the fully loaded vehi-
cle. This is called the GVWR (Gross
Vehicle Weight Rating). The GVWR
includes the weight of the vehicle, all
occupants, fuel and cargo.
This label also tells you the maxi-
mum weight that can be supported
by the front and rear axles, called
Gross Axle Weight Rating (GAWR).The total weight of the vehicle,
including all occupants, accessories,
cargo, and trailer tongue load must
not exceed the Gross Vehicle Weight
Rating (GVWR) or the Gross Axle
Weight Rating (GAWR). To find out
the actual loads on your front and
rear axles, you need to go to a weigh
station and weigh your vehicle. Be
sure to spread out your load equally
on both sides of the centerline.
OBH059070
Overloading
Never exceed the GVWR for
your vehicle, the GAWR for
either the front or rear axle
and vehicle capacity weight.
Exceeding these ratings can
affect your vehicle’s handling
and braking ability, and cause
an accident.
Do not overload your vehicle.
Overloading your vehicle can
cause heat buildup in your
vehicle’s tires and possible
tire failure, increased stop-
ping distances and poor vehi-
cle handling-all of which may
result in a crash.
WARNING
Page 569 of 663
Maintenance
7-10
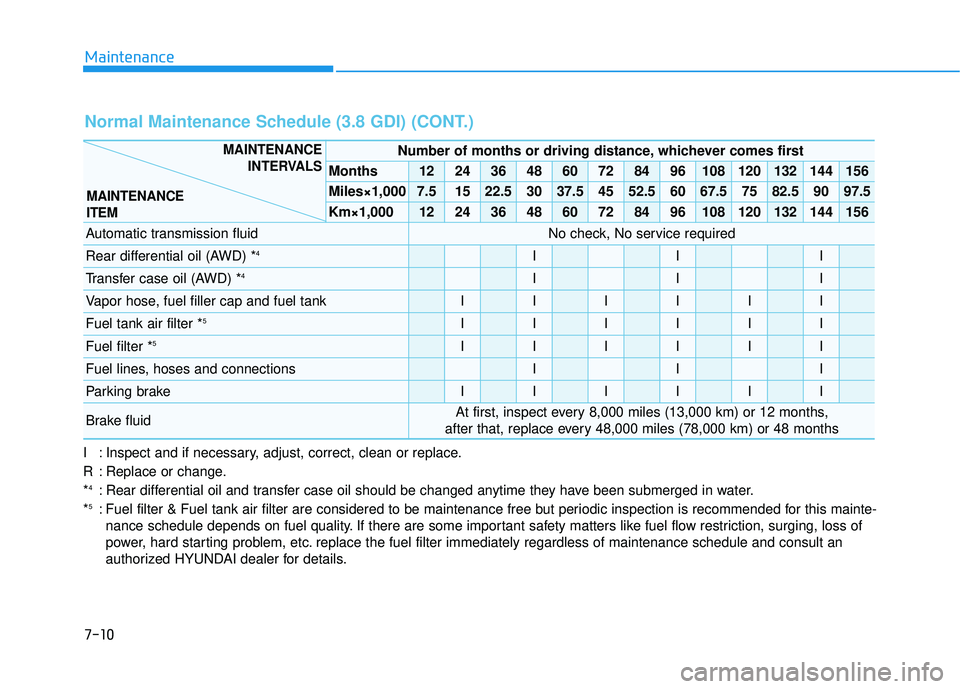
I : Inspect and if necessary, adjust, correct, clean or replace.
R : Replace or change.
*
4: Rear differential oil and transfer case oil should be changed anytime they have been submerged in water.
*5: Fuel filter & Fuel tank air filter are considered to be maintenance free\
but periodic inspection is recommended for this mainte- nance schedule depends on fuel quality. If there are some important safety matters like fuel flow restriction, surging, loss of
power, hard starting problem, etc. replace the fuel filter immediately regardless of maintenance schedule a\
nd consult an
authorized HYUNDAI dealer for details.
Number of months or driving distance, whichever comes first
Months1224364860728496108120132144156
Miles×1,0007.51522.53037.54552.56067.57582.59097.5
Km×1,0001224364860728496108120132144156
Automatic transmission fluidNo check, No service required
Rear differential oil (AWD) *4III
Transfer case oil (AWD) *4III
Vapor hose, fuel filler cap and fuel tankIIIIII
Fuel tank air filter *5IIIIII
Fuel filter *5IIIIII
Fuel lines, hoses and connectionsIII
Parking brakeIIIIII
Brake fluidAt first, inspect every 8,000 miles (13,000 km) or 12 months,
after that, replace every 48,000 miles (78,000 km) or 48 months
MAINTENANCE INTERVALS
MAINTENANCE
ITEM
Normal Maintenance Schedule (3.8 GDI) (CONT.)
Page 572 of 663
7-13
7
Maintenance
E EX X P PL LA A N N A AT TI IO O N N O O F F S S C C H H E ED D U U L LE E D D M M A AI IN N T TE EN N A AN N C CE E I IT T E EM M S S
Engine Oil and Filter
The engine oil and filter should be
changed at the intervals specified in
the maintenance schedule. If the
vehicle is being driven in severe con-
ditions, more frequent oil and filter
changes are required.
Drive Belts
Inspect all drive belts for evidence of
cuts, cracks, excessive wear or oil
saturation and replace if necessary.
Drive belts should be checked peri-
odically for proper tension and
adjusted as necessary.
Fuel Filter
A clogged-up fuel filter may limit the
vehicle driving speed, damage the
emission system, and cause the
hard starting. When a considerable
amount of foreign substances are
accumulated in the fuel tank, the fuel
filter should be replaced.
Upon installing a new fuel filter, oper-
ate the engine for several minutes,
and check the connections for any
leakages. Fuel filters should be
installed by an authorized HYUNDAI
dealer.
Fuel Lines, Fuel Hoses and
Connections
Check the fuel lines, fuel hoses and
connections for leakage and dam-
age. Have an authorized HYUNDAI
dealer replace any damaged or leak-
ing parts immediately.
Vapor Hose and Fuel Filler
Cap
The vapor hose and fuel filler cap
should be inspected at those inter-
vals specified in the maintenance
schedule. Make sure a new vapor
hose or fuel filler cap is correctly
replaced.
Vacuum Crankcase Ventilation
Hoses
Inspect the surface of hoses for evi-
dence of heat and/or mechanical
damage. Hard and brittle rubber,
cracking, tears, cuts, abrasions, and
excessive swelling indicate deterio-
ration. Particular attention should be
paid to examine those hose surfaces
nearest to high heat sources, such
as the exhaust manifold.
Inspect the hose routing to ensure
that the hoses do not come in con-
tact with any heat source, sharp
edges or moving component which
might cause heat damage or
mechanical wear. Inspect all hose
connections, such as clamps and
couplings, to make sure they are
secure, and that no leaks are pres-
ent. Hoses should be replaced
immediately if there is any evidence
of deterioration or damage.
Page 602 of 663
7-43
7
Maintenance
Tire Terminology and
Definitions
Air Pressure
The amount of air inside the tire
pressing outward on the tire. Air
pressure is expressed in pounds per
square inch (psi) or kilopascal (kPa).
Accessory Weight
This means the combined weight of
optional accessories. Some exam-
ples of optional accessories are
automatic transmission, power
seats, and air conditioning.
Aspect Ratio
The relationship of a tire's height to
its width.
Belt
A rubber coated layer of cords that is
located between the plies and the
tread. Cords may be made from steel
or other reinforcing materials.
Bead
The tire bead contains steel wires
wrapped by steel cords that hold the
tire onto the rim.
Bias Ply Tire
A pneumatic tire in which the plies
are laid at alternate angles less than
90 degrees to the centerline of the
tread.
Cold Tire Pressure
The amount of air pressure in a tire,
measured in pounds per square inch
(psi) or kilopascals (kPa) before a tire
has built up heat from driving.
Curb Weight
This means the weight of a motor
vehicle with standard and optional
equipment including the maximum
capacity of fuel, oil and coolant, but
without passengers and cargo.
DOT Markings
A code molded into the sidewall of a
tire signifying that the tire is in com-
pliance with the U.S. Department of
Transportation motor vehicle safety
standards. The DOT code includes
the Tire Identification Number (TIN),
an alphanumeric designator which
can also identify the tire manufactur-
er, production plant, brand and date
of production.
GVWR
Gross Vehicle Weight Rating
GAWR FRT
Gross Axle Weight Rating for the
Front Axle.
GAWR RR
Gross Axle Weight Rating for the
Rear axle.