oil pressure Hyundai Santa Fe 2004 Owner's Manual
[x] Cancel search | Manufacturer: HYUNDAI, Model Year: 2004, Model line: Santa Fe, Model: Hyundai Santa Fe 2004Pages: 253, PDF Size: 22.41 MB
Page 13 of 253
YOUR VEHICLE AT A GLANCE
B255A03O-AAT
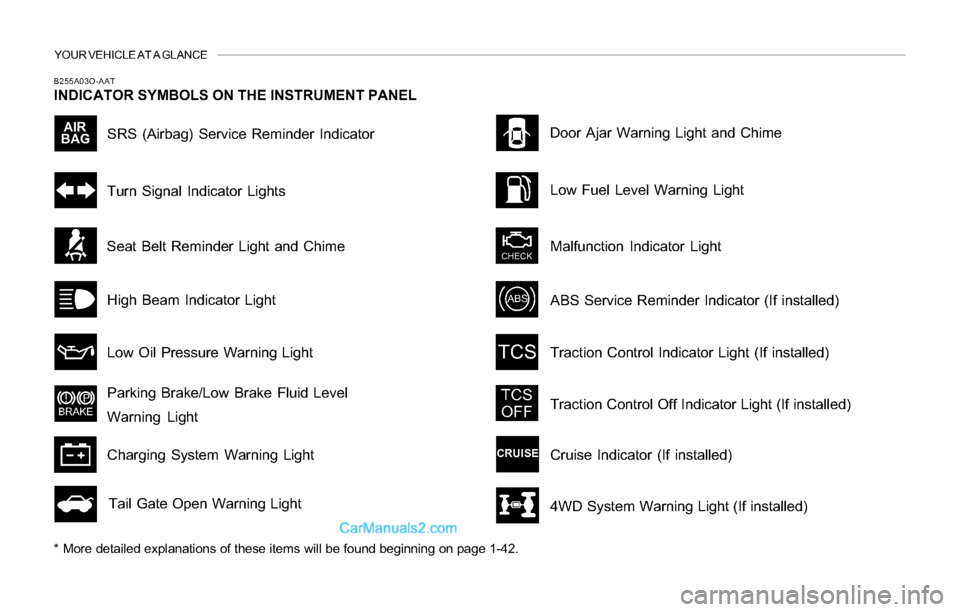
INDICATOR SYMBOLS ON THE INSTRUMENT PANEL
* More detailed explanations of these items will be found beginning on page 1-42.
SRS (Airbag) Service Reminder Indicator
Turn Signal Indicator Lights
High Beam Indicator Light
Low Oil Pressure Warning Light
Parking Brake/Low Brake Fluid Level
Warning Light
Charging System Warning Light
Tail Gate Open Warning LightDoor Ajar Warning Light and Chime
Low Fuel Level Warning Light
Malfunction Indicator Light Seat Belt Reminder Light and Chime
Traction Control Indicator Light (If installed)
Cruise Indicator (If installed)
ABS Service Reminder Indicator (If installed)
4WD System Warning Light (If installed)
Traction Control Off Indicator Light (If installed)
Page 52 of 253
1FEATURES OF YOUR HYUNDAI
39
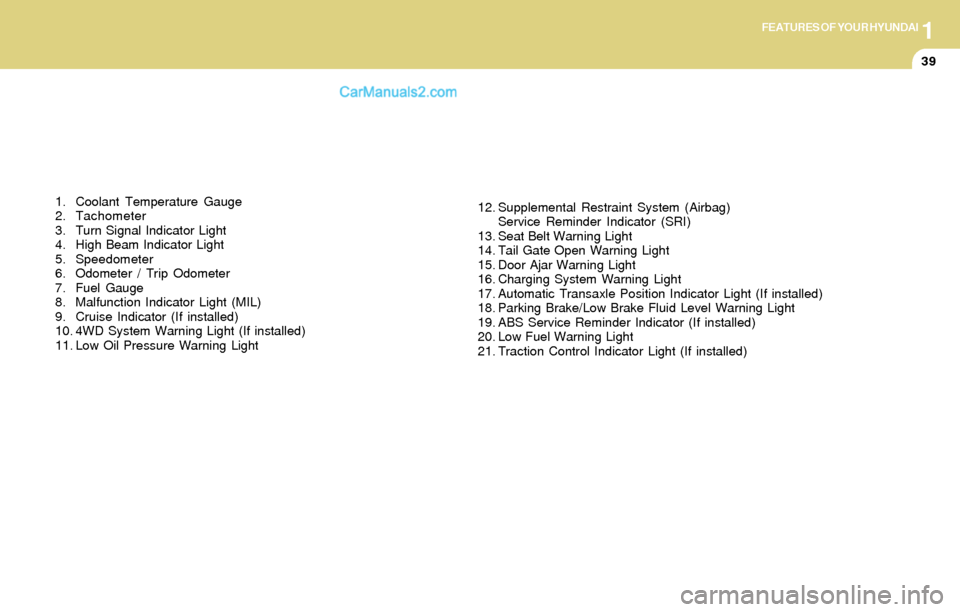
1. Coolant Temperature Gauge
2. Tachometer
3. Turn Signal Indicator Light
4. High Beam Indicator Light
5. Speedometer
6. Odometer / Trip Odometer
7. Fuel Gauge
8. Malfunction Indicator Light (MIL)
9. Cruise Indicator (If installed)
10. 4WD System Warning Light (If installed)
11. Low Oil Pressure Warning Light12. Supplemental Restraint System (Airbag)
Service Reminder Indicator (SRI)
13. Seat Belt Warning Light
14. Tail Gate Open Warning Light
15. Door Ajar Warning Light
16. Charging System Warning Light
17. Automatic Transaxle Position Indicator Light (If installed)
18. Parking Brake/Low Brake Fluid Level Warning Light
19. ABS Service Reminder Indicator (If installed)
20. Low Fuel Warning Light
21. Traction Control Indicator Light (If installed)
Page 54 of 253
1FEATURES OF YOUR HYUNDAI
41
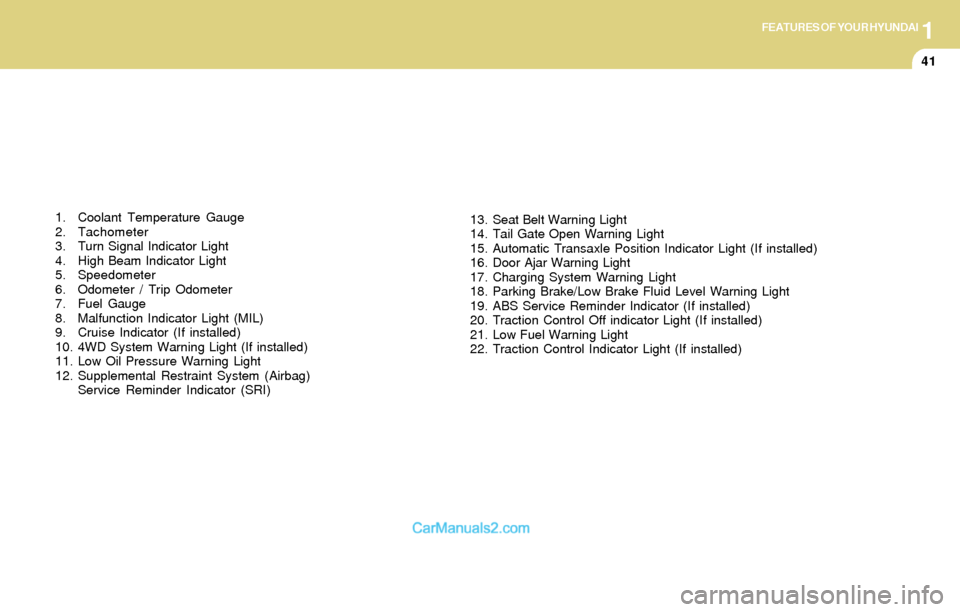
1. Coolant Temperature Gauge
2. Tachometer
3. Turn Signal Indicator Light
4. High Beam Indicator Light
5. Speedometer
6. Odometer / Trip Odometer
7. Fuel Gauge
8. Malfunction Indicator Light (MIL)
9. Cruise Indicator (If installed)
10. 4WD System Warning Light (If installed)
11. Low Oil Pressure Warning Light
12. Supplemental Restraint System (Airbag)
Service Reminder Indicator (SRI)13. Seat Belt Warning Light
14. Tail Gate Open Warning Light
15. Automatic Transaxle Position Indicator Light (If installed)
16. Door Ajar Warning Light
17. Charging System Warning Light
18. Parking Brake/Low Brake Fluid Level Warning Light
19. ABS Service Reminder Indicator (If installed)
20. Traction Control Off indicator Light (If installed)
21. Low Fuel Warning Light
22. Traction Control Indicator Light (If installed)
Page 55 of 253
1FEATURES OF YOUR HYUNDAI
42WARNING AND INDICATOR LIGHTS
B260B01A-AAT
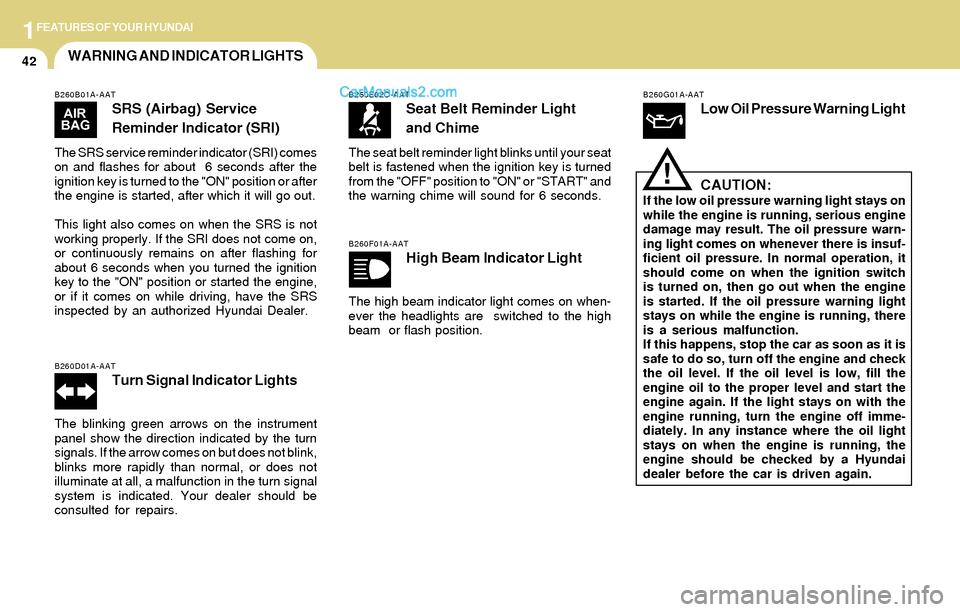
SRS (Airbag) Service
Reminder Indicator (SRI)
The SRS service reminder indicator (SRI) comes
on and flashes for about 6 seconds after the
ignition key is turned to the "ON" position or after
the engine is started, after which it will go out.
This light also comes on when the SRS is not
working properly. If the SRI does not come on,
or continuously remains on after flashing for
about 6 seconds when you turned the ignition
key to the "ON" position or started the engine,
or if it comes on while driving, have the SRS
inspected by an authorized Hyundai Dealer.
B260D01A-AAT
Turn Signal Indicator Lights
The blinking green arrows on the instrument
panel show the direction indicated by the turn
signals. If the arrow comes on but does not blink,
blinks more rapidly than normal, or does not
illuminate at all, a malfunction in the turn signal
system is indicated. Your dealer should be
consulted for repairs.
B260E02O-AAT
Seat Belt Reminder Light
and Chime
The seat belt reminder light blinks until your seat
belt is fastened when the ignition key is turned
from the "OFF" position to "ON" or "START" and
the warning chime will sound for 6 seconds.
B260F01A-AAT
High Beam Indicator Light
The high beam indicator light comes on when-
ever the headlights are switched to the high
beam or flash position.
B260G01A-AAT
Low Oil Pressure Warning Light
CAUTION:
If the low oil pressure warning light stays on
while the engine is running, serious engine
damage may result. The oil pressure warn-
ing light comes on whenever there is insuf-
ficient oil pressure. In normal operation, it
should come on when the ignition switch
is turned on, then go out when the engine
is started. If the oil pressure warning light
stays on while the engine is running, there
is a serious malfunction.
If this happens, stop the car as soon as it is
safe to do so, turn off the engine and check
the oil level. If the oil level is low, fill the
engine oil to the proper level and start the
engine again. If the light stays on with the
engine running, turn the engine off imme-
diately. In any instance where the oil light
stays on when the engine is running, the
engine should be checked by a Hyundai
dealer before the car is driven again.
!
Page 162 of 253
2DRIVING YOUR HYUNDAI
25HIGHER SPEED MOTORING
C170A01A-AAT
Pre-Trip Inspections
1. Tires:
Adjust the tire inflation pressures to specifica-
tion. Low tire inflation pressures will result in
overheating and possible failure of the tires.
Avoid using worn or damaged tires which may
result in reduced traction or tire failure.
NOTE:Never exceed the maximum tire inflation
pressure shown on the tires.
2. Fuel, engine coolant and engine oil:
High speed travel consumes more fuel than
urban motoring. Do not forget to check both
engine coolant and engine oil.
3. Drive belt:
A loose or damaged drive belt may result in
overheating of the engine.
C160K01A-AATCarry Emergency Equipment
Depending on the severity of the weather where
you drive your car, you should carry appropri-
ate emergency equipment. Some of the items
you may want to carry include tire chains, tow
straps or chains, flashlight, emergency flares,
sand, a shovel, jumper cables, a window scraper,
gloves, ground cloth, coveralls, a blanket, etc.
USE OF LIGHTS
C180A01A-AAT
Check your lights regularly for correct opera-
tion and always keep them clean. When driving
during the day in conditions of poor visibility, it
is helpful to drive with headlights on low beam.
This enables you to be seen as well as to see.
Page 199 of 253
6DO-IT-YOURSELF MAINTENANCE
5GENERAL CHECKS
G020C01A-AAT
Vehicle Interior
The following should be checked each time
when the vehicle is driven:
o Lights operation
o Windshield wiper operation
o Horn operation
o Defroster, heating system operation (and air
conditioning, if installed)
o Steering operation and condition
o Mirror condition and operation
o Turn signal operation
o Accelerator pedal operation
o Brake operation, including parking brake
o Manual transaxle operation, including clutch
operation
o Automatic transaxle operation, including
"Park" mechanism operation
o Seat control condition and operation
o Seat belt condition and operation
o Sunvisor operation
If you notice anything that does not operate
correctly or appears to be functioning correctly,
inspect it carefully and seek assistance from
your Hyundai dealer if service is needed.
G020B01A-AAT
Vehicle Exterior
The following should be checked monthly:
o Overall appearance and condition
o Wheel condition and wheel nut torque
o Exhaust system condition
o Light condition and operation
o Windshield glass condition
o Wiper blade condition
o Paint condition and body corrosion
o Fluid leaks
o Door and hood lock condition
o Tire pressure and condition
(including spare tire)
G020A01A-AAT
Engine Compartment
The following should be checked regularly:
o Engine oil level and condition
o Transaxle fluid level and condition
o Brake fluid level
o Clutch fluid level
o Engine coolant level
o Windshield washer fluid level
o Accessory drive belt condition
o Engine coolant hose condition
o Fluid leaks (on or below components)
o Power steering fluid level
o Battery condition
o Air filter condition
Page 202 of 253
6DO-IT-YOURSELF MAINTENANCE
8CHECKING AND CHANGING THE
ENGINE COOLANT
!
!
G050A01A-AAT
WARNING:Do not remove the radiator cap when the
engine is hot. When the engine is hot, the
engine coolant is under pressure and may
erupt through the opening if the cap is
removed. You could be seriously burned if
you do not observe this precaution. Do not
remove the radiator cap until the radiator is
cool to the touch. 4 . When the oil has stopped draining, replace
the drain plug using a new washer and
retighten by turning it clockwise.
Oil pan drain plug tightening torque:
3.5 ~ 4.5 kgf.m
5. Remove the oil filter by turning it counter-
clockwise with a oil filter wrench of the proper
size. A certain amount of oil will come out
when you remove the filter. So be sure to
have your drain pan in place underneath it.
6 . Install a new oil filter in accordance with the
instructions on the carton or on the filter itself.
Do not over-tighten. (Tightening torque :
1.2 ~ 1.6 kgf.m) Be sure that the mounting
surface on the engine is clean and that the
old gasket is removed completely. Lubricate
the new gasket on the filter with clean engine
oil before installation.
7 . Refill the crankcase with the recommended
engine oil. Refer to the specification in chap-
ter 9 for engine oil capacity.
8 . Start the engine and check to be sure no oil
is leaking from the drain plug or oil filter.
9 . Shut off the engine and recheck the oil level.
NOTE:Always dispose of used engine oil in an
environmentally acceptable manner. It is
suggested that it be placed in a sealed
container and taken to a service station for
reclamation. Do not pour the oil on the
ground or put it in with the household
trash.
WARNING:Used motor oil may cause irritation or can-
cer of the skin if left in contact with the skin
for prolonged periods of time. Wash your
hands thoroughly with soap and warm
water as soon as possible after handling
used oil.
!PROPOSITION 65 WARNING:Used engine oil may cause irritation or
cancer of the skin if left in contact with the
skin for prolonged periods of time. Used
engine oil contains chemicals that have
caused cancer in laboratory animals. Al-
ways protect your skin by washing your
hands thoroughly with soap and warm
water as soon as possible after handling
used oil.
Page 219 of 253
6DO-IT-YOURSELF MAINTENANCE
25HEADLIGHT AIMING ADJUSTMENT
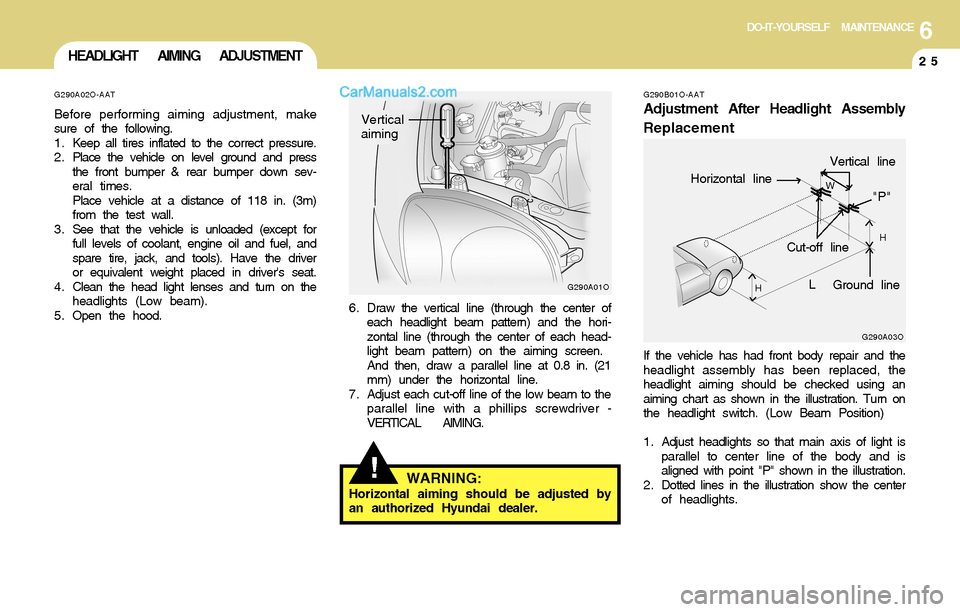
G290B01O-AAT
Adjustment After Headlight Assembly
Replacement
If the vehicle has had front body repair and the
headlight assembly has been replaced, the
headlight aiming should be checked using an
aiming chart as shown in the illustration. Turn on
the headlight switch. (Low Beam Position)
1 . Adjust headlights so that main axis of light is
parallel to center line of the body and is
aligned with point "P" shown in the illustration.
2 . Dotted lines in the illustration show the center
of headlights.
G290A03O
L
W
H
H
Cut-off line
Ground line
"P"
Horizontal line
Vertical line
!
6 . Draw the vertical line (through the center of
each headlight beam pattern) and the hori-
zontal line (through the center of each head-
light beam pattern) on the aiming screen.
And then, draw a parallel line at 0.8 in. (21
mm) under the horizontal line.
7. Adjust each cut-off line of the low beam to the
parallel line with a phillips screwdriver -
VERTICAL AIMING.
WARNING:Horizontal aiming should be adjusted by
an authorized Hyundai dealer.
G290A01O
Vertical
aiming
G290A02O-AAT
Before performing aiming adjustment, make
sure of the following.
1 . Keep all tires inflated to the correct pressure.
2 . Place the vehicle on level ground and press
the front bumper & rear bumper down sev-
eral times.
Place vehicle at a distance of 118 in. (3m)
from the test wall.
3 . See that the vehicle is unloaded (except for
full levels of coolant, engine oil and fuel, and
spare tire, jack, and tools). Have the driver
or equivalent weight placed in driver's seat.
4 . Clean the head light lenses and turn on the
headlights (Low beam).
5 . Open the hood.
Page 243 of 253
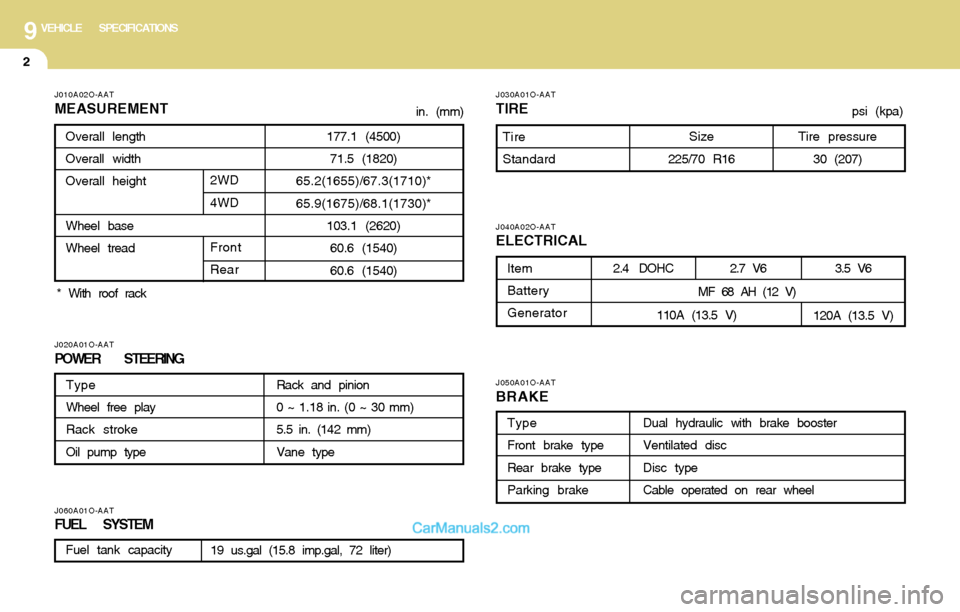
9VEHICLE SPECIFICATIONS
2
J060A01O-AATFUEL SYSTEM
J050A01O-AAT
BRAKE
J040A02O-AATELECTRICAL
J030A01O-AAT
TIRE
J020A01O-AATPOWER STEERING
J010A02O-AAT
MEASUREMENT
177.1 (4500)
71.5 (1820)
65.2(1655)/67.3(1710)*
65.9(1675)/68.1(1730)*
103.1 (2620)
60.6 (1540)
60.6 (1540) Overall length
Overall width
Overall height
Wheel base
Wheel tread
Front
Rear
Type
Wheel free play
Rack stroke
Oil pump typeRack and pinion
0 ~ 1.18 in. (0 ~ 30 mm)
5.5 in. (142 mm)
Vane type
Tire pressure
30 (207)Tire
Standard
Item
Battery
Generator2.4 DOHC2.7 V6
110A (13.5 V)
Dual hydraulic with brake booster
Ventilated disc
Disc type
Cable operated on rear wheel Type
Front brake type
Rear brake type
Parking brake
19 us.gal (15.8 imp.gal, 72 liter)psi (kpa)
Size
225/70 R16Fuel tank capacity
3.5 V6
120A (13.5 V)
MF 68 AH (12 V) 2WD
4WD* With roof rackin. (mm)
Page 253 of 253
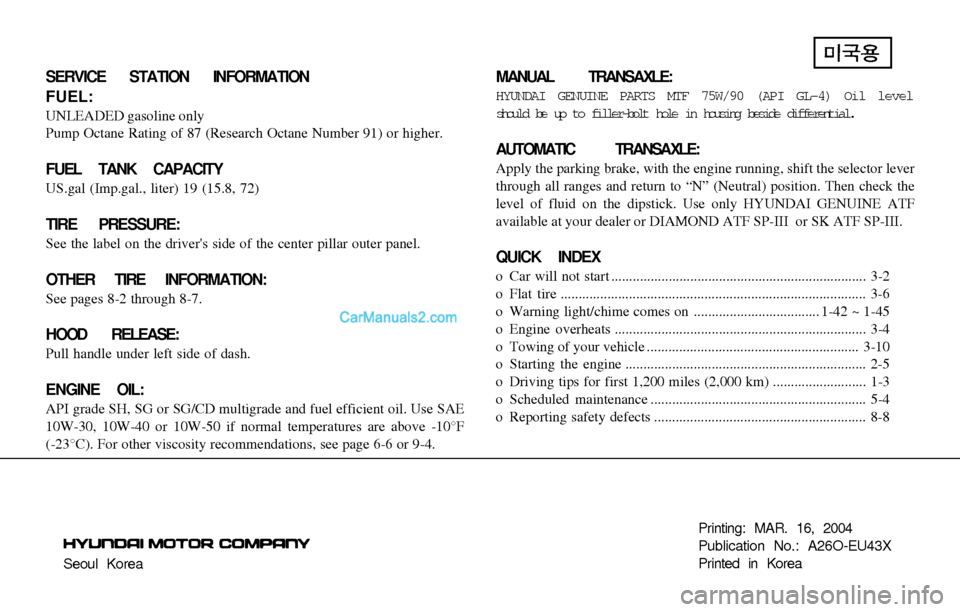
Seoul KoreaPrinting: MAR. 16, 2004
Publication No.: A26O-EU43X
Printed in Korea
SERVICE STATION INFORMATION
FUEL:
UNLEADED gasoline only
Pump Octane Rating of 87 (Research Octane Number 91) or higher.
FUEL TANK CAPACITY
US.gal (Imp.gal., liter) 19 (15.8, 72)
TIRE PRESSURE:
See the label on the driver's side of the center pillar outer panel.
OTHER TIRE INFORMATION:
See pages 8-2 through 8-7.
HOOD RELEASE:
Pull handle under left side of dash.
ENGINE OIL:
API grade SH, SG or SG/CD multigrade and fuel efficient oil. Use SAE
10W-30, 10W-40 or 10W-50 if normal temperatures are above -10°F
(-23°C). For other viscosity recommendations, see page 6-6 or 9-4.
MANUAL TRANSAXLE:
HYUNDAI GENUINE PARTS MTF 75W/90 (API GL-4) Oil level
should be up to filler-bolt hole in housing beside differential.
AUTOMATIC TRANSAXLE:
Apply the parking brake, with the engine running, shift the selector lever
through all ranges and return to “N” (Neutral) position. Then check the
level of fluid on the dipstick. Use only HYUNDAI GENUINE ATF
available at your dealer or DIAMOND ATF SP-III or SK ATF SP-III.
QUICK INDEX
o Car will not start ....................................................................... 3-2
o Flat tire ..................................................................................... 3-6
o Warning light/chime comes on ................................... 1-42 ~ 1-45
o Engine overheats ...................................................................... 3-4
o Towing of your vehicle ........................................................... 3-10
o Starting the engine ................................................................... 2-5
o Driving tips for first 1,200 miles (2,000 km) .......................... 1-3
o Scheduled maintenance ............................................................ 5-4
o Reporting safety defects ........................................................... 8-8