roof Hyundai Santa Fe 2005 Owner's Manual
[x] Cancel search | Manufacturer: HYUNDAI, Model Year: 2005, Model line: Santa Fe, Model: Hyundai Santa Fe 2005Pages: 277, PDF Size: 10.53 MB
Page 12 of 277
1
Fuel Recommendations ................................................ 1-2
Breaking in Your New Hyundai ..................................... 1-3
Keys.............................................................................. 1-3
Door Locks ................................................................... 1-4
Theft-Alarm System ...................................................... 1-8
Power Windows..........................................................1-11
Seats...........................................................................1-12
Seat Belts....................................................................1-19
Child Restraint System ...............................................1-26
Advanced Supplemental Restraint (AIRBAG)
System (SRS) ...........................................................1-34
Instrument Cluster and Indicator Lights...................... 1-46
Warning and Indicator Lights......................................1-48
Trip Computer.............................................................1-55
Multi-Function Light Switch .........................................1-57
Windshield Wiper/Washer Switch...............................1-60
Sunroof.......................................................................1-69
Mirror...........................................................................1-73
Hood Release .............................................................1-85
Cruise Control.............................................................1-89
Heating and Cooling Control .......................................1-92
Stereo Sound System...............................................1-109
Audio System............................................................1-111
Antenna.....................................................................1-138
FEATURES OF YOUR HYUNDAI
1
Page 35 of 277
1FEATURES OF YOUR HYUNDAI24
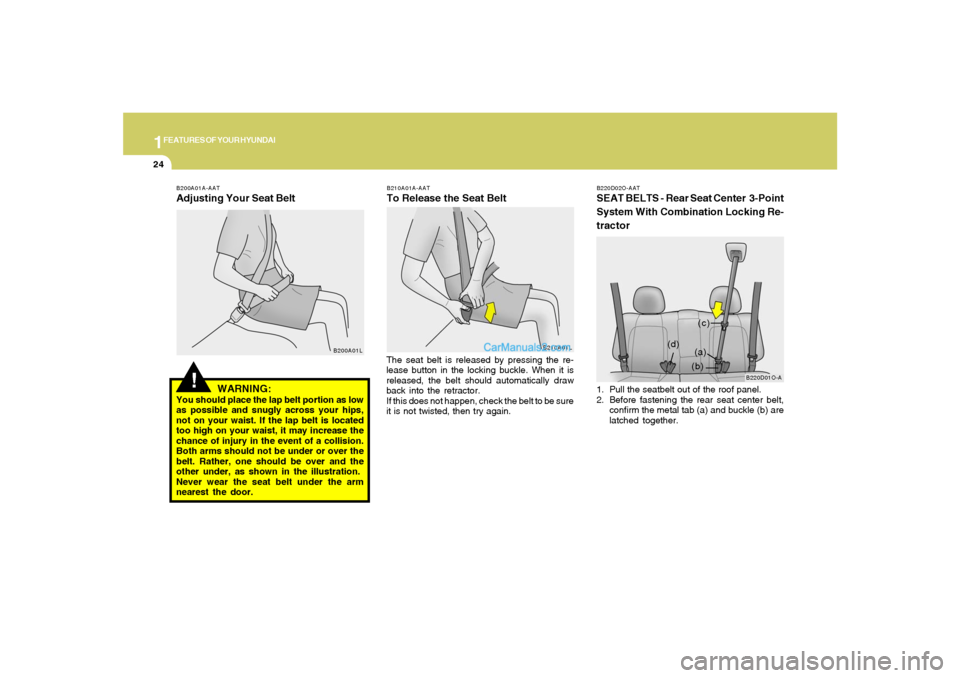
The seat belt is released by pressing the re-
lease button in the locking buckle. When it is
released, the belt should automatically draw
back into the retractor.
If this does not happen, check the belt to be sure
it is not twisted, then try again.
WARNING:
You should place the lap belt portion as low
as possible and snugly across your hips,
not on your waist. If the lap belt is located
too high on your waist, it may increase the
chance of injury in the event of a collision.
Both arms should not be under or over the
belt. Rather, one should be over and the
other under, as shown in the illustration.
Never wear the seat belt under the arm
nearest the door.
B210A01A-AATTo Release the Seat Belt
B210A01L
!
B200A01A-AATAdjusting Your Seat Belt
B200A01L
(b)
B220D02O-AATSEAT BELTS - Rear Seat Center 3-Point
System With Combination Locking Re-
tractor
B220D01O-A
1. Pull the seatbelt out of the roof panel.
2. Before fastening the rear seat center belt,
confirm the metal tab (a) and buckle (b) are
latched together.(a) (d)(c)
Page 74 of 277
1
FEATURES OF YOUR HYUNDAI
63
DIGITAL CLOCK
NOTE:
The ignition must be in the "ON" position
for the rear window defroster to operate.
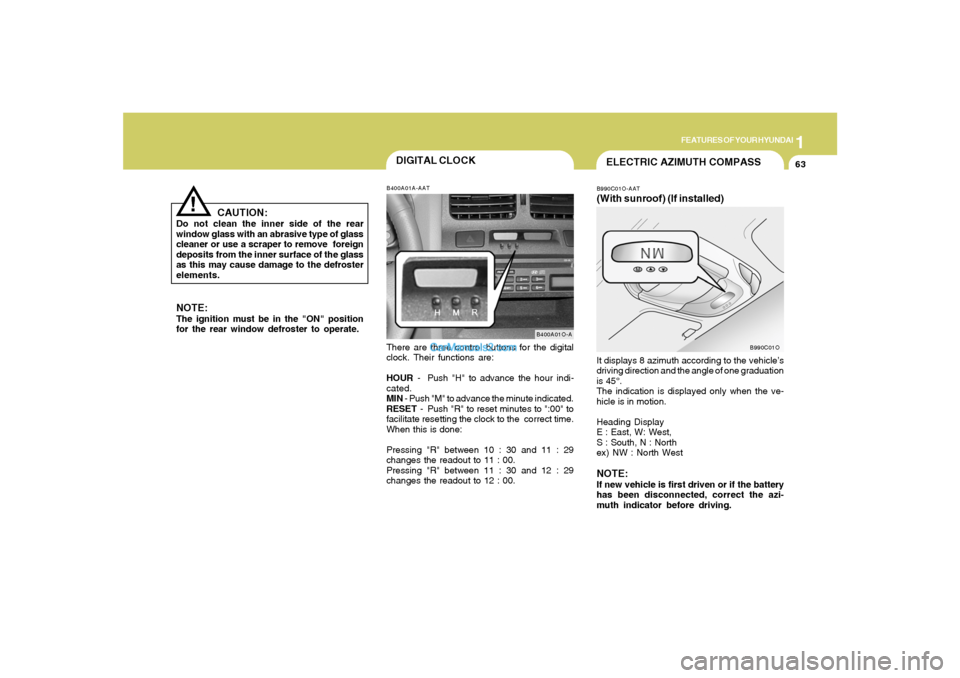
B400A01A-AATThere are three control buttons for the digital
clock. Their functions are:
HOUR - Push "H" to advance the hour indi-
cated.
MIN - Push "M" to advance the minute indicated.
RESET - Push "R" to reset minutes to ":00" to
facilitate resetting the clock to the correct time.
When this is done:
Pressing "R" between 10 : 30 and 11 : 29
changes the readout to 11 : 00.
Pressing "R" between 11 : 30 and 12 : 29
changes the readout to 12 : 00.
B400A01O-A
CAUTION:
Do not clean the inner side of the rear
window glass with an abrasive type of glass
cleaner or use a scraper to remove foreign
deposits from the inner surface of the glass
as this may cause damage to the defroster
elements.
!
ELECTRIC AZIMUTH COMPASSB990C01O-AAT(With sunroof) (If installed)It displays 8 azimuth according to the vehicle’s
driving direction and the angle of one graduation
is 45°.
The indication is displayed only when the ve-
hicle is in motion.
Heading Display
E : East, W: West,
S : South, N : North
ex) NW : North WestNOTE:If new vehicle is first driven or if the battery
has been disconnected, correct the azi-
muth indicator before driving.
B990C01O
Page 80 of 277
1
FEATURES OF YOUR HYUNDAI
69
!!
SUNROOF!
B460A01Y-AAT(If installed)
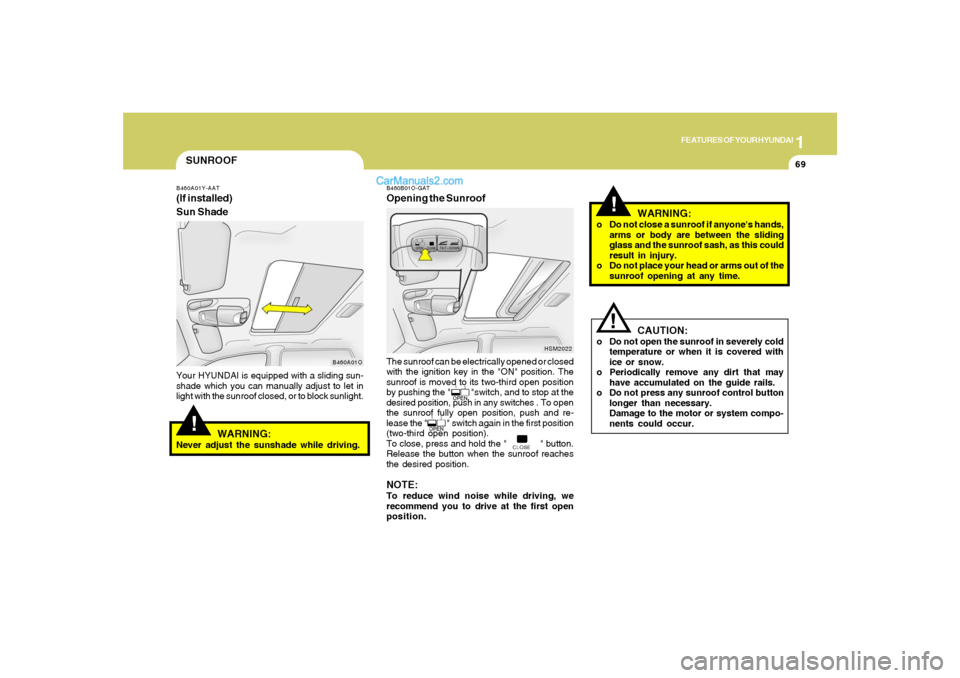
Sun ShadeYour HYUNDAI is equipped with a sliding sun-
shade which you can manually adjust to let in
light with the sunroof closed, or to block sunlight.
WARNING:
Never adjust the sunshade while driving.
B460A01OB460B01O-GAT
Opening the SunroofThe sunroof can be electrically opened or closed
with the ignition key in the "ON" position. The
sunroof is moved to its two-third open position
by pushing the " "switch, and to stop at the
desired position, push in any switches . To open
the sunroof fully open position, push and re-
lease the " " switch again in the first position
(two-third open position).
To close, press and hold the " " button.
Release the button when the sunroof reaches
the desired position.NOTE:To reduce wind noise while driving, we
recommend you to drive at the first open
position.
HSM2022
WARNING:
o Do not close a sunroof if anyone's hands,
arms or body are between the sliding
glass and the sunroof sash, as this could
result in injury.
o Do not place your head or arms out of the
sunroof opening at any time.
CAUTION:
o Do not open the sunroof in severely cold
temperature or when it is covered with
ice or snow.
o Periodically remove any dirt that may
have accumulated on the guide rails.
o Do not press any sunroof control button
longer than necessary.
Damage to the motor or system compo-
nents could occur.
Page 81 of 277
1FEATURES OF YOUR HYUNDAI70
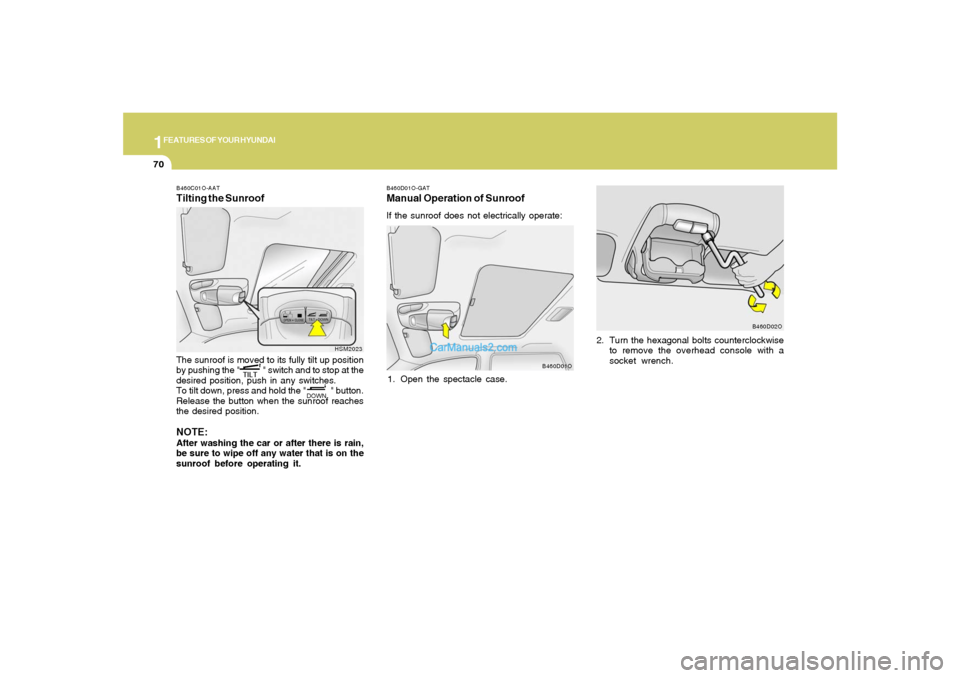
B460D01O-GATManual Operation of SunroofIf the sunroof does not electrically operate:
1. Open the spectacle case.2. Turn the hexagonal bolts counterclockwise
to remove the overhead console with a
socket wrench.
B460D01OB460D02O
B460C01O-AATTilting the SunroofThe sunroof is moved to its fully tilt up position
by pushing the " " switch and to stop at the
desired position, push in any switches.
To tilt down, press and hold the " " button.
Release the button when the sunroof reaches
the desired position.NOTE:After washing the car or after there is rain,
be sure to wipe off any water that is on the
sunroof before operating it.
HSM2023
Page 82 of 277
1
FEATURES OF YOUR HYUNDAI
71
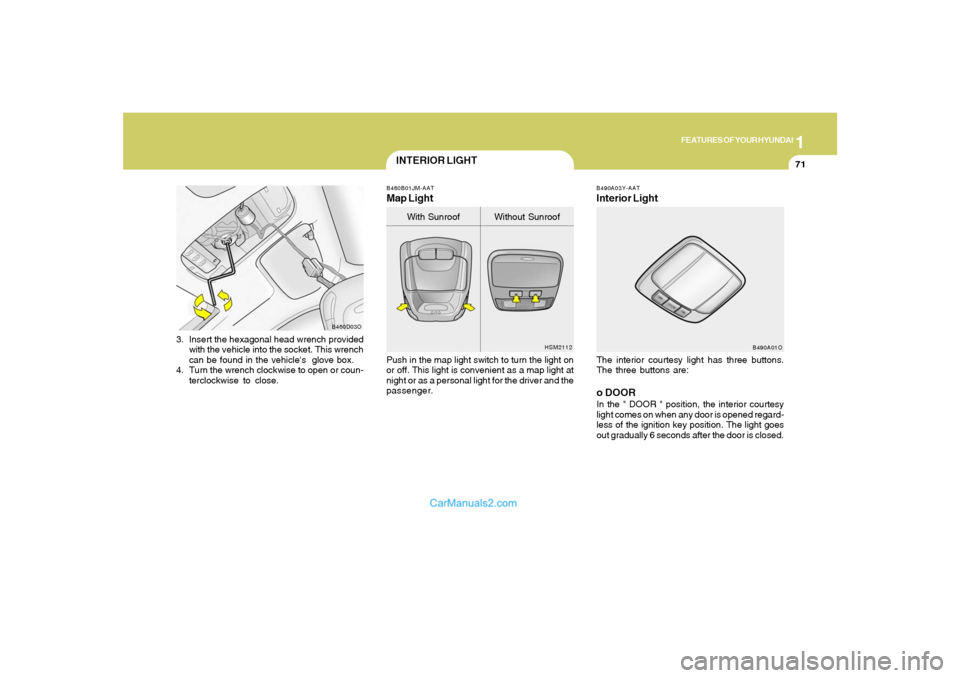
3. Insert the hexagonal head wrench provided
with the vehicle into the socket. This wrench
can be found in the vehicle's glove box.
4. Turn the wrench clockwise to open or coun-
terclockwise to close.
B460D03O
INTERIOR LIGHT
B490A03Y-AATInterior LightThe interior courtesy light has three buttons.
The three buttons are:o DOORIn the " DOOR " position, the interior courtesy
light comes on when any door is opened regard-
less of the ignition key position. The light goes
out gradually 6 seconds after the door is closed.
B490A01O B480B01JM-AAT
Map LightPush in the map light switch to turn the light on
or off. This light is convenient as a map light at
night or as a personal light for the driver and the
passenger.
HSM2112
With Sunroof Without Sunroof
Page 83 of 277
1FEATURES OF YOUR HYUNDAI72
GLOVE BOX
SPECTACLE CASE
!
B500A01S-AAT
WARNING:
To avoid the possibility of injury in case of
an accident or a sudden stop, the glove box
door should be kept closed when the car is
in motion.
B500A01O
UNLOCKLOCK
!
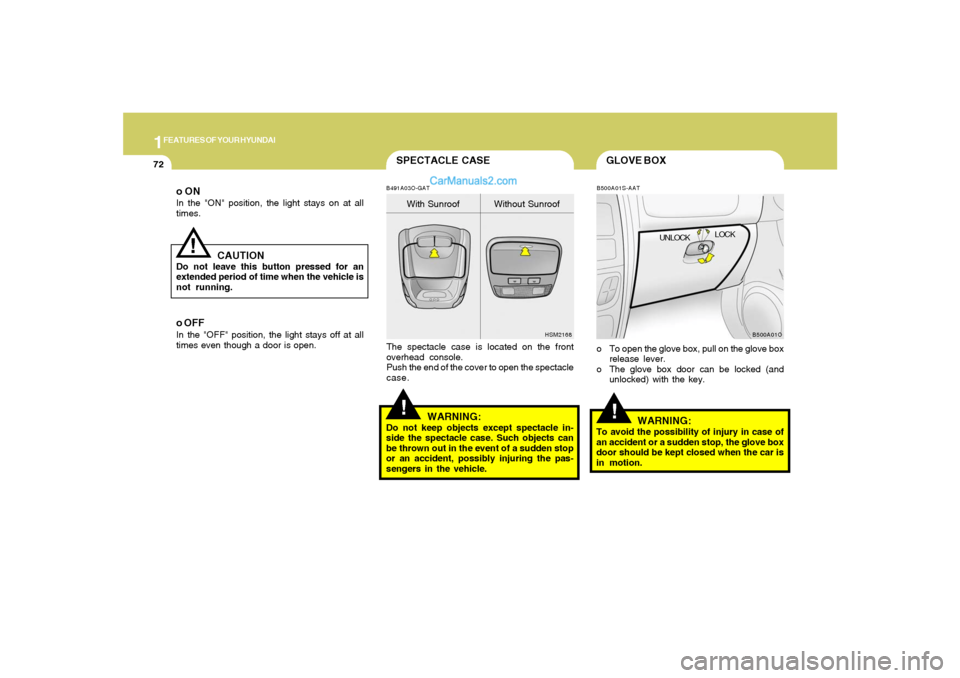
B491A03O-GAT
HSM2168The spectacle case is located on the front
overhead console.
Push the end of the cover to open the spectacle
case.
WARNING:
Do not keep objects except spectacle in-
side the spectacle case. Such objects can
be thrown out in the event of a sudden stop
or an accident, possibly injuring the pas-
sengers in the vehicle.With Sunroof Without Sunroof
o ONIn the "ON" position, the light stays on at all
times.
!
CAUTION
Do not leave this button pressed for an
extended period of time when the vehicle is
not running.o OFFIn the "OFF" position, the light stays off at all
times even though a door is open.
o To open the glove box, pull on the glove box
release lever.
o The glove box door can be locked (and
unlocked) with the key.
Page 94 of 277
1
FEATURES OF YOUR HYUNDAI
83
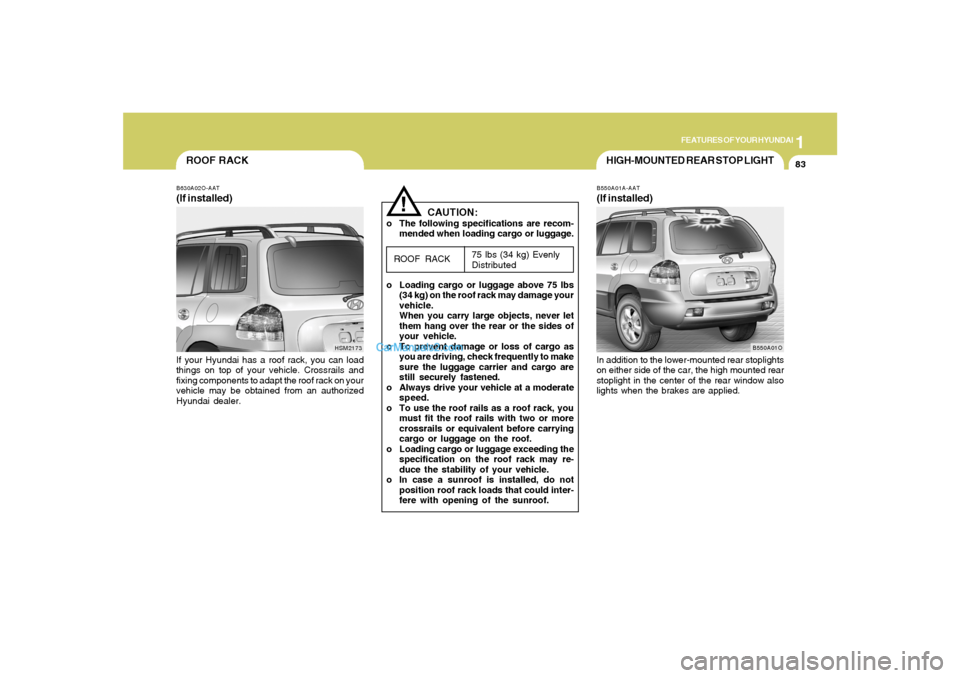
ROOF RACKB630A02O-AAT(If installed)If your Hyundai has a roof rack, you can load
things on top of your vehicle. Crossrails and
fixing components to adapt the roof rack on your
vehicle may be obtained from an authorized
Hyundai dealer.
HSM2173
CAUTION:
o The following specifications are recom-
mended when loading cargo or luggage.
75 lbs (34 kg) Evenly
Distributed
o Loading cargo or luggage above 75 lbs
(34 kg) on the roof rack may damage your
vehicle.
When you carry large objects, never let
them hang over the rear or the sides of
your vehicle.
o To prevent damage or loss of cargo as
you are driving, check frequently to make
sure the luggage carrier and cargo are
still securely fastened.
o Always drive your vehicle at a moderate
speed.
o To use the roof rails as a roof rack, you
must fit the roof rails with two or more
crossrails or equivalent before carrying
cargo or luggage on the roof.
o Loading cargo or luggage exceeding the
specification on the roof rack may re-
duce the stability of your vehicle.
o In case a sunroof is installed, do not
position roof rack loads that could inter-
fere with opening of the sunroof.ROOF RACK!
HIGH-MOUNTED REAR STOP LIGHTB550A01A-AAT(If installed)In addition to the lower-mounted rear stoplights
on either side of the car, the high mounted rear
stoplight in the center of the rear window also
lights when the brakes are applied.
B550A01O
Page 208 of 277
5
VEHICLE MAINTENANCE REQUIREMENTS6
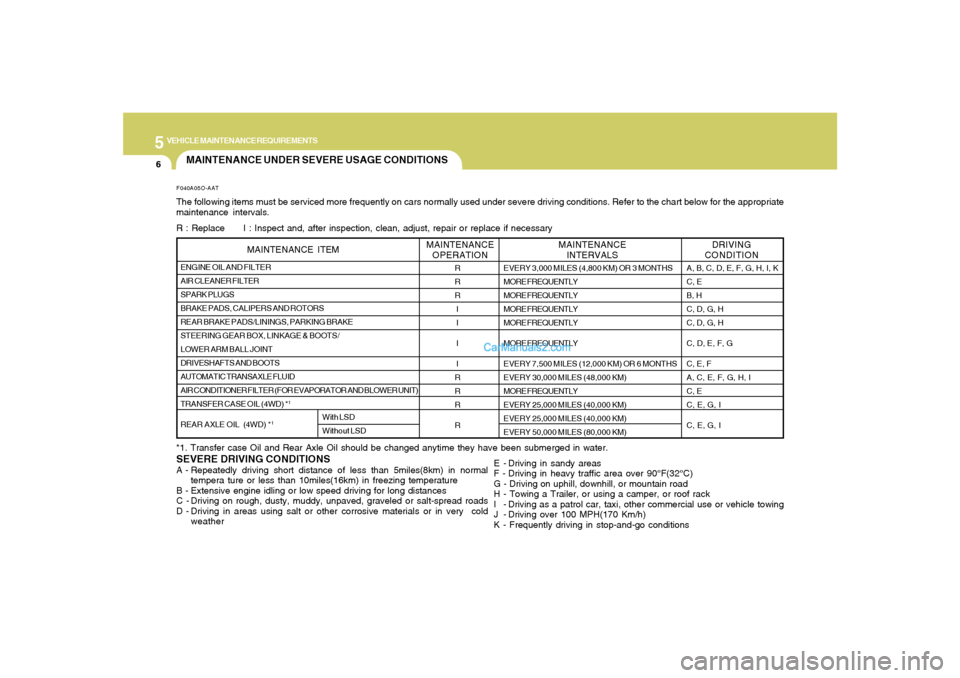
MAINTENANCE UNDER SEVERE USAGE CONDITIONS
SEVERE DRIVING CONDITIONSA - Repeatedly driving short distance of less than 5miles(8km) in normal
tempera ture or less than 10miles(16km) in freezing temperature
B - Extensive engine idling or low speed driving for long distances
C - Driving on rough, dusty, muddy, unpaved, graveled or salt-spread roads
D - Driving in areas using salt or other corrosive materials or in very cold
weatherF040A05O-AATThe following items must be serviced more frequently on cars normally used under severe driving conditions. Refer to the chart below for the appropriate
maintenance intervals.
R : Replace I : Inspect and, after inspection, clean, adjust, repair or replace if necessary
*1. Transfer case Oil and Rear Axle Oil should be changed anytime they have been submerged in water.
E - Driving in sandy areas
F - Driving in heavy traffic area over 90°F(32°C)
G - Driving on uphill, downhill, or mountain road
H - Towing a Trailer, or using a camper, or roof rack
I - Driving as a patrol car, taxi, other commercial use or vehicle towing
J - Driving over 100 MPH(170 Km/h)
K - Frequently driving in stop-and-go conditionsENGINE OIL AND FILTER
AIR CLEANER FILTER
SPARK PLUGS
BRAKE PADS, CALIPERS AND ROTORS
REAR BRAKE PADS/LININGS, PARKING BRAKE
STEERING GEAR BOX, LINKAGE & BOOTS/
LOWER ARM BALL JOINT
DRIVESHAFTS AND BOOTS
AUTOMATIC TRANSAXLE FLUID
AIR CONDITIONER FILTER (FOR EVAPORATOR AND BLOWER UNIT)
TRANSFER CASE OIL (4WD) *
1
REAR AXLE OIL (4WD) *
1
MAINTENANCE ITEM
R
R
R
I
I
I
I
R
R
R
R
EVERY 3,000 MILES (4,800 KM) OR 3 MONTHS
MORE FREQUENTLY
MORE FREQUENTLY
MORE FREQUENTLY
MORE FREQUENTLY
MORE FREQUENTLY
EVERY 7,500 MILES (12,000 KM) OR 6 MONTHS
EVERY 30,000 MILES (48,000 KM)
MORE FREQUENTLY
EVERY 25,000 MILES (40,000 KM)
EVERY 25,000 MILES (40,000 KM)
EVERY 50,000 MILES (80,000 KM)
With LSD
Without LSD
DRIVING
CONDITION MAINTENANCE
INTERVALS MAINTENANCE
OPERATION
A, B, C, D, E, F, G, H, I, K
C, E
B, H
C, D, G, H
C, D, G, H
C, D, E, F, G
C, E, F
A, C, E, F, G, H, I
C, E
C, E, G, I
C, E, G, I
Page 243 of 277
6
DO-IT-YOURSELF MAINTENANCE
32
Socket type
S8.5/8.5
P43t
BA15d
BA9s
BA9s
S8.5/8.5
PG13
W2.1×9.5D
Part Name
Front Door Edge Warning Light (If installed)
Luggage Compartment Light
High Mounted Rear Stop Light (If installed)
Rear Combination Light
Turn Signal Light
Stop/Tail Light (Side Marker Light)
Back-up Light
License Plate LightWattage
5
10
17
27
27/8(8)
27
5 No.
1
2
3
4
5
6
7
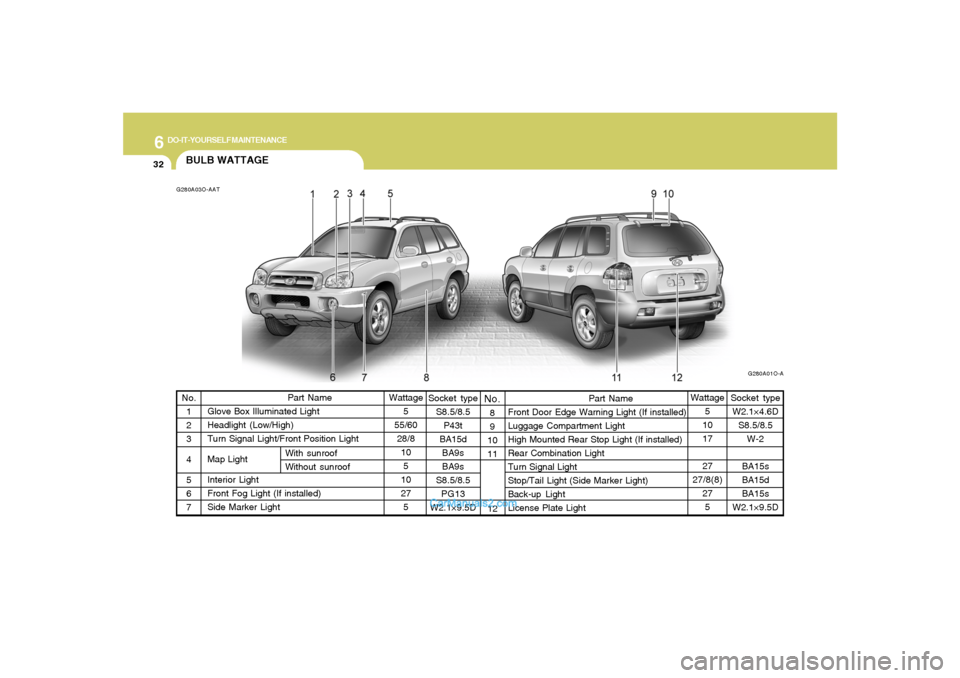
BULB WATTAGEG280A03O-AAT
G280A01O-A
Part Name
Glove Box Illuminated Light
Headlight (Low/High)
Turn Signal Light/Front Position Light
Map Light
Interior Light
Front Fog Light (If installed)
Side Marker LightWattage
5
55/60
28/8
10
5
10
27
5
No.
With sunroof
Without sunroof8
9
10
11
12
Socket type
W2.1×4.6D
S8.5/8.5
W-2
BA15s
BA15d
BA15s
W2.1×9.5D