engine overheat Hyundai Santa Fe 2010 User Guide
[x] Cancel search | Manufacturer: HYUNDAI, Model Year: 2010, Model line: Santa Fe, Model: Hyundai Santa Fe 2010Pages: 408, PDF Size: 8.63 MB
Page 284 of 408
Driving your vehicle
50
5
E140405AFD
Turn signals when towing a trailer
When you tow a trailer, your vehicle has
to have a different turn signal flasher and
extra wiring. The green arrows on your
instrument panel will flash whenever you
signal a turn or lane change. Properly
connected, the trailer lights will also flash
to alert other drivers you’re about to turn,
change lanes, or stop.
When towing a trailer, the green arrows
on your instrument panel will flash for
turns even if the bulbs on the trailer are
burned out. Thus, you may think drivers
behind you are seeing your signals
when, in fact, they are not. It’s important
to check occasionally to be sure the trail-
er bulbs are still working. You must also
check the lights every time you discon-
nect and then reconnect the wires.
Do not connect a trailer lighting system
directly to your vehicle’s lighting system.
Use only an approved trailer wiring har-
ness.
An authorized HYUNDAI dealer can
assist you in installing the wiring harness.
E140406AFD
Driving on grades
Reduce speed and shift to a lower gear
before you start down a long or steep
downgrade. If you don’t shift down, you
might have to use your brakes so much
that they would get hot and no longer
operate efficiently.
On a long uphill grade, shift down and
reduce your speed to around 45 mph (70
km/h) to reduce the possibility of engine
and transaxle overheating.
If your trailer weighs more than the max-
imum trailer weight without trailer brakes
and you have an automatic transaxle,
you should drive in D (Drive) when tow-
ing a trailer.
Operating your vehicle in D (Drive) when
towing a trailer will minimize heat build up
and extend the life of your transaxle.
WARNING
Failure to use an approved trailer
wiring harness could result in dam-
age to the vehicle electrical system
and/or personal injury.
Page 285 of 408
551
Driving your vehicle
E140407AUN-EA
Parking on hills
Generally, if you have a trailer attached to
your vehicle, you should not park your
vehicle on a hill. People can be seriously
or fatally injured, and both your vehicle
and the trailer can be damaged if they
unexpectedly roll down hill.
However, if you ever have to park your
trailer on a hill, here's how to do it:
1. Pull the vehicle into the parking space.Turn the steering wheel in the direction
of the curb (right if headed down hill,
left if headed up hill).
2. If the vehicle has a manual transaxle, place the car in neutral. If the vehicle
has an automatic transaxle, place the
car in P (Park).
3. Set the parking brake and shut off the vehicle. 4. Place chocks under the trailer wheels
on the down hill side of the wheels.
5. Start the vehicle, hold the brakes, shift to neutral, release the parking brake
and slowly release the brakes until the
trailer chocks absorb the load.
6. Reapply the brakes, reapply the park- ing brake and shift the vehicle to R
(Reverse) for manual transaxle or P
(Park) for automatic transaxle.
7. Shut off the vehicle and release the vehicle brakes but leave the parking
brake set.
CAUTION
When towing a trailer on steep grades (in excess of 6%) payclose attention to the enginecoolant temperature gauge toensure the engine does not over- heat.
If the needle of the coolant tem-perature gauge moves across thedial towards “H” (HOT), pull overand stop as soon as it is safe todo so, and allow the engine to idleuntil it cools down. You may pro-ceed once the engine has cooledsufficiently.
You must decide driving speed depending on trailer weight anduphill grade to reduce the possi-bility of engine and transaxleoverheating.
WARNING- Parking on a hill
Parking your vehicle on a hill with a
trailer attached could cause seri-
ous injury or death, should the trail-
er break loose or brake stops work-
ing.
WARNING- Parking brake
It can be dangerous to get out of
your vehicle if the parking brake is
not firmly set.
If you have left the engine running,
the vehicle can move suddenly. You
or others could be seriously or
fatally injured.
Page 286 of 408
Driving your vehicle
52
5
When you are ready to leave after park-
ing on a hill
1. With the manual transaxle in Neutral
or automatic transaxle in P (Park),
apply your brakes and hold the brake
pedal down while you:
and
2. Slowly remove your foot from the brake pedal.
3. Drive slowly until the trailer is clear of the chocks.
4. Stop and have someone pick up and store the chocks.Maintenance when trailer towing
Your vehicle will need service more often
when you regularly pull a trailer.
Important items to pay particular atten-
tion to include engine oil, automatic
transaxle fluid, axle lubricant and cooling
system fluid. Brake condition is another
important item to frequently check. Each
item is covered in this manual, and the
Index will help you find them quickly. If
you’re trailering, it’s a good idea to review
these sections before you start your trip.
Don’t forget to also maintain your trailer
and hitch. Follow the maintenance
schedule that accompanied your trailer
and check it periodically. Preferably, con-
duct the check at the start of each day’s
driving. Most importantly, all hitch nuts
and bolts should be tight.CAUTION
Due to higher load during trailer usage, overheating might occurin hot days or during uphill driv- ing. If the coolant gauge indicatesover-heating, switch off the A/Cand stop the vehicle in a safe area to cool down the engine.
When towing check transaxle fluid more frequently.
Page 295 of 408
6
Road warning / 6-2
In case of an emergency while driving / 6-2
If the engine will not start / 6-3
Emergency starting / 6-4
If the engine overheats / 6-6
Tire pressure monitoring system (TPMS) / 6-7
If you have a flat tire / 6-13
Towing / 6-22
What to do in an emergency
Page 299 of 408
65
What to do in an emergency
F040101AFD
Jump starting procedure
1. Make sure the booster battery is 12-volt and that its negative terminal is
grounded.
2. If the booster battery is in another vehicle, do not allow the vehicles to
touch.
3. Turn off all unnecessary electrical loads.
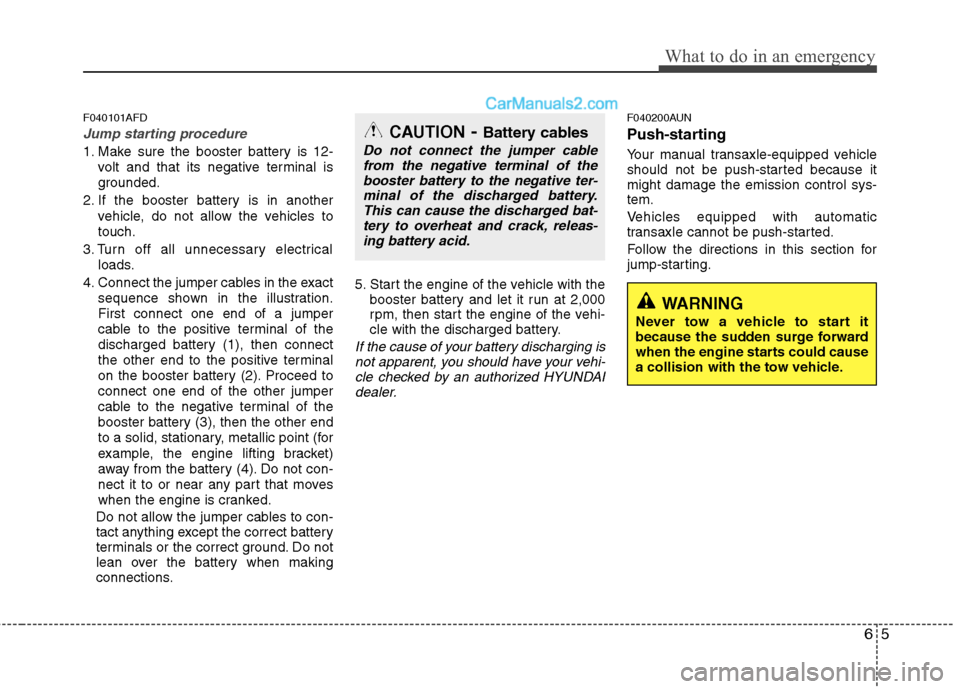
4. Connect the jumper cables in the exact sequence shown in the illustration.
First connect one end of a jumper
cable to the positive terminal of the
discharged battery (1), then connect
the other end to the positive terminal
on the booster battery (2). Proceed to
connect one end of the other jumper
cable to the negative terminal of the
booster battery (3), then the other end
to a solid, stationary, metallic point (for
example, the engine lifting bracket)
away from the battery (4). Do not con-
nect it to or near any part that moves
when the engine is cranked.
Do not allow the jumper cables to con-
tact anything except the correct battery
terminals or the correct ground. Do not
lean over the battery when making
connections. 5. Start the engine of the vehicle with the
booster battery and let it run at 2,000
rpm, then start the engine of the vehi-
cle with the discharged battery.
If the cause of your battery discharging isnot apparent, you should have your vehi-cle checked by an authorized HYUNDAIdealer.
F040200AUN
Push-starting
Your manual transaxle-equipped vehicle
should not be push-started because it
might damage the emission control sys-
tem.
Vehicles equipped with automatic
transaxle cannot be push-started.
Follow the directions in this section for
jump-starting.
WARNING
Never tow a vehicle to start it
because the sudden surge forward
when the engine starts could cause
a collision with the tow vehicle.
CAUTION- Battery cables
Do not connect the jumper cable from the negative terminal of thebooster battery to the negative ter-minal of the discharged battery.This can cause the discharged bat-tery to overheat and crack, releas- ing battery acid.
Page 300 of 408
What to do in an emergency
6
6
IF THE ENGINE OVERHEATS
F050000AFD
If your temperature gauge indicates over-
heating, you experience a loss of power,
or hear loud pinging or knocking, the
engine is probably too hot. If this hap-
pens, you should:
1. Pull off the road and stop as soon as it
is safe to do so.
2. Place the shift lever in P (automatic transaxle) or neutral (manual transaxle)
and set the parking brake. If the air con-
ditioning is on, turn it off.
3. If engine coolant is running out under the vehicle or steam is coming out
from the hood, stop the engine. Do not
open the hood until the coolant has
stopped running or the steaming has
stopped. If there is no visible loss of
engine coolant and no steam, leave
the engine running and check to be
sure the engine cooling fan is operat-
ing. If the fan is not running, turn the
engine off.
4. Check to see if the water pump drive belt is missing. If it is not missing,
check to see that it is tight. If the drive
belt seems to be satisfactory, check for
coolant leaking from the radiator,
hoses or under the vehicle. (If the air
conditioning had been in use, it is nor-
mal for cold water to be draining from
it when you stop). 5. If the water pump drive belt is broken
or engine coolant is leaking out, stop
the engine immediately and call the
nearest authorized HYUNDAI dealer
for assistance. 6. If you cannot find the cause of the
overheating, wait until the engine tem-
perature has returned to normal. Then,
if coolant has been lost, carefully add
coolant to the reservoir to bring the
fluid level in the reservoir up to the
halfway mark.
7. Proceed with caution, keeping alert for further signs of overheating. If over-
heating happens again, call an author-
ized HYUNDAI dealer for assistance.
CAUTION
Serious loss of coolant indicates
there is a leak in the cooling systemand this should be checked as soonas possible by an authorizedHYUNDAI dealer.
WARNING
While the engine is running, keep
hair, hands and clothing away from
moving parts such as the fan and
drive belts to prevent injury.
WARNING
Do not remove the radiator cap
when the engine is hot. This can
allow coolant to be blown out of the
opening and cause serious burns.
Page 404 of 408

I3
Index
Defroster ··················\
··················\
··················\
··················\
4-66
Dimensions ··················\
··················\
··················\
················8-2
Door locks··················\
··················\
··················\
················4-14Central door lock switch ··················\
··················\
···········4-8
Child-protector rear door lock ··················\
··················\
·4-10
Economical operation ··················\
··················\
················5-37
Emergency starting ··················\
··················\
··················\
····6-4 Jump starting ··················\
··················\
··················\
···········6-4
Push starting ··················\
··················\
··················\
············6-5
Emission control system ··················\
··················\
············7-69 Crankcase emission control system··················\
···········7-69
Evaporative emission control (including ORVR:Onboard Refueling Vapor Recovery) System ···········7-69
Exhaust emission control system ··················\
··············7-70
Engine compartment ··················\
··················\
············2-4, 7-2
Engine coolant ··················\
··················\
··················\
·········7-15
Engine number ··················\
··················\
··················\
···········8-8
Engine oil ··················\
··················\
··················\
·················7-14\
Explanation of scheduled maintenance items ···············7-11
Exterior features··················\
··················\
··················\
·······4-98 Roof rack ··················\
··················\
··················\
···············4-98 Fuel filler lid ··················\
··················\
··················\
············4-19
Fuel requirements ··················\
··················\
··················\
······1-2
Fuses ··················\
··················\
··················\
··················\
······7-45
Fuse/relay panel description ··················\
··················\
····7-49
Main fuse ··················\
··················\
··················\
···············7-48
Memory fuse··················\
··················\
··················\
··········7-47
Hazard warning flasher ··················\
··················\
··············4-56
Hood··················\
··················\
··················\
··················\
·······4-17
How to use this manual ··················\
··················\
···············1-2
If the engine overheats··················\
··················\
·················6-6
If the engine will not start ··················\
··················\
···········6-3
If you have a flat tire ··················\
··················\
·················6-13\
Changing tires··················\
··················\
··················\
········6-16
Compact spare tire ··················\
··················\
··················\
·6-20
Jack and tools ··················\
··················\
··················\
········6-13
Removing and storing the spare tire···········\
·················6-13\
D
E
F
H
I