Hyundai Santa Fe 2011 - RHD (UK, Australia) Owner's Guide
Manufacturer: HYUNDAI, Model Year: 2011, Model line: Santa Fe, Model: Hyundai Santa Fe 2011Pages: 312, PDF Size: 23.92 MB
Page 21 of 312
Safety system of your vehicle
4
3
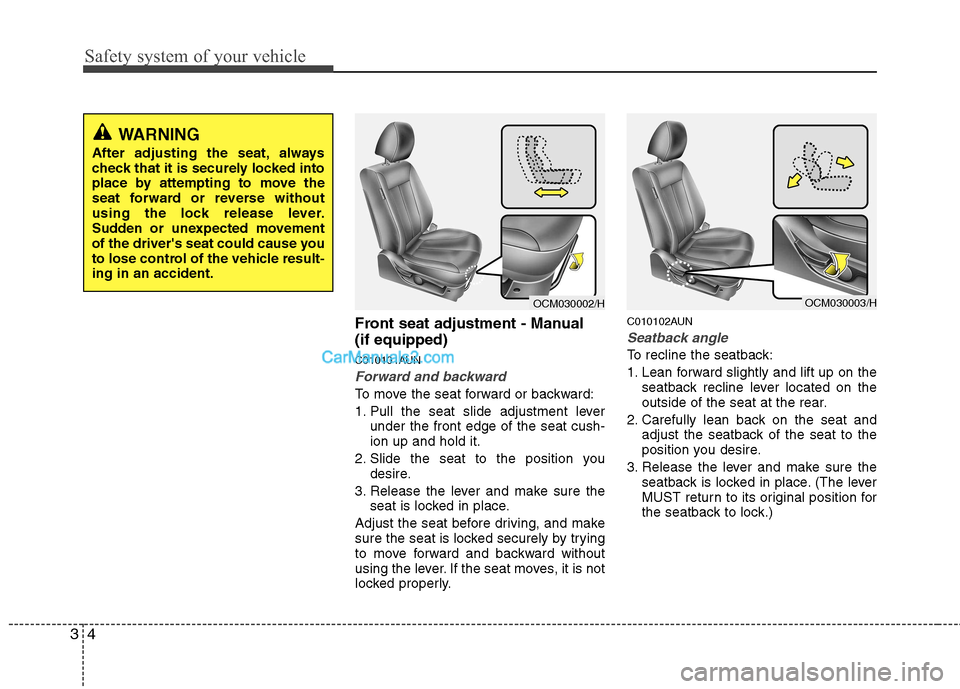
Front seat adjustment - Manual (if equipped)
C010101AUN
Forward and backward
To move the seat forward or backward:
1. Pull the seat slide adjustment lever
under the front edge of the seat cush- ion up and hold it.
2. Slide the seat to the position you desire.
3. Release the lever and make sure the seat is locked in place.
Adjust the seat before driving, and make
sure the seat is locked securely by trying
to move forward and backward without
using the lever. If the seat moves, it is not
locked properly. C010102AUN
Seatback angle
To recline the seatback:
1. Lean forward slightly and lift up on the
seatback recline lever located on the
outside of the seat at the rear.
2. Carefully lean back on the seat and adjust the seatback of the seat to the
position you desire.
3. Release the lever and make sure the seatback is locked in place. (The lever
MUST return to its original position for
the seatback to lock.)
OCM030003/HOCM030002/H
WARNING
After adjusting the seat, always
check that it is securely locked into
place by attempting to move the
seat forward or reverse without
using the lock release lever.
Sudden or unexpected movement
of the driver's seat could cause you
to lose control of the vehicle result-ing in an accident.
Page 22 of 312
35
Safety system of your vehicle
C010103AUN
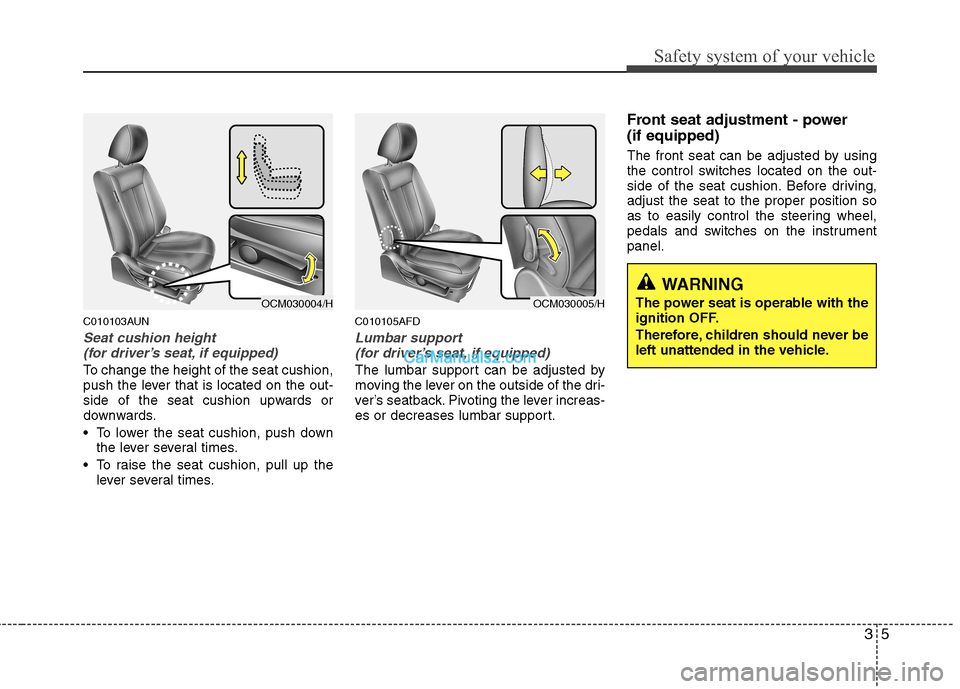
Seat cushion height (for driver’s seat, if equipped)
To change the height of the seat cushion,
push the lever that is located on the out-
side of the seat cushion upwards or
downwards.
To lower the seat cushion, push down the lever several times.
To raise the seat cushion, pull up the lever several times. C010105AFD
Lumbar support
(for driver’s seat, if equipped)
The lumbar support can be adjusted by
moving the lever on the outside of the dri-
ver’s seatback. Pivoting the lever increas-
es or decreases lumbar support. Front seat adjustment - power (if equipped)
The front seat can be adjusted by using
the control switches located on the out-
side of the seat cushion. Before driving,adjust the seat to the proper position so
as to easily control the steering wheel,
pedals and switches on the instrumentpanel.
OCM030004/HOCM030005/H
WARNING
The power seat is operable with the
ignition OFF.
Therefore, children should never be
left unattended in the vehicle.
Page 23 of 312
Safety system of your vehicle
6
3
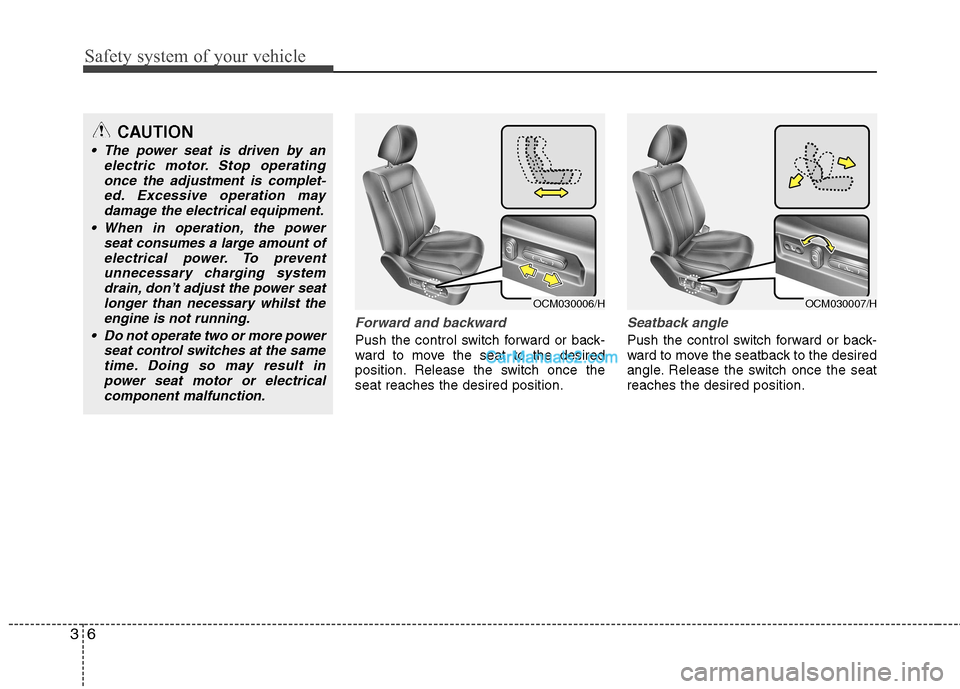
Forward and backward
Push the control switch forward or back-
ward to move the seat to the desired
position. Release the switch once theseat reaches the desired position.
Seatback angle
Push the control switch forward or back-
ward to move the seatback to the desired
angle. Release the switch once the seatreaches the desired position.
CAUTION
The power seat is driven by an
electric motor. Stop operating
once the adjustment is complet-ed. Excessive operation maydamage the electrical equipment.
When in operation, the power seat consumes a large amount ofelectrical power. To preventunnecessary charging system drain, don’t adjust the power seat
longer than necessary whilst theengine is not running.
Do not operate two or more power seat control switches at the sametime. Doing so may result in
power seat motor or electricalcomponent malfunction.
OCM030006/HOCM030007/H
Page 24 of 312
37
Safety system of your vehicle
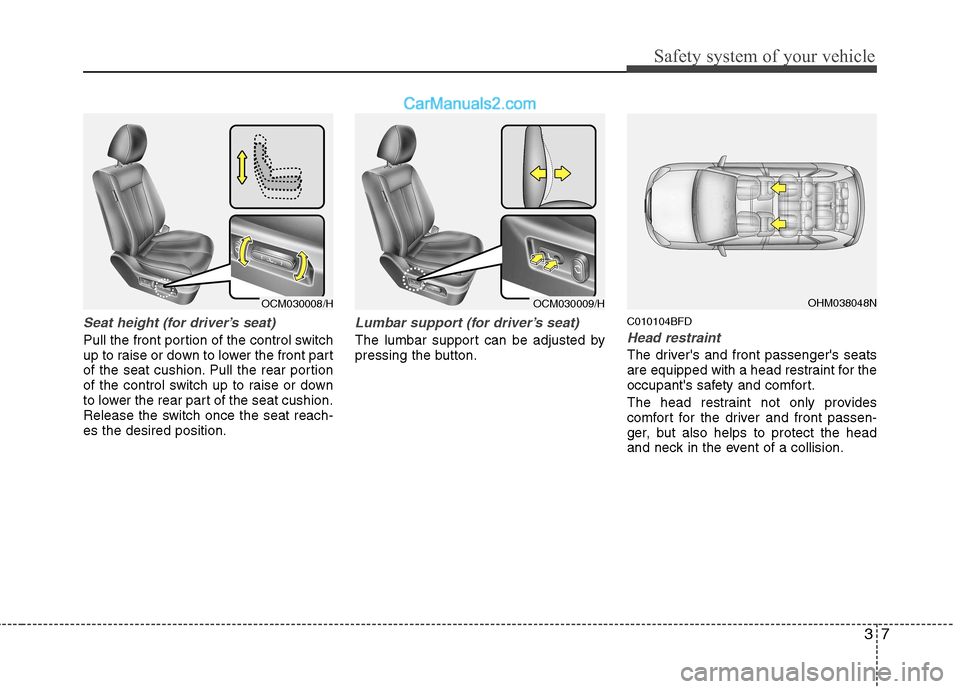
Seat height (for driver’s seat)
Pull the front portion of the control switch
up to raise or down to lower the front part
of the seat cushion. Pull the rear portion
of the control switch up to raise or down
to lower the rear part of the seat cushion.
Release the switch once the seat reach-es the desired position.
Lumbar support (for driver’s seat)
The lumbar support can be adjusted by
pressing the button.C010104BFDHead restraint
The driver's and front passenger's seats
are equipped with a head restraint for the
occupant's safety and comfort.
The head restraint not only provides
comfort for the driver and front passen-
ger, but also helps to protect the head
and neck in the event of a collision.
OCM030008/HOCM030009/HOHM038048N
Page 25 of 312
Safety system of your vehicle
8
3
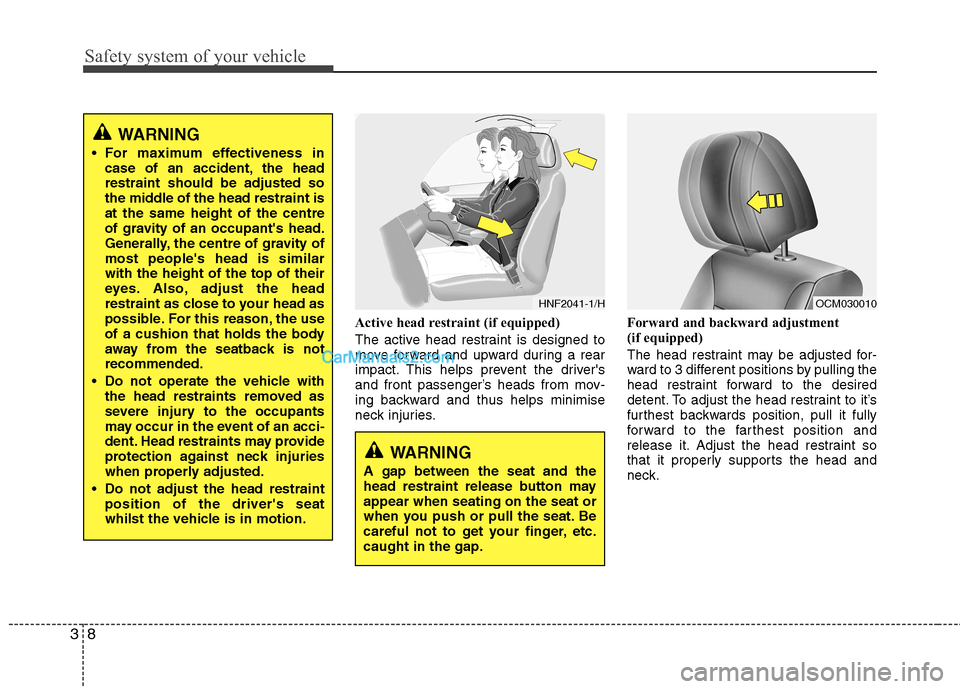
Active head restraint (if equipped)
The active head restraint is designed to
move forward and upward during a rear
impact. This helps prevent the driver's
and front passenger’s heads from mov-
ing backward and thus helps minimise
neck injuries. Forward and backward adjustment
(if equipped)
The head restraint may be adjusted for-
ward to 3 different positions by pulling the
head restraint forward to the desired
detent. To adjust the head restraint to it’s
furthest backwards position, pull it fully
forward to the farthest position and
release it. Adjust the head restraint so
that it properly supports the head and
neck.
OCM030010HNF2041-1/H
WARNING
For maximum effectiveness in case of an accident, the head restraint should be adjusted so
the middle of the head restraint isat the same height of the centre
of gravity of an occupant's head.
Generally, the centre of gravity ofmost people's head is similarwith the height of the top of their
eyes. Also, adjust the head
restraint as close to your head as
possible. For this reason, the use
of a cushion that holds the body
away from the seatback is notrecommended.
Do not operate the vehicle with the head restraints removed as
severe injury to the occupants
may occur in the event of an acci-
dent. Head restraints may provide
protection against neck injuries
when properly adjusted.
Do not adjust the head restraint position of the driver's seat
whilst the vehicle is in motion.
WARNING
A gap between the seat and the
head restraint release button mayappear when seating on the seat or
when you push or pull the seat. Be
careful not to get your finger, etc.caught in the gap.
Page 26 of 312
39
Safety system of your vehicle
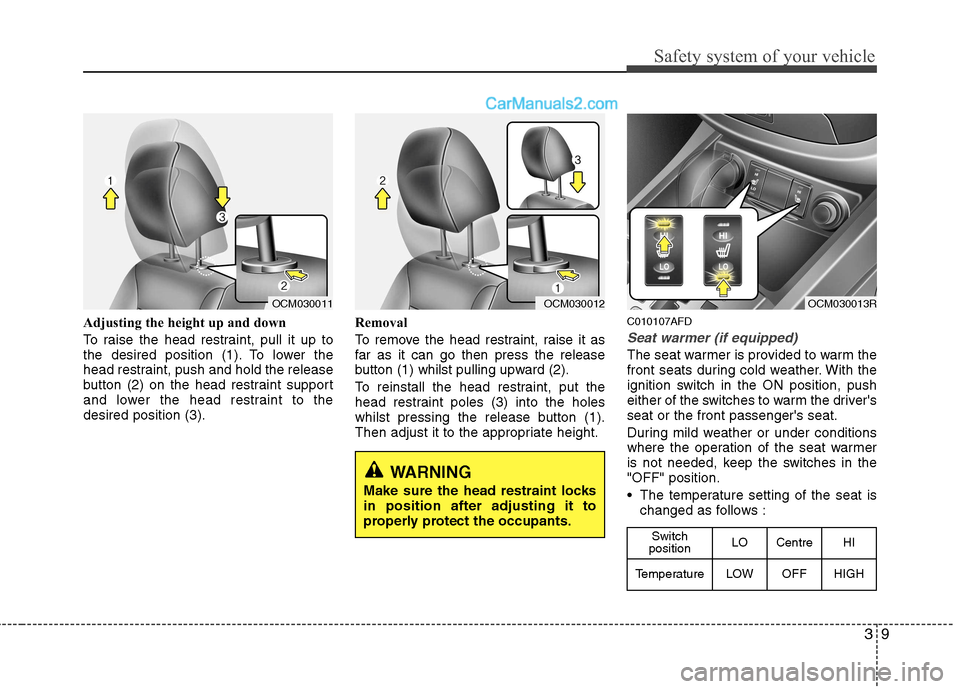
Adjusting the height up and down
To raise the head restraint, pull it up to
the desired position (1). To lower the
head restraint, push and hold the release
button (2) on the head restraint support
and lower the head restraint to thedesired position (3).Removal
To remove the head restraint, raise it as
far as it can go then press the release
button (1) whilst pulling upward (2).
To reinstall the head restraint, put the
head restraint poles (3) into the holes
whilst pressing the release button (1).
Then adjust it to the appropriate height.C010107AFD
Seat warmer (if equipped)
The seat warmer is provided to warm the
front seats during cold weather. With the
ignition switch in the ON position, push
either of the switches to warm the driver'sseat or the front passenger's seat.
During mild weather or under conditions
where the operation of the seat warmer
is not needed, keep the switches in the"OFF" position.
The temperature setting of the seat is
changed as follows :
OCM030012
WARNING
Make sure the head restraint locks in position after adjusting it to
properly protect the occupants.
OCM030011
Switch
position LO Centre HI
TemperatureLOWOFFHIGH
OCM030013R
Page 27 of 312
Safety system of your vehicle
10
3
✽✽
NOTICE
With the seat warmer switch in ON
position, the heating system in the seat
turns off or on automatically depending
on the seat temperature.
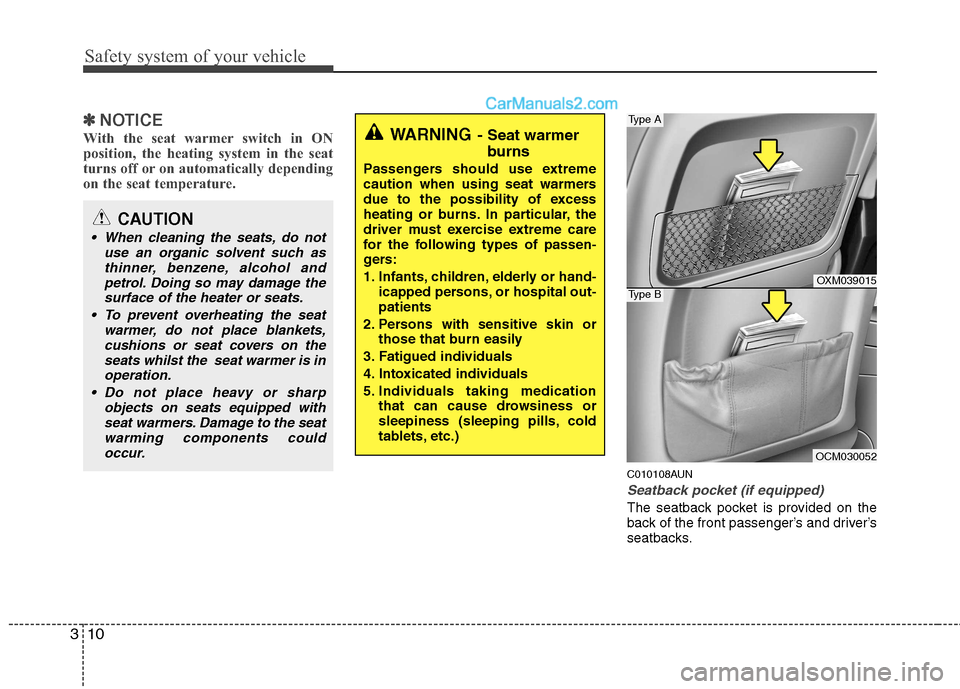
C010108AUN
Seatback pocket (if equipped)
The seatback pocket is provided on the
back of the front passenger’s and driver’s
seatbacks.
WARNING - Seat warmer
burns
Passengers should use extreme
caution when using seat warmers
due to the possibility of excess
heating or burns. In particular, the
driver must exercise extreme care
for the following types of passen-
gers:
1. Infants, children, elderly or hand- icapped persons, or hospital out- patients
2. Persons with sensitive skin or those that burn easily
3. Fatigued individuals
4. Intoxicated individuals
5. Individuals taking medication that can cause drowsiness or
sleepiness (sleeping pills, cold
tablets, etc.)
CAUTION
When cleaning the seats, do not
use an organic solvent such asthinner, benzene, alcohol and
petrol. Doing so may damage thesurface of the heater or seats.
To prevent overheating the seat warmer, do not place blankets,
cushions or seat covers on theseats whilst the seat warmer is in operation.
Do not place heavy or sharp objects on seats equipped with
seat warmers. Damage to the seatwarming components couldoccur.
OXM039015
OCM030052
Type A
Type B
Page 28 of 312
311
Safety system of your vehicle
Rear seat adjustment
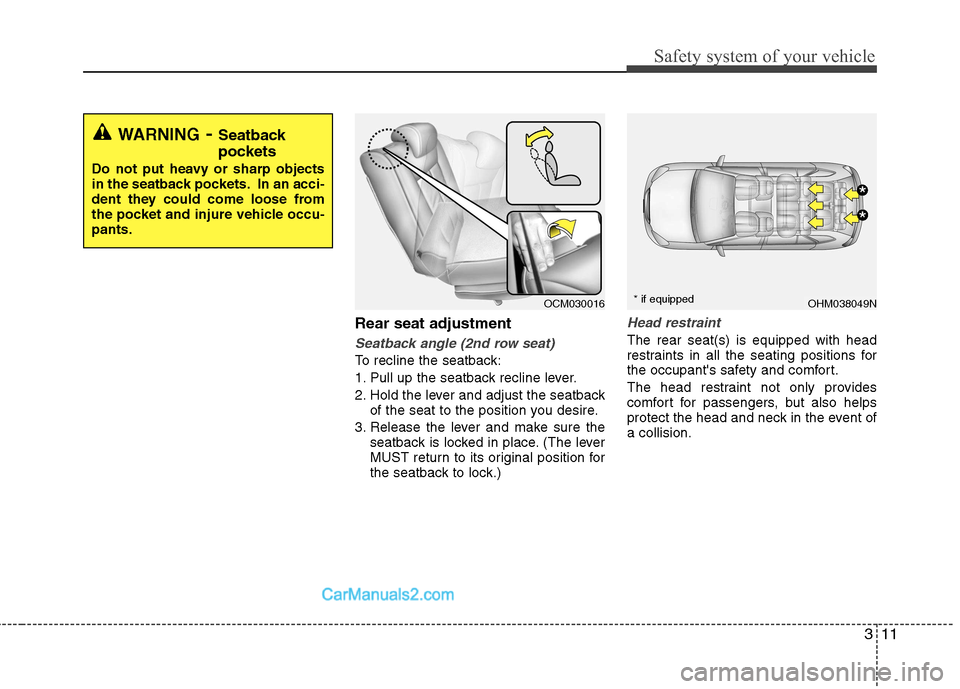
Seatback angle (2nd row seat)
To recline the seatback:
1. Pull up the seatback recline lever.
2. Hold the lever and adjust the seatbackof the seat to the position you desire.
3. Release the lever and make sure the seatback is locked in place. (The lever
MUST return to its original position for
the seatback to lock.)
Head restraint
The rear seat(s) is equipped with head
restraints in all the seating positions for
the occupant's safety and comfort.
The head restraint not only provides
comfort for passengers, but also helps
protect the head and neck in the event ofa collision.
WARNING - Seatback
pockets
Do not put heavy or sharp objects
in the seatback pockets. In an acci-
dent they could come loose from
the pocket and injure vehicle occu-pants.
OHM038049NOCM030016
*
*
* if equipped
Page 29 of 312
Safety system of your vehicle
12
3
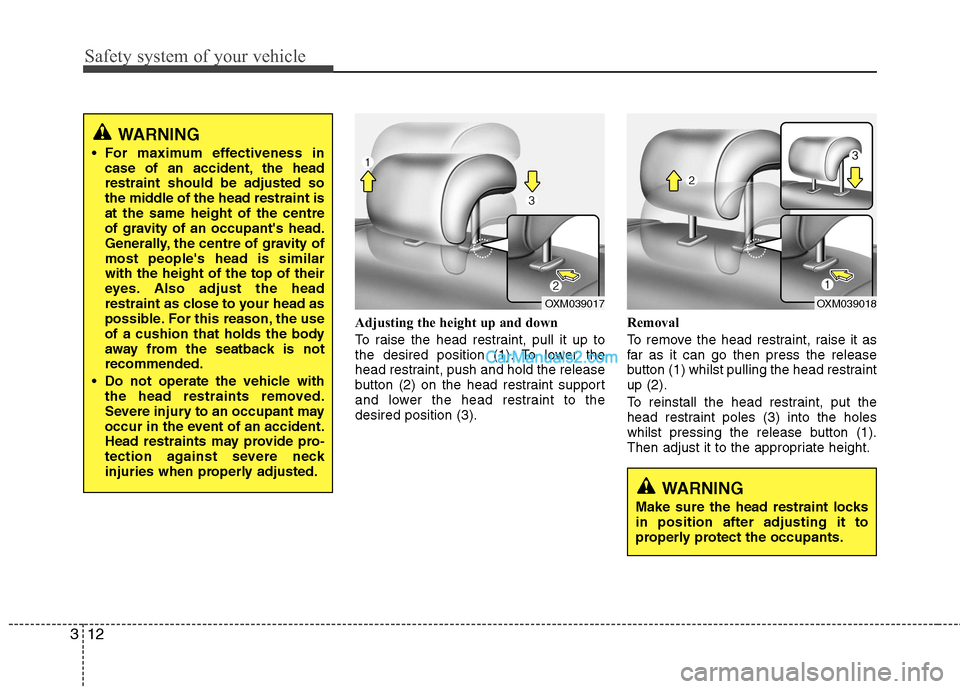
Adjusting the height up and down
To raise the head restraint, pull it up to
the desired position (1). To lower the
head restraint, push and hold the release
button (2) on the head restraint support
and lower the head restraint to thedesired position (3). Removal
To remove the head restraint, raise it as
far as it can go then press the release
button (1) whilst pulling the head restraintup (2).
To reinstall the head restraint, put the
head restraint poles (3) into the holes
whilst pressing the release button (1).
Then adjust it to the appropriate height.
WARNING
For maximum effectiveness in case of an accident, the head restraint should be adjusted so
the middle of the head restraint isat the same height of the centre
of gravity of an occupant's head.
Generally, the centre of gravity ofmost people's head is similarwith the height of the top of their
eyes. Also adjust the head
restraint as close to your head as
possible. For this reason, the use
of a cushion that holds the body
away from the seatback is notrecommended.
Do not operate the vehicle with the head restraints removed.
Severe injury to an occupant may
occur in the event of an accident.
Head restraints may provide pro-
tection against severe neck
injuries when properly adjusted.
OXM039018
WARNING
Make sure the head restraint locks in position after adjusting it to
properly protect the occupants.
OXM039017
Page 30 of 312
313
Safety system of your vehicle
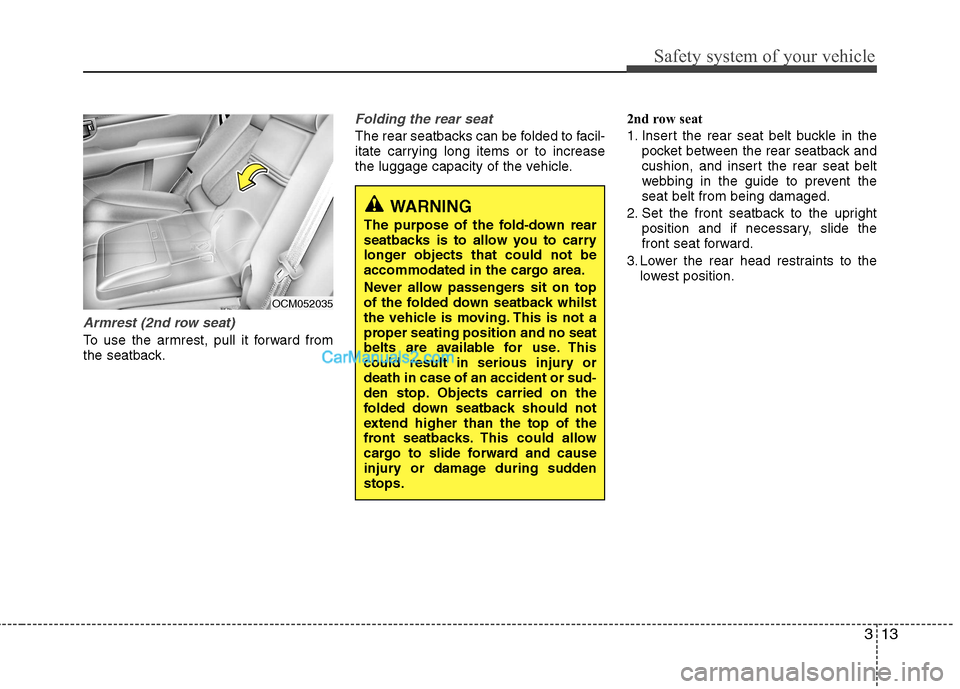
Armrest (2nd row seat)
To use the armrest, pull it forward from
the seatback.
Folding the rear seat
The rear seatbacks can be folded to facil-
itate carrying long items or to increase
the luggage capacity of the vehicle.2nd row seat
1. Insert the rear seat belt buckle in the
pocket between the rear seatback and
cushion, and insert the rear seat belt
webbing in the guide to prevent theseat belt from being damaged.
2. Set the front seatback to the upright position and if necessary, slide the
front seat forward.
3. Lower the rear head restraints to the lowest position.
OCM052035
WARNING
The purpose of the fold-down rear
seatbacks is to allow you to carry
longer objects that could not be
accommodated in the cargo area.
Never allow passengers sit on top
of the folded down seatback whilst
the vehicle is moving. This is not a
proper seating position and no seat
belts are available for use. This
could result in serious injury ordeath in case of an accident or sud-
den stop. Objects carried on the
folded down seatback should not
extend higher than the top of the
front seatbacks. This could allow
cargo to slide forward and cause
injury or damage during suddenstops.