lock Hyundai Santa Fe 2011 Owner's Manual - RHD (UK, Australia)
[x] Cancel search | Manufacturer: HYUNDAI, Model Year: 2011, Model line: Santa Fe, Model: Hyundai Santa Fe 2011Pages: 312, PDF Size: 23.92 MB
Page 10 of 312
13
Introduction
A020103AUN
Petrol containing alcohol andmethanol
Gasohol, a mixture of petrol and ethanol
(also known as grain alcohol), and petrolor gasohol containing methanol (also
known as wood alcohol) are being mar-
keted along with or instead of leaded orunleaded petrol. Do not use gasohol containing more than 10% ethanol, and do not use petrol or
gasohol containing any methanol. Either
of these fuels may cause drivability prob-lems and damage to the fuel system.
Discontinue using gasohol of any kind if
drivability problems occur.
Vehicle damage or driveability problems
may not be covered by the manufactur-
er’s warranty if they result from the useof:
1. Gasohol containing more than 10% ethanol.
2. Petrol or gasohol containing methanol.
3. Leaded fuel or leaded gasohol. A020104AUN
Use of MTBE
We recommend that fuels containing
MTBE (Methyl Tertiary Butyl Ether) over
15.0% vol. (Oxygen Content 2.7%
weight) should not be used in your vehi-
cle.
Fuel containing MTBE over 15.0% vol.
(Oxygen Content 2.7% weight) may
reduce vehicle performance and produce
vapour lock or hard starting.
WARNING
Do not "top off" after the nozzle automatically shuts off when refuelling.
Always check that the fuel cap is installed securely to prevent fuel
spillage in the event of an acci-dent.
CAUTION
Never use gasohol which contains
methanol. Discontinue use of any
gasohol product which impairs dri- vability.
CAUTION
Your New Vehicle Limited Warrantymay not cover damage to the fuel
system and any performance prob-lems that are caused by the use of fuels containing methanol or fuelscontaining MTBE (Methyl Tertiary
Butyl Ether) over 15.0% vol.(Oxygen Content 2.7% weight.)
Page 13 of 312
Introduction
6
1
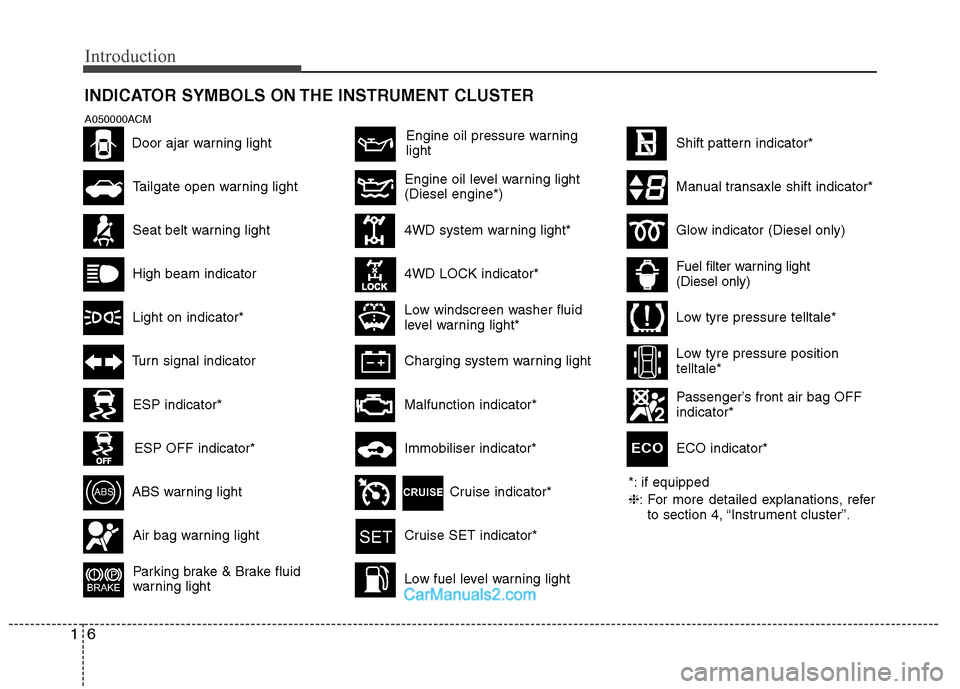
INDICATOR SYMBOLS ON THE INSTRUMENT CLUSTER
Engine oil pressure warning light
*: if equipped ❈: For more detailed explanations, refer
to section 4, “Instrument cluster”.
Passenger’s front air bag OFF indicator*
Seat belt warning light
Tailgate open warning light
High beam indicator
Light on indicator*
Turn signal indicator
ABS warning light
Parking brake & Brake fluid
warning light
4WD system warning light* 4WD LOCK indicator*
Malfunction indicator*
Air bag warning lightCruise SET indicator*
Low fuel level warning light
Shift pattern indicator*
Charging system warning light
Low windscreen washer fluid
level warning light*
Door ajar warning light
Glow indicator (Diesel only)
Fuel filter warning light (Diesel only)
ESP indicator*
ESP OFF indicator*Immobiliser indicator*
Low tyre pressure telltale*
Low tyre pressure position telltale*
A050000ACM
Manual transaxle shift indicator*Engine oil level warning light (Diesel engine*)
ECO indicator*
ECO
Cruise indicator*
Page 15 of 312
Your vehicle at a glance
2
2
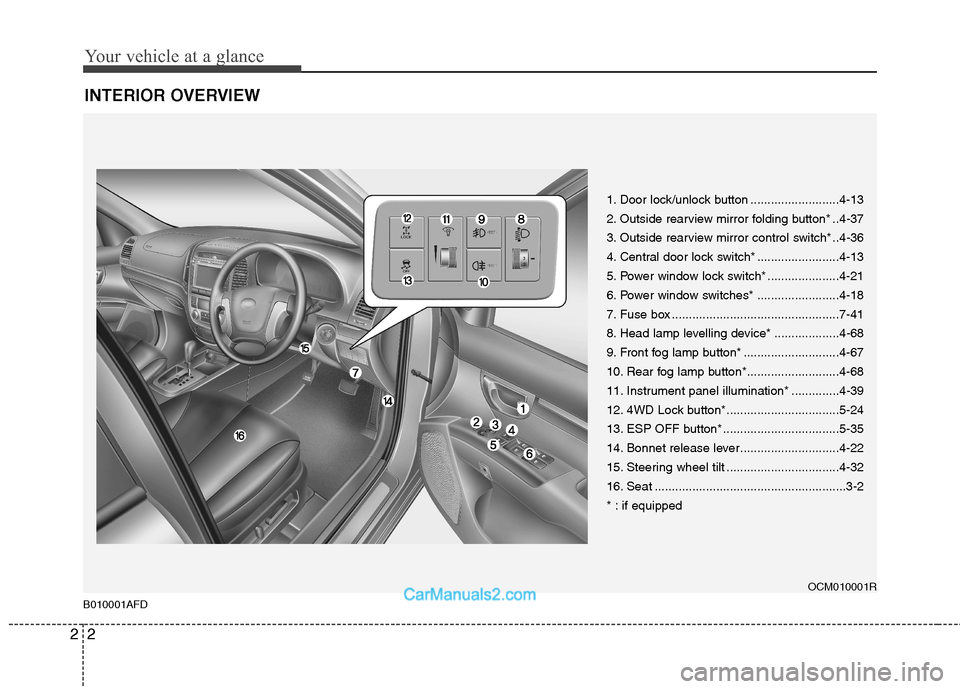
INTERIOR OVERVIEW
B010001AFD
1. Door lock/unlock button ..........................4-13
2. Outside rearview mirror folding button* ..4-37
3. Outside rearview mirror control switch* ..4-36
4. Central door lock switch* ........................4-13
5. Power window lock switch* .....................4-21
6. Power window switches* ........................4-18
7. Fuse box .................................................7-41
8. Head lamp levelling device* ...................4-68
9. Front fog lamp button* ............................4-67
10. Rear fog lamp button*...........................4-68
11. Instrument panel illumination* ..............4-39
12. 4WD Lock button*.................................5-24
13. ESP OFF button* ..................................5-35
14. Bonnet release lever.............................4-22
15. Steering wheel tilt .................................4-32
16. Seat ........................................................3-2
* : if equipped OCM010001R
Page 16 of 312
23
Your vehicle at a glance
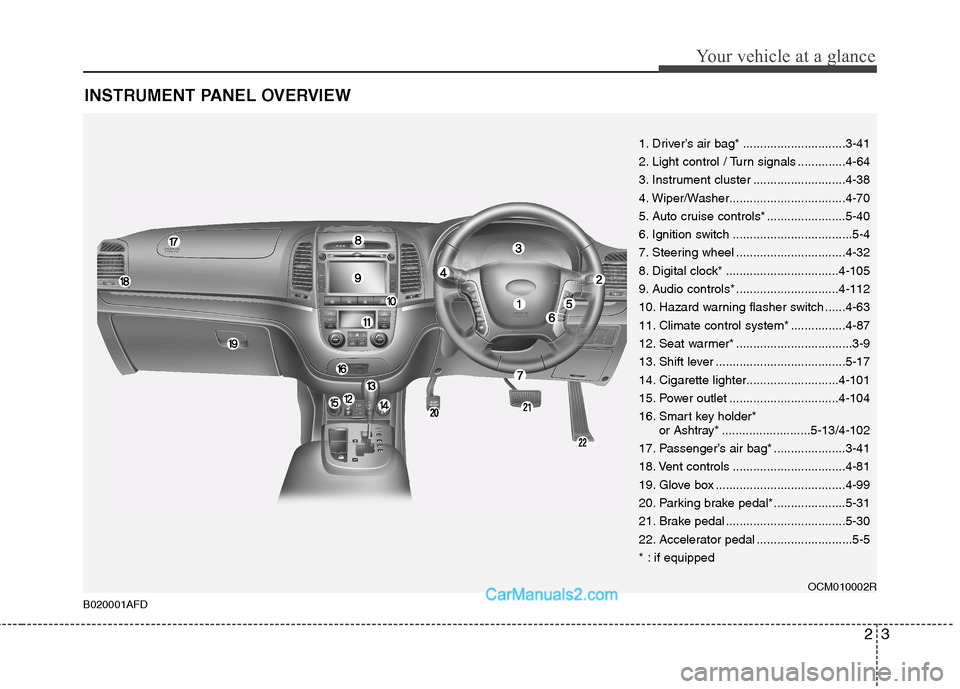
INSTRUMENT PANEL OVERVIEW
1. Driver’s air bag* ..............................3-41
2. Light control / Turn signals ..............4-64
3. Instrument cluster ...........................4-38
4. Wiper/Washer..................................4-70
5. Auto cruise controls* .......................5-40
6. Ignition switch ...................................5-4
7. Steering wheel ................................4-32
8. Digital clock* .................................4-105
9. Audio controls* ..............................4-112
10. Hazard warning flasher switch ......4-63
11. Climate control system* ................4-87
12. Seat warmer* ..................................3-9
13. Shift lever ......................................5-17
14. Cigarette lighter...........................4-101
15. Power outlet ................................4-10416.
Smart key holder*
or Ashtray*..........................5-13/4-102
17. Passenger’s air bag* .....................3-41
18. Vent controls .................................4-81
19. Glove box ......................................4-99
20. Parking brake pedal*.....................5-31
21. Brake pedal ...................................5-30
22. Accelerator pedal ............................5-5
* : if equipped
OCM010002R
B020001AFD
Page 20 of 312
33
Safety system of your vehicle
WARNING- Driver’s seat
Never attempt to adjust seat whilst the vehicle is moving. This
could result in loss of control,and an accident causing death,
serious injury, or property dam-
age.
Do not allow anything to interfere with the normal position of the
seatback. Storing items against a
seatback or in any other way
interfering with proper locking of
a seatback could result in serious
or fatal injury in a sudden stop orcollision.
seatback upright and the lap por-
tion of the seat belt snug and low
across the hips. This is the best
position to protect you in case ofan accident.
In order to avoid unnecessary and perhaps severe air bag
injuries, always sit as far back as
possible from the steering wheel
whilst maintaining comfortable
control of the vehicle. It is recom-
mended that your chest is at least
10 inches (250 mm) away fromthe steering wheel.
WARNING - Uprighting seat
When you return the seatback to its
upright position, hold the seatback
and return it slowly and be surethere are no other occupants
around the seat. If the seatback isreturned without being held and
controlled, the back of the seat
could spring forward resulting in
accidental injury to a person struck
by the seatback.
WARNING - Loose objects
Loose objects in the driver’s foot
area could interfere with the opera-
tion of the foot pedals, possibly
causing an accident. Do not place
anything under the front seats.WARNING - Driver respon-
sibility for front seat pas-
senger
Riding in a vehicle with a front seat-
back reclined could lead to serious
or fatal injury in an accident. If a
front seat is reclined during an
accident, the occupant’s hips may
slide under the lap portion of the
seat belt applying great force to the
unprotected abdomen. Serious orfatal internal injuries could result.
The driver must advise the front
passenger to keep the seatback in
an upright position whenever the
vehicle is in motion.
Page 21 of 312
Safety system of your vehicle
4
3
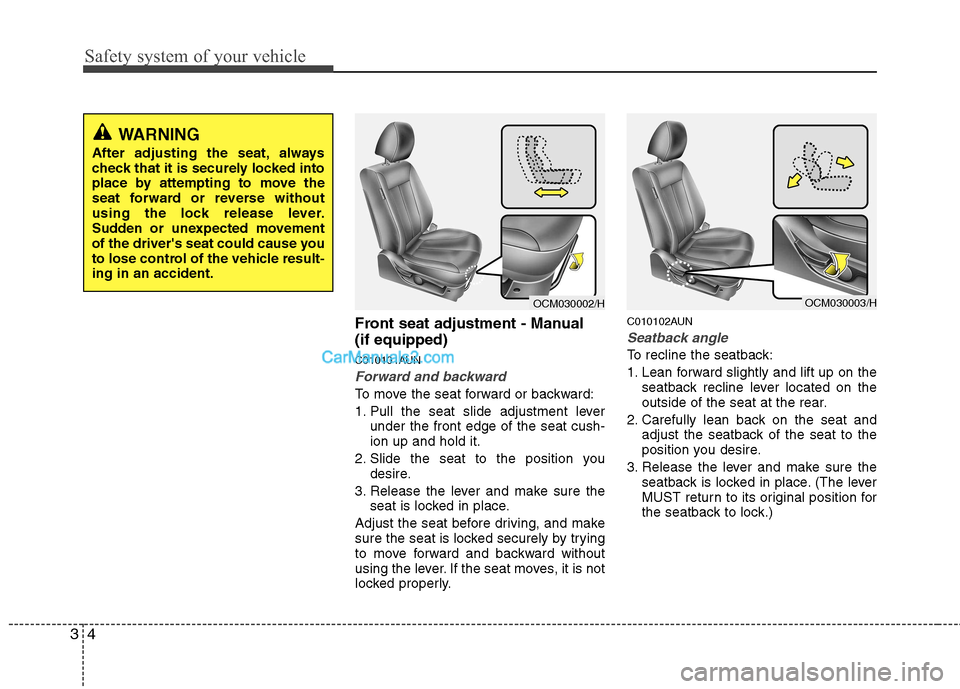
Front seat adjustment - Manual (if equipped)
C010101AUN
Forward and backward
To move the seat forward or backward:
1. Pull the seat slide adjustment lever
under the front edge of the seat cush- ion up and hold it.
2. Slide the seat to the position you desire.
3. Release the lever and make sure the seat is locked in place.
Adjust the seat before driving, and make
sure the seat is locked securely by trying
to move forward and backward without
using the lever. If the seat moves, it is not
locked properly. C010102AUN
Seatback angle
To recline the seatback:
1. Lean forward slightly and lift up on the
seatback recline lever located on the
outside of the seat at the rear.
2. Carefully lean back on the seat and adjust the seatback of the seat to the
position you desire.
3. Release the lever and make sure the seatback is locked in place. (The lever
MUST return to its original position for
the seatback to lock.)
OCM030003/HOCM030002/H
WARNING
After adjusting the seat, always
check that it is securely locked into
place by attempting to move the
seat forward or reverse without
using the lock release lever.
Sudden or unexpected movement
of the driver's seat could cause you
to lose control of the vehicle result-ing in an accident.
Page 26 of 312
39
Safety system of your vehicle
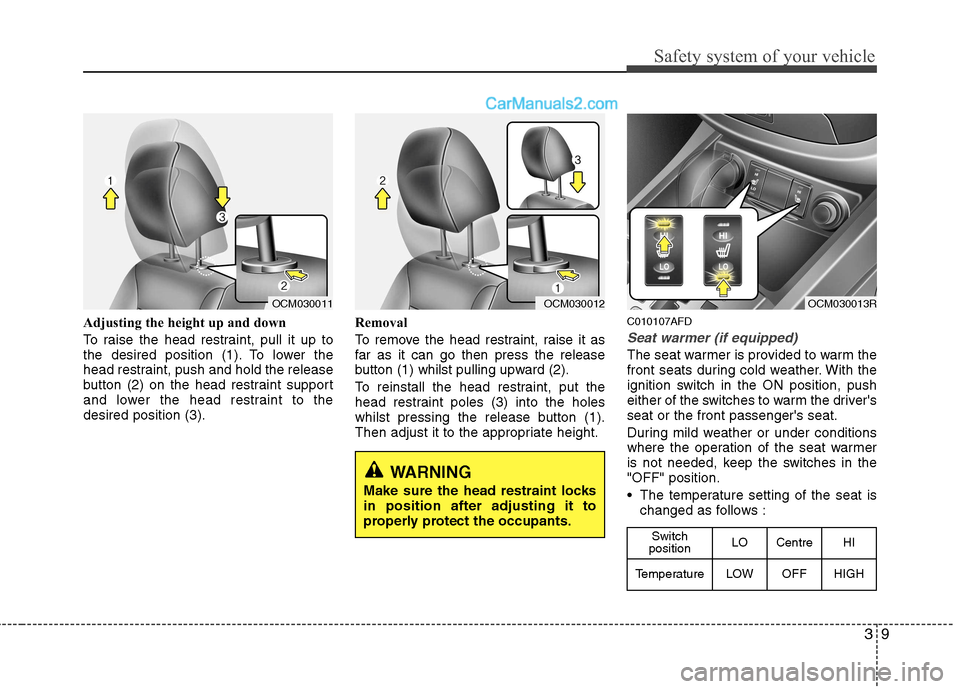
Adjusting the height up and down
To raise the head restraint, pull it up to
the desired position (1). To lower the
head restraint, push and hold the release
button (2) on the head restraint support
and lower the head restraint to thedesired position (3).Removal
To remove the head restraint, raise it as
far as it can go then press the release
button (1) whilst pulling upward (2).
To reinstall the head restraint, put the
head restraint poles (3) into the holes
whilst pressing the release button (1).
Then adjust it to the appropriate height.C010107AFD
Seat warmer (if equipped)
The seat warmer is provided to warm the
front seats during cold weather. With the
ignition switch in the ON position, push
either of the switches to warm the driver'sseat or the front passenger's seat.
During mild weather or under conditions
where the operation of the seat warmer
is not needed, keep the switches in the"OFF" position.
The temperature setting of the seat is
changed as follows :
OCM030012
WARNING
Make sure the head restraint locks in position after adjusting it to
properly protect the occupants.
OCM030011
Switch
position LO Centre HI
TemperatureLOWOFFHIGH
OCM030013R
Page 28 of 312
311
Safety system of your vehicle
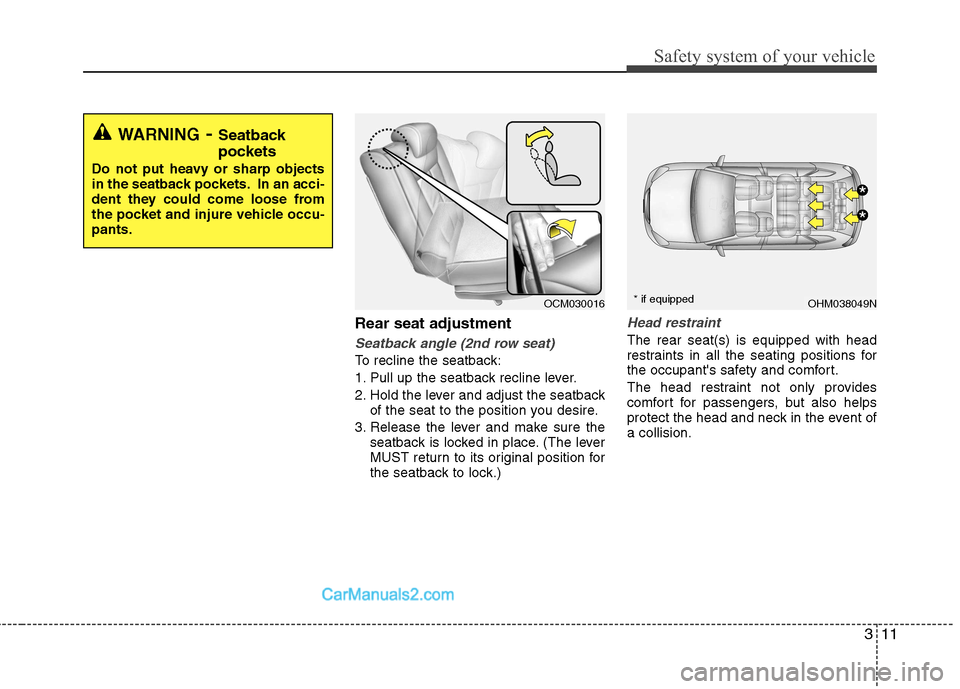
Rear seat adjustment
Seatback angle (2nd row seat)
To recline the seatback:
1. Pull up the seatback recline lever.
2. Hold the lever and adjust the seatbackof the seat to the position you desire.
3. Release the lever and make sure the seatback is locked in place. (The lever
MUST return to its original position for
the seatback to lock.)
Head restraint
The rear seat(s) is equipped with head
restraints in all the seating positions for
the occupant's safety and comfort.
The head restraint not only provides
comfort for passengers, but also helps
protect the head and neck in the event ofa collision.
WARNING - Seatback
pockets
Do not put heavy or sharp objects
in the seatback pockets. In an acci-
dent they could come loose from
the pocket and injure vehicle occu-pants.
OHM038049NOCM030016
*
*
* if equipped
Page 29 of 312
Safety system of your vehicle
12
3
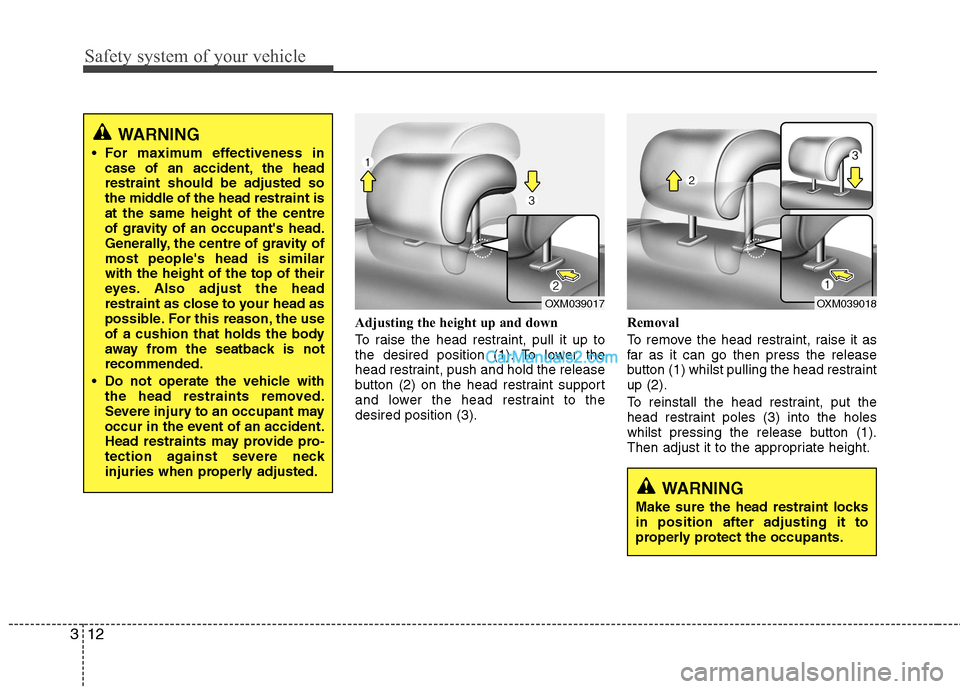
Adjusting the height up and down
To raise the head restraint, pull it up to
the desired position (1). To lower the
head restraint, push and hold the release
button (2) on the head restraint support
and lower the head restraint to thedesired position (3). Removal
To remove the head restraint, raise it as
far as it can go then press the release
button (1) whilst pulling the head restraintup (2).
To reinstall the head restraint, put the
head restraint poles (3) into the holes
whilst pressing the release button (1).
Then adjust it to the appropriate height.
WARNING
For maximum effectiveness in case of an accident, the head restraint should be adjusted so
the middle of the head restraint isat the same height of the centre
of gravity of an occupant's head.
Generally, the centre of gravity ofmost people's head is similarwith the height of the top of their
eyes. Also adjust the head
restraint as close to your head as
possible. For this reason, the use
of a cushion that holds the body
away from the seatback is notrecommended.
Do not operate the vehicle with the head restraints removed.
Severe injury to an occupant may
occur in the event of an accident.
Head restraints may provide pro-
tection against severe neck
injuries when properly adjusted.
OXM039018
WARNING
Make sure the head restraint locks in position after adjusting it to
properly protect the occupants.
OXM039017
Page 31 of 312
Safety system of your vehicle
14
3
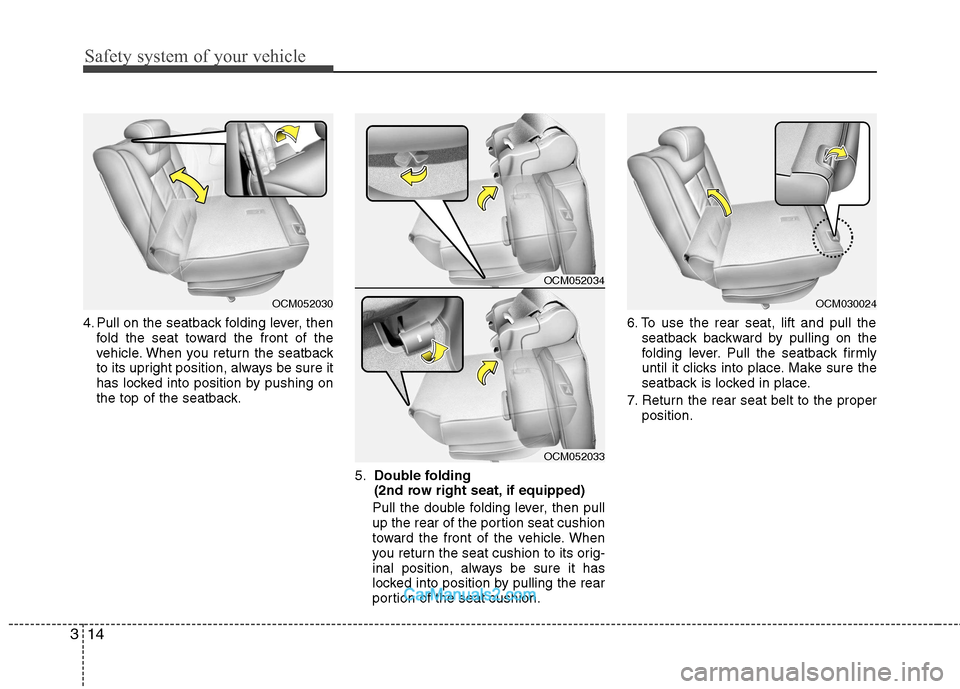
4. Pull on the seatback folding lever, then
fold the seat toward the front of the
vehicle. When you return the seatback
to its upright position, always be sure it
has locked into position by pushing on
the top of the seatback.
5.Double folding
(2nd row right seat, if equipped)
Pull the double folding lever, then pull
up the rear of the portion seat cushion
toward the front of the vehicle. When
you return the seat cushion to its orig-
inal position, always be sure it has
locked into position by pulling the rear
portion of the seat cushion. 6. To use the rear seat, lift and pull the
seatback backward by pulling on the
folding lever. Pull the seatback firmly
until it clicks into place. Make sure the
seatback is locked in place.
7. Return the rear seat belt to the proper position.
OCM052030OCM030024
OCM052034
OCM052033