length Hyundai Santa Fe 2011 Owner's Manual
[x] Cancel search | Manufacturer: HYUNDAI, Model Year: 2011, Model line: Santa Fe, Model: Hyundai Santa Fe 2011Pages: 408, PDF Size: 8.63 MB
Page 35 of 408
Safety system of your vehicle
18
3
Seat belt warning
As a reminder to the driver, the seat belt
warning light will blink for approximately
6 seconds each time you turn the ignition
switch ON regardless of belt fastening.
If the driver's seat belt is not fastened
when the ignition switch is turned on, the
seat belt warning light and the seat belt
warning chime will operate for approxi-
mately 6 seconds. But if it is fastened
within the 6 seconds, the warning light
will blink till the 6 seconds and the warn-
ing chime will turn off immediately. If the driver's seat belt is disconnected
after the ignition switch is turned to the
ON position, the seat belt warning light
will operate for approximately 6 seconds.
But if it is fastened within the 6 seconds,
the warning light will turn off immediately.
If the driver's seat belt is not fastened
when the vehicle speed exceeds 6 mph
(10 km/h), the seat belt warning light and
chime will operate for approximately 11
times with a pattern of 6 seconds on and
24 seconds off until the belt is fastened
or the vehicle speed decreases below 3
mph (5 km/h).
C020102AFD-EU
Seat belt - Driver's 3-point system
with emergency locking retractor
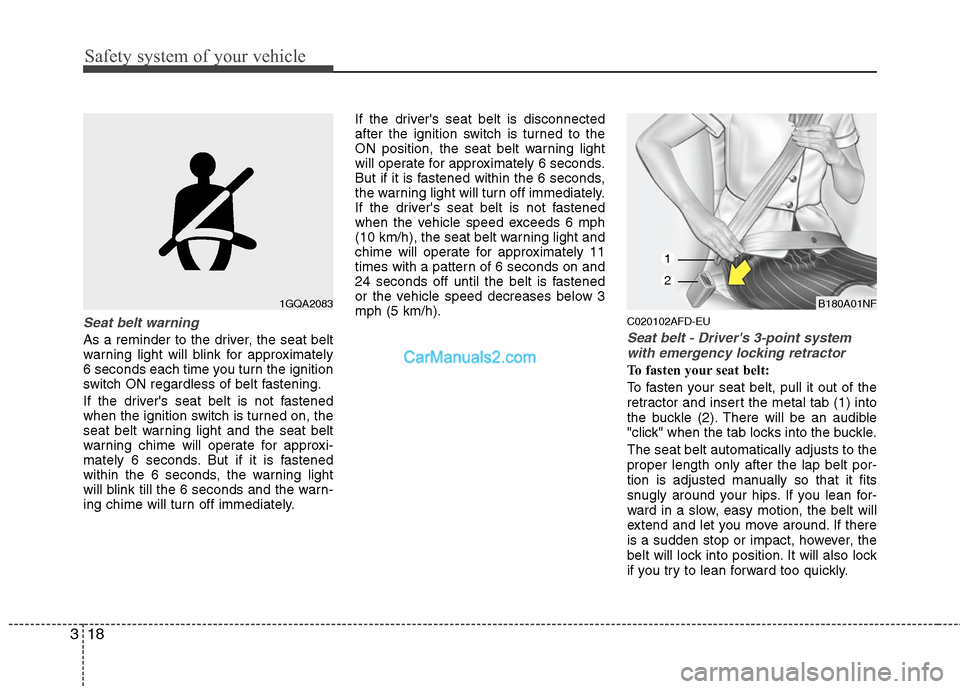
To fasten your seat belt:
To fasten your seat belt, pull it out of the
retractor and insert the metal tab (1) into
the buckle (2). There will be an audible
"click" when the tab locks into the buckle.
The seat belt automatically adjusts to the
proper length only after the lap belt por-
tion is adjusted manually so that it fits
snugly around your hips. If you lean for-
ward in a slow, easy motion, the belt will
extend and let you move around. If there
is a sudden stop or impact, however, the
belt will lock into position. It will also lock
if you try to lean forward too quickly.
1GQA2083
B180A01NF
1
2
Page 37 of 408
Safety system of your vehicle
20
3
C020106AFD
Seat belts - Front passenger and rear
seat 3-point system with combinationlocking retractor
To fasten your seat belt:
Combination retractor type seat belts are
installed in the rear seat positions to help
accommodate the installation of child
restraint systems. Although a combina-
tion retractor is also installed in the front
passenger seat position, it is strongly
recommended that children always be
seated in the rear seat. NEVER place
any infant restraint system in the front
seat of the vehicle.
This type of seat belt combines the fea-
tures of both an emergency locking
retractor seat belt and an automatic lock-
ing retractor seat belt. To fasten your seat
belt, pull it out of the retractor and insert
the metal tab into the buckle. There will
be an audible "click" when the tab locks
into the buckle. When not securing a
child restraint, the seat belt operates in
the same way as the driver's seat belt
(Emergency Locking Retractor Type). It
automatically adjusts to the proper length
only after the lap belt portion of the seat
belt is adjusted manually so that it fits
snugly around your hips. When the seat belt is fully extended from
the retractor to allow the installation of a
child restraint system, the seat belt oper-
ation changes to allow the belt to retract,
but not to extend (Automatic Locking
Retractor Type). Refer to “Using a child
restraint system” in this section.
✽ ✽
NOTICE
Although the combination retractor
provides the same level of protection for
seated passengers in either emergency
or automatic locking modes, it is recom-
mended that seated passengers use the
emergency locking feature for improved
convenience. The automatic locking
function is intended to facilitate child
restraint installation. To convert from
the automatic locking feature to the
emergency locking operation mode,
allow the unbuckled seat belt to fully
retract.
B200A01NF
WARNING
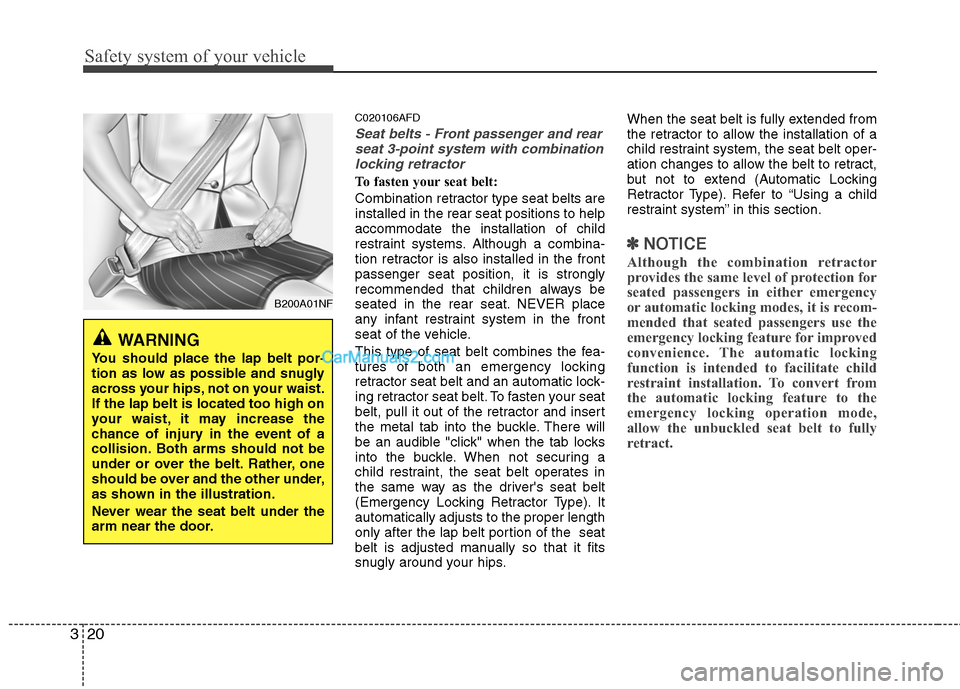
You should place the lap belt por-
tion as low as possible and snugly
across your hips, not on your waist.
If the lap belt is located too high on
your waist, it may increase the
chance of injury in the event of a
collision. Both arms should not be
under or over the belt. Rather, one
should be over and the other under,
as shown in the illustration.
Never wear the seat belt under the
arm near the door.
Page 177 of 408
EXTERIOR FEATURES
D290100AFD
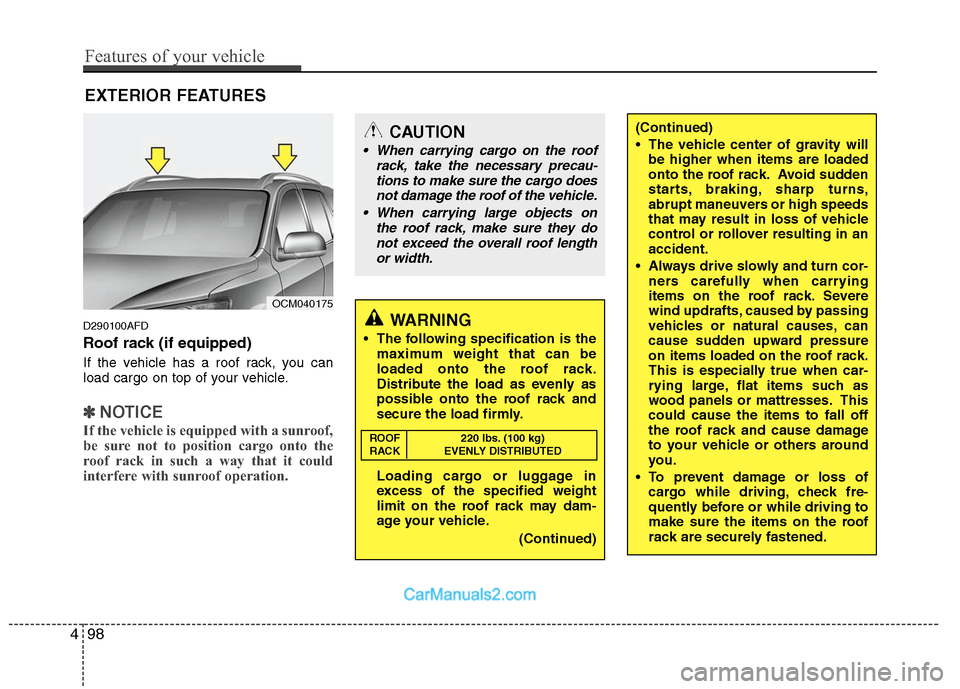
Roof rack (if equipped)
If the vehicle has a roof rack, you can
load cargo on top of your vehicle.
✽ ✽NOTICE
If the vehicle is equipped with a sunroof,
be sure not to position cargo onto the
roof rack in such a way that it could
interfere with sunroof operation.
OCM040175
CAUTION
When carrying cargo on the roof
rack, take the necessary precau-tions to make sure the cargo doesnot damage the roof of the vehicle.
When carrying large objects on the roof rack, make sure they donot exceed the overall roof length or width.
WARNING
The following specification is the maximum weight that can be
loaded onto the roof rack.
Distribute the load as evenly as
possible onto the roof rack and
secure the load firmly.
Loading cargo or luggage in
excess of the specified weight
limit on the roof rack may dam-
age your vehicle.
(Continued)
(Continued)
The vehicle center of gravity willbe higher when items are loaded
onto the roof rack. Avoid sudden
starts, braking, sharp turns,
abrupt maneuvers or high speeds
that may result in loss of vehicle
control or rollover resulting in an
accident.
Always drive slowly and turn cor- ners carefully when carrying
items on the roof rack. Severe
wind updrafts, caused by passing
vehicles or natural causes, can
cause sudden upward pressure
on items loaded on the roof rack.
This is especially true when car-
rying large, flat items such as
wood panels or mattresses. This
could cause the items to fall off
the roof rack and cause damage
to your vehicle or others around
you.
To prevent damage or loss of cargo while driving, check fre-
quently before or while driving to
make sure the items on the roof
rack are securely fastened.
ROOF 220 lbs. (100 kg)
RACK EVENLY DISTRIBUTED
498
Features of your vehicle
Page 208 of 408
4129
Features of your vehicle
The system can recognize single digits
from zero to nine. Numbers that are ten
or greater are not recognized.
To speed up input, it is a good idea to
group all digits into a continuous string.
However, you can enter each digit indi-
vidually or group digits together in pre-
ferred string lengths.
The display corresponding to each oper-
ation appears on the screen as follows:
Input operation
1. say: "Nine, nine, five"Display: "995"
2. say: "Seven, three, four" Display: "995734"
Changing Name
The registered names can be changed.
1. Press the button.
2. Say "phonebook".
3. Say "Change name".
4. Say the name of the phonebook [voice tag].
5. Say "yes".
6. Say the name of the phonebook to be changed.
Deleting name The registered names can be deleted.
1. Press the button.
2. Say "phonebook".
3. Say "Delete name".
4. Say the name of the contact.
5. Say "yes".
■ Making a phone call
Calling by Name
The system dials the numbers corre-
sponding to the spoken names regis-
tered in the system.
1. Press the button.
2. Say "Call".
3. Say "name".
4. Say "
6. Say "
7. Say "yes".
✽ ✽ Tip
A shortcut to each of the following func-
tions is available.
1. Say "Call name".
2. Say "Call
3. Say "Call
Dialing by Number The system will make a phone call by
dialing the spoken numbers.
The system can recognize single digits
from zero to nine.
1. Press the button.
2. Say "Call".
3. Say "Number".
4. Say "
5. Say "
6. Say "Dial".
✽ ✽ Tip
A shortcut to each of the following func-
tions is available.
1. Say "Dial number".
2. Say "Dial
Page 283 of 408
549
Driving your vehicle
E140400AUN
Driving with a trailer
Towing a trailer requires a certain
amount of experience. Before setting out
for the open road, you must get to know
your trailer. Acquaint yourself with the
feel of handling and braking with the
added weight of the trailer. And always
keep in mind that the vehicle you are
driving is now a good deal longer and not
nearly so responsive as your vehicle is
by itself.
Before you start, check the trailer hitch
and platform, safety chains, electrical
connector(s), lights, tires and mirror
adjustment. If the trailer has electric
brakes, start your vehicle and trailer mov-
ing and then apply the trailer brake con-
troller by hand to be sure the brakes are
working. This lets you check your electri-
cal connection at the same time.
During your trip, check occasionally to be
sure that the load is secure, and that the
lights and any trailer brakes are still work-
ing.
E140401AUN
Following distance
Stay at least twice as far behind the vehi-
cle ahead as you would when driving
your vehicle without a trailer. This can
help you avoid situations that require
heavy braking and sudden turns.
E140402AUN
Passing
You’ll need more passing distance up
ahead when you’re towing a trailer. And,
because of the increased vehicle length,
you’ll need to go much farther beyond the
passed vehicle before you can return to
your lane. Due to the added load to the
engine when going uphill the vehicle may
also take longer to pass than it would on
flat ground.
E140403AUN
Backing up
Hold the bottom of the steering wheel
with one hand. Then, to move the trailer
to the left, just move your hand to the left.
To move the trailer to the right, move your
hand to the right. Always back up slowly
and, if possible, have someone guide
you.
E140404AUN
Making turns
When you’re turning with a trailer, make
wider turns than normal. Do this so your
trailer won’t strike soft shoulders, curbs,
road signs, trees, or other objects near
the edge of the road. Avoid jerky or sud-
den maneuvers. Signal well in advance
before turning or lane changes.
Page 393 of 408
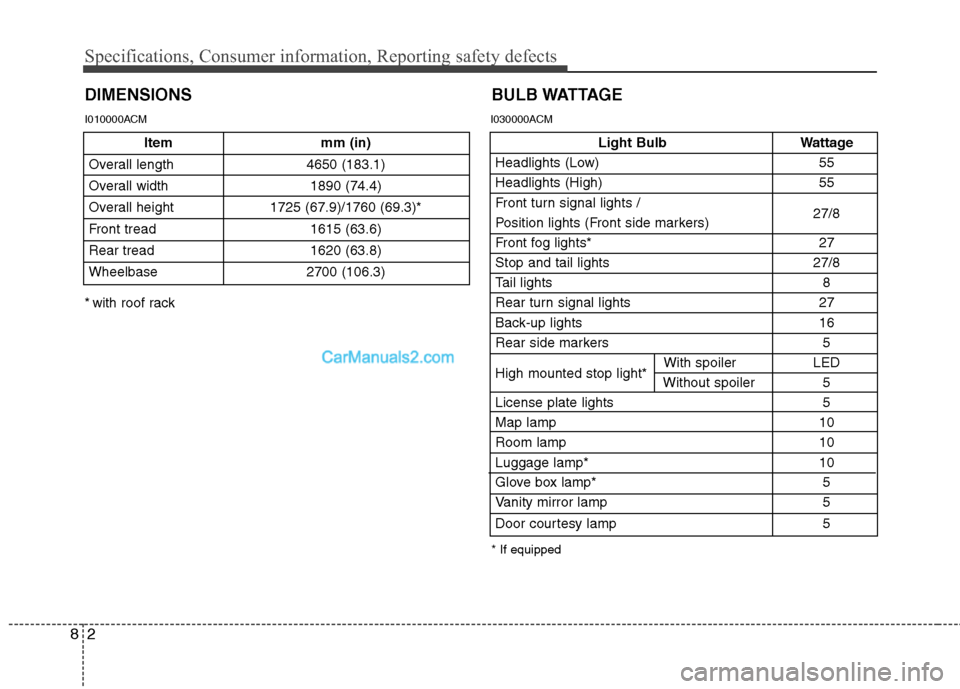
Specifications, Consumer information, Reporting safety defects
2
8
Item mm (in)
Overall length 4650 (183.1)
Overall width 1890 (74.4)
Overall height 1725 (67.9)/1760 (69.3)*
Front tread 1615 (63.6)
Rear tread 1620 (63.8)
Wheelbase 2700 (106.3)
DIMENSIONS
Light Bulb Wattage
Headlights (Low) 55
Headlights (High) 55
Front turn signal lights / 27/8
Position lights (Front side markers)
Front fog lights* 27
Stop and tail lights 27/8
Tail lights 8
Rear turn signal lights 27
Back-up lights 16
Rear side markers 5
High mounted stop light* With spoiler LED
Without spoiler 5
License plate lights 5
Map lamp 10
Room lamp 10
Luggage lamp* 10
Glove box lamp* 5
Vanity mirror lamp 5
Door courtesy lamp 5
BULB WATTAGE
* If equipped
* with roof rack
I010000ACM I030000ACM