alarm Hyundai Santa Fe 2016 Owner's Manual - RHD (UK, Australia)
[x] Cancel search | Manufacturer: HYUNDAI, Model Year: 2016, Model line: Santa Fe, Model: Hyundai Santa Fe 2016Pages: 699, PDF Size: 15.65 MB
Page 99 of 699
Features of your vehicle
Keys . . . . . . . . . . . . . . . . . . . . . . . . . . . . . . . . . . . . . . 4-5
• Record your key number . . . . . . . . . . . . . . . . . . . . . . . 4-5
• Key operations . . . . . . . . . . . . . . . . . . . . . . . . . . . . . . . . 4-5
• Immobiliser system . . . . . . . . . . . . . . . . . . . . . . . . . . . . 4-6
Remote keyless entry . . . . . . . . . . . . . . . . . . . . . . . . 4-8
• System operation . . . . . . . . . . . . . . . . . . . . . . . . . . . . . . 4-8
• Transmitter precautions . . . . . . . . . . . . . . . . . . . . . . . 4-10
• Battery replacement . . . . . . . . . . . . . . . . . . . . . . . . . . 4-11
Smart key . . . . . . . . . . . . . . . . . . . . . . . . . . . . . . . . 4-13
• Smart key function . . . . . . . . . . . . . . . . . . . . . . . . . . . 4-13
• Smart key precautions . . . . . . . . . . . . . . . . . . . . . . . . 4-14
• Door lock/unlock in an emergency situation . . . . . . 4-15
Theft-alarm system . . . . . . . . . . . . . . . . . . . . . . . . 4-17
• Armed stage . . . . . . . . . . . . . . . . . . . . . . . . . . . . . . . . . 4-17
• Theft-alarm stage . . . . . . . . . . . . . . . . . . . . . . . . . . . . 4-19
• Disarmed stage. . . . . . . . . . . . . . . . . . . . . . . . . . . . . . . 4-19
Door locks . . . . . . . . . . . . . . . . . . . . . . . . . . . . . . . . 4-20
• From outside . . . . . . . . . . . . . . . . . . . . . . . . . . . . . . . . 4-20
• From inside . . . . . . . . . . . . . . . . . . . . . . . . . . . . . . . . . 4-21
• Deadlocks . . . . . . . . . . . . . . . . . . . . . . . . . . . . . . . . . . . 4-23
• Door lock/unlock features. . . . . . . . . . . . . . . . . . . . . . 4-23
• Child-protector rear door lock . . . . . . . . . . . . . . . . . 4-24
Tailgate . . . . . . . . . . . . . . . . . . . . . . . . . . . . . . . . . . 4-25
• Non-power tailgate . . . . . . . . . . . . . . . . . . . . . . . . . . . 4-25
• Power tailgate . . . . . . . . . . . . . . . . . . . . . . . . . . . . . . . 4-27• Smart tailgate. . . . . . . . . . . . . . . . . . . . . . . . . . . . . . . . 4-32
• Emergency tailgate safety release . . . . . . . . . . . . . . . 4-36
Windows . . . . . . . . . . . . . . . . . . . . . . . . . . . . . . . . . 4-37
• Power windows . . . . . . . . . . . . . . . . . . . . . . . . . . . . . . 4-38
Bonnet . . . . . . . . . . . . . . . . . . . . . . . . . . . . . . . . . . . 4-42
• Opening the bonnet . . . . . . . . . . . . . . . . . . . . . . . . . . . 4-42
• Closing the bonnet . . . . . . . . . . . . . . . . . . . . . . . . . . . . 4-43
Fuel filler lid . . . . . . . . . . . . . . . . . . . . . . . . . . . . . . 4-44
• Opening the fuel filler lid . . . . . . . . . . . . . . . . . . . . . . 4-44
• Closing the fuel filler lid . . . . . . . . . . . . . . . . . . . . . . . 4-44
• Emergency fuel filler lid release. . . . . . . . . . . . . . . . . 4-46
Panorama sunroof . . . . . . . . . . . . . . . . . . . . . . . . . 4-47
• Sunroof open warning. . . . . . . . . . . . . . . . . . . . . . . . . 4-47
• Sunshade . . . . . . . . . . . . . . . . . . . . . . . . . . . . . . . . . . . 4-48
• Sliding the sunroof . . . . . . . . . . . . . . . . . . . . . . . . . . . 4-49
• Tilting the sunroof . . . . . . . . . . . . . . . . . . . . . . . . . . . . 4-49
• Closing the sunroof . . . . . . . . . . . . . . . . . . . . . . . . . . . 4-50
• Resetting the sunroof . . . . . . . . . . . . . . . . . . . . . . . . . 4-51
Steering wheel . . . . . . . . . . . . . . . . . . . . . . . . . . . . . 4-52
• Electronic power steering . . . . . . . . . . . . . . . . . . . . . . 4-52
• Power steering . . . . . . . . . . . . . . . . . . . . . . . . . . . . . . . 4-53
• Tilt steering . . . . . . . . . . . . . . . . . . . . . . . . . . . . . . . . . 4-53
• Heated steering wheel . . . . . . . . . . . . . . . . . . . . . . . . . 4-54
• Horn . . . . . . . . . . . . . . . . . . . . . . . . . . . . . . . . . . . . . . . 4-55
• Flex steering wheel . . . . . . . . . . . . . . . . . . . . . . . . . . . 4-55
4
Page 115 of 699
417
Features of your vehicle
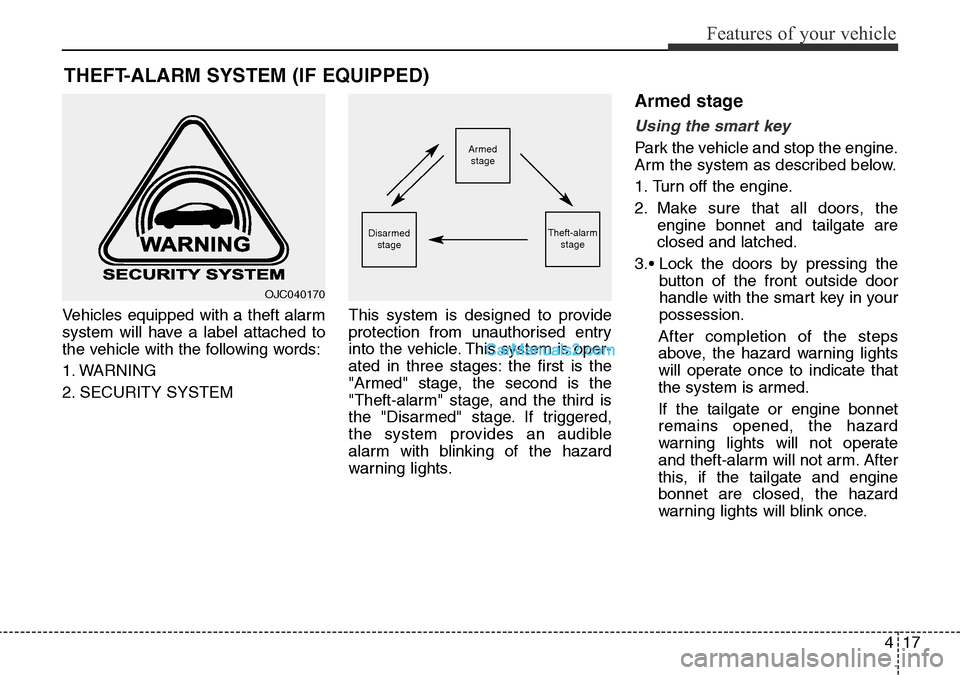
Vehicles equipped with a theft alarm
system will have a label attached to
the vehicle with the following words:
1. WARNING
2. SECURITY SYSTEMThis system is designed to provide
protection from unauthorised entry
into the vehicle. This system is oper-
ated in three stages: the first is the
"Armed" stage, the second is the
"Theft-alarm" stage, and the third is
the "Disarmed" stage. If triggered,
the system provides an audible
alarm with blinking of the hazard
warning lights.
Armed stage
Using the smart key
Park the vehicle and stop the engine.
Arm the system as described below.
1. Turn off the engine.
2. Make sure that all doors, the
engine bonnet and tailgate are
closed and latched.
3.• Lock the doors by pressing the
button of the front outside door
handle with the smart key in your
possession.
After completion of the steps
above, the hazard warning lights
will operate once to indicate that
the system is armed.
If the tailgate or engine bonnet
remains opened, the hazard
warning lights will not operate
and theft-alarm will not arm. After
this, if the tailgate and engine
bonnet are closed, the hazard
warning lights will blink once.
THEFT-ALARM SYSTEM (IF EQUIPPED)
Armed
stage
Theft-alarm
stageDisarmed
stage
OJC040170
Page 116 of 699
Features of your vehicle
18 4
• Lock the doors by pressing the
lock button on the smart key.
After completion of the steps
above, the hazard warning lights
will operate once to indicate that
the system is armed.
If any door, tailgate or engine bon-
net remains open, the hazard
warning lights won't operate and
theft-alarm will not arm. After this,
if all doors, tailgate and engine
bonnet are closed, the hazard
warning lights will blink once.Using the transmitter
Park the vehicle and stop the engine.
Arm the system as described below.
1.Turn off the engine and remove the
ignition key from the ignition switch.
2.Make sure that all doors, the
engine bonnet and tailgate are
closed and latched.
3.Lock the doors by pressing the lock
button on the transmitter.
After completion of the steps
above, the hazard warning lights
will blink once to indicate that the
system is armed.
If any door, tailgate or engine bon-
net remains opened, the hazard
warning lights will not operate and
theft-alarm will not arm. After this, if
all doors, tailgate and engine bon-
net are closed, the hazard warning
lights will blink once.• Do not arm the system until all
passengers have left the vehi-
cle. If the system is armed whilst
a passenger(s) remains in the
vehicle, the alarm may be acti-
vated when the remaining pas-
senger(s) leave the vehicle. If
any door, tailgate or engine bon-
net is opened within 30 seconds
after entering the armed stage,
the system is disarmed to pre-
vent unnecessary alarm.
Page 117 of 699
419
Features of your vehicle
Theft-alarm stage
The alarm will be activated if any of
the following occurs whilst the sys-
tem is armed.
• A front or rear door is opened with-
out using transmitter or smart key.
• The tailgate is opened without
using transmitter or smart key.
• The engine bonnet is opened.
The siren will sound and the hazard
warning lights will blink continuously
for 27 seconds, unless the system is
disarmed. To turn off the system,
unlock the doors with the transmitter
or smart key.
Disarmed stage
The system will be disarmed when:
Transmitter
- The door unlock button is pressed.
- The engine is started.
- The ignition switch is in the “ON”
position for 30 seconds or more.
Smart key
- The door unlock button is pressed.
- The button of the front outside door
is pressed whilst carrying the smart
key.
- The engine is started.
- The engine start/stop button is
turned to the ON position.
After the doors are unlocked, the haz-
ard warning lights will blink twice to
indicate that the system is disarmed.
After pressing the unlock button, if
any door (or tailgate) is not opened
within 30 seconds, the system will be
rearmed.
✽NOTICE
• Without smart key system
If the system is not disarmed with
the transmitter, insert the key into
the ignition switch and start the
engine. Then the system will be
disarmed.
• With smart key system
If the system is not disarmed with
the smart key, open the door with
the mechanical key and start the
engine. Then the system will be
disarmed.
• If you lose your keys, we recom-
mend that you consult with your
HYUNDAI authorised repairer.
CAUTION
Do not change, alter or adjust
the theft-alarm system because
it could cause the theft-alarm
system to malfunction and we
recommend that the system be
serviced by a HYUNDAI autho-
rised repairer.
Malfunctions caused by improp-
er alterations, adjustments or
modifications to the theft-alarm
system are not covered by your
vehicle manufacturer warranty.
Page 166 of 699
Features of your vehicle
68 4
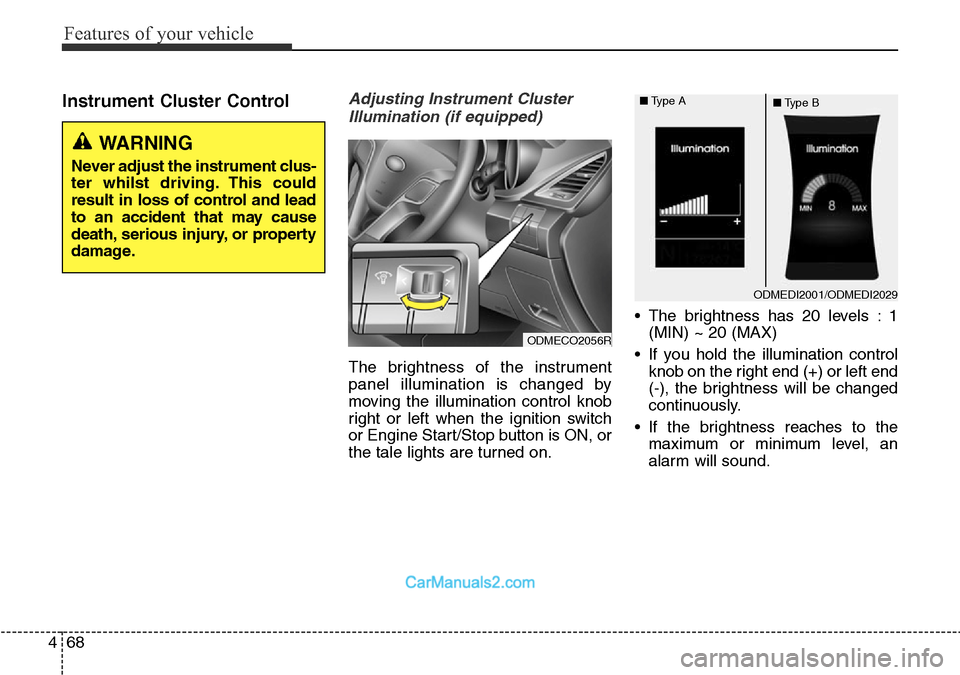
Instrument Cluster ControlAdjusting Instrument Cluster
Illumination (if equipped)
The brightness of the instrument
panel illumination is changed by
moving the illumination control knob
right or left when the ignition switch
or Engine Start/Stop button is ON, or
the tale lights are turned on.• The brightness has 20 levels : 1
(MIN) ~ 20 (MAX)
• If you hold the illumination control
knob on the right end (+) or left end
(-), the brightness will be changed
continuously.
• If the brightness reaches to the
maximum or minimum level, an
alarm will sound.
ODMEDI2001/ODMEDI2029 ■Type A
■Type B
ODMECO2056R
WARNING
Never adjust the instrument clus-
ter whilst driving. This could
result in loss of control and lead
to an accident that may cause
death, serious injury, or property
damage.
Page 468 of 699

Driving your vehicle
10 5
ENGINE START/STOP BUTTON (IF EQUIPPED)
Illuminated engine start/stop
button
Whenever the front door is opened,
the engine start/stop button will illu-
minate for your convenience. The
light will go off after about 30 sec-
onds when the door is closed. It will
also go off immediately when the
theft-alarm system is armed.
Engine start/stop button posi-
tion
OFF
With manual transaxle
To turn off the engine (START/RUN
position) or vehicle power (ON posi-
tion), stop the vehicle then press the
engine start/stop button.
With automatic transaxle
To turn off the engine (START/RUN
position) or vehicle power (ON posi-
tion), press the engine start/stop but-
ton with the shift lever in the P (Park)
position. When you press the engine
start/stop button without the shift
lever in the P (Park) position, the
engine start/stop button will not
change to the OFF position but to the
ACC position.Vehicles equipped with anti-theft
steering column lock
The steering wheel locks when the
engine start/stop button is in the OFF
position to protect you against theft.
It locks when the door is opened.
If the steering wheel is not locked
properly when you open the driver's
door, the warning chime will sound.
Try locking the steering wheel again.
If the problem is not solved, we rec-
ommend that the system be checked
by a HYUNDAI authorised repairer.
In addition, if the engine start/stop
button is in the OFF position after the
driver's door is opened, the steering
wheel will not lock and the warning
chime will sound. In such a situation,
close the door. Then the steering
wheel will lock and the warning
chime will stop.
White
ODMEDR2201R
Page 650 of 699
753
Maintenance
DescriptionSymbol Fuse ratingProtected Component
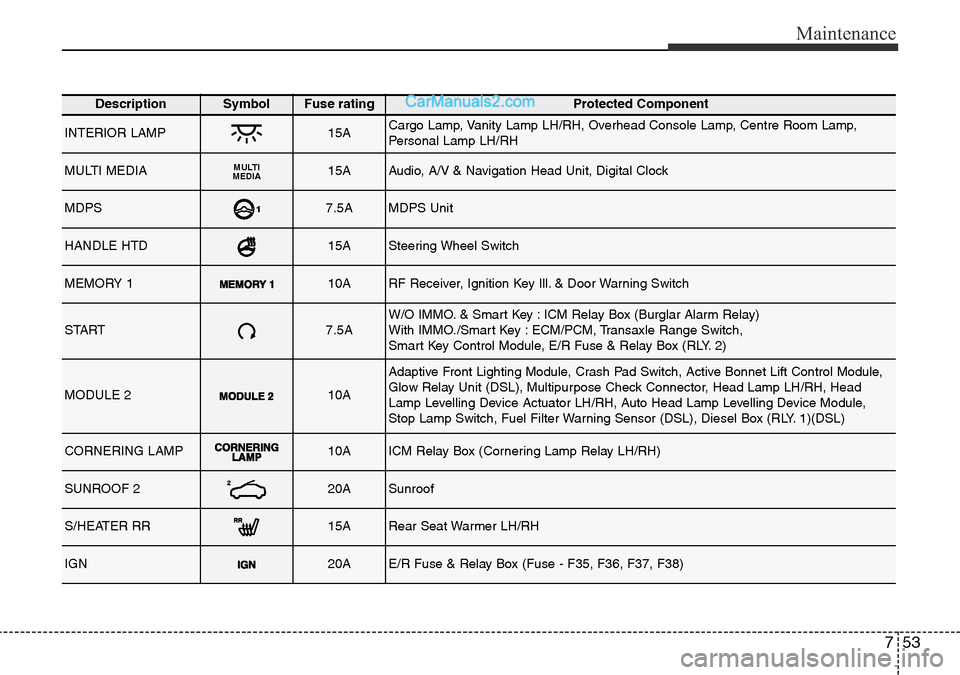
INTERIOR LAMP15ACargo Lamp, Vanity Lamp LH/RH, Overhead Console Lamp, Centre Room Lamp,
Personal Lamp LH/RH
MULTI MEDIAMULTI
MEDIA15AAudio, A/V & Navigation Head Unit, Digital Clock
MDPS7.5AMDPS Unit
HANDLE HTD15ASteering Wheel Switch
MEMORY 110ARF Receiver, Ignition Key Ill. & Door Warning Switch
START7.5AW/O IMMO. & Smart Key : ICM Relay Box (Burglar Alarm Relay)
With IMMO./Smart Key : ECM/PCM, Transaxle Range Switch,
Smart Key Control Module, E/R Fuse & Relay Box (RLY. 2)
MODULE 210A
Adaptive Front Lighting Module, Crash Pad Switch, Active Bonnet Lift Control Module,
Glow Relay Unit (DSL), Multipurpose Check Connector, Head Lamp LH/RH, Head
Lamp Levelling Device Actuator LH/RH, Auto Head Lamp Levelling Device Module,
Stop Lamp Switch, Fuel Filter Warning Sensor (DSL), Diesel Box (RLY. 1)(DSL)
CORNERING LAMP 10AICM Relay Box (Cornering Lamp Relay LH/RH)
SUNROOF 220ASunroof
S/HEATER RR15ARear Seat Warmer LH/RH
IGN20AE/R Fuse & Relay Box (Fuse - F35, F36, F37, F38)
Page 658 of 699
761
Maintenance
DescriptionSymbol Fuse ratingProtected Component
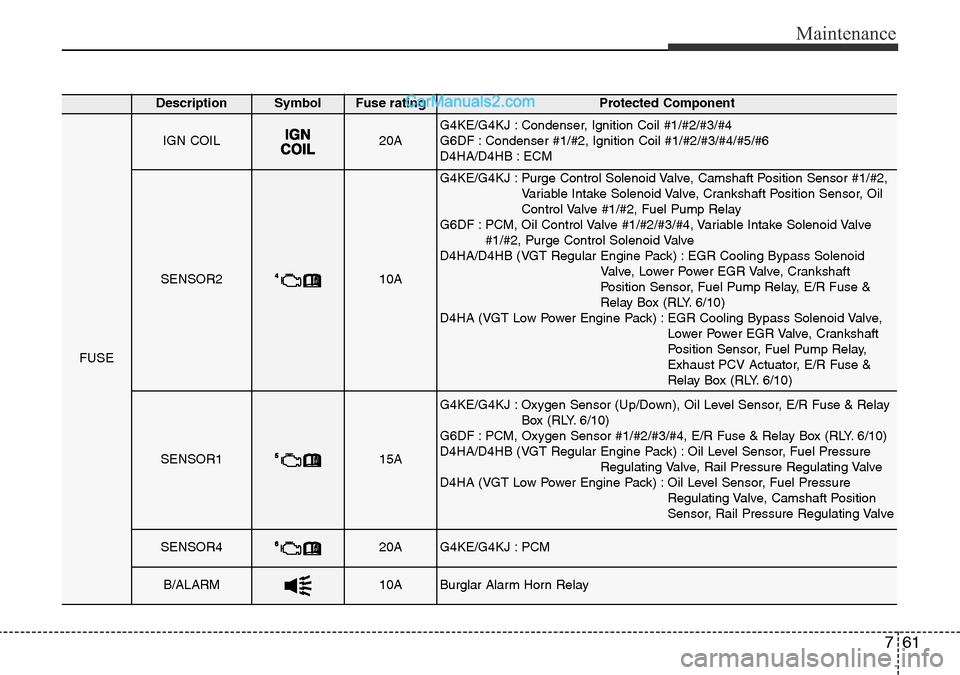
FUSE
IGN COIL20AG4KE/G4KJ : Condenser, Ignition Coil #1/#2/#3/#4
G6DF : Condenser #1/#2, Ignition Coil #1/#2/#3/#4/#5/#6
D4HA/D4HB : ECM
SENSOR210A
G4KE/G4KJ : Purge Control Solenoid Valve, Camshaft Position Sensor #1/#2,
Variable Intake Solenoid Valve, Crankshaft Position Sensor, Oil
Control Valve #1/#2, Fuel Pump Relay
G6DF : PCM, Oil Control Valve #1/#2/#3/#4, Variable Intake Solenoid Valve
#1/#2, Purge Control Solenoid Valve
D4HA/D4HB (VGT Regular Engine Pack) : EGR Cooling Bypass Solenoid
Valve, Lower Power EGR Valve, Crankshaft
Position Sensor, Fuel Pump Relay, E/R Fuse &
Relay Box (RLY. 6/10)
D4HA (VGT Low Power Engine Pack) : EGR Cooling Bypass Solenoid Valve,
Lower Power EGR Valve, Crankshaft
Position Sensor, Fuel Pump Relay,
Exhaust PCV Actuator, E/R Fuse &
Relay Box (RLY. 6/10)
SENSOR115A
G4KE/G4KJ : Oxygen Sensor (Up/Down), Oil Level Sensor, E/R Fuse & Relay
Box (RLY. 6/10)
G6DF : PCM, Oxygen Sensor #1/#2/#3/#4, E/R Fuse & Relay Box (RLY. 6/10)
D4HA/D4HB (VGT Regular Engine Pack) : Oil Level Sensor, Fuel Pressure
Regulating Valve, Rail Pressure Regulating Valve
D4HA (VGT Low Power Engine Pack) : Oil Level Sensor, Fuel Pressure
Regulating Valve, Camshaft Position
Sensor, Rail Pressure Regulating Valve
SENSOR420AG4KE/G4KJ : PCM
B/ALARM10ABurglar Alarm Horn Relay