seat adjustment Hyundai Santa Fe 2019 Owner's Manual - RHD (UK, Australia)
[x] Cancel search | Manufacturer: HYUNDAI, Model Year: 2019, Model line: Santa Fe, Model: Hyundai Santa Fe 2019Pages: 682, PDF Size: 16.24 MB
Page 25 of 682
2-4
Safety system of your vehicle
SEATS
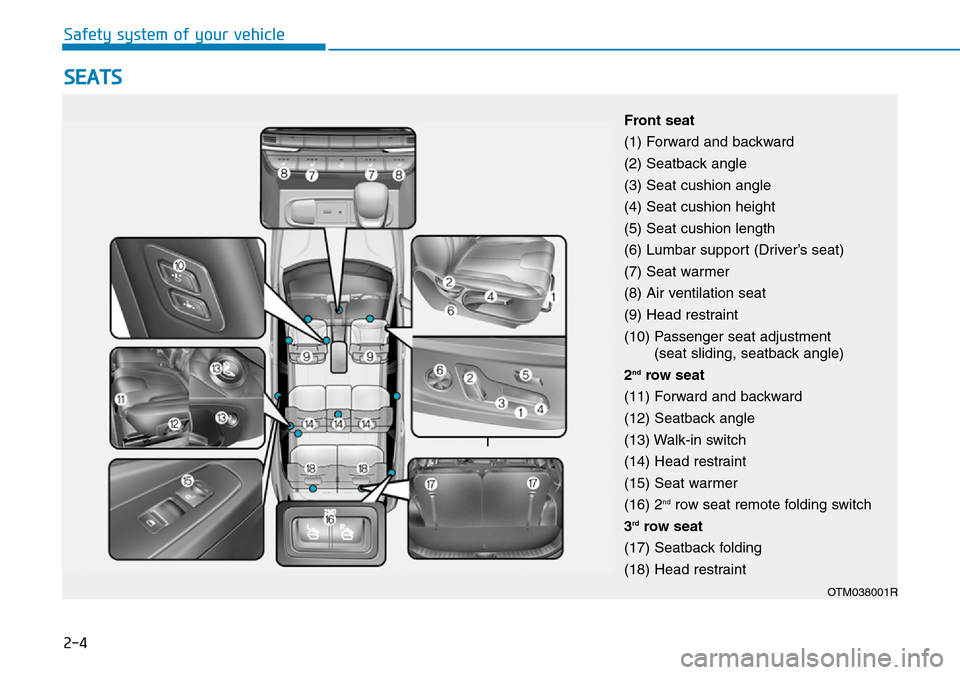
Front seat
(1) Forward and backward
(2) Seatback angle
(3) Seat cushion angle
(4) Seat cushion height
(5) Seat cushion length
(6) Lumbar support (Driver’s seat)
(7) Seat warmer
(8) Air ventilation seat
(9) Head restraint
(10) Passenger seat adjustment
(seat sliding, seatback angle)
2
ndrow seat
(11) Forward and backward
(12) Seatback angle
(13) Walk-in switch
(14) Head restraint
(15) Seat warmer
(16) 2
ndrow seat remote folding switch
3
rdrow seat
(17) Seatback folding
(18) Head restraint
OTM038001R
Page 28 of 682
2-7
Safety system of your vehicle
2
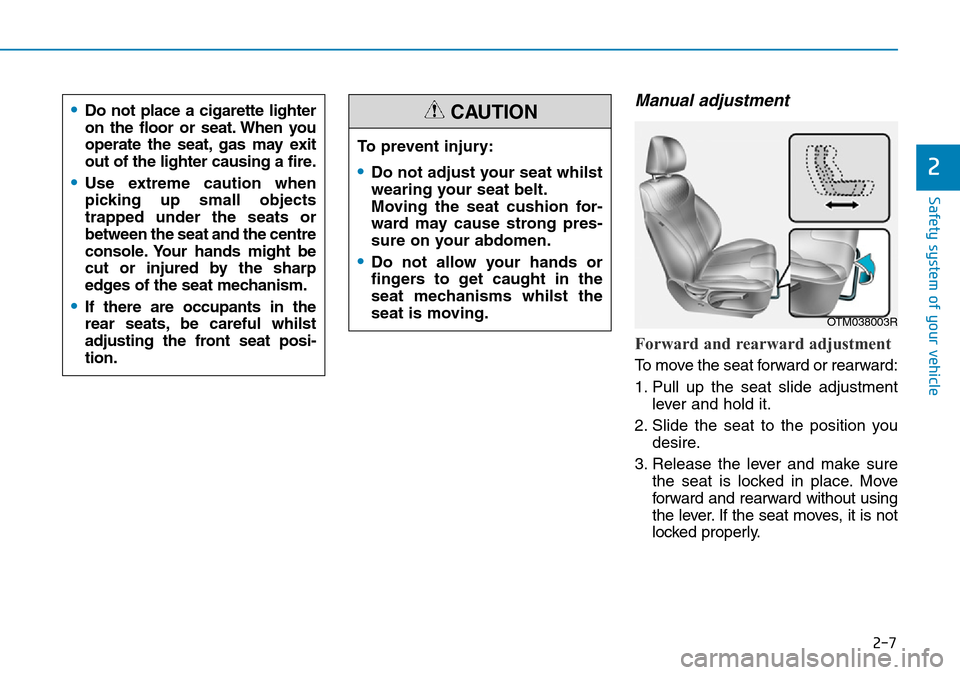
Manual adjustment
Forward and rearward adjustment
To move the seat forward or rearward:
1. Pull up the seat slide adjustment
lever and hold it.
2. Slide the seat to the position you
desire.
3. Release the lever and make sure
the seat is locked in place. Move
forward and rearward without using
the lever. If the seat moves, it is not
locked properly. To prevent injury:
•Do not adjust your seat whilst
wearing your seat belt.
Moving the seat cushion for-
ward may cause strong pres-
sure on your abdomen.
•Do not allow your hands or
fingers to get caught in the
seat mechanisms whilst the
seat is moving.
CAUTION•Do not place a cigarette lighter
on the floor or seat. When you
operate the seat, gas may exit
out of the lighter causing a fire.
•Use extreme caution when
picking up small objects
trapped under the seats or
between the seat and the centre
console. Your hands might be
cut or injured by the sharp
edges of the seat mechanism.
•If there are occupants in the
rear seats, be careful whilst
adjusting the front seat posi-
tion.OTM038003R
Page 30 of 682
2-9
Safety system of your vehicle
2
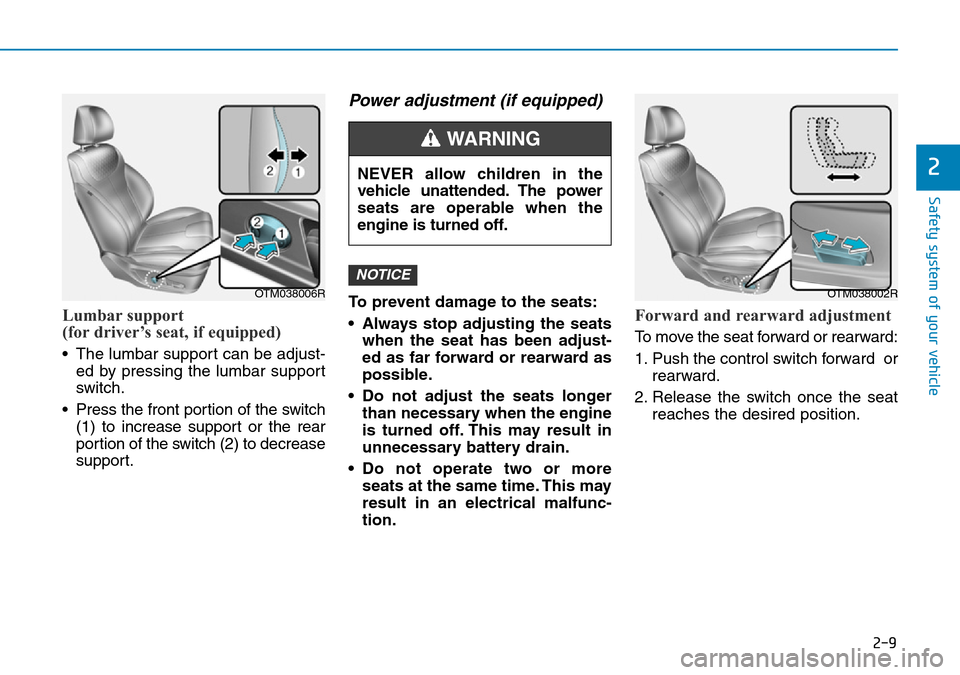
Lumbar support
(for driver’s seat, if equipped)
• The lumbar support can be adjust-
ed by pressing the lumbar support
switch.
• Press the front portion of the switch
(1) to increase support or the rear
portion of the switch (2) to decrease
support.
Power adjustment (if equipped)
To prevent damage to the seats:
• Always stop adjusting the seats
when the seat has been adjust-
ed as far forward or rearward as
possible.
• Do not adjust the seats longer
than necessary when the engine
is turned off. This may result in
unnecessary battery drain.
• Do not operate two or more
seats at the same time. This may
result in an electrical malfunc-
tion.Forward and rearward adjustment
To move the seat forward or rearward:
1. Push the control switch forward or
rearward.
2. Release the switch once the seat
reaches the desired position.
NOTICE
NEVER allow children in the
vehicle unattended. The power
seats are operable when the
engine is turned off.
WARNING
OTM038002ROTM038006R
Page 33 of 682
2-12
Safety system of your vehicle
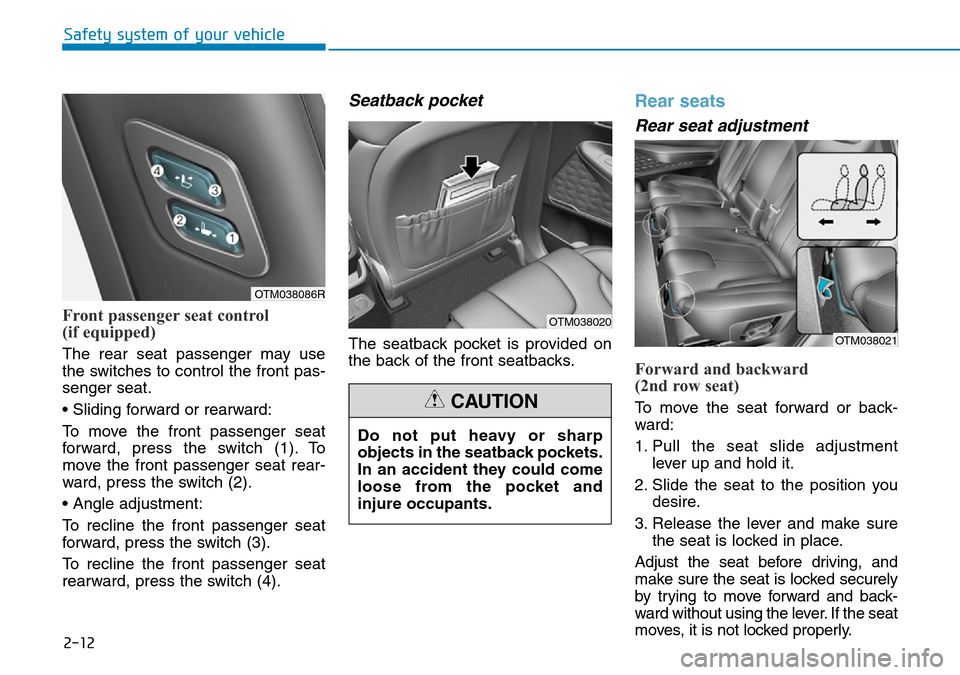
Front passenger seat control
(if equipped)
The rear seat passenger may use
the switches to control the front pas-
senger seat.
• Sliding forward or rearward:
To move the front passenger seat
forward, press the switch (1). To
move the front passenger seat rear-
ward, press the switch (2).
• Angle adjustment:
To recline the front passenger seat
forward, press the switch (3).
To recline the front passenger seat
rearward, press the switch (4).
Seatback pocket
The seatback pocket is provided on
the back of the front seatbacks.
Rear seats
Rear seat adjustment
Forward and backward
(2nd row seat)
To move the seat forward or back-
ward:
1. Pull the seat slide adjustment
lever up and hold it.
2. Slide the seat to the position you
desire.
3. Release the lever and make sure
the seat is locked in place.
Adjust the seat before driving, and
make sure the seat is locked securely
by trying to move forward and back-
ward without using the lever. If the seat
moves, it is not locked properly.
OTM038086R
OTM038020
Do not put heavy or sharp
objects in the seatback pockets.
In an accident they could come
loose from the pocket and
injure occupants.
CAUTION
OTM038021
Page 41 of 682
2-20
Safety system of your vehicle
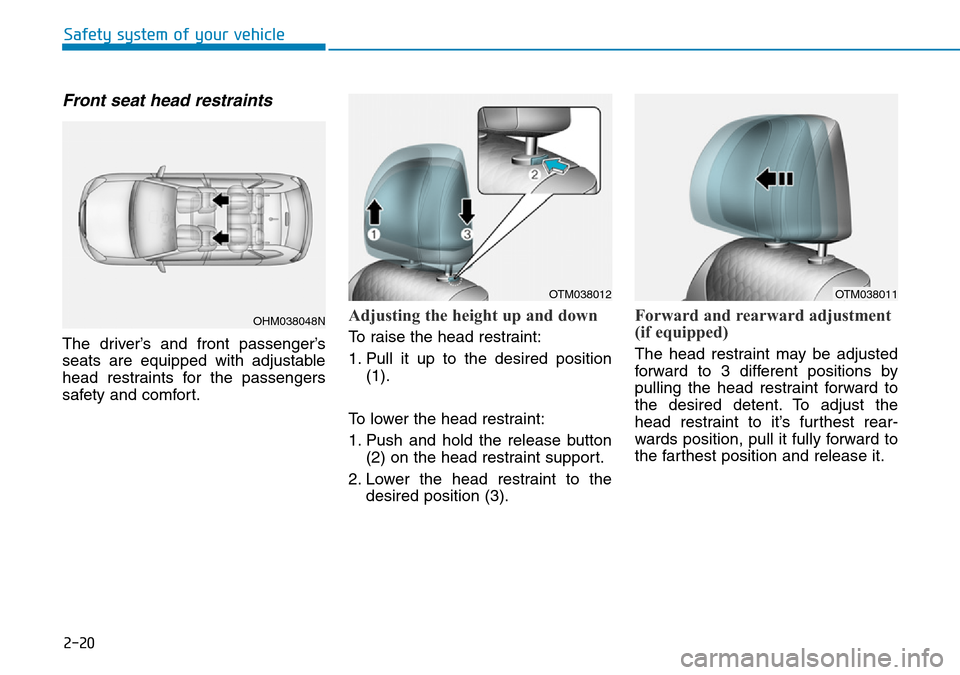
Front seat head restraints
The driver’s and front passenger’s
seats are equipped with adjustable
head restraints for the passengers
safety and comfort.
Adjusting the height up and down
To raise the head restraint:
1. Pull it up to the desired position
(1).
To lower the head restraint:
1. Push and hold the release button
(2) on the head restraint support.
2. Lower the head restraint to the
desired position (3).
Forward and rearward adjustment
(if equipped)
The head restraint may be adjusted
forward to 3 different positions by
pulling the head restraint forward to
the desired detent. To adjust the
head restraint to it’s furthest rear-
wards position, pull it fully forward to
the farthest position and release it.
OHM038048N
OTM038012OTM038011
Page 53 of 682
2-32
Safety system of your vehicle
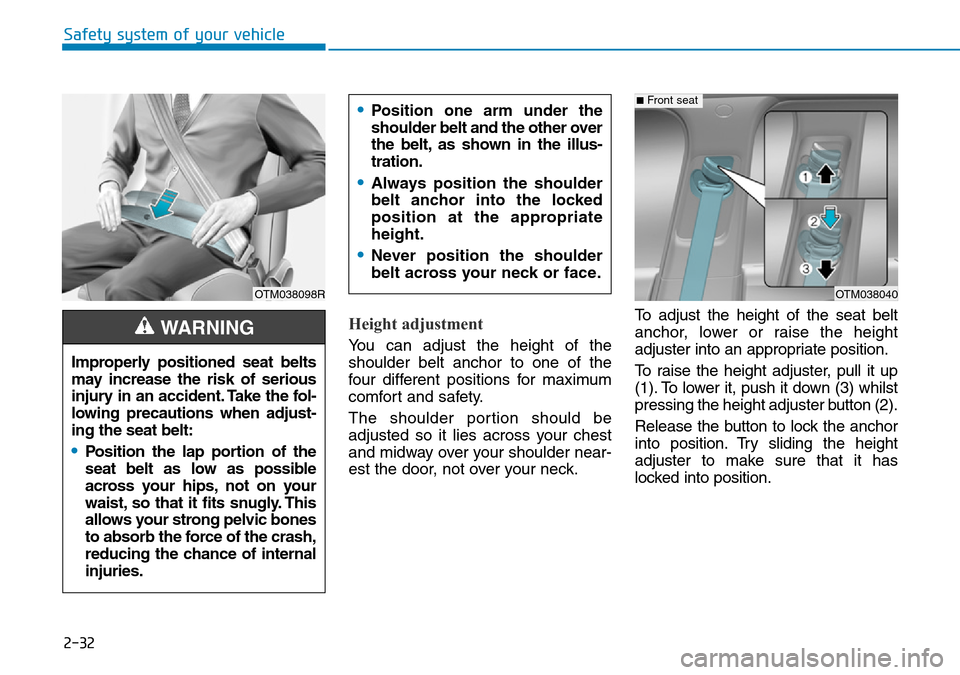
Height adjustment
You can adjust the height of the
shoulder belt anchor to one of the
four different positions for maximum
comfort and safety.
The shoulder portion should be
adjusted so it lies across your chest
and midway over your shoulder near-
est the door, not over your neck.To adjust the height of the seat belt
anchor, lower or raise the height
adjuster into an appropriate position.
To raise the height adjuster, pull it up
(1). To lower it, push it down (3) whilst
pressing the height adjuster button (2).
Release the button to lock the anchor
into position. Try sliding the height
adjuster to make sure that it has
locked into position.
OTM038098R
Improperly positioned seat belts
may increase the risk of serious
injury in an accident. Take the fol-
lowing precautions when adjust-
ing the seat belt:
•Position the lap portion of the
seat belt as low as possible
across your hips, not on your
waist, so that it fits snugly. This
allows your strong pelvic bones
to absorb the force of the crash,
reducing the chance of internal
injuries.
WARNING
•Position one arm under the
shoulder belt and the other over
the belt, as shown in the illus-
tration.
•Always position the shoulder
belt anchor into the locked
position at the appropriate
height.
•Never position the shoulder
belt across your neck or face.
OTM038040
■Front seat
Page 116 of 682
3-25
Convenient features of your vehicle
You can activate or deactivate the
Easy Access Function from the User
Settings mode on the LCD display.
- Seat easy access: Convenience →
Seat easy access →Off/
Normal/Extended.
- Steering easy access: Convenience
→Steering easy access →On/Off.
For more details, refer to "LCD
Display" in this chapter.Driver position memory system
reset
If the Driver position memory system
does not work properly, initialise the
system as follows.
How to initialise:
1. Stop the vehicle and open the dri-
ver’s door with the Engine Start/
Stop button in the ON position and
the vehicle shifted to P (Park).
2. Pull the driver’s seat forward as far
as possible and have the seatback
upright as much as possible using
the driver’s seat forward/backward
adjustment and seatback angle
(recline) switches.
3. Push the SET button and seat for-
ward movement switch for 2 sec-
onds simultaneously.Initialisation in the process:
1. Initialisation begins as the alarm
sounds.
2. The seat and seatback will auto-
matically move backwards. The
alarm sound will continue whilst
the system is in operation.
3. Initialisation will be complete after
the seat and seatback move to the
centre with an alarm sound. If,
however, cases as follows occur,
the initialisation process will come
to a stop and the alarm sound will
stop as well.
- When pushing driving position
memory system button
- When pushing driver’s seat
height adjustment switch
- When shifting from P (Park) to
other positions
- When driving speed exceeds
2mph (3 km/h)
- When the driver’s door is closed
3
Driver should be cautious when
using this function to assure no
injury to passenger or child on
the back seat. In case of emer-
gency the driver has to stop
movement of front seat (when
easy access feature is activat-
ed) by pressing SET button or
any of the driver seat control
switches.
CAUTION
Page 120 of 682
3-29
Convenient features of your vehicle
MIRRORS
3
Inside rearview mirror
Before you start driving, adjust the
rearview mirror to the centre on the
view through the rear window.When cleaning the mirror, use a
paper towel or similar material
dampened with glass cleaner. Do
not spray glass cleaner directly on
the mirror as that may cause the
liquid cleaner to enter the mirror
housing.
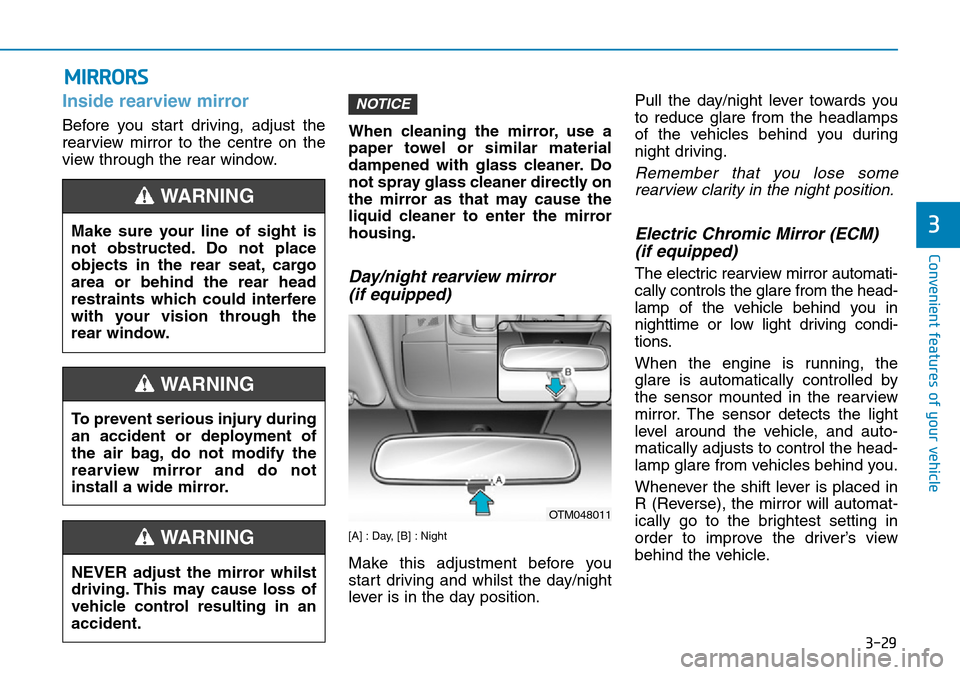
Day/night rearview mirror
(if equipped)
[A] : Day, [B] : Night
Make this adjustment before you
start driving and whilst the day/night
lever is in the day position.Pull the day/night lever towards you
to reduce glare from the headlamps
of the vehicles behind you during
night driving.
Remember that you lose some
rearview clarity in the night position.
Electric Chromic Mirror (ECM)
(if equipped)
The electric rearview mirror automati-
cally controls the glare from the head-
lamp of the vehicle behind you in
nighttime or low light driving condi-
tions.
When the engine is running, the
glare is automatically controlled by
the sensor mounted in the rearview
mirror. The sensor detects the light
level around the vehicle, and auto-
matically adjusts to control the head-
lamp glare from vehicles behind you.
Whenever the shift lever is placed in
R (Reverse), the mirror will automat-
ically go to the brightest setting in
order to improve the driver’s view
behind the vehicle.
NOTICE
NEVER adjust the mirror whilst
driving. This may cause loss of
vehicle control resulting in an
accident.
WARNING
Make sure your line of sight is
not obstructed. Do not place
objects in the rear seat, cargo
area or behind the rear head
restraints which could interfere
with your vision through the
rear window.
WARNING
To prevent serious injury during
an accident or deployment of
the air bag, do not modify the
rearview mirror and do not
install a wide mirror.
WARNING
OTM048011