Cargo Hyundai Santa Fe 2019 Owner's Manual
[x] Cancel search | Manufacturer: HYUNDAI, Model Year: 2019, Model line: Santa Fe, Model: Hyundai Santa Fe 2019Pages: 557, PDF Size: 14.8 MB
Page 32 of 557
2-14
Safety system of your vehicle
Folding the rear seat
The rear seatbacks can be folded to
facilitate carrying long items or to
increase the luggage capacity of the
vehicle.To fold down the rear seatback:
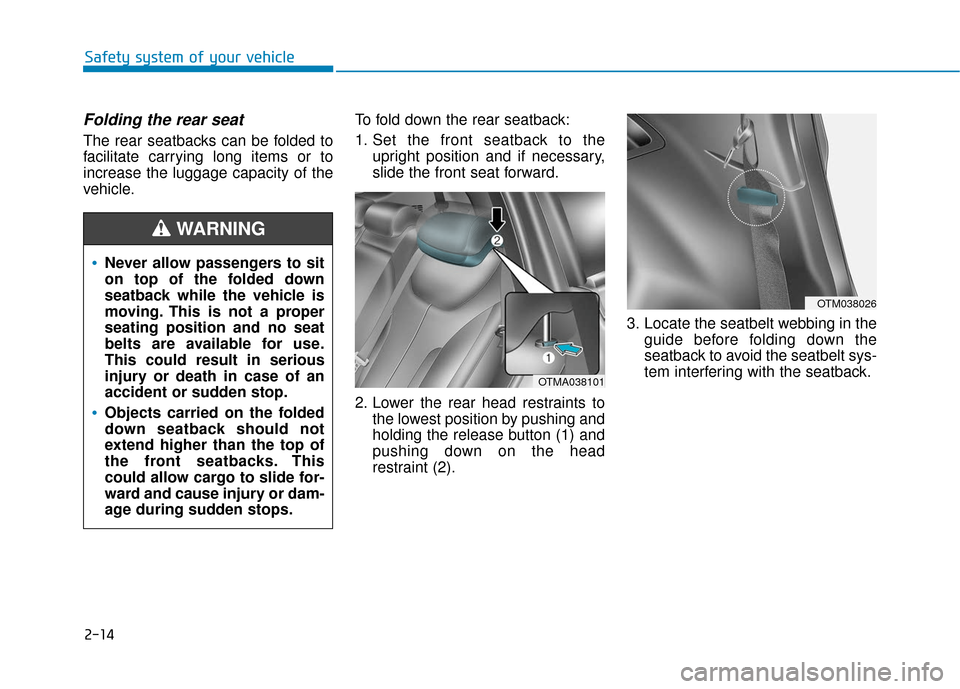
1. Set the front seatback to the
upright position and if necessary,
slide the front seat forward.
2. Lower the rear head restraints to the lowest position by pushing and
holding the release button (1) and
pushing down on the head
restraint (2). 3. Locate the seatbelt webbing in the
guide before folding down the
seatback to avoid the seatbelt sys-
tem interfering with the seatback.
OTMA038101
OTM038026
Never allow passengers to sit
on top of the folded down
seatback while the vehicle is
moving. This is not a proper
seating position and no seat
belts are available for use.
This could result in serious
injury or death in case of an
accident or sudden stop.
Objects carried on the folded
down seatback should not
extend higher than the top of
the front seatbacks. This
could allow cargo to slide for-
ward and cause injury or dam-
age during sudden stops.
WARNING
Page 33 of 557
2-15
Safety system of your vehicle
2
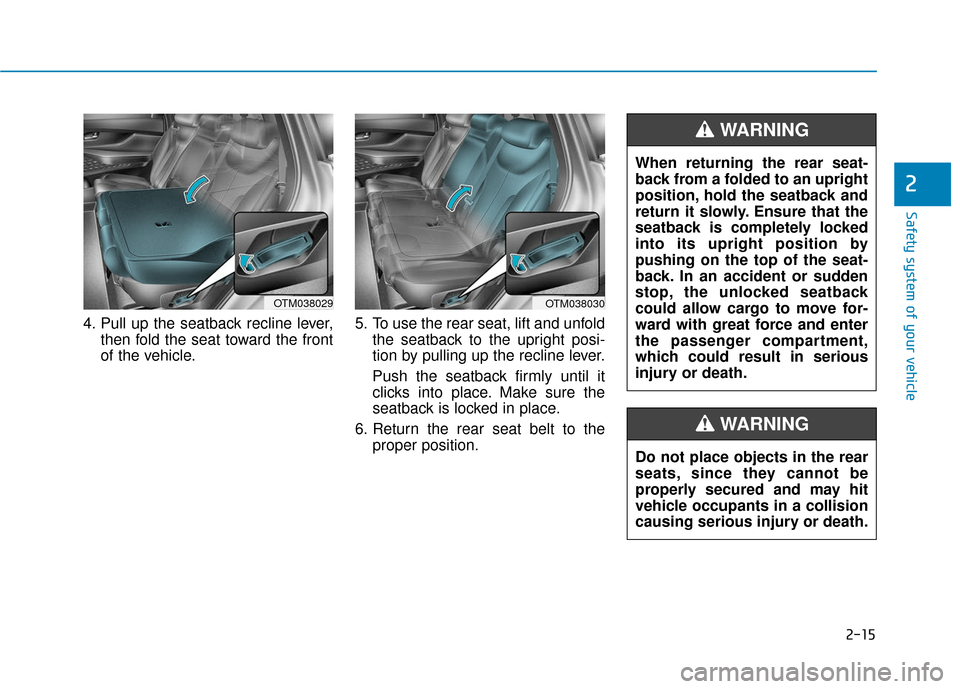
4. Pull up the seatback recline lever,then fold the seat toward the front
of the vehicle. 5. To use the rear seat, lift and unfold
the seatback to the upright posi-
tion by pulling up the recline lever.
Push the seatback firmly until it
clicks into place. Make sure the
seatback is locked in place.
6. Return the rear seat belt to the proper position. Do not place objects in the rear
seats, since they cannot be
properly secured and may hit
vehicle occupants in a collision
causing serious injury or death.
WARNING
When returning the rear seat-
back from a folded to an upright
position, hold the seatback and
return it slowly. Ensure that the
seatback is completely locked
into its upright position by
pushing on the top of the seat-
back. In an accident or sudden
stop, the unlocked seatback
could allow cargo to move for-
ward with great force and enter
the passenger compartment,
which could result in serious
injury or death.
WARNING
OTM038030OTM038029
Page 34 of 557
2-16
Safety system of your vehicle
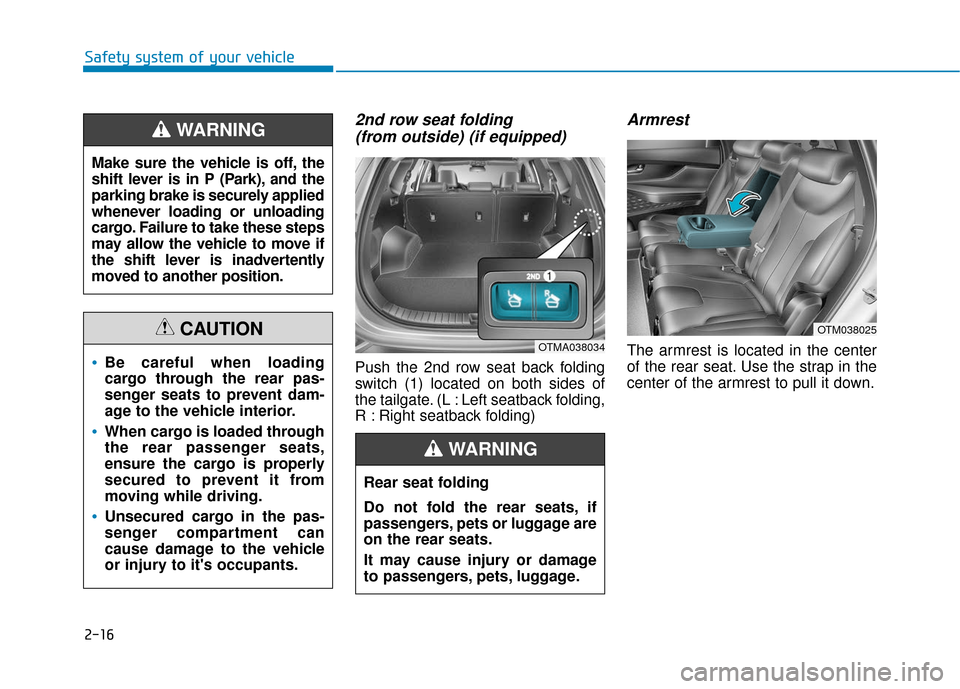
2nd row seat folding (from outside) (if equipped)
Push the 2nd row seat back folding
switch (1) located on both sides of
the tailgate. (L : Left seatback folding,
R : Right seatback folding)
Armrest
The armrest is located in the center
of the rear seat. Use the strap in the
center of the armrest to pull it down.
OTM038025
OTMA038034
Rear seat folding
Do not fold the rear seats, if
passengers, pets or luggage are
on the rear seats.
It may cause injury or damage
to passengers, pets, luggage.
WARNING
Make sure the vehicle is off, the
shift lever is in P (Park), and the
parking brake is securely applied
whenever loading or unloading
cargo. Failure to take these steps
may allow the vehicle to move if
the shift lever is inadvertently
moved to another position.
WARNING
Be careful when loading
cargo through the rear pas-
senger seats to prevent dam-
age to the vehicle interior.
When cargo is loaded through
the rear passenger seats,
ensure the cargo is properly
secured to prevent it from
moving while driving.
Unsecured cargo in the pas-
senger compartment can
cause damage to the vehicle
or injury to it's occupants.
CAUTION
Page 92 of 557
Convenient features of your vehicle
Floor Mat Anchor(s).....................................................3-176
Luggage Net Holder .....................................................3-177
Cargo Security Screen .................................................3-178
Side Curtain ....................................................................3-18\
0
Exterior Features ...............................................3-181
Roof Side Rails ..............................................................3-181
3
Page 119 of 557
3-30
Convenient features of your vehicle
Heated Steering Wheel
(if equipped)
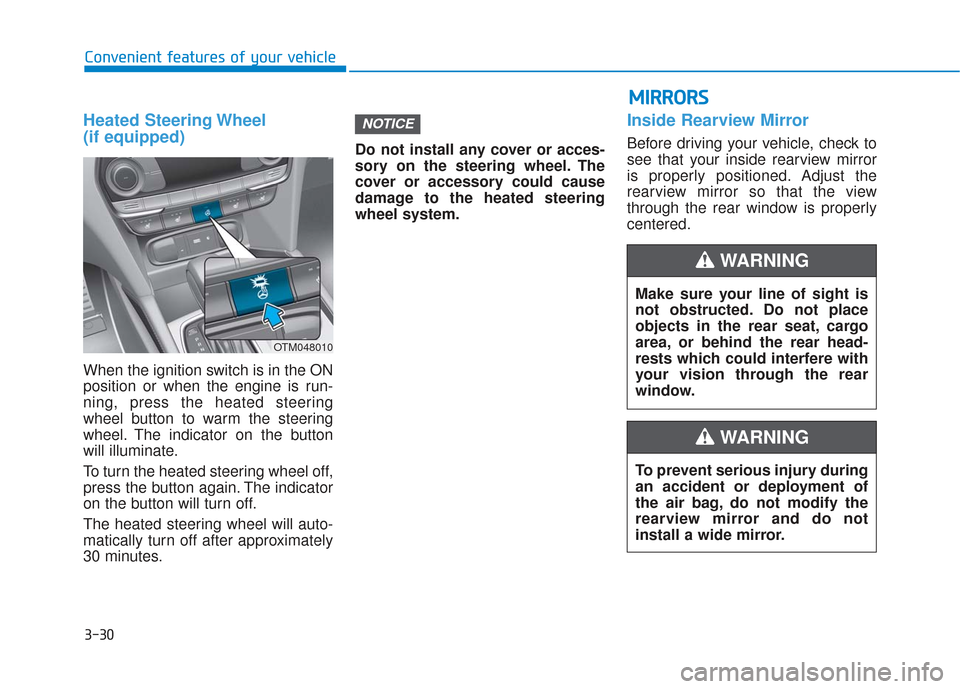
When the ignition switch is in the ON
position or when the engine is run-
ning, press the heated steering
wheel button to warm the steering
wheel. The indicator on the button
will illuminate.
To turn the heated steering wheel off,
press the button again. The indicator
on the button will turn off.
The heated steering wheel will auto-
matically turn off after approximately
30 minutes.Do not install any cover or acces-
sory on the steering wheel. The
cover or accessory could cause
damage to the heated steering
wheel system.
Inside Rearview Mirror
Before driving your vehicle, check to
see that your inside rearview mirror
is properly positioned. Adjust the
rearview mirror so that the view
through the rear window is properly
centered.
NOTICE
Make sure your line of sight is
not obstructed. Do not place
objects in the rear seat, cargo
area, or behind the rear head-
rests which could interfere with
your vision through the rear
window.
WARNING
To prevent serious injury during
an accident or deployment of
the air bag, do not modify the
rearview mirror and do not
install a wide mirror.
WARNING
M M
I
IR
R R
RO
O R
RS
S
OTM048010
Page 144 of 557
3-55
Convenient features of your vehicle
3
Do not close or open the power
liftgate manually. This may cause
damage to the power liftgate. If it
is necessary to close or open the
power liftgate manually when the
battery is discharged or discon-
nected, do not apply excessive
force.
Opening the liftgate
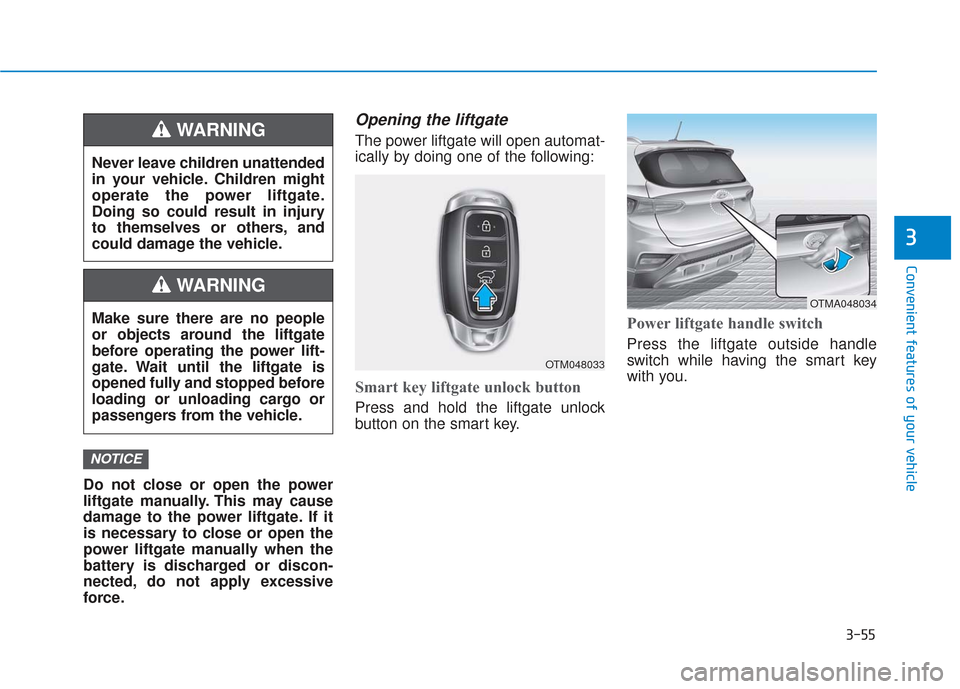
The power liftgate will open automat-
ically by doing one of the following:
Smart key liftgate unlock button
Press and hold the liftgate unlock
button on the smart key.
Power liftgate handle switch
Press the liftgate outside handle
switch while having the smart key
with you.
NOTICE
Never leave children unattended
in your vehicle. Children might
operate the power liftgate.
Doing so could result in injury
to themselves or others, and
could damage the vehicle.
WARNING
Make sure there are no people
or objects around the liftgate
before operating the power lift-
gate. Wait until the liftgate is
opened fully and stopped before
loading or unloading cargo or
passengers from the vehicle.
WARNING
OTM048033
OTMA048034
Page 149 of 557
3-60
Convenient features of your vehicle
Power liftgate opening heightuser setting
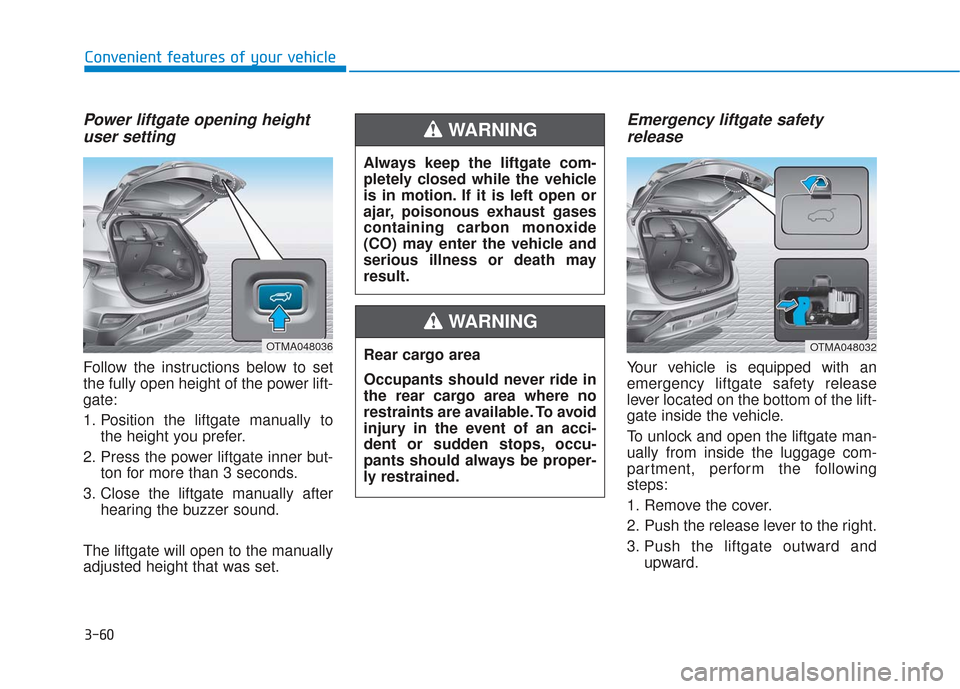
Follow the instructions below to set
the fully open height of the power lift-
gate:
1. Position the liftgate manually to
the height you prefer.
2. Press the power liftgate inner but- ton for more than 3 seconds.
3. Close the liftgate manually after hearing the buzzer sound.
The liftgate will open to the manually
adjusted height that was set.
Emergency liftgate safety release
Your vehicle is equipped with an
emergency liftgate safety release
lever located on the bottom of the lift-
gate inside the vehicle.
To unlock and open the liftgate man-
ually from inside the luggage com-
partment, perform the following
steps:
1. Remove the cover.
2. Push the release lever to the right.
3. Push the liftgate outward and
upward.
OTMA048036
Always keep the liftgate com-
pletely closed while the vehicle
is in motion. If it is left open or
ajar, poisonous exhaust gases
containing carbon monoxide
(CO) may enter the vehicle and
serious illness or death may
result.
WARNING
Rear cargo area
Occupants should never ride in
the rear cargo area where no
restraints are available. To avoid
injury in the event of an acci-
dent or sudden stops, occu-
pants should always be proper-
ly restrained.
WARNING
OTMA048032
Page 151 of 557
3-62
Convenient features of your vehicle
Information
The Smart Liftgate will NOT operate
when:
• Any door is open, or all doors areclosed but not locked
• The smart key is detected within 15 seconds from when the doors were
closed and locked
• For vehicles equipped with illumi- nated exterior front door handles, if
the smart key is detected within 15
seconds from when the doors were
closed and locked or if the smart
key is within 60 inches (1.5m) from
the front door handles
• The smart key is in the vehicle. 1.Setting
To activate the Smart Liftgate, go to
User Settings mode and select
Smart Liftgate in the cluster LCD dis-
play.
For more details, refer to "LCD
Display" in this chapter.
2.Detect and Alert
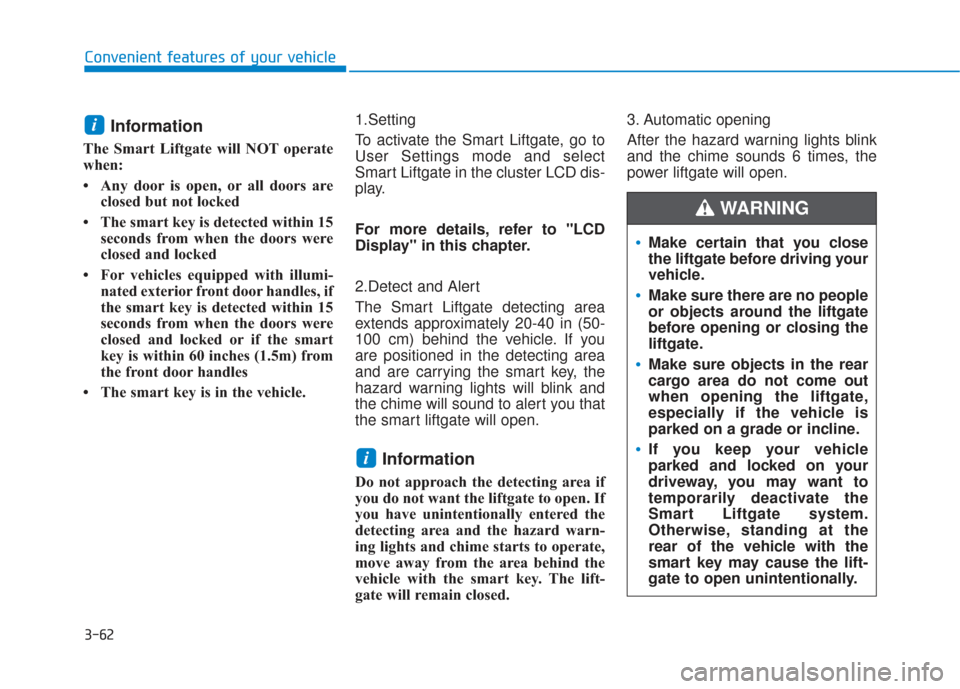
The Smart Liftgate detecting area
extends approximately 20-40 in (50-
100 cm) behind the vehicle. If you
are positioned in the detecting area
and are carrying the smart key, the
hazard warning lights will blink and
the chime will sound to alert you that
the smart liftgate will open.
Information
Do not approach the detecting area if
you do not want the liftgate to open. If
you have unintentionally entered the
detecting area and the hazard warn-
ing lights and chime starts to operate,
move away from the area behind the
vehicle with the smart key. The lift-
gate will remain closed.3. Automatic opening
After the hazard warning lights blink
and the chime sounds 6 times, the
power liftgate will open.
i
i
Make certain that you close
the liftgate before driving your
vehicle.
Make sure there are no people
or objects around the liftgate
before opening or closing the
liftgate.
Make sure objects in the rear
cargo area do not come out
when opening the liftgate,
especially if the vehicle is
parked on a grade or incline.
If you keep your vehicle
parked and locked on your
driveway, you may want to
temporarily deactivate the
Smart Liftgate system.
Otherwise, standing at the
rear of the vehicle with the
smart key may cause the lift-
gate to open unintentionally.
WARNING
Page 267 of 557
3-178
Convenient features of your vehicle
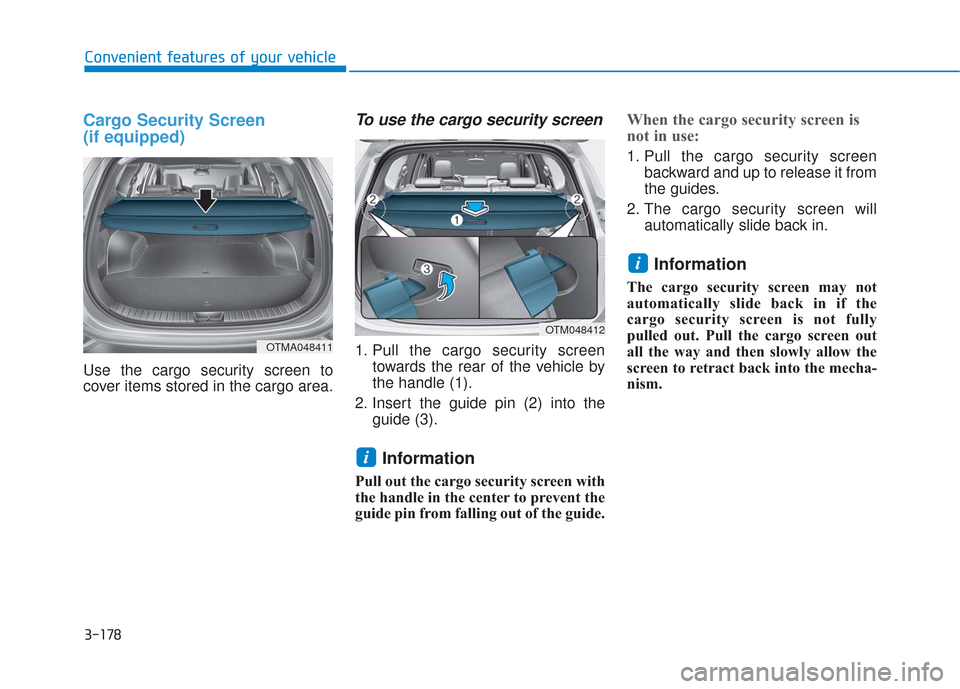
Cargo Security Screen
(if equipped)
Use the cargo security screen to
cover items stored in the cargo area.
To use the cargo security screen
1. Pull the cargo security screentowards the rear of the vehicle by
the handle (1).
2. Insert the guide pin (2) into the guide (3).
Information
Pull out the cargo security screen with
the handle in the center to prevent the
guide pin from falling out of the guide.
When the cargo security screen is
not in use:
1. Pull the cargo security screenbackward and up to release it from
the guides.
2. The cargo security screen will automatically slide back in.
Information
The cargo security screen may not
automatically slide back in if the
cargo security screen is not fully
pulled out. Pull the cargo screen out
all the way and then slowly allow the
screen to retract back into the mecha-
nism.
i
i
OTMA048411
OTM048412
Page 268 of 557
3-179
Convenient features of your vehicle
3
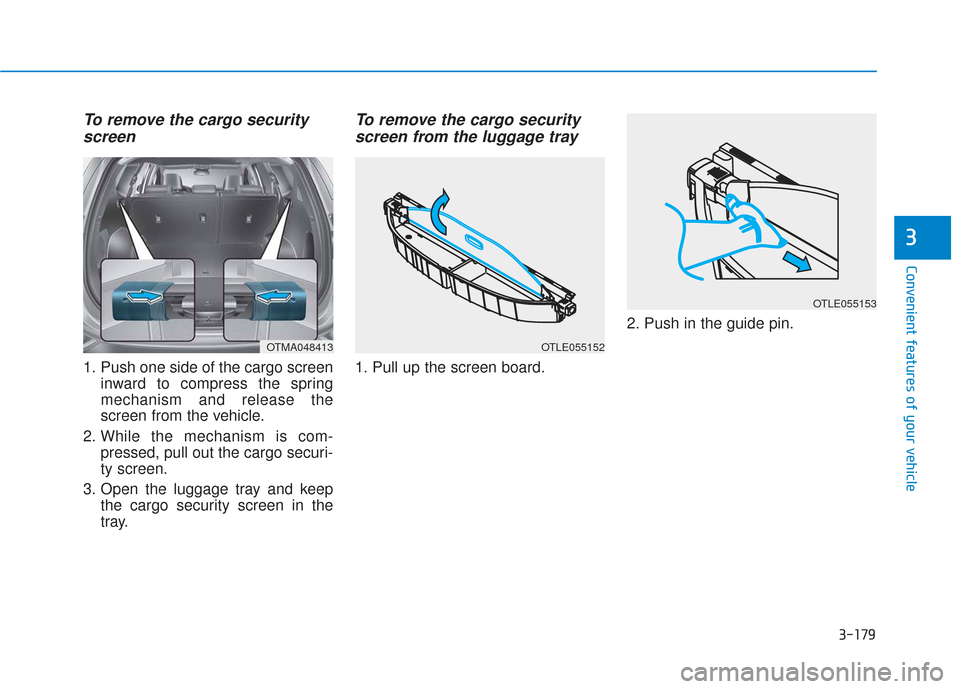
To remove the cargo securityscreen
1. Push one side of the cargo screen
inward to compress the spring
mechanism and release the
screen from the vehicle.
2. While the mechanism is com- pressed, pull out the cargo securi-
ty screen.
3. Open the luggage tray and keep the cargo security screen in the
tray.
To remove the cargo securityscreen from the luggage tray
1. Pull up the screen board. 2. Push in the guide pin.
OTMA048413OTLE055152
OTLE055153