rear view mirror Hyundai Santa Fe 2019 Owner's Manual
[x] Cancel search | Manufacturer: HYUNDAI, Model Year: 2019, Model line: Santa Fe, Model: Hyundai Santa Fe 2019Pages: 557, PDF Size: 14.8 MB
Page 90 of 557
Convenient features of your vehicle
Accessing Your Vehicle .........................................3-4
Remote Key........................................................................\
.3-4
Smart Key ........................................................................\
....3-7
Immobilizer System .........................................................3-12
Door Locks ............................................................3-14
Operating Door Locks from Outside the Vehicle ....3-14
Operating Door Locks from Inside the Vehicle .......3-15
Automatic Door Lock and Unlock Features .............3-18
Child-Protector Rear Door Locks ...............................3-19
Electronic Child Safety Lock System .........................3-19
Safe Exit Assist (SEA) System .....................................3-20
Rear Occupant Alert (ROA) System ...........................3-22
Theft-Alarm System ............................................3-24
Driver Position Memory System ........................3-25
Storing Positions into Memory ..................................3-25
Recalling Positions from Memory...............................3-26
Resetting the Driver's Seat Memory System...........3-26
Easy Access Function ....................................................3-27
Steering Wheel .....................................................3-28
Electric Power Steering (EPS) .....................................3-28
Tilt Steering / Telescopic Steering .............................3-29
Horn ........................................................................\
............3-29
Heated Steering Wheel ..................................................3-30
Mirrors ...................................................................3-30
Inside Rearview Mirror ..................................................3-30
Side View Mirrors ...........................................................3-40
Reverse Parking Aid Function......................................3-41
Windows ................................................................3-43
Power Windows ...............................................................3-44
Panoramic Sunroof ..............................................3-47
Sunshade ........................................................................\
...3-48
Sliding the Sunroof .........................................................3-48
Tilting the Sunroof .........................................................3-49
Closing the Sunroof........................................................3-49
Resetting the Sunroof ...................................................3-50
Sunroof Open Warning ..................................................3-50
Exterior Features .................................................3-51
Hood ........................................................................\
...........3-51
Non-Powered Liftgate ...................................................3-52
Power Liftgate .................................................................3-54
Smart Liftgate ..................................................................3-61
Fuel Filler Door ................................................................3-64
Instrument Cluster ...............................................3-68
Instrument Cluster Control............................................3-69
Gauges and Meters ........................................................3-70
Transmission Shift Indicator .........................................3-73
Warning and Indicator Lights .......................................3-74
LCD Display Messages ...................................................3-87
3
Page 115 of 557
3-26
Convenient features of your vehicle
Recalling Positions from
Memory
1. Shift to P (Park) while the ignitionswitch is in the ON position.
2. Press the desired memory button (1 or 2). The system will beep
once, and then the driver's seat
position, side view mirror position,
instrument panel illumination
intensity and head-up display
height/brightness will automatical-
ly adjust to the stored positions.
3. "Driver 1 (or 2) settings applied" will appear on the cluster LCD dis-
play.
Information
• While recalling the "1" memoryposition, pressing the SET or 1 but-
ton temporarily stops the adjust-
ment of the recalled memory posi-
tion. Pressing the 2 button recalls
the "2" memory position. • While recalling the "2" memory
position, pressing the SET or 2 but-
ton temporarily stops the adjust-
ment of the recalled memory posi-
tion. Pressing the 1 button recalls
the "1" memory position.
• While recalling the stored positions, pressing one of the control buttons
for the driver's seat, side view mir-
ror, instrument panel illumination
or head-up display will cause the
movement of that component to stop
and move in the direction that the
control button is pressed.
Resetting the Driver's Seat
Memory System
Take the following procedures to reset
the driver's seat memory system,
when it does not operate properly.
To reset the driver's seat memo-ry system
1. Place the ignition switch to the ON
position, shift to P (Park), and
open the driver's door. 2. Operate the control switch to set
the driver's seat and seatback to
the foremost position.
3. Simultaneously press the SET button and push forward the seat
movement switch over 2 seconds.
While resetting the driver's seatmemory system
1. It starts with the notification sound.
2. The driver's seat and seatback is
adjusted to the rearward position
with the notification sound.
3. The driver's seat and seatback is re-adjusted to the default position
(central position) with the notifica-
tion sound.
However, in the following cases, the
resetting procedure and the notifica-
tion sound may stop.
- The memory button is pressed.
- The control switch is operated.
- The gear is shifted out of P (Park).
- The driving speed exceeds 2 mph (3 km/h).
- The driver's door is closed.
i
Page 119 of 557
3-30
Convenient features of your vehicle
Heated Steering Wheel
(if equipped)
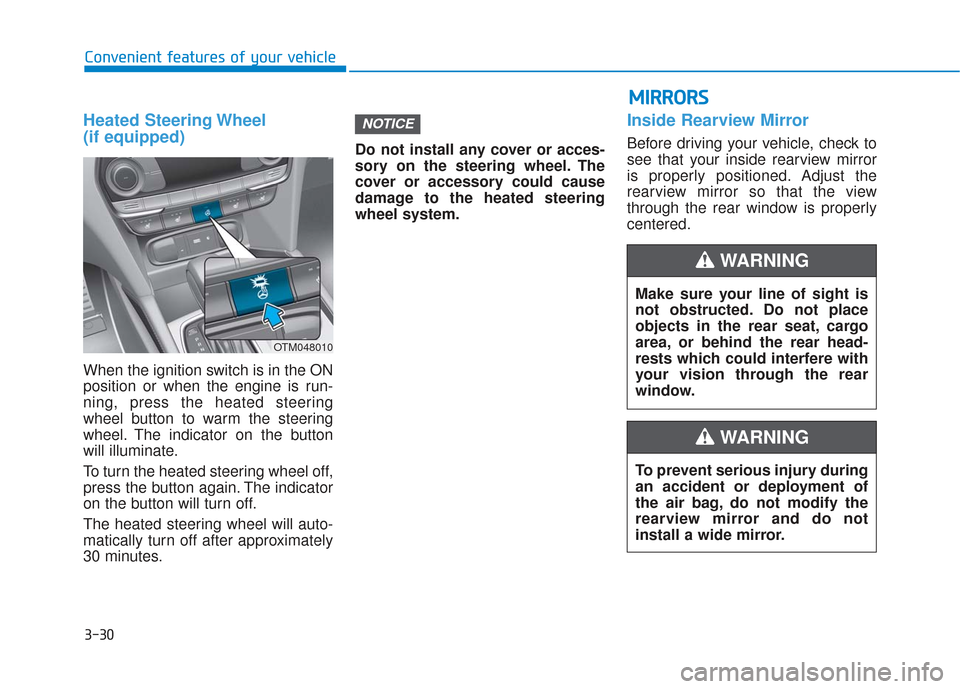
When the ignition switch is in the ON
position or when the engine is run-
ning, press the heated steering
wheel button to warm the steering
wheel. The indicator on the button
will illuminate.
To turn the heated steering wheel off,
press the button again. The indicator
on the button will turn off.
The heated steering wheel will auto-
matically turn off after approximately
30 minutes.Do not install any cover or acces-
sory on the steering wheel. The
cover or accessory could cause
damage to the heated steering
wheel system.
Inside Rearview Mirror
Before driving your vehicle, check to
see that your inside rearview mirror
is properly positioned. Adjust the
rearview mirror so that the view
through the rear window is properly
centered.
NOTICE
Make sure your line of sight is
not obstructed. Do not place
objects in the rear seat, cargo
area, or behind the rear head-
rests which could interfere with
your vision through the rear
window.
WARNING
To prevent serious injury during
an accident or deployment of
the air bag, do not modify the
rearview mirror and do not
install a wide mirror.
WARNING
M M
I
IR
R R
RO
O R
RS
S
OTM048010
Page 120 of 557
3-31
Convenient features of your vehicle
3
When cleaning the mirror, use a
paper towel or similar material
dampened with glass cleaner. Do
not spray glass cleaner directly on
the mirror as this may cause the
liquid cleaner to enter the mirror
housing.
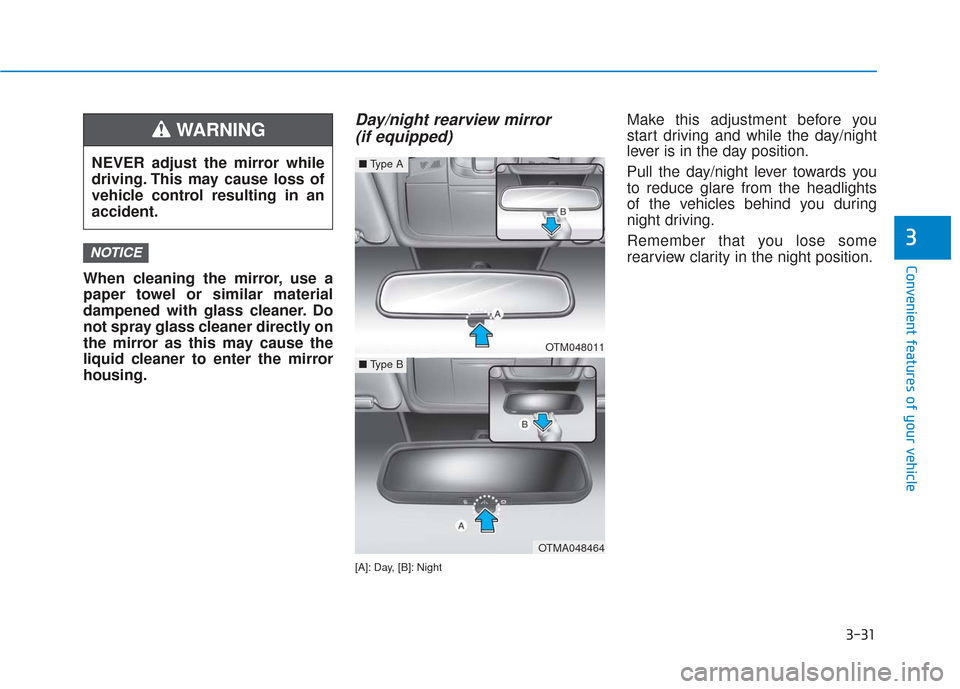
Day/night rearview mirror (if equipped)
[A]: Day, [B]: Night
Make this adjustment before you
start driving and while the day/night
lever is in the day position.
Pull the day/night lever towards you
to reduce glare from the headlights
of the vehicles behind you during
night driving.
Remember that you lose some
rearview clarity in the night position.
NOTICE
NEVER adjust the mirror while
driving. This may cause loss of
vehicle control resulting in an
accident.
WARNING
OTM048011
■ Type A
OTMA048464
■Type B
Page 121 of 557
3-32
Convenient features of your vehicle
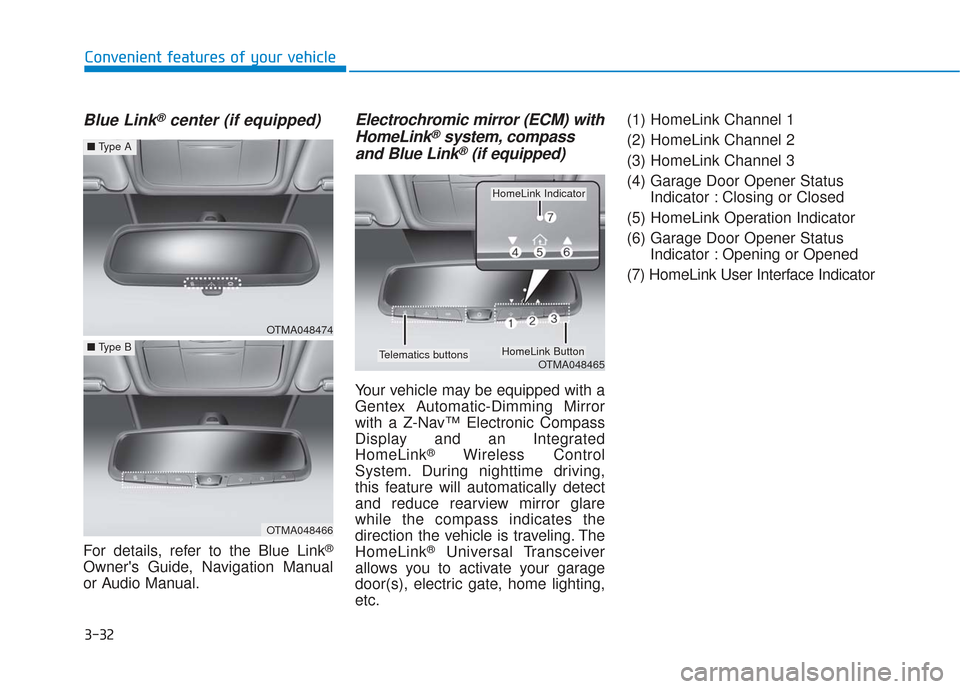
Blue Link®center (if equipped)
For details, refer to the Blue Link®
Owner's Guide, Navigation Manual
or Audio Manual.
Electrochromic mirror (ECM) withHomeLink®system, compass
and Blue Link®(if equipped)
Your vehicle may be equipped with a
Gentex Automatic-Dimming Mirror
with a Z-Nav™ Electronic Compass
Display and an Integrated
HomeLink
®Wireless Control
System. During nighttime driving,
this feature will automatically detect
and reduce rearview mirror glare
while the compass indicates the
direction the vehicle is traveling. The
HomeLink
®Universal Transceiver
allows you to activate your garage
door(s), electric gate, home lighting,
etc. (1) HomeLink Channel 1
(2) HomeLink Channel 2
(3) HomeLink Channel 3
(4) Garage Door Opener Status
Indicator : Closing or Closed
(5) HomeLink Operation Indicator
(6) Garage Door Opener Status Indicator : Opening or Opened
(7) HomeLink User Interface Indicator
OTMA048474
■ Type A
OTMA048466
■Type B
OTMA048465
HomeLink Indicator
HomeLink ButtonTelematics buttons
Page 129 of 557
3-40
Convenient features of your vehicle
Side View Mirrors
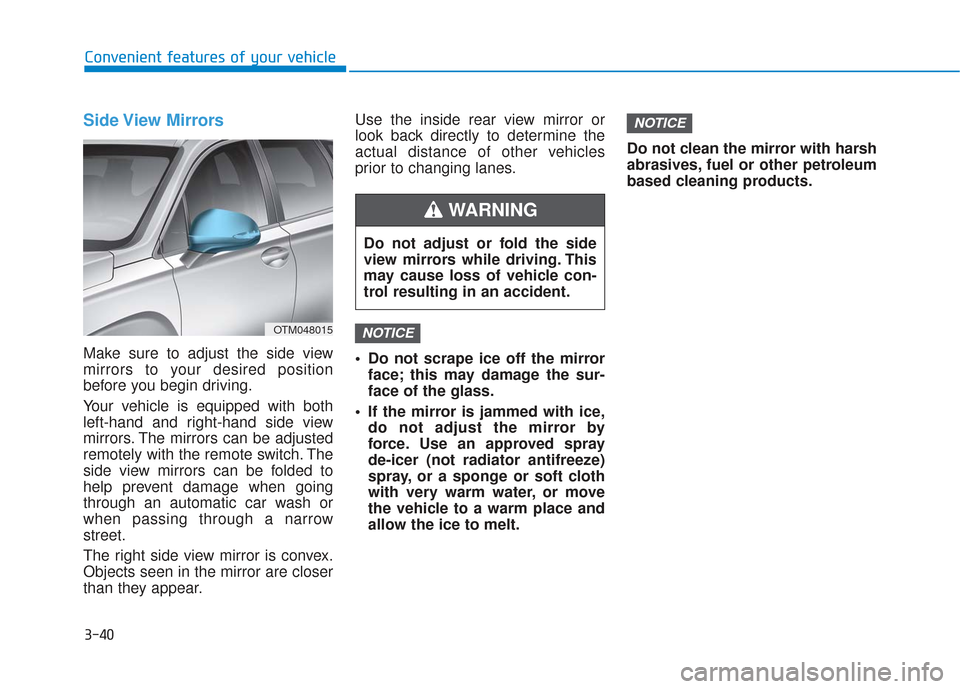
Make sure to adjust the side view
mirrors to your desired position
before you begin driving.
Your vehicle is equipped with both
left-hand and right-hand side view
mirrors. The mirrors can be adjusted
remotely with the remote switch. The
side view mirrors can be folded to
help prevent damage when going
through an automatic car wash or
when passing through a narrow
street.
The right side view mirror is convex.
Objects seen in the mirror are closer
than they appear.Use the inside rear view mirror or
look back directly to determine the
actual distance of other vehicles
prior to changing lanes.
Do not scrape ice off the mirror
face; this may damage the sur-
face of the glass.
If the mirror is jammed with ice, do not adjust the mirror by
force. Use an approved spray
de-icer (not radiator antifreeze)
spray, or a sponge or soft cloth
with very warm water, or move
the vehicle to a warm place and
allow the ice to melt. Do not clean the mirror with harsh
abrasives, fuel or other petroleum
based cleaning products.
NOTICE
NOTICEOTM048015
Do not adjust or fold the side
view mirrors while driving. This
may cause loss of vehicle con-
trol resulting in an accident.
WARNING
Page 130 of 557
3-41
Convenient features of your vehicle
3
Side view mirror adjustment
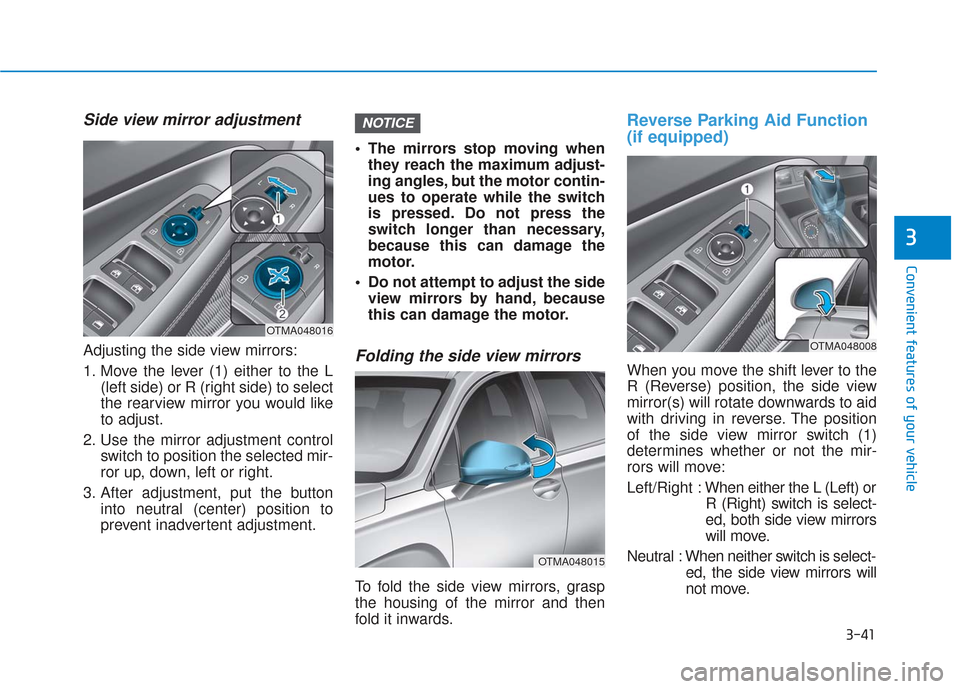
Adjusting the side view mirrors:
1. Move the lever (1) either to the L(left side) or R (right side) to select
the rearview mirror you would like
to adjust.
2. Use the mirror adjustment control switch to position the selected mir-
ror up, down, left or right.
3. After adjustment, put the button into neutral (center) position to
prevent inadvertent adjustment. The mirrors stop moving when
they reach the maximum adjust-
ing angles, but the motor contin-
ues to operate while the switch
is pressed. Do not press the
switch longer than necessary,
because this can damage the
motor.
Do not attempt to adjust the side view mirrors by hand, because
this can damage the motor.Folding the side view mirrors
To fold the side view mirrors, grasp
the housing of the mirror and then
fold it inwards.
Reverse Parking Aid Function
(if equipped)
When you move the shift lever to the
R (Reverse) position, the side view
mirror(s) will rotate downwards to aid
with driving in reverse. The position
of the side view mirror switch (1)
determines whether or not the mir-
rors will move:
Left/Right : When either the L (Left) or
R (Right) switch is select-
ed, both side view mirrors
will move.
Neutral : When neither switch is select- ed, the side view mirrors will
not move.
NOTICE
OTMA048015
OTMA048016OTMA048008
Page 222 of 557
3-133
Convenient features of your vehicle
3
Information
• If vehicle speed is over 10 mph (15km/h)
- the rear image stays ON when therear view was on the screen
- screen (top, front wide, front right and front left) of other modes of
SVM system turns OFF and
switches to the original AVN
screen when other modes were on
the screen
• If the SVM system is ON and the vehicle speed is under 10 mph (15
km/h)
- the rear image stays ON when therear view was on the screen
- a pop-up for selecting the SVM mode (top, front wide, front right
and front left) appears when
pressing (2) on the screen • When the vehicle is backing up, the
rear image will appear on the
screen automatically regardless of
vehicle speed or SVM button (1)
status.
- If the rear image was ON, thescreen switches to the parking
assist screen.
- If the screen (top, front wide, front right and front left) of other
modes of SVM system was ON, the
screen for setting the initial rear
view mode appears.
- When the shift lever is moved from R (Reverse) to D (Drive), the
screen of the previous mode is dis-
played.
• A warning appears on the system when:
- The liftgate is opened
- The driver's door is opened
- The passenger's door is opened
- The outer side view mirror is folded
• If the system is not operating nor- mally, the system should be checked
by an authorized HYUNDAI dealer.
For more details, refer to the sep-
arately supplied manual with your
vehicle.
Parking Distance Warning
(Reverse) System (if equipped)
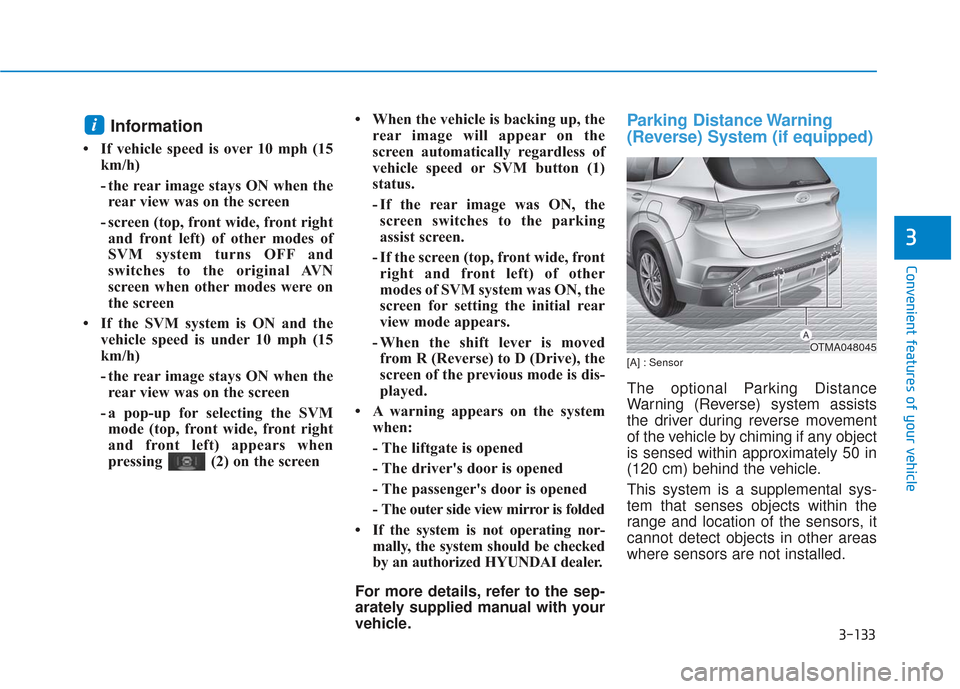
[A] : Sensor
The optional Parking Distance
Warning (Reverse) system assists
the driver during reverse movement
of the vehicle by chiming if any object
is sensed within approximately 50 in
(120 cm) behind the vehicle.
This system is a supplemental sys-
tem that senses objects within the
range and location of the sensors, it
cannot detect objects in other areas
where sensors are not installed.
i
OTMA048045
Page 248 of 557
3-159
Convenient features of your vehicle
3
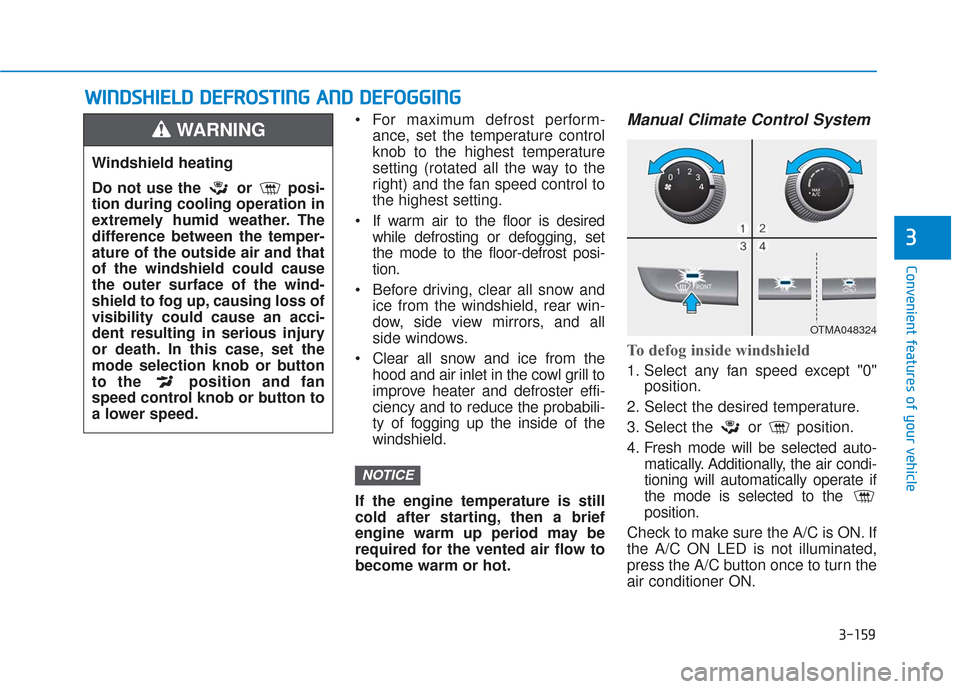
For maximum defrost perform-ance, set the temperature control
knob to the highest temperature
setting (rotated all the way to the
right) and the fan speed control to
the highest setting.
If warm air to the floor is desired while defrosting or defogging, set
the mode to the floor-defrost posi-
tion.
Before driving, clear all snow and ice from the windshield, rear win-
dow, side view mirrors, and all
side windows.
Clear all snow and ice from the hood and air inlet in the cowl grill to
improve heater and defroster effi-
ciency and to reduce the probabili-
ty of fogging up the inside of the
windshield.
If the engine temperature is still
cold after starting, then a brief
engine warm up period may be
required for the vented air flow to
become warm or hot.Manual Climate Control System
To defog inside windshield
1. Select any fan speed except "0" position.
2. Select the desired temperature.
3. Select the or position.
4. Fresh mode will be selected auto- matically. Additionally, the air condi-
tioning will automatically operate if
the mode is selected to the
position.
Check to make sure the A/C is ON. If
the A/C ON LED is not illuminated,
press the A/C button once to turn the
air conditioner ON.
NOTICE
W
W I
IN
N D
DS
SH
H I
IE
E L
LD
D
D
D E
EF
FR
R O
O S
ST
T I
IN
N G
G
A
A N
N D
D
D
D E
EF
FO
O G
GG
GI
IN
N G
G
Windshield heating
Do not use the or posi-
tion during cooling operation in
extremely humid weather. The
difference between the temper-
ature of the outside air and that
of the windshield could cause
the outer surface of the wind-
shield to fog up, causing loss of
visibility could cause an acci-
dent resulting in serious injury
or death. In this case, set the
mode selection knob or button
to the position and fan
speed control knob or button to
a lower speed.
WARNING
OTMA048324
Page 252 of 557
3-163
Convenient features of your vehicle
3
Rear Window Defroster
To prevent damage to the rear
window defroster conducting ele-
ments bonded to the inside sur-
face of the rear window, never use
sharp instruments or window
cleaners containing abrasives to
clean the window.
If you want to defrost and defog
the front windshield, refer to the
"Windshield Defrosting and
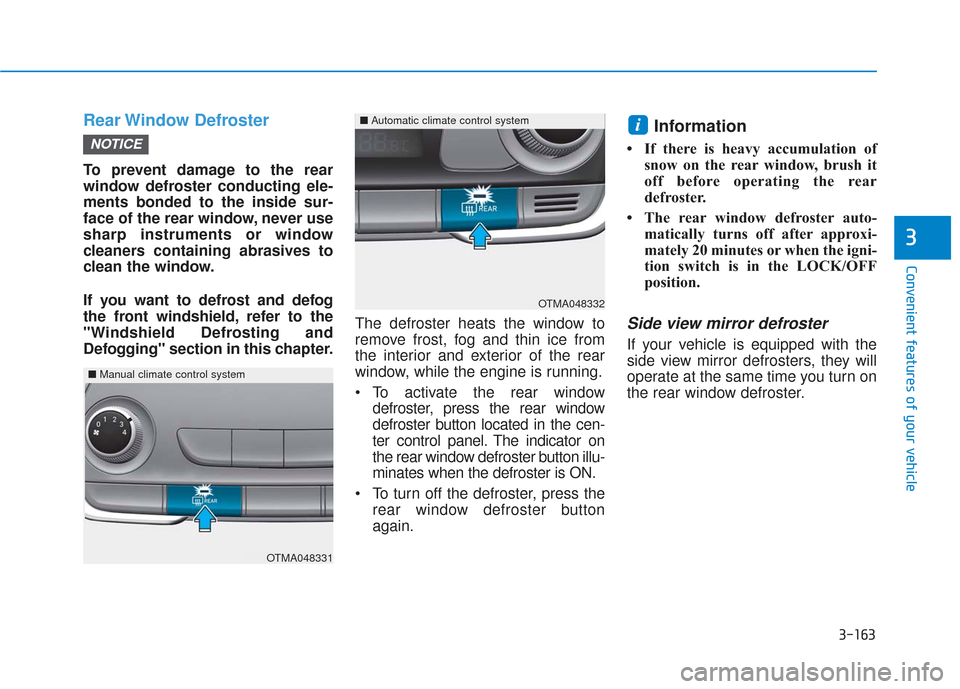
Defogging" section in this chapter.The defroster heats the window to
remove frost, fog and thin ice from
the interior and exterior of the rear
window, while the engine is running.
To activate the rear window
defroster, press the rear window
defroster button located in the cen-
ter control panel. The indicator on
the rear window defroster button illu-
minates when the defroster is ON.
To turn off the defroster, press the rear window defroster button
again.
Information
• If there is heavy accumulation ofsnow on the rear window, brush it
off before operating the rear
defroster.
• The rear window defroster auto- matically turns off after approxi-
mately 20 minutes or when the igni-
tion switch is in the LOCK/OFF
position.
Side view mirror defroster
If your vehicle is equipped with the
side view mirror defrosters, they will
operate at the same time you turn on
the rear window defroster.
i
NOTICE
OTMA048332
■Automatic climate control system
OTMA048331
■Manual climate control system