Hyundai Santa Fe 2020 Owner's Manual
Manufacturer: HYUNDAI, Model Year: 2020, Model line: Santa Fe, Model: Hyundai Santa Fe 2020Pages: 557, PDF Size: 19.29 MB
Page 261 of 557
3-172
Convenient features of your vehicle
To reduce a risk of serious or
fatal injuries:
Do not use a heated electric
device such as a coffeepot,
toaster, heater, iron, etc.
Do not insert foreign objects
into the outlet and do not
touch the outlet as you may
get shocked.
Do not let children touch the
AC inverter.
WARNING
To prevent the battery from beingdischarged, do not use the AC
inverter while the engine is not
running.
When not using the AC inverter, make sure to close the AC invert-
er cover.
After using an electric accessory or equipment, pull the plug out.
Leaving the accessory or equip-
ment plugged in for a long time
may cause battery discharge.
Do not use an electric accessory or equipment the power con-
sumption of which is greater
than 150W(115V).
Some electric accessories or equipments can cause electron-
ic interference. It may cause
excessive audio noise and mal-
functions in other electric sys-
tems or devices in the vehicle.
Do not use broken electric accessories or equipments,
which may damage the AC
inverter and electrical systems
of the vehicle. Do not use two or more electric
accessories or equipments at
the same time. It may cause
damage to the electrical sys-
tems of the vehicle.
When the input voltage is lower, outlet LED will blink and the AC
inverter will turn off automatical-
ly. If the input voltage goes up to
normal, the AC inverter will turn
on again.
NOTICE
Page 262 of 557
3-173
Convenient features of your vehicle
3
USB Charger (if equipped)
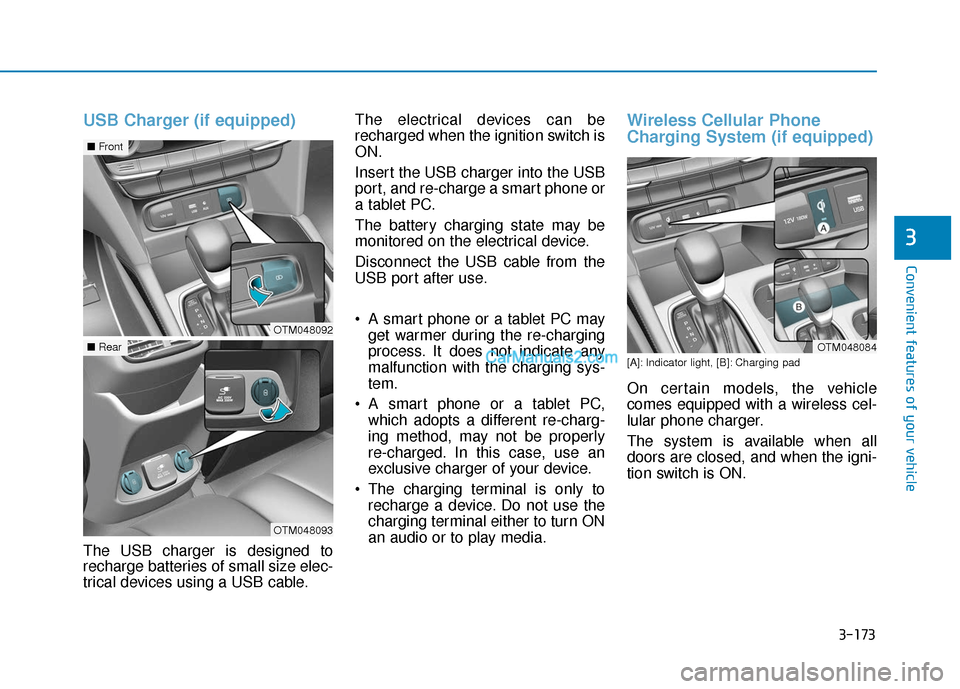
The USB charger is designed to
recharge batteries of small size elec-
trical devices using a USB cable.The electrical devices can be
recharged when the ignition switch is
ON.
Insert the USB charger into the USB
port, and re-charge a smart phone or
a tablet PC.
The battery charging state may be
monitored on the electrical device.
Disconnect the USB cable from the
USB port after use.
A smart phone or a tablet PC may
get warmer during the re-charging
process. It does not indicate any
malfunction with the charging sys-
tem.
A smart phone or a tablet PC, which adopts a different re-charg-
ing method, may not be properly
re-charged. In this case, use an
exclusive charger of your device.
The charging terminal is only to recharge a device. Do not use the
charging terminal either to turn ON
an audio or to play media.
Wireless Cellular Phone
Charging System (if equipped)
[A]: Indicator light, [B]: Charging pad
On certain models, the vehicle
comes equipped with a wireless cel-
lular phone charger.
The system is available when all
doors are closed, and when the igni-
tion switch is ON.
OTM048084
OTM048092
■ Front
OTM048093
■Rear
Page 263 of 557
3-174
Convenient features of your vehicle
To charge a cellular phone
The wireless cellular phone charging
system charges only the Qi-enabled
cellular phones ( ). Read the label
on the cellular phone accessory
cover or visit your cellular phone
manufacturer's website to check
whether your cellular phone supports
the Qi technology.
The wireless charging process starts
when you put a Qi-enabled cellular
phone on the wireless charging unit.
1. Remove other items, including thesmart key, from the wireless charg-
ing unit. If not, the wireless charg-
ing process may be interrupted.
Place the cellular phone on the
center of the charging pad ( ).
2. The indicator light is orange when the cellular phone is charging. The
indicator light turns green when
phone charging is complete.
3. You can turn ON or OFF the wire- less charging function in the user
settings mode on the instrument
cluster. For further information,
refer to the "LCD Display Modes"
in this chapter. If your cellular phone is not charging:
- Slightly change the position of the
cellular phone on the charging
pad.
- Make sure the indicator light is orange.
The indicator light will blink orange for
10 seconds if there is a malfunction in
the wireless charging system.
In this case, temporarily stop the
charging process, and re-attempt to
charge your cellular phone again.
The system warns you with a mes-
sage on the LCD display if the cellular
phone is still on the wireless charging
unit after the engine is turned OFF
and the front door is opened.
Information
For some manufacturers' cellular
phones, the system may not warn you
even though the cellular phone is left
on the wireless charging unit. This is
due to the particular characteristic of
the cellular phone and not a malfunc-
tion of the wireless charging. The wireless cellular phone
charging system may not sup-
port certain cellular phones,
which are not verified for the Qi
specification ( ).
When placing your cellular phone on the charging mat,
position the phone in the middle
of the mat for optimal charging
performance. If your cellular
phone is off to the side, the
charging rate may be less and in
some cases the cellular phone
may experience higher heat con-
duction.
In some cases, the wireless charging may stop temporarily
when the Remote Key or Smart
Key is used, either when starting
the vehicle or locking/unlocking
the doors, etc.
When charging certain cellular phones, the charging indicator
may not change to green when
the cellular phone is fully
charged.
NOTICE
i
Page 264 of 557
3-175
Convenient features of your vehicle
3
The wireless charging processmay temporarily stop, when tem-
perature abnormally increases
inside the wireless cellular phone
charging system. Stop the charg-
ing cellular phone and wait until
temperature falls to a certain level.
The wireless charging process may temporarily stop when there
is any metallic item, such as a
coin, between the wireless cellular
phone charging system and the
cellular phone.
When charging some cellular phones with a self-protection fea-
ture, the wireless charging speed
may decrease and the wireless
charging may stop.
If the cellular phone has a thick cover, the wireless charging may
not be possible.
If the cellular phone is not com- pletely contacting the charging
pad, wireless charging may not
operate properly.
Some magnetic items like credit cards, phone cards or rail tickets
may be damaged if left with the
cellular phone during the charging
process. When any cellular phone without a
wireless charging function or a
metallic object is placed on the
charging pad, a small noise may
sound. This small sound is due to
the vehicle discerning compatibil-
ity of the object placed on the
charging pad. It does not affect
your vehicle or the cellular phone
in any way.
Information
If the ignition switch is in the OFF
position, the charging also stops.
Information
This device complies with part 15 of
the FCC Rules.
Operation is subject to the following
two conditions:
1. This device may not cause harmful interference, and
2. This device must accept any inter- ference received, including inter-
ference that may cause undesired
operation.
Clock
Vehicles with Audio system
Select the [SETUP] button on the
audio system ➟ Select [Date/Time].
Set time: Set the time displayed on the audio screen.
Time format: Choose between 12- hour and 24-hour time formats.
Vehicles with Navigation system
Select the Settings menu on the
Navigation system ➟Select
[Date/Time].
GPS time: Displays time accord- ing to the received GNSS time.
24-hour: Switches to 12 hour or 24 hour.
i
i
Do not attempt to adjust the
clock while driving. Doing so
may result in distracted driving
which may lead to an accident
involving personal injury or
death.
WARNING
Page 265 of 557
3-176
Convenient features of your vehicle
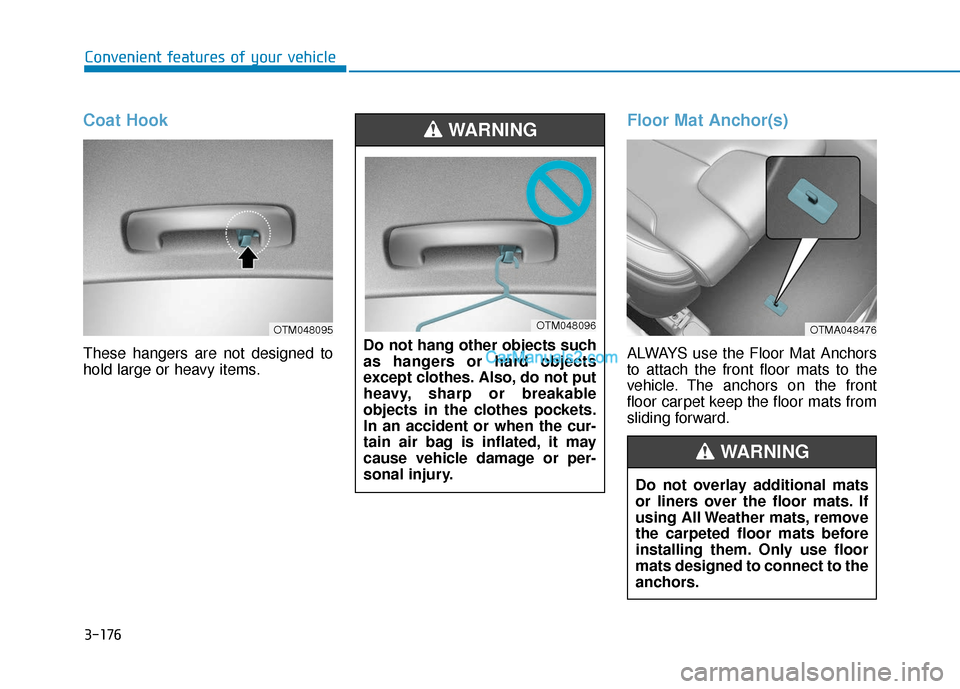
Coat Hook
These hangers are not designed to
hold large or heavy items.
Floor Mat Anchor(s)
ALWAYS use the Floor Mat Anchors
to attach the front floor mats to the
vehicle. The anchors on the front
floor carpet keep the floor mats from
sliding forward.
Do not hang other objects such
as hangers or hard objects
except clothes. Also, do not put
heavy, sharp or breakable
objects in the clothes pockets.
In an accident or when the cur-
tain air bag is inflated, it may
cause vehicle damage or per-
sonal injury.
WARNING
OTM048095OTM048096OTMA048476
Do not overlay additional mats
or liners over the floor mats. If
using All Weather mats, remove
the carpeted floor mats before
installing them. Only use floor
mats designed to connect to the
anchors.
WARNING
Page 266 of 557
3-177
Convenient features of your vehicle
3
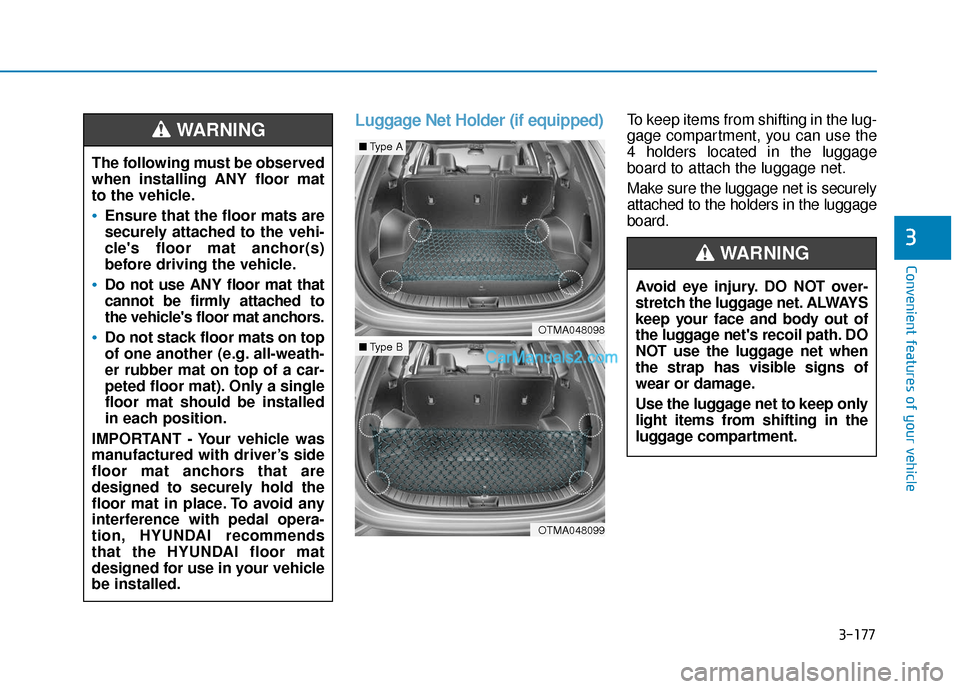
Luggage Net Holder (if equipped)To keep items from shifting in the lug-
gage compartment, you can use the
4 holders located in the luggage
board to attach the luggage net.
Make sure the luggage net is securely
attached to the holders in the luggage
board.
The following must be observed
when installing ANY floor mat
to the vehicle.
Ensure that the floor mats are
securely attached to the vehi-
cle's floor mat anchor(s)
before driving the vehicle.
Do not use ANY floor mat that
cannot be firmly attached to
the vehicle's floor mat anchors.
Do not stack floor mats on top
of one another (e.g. all-weath-
er rubber mat on top of a car-
peted floor mat). Only a single
floor mat should be installed
in each position.
IMPORTANT - Your vehicle was
manufactured with driver’s side
floor mat anchors that are
designed to securely hold the
floor mat in place. To avoid any
interference with pedal opera-
tion, HYUNDAI recommends
that the HYUNDAI floor mat
designed for use in your vehicle
be installed.
WARNING
OTMA048098
■ Type A
OTMA048099
■Type B
Avoid eye injury. DO NOT over-
stretch the luggage net. ALWAYS
keep your face and body out of
the luggage net's recoil path. DO
NOT use the luggage net when
the strap has visible signs of
wear or damage.
Use the luggage net to keep only
light items from shifting in the
luggage compartment.
WARNING
Page 267 of 557
3-178
Convenient features of your vehicle
Cargo Security Screen
(if equipped)
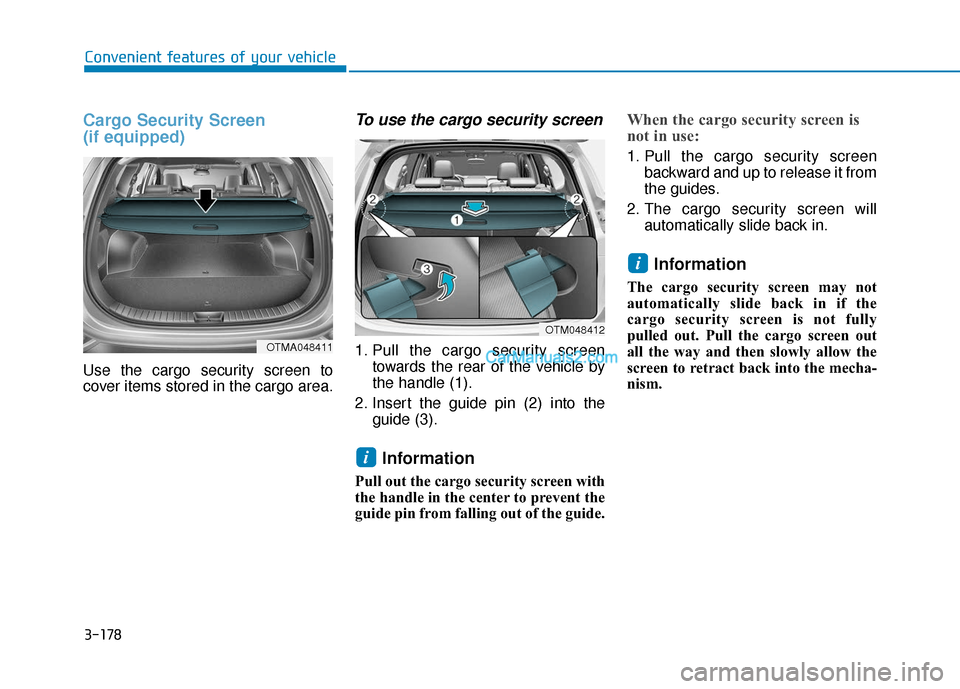
Use the cargo security screen to
cover items stored in the cargo area.
To use the cargo security screen
1. Pull the cargo security screentowards the rear of the vehicle by
the handle (1).
2. Insert the guide pin (2) into the guide (3).
Information
Pull out the cargo security screen with
the handle in the center to prevent the
guide pin from falling out of the guide.
When the cargo security screen is
not in use:
1. Pull the cargo security screenbackward and up to release it from
the guides.
2. The cargo security screen will automatically slide back in.
Information
The cargo security screen may not
automatically slide back in if the
cargo security screen is not fully
pulled out. Pull the cargo screen out
all the way and then slowly allow the
screen to retract back into the mecha-
nism.
i
i
OTMA048411
OTM048412
Page 268 of 557
3-179
Convenient features of your vehicle
3
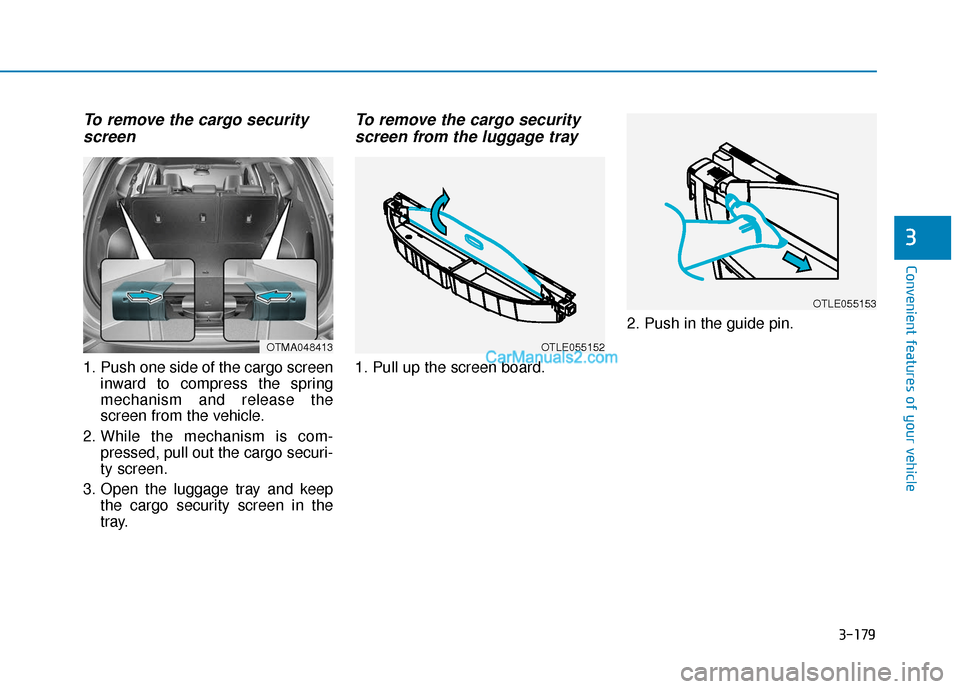
To remove the cargo securityscreen
1. Push one side of the cargo screen
inward to compress the spring
mechanism and release the
screen from the vehicle.
2. While the mechanism is com- pressed, pull out the cargo securi-
ty screen.
3. Open the luggage tray and keep the cargo security screen in the
tray.
To remove the cargo securityscreen from the luggage tray
1. Pull up the screen board. 2. Push in the guide pin.
OTMA048413OTLE055152
OTLE055153
Page 269 of 557
3-180
Convenient features of your vehicle
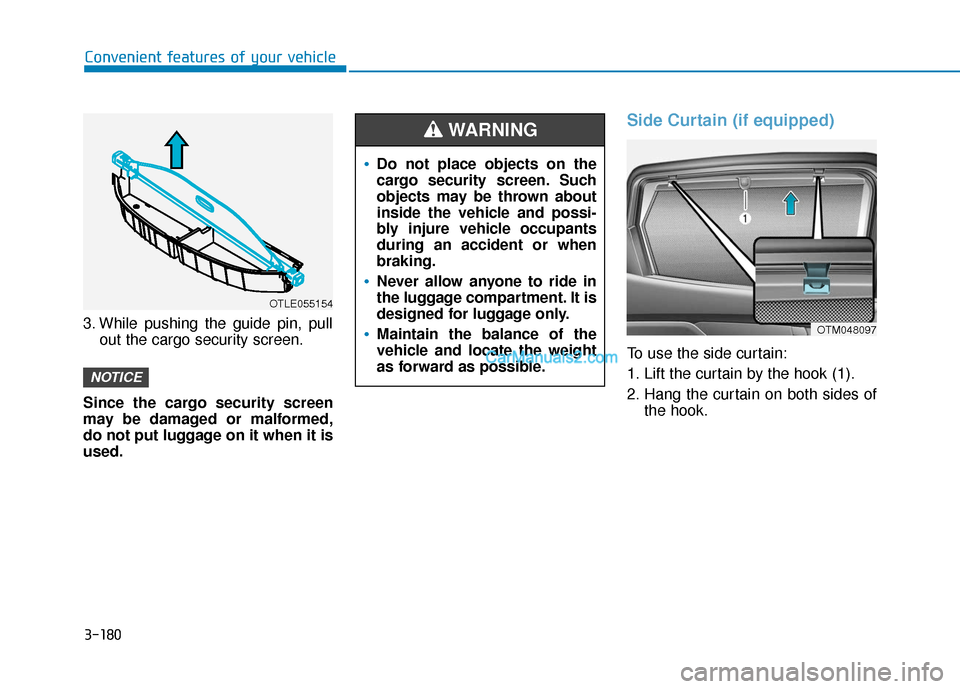
3. While pushing the guide pin, pull out the cargo security screen.
Since the cargo security screen
may be damaged or malformed,
do not put luggage on it when it is
used.
Side Curtain (if equipped)
To use the side curtain:
1. Lift the curtain by the hook (1).
2. Hang the curtain on both sides of the hook.
NOTICE
OTLE055154
Do not place objects on the
cargo security screen. Such
objects may be thrown about
inside the vehicle and possi-
bly injure vehicle occupants
during an accident or when
braking.
Never allow anyone to ride in
the luggage compartment. It is
designed for luggage only.
Maintain the balance of the
vehicle and locate the weight
as forward as possible.
WARNING
OTM048097
Page 270 of 557
3-181
Convenient features of your vehicle
3
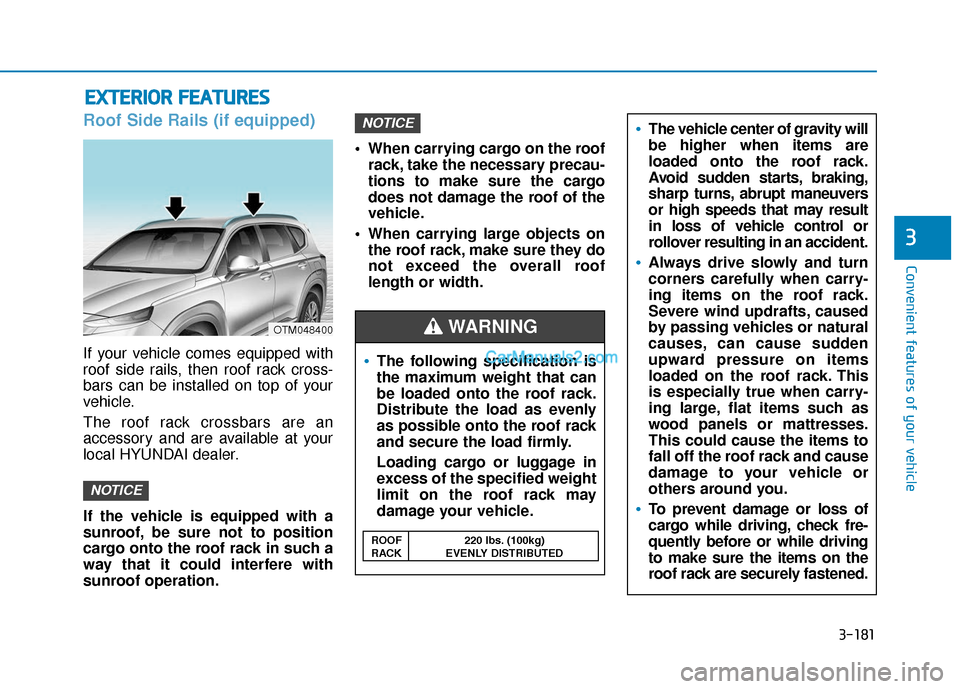
Roof Side Rails (if equipped)
If your vehicle comes equipped with
roof side rails, then roof rack cross-
bars can be installed on top of your
vehicle.
The roof rack crossbars are an
accessory and are available at your
local HYUNDAI dealer.
If the vehicle is equipped with a
sunroof, be sure not to position
cargo onto the roof rack in such a
way that it could interfere with
sunroof operation. When carrying cargo on the roof
rack, take the necessary precau-
tions to make sure the cargo
does not damage the roof of the
vehicle.
When carrying large objects on the roof rack, make sure they do
not exceed the overall roof
length or width.
NOTICE
NOTICE
E EX
X T
TE
ER
R I
IO
O R
R
F
F E
E A
A T
TU
U R
RE
ES
S
The following specification is
the maximum weight that can
be loaded onto the roof rack.
Distribute the load as evenly
as possible onto the roof rack
and secure the load firmly.
Loading cargo or luggage in
excess of the specified weight
limit on the roof rack may
damage your vehicle.
The vehicle center of gravity will
be higher when items are
loaded onto the roof rack.
Avoid sudden starts, braking,
sharp turns, abrupt maneuvers
or high speeds that may result
in loss of vehicle control or
rollover resulting in an accident.
Always drive slowly and turn
corners carefully when carry-
ing items on the roof rack.
Severe wind updrafts, caused
by passing vehicles or natural
causes, can cause sudden
upward pressure on items
loaded on the roof rack. This
is especially true when carry-
ing large, flat items such as
wood panels or mattresses.
This could cause the items to
fall off the roof rack and cause
damage to your vehicle or
others around you.
To prevent damage or loss of
cargo while driving, check fre-
quently before or while driving
to make sure the items on the
roof rack are securely fastened.
WARNING OTM048400
ROOF 220 lbs. (100kg)
RACK EVENLY DISTRIBUTED