Reverse light Hyundai Santa Fe 2020 Owner's Manual
[x] Cancel search | Manufacturer: HYUNDAI, Model Year: 2020, Model line: Santa Fe, Model: Hyundai Santa Fe 2020Pages: 557, PDF Size: 19.29 MB
Page 90 of 557
Convenient features of your vehicle
Accessing Your Vehicle .........................................3-4
Remote Key........................................................................\
.3-4
Smart Key ........................................................................\
....3-7
Immobilizer System .........................................................3-12
Door Locks ............................................................3-13
Operating Door Locks from Outside the Vehicle ....3-13
Operating Door Locks from Inside the Vehicle .......3-15
Automatic Door Lock and Unlock Features .............3-17
Child-Protector Rear Door Locks ...............................3-18
Electronic Child Safety Lock System .........................3-19
Safe Exit Assist (SEA) System .....................................3-20
Rear Occupant Alert (ROA) System ...........................3-21
Theft-Alarm System ............................................3-23
Driver Position Memory System ........................3-24
Storing Positions into Memory ..................................3-24
Recalling Positions from Memory...............................3-25
Resetting the Driver's Seat Memory System...........3-25
Easy Access Function ....................................................3-26
Steering Wheel .....................................................3-27
Electric Power Steering (EPS) .....................................3-27
Tilt Steering / Telescopic Steering .............................3-28
Horn ........................................................................\
............3-28
Heated Steering Wheel ..................................................3-29
Mirrors ...................................................................3-30
Inside Rearview Mirror ..................................................3-30
Side View Mirrors ...........................................................3-38
Reverse Parking Aid Function......................................3-40
Windows ................................................................3-41
Power Windows ...............................................................3-42
Panoramic Sunroof ..............................................3-45
Sunshade ........................................................................\
...3-46
Sliding the Sunroof .........................................................3-46
Tilting the Sunroof .........................................................3-47
Closing the Sunroof........................................................3-47
Resetting the Sunroof ...................................................3-48
Sunroof Open Warning ..................................................3-48
Exterior Features .................................................3-49
Hood ........................................................................\
...........3-49
Non-Powered Liftgate ...................................................3-50
Power Liftgate .................................................................3-52
Smart Liftgate ..................................................................3-59
Fuel Filler Door ................................................................3-62
Instrument Cluster ...............................................3-66
Instrument Cluster Control............................................3-67
Gauges and Meters ........................................................3-68
Transmission Shift Indicator .........................................3-71
Warning and Indicator Lights .......................................3-72
LCD Display Messages ...................................................3-85
3
Page 91 of 557
LCD Display ...........................................................3-91
LCD Display Control ........................................................3-91
LCD Display Modes .........................................................3-92
Trip Computer .....................................................3-106
Head Up Display (HUD).....................................3-110
Lighting................................................................3-112
Exterior Lights ...............................................................3-112
Interior Lights ................................................................3-120
Welcome System ...........................................................3-123
Wipers And Washers .........................................3-124
Front Windshield Wipers .............................................3-124
Front Windshield Washers ..........................................3-126
Rear Window Wiper and Washer..............................3-127
Driver Assist System .........................................3-128
Rear view monitor ........................................................3-128
Surround View Monitoring .........................................3-129
Blind-spot View Monitor system ..............................3-131
Reverse Parking Distance Warning system............3-133
Manual Climate Control System.......................3-137
Heating and Air Conditioning .....................................3-138
System Operation .........................................................3-142
System Maintenance....................................................3-144
Automatic Climate Control System ..................3-146
Automatic Temperature Control Mode ....................3-147
Manual Temperature Control Mode .........................3-148
System Operation .........................................................3-155
System Maintenance....................................................3-156
Windshield Defrosting and Defogging ............3-158
Auto Defogging System ..............................................3-160
Rear Window Defroster ..............................................3-162
Climate Control Additional Features ...............3-163
Cluster ionizer ................................................................3-163
Automatic Ventilation ...................................................3-163
Sunroof Inside Air Recirculation ...............................3-164
Auto comfort control ...................................................3-164
Storage Compartment .......................................3-165
Center Console Storage ..............................................3-165
Glove Box ........................................................................\
3-165
Sunglass Holder.............................................................3-166
Tray......................................................................\
.............3-166
Luggage Tray .................................................................3-167
3
Page 124 of 557
3-35
Convenient features of your vehicle
3
Programming HomeLink®
Please note the following:
When programming a garage dooropener, it is advised to park the
vehicle outside of the garage.
It is recommended that a new bat- tery be placed in the hand-held
transmitter of the device being pro-
grammed to HomeLink
®for quicker
training and accurate transmission
of the radio-frequency signal.
Some vehicles may require the igni- tion switch to be placed in the ACC
(or "Accessories") position for pro-
gramming and/or operation of
HomeLink
®.
In the event that there are still pro- gramming difficulties or questions
after following the programming
steps listed below, contact
HomeLink
®at: www.homelink.com
or by calling 1-800-355-3515.
Programming
To train most devices, follow these
instructions:
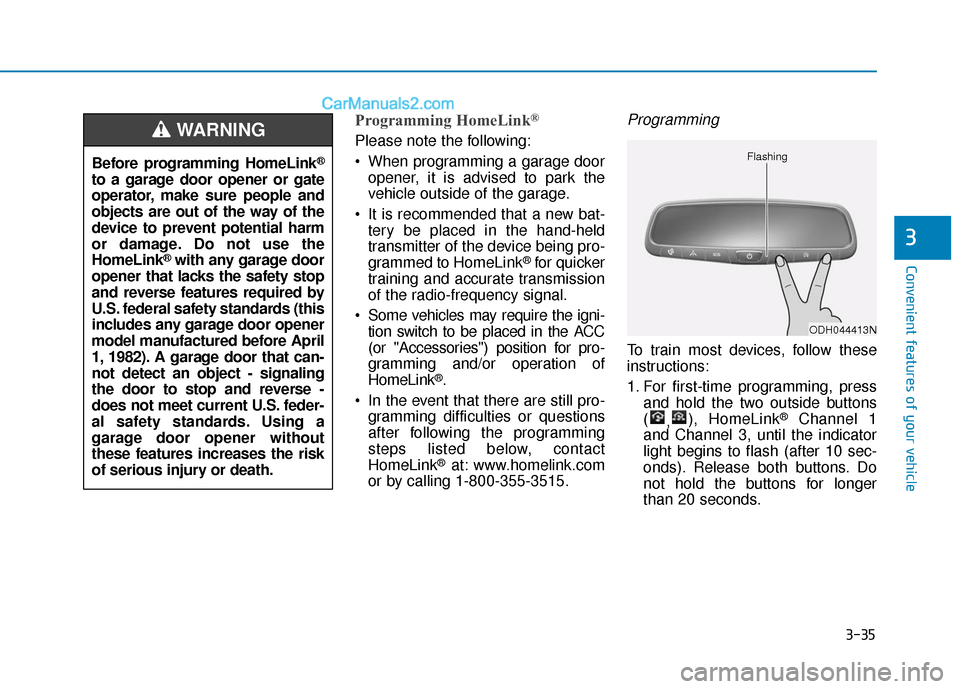
1. For first-time programming, press and hold the two outside buttons
( ,), HomeLink
®Channel 1
and Channel 3, until the indicator
light begins to flash (after 10 sec-
onds). Release both buttons. Do
not hold the buttons for longer
than 20 seconds.
ODH044413N
Flashing
Before programming HomeLink®
to a garage door opener or gate
operator, make sure people and
objects are out of the way of the
device to prevent potential harm
or damage. Do not use the
HomeLink
®with any garage door
opener that lacks the safety stop
and reverse features required by
U.S. federal safety standards (this
includes any garage door opener
model manufactured before April
1, 1982). A garage door that can-
not detect an object - signaling
the door to stop and reverse -
does not meet current U.S. feder-
al safety standards. Using a
garage door opener without
these features increases the risk
of serious injury or death.
WARNING
Page 192 of 557
3-103
Convenient features of your vehicle
3
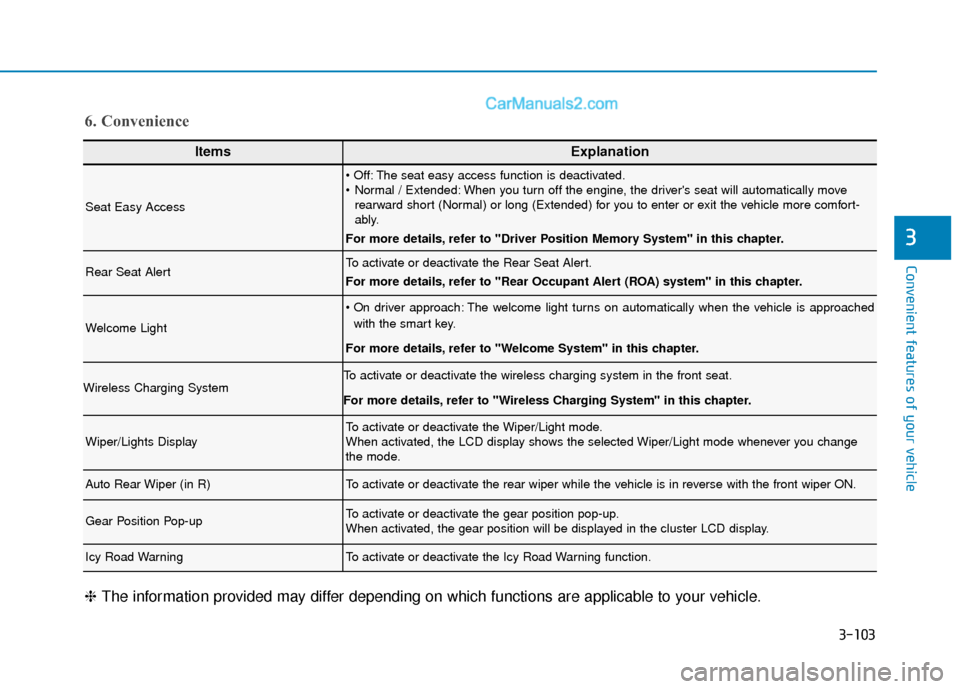
ItemsExplanation
Seat Easy Access
The seat easy access function is deactivated.
Normal / Extended: When you turn off the engine, the driver's seat will automatically moverearward short (Normal) or long (Extended) for you to enter or exit the vehicle more comfort-
ably.
For more details, refer to "Driver Position Memory System" in this chapter.
Rear Seat AlertTo activate or deactivate the Rear Seat Alert.
For more details, refer to "Rear Occupant Alert (ROA) system" in this chapter.
Welcome Light
The welcome light turns on automatically when the vehicle is approached with the smart key.
For more details, refer to ''Welcome System'' in this chapter.
Wireless Charging SystemTo activate or deactivate the wireless charging system in the front seat.
For more details, refer to "Wireless Charging System" in this chapter.
Wiper/Lights DisplayTo activate or deactivate the Wiper/Light mode.
When activated, the LCD display shows the selected Wiper/Light mode whenever you change
the mode.
Auto Rear Wiper (in R)To activate or deactivate the rear wiper while the vehicle is in reverse with the front wiper ON.
Gear Position Pop-upTo activate or deactivate the gear position pop-up.
When activated, the gear position will be displayed in the cluster LCD display.
Icy Road WarningTo activate or deactivate the Icy Road Warning function.
6. Convenience
❈ The information provided may differ depending on which functions are applicable to your vehicle.
Page 223 of 557
3-134
Convenient features of your vehicle
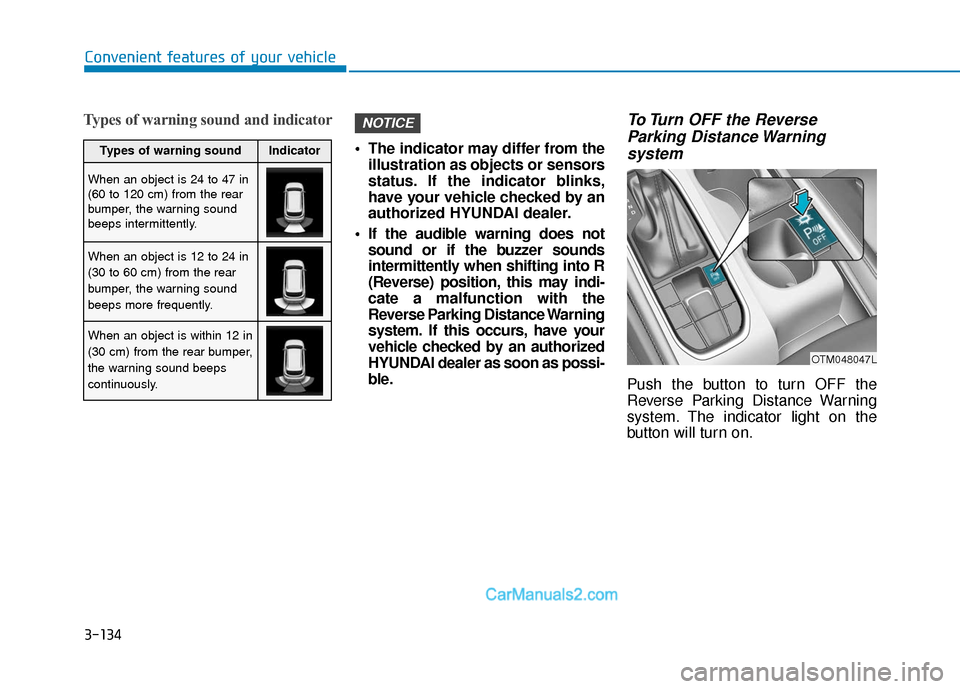
Types of warning sound and indicator
The indicator may differ from theillustration as objects or sensors
status. If the indicator blinks,
have your vehicle checked by an
authorized HYUNDAI dealer.
If the audible warning does not sound or if the buzzer sounds
intermittently when shifting into R
(Reverse) position, this may indi-
cate a malfunction with the
Reverse Parking Distance Warning
system. If this occurs, have your
vehicle checked by an authorized
HYUNDAI dealer as soon as possi-
ble.
To Turn OFF the ReverseParking Distance Warning system
Push the button to turn OFF the
Reverse Parking Distance Warning
system. The indicator light on the
button will turn on.
NOTICE
OTM048047L
Types of warning soundIndicator
When an object is 24 to 47 in
(60 to 120 cm) from the rear
bumper, the warning sound
beeps intermittently.
When an object is 12 to 24 in
(30 to 60 cm) from the rear
bumper, the warning sound
beeps more frequently.
When an object is within 12 in
(30 cm) from the rear bumper,
the warning sound beeps
continuously.
Page 292 of 557
5-18
Driving your vehicle
5. Move the shift lever.
6. Remove the tool from the shift- lock override access hole then
install the cap.
If you need to use the shift-lock
release, have your vehicle inspected
by an authorized HYUNDAI dealer
as soon as possible.
Parking
Always come to a complete stop and
continue to depress the brake pedal.
Move the shift lever into the P (Park)
position, apply the parking brake,
and place the ignition switch in the
LOCK/OFF position. Take the Key
with you when exiting the vehicle.
Good Driving Practices
Never move the shift lever from P (Park) or N (Neutral) to any other
position with the accelerator pedal
depressed.
Never move the shift lever into P (Park) when the vehicle is in
motion.
Be sure the vehicle is completely
stopped before you attempt to
shift into R (Reverse) or D (Drive).
Do not move the shift lever to N (Neutral) when driving. If the shift
lever is moved to N (Neutral) while
driving the vehicle loses the ability
to provide engine braking. Doing
so may increase the risk of an
accident.
Do not drive with your foot resting on the brake pedal. Even light, but
consistent pedal pressure can
result in the brakes overheating,
brake wear and possibly even
brake failure.
When you stay in the vehicle
with the engine running, be
careful not to depress the
accelerator pedal for a long
period of time. The engine or
exhaust system may overheat
and start a fire.
The exhaust gas and the
exhaust system are very hot.
Keep away from the exhaust
system components.
Do not stop or park over flam-
mable materials, such as dry
grass, paper or leaves. They
may ignite and cause a fire.
WARNING
Page 296 of 557
5-22
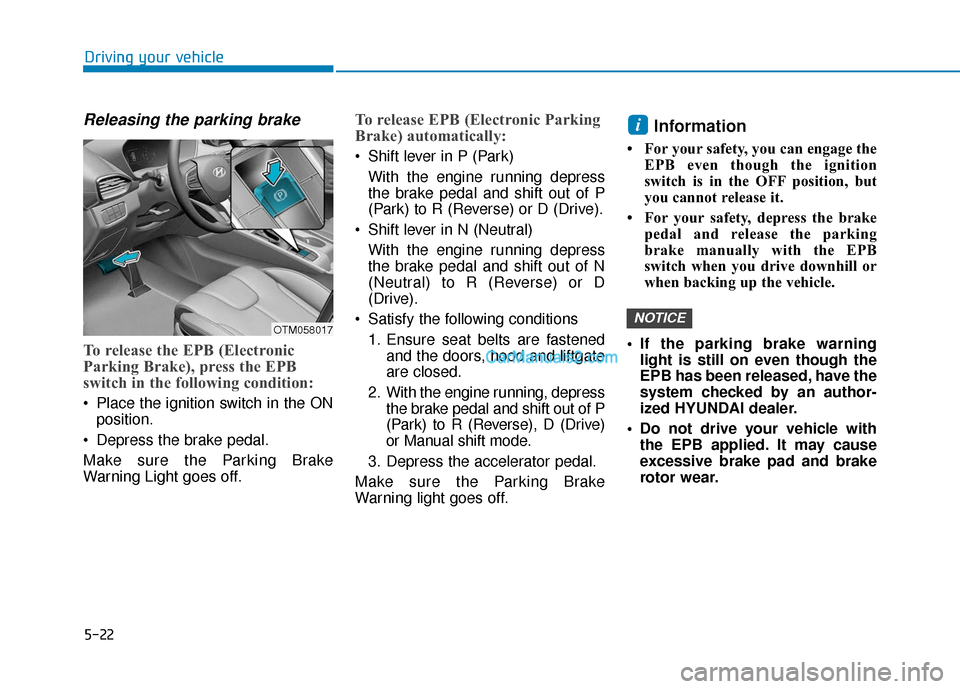
Releasing the parking brake
To release the EPB (Electronic
Parking Brake), press the EPB
switch in the following condition:
Place the ignition switch in the ONposition.
Depress the brake pedal.
Make sure the Parking Brake
Warning Light goes off.
To release EPB (Electronic Parking
Brake) automatically:
Shift lever in P (Park) With the engine running depress
the brake pedal and shift out of P
(Park) to R (Reverse) or D (Drive).
Shift lever in N (Neutral) With the engine running depress
the brake pedal and shift out of N
(Neutral) to R (Reverse) or D
(Drive).
Satisfy the following conditions 1. Ensure seat belts are fastened and the doors, hood and liftgate
are closed.
2. With the engine running, depress the brake pedal and shift out of P
(Park) to R (Reverse), D (Drive)
or Manual shift mode.
3. Depress the accelerator pedal.
Make sure the Parking Brake
Warning light goes off.
Information
• For your safety, you can engage the EPB even though the ignition
switch is in the OFF position, but
you cannot release it.
• For your safety, depress the brake pedal and release the parking
brake manually with the EPB
switch when you drive downhill or
when backing up the vehicle.
If the parking brake warning light is still on even though the
EPB has been released, have the
system checked by an author-
ized HYUNDAI dealer.
Do not drive your vehicle with the EPB applied. It may cause
excessive brake pad and brake
rotor wear.
NOTICE
i
Driving your vehicle
OTM058017
Page 302 of 557
![Hyundai Santa Fe 2020 Owners Manual 5-28
To cancel :
1. Depress the brake pedal.
2. Press the [AUTO HOLD] switch.
The AUTO HOLD indicator will turn
off.
Information
• The Auto Hold does not operatewhen:
- The drivers door is opened
Hyundai Santa Fe 2020 Owners Manual 5-28
To cancel :
1. Depress the brake pedal.
2. Press the [AUTO HOLD] switch.
The AUTO HOLD indicator will turn
off.
Information
• The Auto Hold does not operatewhen:
- The drivers door is opened](/img/35/16315/w960_16315-301.png)
5-28
To cancel :
1. Depress the brake pedal.
2. Press the [AUTO HOLD] switch.
The AUTO HOLD indicator will turn
off.
Information
• The Auto Hold does not operatewhen:
- The driver's door is opened
- The engine hood is opened
- The shift lever is in P (Park) or R(Reverse)
- The EPB is applied
• For your safety, the Auto Hold automatically switches to EPB
when:
- The driver's door is opened withthe shift lever in D (Drive) or N
(Neutral)
- The engine hood is opened with the shift lever in D (Drive) or N
(Neutral)
- The vehicle stops for more than 10 minutes
- The vehicle stands on a steep slope
- The vehicle moves several times In these cases, the parking brake
warning light comes on, the AUTO
HOLD indicator changes from
green to white, and a warning
sound and a message will appear to
inform you that EPB has been auto-
matically engaged. Before driving
off again, press foot brake pedal,
check the surrounding area near
your vehicle and release parking
brake manually with the EPB
switch.
• While operating Auto Hold, you may hear mechanical noise.
However, it is normal operating
noise.
If the AUTO HOLD indicator
changes to yellow, the Auto Hold
is not working properly. Contact
an authorized HYUNDAI dealer.
NOTICE
i
Driving your vehicle
OTM058020
To prevent, unexpected and sud-
den vehicle movement, ALWAYS
press your foot on the brake
pedal to cancel the Auto Hold
before you:
- Drive downhill.
- Drive the vehicle in R (Reverse).
- Park the vehicle.
WARNING
Page 316 of 557
5-42
Driving your vehicle
When driving on normal roads,
deactivate the AWD LOCK mode
by pushing the AWD LOCK button
(AWD LOCK indicator light goes
off). Driving on normal roads with
the AWD LOCK mode, especially,
when cornering may cause
mechanical noise or vibration. The
noise and vibration will disappear
when the AWD LOCK mode is
deactivated. Prolong driving with
the noise and vibration may dam-
age some parts of the power train.
Information
When the AWD LOCK mode is deac-
tivated, a sensation may be felt as the
driving power is delivered entirely to
the front wheels.
For safe AWD operation
Before driving
Make sure all passengers are wearing seat belts.
Sit upright and closer to the steer- ing wheel than usual. Adjust the
steering wheel to a position com-
fortable for you to drive.
Driving on snow-covered or icy
roads
Start off slowly by applying theaccelerator pedal gently.
Use snow tires or tire chains.
Keep sufficient distance between your vehicle and the vehicle in
front of you.
Apply engine braking during decel- eration by switching the gear shift
lever to Manual Shift Mode and
manually selecting a lower gear.
Avoid speeding, rapid accelera- tion, sudden brake applications,
and sharp turns to prevent skids.
Driving in sand or mud
Maintain slow and constant speed.
Use tire chains driving in mud ifnecessary.
Keep sufficient distance between your vehicle and the vehicle in
front of you.
Reduce vehicle speed and always check the road condition.
Avoid speeding, rapid accelera- tion, sudden brake applications,
and sharp turns to prevent getting
stuck.
i
NOTICE
When the vehicle is stuck in
snow, sand or mud, place a non-
slip material under the drive
wheels to provide traction OR
Slowly spin the wheels in for-
ward and reverse directions
which causes a rocking motion
that may free the vehicle.
However, avoid running the
engine continuously at high
rpm, doing so may damage the
AWD system.
CAUTION
Page 358 of 557
5-84
Driving your vehicle
- Normal:
When this condition is selected, the
initial Rear Cross-Traffic Collision
Warning is activated normally. If this
setting feels sensitive, change the
option to 'Later'.
The warning activation time may feel
late if the a vehicle at the side or rear
abruptly accelerates.
- Later:
Select this warning activation time
when the traffic is light and you are
driving in a low speed.
Information
If you change the warning timing, the
warning time of other systems may
change. Always be aware before
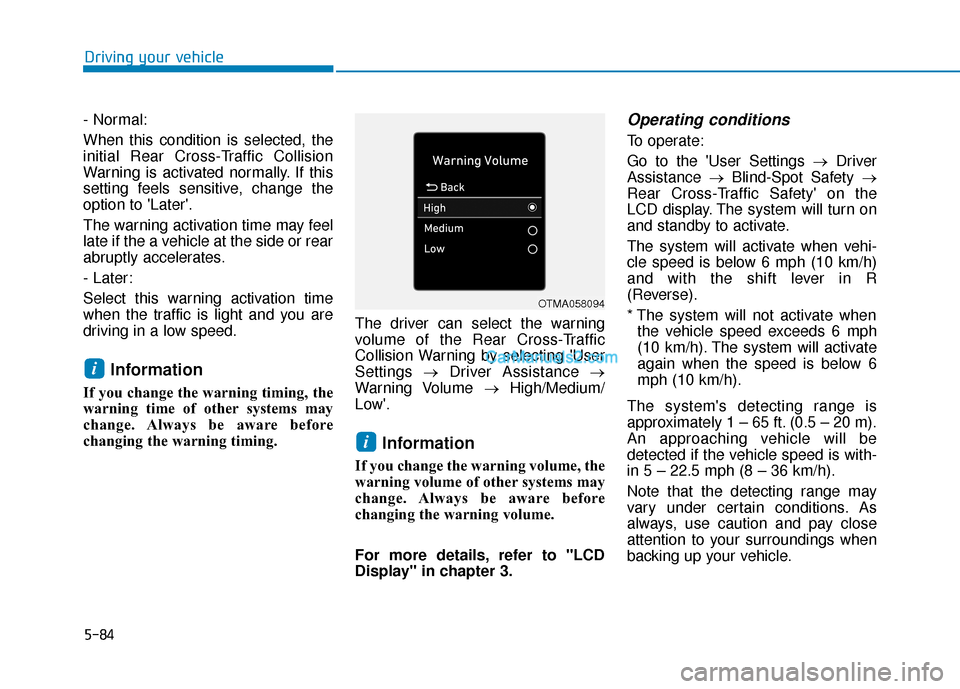
changing the warning timing. The driver can select the warning
volume of the Rear Cross-Traffic
Collision Warning by selecting 'User
Settings
→Driver Assistance →
Warning Volume →High/Medium/
Low'.
Information
If you change the warning volume, the
warning volume of other systems may
change. Always be aware before
changing the warning volume.
For more details, refer to "LCD
Display" in chapter 3.
Operating conditions
To operate:
Go to the 'User Settings → Driver
Assistance →Blind-Spot Safety →
Rear Cross-Traffic Safety' on the
LCD display. The system will turn on
and standby to activate.
The system will activate when vehi-
cle speed is below 6 mph (10 km/h)
and with the shift lever in R
(Reverse).
* The system will not activate when the vehicle speed exceeds 6 mph
(10 km/h). The system will activate
again when the speed is below 6
mph (10 km/h).
The system's detecting range is
approximately 1 – 65 ft. (0.5 – 20 m).
An approaching vehicle will be
detected if the vehicle speed is with-
in 5 – 22.5 mph (8 – 36 km/h).
Note that the detecting range may
vary under certain conditions. As
always, use caution and pay close
attention to your surroundings when
backing up your vehicle.
i
i
OTMA058094