latch HYUNDAI SANTA FE CALLIGRAPHY 2021 Owners Manual
[x] Cancel search | Manufacturer: HYUNDAI, Model Year: 2021, Model line: SANTA FE CALLIGRAPHY, Model: HYUNDAI SANTA FE CALLIGRAPHY 2021Pages: 636, PDF Size: 81.2 MB
Page 55 of 636
03
3-23
SEAT BELTS
This section describes how to use the
seat belts properly. It also describes
some of the things not to do when using
seat belts.
Seat belt safety precautions
Always fasten your seat belt and make
sure all passengers have fastened their
seat belts before starting any trip. Air
bags are designed to supplement the
seat belt as an additional safety device,
but they are not a substitute. Most
countries require all occupants of a
vehicle to wear seat belts.
WARNING
Seat belts must be used by ALL
passengers whenever the vehicle is
moving. Take the following precautions
when adjusting and wearing seat belts:
• Children under the age of 13 should
be properly restrained in the rear
seats.
• Never allow children to ride in the
front passenger seat, unless the air
bag is deactivated. If a child is seated
in the front passenger seat, move
the seat as far back as possible and
properly restrain them in the seat.
• NEVER allow an infant or child to be
carried on an occupant’s lap.
• NEVER ride with the seatback
reclined when the vehicle is moving.
• Do not allow children to share a seat
or seat belt.
• Do not wear the shoulder belt under
your arm or behind your back. •
Never wear a seat belt over fragile
objects. If there is a sudden stop or
impact, the seat belt can damage it.
• Do not use the seat belt if it is
twisted. A twisted seat belt will not
protect you properly in an accident.
• Do not use a seat belt if the webbing
or hardware is damaged.
• Do not latch the seat belt into the
buckles of other seats.
• NEVER unfasten the seat belt
while driving. This may cause loss
of vehicle control resulting in an
accident.
• Make sure there is nothing in the
buckle interfering with the seat belt
latch mechanism. This may prevent
the seat belt from fastening securely.
• No modifications or additions
should be made by the user which
will either prevent the seat belt
adjusting devices from operating to
remove slack, or prevent the seat
belt assembly from being adjusted to
remove slack.
WARNING
Damaged seat belts and seat belt
assemblies will not operate properly.
Always replace:
• Frayed, contaminated, or damaged
webbing.
• Damaged hardware.
• The entire seat belt assembly after it
has been worn in an accident, even
if damage to webbing or assembly is
not apparent.
Page 60 of 636
Seats & Safety System
3-28
Second row center seatbelt
(3-point rear center seat belt)
OTM038041
1. Insert the tongue plate (1) into the
buckle (2) until an audible “click" is
heard, indicating the latch is locked.
Make sure the belt is not twisted.
When using the rear center seat belt, the
buckle with the “CENTER” mark must be
used.
Information
If you are not able to pull out the safety
belt from the retractor, firmly pull the belt
out and release it. After release, you will be
able to pull the belt out smoothly.
WARNING
Make sure that the seatback is locked in
place when using the rear center seat
belt.
If not, the seatback may move when
there is a sudden stop or collision,
which could result in serious injury.
Stowing the rear seat belt
OTM030022• The rear seat belt buckles can be
stowed in the pocket between the
rear seatback and cushion when not
in use.
„„Rear seat
OTM030024
• Routing the seat belt webbing through
the rear seat belt guides will help keep
the belts from being trapped behind
or under the seats.
After inserting the seat belt, tighten
the belt webbing by pulling it up.
CAUTION
When using the seat belt, use it after
taking it out of the guides.
If you pull the seat belt when it is stored
in the guides, it may damage the guides
and/or belt webbing.
Page 66 of 636
Seats & Safety System
3-34
Children Always in the Rear
WARNING
Always properly restrain children in the
vehicle. Children of all ages are safer
when restrained in the rear seat. A child
riding in the front passenger seat can
be forcefully struck by an inflating air
bag resulting in SERIOUS INJURY or
DEATH.
Children under age 13 should always
ride in the rear seats and must always be
properly restrained to minimize the risk
of injury in an accident, sudden stop or
sudden maneuver.
According to accident statistics, children
are safer when properly restrained in the
rear seats than in the front seat. Even
with air bags, children can be seriously
injured or killed. Children too large for a
Child Restraint System must use the seat
belts provided.
All 50 states have child restraint laws
which require children to travel in
approved Child Restraint Systems.
The laws governing the age or height/
weight restrictions at which seat belts
can be used instead of Child Restraint
System differs among states, so
you should be aware of the specific
requirements in your country, and where
you are travelling.
Child Restraint Systems must be properly
placed and installed in the rear seat.
You must use a commercially available
Child Restraint System that meets the
requirements of the Federal Motor
Vehicle Safety Standards (FMVSS 213).
Child Restraint Systems are generally
designed to be secured in a vehicle seat
by lap belt portion of a lap/shoulder belt,
or by a LATCH system in the rear seats of
the vehicle.
Child Restraint System (CRS)
Infants and younger children must be
restrained in an appropriate rearward-
facing or forward-facing CRS that has
first been properly secured to the seat
of the vehicle. Read and comply with
the instructions for installation and use
provided by the manufacturer of the
Child Restraint System.
WARNING
An improperly secured child restraint
can increase the risk of SERIOUS
INJURY or DEATH in an accident. Always
take the following precautions when
using a Child Restraint System:
• NEVER install a child or infant
restraint in the front passenger's
seat.
• Always properly secure the child
restraint to a rear seat of the vehicle.
• Always follow the child restraint
system manufacturer's instructions
for installation and use.
• Always properly restrain your child in
the child restraint.
• If the vehicle head restraint prevents
proper installation of a child seat
(as described in the child restraint
system manual), the head restraint of
the respective seating position shall
be readjusted or entirely removed.
• Do not use an infant carrier or a
child safety seat that "hooks" over
a seatback, it may not provide
adequate protection in an accident.
• After an accident, have an authorized
HYUNDAI dealer check the child
restraint system, seat belts, tether
anchors and lower anchors.
ChILD REsTRAInT s YsTEm (CRs)
Page 69 of 636
03
3-37
Installing a Child Restraint
System (CRS)
WARNING
Before installing your Child Restraint
System always:
Read and follow the instructions
provided by the manufacturer of the
Child Restraint System.
Failure to follow all warnings and
instructions could increase the risk of
the SERIOUS INJURY or DEATH if an
accident occurs.
WARNING
If the vehicle head restraint prevents
proper installation of a Child Restraint
System, the head restraint of the
respective seating position shall be
readjusted or entirely removed.
After selecting a proper Child Restraint
System for your child and checking that
the Child Restraint System fits properly
on the seating position, there are three
general steps for a proper installation:
• Properly secure the Child Restraint
System to the vehicle. All Child
Restraint Systems must be secured
to the vehicle with the lap belt or
lap part of a lap/shoulder part of a
lap/shoulder belt or with the LATCH
system. •
Make sure the Child Restraint System
is firmly secured. After installing a
Child Restraint System to the vehicle,
push and pull the seat forward and
from side-to-side to verify that it is
securely attached to the seat. A Child
Restraint System secured with a seat
belt should be installed as firmly as
possible. However, some side-to-side
movement can be expected.
When installing a Child Restraint
System, adjust the vehicle seat and
seatback (up and down, forward
and rearward) so that your child fits
in the Child Restraint System in a
comfortable manner.
• Secure the child in the Child
Restraint System. Make sure the
child is properly strapped in the Child
Restraint System according to the
Child Restraint System manufacturer’s
instructions.
CAUTION
A Child Restraint System in a closed
vehicle can become very hot. To prevent
burns, check the seating surface and
buckles before placing your child in the
Child Restraint System.
Page 70 of 636
Seats & Safety System
3-38
Lower Anchors and Tether for
Children (LATCH System)
The LATCH system holds a Child
Restraint System during driving and in
an accident. This system is designed
to make installation of the Child
Restraint System easier and reduce
the possibility of improperly installing
your Child Restraint System. The LATCH
system uses anchors in the vehicle and
attachments on the Child Restraint
System. The LATCH system eliminates
the need to use seat belts to secure the
Child Restraint System to the rear seats.
Lower anchors are metal bars built into
the vehicle. There are two lower anchors
for each LATCH seating position that will
accommodate a Child Restraint System
with lower attachments.
To use the LATCH system in your vehicle,
you must have a Child Restraint System
with LATCH attachments.
The Child Restraint System manufacturer
will provide you with instructions on how
to use the Child Restraint System with its
attachments for the LATCH anchorages.
OOSEV038012
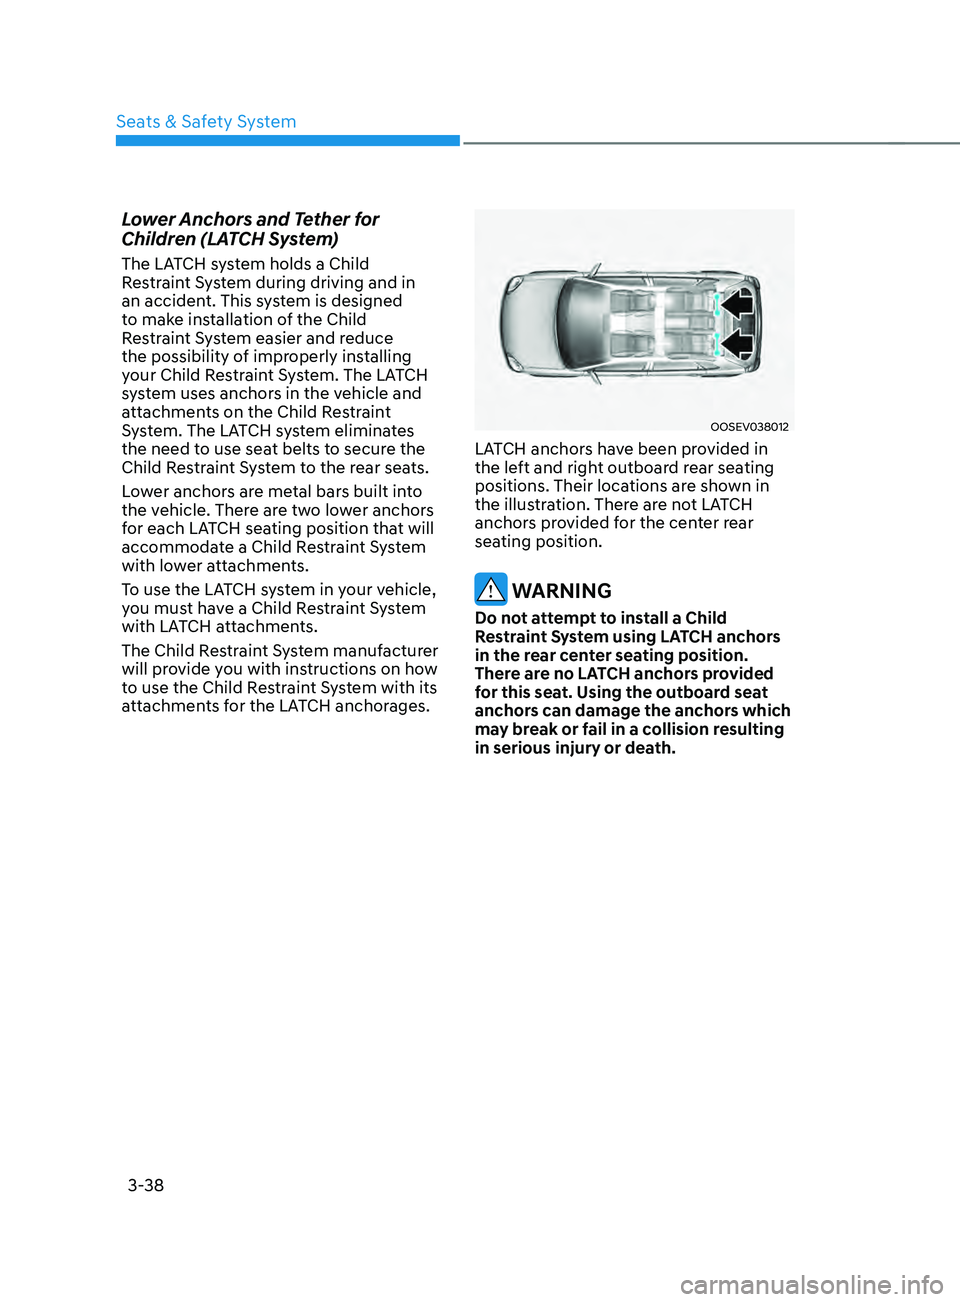
LATCH anchors have been provided in
the left and right outboard rear seating
positions. Their locations are shown in
the illustration. There are not LATCH
anchors provided for the center rear
seating position.
WARNING
Do not attempt to install a Child
Restraint System using LATCH anchors
in the rear center seating position.
There are no LATCH anchors provided
for this seat. Using the outboard seat
anchors can damage the anchors which
may break or fail in a collision resulting
in serious injury or death.
Page 71 of 636
![HYUNDAI SANTA FE CALLIGRAPHY 2021 Owners Manual 03
3-39
„„Rear passenger seat
OTM030012
[A] : Lower Anchor Position Indicator(Type A- ,Type B- ),
[B] : Lower Anchor
The lower anchor position indicator
symbols are located on the left an HYUNDAI SANTA FE CALLIGRAPHY 2021 Owners Manual 03
3-39
„„Rear passenger seat
OTM030012
[A] : Lower Anchor Position Indicator(Type A- ,Type B- ),
[B] : Lower Anchor
The lower anchor position indicator
symbols are located on the left an](/img/35/56181/w960_56181-70.png)
03
3-39
„„Rear passenger seat
OTM030012
[A] : Lower Anchor Position Indicator(Type A- ,Type B- ),
[B] : Lower Anchor
The lower anchor position indicator
symbols are located on the left and right
rear seat backs to identify the position
of the lower anchors in your vehicle (see
arrows in illustration).
The LATCH anchors are located between
the seatback and the seat cushion of the
rear seat left and right outboard seating
positions.
WARNING
Before installing the Child Restraint
System, make sure that there are no
objects (e.g. toy, pen, wire) around the
lower anchor area. Those objects may
damage either the seat belt system or
the Child Restraint System during the
installment procedure. If necessary,
have the vehicle inspected by an
authorized HYUNDAI dealer.
Securing a Child Restraint System
with the “LATCH Anchors System”
To install a LATCH-compatible Child
Restraint System in either of the rear
outboard seating positions:
1.
Mo
ve the seat belt buckle away from
the lower anchors.
2.
Mo
ve any other objects away from
the anchorages that could prevent
a secure connection between the
Child Restraint System and the lower
anchors.
3.
Place the Child Res
traint System on
the vehicle seat, then attach the seat
to the lower anchors according to the
instructions provided by the Child
Restraint System manufacturer.
4.
Follo
w the instructions of the Child
Restraint System’s manufacturer for
proper installation and connection of
the lower attachments on the Child
Restraint System to the lower anchors.
Page 72 of 636
Seats & Safety System
3-40
WARNING
Take the following precautions when
using the LATCH system:
• Read and follow all installation
instructions provided with your Child
Restraint System.
• To prevent the child from reaching
and taking hold of unretracted
seat belts, buckle all unused rear
seat belts and retract the seat belt
webbing behind the child. Children
can be strangled if a shoulder belt
becomes wrapped around their neck
and the seat belt tightens.
• NEVER attach more than one
Child Restraint System to a single
anchorage. This could cause the
anchor or attachment to come loose
or break.
• Always have the LATCH system
inspected by your dealer after an
accident. An accident can damage
the LATCH system and may not
properly secure the Child Restraint
System.
NOTICE
The recommended weight for the
LATCH system is under 65 lb. (30 kg).
How to determine an appropriate child
restraint weight: Child weight + Child
restraint weight < 65 lb. (30kg)
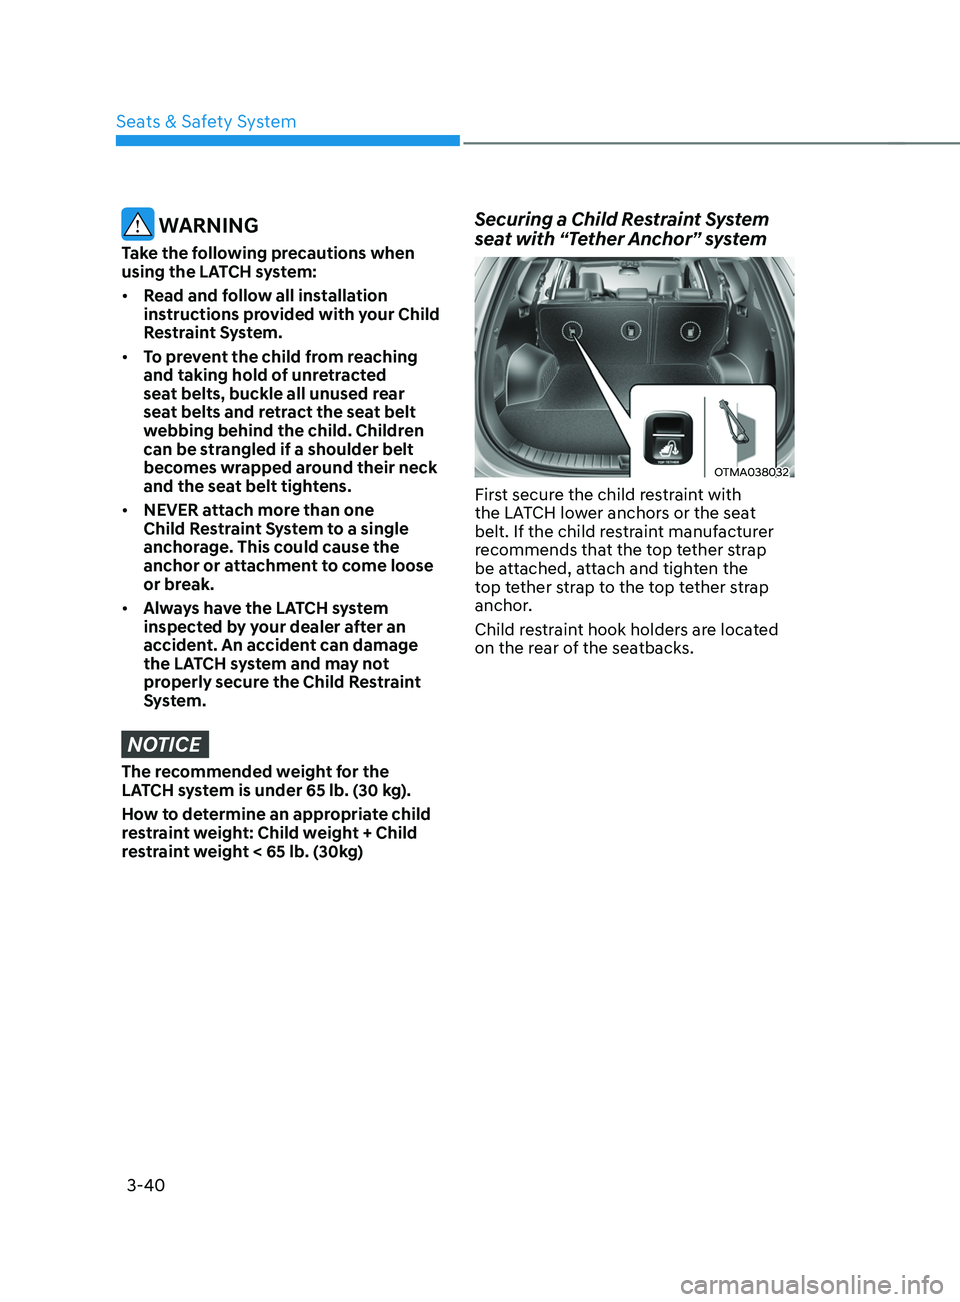
Securing a Child Restraint System
seat with “Tether Anchor” system
OTMA038032
First secure the child restraint with
the LATCH lower anchors or the seat
belt. If the child restraint manufacturer
recommends that the top tether strap
be attached, attach and tighten the
top tether strap to the top tether strap
anchor.
Child restraint hook holders are located
on the rear of the seatbacks.
Page 74 of 636
Seats & Safety System
3-42
Securing a Child Restraint System
with a lap/shoulder belt
WARNING
ALWAYS place a rearward-facing Child
Restraint System in the rear seat of the
vehicle.
Placing a rearward-facing child restraint
in the front seat can result in serious
injury or death if the Child Restraint
System is struck by an inflating air bag.
When not using the LATCH system, all
Child Restraint Systems must be secured
to a rear seat with the lap part of a lap/
shoulder belt.
OHI038145
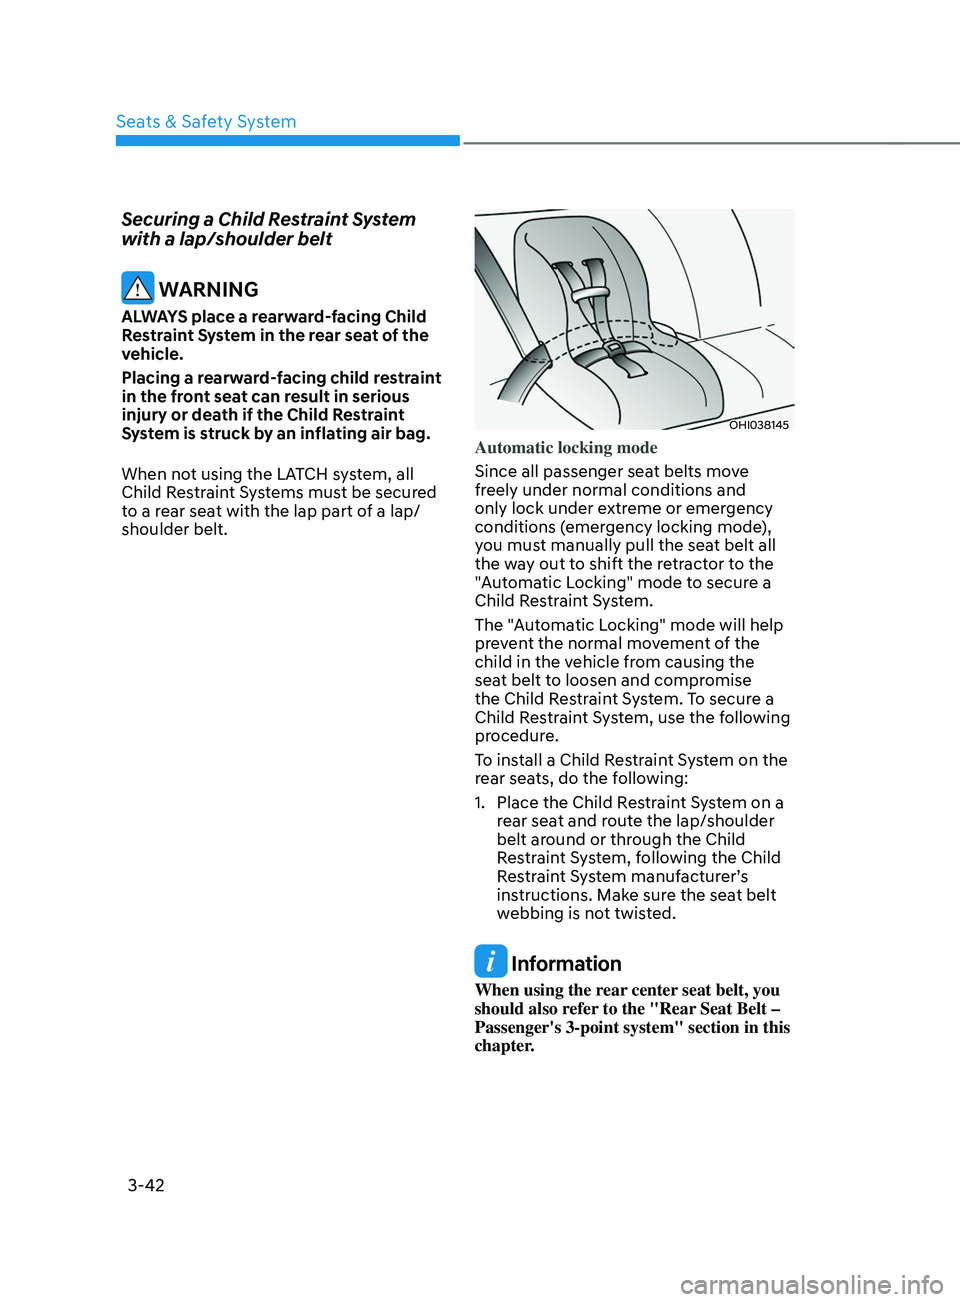
Automatic locking mode
Since all passenger seat belts move
freely under normal conditions and
only lock under extreme or emergency
conditions (emergency locking mode),
you must manually pull the seat belt all
the way out to shift the retractor to the
"Automatic Locking" mode to secure a
Child Restraint System.
The "Automatic Locking" mode will help
prevent the normal movement of the
child in the vehicle from causing the
seat belt to loosen and compromise
the Child Restraint System. To secure a
Child Restraint System, use the following
procedure.
To install a Child Restraint System on the
rear seats, do the following:
1.
Place the Child Res
traint System on a
rear seat and route the lap/shoulder
belt around or through the Child
Restraint System, following the Child
Restraint System manufacturer’s
instructions. Make sure the seat belt
webbing is not twisted.
Information
When using the rear center seat belt, you
should also refer to the "Rear Seat Belt –
Passenger's 3-point system" section in this
chapter.
Page 75 of 636
03
3-43
OHI038146
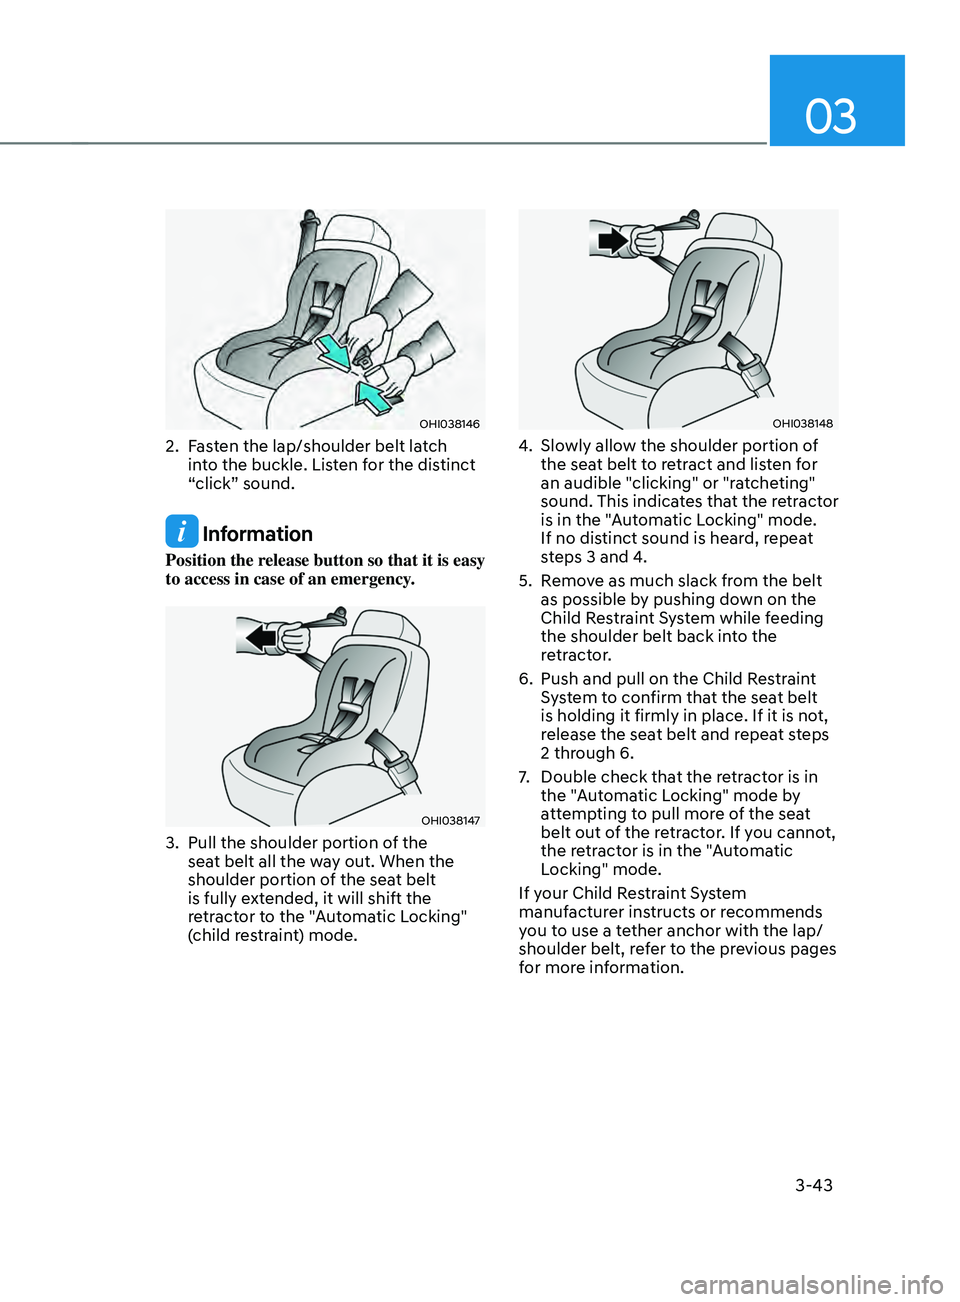
2. Fasten the lap/shoulder belt latch
into the buckle. Listen for the distinct
“click” sound.
Information
Position the release button so that it is easy
to access in case of an emergency.
OHI038147
3. Pull the shoulder portion of the
sea t belt all the way out. When the
shoulder portion of the seat belt
is fully extended, it will shift the
retractor to the "Automatic Locking"
(child restraint) mode.
OHI038148
4. Slowly allow the shoulder portion of
the sea t belt to retract and listen for
an audible "clicking" or "ratcheting"
sound. This indicates that the retractor
is in the "Automatic Locking" mode.
If no distinct sound is heard, repeat
steps 3 and 4.
5.
Remo
ve as much slack from the belt
as possible by pushing down on the
Child Restraint System while feeding
the shoulder belt back into the
retractor.
6.
Push and pull on the Child Res
traint
System to confirm that the seat belt
is holding it firmly in place. If it is not,
release the seat belt and repeat steps
2 through 6.
7.
Double check that the r
etractor is in
the "Automatic Locking" mode by
attempting to pull more of the seat
belt out of the retractor. If you cannot,
the retractor is in the "Automatic
Locking" mode.
If your Child Restraint System
manufacturer instructs or recommends
you to use a tether anchor with the lap/
shoulder belt, refer to the previous pages
for more information.
Page 211 of 636
05
5-67
Hood
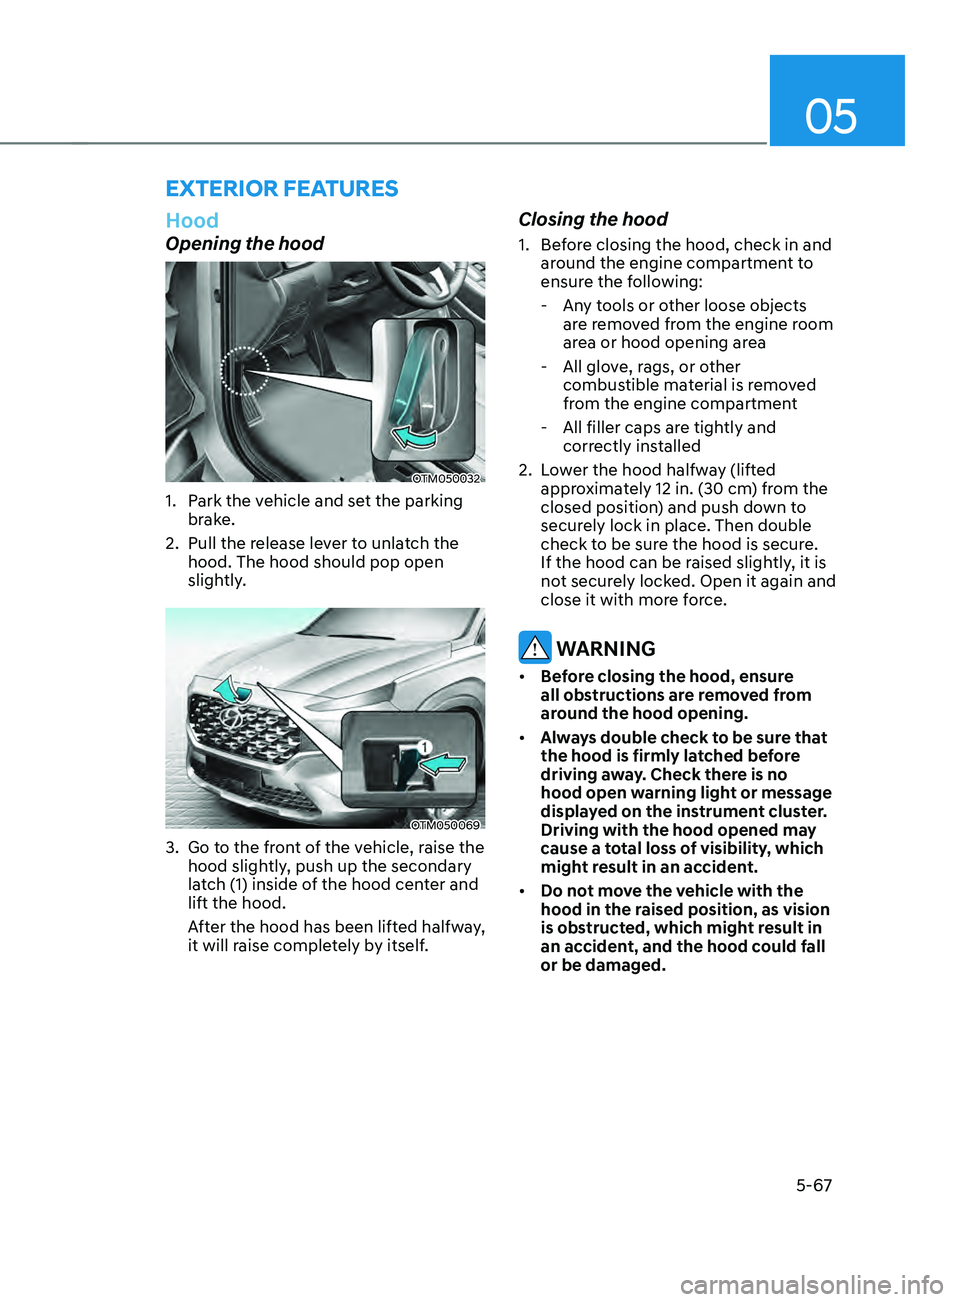
Opening the hood
OTM050032
1. Park the vehicle and set the parking
brake.
2.
Pull the release le
ver to unlatch the
hood. The hood should pop open
slightly.
OTM050069
3. Go to the front of the vehicle, raise the
hood sligh tly, push up the secondary
latch (1) inside of the hood center and
lift the hood.
After the hood has been lifted halfway,
it will raise completely by itself.
Closing the hood
1. Before closing the hood, check in and
ar ound the engine compartment to
ensure the following:
- Any t
ools or other loose objects
are removed from the engine room
area or hood opening area
- All glov
e, rags, or other
combustible material is removed
from the engine compartment
- All filler caps are tigh
tly and
correctly installed
2.
Lo
wer the hood halfway (lifted
approximately 12 in. (30 cm) from the
closed position) and push down to
securely lock in place. Then double
check to be sure the hood is secure.
If the hood can be raised slightly, it is
not securely locked. Open it again and
close it with more force.
WARNING
• Before closing the hood, ensure
all obstructions are removed from
around the hood opening.
• Always double check to be sure that
the hood is firmly latched before
driving away. Check there is no
hood open warning light or message
displayed on the instrument cluster.
Driving with the hood opened may
cause a total loss of visibility, which
might result in an accident.
• Do not move the vehicle with the
hood in the raised position, as vision
is obstructed, which might result in
an accident, and the hood could fall
or be damaged.
ExTERIOR FEATURES