oil temperature HYUNDAI SANTA FE LIMITED 2021 Owners Manual
[x] Cancel search | Manufacturer: HYUNDAI, Model Year: 2021, Model line: SANTA FE LIMITED, Model: HYUNDAI SANTA FE LIMITED 2021Pages: 636, PDF Size: 81.2 MB
Page 28 of 636
Vehicle Information, Consumer Information and Reporting Safety Defects
2-14
Recommended SAE viscosity number
CAUTION
Always be sure to clean the area around any filler plug, drain plug, or dipstick before
checking or draining any lubricant. This is especially important in dusty or sandy
areas and when the vehicle is used on unpaved roads. Cleaning the plug and dipstick
areas will prevent dirt and grit from entering the engine and other mechanisms that
could be damaged.
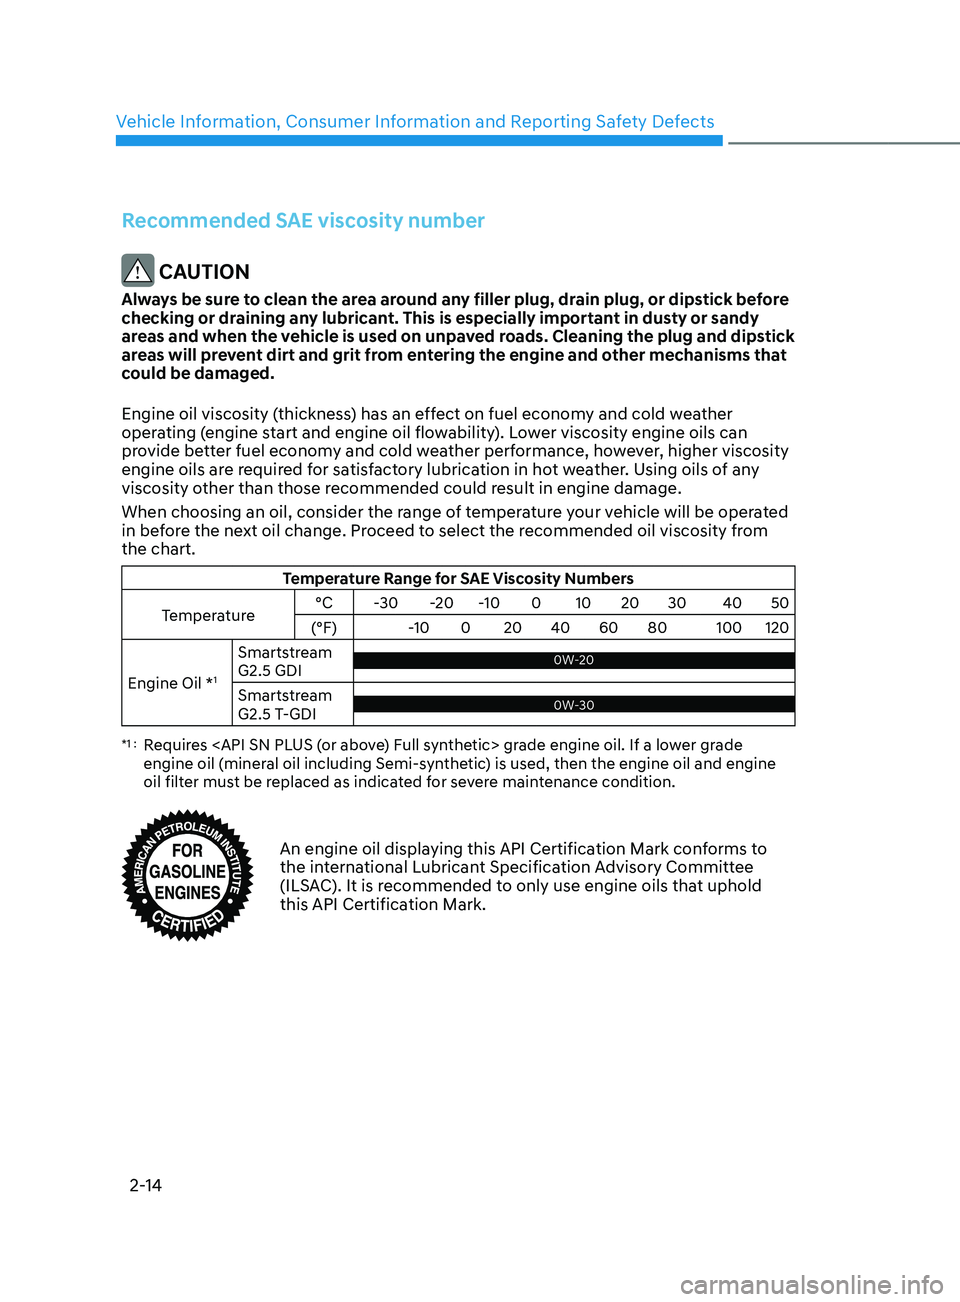
Engine oil viscosity (thickness) has an effect on fuel economy and cold weather
operating (engine start and engine oil flowability). Lower viscosity engine oils can
provide better fuel economy and cold weather performance, however, higher viscosity
engine oils are required for satisfactory lubrication in hot weather. Using oils of any
viscosity other than those recommended could result in engine damage.
When choosing an oil, consider the range of temperature your vehicle will be operated
in before the next oil change. Proceed to select the recommended oil viscosity from
the chart.
Temperature Range for SAE Viscosity Numbers
Temperature °C
-30-20-10 0 10 20 30 40 50
(°F) -100 20 40 60 80 100 120
Engine Oil *
1
Smartstream
G2.5 GDI0W-20 0W-20
Smartstream
G2.5 T-GDI0W-30
*1 : Requires
engine oil (mineral oil including Semi-synthetic) is used, then the engine oil and engine
oil filter must be replaced as indicated for severe maintenance condition.
An engine oil displaying this API Certification Mark conforms to
the international Lubricant Specification Advisory Committee
(ILSAC). It is recommended to only use engine oils that uphold
this API Certification Mark.
Page 99 of 636
Instrument cluster
Instrument cluster ........................................................................\
....................4-4Instrument cluster control ........................................................................\
...................4-5
Instrumen t panel illumination ........................................................................\
........... 4-5
Gauges and me
ters
........................................................................\
.............................. 4-5
Speedome
ter
........................................................................\
..................................... 4-5
T
achometer
........................................................................\
.....................................
...4-5
Engine coolant temperature gauge
........................................................................\
. 4-6
Fuel gauge ........................................................................\
.....................................
....4-6
Outside temperature gauge
........................................................................\
.............. 4
-7
Odometer
........................................................................\
.....................................
.....4-8
Distance to empty
........................................................................\
............................ 4-8
F
uel economy (for 12.3-inch cluster)
...................................................................... 4-9
T
ransmission shift indicator
........................................................................\
................ 4-9
A
utomatic transmission / Dual clutch transmission shift indicator
..................... 4-9
W
arning and indicator lights
........................................................................\
............. 4-
10
Seat belt warning light
........................................................................\
.................... 4-
10
Air bag warning light
........................................................................\
....................... 4-
10
Parking brake & Brake fluid warning light
.............................................................. 4-10
An
ti-lock Brake System (ABS) warning light
........................................................... 4-
11
Electronic Brake Force Distribution (EBD) system warning light
.......................... 4-
11
Electric Power Steering (EPS) warning light
.......................................................... 4-
12
Charging system warning light
........................................................................\
....... 4-
12
Engine oil pressure warning light
........................................................................\
... 4-
13
Low fuel level warning light
........................................................................\
............ 4-
13
Malfunction Indicator Lamp (MIL)
........................................................................\
.. 4-13
Exhaus
t system (GPF) warning light (for gasoline engine)
................................... 4-
14
Electronic Parking Brake (EPB) warning light
........................................................ 4-
14
AUTO HOLD indicator light
........................................................................\
............. 4-
15
Low tire pressure warning light
........................................................................\
...... 4-
15
Forward Safety warning light
........................................................................\
.......... 4-16
Lane Sa
fety indicator light
........................................................................\
.............. 4-
16
4 Wheel Drive (4WD) warning light
........................................................................\
4-
16
4 Wheel Drive (4WD) LOCK Indicator Light
............................................................ 4-17
LED headligh
t warning light
........................................................................\
............. 4-
17
Icy road warning light
........................................................................\
...................... 4-
18
Electronic Stability Control (ESC) indicator light
................................................... 4-
18
Electronic Stability Control (ESC) OFF indicator light
........................................... 4-
18
Immobilizer Indicator Light (without smart key)
.................................................. 4-
19
Immobilizer Indicator Light (with smart key)
......................................................... 4-
19
Downhill Brake Control (DBC) indicator light
........................................................
4-20
4. Instrument cluster
4
Page 246 of 636
Convenient features
5-102
Air conditioning
HYUNDAI Air Conditioning Systems are
filled with R-134a or R-1234yf refrigerant.
1.
Start the engine. Push the air
conditioning butt
on.
2.
Set the mode t
o the
position.
3.
Set the air in
take control to the
outside air or recirculated air position.
4.
Adjus
t the fan speed control and
temperature control to maintain
maximum comfort.
Information
Your vehicle is filled with R-134a or
R-1234yf according to the regulation in
your country at the time of production.
You can find out which air conditioning
refrigerant is applied to your vehicle on
the label located inside of the hood. Refer
to chapter 8 for the location of the air
conditioning refrigerant label.
NOTICE
• The refrigerant system should only
be serviced by trained and certified
technicians to insure proper and safe
operation.
• The refrigerant system should be
serviced in a well-ventilated place.
• The air conditioning evaporator
(cooling coil) shall never be repaired
or replaced with one removed from
a used or salvaged vehicle and new
replacement MAC evaporators shall
be certified (and labeled) as meeting
SAE Standard J2842.
NOTICE
• When using the air conditioning
system, monitor the temperature
gauge closely while driving up
hills or in heavy traffic when
outside temperatures are high.
Air conditioning system operation
may cause engine overheating.
Continue to use the fan but turn the
air conditioning system off if the
temperature gauge indicates engine
overheating.
• When opening the windows in humid
weather air conditioning may create
water droplets inside the vehicle.
Since excessive water droplets
may cause damage to electrical
equipment, air conditioning should
only be used with the windows
closed.
Page 256 of 636
Convenient features
5-112
Air conditioning
HYUNDAI Air Conditioning Systems are
filled with R-1234yf refrigerant.
1.
Start the engine. Push the air
conditioning butt
on.
2.
Set the mode t
o the
position.
3.
Set the air in
take control to the
outside air or recirculated air position.
4.
Adjus
t the fan speed control and
temperature control to maintain
maximum comfort.
Information
Your vehicle is filled with R-134a or
R1234yf according to the regulation in
your country at the time of production.
You can find out which air conditioning
refrigerant is applied to your vehicle on
the label located inside of the hood. Refer
to chapter 8 for the location of the air
conditioning refrigerant label.
NOTICE
• The refrigerant system should only
be serviced by trained and certified
technicians to insure proper and safe
operation.
• The refrigerant system should be
serviced in a well-ventilated place.
• The air conditioning evaporator
(cooling coil) shall never be repaired
or replaced with one removed from
a used or salvaged vehicle and new
replacement MAC evaporators shall
be certified (and labeled) as meeting
SAE Standard J2842.
NOTICE
• When using the air conditioning
system, monitor the temperature
gauge closely while driving up
hills or in heavy traffic when
outside temperatures are high.
Air conditioning system operation
may cause engine overheating.
Continue to use the fan but turn the
air conditioning system off if the
temperature gauge indicates engine
overheating.
• When opening the windows in humid
weather air conditioning may create
water droplets inside the vehicle.
Since excessive water droplets
may cause damage to electrical
equipment, air conditioning should
only be used with the windows
closed.
Page 356 of 636
Driving your vehicle
6-68
• The driving mode automatically
changes to SMART SPORT mode
only in harsh driving situations. In
most of the normal driving situations,
the driving mode sets to be either
in SMART ECO mode or in SMART
COMFORT mode.
Limitation of SMART mode
The SMART mode may be limited in
following situations. (The OFF indicator
illuminates in those situations.)
• The driver manually moves the shift
lever : It deactivates SMART mode.
The vehicle drives, as the driver
manually moves the shift lever.
• The cruise control is activated : The
cruise system may deactivate the
SMART mode. When a higher system
is set by the cruise system, it starts to
control vehicle speed and deactivates
SMART mode. (SMART mode is not
deactivated just by activing the cruise
system.)
• The transmission oil temperature is either
extremely low or extremely high : The
SMART mode can be active in most of
the normal driving situations. However,
an extremely high/ low transmission oil
temperature may temporarily deactivate
the SMART mode, because the
transmission condition is out of normal
operation condition.
Page 359 of 636
06
6-71
Limitation of SMART mode
The SMART mode may be limited in
following situations. (The OFF indicator
illuminates in those situations.)
• The driver manually moves the shift
lever : It deactivates SMART mode.
The vehicle drives, as the driver
manually moves the shift lever.
• The cruise control is activated : The
cruise system may deactivate the
SMART mode. When a higher system
is set by the cruise system, it starts to
control vehicle speed and deactivates
SMART mode. (SMART mode is not
deactivated just by activing the cruise
system.)
• The transmission oil temperature is either
extremely low or extremely high : The
SMART mode can be active in most of
the normal driving situations. However,
an extremely high/ low transmission oil
temperature may temporarily deactivate
the SMART mode, because the
transmission condition is out of normal
operation condition.
Page 365 of 636
06
6-77
Chain Installation
When installing tire chains, follow the
manufacturer’s instructions and mount
them as tightly possible. Drive slowly
(less than 20 mph (30 km/h)) with
chains installed. If you hear the chains
contacting the body or chassis, stop and
tighten them. If they still make contact,
slow down until the noise stops. Remove
the tire chains as soon as you begin
driving on cleared roads.
When mounting snow chains, park the
vehicle on level ground away from traffic.
Turn on the vehicle Hazard Warning
Flasher and place a triangular emergency
warning device behind the vehicle (if
available). Always place the vehicle in P
(Park), apply the parking brake and turn
off the engine before installing snow
chains.
NOTICE
When using tire chains:
• Wrong size chains or improperly
installed chains can damage your
vehicle’s brake lines, suspension,
body and wheels.
• Use SAE “S” class or wire chains.
• If you hear noise caused by chains
contacting the body, retighten the
chain to prevent contact with the
vehicle body.
• To prevent body damage, retighten
the chains after driving 0.3~0.6 miles
(0.5~1.0 km).
• Do not use tire chains on vehicles
equipped with aluminum wheels. If
unavoidable, use a wire type chain.
• Use wire chains less than 0.47 in.
(12mm) thick to prevent damage to
the chain’s connection.
Winter precautions
Use high quality ethylene glycol coolant
Your vehicle is delivered with high
quality ethylene glycol coolant in the
cooling system. It is the only type of
coolant that should be used because it
helps prevent corrosion in the cooling
system, lubricates the water pump and
prevents freezing. Be sure to replace or
replenish your coolant in accordance
with the maintenance schedule in
chapter 9. Before winter, have your
coolant tested to assure that its freezing
point is sufficient for the temperatures
anticipated during the winter.
Check battery and cables
Winter temperatures affect battery
performance. Inspect the battery and
cables, as specified in chapter 9. The
battery charging level can be checked
by an authorized HYUNDAI dealer or in a
service station.
Change to “winter weight” oil if
necessary
In some regions during winter, it is
recommended to use the “winter
weight” oil with lower viscosity In
addition, replace the engine oil and filter
if it is close to the next maintenance
interval. Fresh engine oil ensures
optimum engine operation during the
winter months. For further information,
refer to chapter 2. When you are not
sure about a type of winter weight oil,
we recommend that you consult an
authorized HYUNDAI dealer.
Page 557 of 636

09
9 -7
Follow Normal Maintenance Schedule if the vehicle is usually operated where none of
the following conditions apply. If any of the following conditions apply, you must follow
the Maintenance Under Severe Usage Conditions.
• Repeated driving short distance of less than 5 miles (8 km) in normal temperature or
less than 10 miles (16 km) in freezing temperature
• Extensive engine idling or low speed driving for long distances
• Driving on rough, dusty, muddy, unpaved, graveled or salt-spread roads
• Driving in areas using salt or other corrosive materials or in very cold weather
• Driving in heavy dust conditions
• Driving in heavy traffic area
• Driving on uphill, downhill, or mountain road repeatedly
• Towing a trailer or using a camper, or roof rack
• Driving as a patrol car, taxi, other commercial use of vehicle towing
• Driving over 106 miles (170 km/h)
• Frequently driving in stop-and-go condition
• Engine oil usage which is not recommended (mineral, semi-synthetic, lower grade
spec, etc.)
If your vehicle is operated under the above conditions, you should inspect, replace
or refill more frequently than the following Normal Maintenance Schedule. After the
periods or distance shown in the chart, continue to follow the prescribed maintenance
intervals.
SCHEDULED MAINTENANCE SERVICES
Page 563 of 636
09
9-13
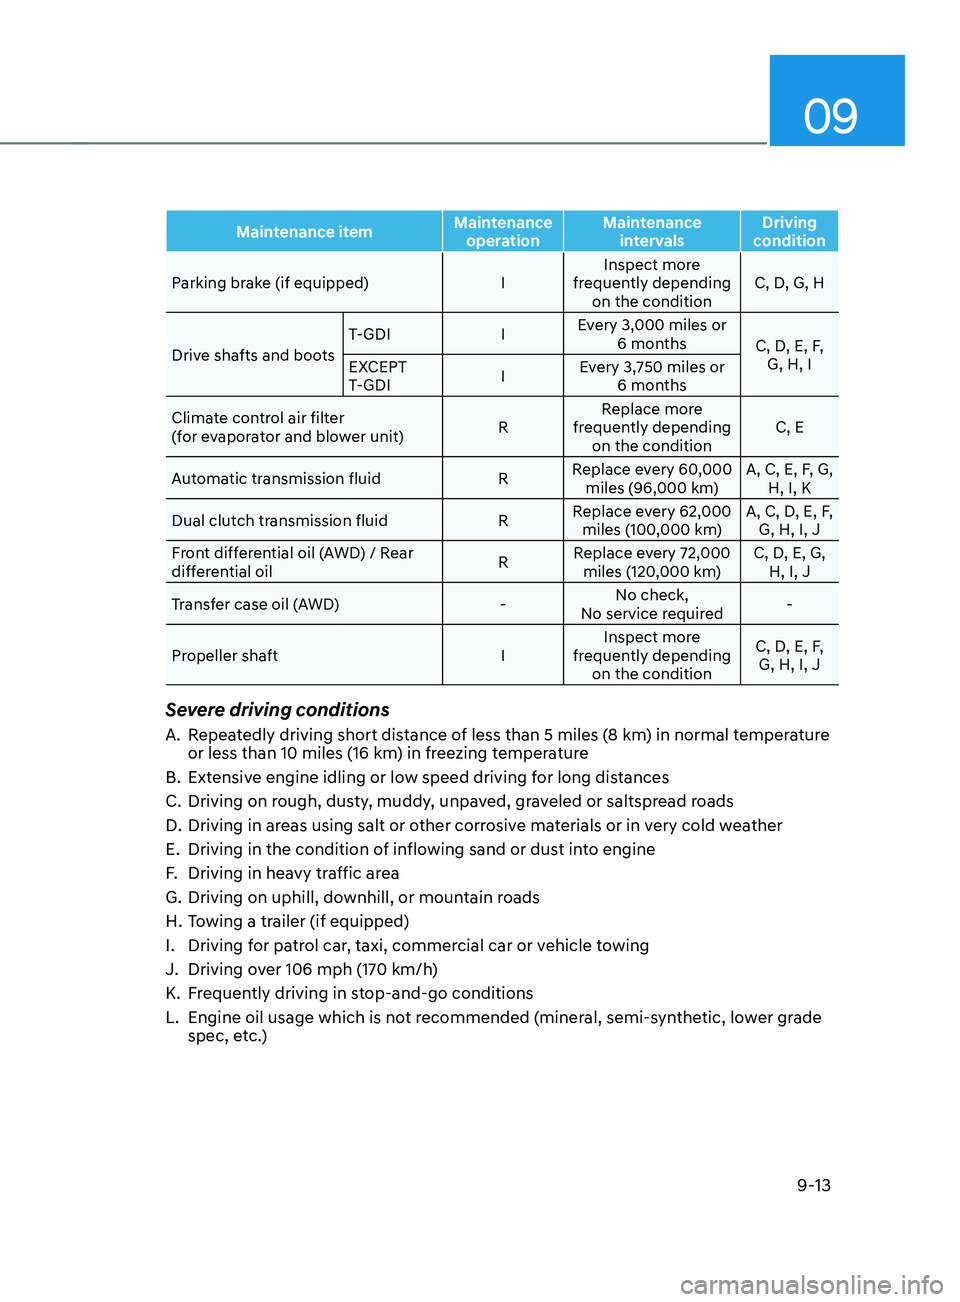
Maintenance itemMaintenance
operation Maintenance
intervals Driving
condition
Parking brake (if equipped) IInspect more
frequently depending on the condition C, D, G, H
Drive shafts and boots T-GDI
IEvery 3,000 miles or
6 months C, D, E, F,
G, H, I
EXCEPT
T-GDI IEvery 3,750 miles or
6 months
Climate control air filter
(for evaporator and blower unit) RReplace more
frequently depending on the condition C, E
Automatic transmission fluid RReplace every 60,000
miles (96,000 km) A, C, E, F, G,
H, I, K
Dual clutch transmission fluid RReplace every 62,000
miles (100,000 km) A, C, D, E, F,
G, H, I, J
Front differential oil (AWD) / Rear
differential oil RReplace every 72,000
miles (120,000 km) C, D, E, G,
H, I, J
Transfer case oil (AWD) -No check,
No service required -
Propeller shaft IInspect more
frequently depending on the condition C, D, E, F,
G, H, I, J
Severe driving conditions
A. Repeatedly driving short distance of less than 5 miles (8 km) in normal temperature
or less than 10 miles (16 km ) in freezing temperature
B.
Extensiv
e engine idling or low speed driving for long distances
C.
Driving on rough, dus
ty, muddy, unpaved, graveled or saltspread roads
D.
Driving in areas using salt or o
ther corrosive materials or in very cold weather
E.
Driving in the condition of in
flowing sand or dust into engine
F.
Driving in heavy tr
affic area
G.
Driving on uphill, downhill, or moun
tain roads
H.
To
wing a trailer (if equipped)
I.
Driving for pa
trol car, taxi, commercial car or vehicle towing
J.
Driving ov
er 106 mph (170 km/h)
K.
Fr
equently driving in stop-and-go conditions
L.
Engine oil usage which is no
t recommended (mineral, semi-synthetic, lower grade
spec, etc.)
Page 566 of 636
Maintenance
9-16
ENGINE OIL
Brake discs, pads, calipers and
rotors
Check the pads, the disc, and the rotor
for any excessive wear-out. Inspect
calipers for any fluid leakage.
For more information on checking the
pads or lining wear limit, refer to the
HYUNDAI web site.
(http://service.hyundai-motor.com)
Propeller shaft
Check the propeller shaft, boots, clamps,
rubber couplings and center-bearing
rubber for cracks, deterioration, or
damage. Replace any damaged parts
and if necessary, repack the grease.
Suspension mounting bolts
Check the suspension connections for
looseness or damage. Retighten to the
specified torque.
Steering gear box, linkage &
boots/lower arm ball joint
With the vehicle stopped and the engine
off, check for excessive free-play in the
steering wheel. Check the linkage for
bends or damage. Check the dust boots
and ball joints for deterioration, cracks,
or damage.
Replace any damaged parts.
Drive shafts and boots
Check the drive shafts, boots and clamps
for cracks, deterioration, or damage.
Replace any damaged parts and, if
necessary, repack the grease.
Air conditioning refrigerant
Check the air conditioning lines and
connections for leakage and damage.
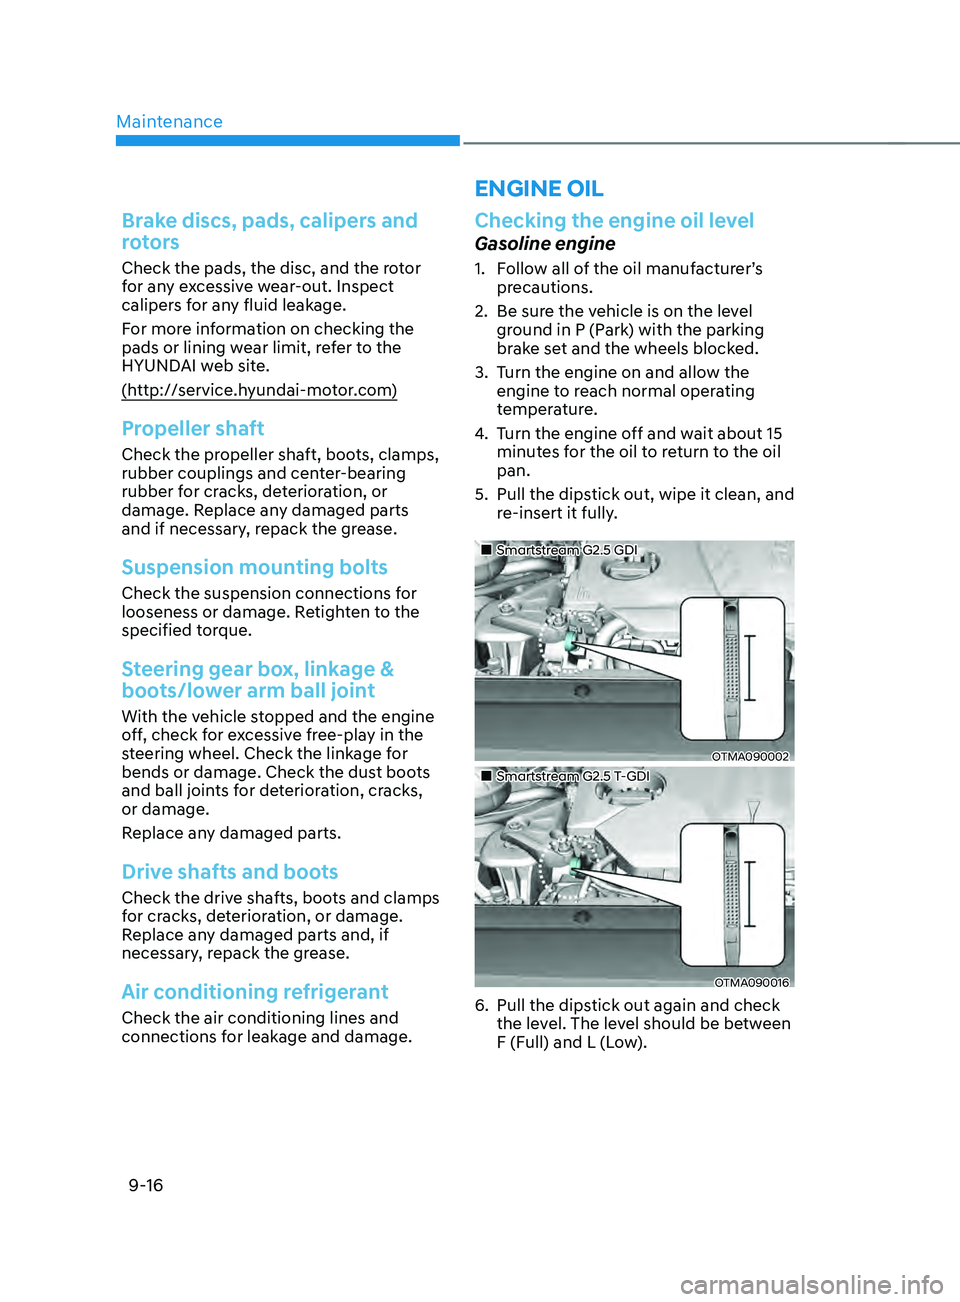
Checking the engine oil level
Gasoline engine
1. Follow all of the oil manufacturer’s
precautions.
2.
Be sure the v
ehicle is on the level
ground in P (Park) with the parking
brake set and the wheels blocked.
3.
Turn the engine on and allo
w the
engine to reach normal operating
temperature.
4.
Turn the engine o
ff and wait about 15
minutes for the oil to return to the oil
pan.
5.
Pull the dipstick out, wipe it clean, and
r
e-insert it fully.
„„Smartstream G2.5 GDI
OTMA090002
„„Smartstream G2.5 T-GDI
OTMA090016
6. Pull the dipstick out again and check
the le vel. The level should be between
F (Full) and L (Low).