wiper arm Hyundai Santa Fe XL 2019 Owner's Manual
[x] Cancel search | Manufacturer: HYUNDAI, Model Year: 2019, Model line: Santa Fe XL, Model: Hyundai Santa Fe XL 2019Pages: 570, PDF Size: 16.74 MB
Page 234 of 570
4131
Features of your vehicle
✽
✽NOTICE
• When you operate the wipers, if
your vehicle has a problem in any
part of the wiper operation sys-
tem, the wiper may operate in the
LO mode regardless of the wiper
switch position. In this case, have
your vehicle checked by an
authorized HYUNDAI dealer as
soon as possible.
• When the ignition key is removed, the wiper blade sometimes may
move slightly for reducing the
deterioration of the windshield
wipers.
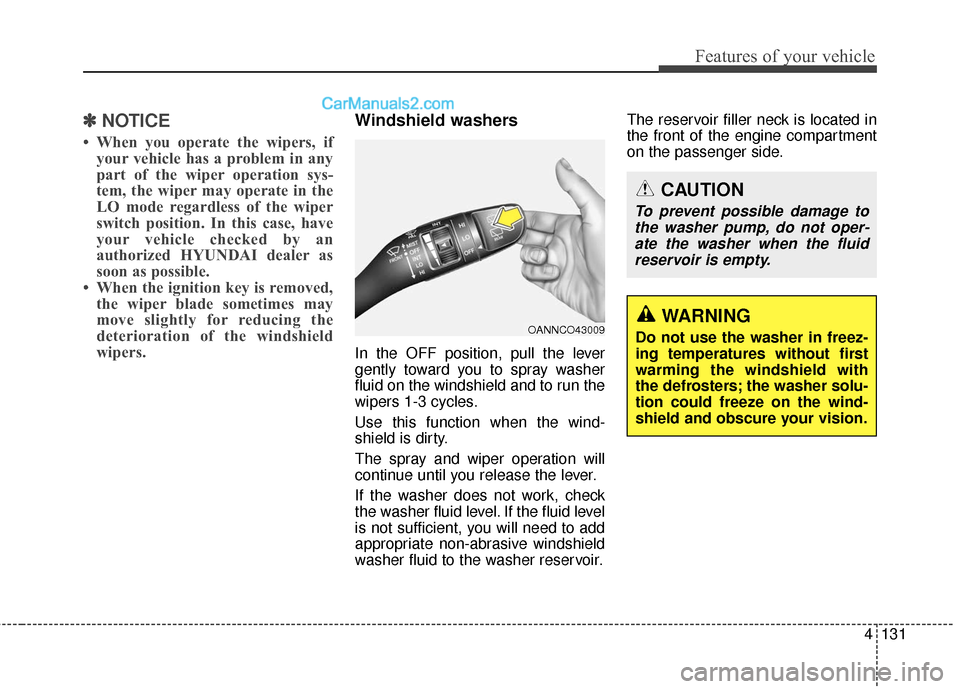
Windshield washers
In the OFF position, pull the lever
gently toward you to spray washer
fluid on the windshield and to run the
wipers 1-3 cycles.
Use this function when the wind-
shield is dirty.
The spray and wiper operation will
continue until you release the lever.
If the washer does not work, check
the washer fluid level. If the fluid level
is not sufficient, you will need to add
appropriate non-abrasive windshield
washer fluid to the washer reservoir. The reservoir filler neck is located in
the front of the engine compartment
on the passenger side.
OANNCO43009
CAUTION
To prevent possible damage to
the washer pump, do not oper-ate the washer when the fluidreservoir is empty.
WARNING
Do not use the washer in freez-
ing temperatures without first
warming the windshield with
the defrosters; the washer solu-
tion could freeze on the wind-
shield and obscure your vision.
Page 235 of 570
Features of your vehicle
132
4
Rear window wiper and
washer switch
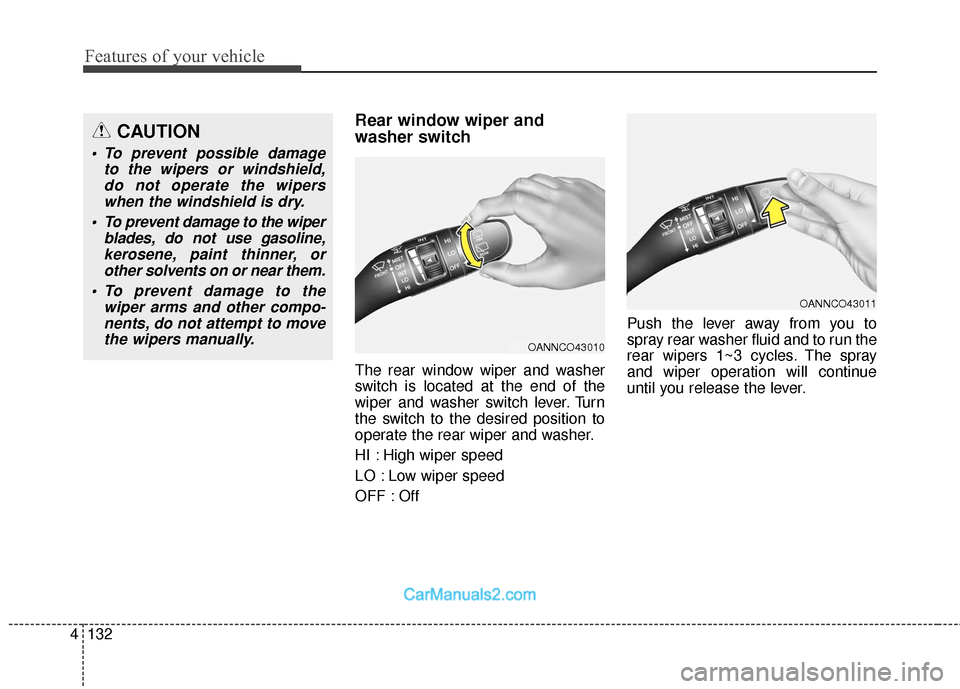
The rear window wiper and washer
switch is located at the end of the
wiper and washer switch lever. Turn
the switch to the desired position to
operate the rear wiper and washer.
HI : High wiper speed
LO : Low wiper speed
OFF : Off Push the lever away from you to
spray rear washer fluid and to run the
rear wipers 1~3 cycles. The spray
and wiper operation will continue
until you release the lever.
CAUTION
To prevent possible damage
to the wipers or windshield,do not operate the wiperswhen the windshield is dry.
To prevent damage to the wiper blades, do not use gasoline,kerosene, paint thinner, orother solvents on or near them.
To prevent damage to the wiper arms and other compo-nents, do not attempt to movethe wipers manually.
OANNCO43010
OANNCO43011
Page 490 of 570
Maintenance
42
7
WIPER BLADES
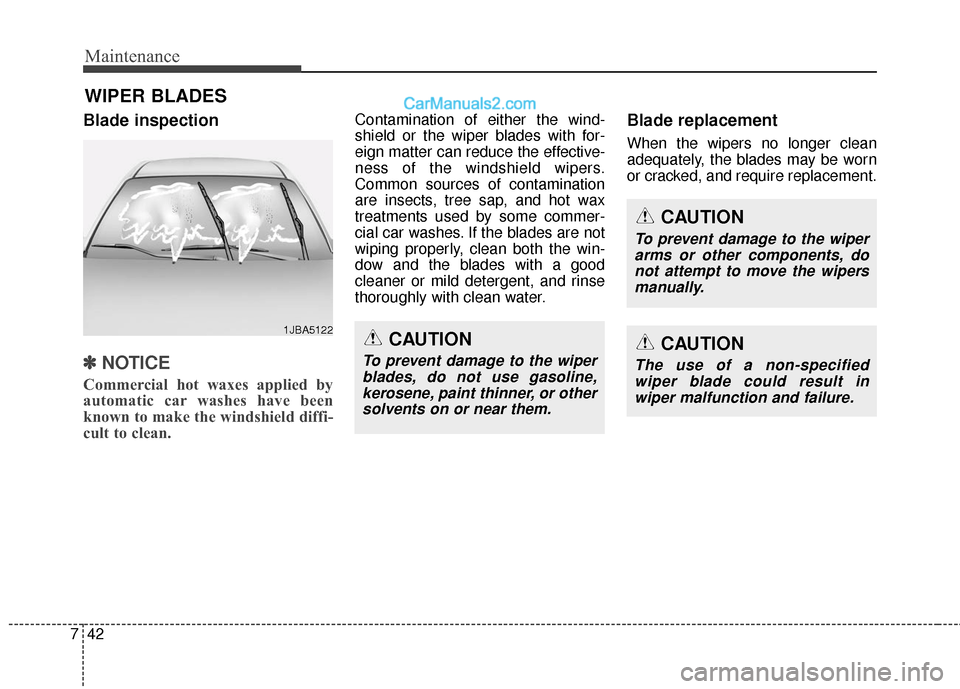
Blade inspection
✽
✽
NOTICE
Commercial hot waxes applied by
automatic car washes have been
known to make the windshield diffi-
cult to clean.
Contamination of either the wind-
shield or the wiper blades with for-
eign matter can reduce the effective-
ness of the windshield wipers.
Common sources of contamination
are insects, tree sap, and hot wax
treatments used by some commer-
cial car washes. If the blades are not
wiping properly, clean both the win-
dow and the blades with a good
cleaner or mild detergent, and rinse
thoroughly with clean water.Blade replacement
When the wipers no longer clean
adequately, the blades may be worn
or cracked, and require replacement.
CAUTION
To prevent damage to the wiper
blades, do not use gasoline,kerosene, paint thinner, or othersolvents on or near them.
CAUTION
To prevent damage to the wiperarms or other components, donot attempt to move the wipersmanually.
CAUTION
The use of a non-specifiedwiper blade could result inwiper malfunction and failure.
1JBA5122
Page 491 of 570
743
Maintenance
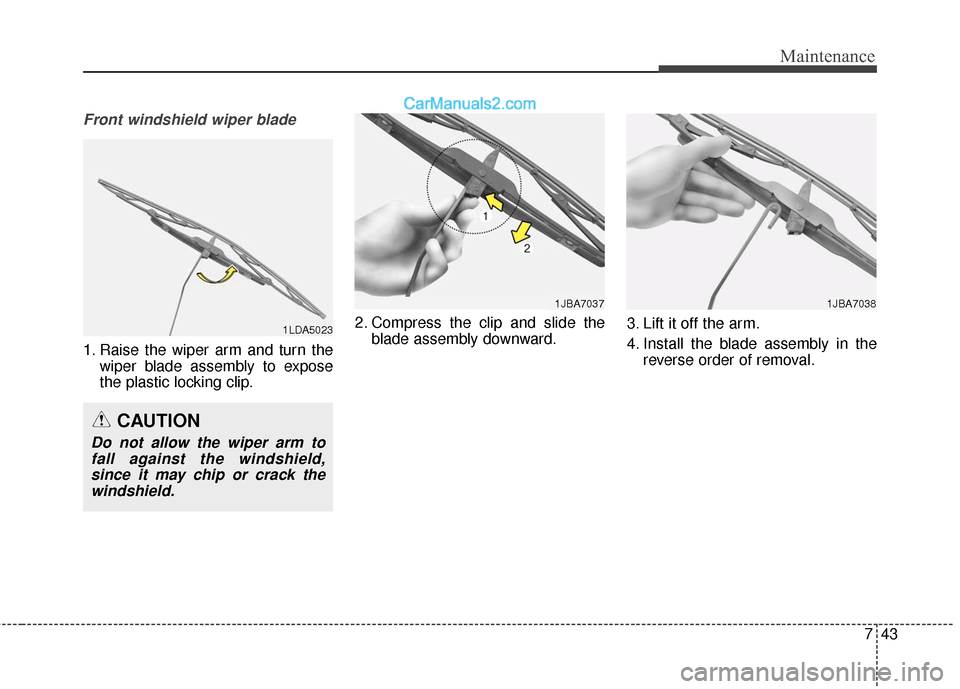
Front windshield wiper blade
1. Raise the wiper arm and turn thewiper blade assembly to expose
the plastic locking clip. 2. Compress the clip and slide the
blade assembly downward. 3. Lift it off the arm.
4. Install the blade assembly in the
reverse order of removal.
1LDA5023
CAUTION
Do not allow the wiper arm tofall against the windshield,since it may chip or crack thewindshield.
1JBA70371JBA7038
Page 492 of 570
Maintenance
44
7
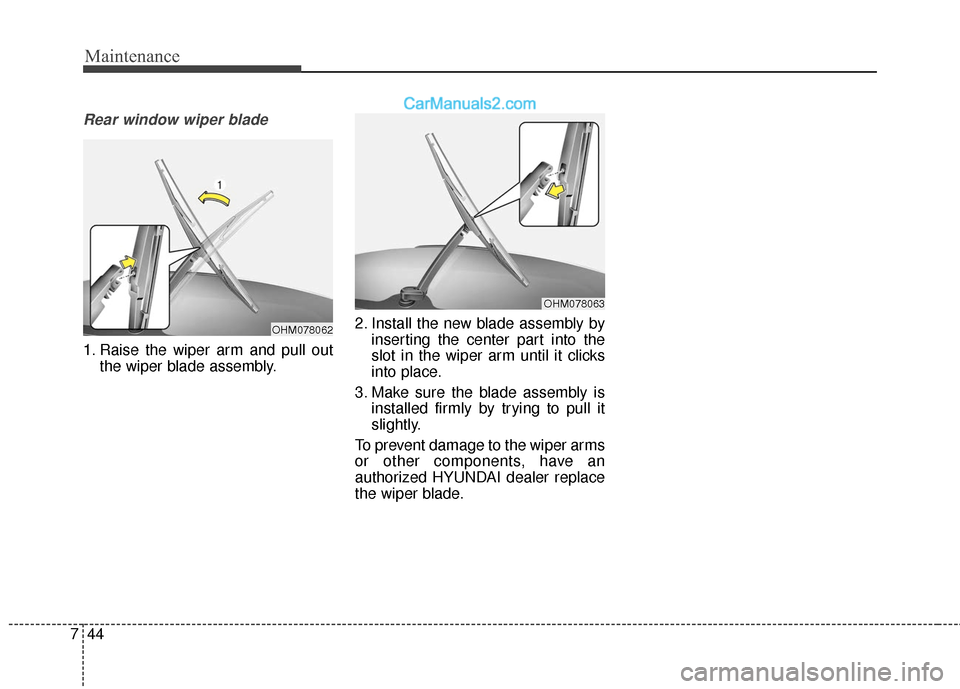
Rear window wiper blade
1. Raise the wiper arm and pull out
the wiper blade assembly. 2. Install the new blade assembly by
inserting the center part into the
slot in the wiper arm until it clicks
into place.
3. Make sure the blade assembly is installed firmly by trying to pull it
slightly.
To prevent damage to the wiper arms
or other components, have an
authorized HYUNDAI dealer replace
the wiper blade.
OHM078062
OHM078063
Page 518 of 570
Maintenance
70
7
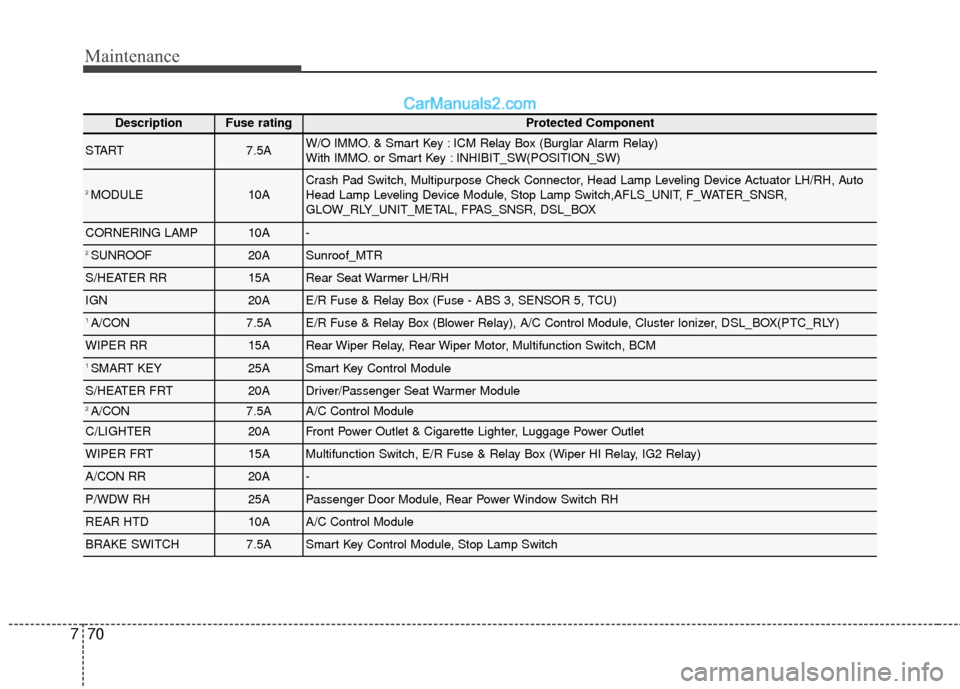
DescriptionFuse ratingProtected Component
START7.5AW/O IMMO. & Smart Key : ICM Relay Box (Burglar Alarm Relay)
With IMMO. or Smart Key : INHIBIT_SW(POSITION_SW)
2 MODULE10ACrash Pad Switch, Multipurpose Check Connector, Head Lamp Leveling Device Actuator LH/RH, Auto
Head Lamp Leveling Device Module, Stop Lamp Switch,AFLS_UNIT, F_WATER_SNSR,
GLOW_RLY_UNIT_METAL, FPAS_SNSR, DSL_BOX
CORNERING LAMP10A-
2 SUNROOF20ASunroof_MTR
S/HEATER RR15ARear Seat Warmer LH/RH
IGN20AE/R Fuse & Relay Box (Fuse - ABS 3, SENSOR 5, TCU)
1 A/CON7.5AE/R Fuse & Relay Box (Blower Relay), A/C Control Module, Cluster Ionizer, DSL_BOX(PTC_RLY)
WIPER RR15ARear Wiper Relay, Rear Wiper Motor, Multifunction Switch, BCM
1 SMART KEY25ASmart Key Control Module
S/HEATER FRT20ADriver/Passenger Seat Warmer Module
2 A/CON7.5AA/C Control Module
C/LIGHTER20AFront Power Outlet & Cigarette Lighter, Luggage Power Outlet
WIPER FRT15AMultifunction Switch, E/R Fuse & Relay Box (Wiper HI Relay, IG2 Relay)
A/CON RR20A-
P/WDW RH25APassenger Door Module, Rear Power Window Switch RH
REAR HTD10AA/C Control Module
BRAKE SWITCH7.5ASmart Key Control Module, Stop Lamp Switch
Page 523 of 570
775
Maintenance
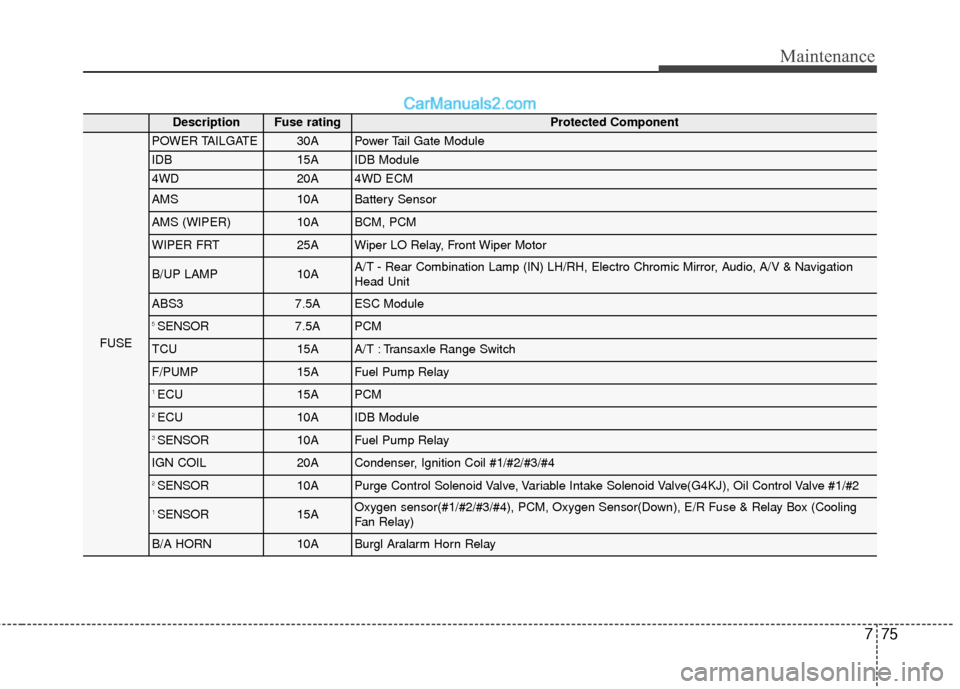
DescriptionFuse ratingProtected Component
FUSE
POWER TAILGATE30APower Tail Gate Module
IDB15AIDB Module
4WD20A4WD ECM
AMS10ABattery Sensor
AMS (WIPER)10ABCM, PCM
WIPER FRT25AWiper LO Relay, Front Wiper Motor
B/UP LAMP10AA/T - Rear Combination Lamp (IN) LH/RH, Electro Chromic Mirror, Audio, A/V & Navigation
Head Unit
ABS37.5AESC Module
5 SENSOR7.5APCM
TCU15AA/T : Transaxle Range Switch
F/PUMP15AFuel Pump Relay
1 ECU 15APCM
2 ECU10AIDB Module
3 SENSOR10AFuel Pump Relay
IGN COIL20ACondenser, Ignition Coil #1/#2/#3/#4
2 SENSOR10APurge Control Solenoid Valve, Variable Intake Solenoid Valve(G4KJ), Oil Control Valve #1/#2
1 SENSOR15AOxygen sensor(#1/#2/#3/#4), PCM, Oxygen Sensor(Down), E/R Fuse & Relay Box (Cooling
Fan Relay)
B/A HORN10ABurgl Aralarm Horn Relay