oil Hyundai Sonata
[x] Cancel search | Manufacturer: HYUNDAI, Model Year: , Model line: , Model:Pages: 285, PDF Size: 9.38 MB
Page 204 of 285
4
CORROSION PREVENTION AND APPEARANCE CARE6
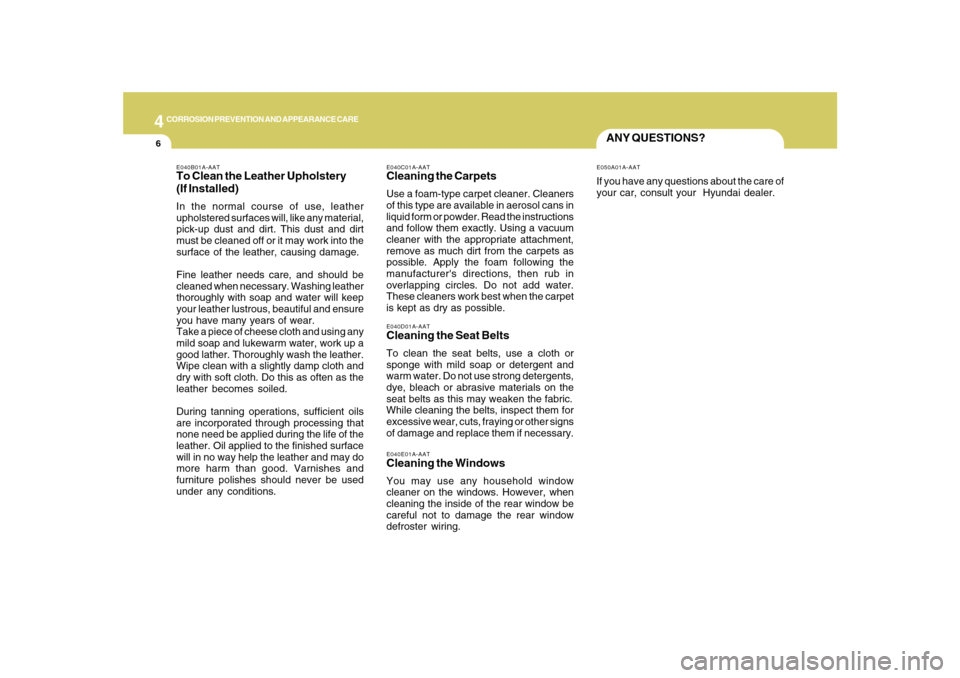
ANY QUESTIONS?
E040D01A-AATCleaning the Seat BeltsTo clean the seat belts, use a cloth or
sponge with mild soap or detergent and
warm water. Do not use strong detergents,
dye, bleach or abrasive materials on the
seat belts as this may weaken the fabric.
While cleaning the belts, inspect them for
excessive wear, cuts, fraying or other signs
of damage and replace them if necessary.E040C01A-AATCleaning the CarpetsUse a foam-type carpet cleaner. Cleaners
of this type are available in aerosol cans in
liquid form or powder. Read the instructions
and follow them exactly. Using a vacuum
cleaner with the appropriate attachment,
remove as much dirt from the carpets as
possible. Apply the foam following the
manufacturer's directions, then rub in
overlapping circles. Do not add water.
These cleaners work best when the carpet
is kept as dry as possible.
E050A01A-AATIf you have any questions about the care of
your car, consult your Hyundai dealer.
E040E01A-AATCleaning the WindowsYou may use any household window
cleaner on the windows. However, when
cleaning the inside of the rear window be
careful not to damage the rear window
defroster wiring.
E040B01A-AATTo Clean the Leather Upholstery
(If Installed)In the normal course of use, leather
upholstered surfaces will, like any material,
pick-up dust and dirt. This dust and dirt
must be cleaned off or it may work into the
surface of the leather, causing damage.
Fine leather needs care, and should be
cleaned when necessary. Washing leather
thoroughly with soap and water will keep
your leather lustrous, beautiful and ensure
you have many years of wear.
Take a piece of cheese cloth and using any
mild soap and lukewarm water, work up a
good lather. Thoroughly wash the leather.
Wipe clean with a slightly damp cloth and
dry with soft cloth. Do this as often as the
leather becomes soiled.
During tanning operations, sufficient oils
are incorporated through processing that
none need be applied during the life of the
leather. Oil applied to the finished surface
will in no way help the leather and may do
more harm than good. Varnishes and
furniture polishes should never be used
under any conditions.
Page 206 of 285
5
VEHICLE MAINTENANCE REQUIREMENTS2
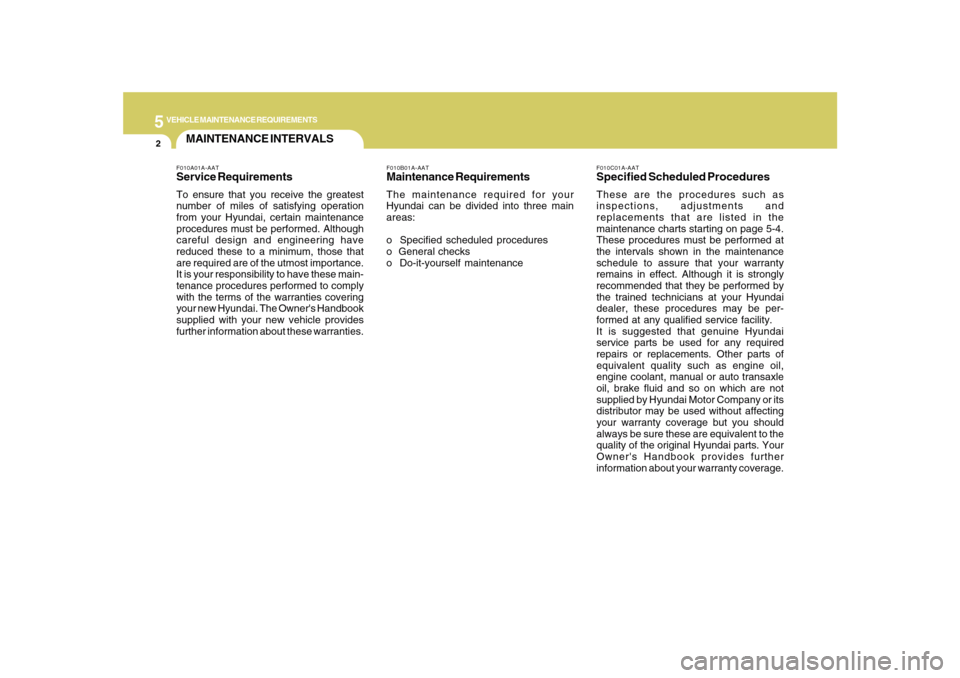
F010C01A-AATSpecified Scheduled ProceduresThese are the procedures such as
inspections, adjustments and
replacements that are listed in the
maintenance charts starting on page 5-4.
These procedures must be performed at
the intervals shown in the maintenance
schedule to assure that your warranty
remains in effect. Although it is strongly
recommended that they be performed by
the trained technicians at your Hyundai
dealer, these procedures may be per-
formed at any qualified service facility.
It is suggested that genuine Hyundai
service parts be used for any required
repairs or replacements. Other parts of
equivalent quality such as engine oil,
engine coolant, manual or auto transaxle
oil, brake fluid and so on which are not
supplied by Hyundai Motor Company or its
distributor may be used without affecting
your warranty coverage but you should
always be sure these are equivalent to the
quality of the original Hyundai parts. Your
Owner's Handbook provides further
information about your warranty coverage.
F010A01A-AATService RequirementsTo ensure that you receive the greatest
number of miles of satisfying operation
from your Hyundai, certain maintenance
procedures must be performed. Although
careful design and engineering have
reduced these to a minimum, those that
are required are of the utmost importance.
It is your responsibility to have these main-
tenance procedures performed to comply
with the terms of the warranties covering
your new Hyundai. The Owner's Handbook
supplied with your new vehicle provides
further information about these warranties.
F010B01A-AATMaintenance RequirementsThe maintenance required for your
Hyundai can be divided into three main
areas:
o Specified scheduled procedures
o General checks
o Do-it-yourself maintenance
MAINTENANCE INTERVALS
Page 208 of 285
5
VEHICLE MAINTENANCE REQUIREMENTS4
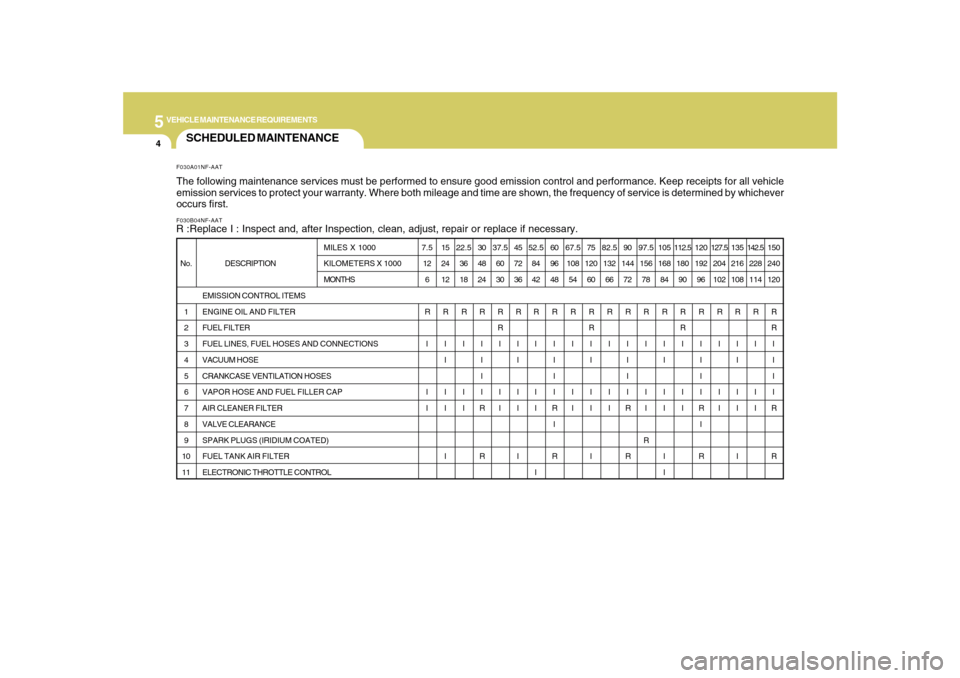
SCHEDULED MAINTENANCEF030B04NF-AATR :Replace I : Inspect and, after Inspection, clean, adjust, repair or replace if necessary.F030A01NF-AATThe following maintenance services must be performed to ensure good emission control and performance. Keep receipts for all vehicle
emission services to protect your warranty. Where both mileage and time are shown, the frequency of service is determined by whichever
occurs first.
DESCRIPTION
EMISSION CONTROL ITEMS
ENGINE OIL AND FILTER
FUEL FILTER
FUEL LINES, FUEL HOSES AND CONNECTIONS
VACUUM HOSE
CRANKCASE VENTILATION HOSES
VAPOR HOSE AND FUEL FILLER CAP
AIR CLEANER FILTER
VALVE CLEARANCE
SPARK PLUGS (IRIDIUM COATED)
FUEL TANK AIR FILTER
ELECTRONIC THROTTLE CONTROL No.
1
2
3
4
5
6
7
8
9
10
11MILES X 1000
KILOMETERS X 1000
MONTHS7.5
12
6
R
I
I
I15
24
12
R
I
I
I
I
I22.5
36
18
R
I
I
I30
48
24
R
I
I
I
I
R
R37.5
60
30
R
R
I
I
I45
72
36
R
I
I
I
I
I52.5
84
42
R
I
I
I
I60
96
48
R
I
I
I
I
R
I
R67.5
108
54
R
I
I
I75
120
60
R
R
I
I
I
I
I82.5
132
66
R
I
I
I90
144
72
R
I
I
I
I
R
R97.5
156
78
R
I
I
I
R105
168
84
R
I
I
I
I
I
I112.5
180
90
R
R
I
I
I120
192
96
R
I
I
I
I
R
I
R127.5
204
102
R
I
I
I135
216
108
R
I
I
I
I
I142.5
228
114
R
I
I
I150
240
120
R
R
I
I
I
I
R
R
Page 209 of 285
5
VEHICLE MAINTENANCE REQUIREMENTS
5
See Note *
1
See Note *
2
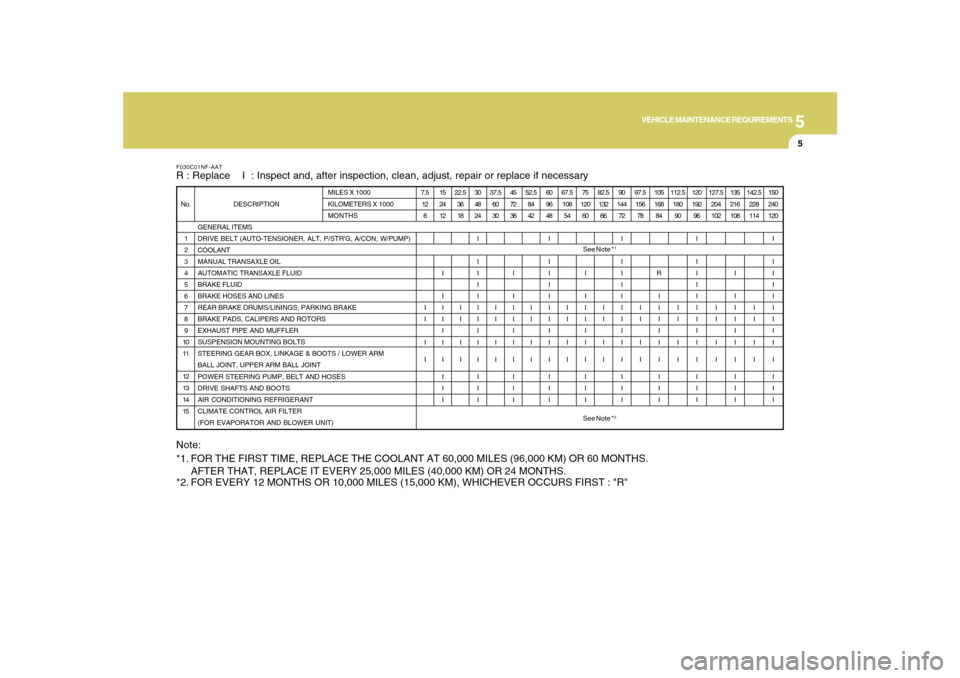
F030C01NF-AATR : Replace I : Inspect and, after inspection, clean, adjust, repair or replace if necessary
GENERAL ITEMS
DRIVE BELT (AUTO-TENSIONER, ALT, P/STR'G, A/CON, W/PUMP)
COOLANT
MANUAL TRANSAXLE OIL
AUTOMATIC TRANSAXLE FLUID
BRAKE FLUID
BRAKE HOSES AND LINES
REAR BRAKE DRUMS/LININGS, PARKING BRAKE
BRAKE PADS, CALIPERS AND ROTORS
EXHAUST PIPE AND MUFFLER
SUSPENSION MOUNTING BOLTS
STEERING GEAR BOX, LINKAGE & BOOTS / LOWER ARM
BALL JOINT, UPPER ARM BALL JOINT
POWER STEERING PUMP, BELT AND HOSES
DRIVE SHAFTS AND BOOTS
AIR CONDITIONING REFRIGERANT
CLIMATE CONTROL AIR FILTER
(FOR EVAPORATOR AND BLOWER UNIT) 1
2
3
4
5
6
7
8
9
10
11
12
13
14
15 No. DESCRIPTIONMILES X 1000
KILOMETERS X 1000
MONTHS7.5
12
6
I
I
I
I15
24
12
I
I
I
I
I
I
I
I
I
I22.5
36
18
I
I
I
I30
48
24
I
I
I
I
I
I
I
I
I
I
I
I
I37.5
60
30
I
I
I
I45
72
36
I
I
I
I
I
I
I
I
I
I52.5
84
42
I
I
I
I60
96
48
I
I
I
I
I
I
I
I
I
I
I
I
I67.5
108
54
I
I
I
I75
120
60
I
I
I
I
I
I
I
I
I
I82.5
132
66
I
I
I
I90
144
72
I
I
I
I
I
I
I
I
I
I
I
I
I97.5
156
78
I
I
I
I105
168
84
R
I
I
I
I
I
I
I
I
I112.5
180
90
I
I
I
I120
192
96
I
I
I
I
I
I
I
I
I
I
I
I
I127.5
204
102
I
I
I
I135
216
108
I
I
I
I
I
I
I
I
I
I142.5
228
114
I
I
I
I150
240
120
I
I
I
I
I
I
I
I
I
I
I
I
I
Note:
*1. FOR THE FIRST TIME, REPLACE THE COOLANT AT 60,000 MILES (96,000 KM) OR 60 MONTHS.
AFTER THAT, REPLACE IT EVERY 25,000 MILES (40,000 KM) OR 24 MONTHS.
*2. FOR EVERY 12 MONTHS OR 10,000 MILES (15,000 KM), WHICHEVER OCCURS FIRST : "R"
Page 210 of 285
5
VEHICLE MAINTENANCE REQUIREMENTS6
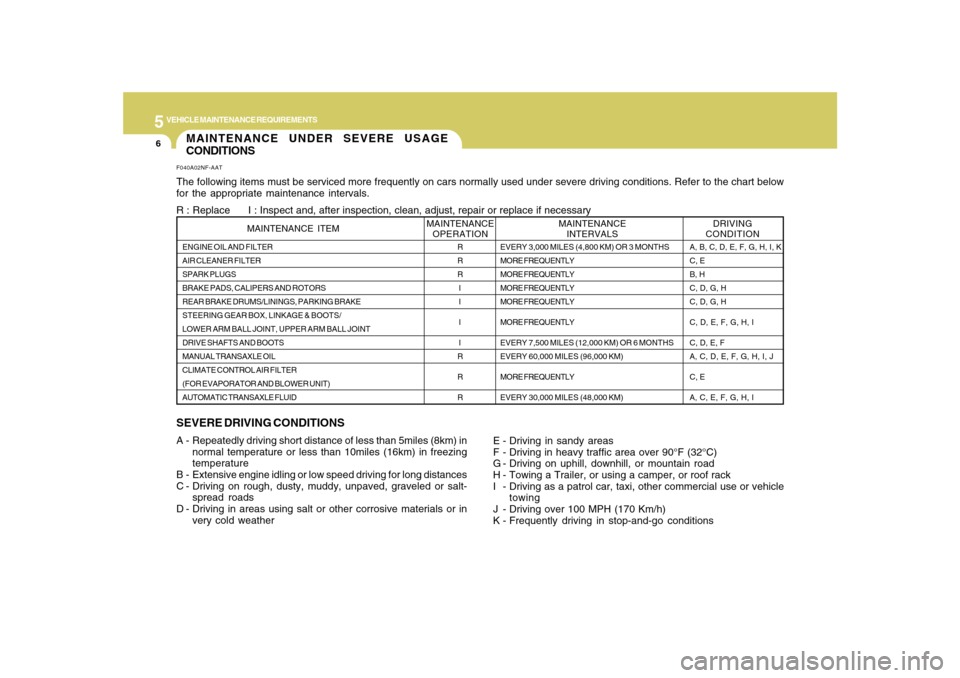
MAINTENANCE UNDER SEVERE USAGE
CONDITIONS
SEVERE DRIVING CONDITIONSA - Repeatedly driving short distance of less than 5miles (8km) in
normal temperature or less than 10miles (16km) in freezing
temperature
B - Extensive engine idling or low speed driving for long distances
C - Driving on rough, dusty, muddy, unpaved, graveled or salt-
spread roads
D - Driving in areas using salt or other corrosive materials or in
very cold weatherF040A02NF-AATThe following items must be serviced more frequently on cars normally used under severe driving conditions. Refer to the chart below
for the appropriate maintenance intervals.
R : Replace I : Inspect and, after inspection, clean, adjust, repair or replace if necessary
E - Driving in sandy areas
F - Driving in heavy traffic area over 90°F (32°C)
G - Driving on uphill, downhill, or mountain road
H - Towing a Trailer, or using a camper, or roof rack
I - Driving as a patrol car, taxi, other commercial use or vehicle
towing
J - Driving over 100 MPH (170 Km/h)
K - Frequently driving in stop-and-go conditionsENGINE OIL AND FILTER
AIR CLEANER FILTER
SPARK PLUGS
BRAKE PADS, CALIPERS AND ROTORS
REAR BRAKE DRUMS/LININGS, PARKING BRAKE
STEERING GEAR BOX, LINKAGE & BOOTS/
LOWER ARM BALL JOINT, UPPER ARM BALL JOINT
DRIVE SHAFTS AND BOOTS
MANUAL TRANSAXLE OIL
CLIMATE CONTROL AIR FILTER
(FOR EVAPORATOR AND BLOWER UNIT)
AUTOMATIC TRANSAXLE FLUID
MAINTENANCE ITEM
R
R
R
I
I
I
I
R
R
R
EVERY 3,000 MILES (4,800 KM) OR 3 MONTHS
MORE FREQUENTLY
MORE FREQUENTLY
MORE FREQUENTLY
MORE FREQUENTLY
MORE FREQUENTLY
EVERY 7,500 MILES (12,000 KM) OR 6 MONTHS
EVERY 60,000 MILES (96,000 KM)
MORE FREQUENTLY
EVERY 30,000 MILES (48,000 KM)
DRIVING
CONDITION MAINTENANCE
INTERVALS MAINTENANCE
OPERATION
A, B, C, D, E, F, G, H, I, K
C, E
B, H
C, D, G, H
C, D, G, H
C, D, E, F, G, H, I
C, D, E, F
A, C, D, E, F, G, H, I, J
C, E
A, C, E, F, G, H, I
Page 211 of 285
5
VEHICLE MAINTENANCE REQUIREMENTS
7
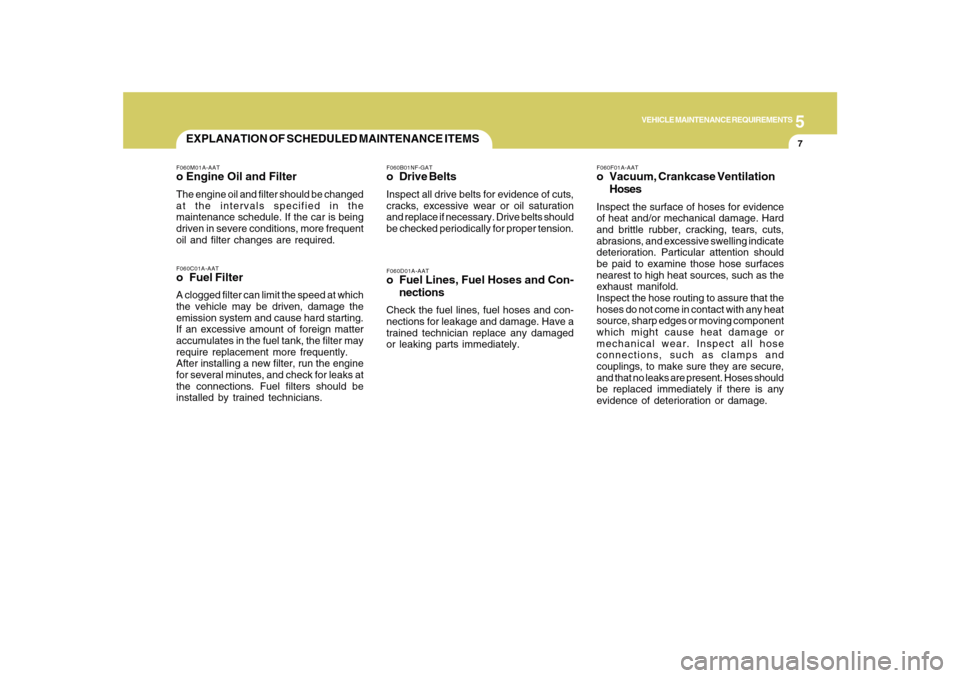
F060D01A-AATo Fuel Lines, Fuel Hoses and Con-
nectionsCheck the fuel lines, fuel hoses and con-
nections for leakage and damage. Have a
trained technician replace any damaged
or leaking parts immediately.F060B01NF-GATo Drive BeltsInspect all drive belts for evidence of cuts,
cracks, excessive wear or oil saturation
and replace if necessary. Drive belts should
be checked periodically for proper tension.
F060M01A-AATo Engine Oil and FilterThe engine oil and filter should be changed
at the intervals specified in the
maintenance schedule. If the car is being
driven in severe conditions, more frequent
oil and filter changes are required.F060C01A-AATo Fuel FilterA clogged filter can limit the speed at which
the vehicle may be driven, damage the
emission system and cause hard starting.
If an excessive amount of foreign matter
accumulates in the fuel tank, the filter may
require replacement more frequently.
After installing a new filter, run the engine
for several minutes, and check for leaks at
the connections. Fuel filters should be
installed by trained technicians.
F060F01A-AATo Vacuum, Crankcase Ventilation
HosesInspect the surface of hoses for evidence
of heat and/or mechanical damage. Hard
and brittle rubber, cracking, tears, cuts,
abrasions, and excessive swelling indicate
deterioration. Particular attention should
be paid to examine those hose surfaces
nearest to high heat sources, such as the
exhaust manifold.
Inspect the hose routing to assure that the
hoses do not come in contact with any heat
source, sharp edges or moving component
which might cause heat damage or
mechanical wear. Inspect all hose
connections, such as clamps and
couplings, to make sure they are secure,
and that no leaks are present. Hoses should
be replaced immediately if there is any
evidence of deterioration or damage.
EXPLANATION OF SCHEDULED MAINTENANCE ITEMS
Page 212 of 285
5
VEHICLE MAINTENANCE REQUIREMENTS8
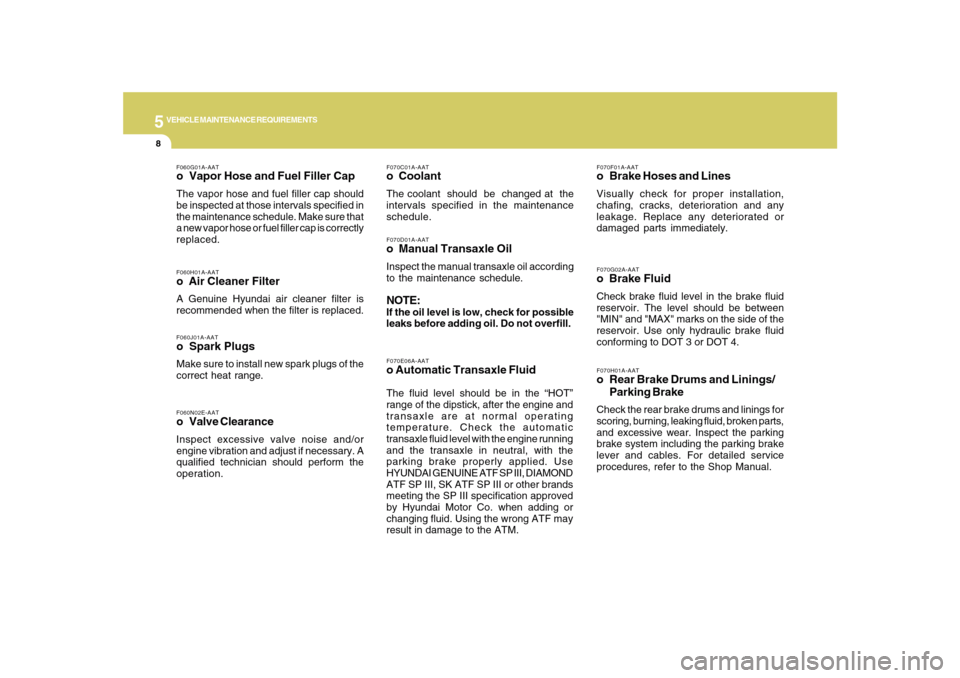
F070G02A-AATo Brake FluidCheck brake fluid level in the brake fluid
reservoir. The level should be between
"MIN" and "MAX" marks on the side of the
reservoir. Use only hydraulic brake fluid
conforming to DOT 3 or DOT 4.F070F01A-AATo Brake Hoses and LinesVisually check for proper installation,
chafing, cracks, deterioration and any
leakage. Replace any deteriorated or
damaged parts immediately.
F070E06A-AATo Automatic Transaxle FluidThe fluid level should be in the “HOT”
range of the dipstick, after the engine and
transaxle are at normal operating
temperature. Check the automatic
transaxle fluid level with the engine running
and the transaxle in neutral, with the
parking brake properly applied. Use
HYUNDAI GENUINE ATF SP III, DIAMOND
ATF SP III, SK ATF SP III or other brands
meeting the SP III specification approved
by Hyundai Motor Co. when adding or
changing fluid. Using the wrong ATF may
result in damage to the ATM.
F070H01A-AATo Rear Brake Drums and Linings/
Parking BrakeCheck the rear brake drums and linings for
scoring, burning, leaking fluid, broken parts,
and excessive wear. Inspect the parking
brake system including the parking brake
lever and cables. For detailed service
procedures, refer to the Shop Manual.
F070C01A-AATo CoolantThe coolant should be changed at the
intervals specified in the maintenance
schedule.
F060J01A-AATo Spark PlugsMake sure to install new spark plugs of the
correct heat range.F060H01A-AATo Air Cleaner FilterA Genuine Hyundai air cleaner filter is
recommended when the filter is replaced.F060G01A-AATo Vapor Hose and Fuel Filler CapThe vapor hose and fuel filler cap should
be inspected at those intervals specified in
the maintenance schedule. Make sure that
a new vapor hose or fuel filler cap is correctly
replaced.
F070D01A-AATo Manual Transaxle OilInspect the manual transaxle oil according
to the maintenance schedule.NOTE:If the oil level is low, check for possible
leaks before adding oil. Do not overfill.
F060N02E-AATo Valve ClearanceInspect excessive valve noise and/or
engine vibration and adjust if necessary. A
qualified technician should perform the
operation.
Page 213 of 285
5
VEHICLE MAINTENANCE REQUIREMENTS
9
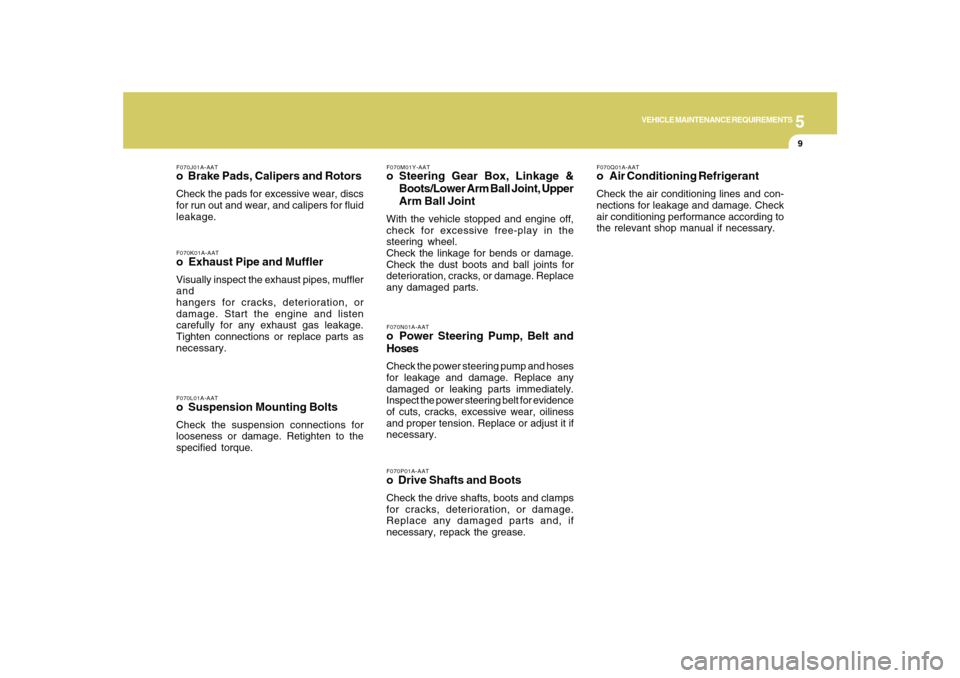
F070L01A-AATo Suspension Mounting BoltsCheck the suspension connections for
looseness or damage. Retighten to the
specified torque.F070K01A-AATo Exhaust Pipe and MufflerVisually inspect the exhaust pipes, muffler
and
hangers for cracks, deterioration, or
damage. Start the engine and listen
carefully for any exhaust gas leakage.
Tighten connections or replace parts as
necessary.F070J01A-AATo Brake Pads, Calipers and RotorsCheck the pads for excessive wear, discs
for run out and wear, and calipers for fluid
leakage.
F070Q01A-AATo Air Conditioning RefrigerantCheck the air conditioning lines and con-
nections for leakage and damage. Check
air conditioning performance according to
the relevant shop manual if necessary.
F070P01A-AATo Drive Shafts and BootsCheck the drive shafts, boots and clamps
for cracks, deterioration, or damage.
Replace any damaged parts and, if
necessary, repack the grease.F070N01A-AATo Power Steering Pump, Belt and
HosesCheck the power steering pump and hoses
for leakage and damage. Replace any
damaged or leaking parts immediately.
Inspect the power steering belt for evidence
of cuts, cracks, excessive wear, oiliness
and proper tension. Replace or adjust it if
necessary.F070M01Y-AATo Steering Gear Box, Linkage &
Boots/Lower Arm Ball Joint, Upper
Arm Ball JointWith the vehicle stopped and engine off,
check for excessive free-play in the
steering wheel.
Check the linkage for bends or damage.
Check the dust boots and ball joints for
deterioration, cracks, or damage. Replace
any damaged parts.
Page 215 of 285
6
Engine Compartment .................................................... 6-2
General Checks ............................................................ 6-4
Checking the Engine Oil ............................................... 6-4
Changing the Engine Oil and Filter ................................ 6-6
Checking and Changing the Engine Coolant ................ 6-8
Changing the Air Cleaner Filter ...................................6-11
Checking the Transaxle Oil (Manual) ......................... 6-14
Checking the Transaxle Fluid (Automatic) ..................6-15
Checking the Brakes..................................................6-17
Air Conditioning Care..................................................6-18
Changing the Climate Control Air Filter.......................6-19
Checking Drive Belts..................................................6-22
Checking and Replacing Fuses ..................................6-22
Checking the Battery..................................................6-24
Power Steering Fluid Level .........................................6-26
Headlight Aiming Adjustment......................................6-27
Replacement of Light Bulbs ........................................6-28
Bulb Wattages.............................................................6-36
Fuse Panel Description...............................................6-37
DO-IT-YOURSELF MAINTENANCE
6
Page 216 of 285
6
DO-IT-YOURSELF MAINTENANCE
2
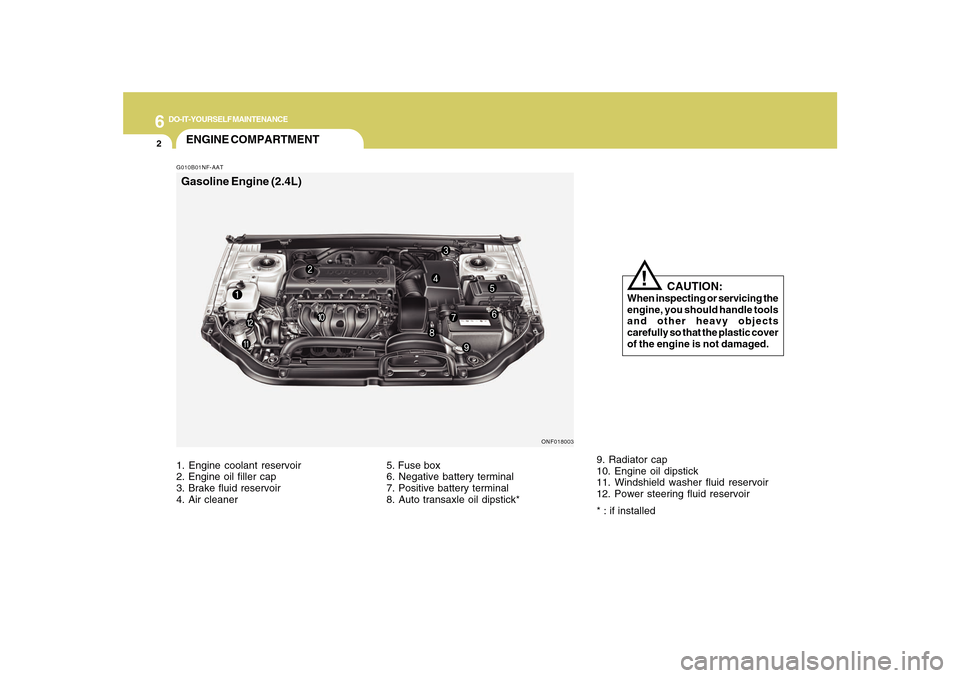
G010B01NF-AATENGINE COMPARTMENT
ONF018003
CAUTION:
When inspecting or servicing the
engine, you should handle tools
and other heavy objects
carefully so that the plastic cover
of the engine is not damaged.
!
1. Engine coolant reservoir
2. Engine oil filler cap
3. Brake fluid reservoir
4. Air cleaner5. Fuse box
6. Negative battery terminal
7. Positive battery terminal
8. Auto transaxle oil dipstick*9. Radiator cap
10. Engine oil dipstick
11. Windshield washer fluid reservoir
12. Power steering fluid reservoir
* : if installedGasoline Engine (2.4L)