Hyundai Sonata
Manufacturer: HYUNDAI, Model Year: , Model line: , Model:Pages: 340, PDF Size: 18.45 MB
Page 231 of 340
What to do in an emergency
4
6
EMERGENCY STARTING
F040100AUN
Jump starting
Jump starting can be dangerous if done
incorrectly. Therefore, to avoid harm to
yourself or damage to your vehicle or
battery, follow the jump starting proce-
dures. If in doubt, we strongly recom-
mend that you have a competent techni-
cian or towing service jump start your
vehicle. F040101AFD-EA
Jump starting procedure
1. Make sure the booster battery is 12-
volt and that its negative terminal is
grounded.
2. If the booster battery is in another vehicle, do not allow the vehicles totouch.
3. Turn off all unnecessary electrical loads.
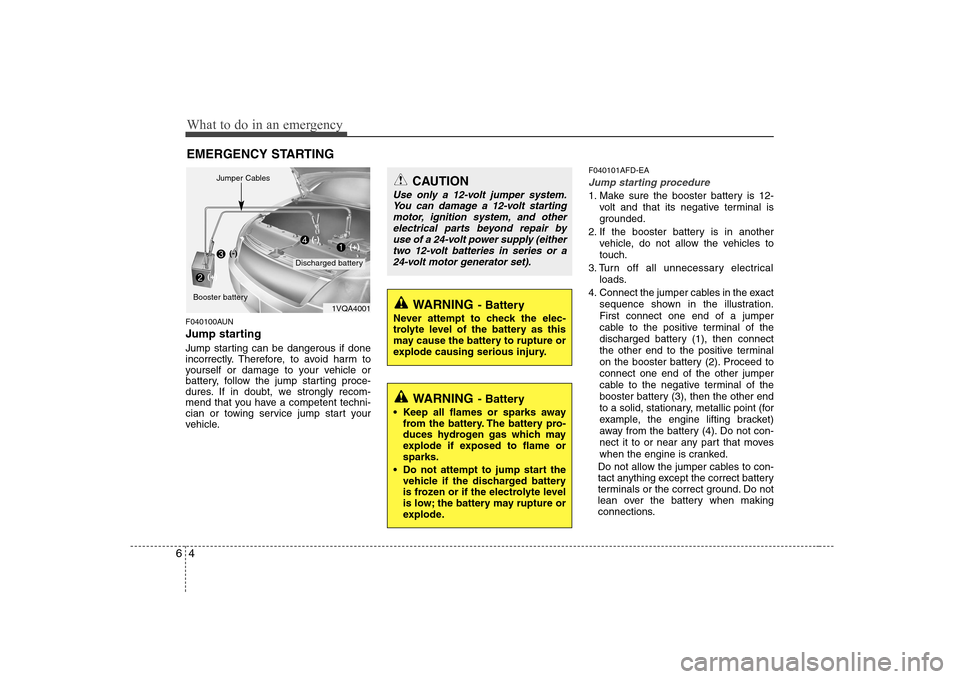
4. Connect the jumper cables in the exact sequence shown in the illustration.First connect one end of a jumper
cable to the positive terminal of the
discharged battery (1), then connect
the other end to the positive terminal
on the booster battery (2). Proceed toconnect one end of the other jumper
cable to the negative terminal of the
booster battery (3), then the other end
to a solid, stationary, metallic point (for
example, the engine lifting bracket)
away from the battery (4). Do not con-
nect it to or near any part that moves
when the engine is cranked.
Do not allow the jumper cables to con-
tact anything except the correct battery
terminals or the correct ground. Do not
lean over the battery when making
connections.
CAUTION
Use only a 12-volt jumper system. You can damage a 12-volt startingmotor, ignition system, and other electrical parts beyond repair by
use of a 24-volt power supply (eithertwo 12-volt batteries in series or a 24-volt motor generator set).
WARNING - Battery
• Keep all flames or sparks away from the battery. The battery pro-
duces hydrogen gas which may
explode if exposed to flame orsparks.
Do not attempt to jump start the vehicle if the discharged battery
is frozen or if the electrolyte level
is low; the battery may rupture or
explode.
WARNING - Battery
Never attempt to check the elec-
trolyte level of the battery as this
may cause the battery to rupture or
explode causing serious injury.1VQA4001
Discharged battery
Jumper Cables
Booster battery(-)
(+)
(+)(-)
Page 232 of 340
65
What to do in an emergency
5. Start the engine of the vehicle with thebooster battery and let it run at 2,000
rpm, then start the engine of the vehi-
cle with the discharged battery.
If the cause of your battery discharging is
not apparent, you should have your vehi-
cle checked by an authorised HYUNDAIdealer.
F040200AUN
Push-starting
Your manual transaxle-equipped vehicle
should not be push-started because itmight damage the emission control sys-tem.
Vehicles equipped with automatic
transaxle cannot be push-started.
Follow the directions in this section for
jump-starting.
WARNING
Never tow a vehicle to start it
because the sudden surge forward
when the engine starts could cause
a collision with the tow vehicle.
CAUTION - Battery cables
Do not connect the jumper cable
from the negative terminal of the booster battery to the negative ter-minal of the discharged battery.
This can cause the discharged bat-tery to overheat and crack, releas-ing battery acid.
Page 233 of 340
What to do in an emergency
6
6
IF THE ENGINE OVERHEATS
F050000AFD-EA
If your temperature gauge indicates over-
heating, you experience a loss of power,
or hear loud pinging or knocking, the
engine is probably too hot. If this hap-
pens, you should:
1. Pull off the road and stop as soon as it is safe to do so.
2. Place the gear selector lever in P (automatic transaxle) or neutral (manu-
al transaxle) and set the parking brake.
If the air conditioning is on, turn it off.
3. If engine coolant is running out under the car or steam is coming out from
the bonnet, stop the engine. Do notopen the bonnet until the coolant has
stopped running or the steaming has
stopped. If there is no visible loss of
engine coolant and no steam, leave
the engine running and check to be
sure the engine cooling fan is operat-
ing. If the fan is not running, turn the
engine off.
4. While engine is switched off, check to see if the water pump drive belt is
missing. If it is not missing, check to
see that it is tight. If the drive belt
seems to be satisfactory, check for
coolant leaking from the radiator,
hoses or under the car. (If the air con-
ditioning had been in use, it is normal
for cold water to be draining from it
when you stop). 5. If the water pump drive belt is broken
or engine coolant is leaking out, stop the engine immediately and call the
nearest authorised HYUNDAI dealer
for assistance. 6. If you cannot find the cause of the
overheating, wait until the engine tem-
perature has returned to normal. Then,if coolant has been lost, carefully add
coolant to the reservoir to bring the
fluid level in the reservoir up to the
halfway mark.
7. Proceed with caution, keeping alert for further signs of overheating. If over-heating happens again, call an autho-
rised HYUNDAI dealer for assistance.
CAUTION
Serious loss of coolant indicates
there is a leak in the cooling systemand this should be checked as soonas possible by an authorisedHYUNDAI dealer.
WARNING
While the engine is running, keep
hair, hands and clothing away from
moving parts such as the fan and
drive belts to prevent injury.
WARNING
Do not remove the radiator cap
when the engine is hot. This can
allow coolant to be blown out of the
opening and cause serious burns.
Page 234 of 340
67
What to do in an emergency
IF YOU HAVE A FLAT TYRE
F070100ANF-EA
Jack and tools
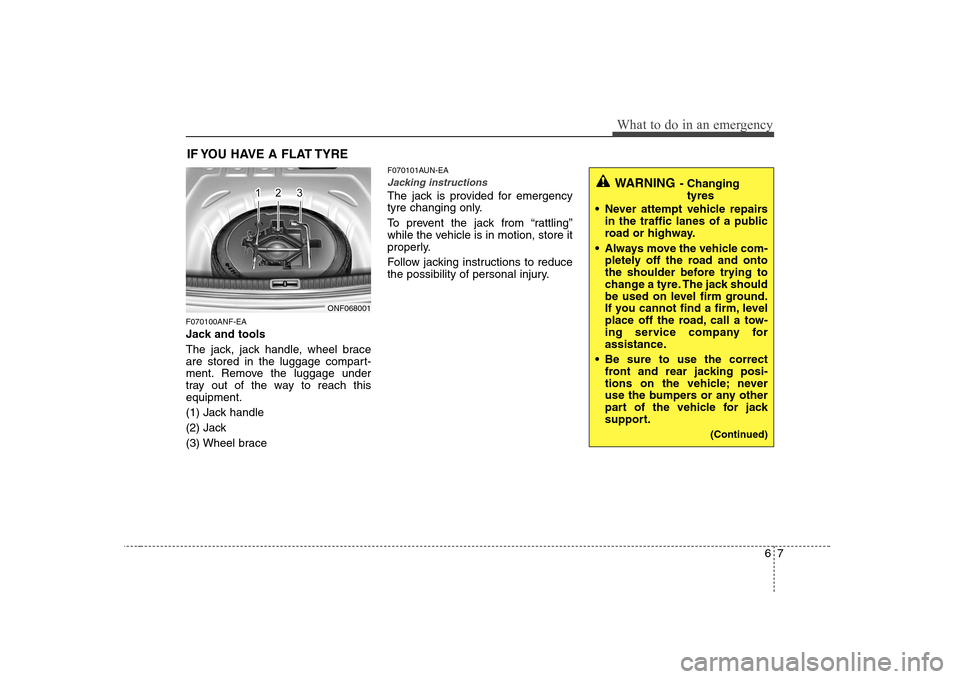
The jack, jack handle, wheel brace
are stored in the luggage compart-
ment. Remove the luggage under
tray out of the way to reach thisequipment.
(1) Jack handle
(2) Jack
(3) Wheel brace F070101AUN-EA
Jacking instructions
The jack is provided for emergency
tyre changing only.
To prevent the jack from “rattling”
while the vehicle is in motion, store it
properly.
Follow jacking instructions to reduce
the possibility of personal injury.
ONF068001
WARNING
- Changing
tyres
Never attempt vehicle repairs in the traffic lanes of a public
road or highway.
Always move the vehicle com- pletely off the road and onto
the shoulder before trying to
change a tyre. The jack should
be used on level firm ground.
If you cannot find a firm, level
place off the road, call a tow-
ing service company for
assistance.
Be sure to use the correct front and rear jacking posi-
tions on the vehicle; never
use the bumpers or any other
part of the vehicle for jack
support.
(Continued)
Page 235 of 340
What to do in an emergency
8
6
F070200AFD-EA
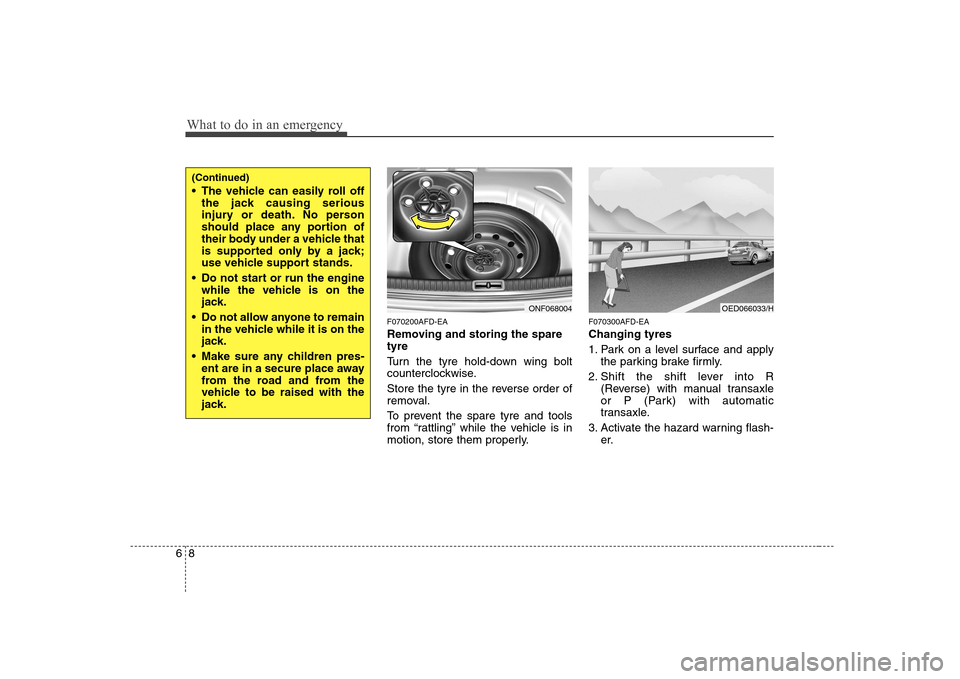
Removing and storing the spare tyre
Turn the tyre hold-down wing bolt
counterclockwise.
Store the tyre in the reverse order of
removal.
To prevent the spare tyre and tools
from “rattling” while the vehicle is in
motion, store them properly. F070300AFD-EA Changing tyres
1. Park on a level surface and apply
the parking brake firmly.
2. Shift the shift lever into R (Reverse) with manual transaxle
or P (Park) with automatic
transaxle.
3. Activate the hazard warning flash- er.
ONF068004
(Continued)
The vehicle can easily roll offthe jack causing serious
injury or death. No person
should place any portion of
their body under a vehicle that
is supported only by a jack;
use vehicle support stands.
Do not start or run the engine while the vehicle is on the
jack.
Do not allow anyone to remain in the vehicle while it is on the
jack.
Make sure any children pres- ent are in a secure place away
from the road and from the
vehicle to be raised with the
jack.
OED066033/H
Page 236 of 340
69
What to do in an emergency
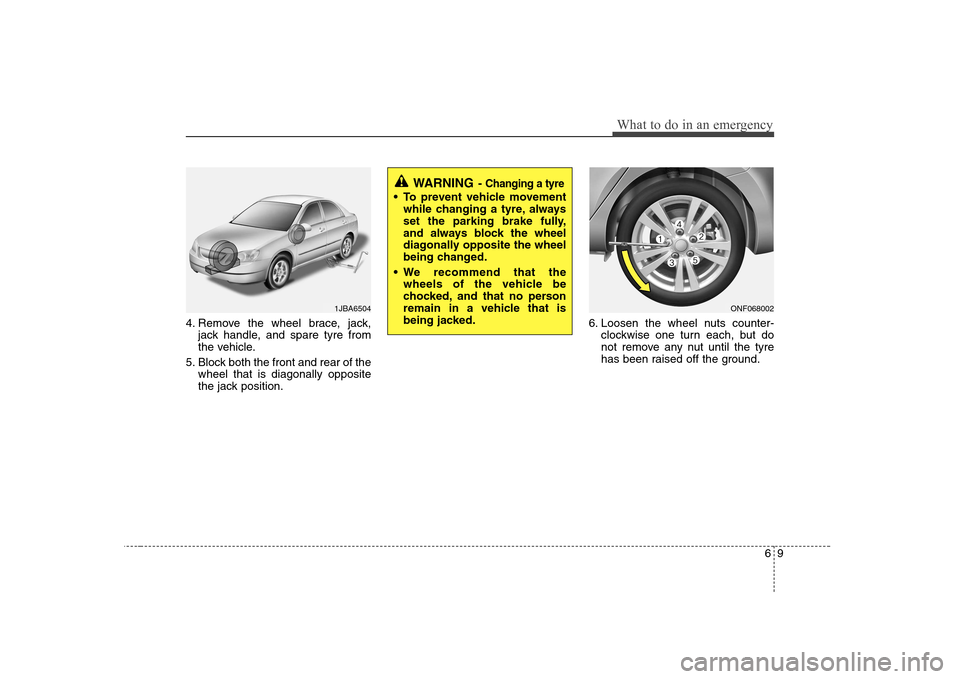
4. Remove the wheel brace, jack,jack handle, and spare tyre from
the vehicle.
5. Block both the front and rear of the wheel that is diagonally opposite
the jack position. 6. Loosen the wheel nuts counter-
clockwise one turn each, but do
not remove any nut until the tyre
has been raised off the ground.
1JBA6504ONF068002
WARNING - Changing a tyre
To prevent vehicle movement
while changing a tyre, always
set the parking brake fully,
and always block the wheel
diagonally opposite the wheel
being changed.
We recommend that the wheels of the vehicle be
chocked, and that no person
remain in a vehicle that is
being jacked.
Page 237 of 340
What to do in an emergency
10
6
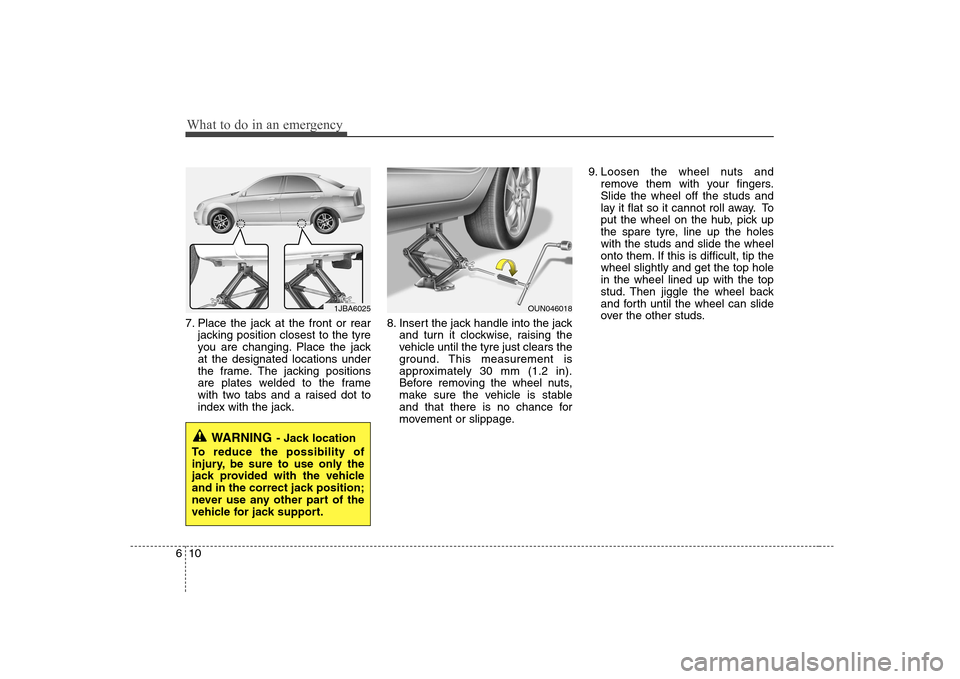
7. Place the jack at the front or rear
jacking position closest to the tyre
you are changing. Place the jackat the designated locations under
the frame. The jacking positions
are plates welded to the frame
with two tabs and a raised dot to
index with the jack. 8. Insert the jack handle into the jack
and turn it clockwise, raising the
vehicle until the tyre just clears the
ground. This measurement is
approximately 30 mm (1.2 in).
Before removing the wheel nuts,
make sure the vehicle is stable
and that there is no chance for
movement or slippage. 9. Loosen the wheel nuts and
remove them with your fingers.Slide the wheel off the studs and
lay it flat so it cannot roll away. To
put the wheel on the hub, pick up
the spare tyre, line up the holeswith the studs and slide the wheel
onto them. If this is difficult, tip thewheel slightly and get the top holein the wheel lined up with the top
stud. Then jiggle the wheel back
and forth until the wheel can slide
over the other studs.
WARNING - Jack location
To reduce the possibility of
injury, be sure to use only the
jack provided with the vehicle
and in the correct jack position;
never use any other part of the
vehicle for jack support.
1JBA6025OUN046018
Page 238 of 340
611
What to do in an emergency
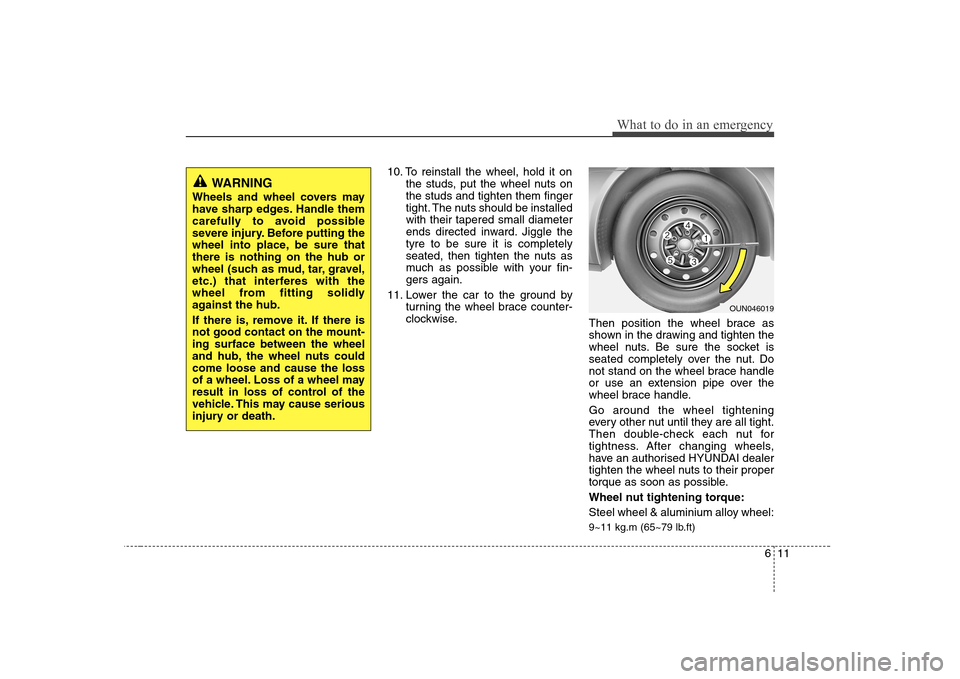
10. To reinstall the wheel, hold it onthe studs, put the wheel nuts on the studs and tighten them finger
tight. The nuts should be installedwith their tapered small diameter
ends directed inward. Jiggle thetyre to be sure it is completely
seated, then tighten the nuts as
much as possible with your fin-gers again.
11. Lower the car to the ground by turning the wheel brace counter-
clockwise. Then position the wheel brace as
shown in the drawing and tighten the
wheel nuts. Be sure the socket is
seated completely over the nut. Do
not stand on the wheel brace handle
or use an extension pipe over the
wheel brace handle. Go around the wheel tightening
every other nut until they are all tight.
Then double-check each nut for
tightness. After changing wheels,
have an authorised HYUNDAI dealer
tighten the wheel nuts to their proper
torque as soon as possible.
Wheel nut tightening torque:
Steel wheel & aluminium alloy wheel:
9~11 kg.m (65~79 lb.ft)
OUN046019
WARNING
Wheels and wheel covers may
have sharp edges. Handle them
carefully to avoid possible
severe injury. Before putting the
wheel into place, be sure thatthere is nothing on the hub or
wheel (such as mud, tar, gravel,
etc.) that interferes with the
wheel from fitting solidly
against the hub.
If there is, remove it. If there is not good contact on the mount-ing surface between the wheel
and hub, the wheel nuts couldcome loose and cause the loss
of a wheel. Loss of a wheel may
result in loss of control of the
vehicle. This may cause serious
injury or death.
Page 239 of 340
What to do in an emergency
12
6
If you have a tyre gauge, remove the
valve cap and check the air pressure.
If the pressure is lower than recom-
mended, drive slowly to the nearest
service station and inflate to the cor-
rect pressure. If it is too high, adjust
it until it is correct. Always reinstall
the valve cap after checking or
adjusting tyre pressure. If the cap is
not replaced, air may leak from the
tyre. If you lose a valve cap, buyanother and install it as soon as pos-
sible.
After you have changed wheels,
always secure the flat tyre in its place
and return the jack and tools to their
proper storage locations. To prevent the jack, jack handle,
wheel brace and spare tyre from rat-
tling while the vehicle is in motion,
store them properly.CAUTION
Your vehicle has metric threads
on the wheel studs and nuts.Make certain during wheelremoval that the same nuts that were removed are reinstalled -or, if replaced, that nuts withmetric threads and the same chamfer configuration are used.Installation of a non-metricthread nut on a metric stud or vice-versa will not secure thewheel to the hub properly andwill damage the stud so that itmust be replaced.
Note that most wheel nuts donot have metric threads. Be sureto use extreme care in checkingfor thread style before installing aftermarket wheel nuts orwheels. If in doubt, consult anauthorised HYUNDAI dealer.
WARNING - Wheel studs
If the studs are damaged, they
may lose their ability to retain
the wheel. This could lead to theloss of the wheel and a collisionresulting in serious injuries.
WARNING - Inadequate
spare tyre pressure
Check the inflation pressures as
soon as possible after installing
the spare tyre. Adjust it to the
specified pressure, if necessary.
Refer to “Tyres and wheels” insection 9.
Page 240 of 340
613
What to do in an emergency
TOWING
F080100AFD-EA
Towing service
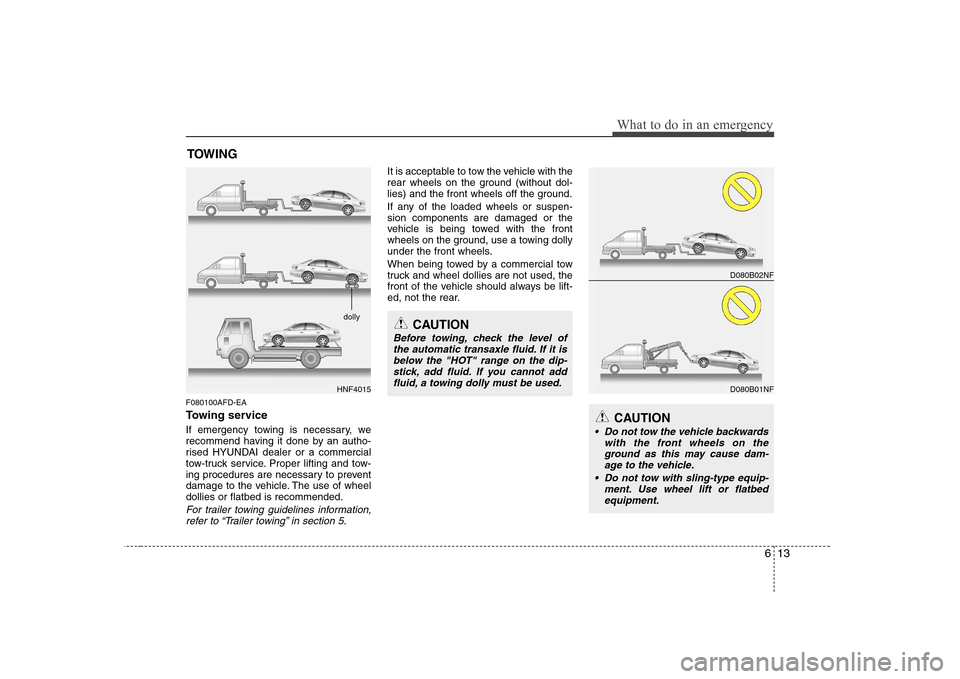
If emergency towing is necessary, we
recommend having it done by an autho-
rised HYUNDAI dealer or a commercial
tow-truck service. Proper lifting and tow-
ing procedures are necessary to prevent
damage to the vehicle. The use of wheeldollies or flatbed is recommended.
For trailer towing guidelines information, refer to “Trailer towing” in section 5.
It is acceptable to tow the vehicle with the
rear wheels on the ground (without dol-
lies) and the front wheels off the ground.
If any of the loaded wheels or suspen- sion components are damaged or the
vehicle is being towed with the front
wheels on the ground, use a towing dolly
under the front wheels.
When being towed by a commercial tow
truck and wheel dollies are not used, the
front of the vehicle should always be lift-
ed, not the rear.
HNF4015
D080B02NF
D080B01NF
CAUTION
Do not tow the vehicle backwards
with the front wheels on theground as this may cause dam- age to the vehicle.
Do not tow with sling-type equip- ment. Use wheel lift or flatbed
equipment.
CAUTION
Before towing, check the level ofthe automatic transaxle fluid. If it isbelow the "HOT" range on the dip- stick, add fluid. If you cannot addfluid, a towing dolly must be used.
dolly