reset Hyundai Sonata 2003 Owner's Manual
[x] Cancel search | Manufacturer: HYUNDAI, Model Year: 2003, Model line: Sonata, Model: Hyundai Sonata 2003Pages: 205, PDF Size: 19.98 MB
Page 46 of 205
1- 34 FEATURES OF YOUR HYUNDAI
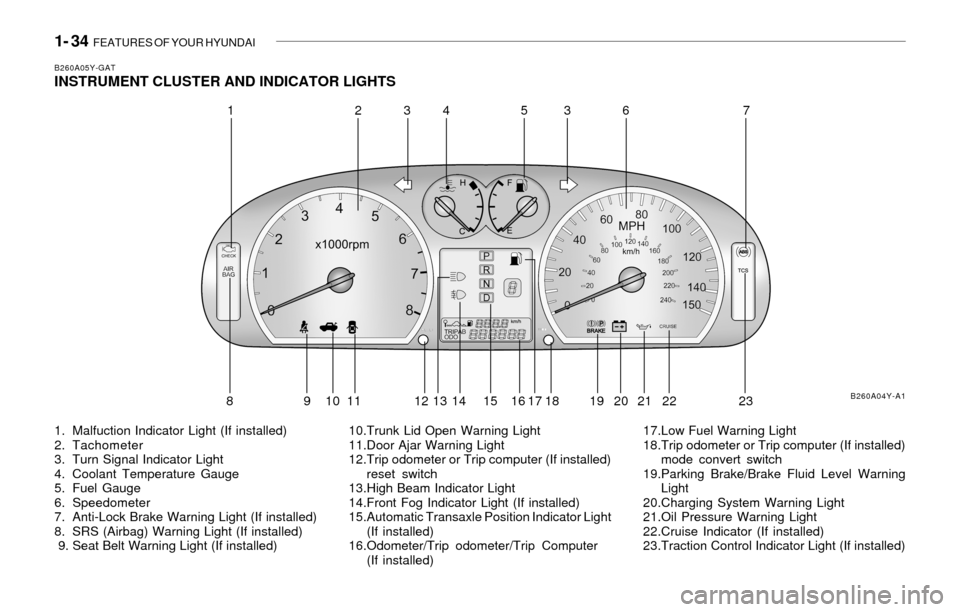
B260A05Y-GATINSTRUMENT CLUSTER AND INDICATOR LIGHTS
1. Malfuction Indicator Light (If installed)
2. Tachometer
3. Turn Signal Indicator Light
4. Coolant Temperature Gauge
5. Fuel Gauge
6. Speedometer
7. Anti-Lock Brake Warning Light (If installed)
8. SRS (Airbag) Warning Light (If installed)
9. Seat Belt Warning Light (If installed)10.Trunk Lid Open Warning Light
11.Door Ajar Warning Light
12.Trip odometer or Trip computer (If installed)
reset switch
13.High Beam Indicator Light
14.Front Fog Indicator Light (If installed)
15.Automatic Transaxle Position Indicator Light
(If installed)
16.Odometer/Trip odometer/Trip Computer
(If installed)17.Low Fuel Warning Light
18.Trip odometer or Trip computer (If installed)
mode convert switch
19.Parking Brake/Brake Fluid Level Warning
Light
20.Charging System Warning Light
21.Oil Pressure Warning Light
22.Cruise Indicator (If installed)
23.Traction Control Indicator Light (If installed)
B260A04Y-A1
12345637
8 9 10 11 12 13 14 15 16 17 18 19 20 21 22 23
Page 51 of 205
FEATURES OF YOUR HYUNDAI 1- 39
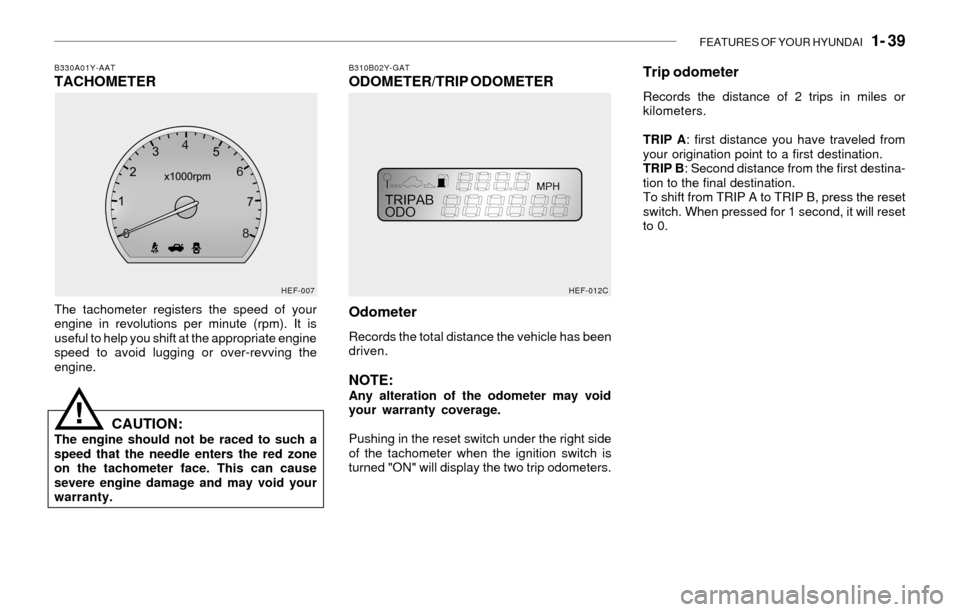
B310B02Y-GATODOMETER/TRIP ODOMETERB330A01Y-AATTACHOMETER
The tachometer registers the speed of your
engine in revolutions per minute (rpm). It is
useful to help you shift at the appropriate engine
speed to avoid lugging or over-revving the
engine.
CAUTION:The engine should not be raced to such a
speed that the needle enters the red zone
on the tachometer face. This can cause
severe engine damage and may void your
warranty.
!
HEF-007
Odometer
Records the total distance the vehicle has been
driven.
NOTE:Any alteration of the odometer may void
your warranty coverage.
Pushing in the reset switch under the right side
of the tachometer when the ignition switch is
turned "ON" will display the two trip odometers.
HEF-012C
Trip odometer
Records the distance of 2 trips in miles or
kilometers.
TRIP A: first distance you have traveled from
your origination point to a first destination.
TRIP B: Second distance from the first destina-
tion to the final destination.
To shift from TRIP A to TRIP B, press the reset
switch. When pressed for 1 second, it will reset
to 0.
Page 52 of 205

1- 40 FEATURES OF YOUR HYUNDAI
Selectable Function
Function ModeDisplay window
HEF-141B
HEF-142B
HEF-143A
HEF-144B
HEF-145B
HEF-146B
Trip A
Trip B
Drive time
Average Speed
Distance to Empty
Warning Light of
Distance to EmptyThis mode indicates first distance you have
traveled from your origination point to a first
destination.
This mode indicates a second distance from the
first destination to the final destination.
This mode indicates the total drive time that the
ignition has been switched on and the engine
has been running since the last "Drive time"
reset.
This mode indicates the average speed since the
last "Average speed" reset.
This mode indicates the estimated distance to
empty from the current fuel in the fuel tank and
distance to empty symbol.
When the distance to empty is less than 50 km
or 30 miles, the distance to empty digits
disappear and warning light [- -] blinks.
B315A02Y-GATTRIP COMPUTER (If installed)
o The trip computer is a microcomputer-con-
trolled driver information system that dis-
plays information related to driving, such as
tripmeter, average speed and distance to
empty on the LCD.
o Pushing in the mode switch under the left
side of the speedometer changes the dis-
play as follows;
o Trip A ® Trip B ® Drive time ® Average
Speed ® Distance to Empty
o Distance to Empty is presumed information.
Even though pressed for 1 second it will not
reset to 0
NOTE:o The distance to empty can differ from
the actual tripmeter according to driving
conditions.
o The distance to empty can vary accord-
ing to the driving conditions, driving
pattern or vehicle speed.
Page 57 of 205
FEATURES OF YOUR HYUNDAI 1- 45
B420A02A-AATCIGARETTE LIGHTER
For the cigarette lighter to work, the key must
be in the "ACC" position or the "ON" position.
To use the cigarette lighter, push it all the way
into its socket. When the element has heated,
the lighter will pop out to the "ready" position.
Do not hold the cigarette lighter pressed in. This
can damage the heating element and create a
fire hazard.
If it is necessary to replace the cigarette lighter,
use only a genuine Hyundai replacement or its
approved equivalent.
CAUTION:Do not use electric accessories or equip-
ment other than the Hyundai genuine parts
in the socket.
!
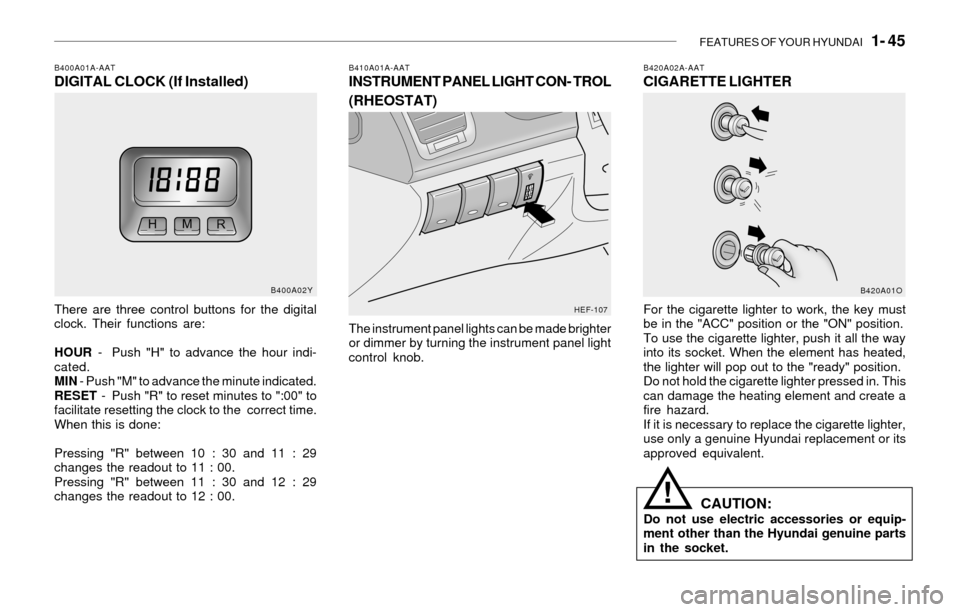
B410A01A-AATINSTRUMENT PANEL LIGHT CON- TROL
(RHEOSTAT)
The instrument panel lights can be made brighter
or dimmer by turning the instrument panel light
control knob.
B400A01A-AATDIGITAL CLOCK (If Installed)
There are three control buttons for the digital
clock. Their functions are:
HOUR - Push "H" to advance the hour indi-
cated.
MIN - Push "M" to advance the minute indicated.
RESET - Push "R" to reset minutes to ":00" to
facilitate resetting the clock to the correct time.
When this is done:
Pressing "R" between 10 : 30 and 11 : 29
changes the readout to 11 : 00.
Pressing "R" between 11 : 30 and 12 : 29
changes the readout to 12 : 00.
B400A02Y
HEF-107B420A01O
Page 74 of 205
1- 62 FEATURES OF YOUR HYUNDAI
!
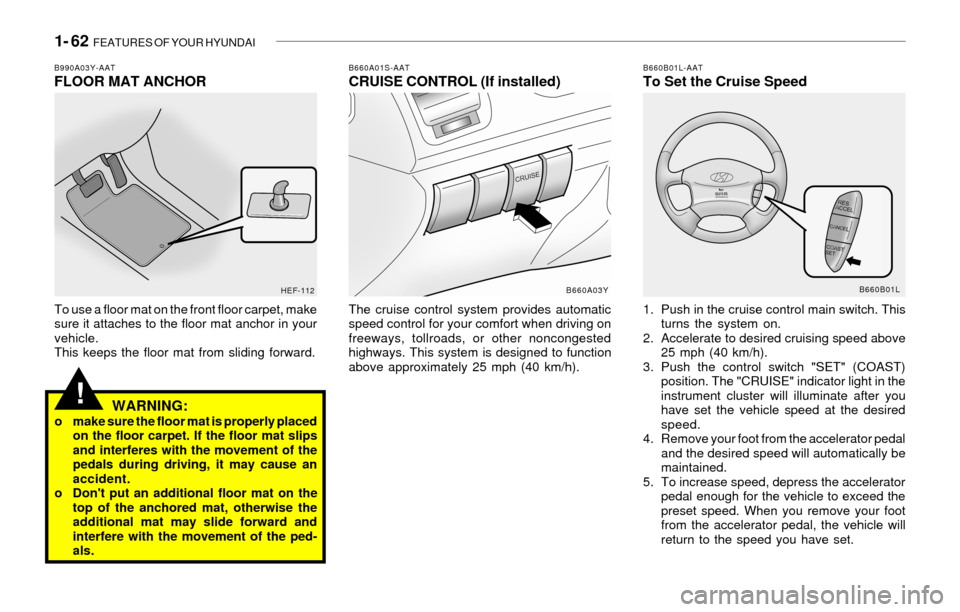
B660A01S-AATCRUISE CONTROL (If installed)
The cruise control system provides automatic
speed control for your comfort when driving on
freeways, tollroads, or other noncongested
highways. This system is designed to function
above approximately 25 mph (40 km/h).
B660B01L-AATTo Set the Cruise Speed
1. Push in the cruise control main switch. This
turns the system on.
2. Accelerate to desired cruising speed above
25 mph (40 km/h).
3. Push the control switch "SET" (COAST)
position. The "CRUISE" indicator light in the
instrument cluster will illuminate after you
have set the vehicle speed at the desired
speed.
4. Remove your foot from the accelerator pedal
and the desired speed will automatically be
maintained.
5. To increase speed, depress the accelerator
pedal enough for the vehicle to exceed the
preset speed. When you remove your foot
from the accelerator pedal, the vehicle will
return to the speed you have set.
B660A03Y
B990A03Y-AATFLOOR MAT ANCHOR
To use a floor mat on the front floor carpet, make
sure it attaches to the floor mat anchor in your
vehicle.
This keeps the floor mat from sliding forward.
WARNING:o make sure the floor mat is properly placed
on the floor carpet. If the floor mat slips
and interferes with the movement of the
pedals during driving, it may cause an
accident.
o Don't put an additional floor mat on the
top of the anchored mat, otherwise the
additional mat may slide forward and
interfere with the movement of the ped-
als.
HEF-112B660B01L
Page 75 of 205
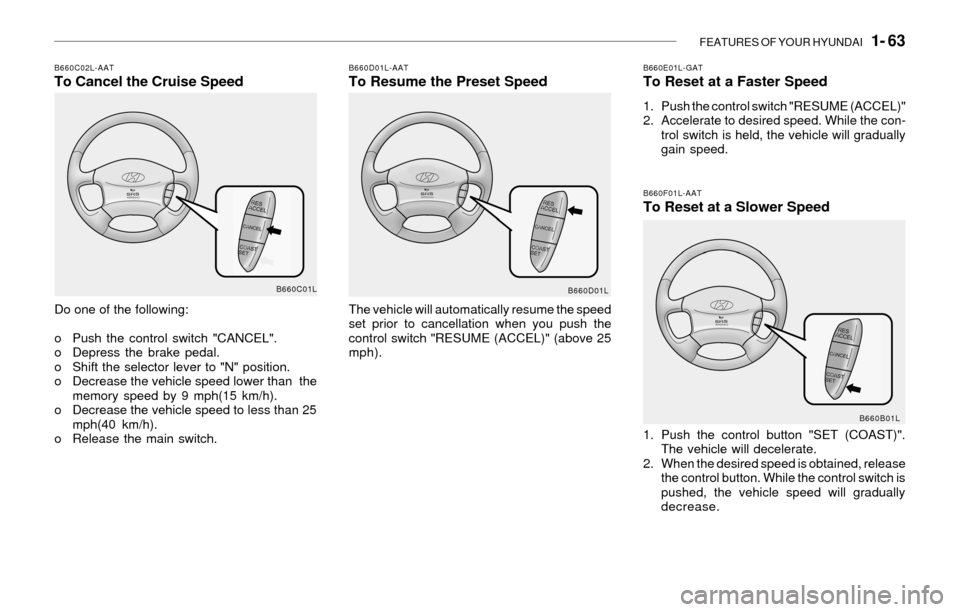
FEATURES OF YOUR HYUNDAI 1- 63
B660F01L-AATTo Reset at a Slower Speed
1. Push the control button "SET (COAST)".
The vehicle will decelerate.
2. When the desired speed is obtained, release
the control button. While the control switch is
pushed, the vehicle speed will gradually
decrease.
B660D01L-AATTo Resume the Preset Speed
The vehicle will automatically resume the speed
set prior to cancellation when you push the
control switch "RESUME (ACCEL)" (above 25
mph).
B660E01L-GATTo Reset at a Faster Speed
1. Push the control switch "RESUME (ACCEL)"
2. Accelerate to desired speed. While the con-
trol switch is held, the vehicle will gradually
gain speed.
B660C02L-AATTo Cancel the Cruise Speed
Do one of the following:
o Push the control switch "CANCEL".
o Depress the brake pedal.
o Shift the selector lever to "N" position.
o Decrease the vehicle speed lower than the
memory speed by 9 mph(15 km/h).
o Decrease the vehicle speed to less than 25
mph(40 km/h).
o Release the main switch.
B660C01L
B660D01L
B660B01L
Page 85 of 205
FEATURES OF YOUR HYUNDAI 1- 73
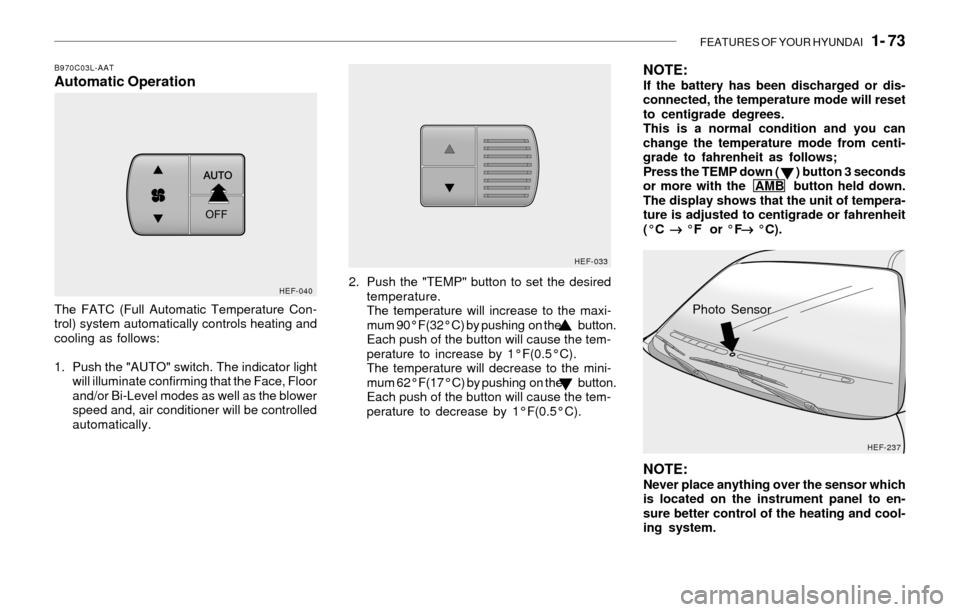
B970C03L-AATAutomatic Operation
The FATC (Full Automatic Temperature Con-
trol) system automatically controls heating and
cooling as follows:
1. Push the "AUTO" switch. The indicator light
will illuminate confirming that the Face, Floor
and/or Bi-Level modes as well as the blower
speed and, air conditioner will be controlled
automatically.2. Push the "TEMP" button to set the desired
temperature.
The temperature will increase to the maxi-
mum 90°F(32°C) by pushing on the button.
Each push of the button will cause the tem-
perature to increase by 1°F(0.5°C).
The temperature will decrease to the mini-
mum 62°F(17°C) by pushing on the button.
Each push of the button will cause the tem-
perature to decrease by 1°F(0.5°C).
NOTE:If the battery has been discharged or dis-
connected, the temperature mode will reset
to centigrade degrees.
This is a normal condition and you can
change the temperature mode from centi-
grade to fahrenheit as follows;
Press the TEMP down ( ) button 3 seconds
or more with the AMB button held down.
The display shows that the unit of tempera-
ture is adjusted to centigrade or fahrenheit
(°C
® ®® ®
® °F or °F
® ®® ®
® °C).
NOTE:Never place anything over the sensor which
is located on the instrument panel to en-
sure better control of the heating and cool-
ing system.
HEF-040HEF-033
HEF-237
Photo Sensor
Page 92 of 205
1- 80 FEATURES OF YOUR HYUNDAI
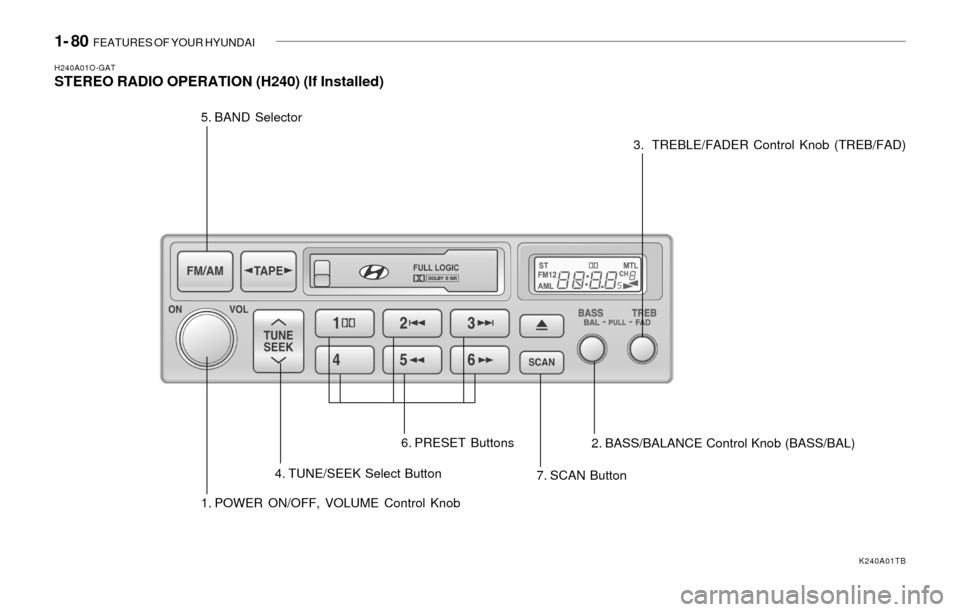
H240A01O-GATSTEREO RADIO OPERATION (H240) (If Installed)
1. POWER ON/OFF, VOLUME Control Knob 5. BAND Selector
4. TUNE/SEEK Select Button
7. SCAN Button 6. PRESET Buttons
2. BASS/BALANCE Control Knob (BASS/BAL)3. TREBLE/FADER Control Knob (TREB/FAD)
K240A01TB
Page 93 of 205

FEATURES OF YOUR HYUNDAI 1- 81
H240B03O-GAT1. POWER ON-OFF Control Knob
The radio unit may be operated when the ignition
key is in the "ACC" or "ON" position. Press the
knob to switch the power on. The LCD shows
the radio frequency in the radio mode or the tape
direction indicator in the tape mode. To switch
the power off, press the knob again.
VOLUME Control
Rotate the knob clockwise to increase the
volume and turn the knob counterclockwise to
reduce the volume.
2. BASS Control Knob
Press to pop the knob out and turn to the left or
right for the desired bass tone.
BAL (Balance Control) Knob
Pull the bass control knob further out. Turn the
control knob clockwise to emphasize right
speaker sound. (Left speaker sound will be
attenuated)
When the control knob is turned counterclock-
wise, left speaker sound will be emphasized.
(Right speaker sound will be attenuated)
3. TREB (Treble Control) Knob
Press to pop the knob out and turn to the left or
right for the desired treble tone.
FAD (Fader Control) Knob
Pull the treble control knob further out.
Turn the control knob counterclockwise to
emphasize front speaker sound. (Rear speaker
sound will be attenuated)
When the control knob is turned clockwise, rear
speaker sound will be emphasized.
(Front speaker sound will be attenuated)
4. TUNE (Manual) Select Button
Press the side or side to increase or to decrease
the frequency. Press either button and hold
down to continuously scroll. Release button
once the desired station is reached.
SEEK Operation
(Automatic Channel Selection)
Press the TUNE select button 1 sec or
more.Releasing will automatically tune to the
next available station with a beep sound.
When the ( ) side is pressed longer than 1
second, releasing will automatically tune to the
next higher frequency and when the ( ) side
is pressed longer than 1 second, releasing will
automatically tune to the next lower frequency.
5. BAND Selector
Pressing the button changes the AM, FM1
and FM2 bands. The mode selected is dis-
played on LCD.
6. PRESET STATION SELECT Button
Six (6) stations for AM, FM and FM2 respec-
tively can be preset in the electronic memory
circuit on this unit.
HOW TO PRESET STATIONS
Six AM and twelve FM stations may be pro-
grammed into the memory of the radio. Then, by
simply pressing the band select button and/or
one of the six station select buttons, you may
recall any of these stations instantly. To pro-
gram the stations, follow these steps:
o Press band selector to set the band for AM,
FM, or FM2.
o Select the desired station to be stored by
seek or manual tuning.
o Determine the preset station select button
you wish to use to access that station.
FM/AM
Page 94 of 205

1- 82 FEATURES OF YOUR HYUNDAI
o Press the station select button for more than
two seconds. A select button indicator will
show in the display indicating which select
button you have depressed. The frequency
display will flash after it has been stored into
the memory with a beep sound. You should
then release the button, and proceed to
program the next desired station. A total of
18 stations can be programmed by selecting
one AM and two FM stations per button.
o When completed, any preset station may be
recalled by selecting AM, FM or FM2 band
and the appropriate station button.
7. SCAN Button
When the scan button is pressed, the frequency
will increase and the receivable stations will be
tuned in one after another, receiving each sta-
tion for 5 seconds. To stop scanning, press the
scan button again.