trunk Hyundai Sonata 2004 User Guide
[x] Cancel search | Manufacturer: HYUNDAI, Model Year: 2004, Model line: Sonata, Model: Hyundai Sonata 2004Pages: 208, PDF Size: 16.93 MB
Page 69 of 208
FEATURES OF YOUR HYUNDAI 1- 57
!
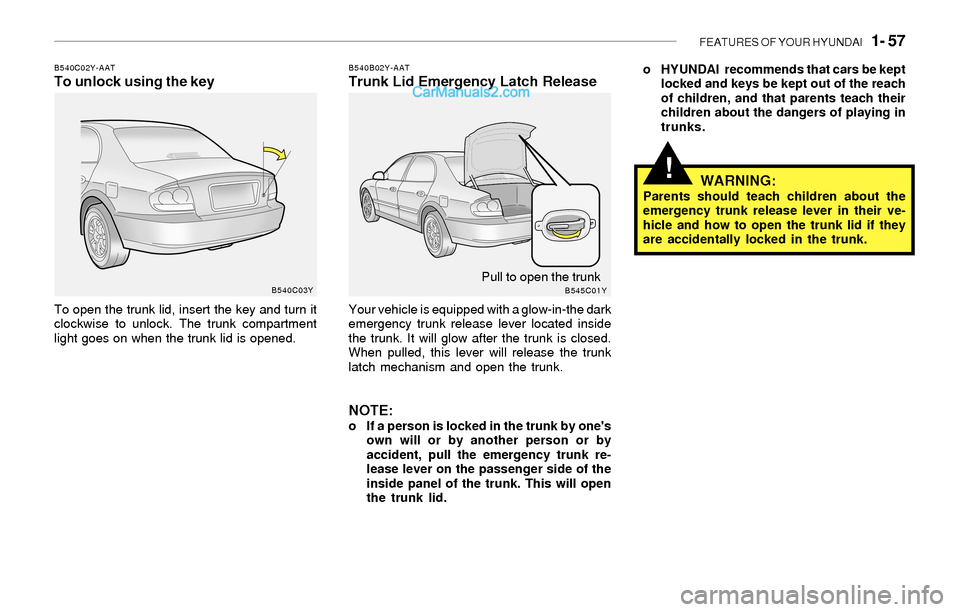
B540C02Y-AATTo unlock using the key
To open the trunk lid, insert the key and turn it
clockwise to unlock. The trunk compartment
light goes on when the trunk lid is opened.
B540B02Y-AATTrunk Lid Emergency Latch Release
Your vehicle is equipped with a glow-in-the dark
emergency trunk release lever located inside
the trunk. It will glow after the trunk is closed.
When pulled, this lever will release the trunk
latch mechanism and open the trunk.
NOTE:o If a person is locked in the trunk by one's
own will or by another person or by
accident, pull the emergency trunk re-
lease lever on the passenger side of the
inside panel of the trunk. This will open
the trunk lid.o HYUNDAI recommends that cars be kept
locked and keys be kept out of the reach
of children, and that parents teach their
children about the dangers of playing in
trunks.
WARNING:Parents should teach children about the
emergency trunk release lever in their ve-
hicle and how to open the trunk lid if they
are accidentally locked in the trunk.
B540C03Y
B545C01YPull to open the trunk
Page 71 of 208
FEATURES OF YOUR HYUNDAI 1- 59
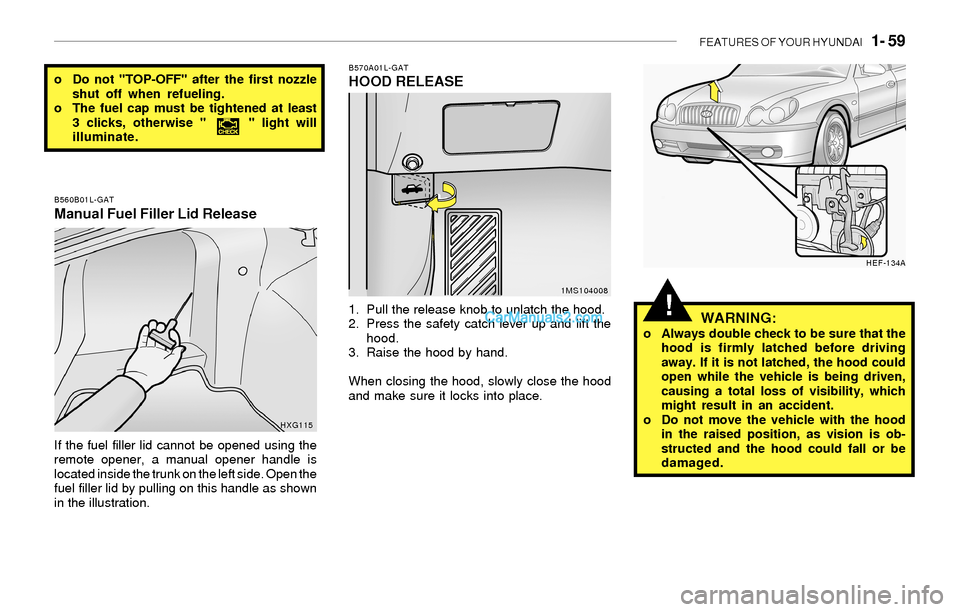
B570A01L-GATHOOD RELEASE
1. Pull the release knob to unlatch the hood.
2. Press the safety catch lever up and lift the
hood.
3. Raise the hood by hand.
When closing the hood, slowly close the hood
and make sure it locks into place.
o Do not "TOP-OFF" after the first nozzle
shut off when refueling.
o The fuel cap must be tightened at least
3 clicks, otherwise " " light will
illuminate.
1MS104008 B560B01L-GAT
Manual Fuel Filler Lid Release
If the fuel filler lid cannot be opened using the
remote opener, a manual opener handle is
located inside the trunk on the left side. Open the
fuel filler lid by pulling on this handle as shown
in the illustration.
HXG115
WARNING:o Always double check to be sure that the
hood is firmly latched before driving
away. If it is not latched, the hood could
open while the vehicle is being driven,
causing a total loss of visibility, which
might result in an accident.
o Do not move the vehicle with the hood
in the raised position, as vision is ob-
structed and the hood could fall or be
damaged.
HEF-134A
!
Page 117 of 208
2- 2 DRIVING YOUR HYUNDAI
!WARNING: ENGINE EXHAUST CAN BE DANGEROUS!
C010A03A-AATEngine exhaust fumes can be extremely dangerous. If, at any time, you smell exhaust fumes inside the vehicle, open the windows immediately.
o Do not inhale exhaust fumes.
Exhaust fumes contain carbon monoxide, a colorless, odorless gas that can cause unconsciousness and death by asphyxiation.
o Be sure the exhaust system does not leak.
The exhaust system should be checked whenever the vehicle is raised to change the oil or for any other purpose. If you hear a change
in the sound of the exhaust or if you drive over something that strikes the underneath side of the car, have the exhaust system checked
as soon as possible by your Hyundai dealer.
o Do not run the engine in an enclosed area.
Letting the engine idle in your garage, even with the garage door open, is a hazardous practice. Never run the engine in your garage any
longer than it takes to start the engine and back the car out.
o Avoid idling the engine for prolonged periods with people inside the car.
If it is necessary to idle the engine for a prolonged period with people inside the car, be sure to do so only in an open area with the air intake
set at "Fresh" and fan operating at one of the higher speeds so fresh air is drawn into the interior.
If you must drive with the trunk lid/ tail gate open because you are carrying objects that make this necessary:
1. Close all windows.
2. Open side vents.
3. Set the air intake control at "Fresh", the air flow control at "Floor" or "Face" and the fan at one of the higher speeds.
To assure proper operation of the ventilation system, be sure the ventilation air intakes located just in front of the windshield are kept clear
of snow, ice, leaves or other obstructions.
!PROPOSITION 65 WARNING:Engine exhaust and a wide variety of automobile components and parts, including components found in the interior furnishings
in a vehicle, contain or emit chemicals known to the State of California to cause cancer and birth defects and reproductive harm.
In addition, certain fluids contained in vehicles and certain products of component wear contain or emit chemicals known to
the State of California to cause cancer and birth defects or other reproductive harm.
Page 132 of 208
DRIVING YOUR HYUNDAI 2- 17
!
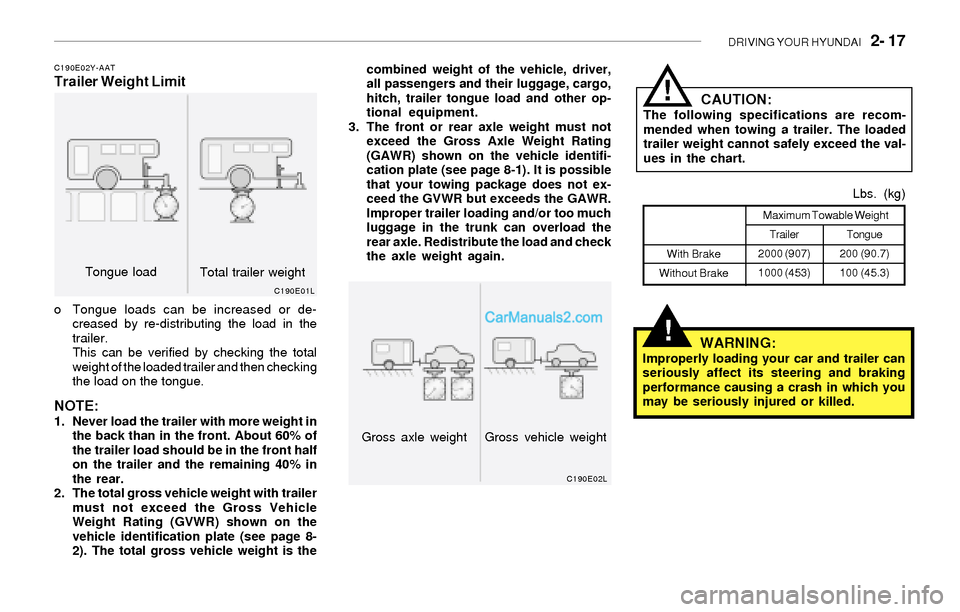
Trailer
2000 (907)
1000 (453)Maximum Towable Weight
C190E02Y-AATTrailer Weight Limit
o Tongue loads can be increased or de-
creased by re-distributing the load in the
trailer.
This can be verified by checking the total
weight of the loaded trailer and then checking
the load on the tongue.
NOTE:1. Never load the trailer with more weight in
the back than in the front. About 60% of
the trailer load should be in the front half
on the trailer and the remaining 40% in
the rear.
2. The total gross vehicle weight with trailer
must not exceed the Gross Vehicle
Weight Rating (GVWR) shown on the
vehicle identification plate (see page 8-
2). The total gross vehicle weight is thecombined weight of the vehicle, driver,
all passengers and their luggage, cargo,
hitch, trailer tongue load and other op-
tional equipment.
3. The front or rear axle weight must not
exceed the Gross Axle Weight Rating
(GAWR) shown on the vehicle identifi-
cation plate (see page 8-1). It is possible
that your towing package does not ex-
ceed the GVWR but exceeds the GAWR.
Improper trailer loading and/or too much
luggage in the trunk can overload the
rear axle. Redistribute the load and check
the axle weight again.
WARNING:Improperly loading your car and trailer can
seriously affect its steering and braking
performance causing a crash in which you
may be seriously injured or killed.Lbs. (kg)
Tongue
200 (90.7)
100 (45.3) With Brake
Without Brake
C190E01L
C190E02L
Tongue load
Total trailer weight
Gross axle weight
Gross vehicle weight
!CAUTION:The following specifications are recom-
mended when towing a trailer. The loaded
trailer weight cannot safely exceed the val-
ues in the chart.
Page 139 of 208
3- 6 WHAT TO DO IN AN EMERGENCY
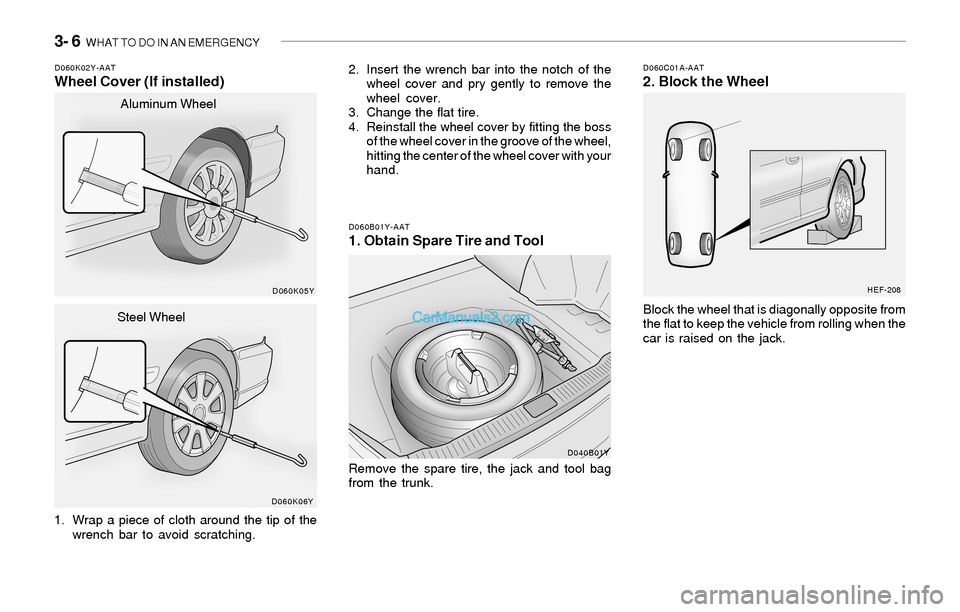
D060C01A-AAT2. Block the WheelD060K02Y-AATWheel Cover (If installed)
1. Wrap a piece of cloth around the tip of the
wrench bar to avoid scratching.Block the wheel that is diagonally opposite from
the flat to keep the vehicle from rolling when the
car is raised on the jack.
D060B01Y-AAT1. Obtain Spare Tire and Tool
Remove the spare tire, the jack and tool bag
from the trunk.
D060K05Y
D040B01YHEF-208
D060K06Y
2. Insert the wrench bar into the notch of the
wheel cover and pry gently to remove the
wheel cover.
3. Change the flat tire.
4. Reinstall the wheel cover by fitting the boss
of the wheel cover in the groove of the wheel,
hitting the center of the wheel cover with your
hand. Aluminum Wheel
Steel Wheel
Page 142 of 208
WHAT TO DO IN AN EMERGENCY 3- 9
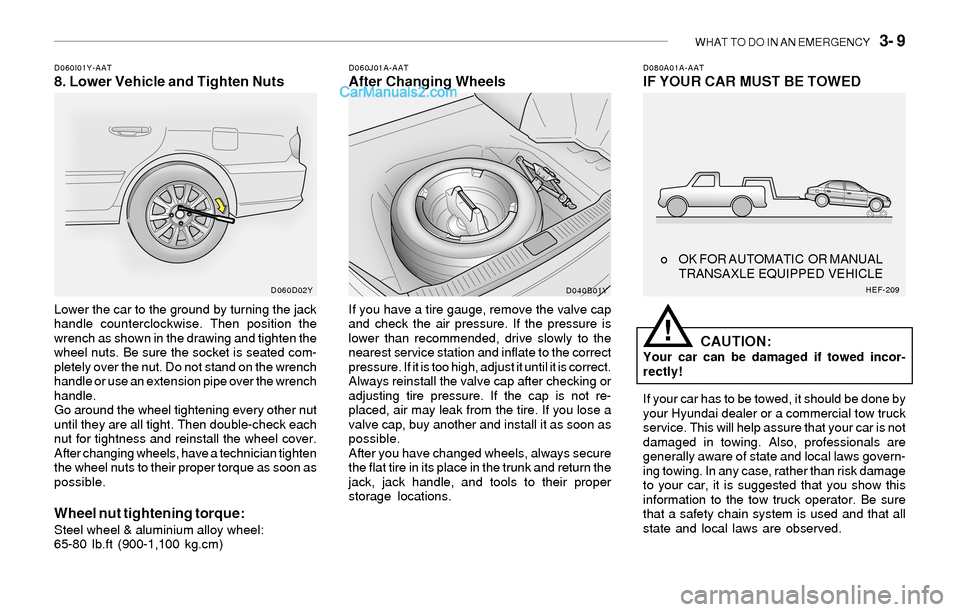
D080A01A-AATIF YOUR CAR MUST BE TOWEDD060I01Y-AAT8. Lower Vehicle and Tighten NutsD060J01A-AATAfter Changing Wheels
Lower the car to the ground by turning the jack
handle counterclockwise. Then position the
wrench as shown in the drawing and tighten the
wheel nuts. Be sure the socket is seated com-
pletely over the nut. Do not stand on the wrench
handle or use an extension pipe over the wrench
handle.
Go around the wheel tightening every other nut
until they are all tight. Then double-check each
nut for tightness and reinstall the wheel cover.
After changing wheels, have a technician tighten
the wheel nuts to their proper torque as soon as
possible.
Wheel nut tightening torque:Steel wheel & aluminium alloy wheel:
65-80 lb.ft (900-1,100 kg.cm)If you have a tire gauge, remove the valve cap
and check the air pressure. If the pressure is
lower than recommended, drive slowly to the
nearest service station and inflate to the correct
pressure. If it is too high, adjust it until it is correct.
Always reinstall the valve cap after checking or
adjusting tire pressure. If the cap is not re-
placed, air may leak from the tire. If you lose a
valve cap, buy another and install it as soon as
possible.
After you have changed wheels, always secure
the flat tire in its place in the trunk and return the
jack, jack handle, and tools to their proper
storage locations.
CAUTION:Your car can be damaged if towed incor-
rectly!
If your car has to be towed, it should be done by
your Hyundai dealer or a commercial tow truck
service. This will help assure that your car is not
damaged in towing. Also, professionals are
generally aware of state and local laws govern-
ing towing. In any case, rather than risk damage
to your car, it is suggested that you show this
information to the tow truck operator. Be sure
that a safety chain system is used and that all
state and local laws are observed.
!
o OK FOR AUTOMATIC OR MANUAL
TRANSAXLE EQUIPPED VEHICLE
D060D02Y
D040B01YHEF-209
Page 182 of 208
6- 24 DO-IT-YOURSELF MAINTENANCE
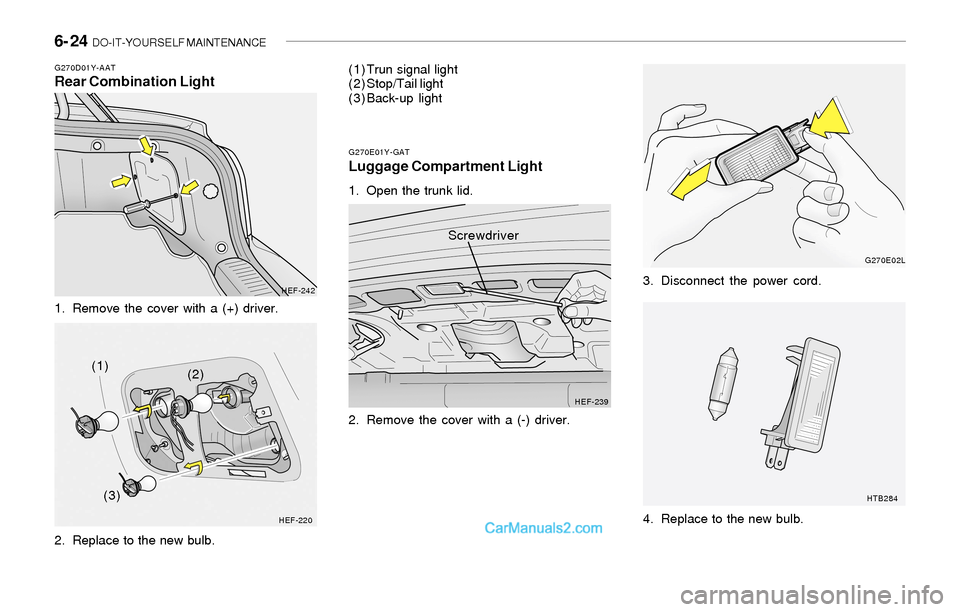
G270D01Y-AATRear Combination Light
1. Remove the cover with a (+) driver.
2. Replace to the new bulb.
HEF-242
HEF-220
(1)
(2)
(3)(1) Trun signal light
(2) Stop/Tail light
(3) Back-up light
G270E01Y-GATLuggage Compartment Light
1. Open the trunk lid.
2. Remove the cover with a (-) driver.
HEF-239G270E02L
HTB284
Screwdriver
3. Disconnect the power cord.
4. Replace to the new bulb.
Page 188 of 208
6- 30 DO-IT-YOURSELF MAINTENANCE
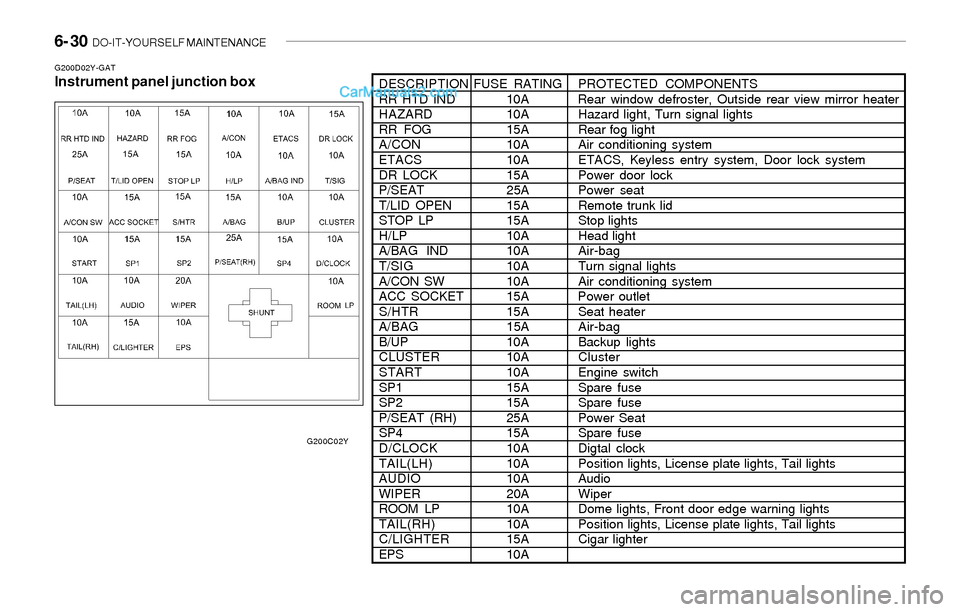
G200D02Y-GATInstrument panel junction boxDESCRIPTIONFUSE RATINGPROTECTED COMPONENTS
RR HTD IND 10A Rear window defroster, Outside rear view mirror heater
HAZARD 10AHazard light, Turn signal lights
RR FOG 15A Rear fog light
A/CON 10AAir conditioning system
ETACS 10AETACS, Keyless entry system, Door lock system
DR LOCK 15A Power door lock
P/SEAT 25A Power seat
T/LID OPEN 15A Remote trunk lid
STOP LP 15A Stop lights
H/LP 10AHead light
A/BAG IND 10A Air-bag
T/SIG 10A Turn signal lights
A/CON SW 10A Air conditioning system
ACC SOCKET 15A Power outlet
S/HTR 15A Seat heater
A/BAG 15A Air-bag
B/UP 10A Backup lights
CLUSTER 10A Cluster
START 10AEngine switch
SP1 15A Spare fuse
SP2 15A Spare fuse
P/SEAT (RH) 25A Power Seat
SP4 15A Spare fuse
D/CLOCK 10ADigtal clock
TAIL(LH) 10APosition lights, License plate lights, Tail lights
AUDIO 10AAudio
WIPER 20A Wiper
ROOM LP 10A Dome lights, Front door edge warning lights
TAIL(RH) 10APosition lights, License plate lights, Tail lights
C/LIGHTER 15ACigar lighter
EPS 10A
G200C02Y
Page 207 of 208
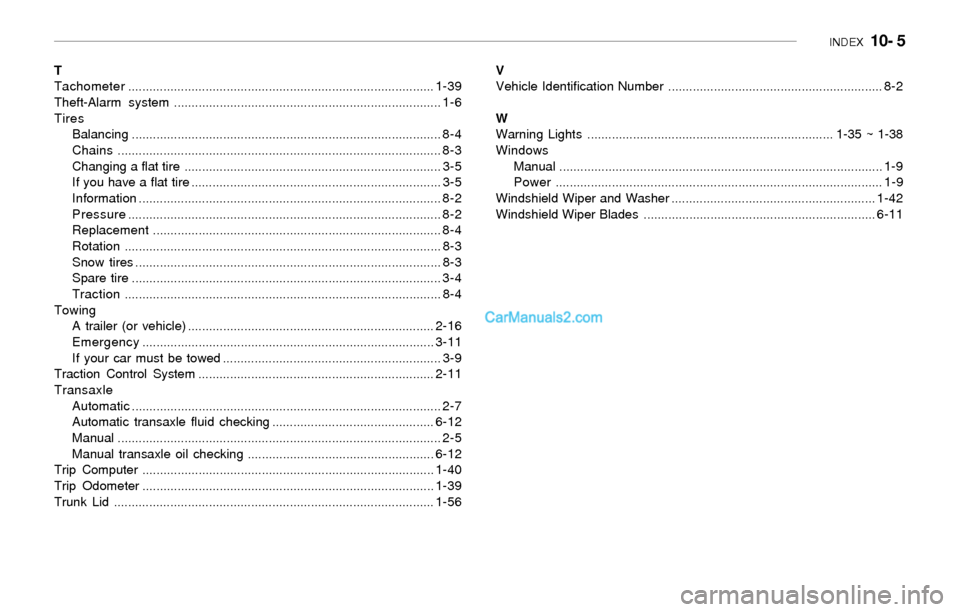
INDEX 10- 5
T
Tachometer.......................................................................................1-39
Theft-Alarm system............................................................................ 1-6
Tires
Balancing........................................................................................ 8-4
Chains............................................................................................ 8-3
Changing a flat tire ......................................................................... 3-5
If you have a flat tire ....................................................................... 3-5
Information...................................................................................... 8-2
Pressure......................................................................................... 8-2
Replacement.................................................................................. 8-4
Rotation.......................................................................................... 8-3
Snow tires....................................................................................... 8-3
Spare tire........................................................................................ 3-4
Traction.......................................................................................... 8-4
Towing
A trailer (or vehicle)......................................................................2-16
Emergency...................................................................................3-11
If your car must be towed .............................................................. 3-9
Traction Control System ...................................................................2-11
Transaxle
Automatic........................................................................................ 2-7
Automatic transaxle fluid checking ..............................................6-12
Manual............................................................................................ 2-5
Manual transaxle oil checking.....................................................6-12
Trip Computer...................................................................................1-40
Trip Odometer...................................................................................1-39
Trunk Lid ...........................................................................................1-56V
Vehicle Identification Number............................................................. 8-2
W
Warning Lights...................................................................... 1-35 ~ 1-38
Windows
Manual............................................................................................ 1-9
Power............................................................................................. 1-9
Windshield Wiper and Washer ..........................................................1-42
Windshield Wiper Blades..................................................................6-11