spare tire Hyundai Sonata 2005 Owner's Manual
[x] Cancel search | Manufacturer: HYUNDAI, Model Year: 2005, Model line: Sonata, Model: Hyundai Sonata 2005Pages: 271, PDF Size: 12.44 MB
Page 165 of 271
2
DRIVING YOUR HYUNDAI
21
C190F01Y-GATTrailer or Vehicle Towing Tips1. Before towing, check hitch and safety chain
connections as well as proper operation of
the trailer running lights, brake lights, and
turn signals.
2. Always drive your vehicle at a moderate
speed. (Less than 60 mph)
3. Trailer towing requires more fuel than normal
conditions.
4. To maintain engine braking efficiency and
electrical charging performance, do not tow
a trailer with the transaxle in fifth gear (manual
transaxle).
5. Always secure items in the trailer to prevent
load shift while driving.
6. Check the condition and air pressure of all
tires on the trailer and your car. Low tire
pressure can seriously affect the handling.
Also check the spare tire.
7. The vehicle/trailer combination is more af-
fected by crosswind and buffeting.
When being passed by a large vehicle, keep
a constant speed and steer straight ahead.
If there is too much wind buffeting, slow down
to get out of the other vehicle's air turbulence.
!
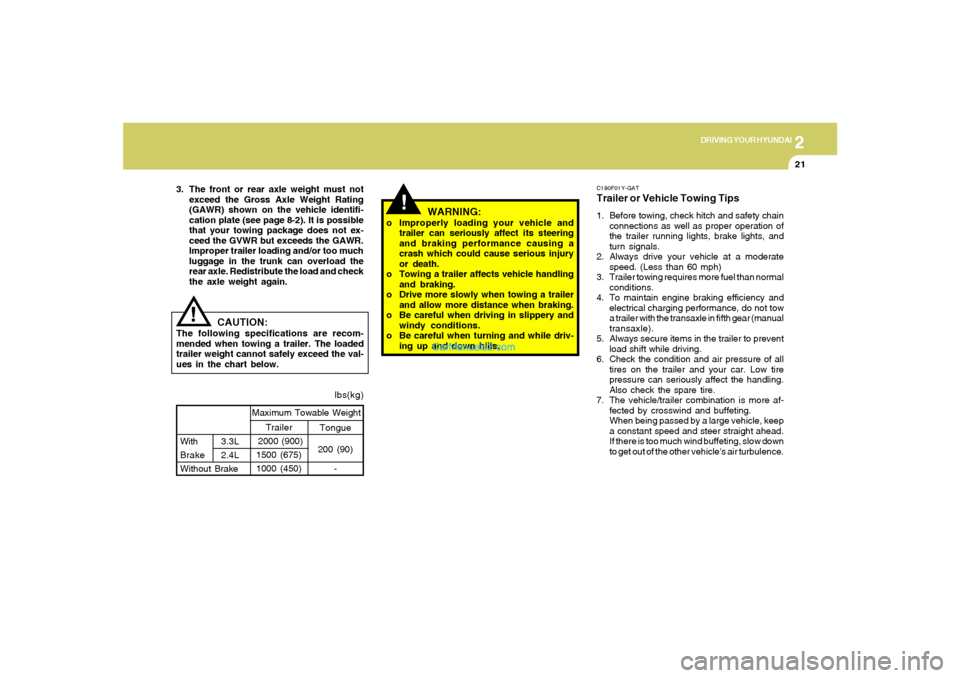
lbs(kg)
!
Tongue
200 (90)
- With3.3L
Brake 2.4L
Without BrakeMaximum Towable Weight
Trailer
2000 (900)
1500 (675)
1000 (450)
CAUTION:
The following specifications are recom-
mended when towing a trailer. The loaded
trailer weight cannot safely exceed the val-
ues in the chart below.
WARNING:
o Improperly loading your vehicle and
trailer can seriously affect its steering
and braking performance causing a
crash which could cause serious injury
or death.
o Towing a trailer affects vehicle handling
and braking.
o Drive more slowly when towing a trailer
and allow more distance when braking.
o Be careful when driving in slippery and
windy conditions.
o Be careful when turning and while driv-
ing up and down hills. 3. The front or rear axle weight must not
exceed the Gross Axle Weight Rating
(GAWR) shown on the vehicle identifi-
cation plate (see page 8-2). It is possible
that your towing package does not ex-
ceed the GVWR but exceeds the GAWR.
Improper trailer loading and/or too much
luggage in the trunk can overload the
rear axle. Redistribute the load and check
the axle weight again.
Page 171 of 271
If the Engine Will Not Start ............................................ 3-2
Jump Starting ................................................................ 3-3
If the Engine Overheats ................................................ 3-4
Spare Tire ..................................................................... 3-5
If You Have a Flat Tire .................................................. 3-6
Changing a Flat Tire ...................................................... 3-6
If Your Vehicle Must Be Towed...................................3-11
Emergency Towing.....................................................3-13
If You Lose Your Keys................................................3-13
3
WHAT TO DO IN AN EMERGENCY
3
Page 175 of 271
3
WHAT TO DO IN AN EMERGENCY
5
SPARE TIRED040A02GK-AATTEMPORARY SPARE TIRE
The following instructions for the tem-
porary spare tire should be observed:
1. Check inflation pressure as soon as
practical after installing the spare
tire, and adjust to the specified pres-
sure. The tire pressure should be
periodically checked and maintained
at the specified pressure while the
tire is stored.Tire Size
Inflation Pressure
T125/80 D16
420 KPA(60 PSI)
4. As the temporary spare tire is spe-
cifically designed for your car, it
should not be used on any other
vehicle.
5. The temporary spare tire should not
be used on any other wheels, nor
should standard tires, snow tires,
wheel covers or trim rings be used
with the temporary spare wheel. If
such use is attempted, damage to
these items or other car components
may occur.
6. The temporary spare tire pressure
should be checked once a month
while the tire is stored.
2. The spare tire should only be used
temporarily and should be returned
to the luggage compartment as soon
as the original tire can be repaired or
replaced.
3. Continuous use at speeds of over 50
mph (80 km/h) is not recommended. Spare Tire Pressure
CAUTION:
o Do not use snow chains with your
temporary spare tire.
o Do not use more than one tempo-
rary spare tire at a time.
o Do not tow a trailer while the tem-
porary spare tire is installed.
!
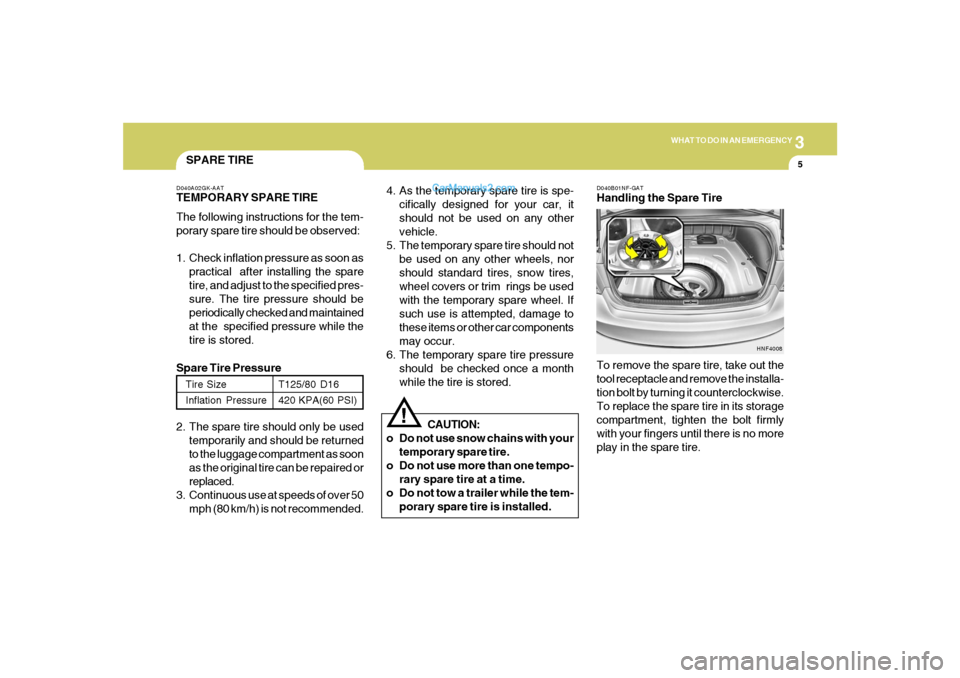
D040B01NF-GATHandling the Spare Tire
To remove the spare tire, take out the
tool receptacle and remove the installa-
tion bolt by turning it counterclockwise.
To replace the spare tire in its storage
compartment, tighten the bolt firmly
with your fingers until there is no more
play in the spare tire.
HNF4008
Page 176 of 271
36WHAT TO DO IN AN EMERGENCY
CHANGING A FLAT TIRE
IF YOU HAVE A FLAT TIRE
D060A01A-AATThe procedure described on the follow-
ing pages can be used to rotate tires as
well as to change a flat tire. When
preparing to change a flat tire, check to
be sure the gear selector lever is in "P"
(automatic transaxle) or reverse gear
(manual transaxle) and that the parking
brake is set, then:
D050A01A-AATIf a tire goes flat while you are driving:
1. Take your foot off the accelerator pedal
and let the car slow down while driving
straight ahead. Do not apply the brakes
immediately or attempt to pull off the
road as this may cause a loss of
control. When the car has slowed to
such a speed that it is safe to do so,
brake carefully and pull off the road.
Drive off the road as far as possible
and park on firm, level ground. If you
are on a divided highway, do not park
in the median area between the two
traffic lanes.
2. When the car is stopped, turn on your
emergency hazard flashers, set the
parking brake and put the transaxle in
"P" (automatic) or reverse (manual
transaxle).
3. Have all passengers get out of the car.
Be sure they all get out on the side of
the car that is away from traffic.
4. Change the tire according to the in-
structions provided as follows.
D060A01NF-A
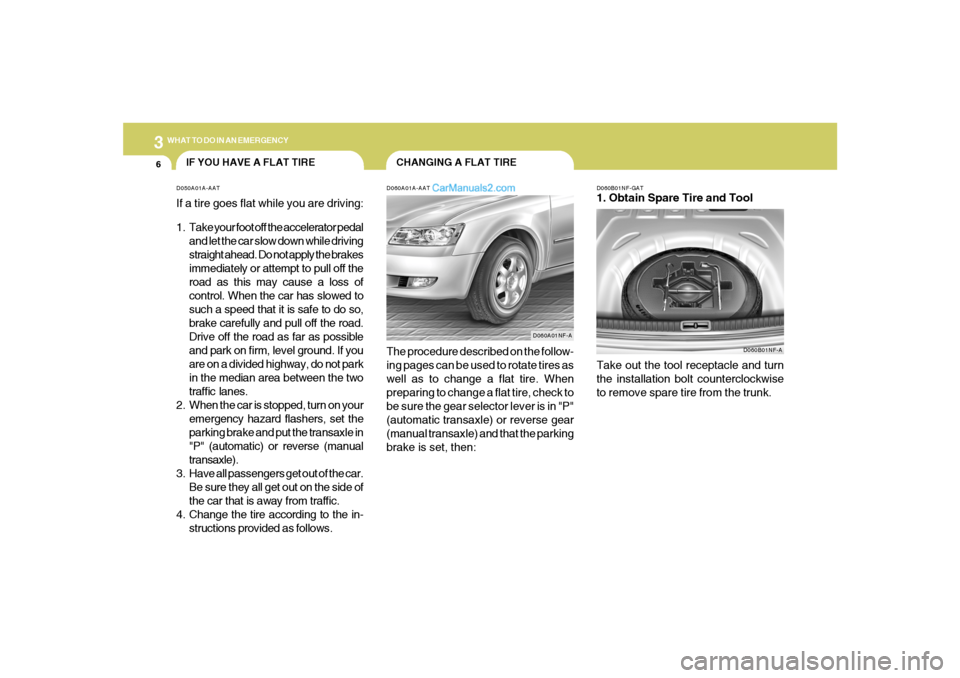
D060B01NF-GAT1. Obtain Spare Tire and Tool
D060B01NF-A
Take out the tool receptacle and turn
the installation bolt counterclockwise
to remove spare tire from the trunk.
Page 178 of 271
38WHAT TO DO IN AN EMERGENCY
!
Raise the car high enough so that the
fully inflated spare tire can be installed.
To do this, you will need more ground
clearance than is required to remove
the flat tire.
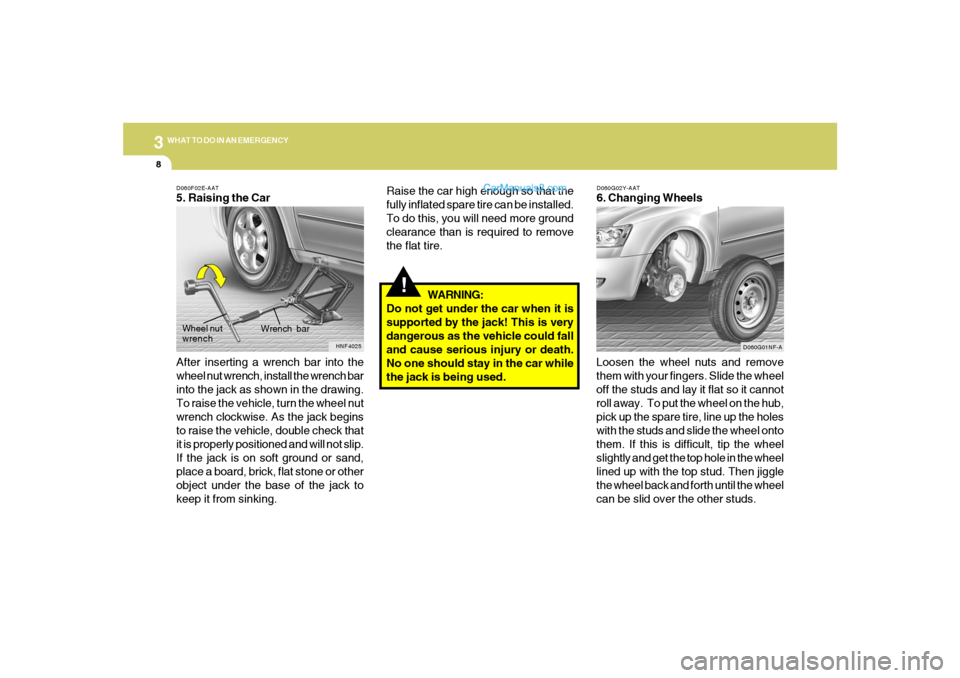
D060F02E-AAT5. Raising the Car
After inserting a wrench bar into the
wheel nut wrench, install the wrench bar
into the jack as shown in the drawing.
To raise the vehicle, turn the wheel nut
wrench clockwise. As the jack begins
to raise the vehicle, double check that
it is properly positioned and will not slip.
If the jack is on soft ground or sand,
place a board, brick, flat stone or other
object under the base of the jack to
keep it from sinking.WARNING:
Do not get under the car when it is
supported by the jack! This is very
dangerous as the vehicle could fall
and cause serious injury or death.
No one should stay in the car while
the jack is being used.
D060G02Y-AAT6. Changing Wheels
Loosen the wheel nuts and remove
them with your fingers. Slide the wheel
off the studs and lay it flat so it cannot
roll away. To put the wheel on the hub,
pick up the spare tire, line up the holes
with the studs and slide the wheel onto
them. If this is difficult, tip the wheel
slightly and get the top hole in the wheel
lined up with the top stud. Then jiggle
the wheel back and forth until the wheel
can be slid over the other studs.
HNF4025
Wrench bar Wheel nut
wrench
D060G01NF-A
Page 202 of 271
6
DO-IT-YOURSELF MAINTENANCE
4
G020C01A-AATVehicle InteriorThe following should be checked each time
when the vehicle is driven:
o Lights operation
o Windshield wiper operation
o Horn operation
o Defroster, heating system operation (and air
conditioning, if installed)
o Steering operation and condition
o Mirror condition and operation
o Turn signal operation
o Accelerator pedal operation
o Brake operation, including parking brake
o Manual transaxle operation, including clutch
operation
o Automatic transaxle operation, including
"Park" mechanism operation
o Seat control condition and operation
o Seat belt condition and operation
o Sun visor operation
If you notice anything that does not operate
correctly or appears to be functioning correctly,
inspect it carefully and seek assistance from
your Hyundai dealer if service is needed.
G020B01A-AATVehicle ExteriorThe following should be checked monthly:
o Overall appearance and condition
o Wheel condition and wheel nut torque
o Exhaust system condition
o Light condition and operation
o Windshield glass condition
o Wiper blade condition
o Paint condition and body corrosion
o Fluid leaks
o Door and hood lock condition
o Tire pressure and condition
(including spare tire)
GENERAL CHECKSG020A01NF-AATEngine CompartmentThe following should be checked regularly:
o Engine oil level and condition
o Transaxle fluid level and condition
o Brake fluid level
o Engine coolant level
o Windshield washer fluid level
o Accessory drive belt condition
o Engine coolant hose condition
o Fluid leaks (on or below components)
o Power steering fluid level
o Battery condition
o Air filter condition
o Engine vibration
Page 228 of 271
6
DO-IT-YOURSELF MAINTENANCE
30
HEADLIGHT AIMING ADJUSTMENTG290A02O-AATBefore performing aiming adjustment, make
sure of the following.
1. Keep all tires inflated to the correct pressure.
2. Place the vehicle on level ground and press
the front bumper & rear bumper down sev-
eral times.
Place vehicle at a distance of 118 in. (3m)
from the test wall.
3. See that the vehicle is unloaded (except for
full levels of coolant, engine oil and fuel, and
spare tire, jack, and tools). Have the driver
or equivalent weight placed in driver's seat.
4. Clean the headlight lenses and turn on the
headlights (Low beam).
5. Open the hood.
G290A01NF-A
Vertical
aiming
!
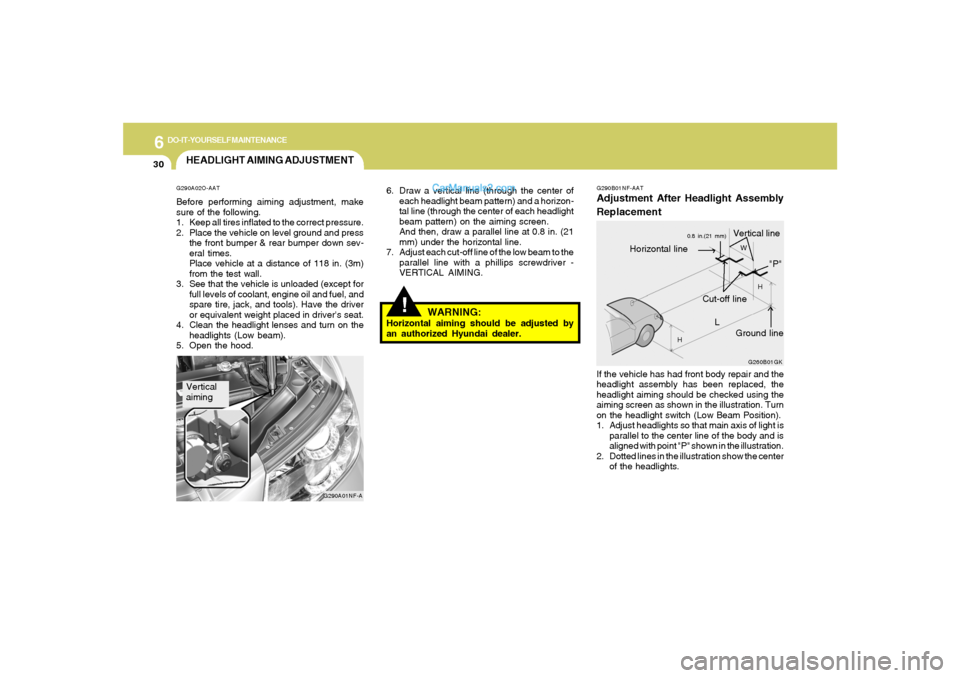
6. Draw a vertical line (through the center of
each headlight beam pattern) and a horizon-
tal line (through the center of each headlight
beam pattern) on the aiming screen.
And then, draw a parallel line at 0.8 in. (21
mm) under the horizontal line.
7. Adjust each cut-off line of the low beam to the
parallel line with a phillips screwdriver -
VERTICAL AIMING.
WARNING:
Horizontal aiming should be adjusted by
an authorized Hyundai dealer.
G290B01NF-AATAdjustment After Headlight Assembly
Replacement
G260B01GK
L
W
H
H
Cut-off line
Ground line
"P"
Horizontal line
Vertical line
0.8 in.(21 mm)
If the vehicle has had front body repair and the
headlight assembly has been replaced, the
headlight aiming should be checked using the
aiming screen as shown in the illustration. Turn
on the headlight switch (Low Beam Position).
1. Adjust headlights so that main axis of light is
parallel to the center line of the body and is
aligned with point "P" shown in the illustration.
2. Dotted lines in the illustration show the center
of the headlights.
Page 245 of 271
Vehicle Identification Number (VIN) .............................. 8-2
Engine Number ............................................................. 8-2
Tire Information ............................................................. 8-2
Recommended Inflation Pressures ............................... 8-3
Checking Tire Inflation Pressure ................................... 8-4
Tire Sidewall Labeling ................................................... 8-4
Tire Terminology and Definitions ................................... 8-6
All Season Tires ............................................................ 8-8
Summer Tires ............................................................... 8-8
Snow Tires .................................................................... 8-8
Tire Chains .................................................................... 8-8
Tire Rotation .................................................................. 8-9
Tire Balancing ............................................................... 8-9
Tire Traction................................................................8-10
When to Replace Tires ...............................................8-10
Tire Maintenance........................................................8-11
Spare Tire and Tools ...................................................8-11
Warranties for Your Hyundai Vehicle..........................8-12
Consumer Information.................................................8-12
Reporting Safety Defects............................................8-14
Binding Arbitration of Warranty Claims.......................8-15
8
8
CONSUMER INFORMATION, REPORTING
SAFETY DEFECTS & BINDING
ARBITRATION OF WARRANTY CLAIMS
Page 248 of 271
8
CONSUMER INFORMATION, REPORTING SAFETY DEFECTS & BINDING ARBITRATION OF WARRANTY CLAIMS4
Check the tire's inflation pressure when
the tires are cold. - "Cold" means your
vehicle has been sitting for at least
three hours or driven no more than 1
mile (1.6 km).
Remove the valve cap from the tire
valve stem. Press the tire gauge firmly
onto the valve to get a pressure mea-
surement. If the cold tire inflation pres-
sure matches the recommended pres-
sure on the tire and loading information
label, no further adjustment is neces-
sary. If the pressure is low, add air until
you reach the recommended amount.
If you overfill the tire, release air by
pushing on the metal stem in the center
of the tire valve. Recheck the tire pres-
sure with the tire gauge. Be sure to put
the valve caps back on the valve stems.
They help prevent leaks by keeping out
dirt and moisture. o Check the pressure of your spare
tire each time you check the pres-
sure of other tires.
o Worn, old tires can cause acci-
dents. If your tread is badly worn,
or if your tires have been dam-
aged, replace them.
I035A01JM-AATCHECKING TIRE INFLATION PRES-
SURE
Check your tires once a month or more.
Also, check the tire pressure of the
spare tire.
How to Check
Use a good quality gauge to check tire
pressure. You cannot tell if your tires
are properly inflated simply by looking
at them. Radial tires may look properly
inflated even when they're underinflated.
Federal law requires tire manufacturers
to place standardized information on
the sidewall of all tires. This information
identifies and describes the fundamen-
tal characteristics of the tire and also
provides the tire identification number
(TIN) for safety standard certification.
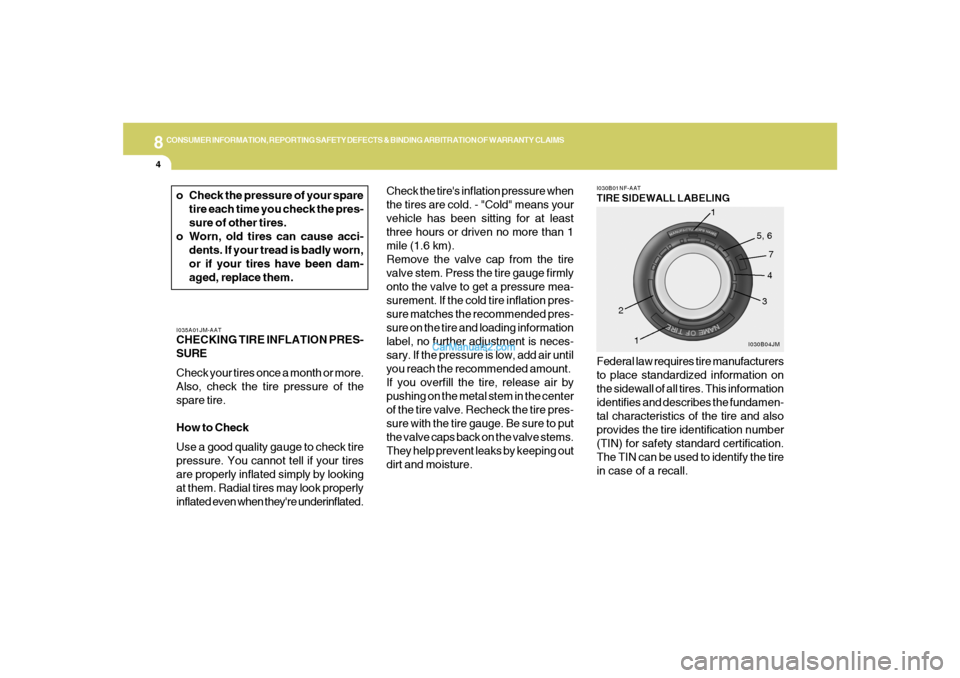
The TIN can be used to identify the tire
in case of a recall.I030B01NF-AATTIRE SIDEWALL LABELING
I030B04JM
1
234 5, 6
7
1
Page 253 of 271
8
CONSUMER INFORMATION, REPORTING SAFETY DEFECTS & BINDING ARBITRATION OF WARRANTY CLAIMS
9
I070A01A-AATTIRE BALANCING
A tire that is out of balance may affect
handling and tire wear. The tires on your
Hyundai were balanced before the car
was delivered but may need balancing
again during the years you own the car.
Whenever a tire is dismounted for re-
pair, it should be rebalanced before
being reinstalled on the car.
!
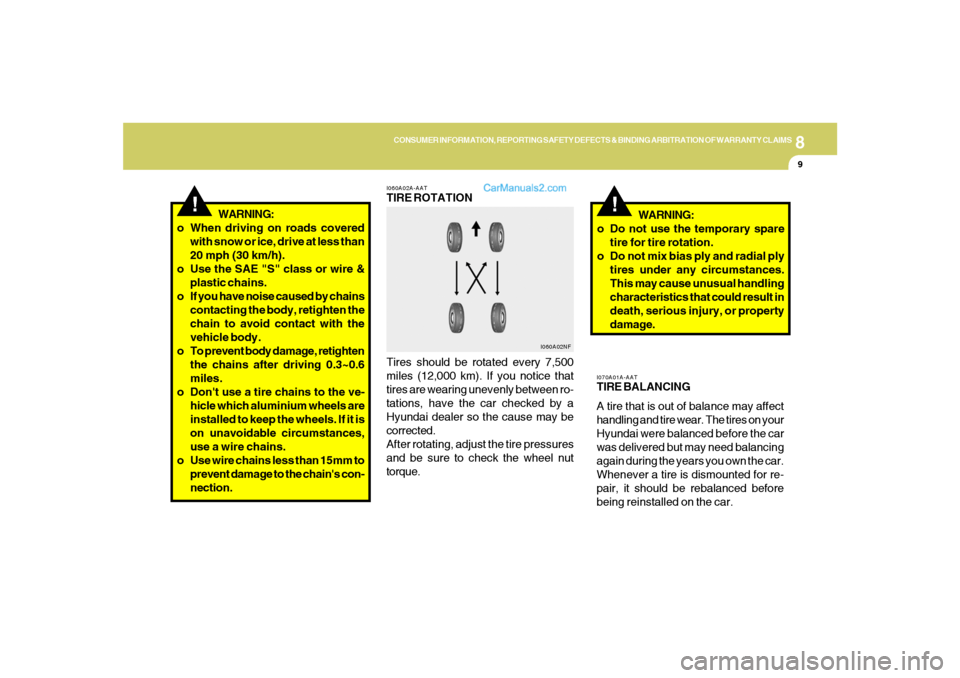
I060A02A-AATTIRE ROTATION
Tires should be rotated every 7,500
miles (12,000 km). If you notice that
tires are wearing unevenly between ro-
tations, have the car checked by a
Hyundai dealer so the cause may be
corrected.
After rotating, adjust the tire pressures
and be sure to check the wheel nut
torque.WARNING:
o Do not use the temporary spare
tire for tire rotation.
o Do not mix bias ply and radial ply
tires under any circumstances.
This may cause unusual handling
characteristics that could result in
death, serious injury, or property
damage.
I060A02NF
!
WARNING:
o When driving on roads covered
with snow or ice, drive at less than
20 mph (30 km/h).
o Use the SAE "S" class or wire &
plastic chains.
o If you have noise caused by chains
contacting the body, retighten the
chain to avoid contact with the
vehicle body.
o To prevent body damage, retighten
the chains after driving 0.3~0.6
miles.
o Don't use a tire chains to the ve-
hicle which aluminium wheels are
installed to keep the wheels. If it is
on unavoidable circumstances,
use a wire chains.
o Use wire chains less than 15mm to
prevent damage to the chain's con-
nection.