clock Hyundai Sonata 2014 Owner's Guide
[x] Cancel search | Manufacturer: HYUNDAI, Model Year: 2014, Model line: Sonata, Model: Hyundai Sonata 2014Pages: 665, PDF Size: 17.43 MB
Page 622 of 665
7-65
7
Maintenance
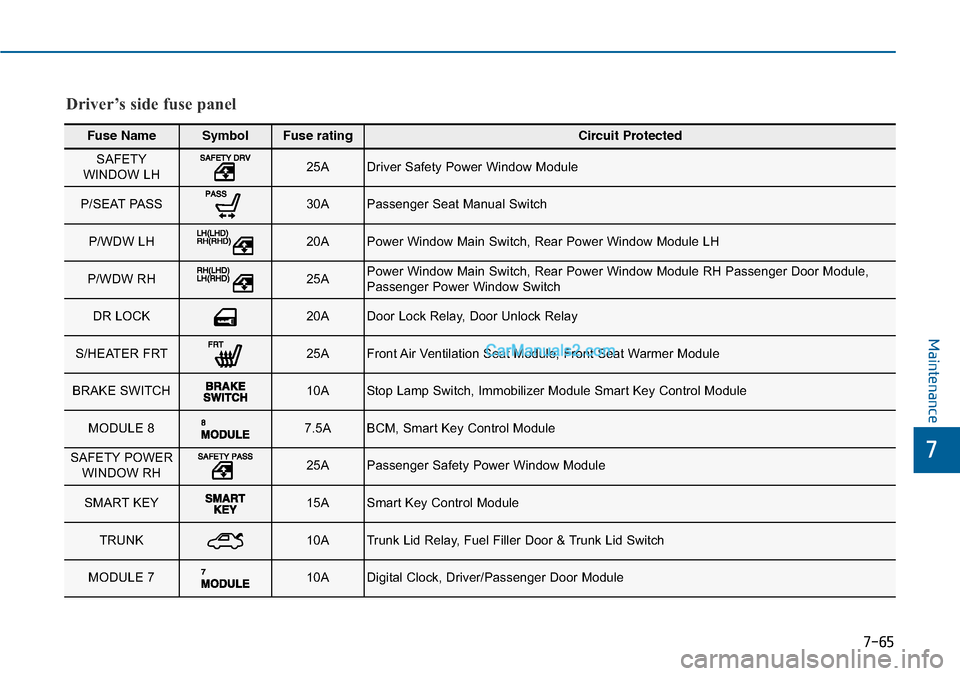
Fuse NameSymbolFuse ratingCircuit Protected
SAFETYWINDOW LH 25ADriver Safety Power Window Module
P/SEAT PASS 30APassenger Seat Manual Switch
P/WDW LH 20APower Window Main Switch, Rear Power Window Module LH
P/WDW RH 25APower Window Main Switch, Rear Power Window Module RH Passenger Door Module,Passenger Power Window Switch
DR LOCK 20ADoor Lock Relay, Door Unlock Relay
S/HEATER FRT25AFront Air Ventilation Seat Module, Front Seat Warmer Module
BRAKE SWITCH 10AStop Lamp Switch, Immobilizer Module Smart Key Control Module
MODULE 8 7.5ABCM, Smart Key Control Module
SAFETY POWERWINDOW RH 25APassenger Safety Power Window Module
SMART KEY15ASmart Key Control Module
TRUNK 10ATrunk Lid Relay, Fuel Filler Door & Trunk Lid Switch
MODULE 7 10ADigital Clock, Driver/Passenger Door Module
Driver’s side fuse panel
Page 623 of 665
7-66
Maintenance
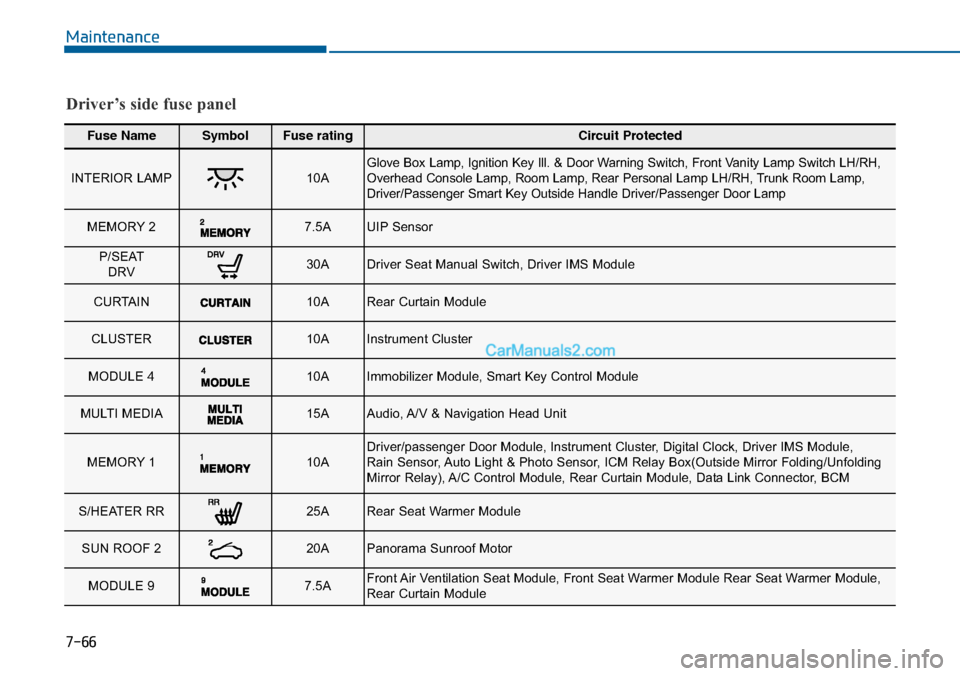
Fuse NameSymbolFuse ratingCircuit Protected
INTERIOR LAMP10AGlove Box Lamp, Ignition Key Ill. & Door Warning Switch, Front Vanity Lamp Switch LH/RH,Overhead Console Lamp, Room Lamp, Rear Personal Lamp LH/RH, Trunk Room Lamp,Driver/Passenger Smart Key Outside Handle Driver/Passenger Door Lamp
MEMORY 2 7.5AUIP Sensor
P/SEATDRV 30ADriver Seat Manual Switch, Driver IMS Module
CURTAIN 10ARear Curtain Module
CLUSTER 10AInstrument Cluster
MODULE 4 10AImmobilizer Module, Smart Key Control Module
MULTI MEDIA15AAudio, A/V & Navigation Head Unit
MEMORY 1 10ADriver/passenger Door Module, Instrument Cluster, Digital Clock, Driver IMS Module,Rain Sensor, Auto Light & Photo Sensor, ICM Relay Box(Outside Mirror Folding/UnfoldingMirror Relay), A/C Control Module, Rear Curtain Module, Data Link Connector, BCM
S/HEATER RR 25ARear Seat Warmer Module
SUN ROOF 2 20APanorama Sunroof Motor
MODULE 9 7.5AFront Air Ventilation Seat Module, Front Seat Warmer Module Rear Seat Warmer Module,Rear Curtain Module
Driver’s side fuse panel
Page 624 of 665
7
Maintenance
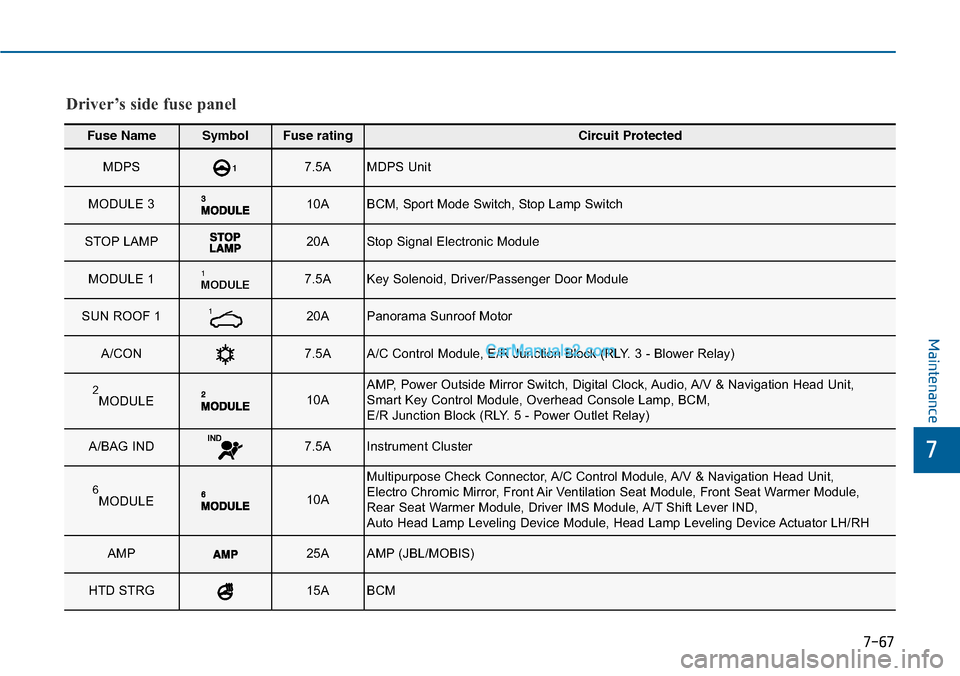
Fuse NameSymbolFuse ratingCircuit Protected
MDPS 17.5AMDPS Unit
MODULE 3 10ABCM, Sport Mode Switch, Stop Lamp Switch
STOP LAMP20AStop Signal Electronic Module
MODULE 1 MODULE17.5AKey Solenoid, Driver/Passenger Door Module
SUN ROOF 1 120APanorama Sunroof Motor
A/CON 7.5AA/C Control Module, E/R Junction Block (RLY. 3 - Blower Relay)
2MODULE 10AAMP, Power Outside Mirror Switch, Digital Clock, Audio, A/V & Navigation Head Unit, Smart Key Control Module, Overhead Console Lamp, BCM, E/R Junction Block (RLY. 5 - Power Outlet Relay)
A/BAG IND 7.5AInstrument Cluster
6MODULE 10A
Multipurpose Check Connector, A/C Control Module, A/V & Navigation Head Unit, Electro Chromic Mirror, Front Air Ventilation Seat Module, Front Seat Warmer Module, Rear Seat Warmer Module, Driver IMS Module, A/T Shift Lever IND, Auto Head Lamp Leveling Device Module, Head Lamp Leveling Device Actuator LH/RH
AMP25AAMP (JBL/MOBIS)
HTD STRG 15ABCM
Driver’s side fuse panel
7-67
Page 631 of 665
7-74
Maintenance
•Always handle them carefully, and
avoid scratches and abrasions. If
the bulbs are lit, avoid contact with
liquids.
•Never touch the glass with bare
hands. Residual oil may cause the
bulb to overheat and burst when lit.
•A bulb should be operated only
when installed in a headlamp.
•If a bulb becomes damaged or
cracked, replace it immediately
and carefully dispose of it.
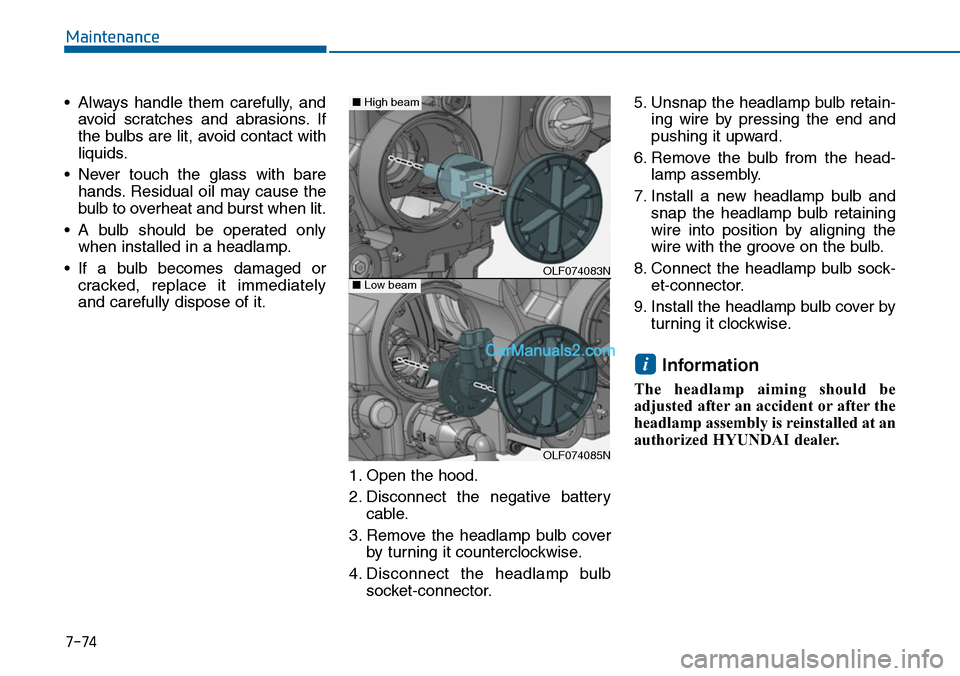
1. Open the hood.
2. Disconnect the negative battery
cable.
3. Remove the headlamp bulb cover
by turning it counterclockwise.
4. Disconnect the headlamp bulb
socket-connector.
5. Unsnap the headlamp bulb retain-
ing wire by pressing the end and
pushing it upward.
6. Remove the bulb from the head-
lamp assembly.
7. Install a new headlamp bulb and
snap the headlamp bulb retaining
wire into position by aligning the
wire with the groove on the bulb.
8. Connect the headlamp bulb sock-
et-connector.
9. Install the headlamp bulb cover by
turning it clockwise.
Information
The headlamp aiming should be
adjusted after an accident or after the
headlamp assembly is reinstalled at an
authorized HYUNDAI dealer.
i
OLF074083N
OLF074085N
■Low beam
■High beam
Page 632 of 665
7-75
7
Maintenance
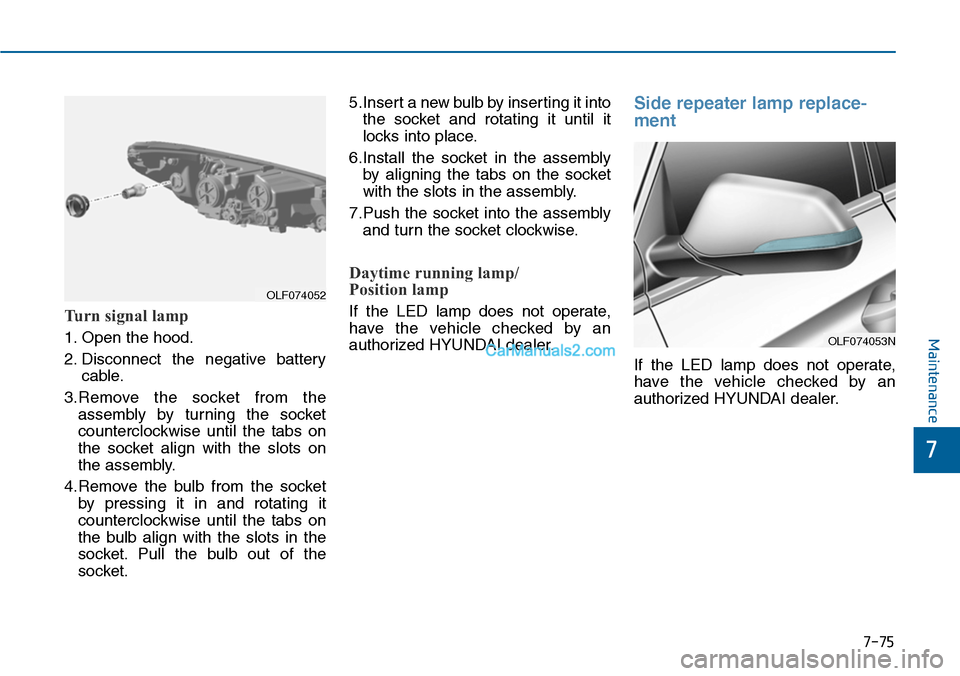
Turn signal lamp
1. Open the hood.
2. Disconnect the negative battery
cable.
3.Remove the socket from the
assembly by turning the socket
counterclockwise until the tabs on
the socket align with the slots on
the assembly.
4.Remove the bulb from the socket
by pressing it in and rotating it
counterclockwise until the tabs on
the bulb align with the slots in the
socket. Pull the bulb out of the
socket.
5.Insert a new bulb by inserting it into
the socket and rotating it until it
locks into place.
6.Install the socket in the assembly
by aligning the tabs on the socket
with the slots in the assembly.
7.Push the socket into the assembly
and turn the socket clockwise.
Daytime running lamp/
Position lamp
If the LED lamp does not operate,
have the vehicle checked by an
authorized HYUNDAI dealer.
Side repeater lamp replace-
ment
If the LED lamp does not operate,
have the vehicle checked by an
authorized HYUNDAI dealer.
OLF074052
OLF074053N
Page 633 of 665
Headlamp and front fog lamp
aiming (For Europe)
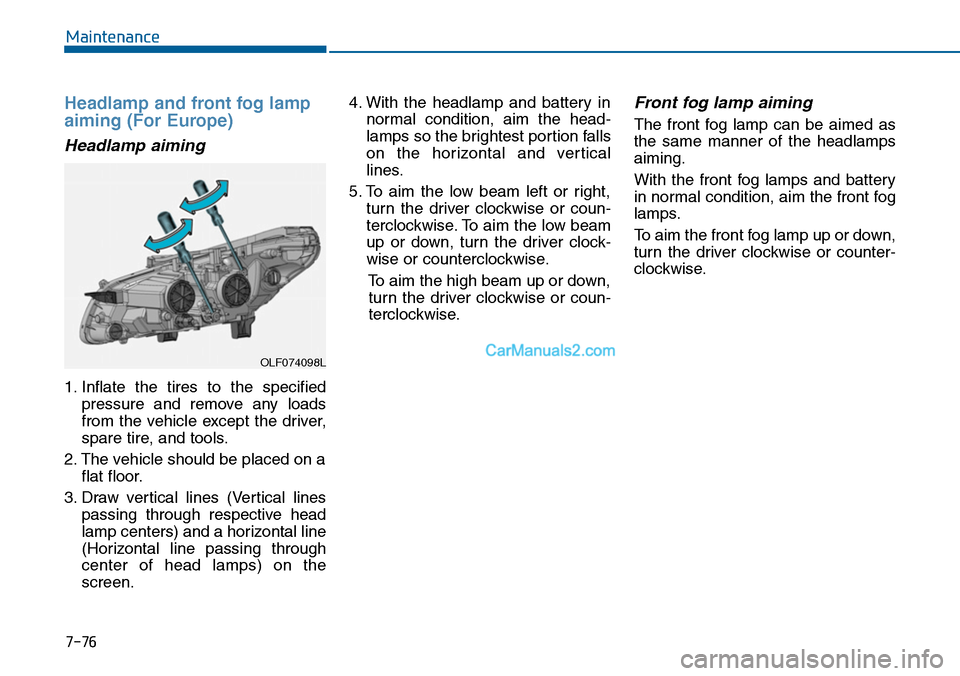
Headlamp aiming
1. Inflate the tires to the specified
pressure and remove any loads
from the vehicle except the driver,
spare tire, and tools.
2. The vehicle should be placed on a
flat floor.
3. Draw vertical lines (Vertical lines
passing through respective head
lamp centers) and a horizontal line
(Horizontal line passing through
center of head lamps) on the
screen.
4. With the headlamp and battery in
normal condition, aim the head-
lamps so the brightest portion falls
on the horizontal and vertical
lines.
5. To aim the low beam left or right,
turn the driver clockwise or coun-
terclockwise. To aim the low beam
up or down, turn the driver clock-
wise or counterclockwise.
To aim the high beam up or down,
turn the driver clockwise or coun-
terclockwise.
Front fog lamp aiming
The front fog lamp can be aimed as
the same manner of the headlamps
aiming.
With the front fog lamps and battery
in normal condition, aim the front fog
lamps.
To aim the front fog lamp up or down,
turn the driver clockwise or counter-
clockwise.
7-76
Maintenance
OLF074098L
Page 638 of 665
7-81
7
Maintenance
Rear combination light bulb
replacement
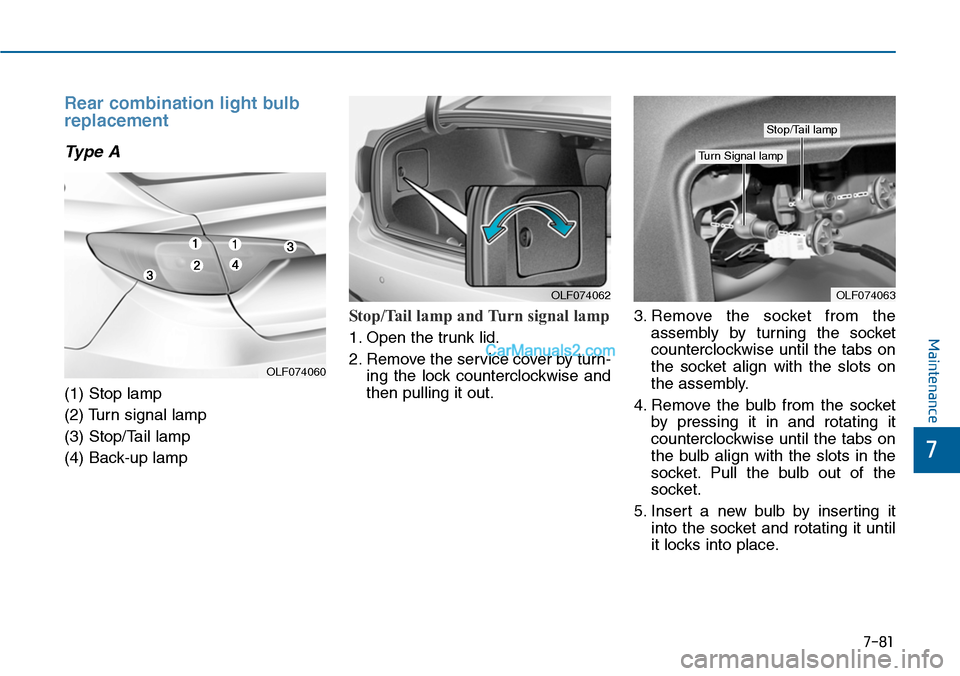
Type A
(1) Stop lamp
(2) Turn signal lamp
(3) Stop/Tail lamp
(4) Back-up lamp
Stop/Tail lamp and Turn signal lamp
1. Open the trunk lid.
2. Remove the service cover by turn-
ing the lock counterclockwise and
then pulling it out.
3. Remove the socket from the
assembly by turning the socket
counterclockwise until the tabs on
the socket align with the slots on
the assembly.
4. Remove the bulb from the socket
by pressing it in and rotating it
counterclockwise until the tabs on
the bulb align with the slots in the
socket. Pull the bulb out of the
socket.
5. Insert a new bulb by inserting it
into the socket and rotating it until
it locks into place.
OLF074063OLF074062
Stop/Tail lamp
Turn Signal lamp
OLF074060
Page 639 of 665
7-82
Maintenance
6. Install the socket in the assembly
by aligning the tabs on the socket
with the slots in the assembly.
Push the socket into the assembly
and turn the socket clockwise.
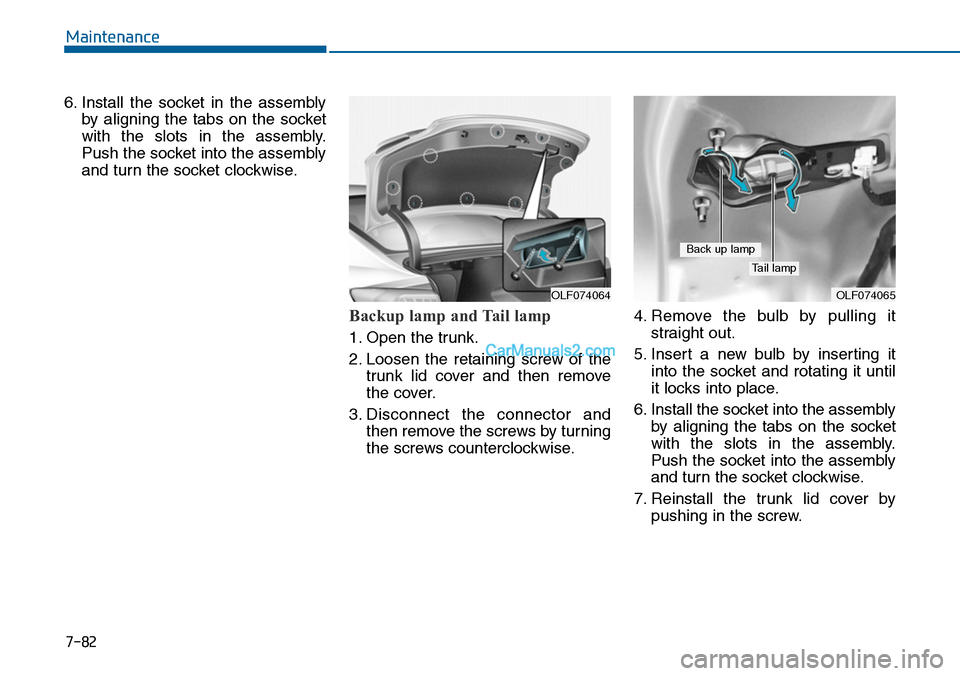
Backup lamp and Tail lamp
1. Open the trunk.
2. Loosen the retaining screw of the
trunk lid cover and then remove
the cover.
3. Disconnect the connector and
then remove the screws by turning
the screws counterclockwise.
4. Remove the bulb by pulling it
straight out.
5. Insert a new bulb by inserting it
into the socket and rotating it until
it locks into place.
6. Install the socket into the assembly
by aligning the tabs on the socket
with the slots in the assembly.
Push the socket into the assembly
and turn the socket clockwise.
7. Reinstall the trunk lid cover by
pushing in the screw.
OLF074065OLF074064
Back up lamp
Tail lamp
Page 640 of 665
7-83
7
Maintenance
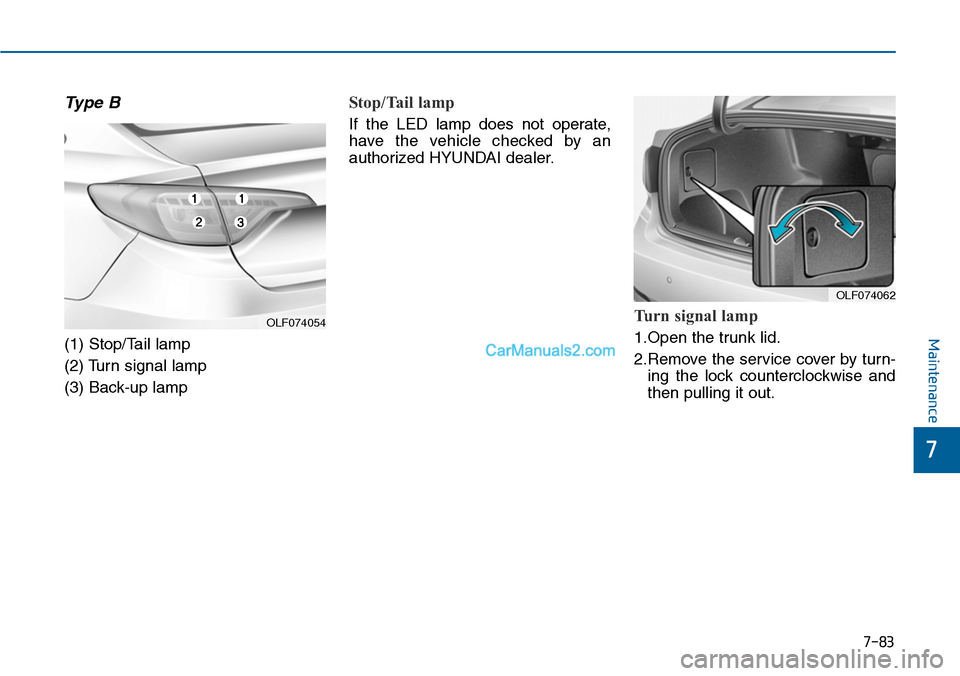
Type B
(1) Stop/Tail lamp
(2) Turn signal lamp
(3) Back-up lamp
Stop/Tail lamp
If the LED lamp does not operate,
have the vehicle checked by an
authorized HYUNDAI dealer.
Turn signal lamp
1.Open the trunk lid.
2.Remove the service cover by turn-
ing the lock counterclockwise and
then pulling it out.
OLF074054
OLF074062
Page 641 of 665
7-84
Maintenance
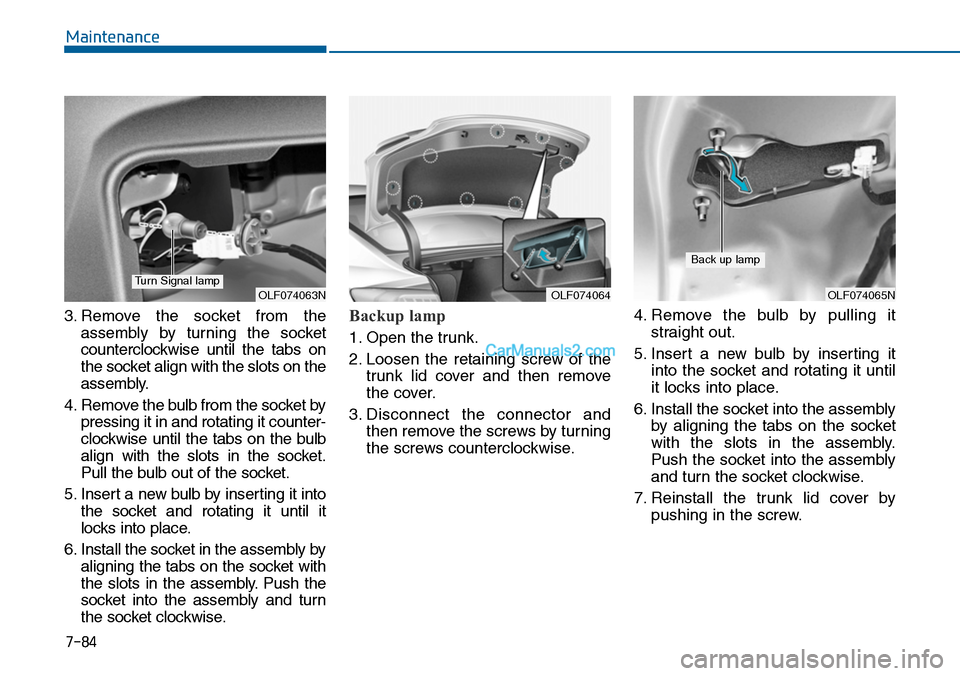
3. Remove the socket from the
assembly by turning the socket
counterclockwise until the tabs on
the socket align with the slots on the
assembly.
4. Remove the bulb from the socket by
pressing it in and rotating it counter-
clockwise until the tabs on the bulb
align with the slots in the socket.
Pull the bulb out of the socket.
5. Insert a new bulb by inserting it into
the socket and rotating it until it
locks into place.
6. Install the socket in the assembly by
aligning the tabs on the socket with
the slots in the assembly. Push the
socket into the assembly and turn
the socket clockwise.
Backup lamp
1. Open the trunk.
2. Loosen the retaining screw of the
trunk lid cover and then remove
the cover.
3. Disconnect the connector and
then remove the screws by turning
the screws counterclockwise.
4. Remove the bulb by pulling it
straight out.
5. Insert a new bulb by inserting it
into the socket and rotating it until
it locks into place.
6. Install the socket into the assembly
by aligning the tabs on the socket
with the slots in the assembly.
Push the socket into the assembly
and turn the socket clockwise.
7. Reinstall the trunk lid cover by
pushing in the screw.
OLF074064OLF074063NOLF074065N
Back up lamp
Turn Signal lamp