Locked out Hyundai Sonata 2020 Owner's Manual
[x] Cancel search | Manufacturer: HYUNDAI, Model Year: 2020, Model line: Sonata, Model: Hyundai Sonata 2020Pages: 537, PDF Size: 14.54 MB
Page 33 of 537
03
3-5
Front Seats
WARNING
Take the following precautions when
adjusting your seat:
• NEVER attempt to adjust the seat
while the vehicle is moving. The seat
could respond with unexpected
movement and may cause loss
of vehicle control resulting in an
accident.
• Do not place anything under the
front seats. Loose objects in the
driver’s foot area could interfere
with the operation of the foot pedals,
causing an accident.
• Do not allow anything to interfere
with the normal position and proper
locking of the seatback.
• Do not place a cigarette lighter on
the floor or seat. When you operate
the seat, gas may exit out of the
lighter causing a fire.
• Use extreme caution when picking
up small objects trapped under the
seats or between the seat and the
center console. Your hands might be
cut or injured by the sharp edges of
the seat mechanism.
• If there are occupants in the rear
seats, be careful while adjusting the
front seat position.
• Make sure that the seat is locked in
place after the adjustment. If not,
the seat might move unexpectedly
resulting in an accident.
CAUTION
To prevent injury:
• Do not adjust your seat while
wearing your seat belt. Moving the
seat cushion forward may cause
strong pressure on your abdomen.
• Do not allow your hands or fingers to
get caught in the seat mechanisms
while the seat is moving.
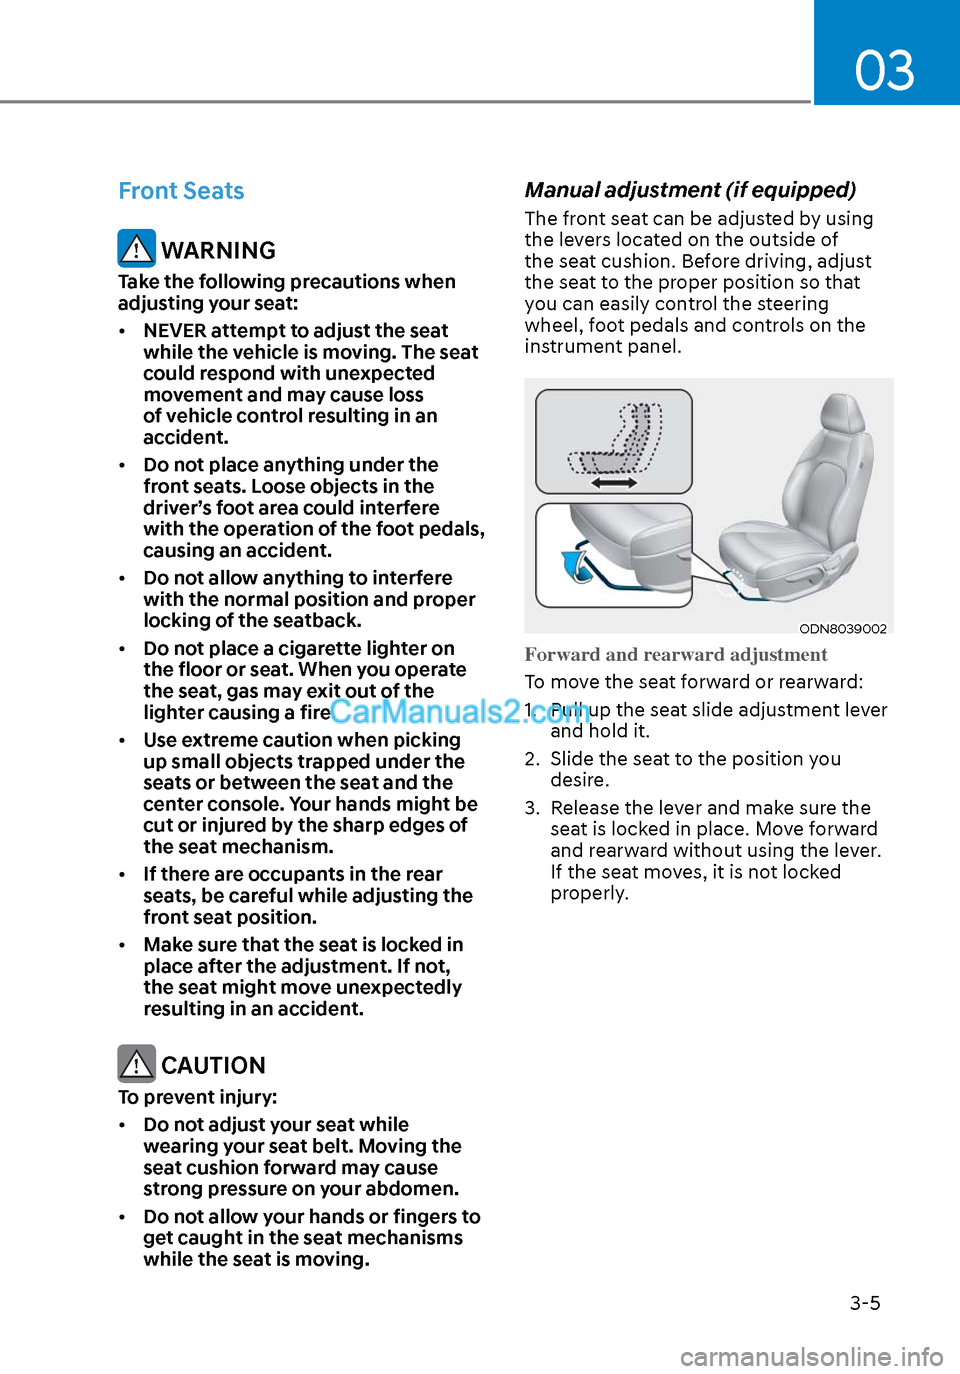
Manual adjustment (if equipped)
The front seat can be adjusted by using
the levers located on the outside of
the seat cushion. Before driving, adjust
the seat to the proper position so that
you can easily control the steering
wheel, foot pedals and controls on the
instrument panel.
ODN8039002ODN8039002
Forward and rearward adjustment
To move the seat forward or rearward:
1.
Pull up the seat slide adjustment lever
and hold it.
2. Slide the seat to the position you desire.
3. Release the lever and make sure the seat is locked in place. Move forward
and rearward without using the lever.
If the seat moves, it is not locked
properly.
Page 49 of 537
03
3-21
Seat Belt Restraint System
WARNING
Improperly positioned seat belts may
increase the risk of serious injury
in an accident. Take the following
precautions when adjusting the seat
belt:
• Position the lap portion of the seat
belt as low as possible across your
hips, not on your waist, so that it fits
snugly.
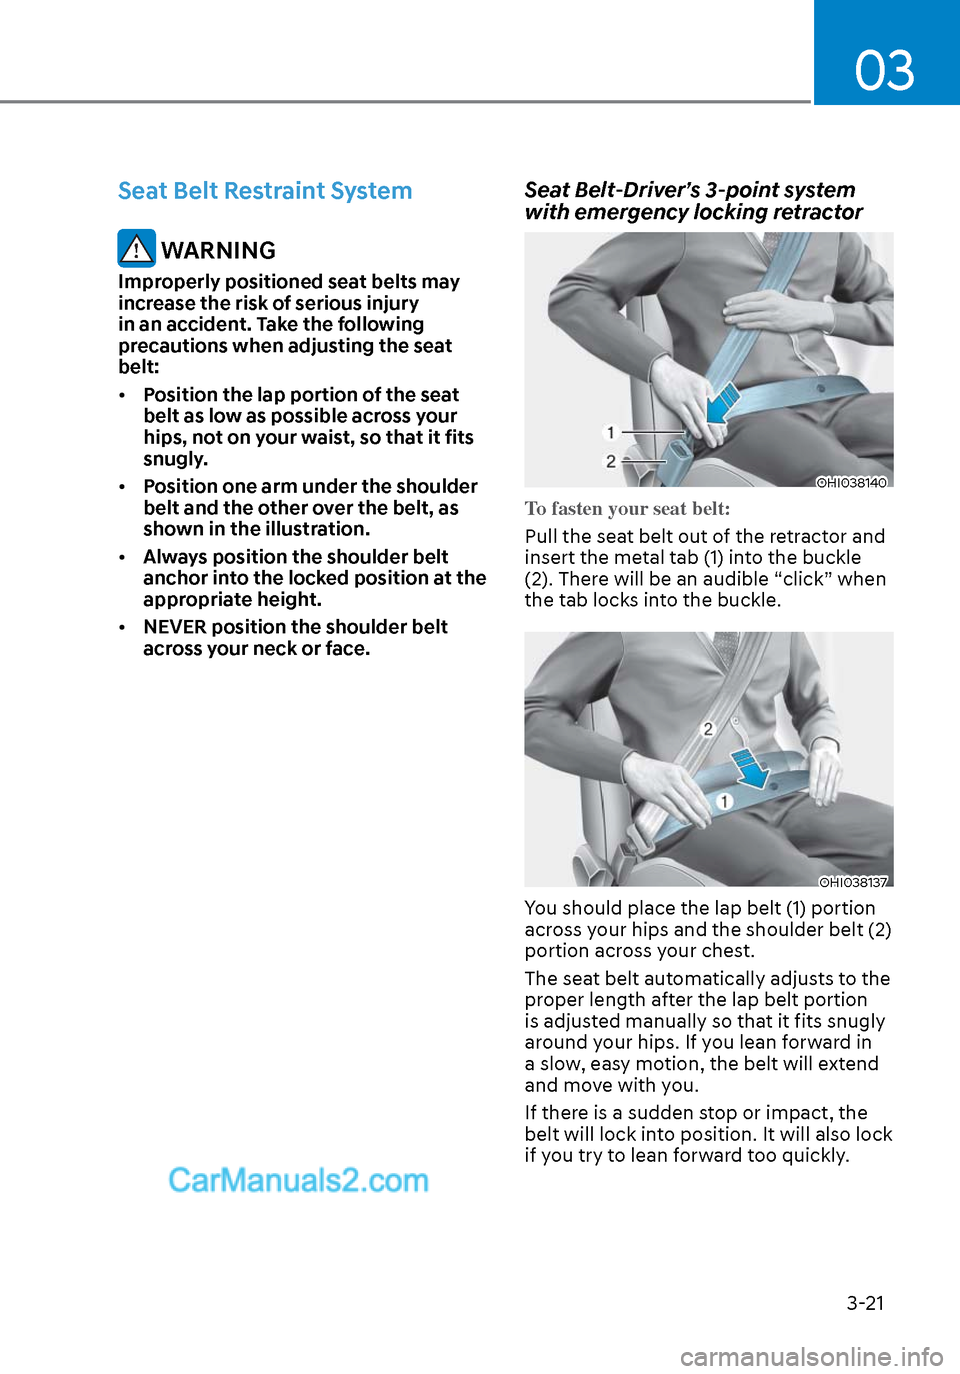
• Position one arm under the shoulder
belt and the other over the belt, as
shown in the illustration.
• Always position the shoulder belt
anchor into the locked position at the
appropriate height.
• NEVER position the shoulder belt
across your neck or face.
Seat Belt-Driver’s 3-point system
with emergency locking retractor
OHI038140OHI038140
To fasten your seat belt:
Pull the seat belt out of the retractor and
insert the me
tal tab (1) into the buckle
(2). There will be an audible “click” when
the tab locks into the buckle.
OHI038137OHI038137
You should place the lap belt (1) portion
across your hips and the shoulder belt (2)
portion across your chest.
The seat belt automatically adjusts to the
proper length after the lap belt portion
is adjusted manually so that it fits snugly
around your hips. If you lean forward in
a slow, easy motion, the belt will extend
and move with you.
If there is a sudden stop or impact, the
belt will lock into position. It will also lock
if you try to lean forward too quickly.
Page 50 of 537
Seats & Safety System3-22
NOTICE
If you are not able to smoothly pull
enough of the seat belt out from the
retractor, firmly pull the seat belt out
and release it. After release, you will be
able to pull the belt out smoothly.
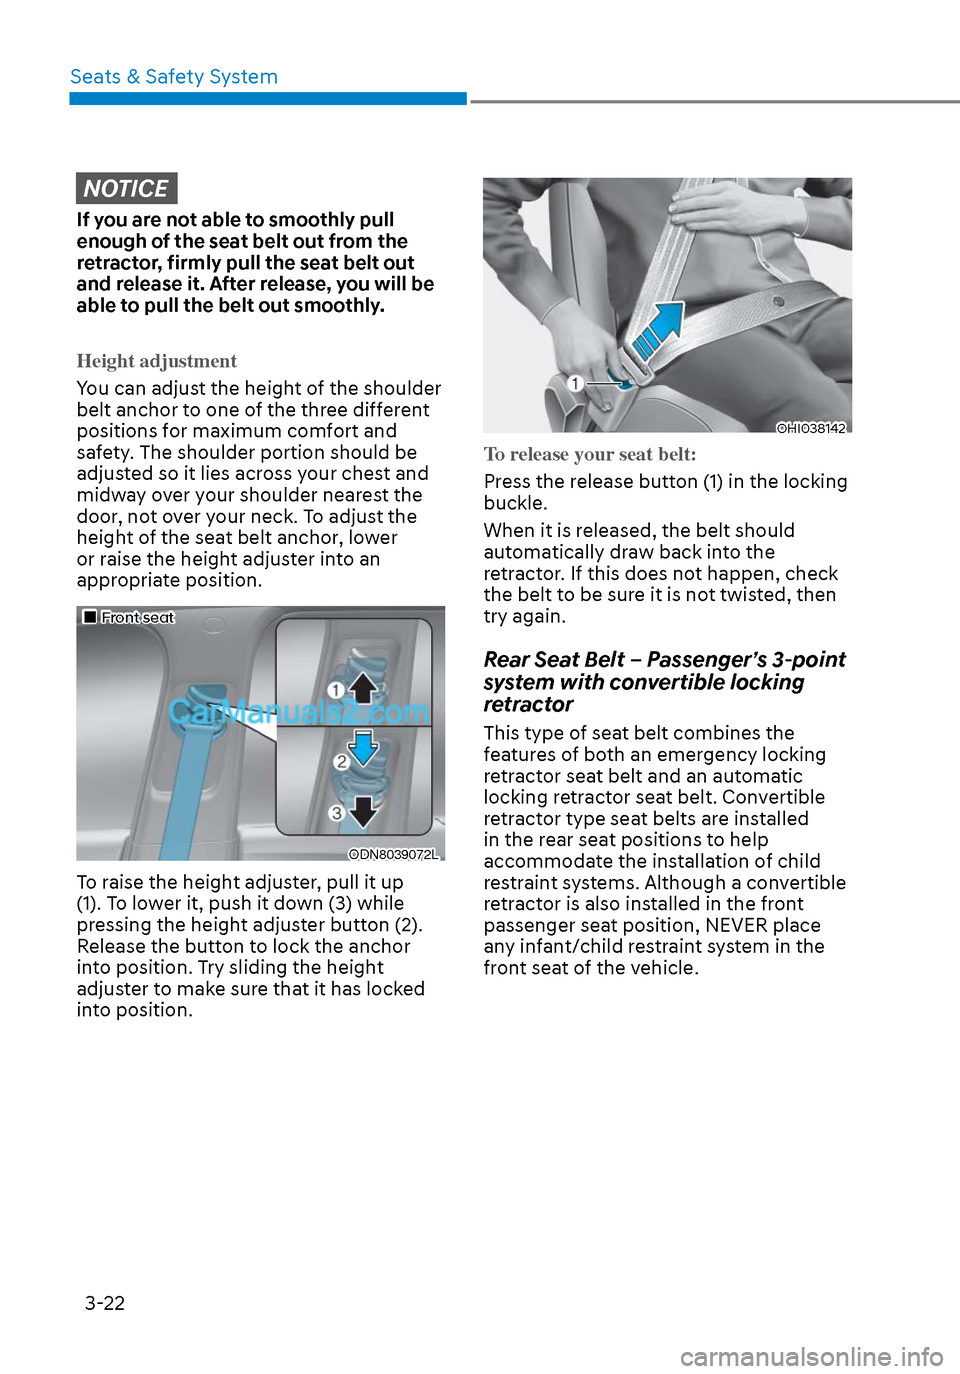
Height adjustment
You can adjust the height of the shoulder
belt anchor t
o one of the three different
positions for maximum comfort and
safety. The shoulder portion should be
adjusted so it lies across your chest and
midway over your shoulder nearest the
door, not over your neck. To adjust the
height of the seat belt anchor, lower
or raise the height adjuster into an
appropriate position.
Front seatFront seat
ODN8039072LODN8039072L
To raise the height adjuster, pull it up
(1). To lower it, push it down (3) while
pressing the height adjuster button (2).
Release the button to lock the anchor
into position. Try sliding the height
adjuster to make sure that it has locked
into position.
OHI038142OHI038142
To release your seat belt:
Press the release button (1) in the locking
buckle.
When it is r
eleased, the belt should
automatically draw back into the
retractor. If this does not happen, check
the belt to be sure it is not twisted, then
try again.
Rear Seat Belt – Passenger’s 3-point
system with convertible locking
retractor
This type of seat belt combines the
features of both an emergency locking
retractor seat belt and an automatic
locking retractor seat belt. Convertible
retractor type seat belts are installed
in the rear seat positions to help
accommodate the installation of child
restraint systems. Although a convertible
retractor is also installed in the front
passenger seat position, NEVER place
any infant/child restraint system in the
front seat of the vehicle.
Page 51 of 537
03
3-23
To fasten your seat belt:
Pull the seat belt out of the retractor
and insert the me
tal tab into the buckle.
There will be an audible “click” when
the tab locks into the buckle. When
not securing a child restraint, the seat
belt operates in the same way as the
driver’s seat belt (Emergency Locking
Retractor Type). It automatically adjusts
to the proper length only after the lap
belt portion of the seat belt is adjusted
manually so that it fits snugly across your
hips.
When the seat belt is fully extended from
the retractor to allow the installation of
a child restraint system, the seat belt
operation changes to allow the belt to
retract, but not to extend (Automatic
Locking Retractor Type). Refer to the
“Using a Child Restraint System” section
in this chapter.
NOTICE
Although the seat belt retractor
provides the same level of protection
for seated passengers in either
emergency or automatic locking
modes, the emergency locking mode
allows seated passengers to move
freely in their seat while keeping
some tension on the belt. During a
collision or sudden stop, the retractor
automatically locks the belt to help
restrain your body.
To deactivate the automatic locking
mode, unbuckle the seat belt and allow
the belt to fully retract.
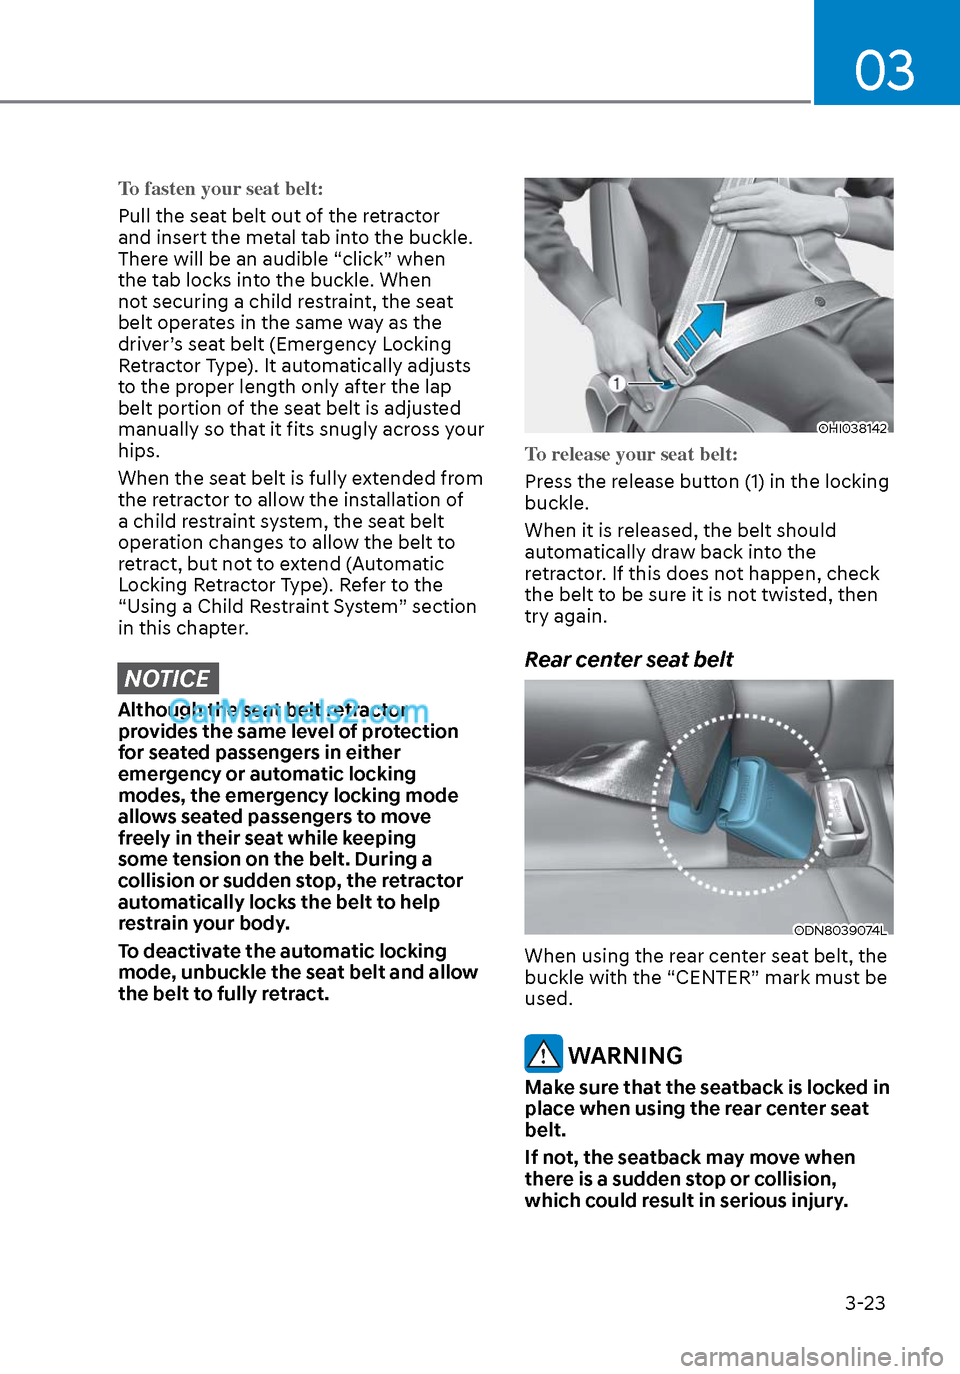
OHI038142OHI038142
To release your seat belt:
Press the release button (1) in the locking
buckle.
When it is r
eleased, the belt should
automatically draw back into the
retractor. If this does not happen, check
the belt to be sure it is not twisted, then
try again.
Rear center seat belt
ODN8039074LODN8039074L
When using the rear center seat belt, the
buckle with the “CENTER” mark must be
used.
WARNING
Make sure that the seatback is locked in
place when using the rear center seat
belt.
If not, the seatback may move when
there is a sudden stop or collision,
which could result in serious injury.
Page 97 of 537
Instrument Cluster4-12
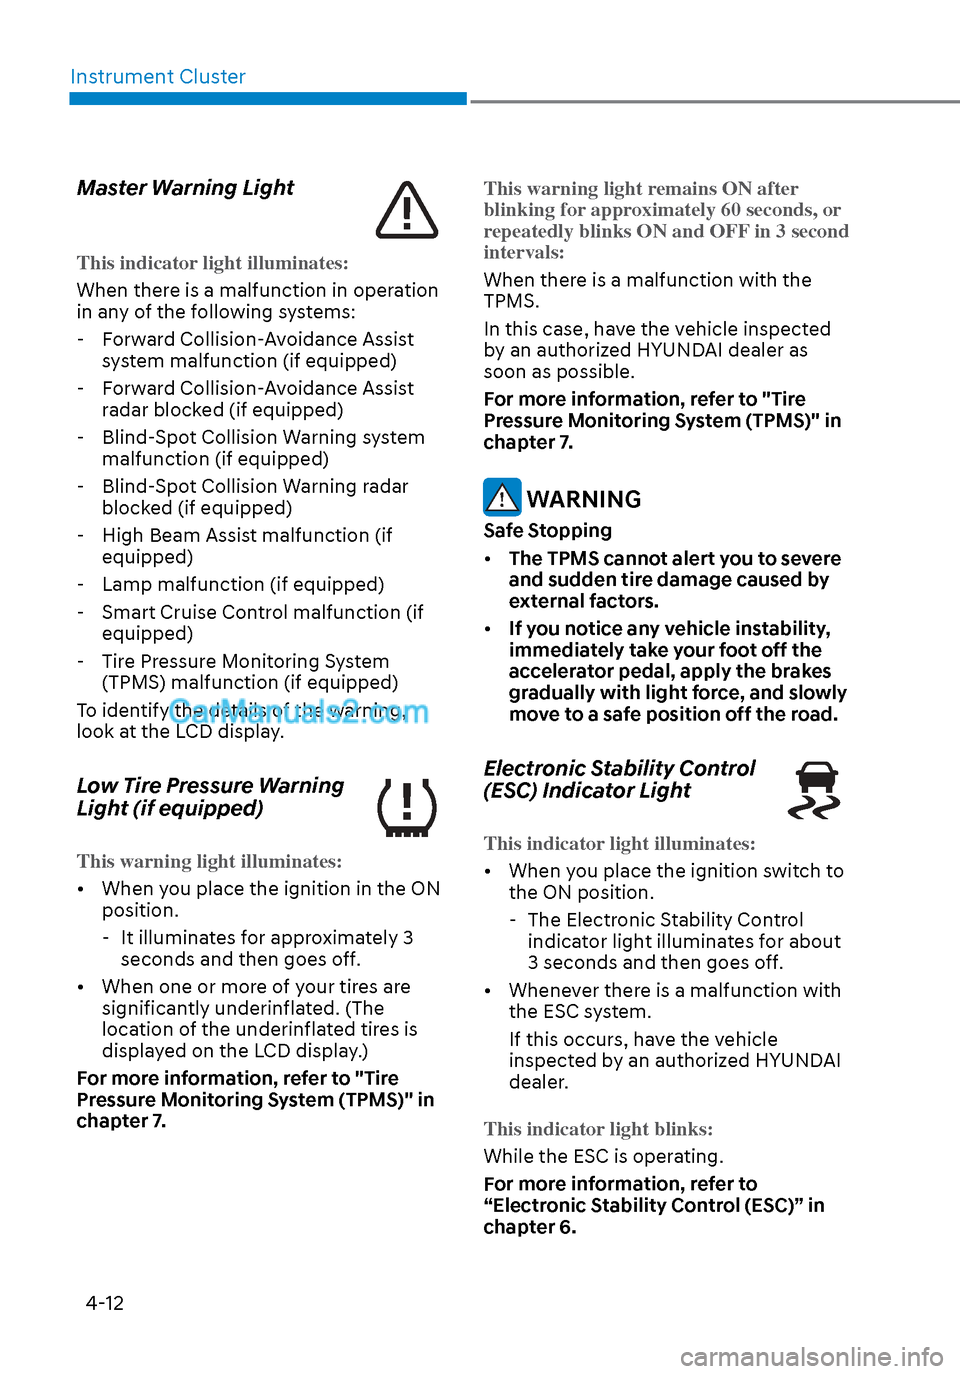
Master Warning Light
This indicator light illuminates:
When there is a malfunction in operation
in an
y of the following systems:
- Forward Collision-Avoidance Assist system malfunction (if equipped)
- Forward Collision-Avoidance Assist radar blocked (if equipped)
- Blind-Spot Collision Warning system malfunction (if equipped)
- Blind-Spot Collision Warning radar blocked (if equipped)
- High Beam Assist malfunction (if equipped)
- Lamp malfunction (if equipped)
- Smart Cruise Control malfunction (if equipped)
- Tire Pressure Monitoring System (TPMS) malfunction (if equipped)
To identify the details of the warning,
look at the LCD display.
Low Tire Pressure Warning
Light (if equipped)
This warning light illuminates:
• When you place the ignition in the ON position.
-
It illuminates for approximately 3
seconds and then goes off.
• When one or more of your tires are significantly underinflated. (The
location of the underinflated tires is
displayed on the LCD display.)
For more information, refer to "Tire
Pressure Monitoring System (TPMS)" in
chapter 7. This warning light remains ON after
blinking for
approximately 60 seconds, or
repeatedly blinks ON and OFF in 3 second
intervals:
When there is a malfunction with the
TPMS.
In this case, ha
ve the vehicle inspected
by an authorized HYUNDAI dealer as
soon as possible.
For more information, refer to "Tire
Pressure Monitoring System (TPMS)" in
chapter 7.
WARNING
Safe Stopping
• The TPMS cannot alert you to severe
and sudden tire damage caused by
external factors.
• If you notice any vehicle instability,
immediately take your foot off the
accelerator pedal, apply the brakes
gradually with light force, and slowly
move to a safe position off the road.
Electronic Stability Control
(ESC) Indicator Light
This indicator light illuminates:
• When you place the ignition switch to
the ON position.
-
The Electronic Stability Control
indicator light illuminates for about
3 seconds and then goes off.
• Whenever there is a malfunction with the ESC system.
If this occurs, have the vehicle
inspected by an authorized HYUNDAI
dealer.
This indicator light blinks:
While the ESC is operating.
F
or more information, refer to
“Electronic Stability Control (ESC)” in
chapter 6.
Page 112 of 537
04
4-27
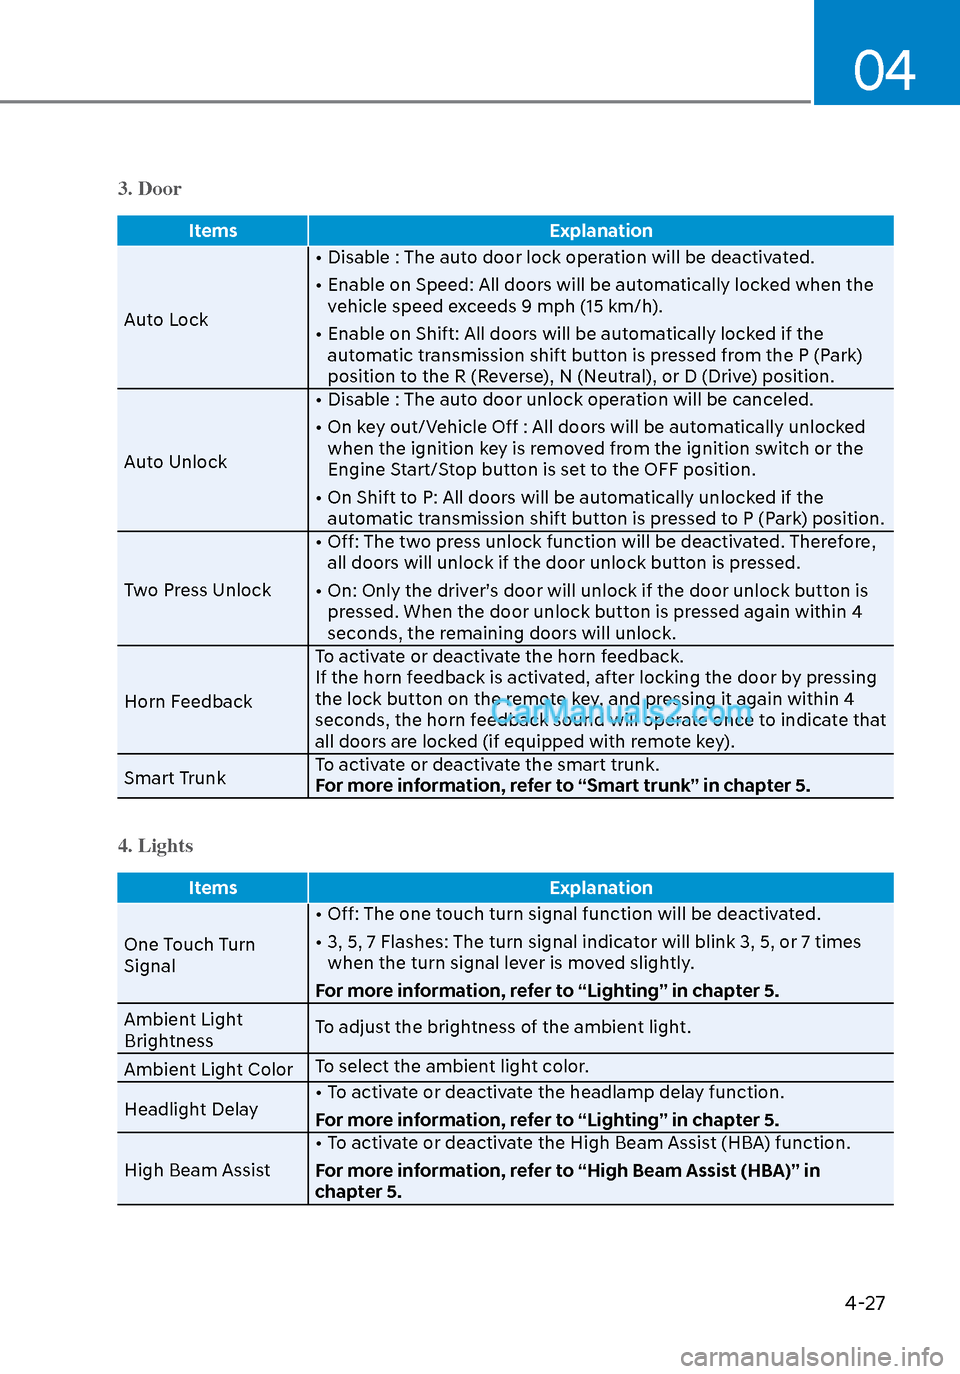
3. Door
ItemsExplanation
Auto Lock •
Disable : The auto door lock operation will be deactivated.
• Enable on Speed: All doors will be automatically locked when the vehicle speed exceeds 9 mph (15 km/h).
• Enable on Shift: All doors will be automatically locked if the automatic transmission shift button is pressed from the P (Park)
position to the R (Reverse), N (Neutral), or D (Drive) position.
Auto Unlock • Disable : The auto door unlock operation will be canceled.
• On key out/Vehicle Off : All doors will be automatically unlocked
when the ignition key is removed from the ignition switch or the
Engine Start/Stop button is set to the OFF position.
• On Shift to P: All doors will be automatically unlocked if the automatic transmission shift button is pressed to P (Park) position.
Two Press Unlock • Off: The two press unlock function will be deactivated. Therefore,
all doors will unlock if the door unlock button is pressed.
• On: Only the driver’s door will unlock if the door unlock button is pressed. When the door unlock button is pressed again within 4
seconds, the remaining doors will unlock.
Horn Feedback To activate or deactivate the horn feedback.
If the horn feedback is activated, after locking the door by pressing
the lock button on the remote key, and pressing it again within 4
seconds, the horn feedback sound will operate once to indicate that
all doors are locked (if equipped with remote key).
Smart Trunk To activate or deactivate the smart trunk.
For more information, refer to “Smart trunk” in chapter 5.
4. Lights
Items
Explanation
One Touch Turn
Signal •
Off: The one touch turn signal function will be deactivated.
• 3, 5, 7 Flashes: The turn signal indicator will blink 3, 5, or 7 times when the turn signal lever is moved slightly.
For more information, refer to “Lighting” in chapter 5.
Ambient Light
Brightness To adjust the brightness of the ambient light.
Ambient Light Color To select the ambient light color.
Headlight Delay • To activate or deactivate the headlamp delay function.
For more information, refer to “Lighting” in chapter 5.
High Beam Assist • To activate or deactivate the High Beam Assist (HBA) function.
For more information, refer to “High Beam Assist (HBA)” in
chapter 5.
Page 127 of 537
Instrument Cluster4-42
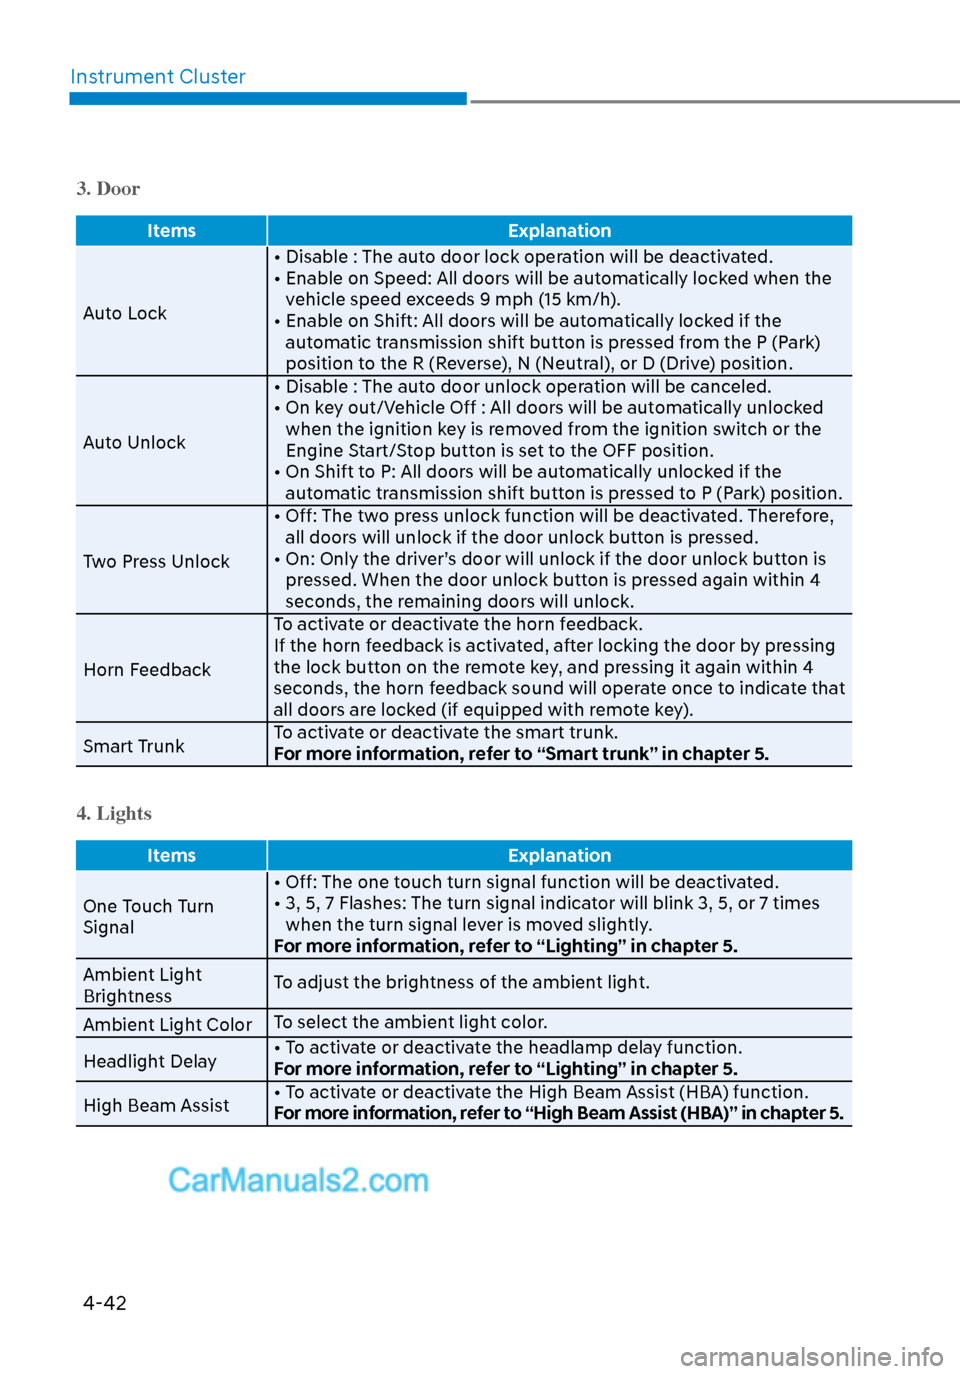
3. Door
Items Explanation
Auto Lock • Disable : The aut
o door lock operation will be deactivated.
• Enable on Speed: All doors will be automatically locked when the vehicle speed exceeds 9 mph (15 km/h).
• Enable on Shift: All doors will be automatically locked if the automatic transmission shift button is pressed from the P (Park)
position to the R (Reverse), N (Neutral), or D (Drive) position.
Auto Unlock • Disable : The auto door unlock operation will be canceled.
• On key out/Vehicle Off : All doors will be automatically unlocked
when the ignition key is removed from the ignition switch or the
Engine Start/Stop button is set to the OFF position.
• On Shift to P: All doors will be automatically unlocked if the automatic transmission shift button is pressed to P (Park) position.
Two Press Unlock • Off: The two press unlock function will be deactivated. Therefore,
all doors will unlock if the door unlock button is pressed.
• On: Only the driver’s door will unlock if the door unlock button is pressed. When the door unlock button is pressed again within 4
seconds, the remaining doors will unlock.
Horn Feedback To activate or deactivate the horn feedback.
If the horn feedback is activated, after locking the door by pressing
the lock button on the remote key, and pressing it again within 4
seconds, the horn feedback sound will operate once to indicate that
all doors are locked (if equipped with remote key).
Smart Trunk To activate or deactivate the smart trunk.
For more information, refer to “Smart trunk” in chapter 5.
4. Lights
Items
Explanation
One Touch Turn
Signal • Off: The one t
ouch turn signal function will be deactivated.
• 3, 5, 7 Flashes: The turn signal indicator will blink 3, 5, or 7 times when the turn signal lever is moved slightly.
For more information, refer to “Lighting” in chapter 5.
Ambient Light
Brightness To adjust the brightness of the ambient light.
Ambient Light Color To select the ambient light color.
Headlight Delay • To activate or deactivate the headlamp delay function.
For more information, refer to “Lighting” in chapter 5.
High Beam Assist • To activate or deactivate the High Beam Assist (HBA) function.
For more information, refer to “High Beam Assist (HBA)” in chapter 5.
Page 135 of 537
05
5-5
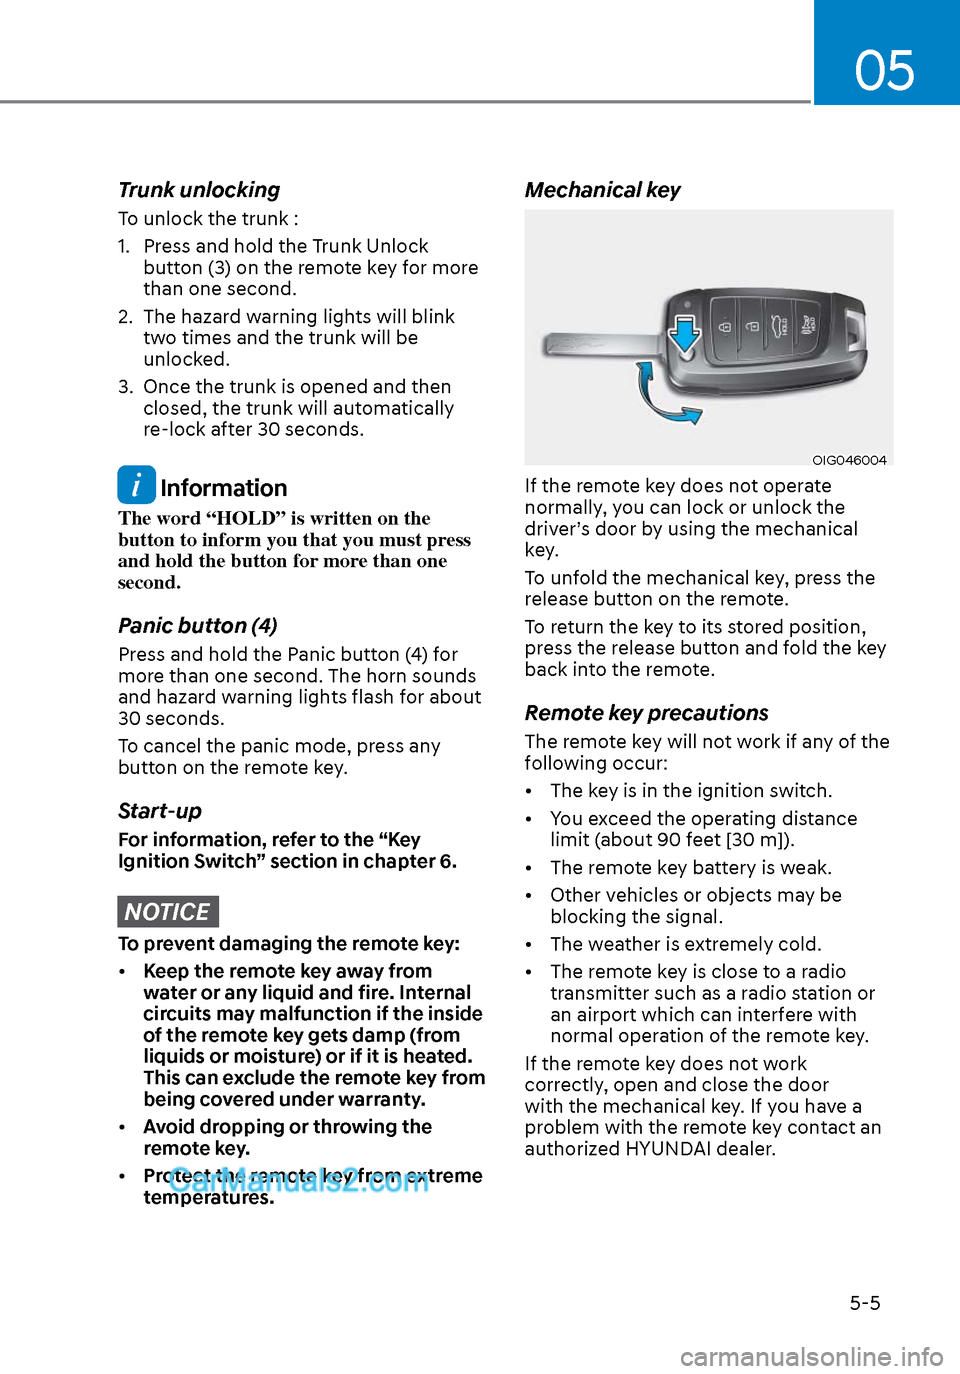
Trunk unlocking
To unlock the trunk :
1. Press and hold the Trunk Unlock button (3) on the remote key for more
than one second.
2. The hazard warning lights will blink two times and the trunk will be
unlocked.
3. Once the trunk is opened and then closed, the trunk will automatically
re-lock after 30 seconds.
Information
The word “HOLD” is written on the
button to inform you that you must press
and hold the button for more than one
second.
Panic button (4)
Press and hold the Panic button (4) for
more than one second. The horn sounds
and hazard warning lights flash for about
30 seconds.
To cancel the panic mode, press any
button on the remote key.
Start-up
For information, refer to the “Key
Ignition Switch” section in chapter 6.
NOTICE
To prevent damaging the remote key:
• Keep the remote key away from
water or any liquid and fire. Internal
circuits may malfunction if the inside
of the remote key gets damp (from
liquids or moisture) or if it is heated.
This can exclude the remote key from
being covered under warranty.
• Avoid dropping or throwing the
remote key.
• Protect the remote key from extreme
temperatures.
Mechanical key
OIG046004OIG046004
If the remote key does not operate
normally, you can lock or unlock the
driver’s door by using the mechanical
key.
To unfold the mechanical key, press the
release button on the remote.
To return the key to its stored position,
press the release button and fold the key
back into the remote.
Remote key precautions
The remote key will not work if any of the
following occur:
• The key is in the ignition switch.
• You exceed the operating distance
limit (about 90 feet [30 m]).
• The remote key battery is weak.
• Other vehicles or objects may be blocking the signal.
• The weather is extremely cold.
• The remote key is close to a radio transmitter such as a radio station or
an airport which can interfere with
normal operation of the remote key.
If the remote key does not work
correctly, open and close the door
with the mechanical key. If you have a
problem with the remote key contact an
authorized HYUNDAI dealer.
Page 137 of 537
05
5-7
Smart Key (if equipped)
Type AType A
ODN8059006ODN8059006
Type BType B
ODN8059007ODN8059007
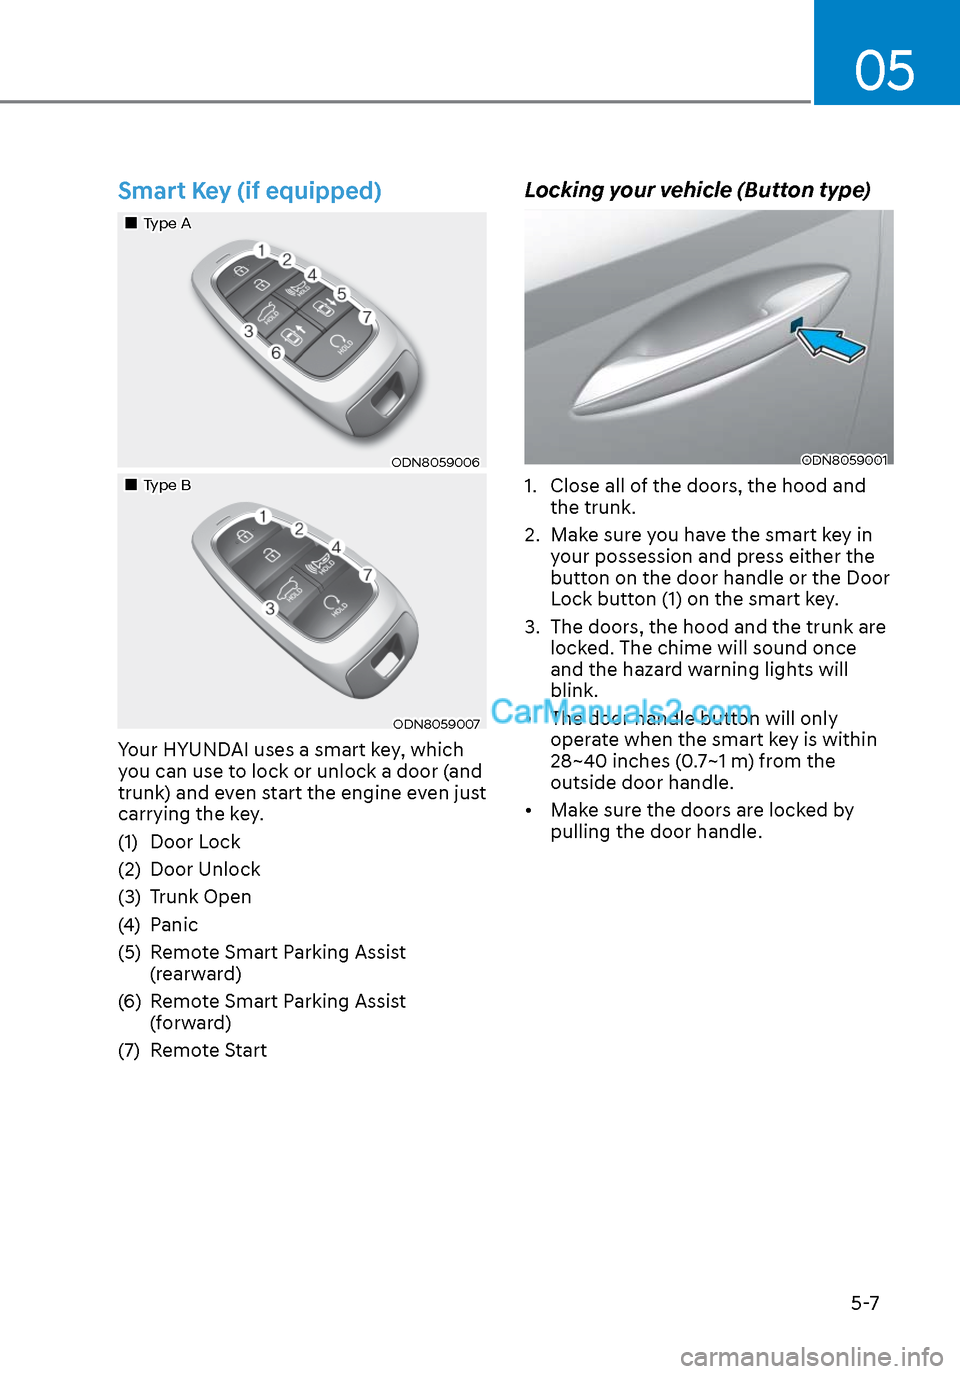
Your HYUNDAI uses a smart key, which
you can use to lock or unlock a door (and
trunk) and even start the engine even just
carrying the key.
(1) Door Lock
(2) Door Unlock
(3) Trunk Open
(4) Panic
(5) Remote Smart Parking Assist (rearward)
(6) Remote Smart Parking Assist (forward)
(7) Remote Start
Locking your vehicle (Button type)
ODN8059001ODN8059001
1. Close all of the doors, the hood and the trunk.
2. Make sure you have the smart key in your possession and press either the
button on the door handle or the Door
Lock button (1) on the smart key.
3. The doors, the hood and the trunk are locked. The chime will sound once
and the hazard warning lights will
blink.
• The door handle button will only operate when the smart key is within
28~40 inches (0.7~1 m) from the
outside door handle.
• Make sure the doors are locked by pulling the door handle.
Page 138 of 537
Convenient Features5-8
Locking your vehicle
(Touch sensor type)
ODN8059236ODN8059236
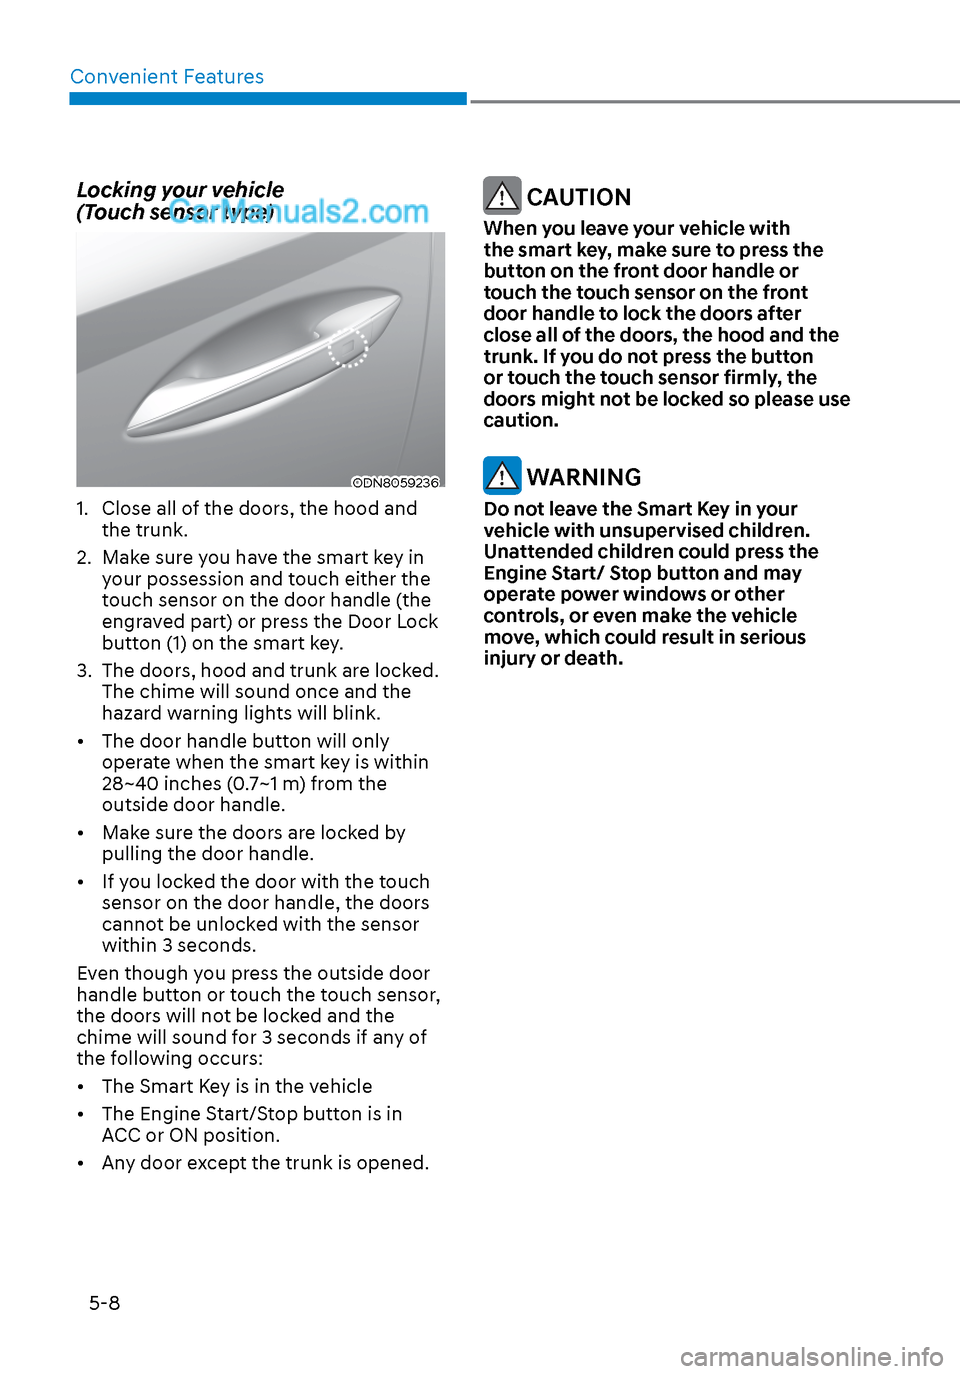
1. Close all of the doors, the hood and the trunk.
2. Make sure you have the smart key in your possession and touch either the
touch sensor on the door handle (the
engraved part) or press the Door Lock
button (1) on the smart key.
3. The doors, hood and trunk are locked. The chime will sound once and the
hazard warning lights will blink.
• The door handle button will only operate when the smart key is within
28~40 inches (0.7~1 m) from the
outside door handle.
• Make sure the doors are locked by pulling the door handle.
• If you locked the door with the touch sensor on the door handle, the doors
cannot be unlocked with the sensor
within 3 seconds.
Even though you press the outside door
handle button or touch the touch sensor,
the doors will not be locked and the
chime will sound for 3 seconds if any of
the following occurs:
• The Smart Key is in the vehicle
• The Engine Start/Stop button is in ACC or ON position.
• Any door except the trunk is opened.
CAUTION
When you leave your vehicle with
the smart key, make sure to press the
button on the front door handle or
touch the touch sensor on the front
door handle to lock the doors after
close all of the doors, the hood and the
trunk. If you do not press the button
or touch the touch sensor firmly, the
doors might not be locked so please use
caution.
WARNING
Do not leave the Smart Key in your
vehicle with unsupervised children.
Unattended children could press the
Engine Start/ Stop button and may
operate power windows or other
controls, or even make the vehicle
move, which could result in serious
injury or death.