check engine light HYUNDAI SONATA 2021 Owner's Manual
[x] Cancel search | Manufacturer: HYUNDAI, Model Year: 2021, Model line: SONATA, Model: HYUNDAI SONATA 2021Pages: 546, PDF Size: 51.21 MB
Page 317 of 546
06
6-33
The Idle Stop and Go (ISG) system
automatically and temporarily shuts
down the engine when the vehicle
is stopped and idling to improve fuel
efficiency and reduce exhaust gas
emissions. (i.e. red stop light, stop sign,
and traffic jam).
The engine is automatically started upon
satisfying the starting conditions.
The ISG system is always active, when
the engine is running.
Information
When the engine is automatically started
by the ISG system, some warning
lights (i.e. ABS, ESC, ESC OFF, EPS,
and parking brake warning light) may
illuminate for a few seconds due to the
low battery voltage. However, it does
not indicate a malfunction with the ISG
system.
To Activate the ISG System
Prerequisite for activation
The ISG system operates in the following
situations.
• The driver's seatbelt is fastened
• The driver's door and hood are closed
• The brake vacuum pressure is
adequate
• The battery sensor is activated and
the battery is sufficiently charged
• Outside temperature is not too low or
too high
• The vehicle is driven over a constant
speed and stops
• The climate control system satisfies
the conditions
• The vehicle is sufficiently warmed up
• The incline is gradual
• The steering wheel is turned less than
180 degrees and then the vehicle
stops
Information
• The ISG system is not
activated, when the
prerequisites to activate
the ISG system are
unsatisfied. In this case,
the ISG OFF button indicator
illuminates, and the auto stop indicator
(
) illuminates in yellow on the
instrument cluster.
• When the above indicator remains
illuminated on the instrument cluster,
have the IGS system checked by an
authorized HYUNDAI dealer.
Auto stop
To stop the engine in idle stop mode
1.
Decr
ease the vehicle speed to 0 mph.
2.
Depr
ess the brake pedal with the shift
button in D (Drive) or N (Neutral).
The auto stop indicator (
) illuminates
in green on the instrument cluster, when
the engine stops.
Information
The driving speed must reach at least 3
mph (5 km/h) after an idle stop to stop the
engine in idle stop mode again.
In auto stop mode, when the driver
opens the hood, the ISG system will be
deactivated.
ISG (Idle Stop and Go) SyStem ( I f equ I pped)
Page 319 of 546
06
6-35
OIK057086N
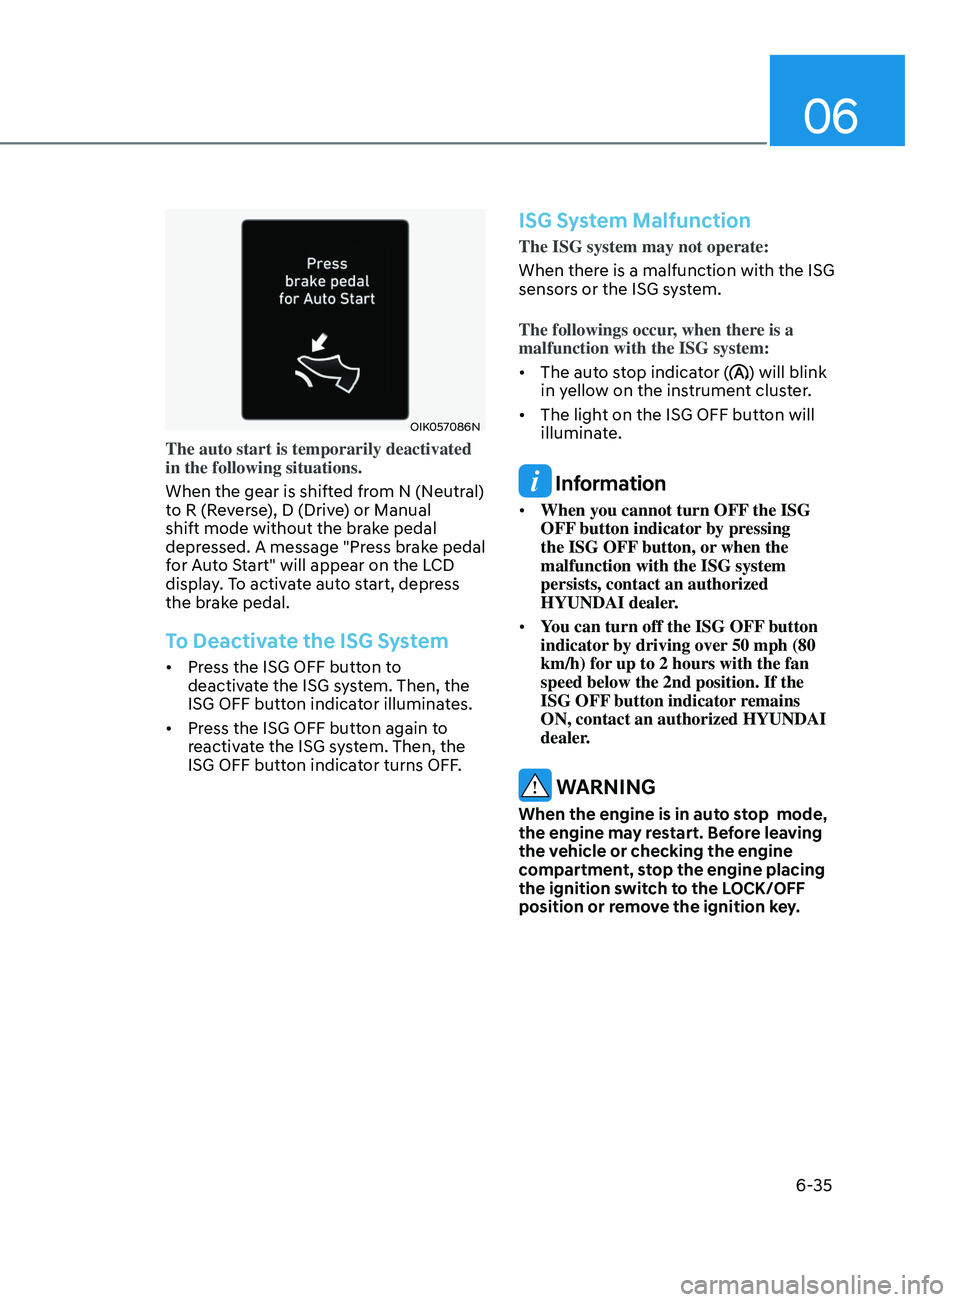
The auto start is temporarily deactivated
in the following situations.
When the gear is shifted from N (Neutral)
to R (Reverse), D (Drive) or Manual
shift mode without the brake pedal
depressed. A message "Press brake pedal
for Auto Start" will appear on the LCD
display. To activate auto start, depress
the brake pedal.
To Deactivate the ISG System
• Press the ISG OFF button to
deactivate the ISG system. Then, the
ISG OFF button indicator illuminates.
• Press the ISG OFF button again to
reactivate the ISG system. Then, the
ISG OFF button indicator turns OFF.
ISG System Malfunction
The ISG system may not operate:
When there is a malfunction with the ISG
sensors or the ISG system.
The followings occur, when there is a
malfunction with the ISG system:
• The auto stop indicator (
) will blink
in yellow on the instrument cluster.
• The light on the ISG OFF button will
illuminate.
Information
• When you cannot turn OFF the ISG
OFF button indicator by pressing
the ISG OFF button, or when the
malfunction with the ISG system
persists, contact an authorized
HYUNDAI dealer.
• You can turn off the ISG OFF button
indicator by driving over 50 mph (80
km/h) for up to 2 hours with the fan
speed below the 2nd position. If the
ISG OFF button indicator remains
ON, contact an authorized HYUNDAI
dealer.
WARNING
When the engine is in auto stop mode,
the engine may restart. Before leaving
the vehicle or checking the engine
compartment, stop the engine placing
the ignition switch to the LOCK/OFF
position or remove the ignition key.
Page 348 of 546
6-64
Warning Light and Message
•„Type A•„Type B
OIK057121NOIK057122N
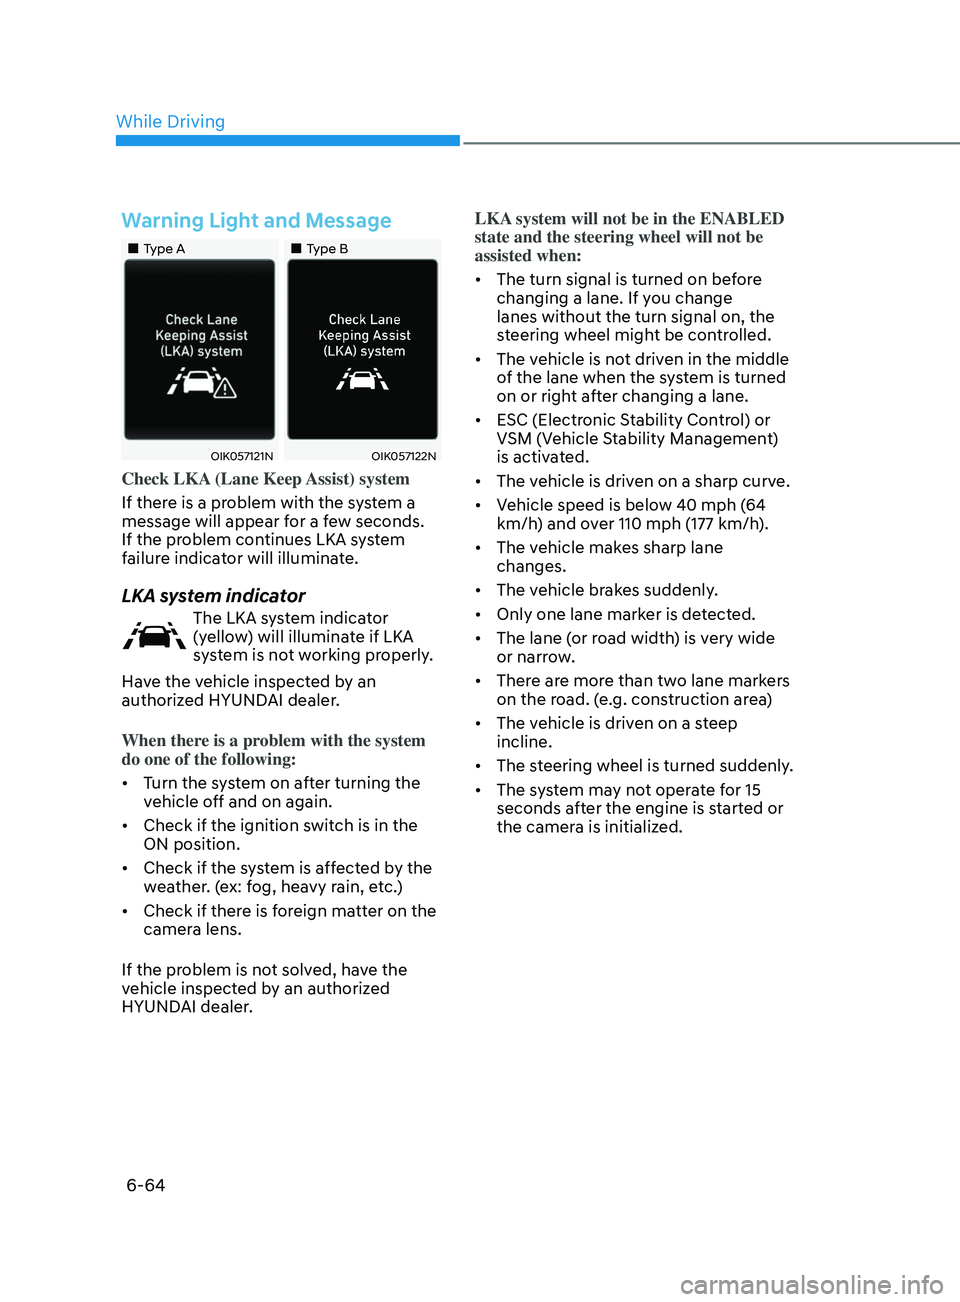
Check LKA (Lane Keep Assist) system
If there is a problem with the system a
message will appear for a few seconds.
If the problem continues LKA system
failure indicator will illuminate.
LKA system indicator
The LKA system indicator
(yellow) will illuminate if LKA
system is not working properly.
Have the vehicle inspected by an
authorized HYUNDAI dealer.
When there is a problem with the system
do one of the following:
• Turn the system on after turning the
vehicle off and on again.
• Check if the ignition switch is in the
ON position.
• Check if the system is affected by the
weather. (ex: fog, heavy rain, etc.)
• Check if there is foreign matter on the
camera lens.
If the problem is not solved, have the
vehicle inspected by an authorized
HYUNDAI dealer. LKA system will not be in the ENABLED
state and the steering wheel will not be
assisted when:
•
The turn signal is turned on before
changing a lane. If you change
lanes without the turn signal on, the
steering wheel might be controlled.
• The vehicle is not driven in the middle
of the lane when the system is turned
on or right after changing a lane.
• ESC (Electronic Stability Control) or
VSM (Vehicle Stability Management)
is activated.
• The vehicle is driven on a sharp curve.
• Vehicle speed is below 40 mph (64
km/h) and over 110 mph (177 km/h).
• The vehicle makes sharp lane
changes.
• The vehicle brakes suddenly.
• Only one lane marker is detected.
• The lane (or road width) is very wide
or narrow.
• There are more than two lane markers
on the road. (e.g. construction area)
• The vehicle is driven on a steep
incline.
• The steering wheel is turned suddenly.
• The system may not operate for 15
seconds after the engine is started or
the camera is initialized.
While Driving
Page 427 of 546
06
6-143
The severe weather conditions of winter
quickly wear out tires and cause other
problems. To minimize winter driving
problems, you should take the following
suggestions:
Snow or Icy Conditions
You need to keep sufficient distance
between your vehicle and the vehicle in
front of you.
Apply the brakes gently. Speeding, rapid
acceleration, sudden brake applications,
and sharp turns are potentially
very hazardous practices. During
deceleration, use engine braking to the
fullest extent. Sudden brake applications
on snowy or icy roads may cause the
vehicle to skid.
To drive your vehicle in deep snow, it
may be necessary to use snow tires or to
install tire chains on your tires.
Always carry emergency equipment.
Some of the items you may want to carry
include tire chains, tow straps or chains,
a flashlight, emergency flares, sand, a
shovel, jumper cables, a window scraper,
gloves, ground cloth, coveralls, a blanket,
etc.
Snow tires
WARNING
Snow tires should be equivalent in size
and type to the vehicle’s standard tires.
Otherwise, the safety and handling of
your vehicle may be adversely affected.
If you mount snow tires on your vehicle,
make sure to use radial tires of the same
size and load range as the original tires.
Mount snow tires on all four wheels
to balance your vehicle’s handling in
all weather conditions. The traction
provided by snow tires on dry roads
may not be as high as your vehicle's
original equipment tires. Check with
the tire dealer for maximum speed
recommendations.
Information
Do not install studded tires without
first checking local, state and municipal
regulations for possible restrictions against
their use.
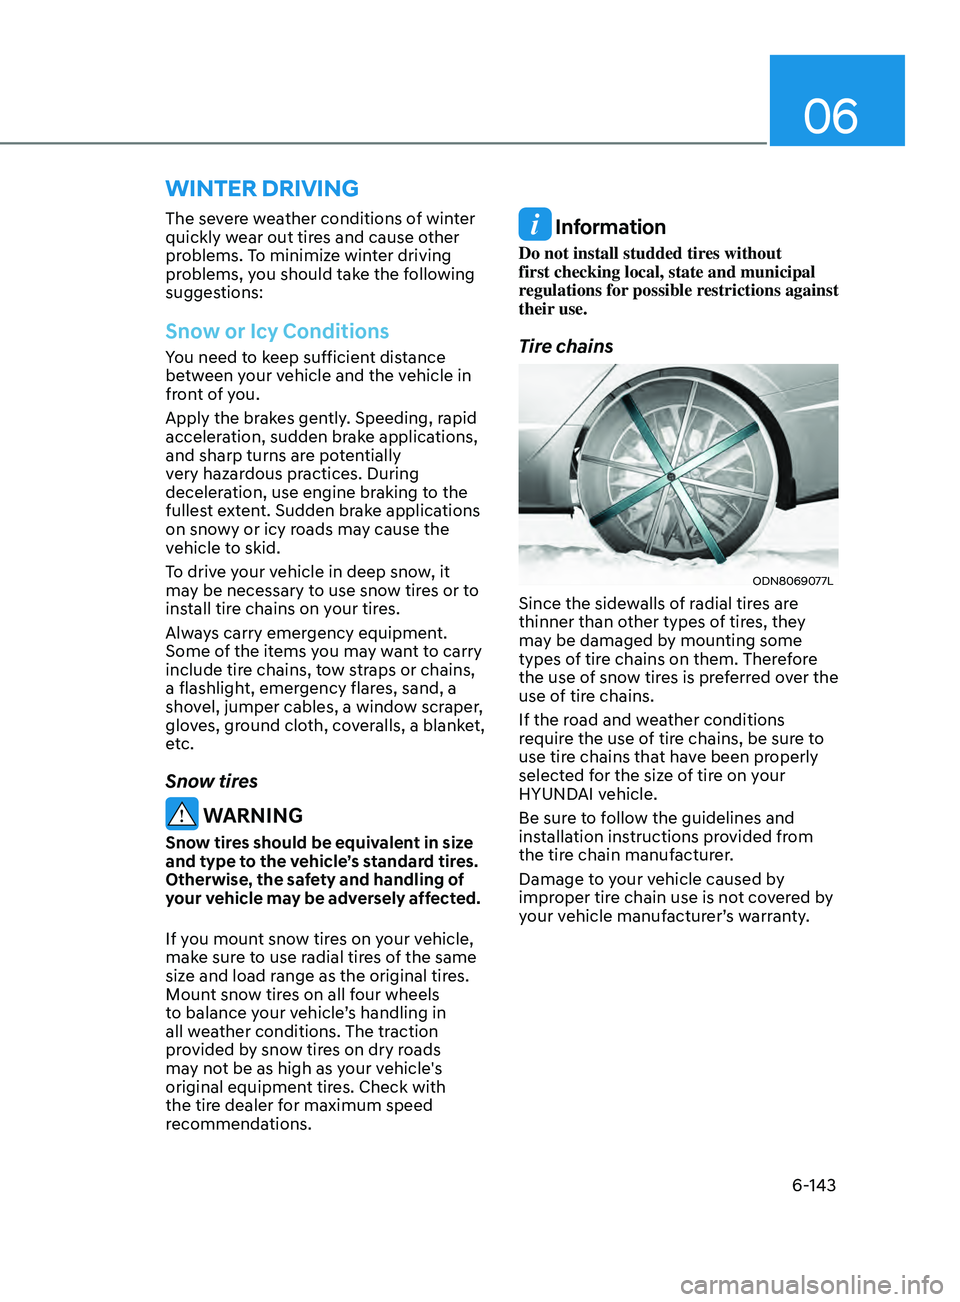
Tire chains
ODN8069077L
Since the sidewalls of radial tires are
thinner than other types of tires, they
may be damaged by mounting some
types of tire chains on them. Therefore
the use of snow tires is preferred over the
use of tire chains.
If the road and weather conditions
require the use of tire chains, be sure to
use tire chains that have been properly
selected for the size of tire on your
HYUNDAI vehicle.
Be sure to follow the guidelines and
installation instructions provided from
the tire chain manufacturer.
Damage to your vehicle caused by
improper tire chain use is not covered by
your vehicle manufacturer’s warranty.
winter Driving
Page 438 of 546
07
7-3
If you Have a Flat Tire While
Driving
If a tire goes flat while you are driving:
• Take your foot off the accelerator
pedal and let the vehicle slow down
while driving straight ahead. Do not
apply the brakes immediately or
attempt to pull off the road as this
may cause loss of vehicle control
resulting in an accident. When the
vehicle has slowed to such a speed
that it is safe to do so, brake carefully
and pull off the road. Drive off the
road as far as possible and park on
firm, level ground. If you are on a
divided highway, do not park in the
median area between the two traffic
lanes.
• When the vehicle is stopped, press the
hazard warning flasher button, move
the shift button into P (Park), and
apply the parking brake, and place
the ignition switch in the LOCK/OFF
position.
• Have all passengers get out of the
vehicle. Be sure they all get out on the
side of the vehicle that is away from
traffic.
• When changing a flat tire, follow the
instructions provided later in this
chapter.
If the engIne WIll not
sta
rt
If the Engine Doesn’t Turn Over
or Turns Over Slowly
• Be sure the shift button is in N
(Neutral) or P (Park). The engine starts
only when the shift button is in N
(Neutral) or P (Park).
• Check the battery connections to be
sure they are clean and tight.
• Turn on the interior light. If the light
dims or goes out when you operate
the starter, the battery is drained.
Do not push or pull the vehicle to start it.
This could cause damage to your vehicle.
See instructions for “Jump Starting”
provided in this chapter.
CAUTION
Push or pull starting the vehicle may
cause the catalytic converter to
overload which can lead to damage to
the emission control system.
If the Engine Turns Over
Normally but Doesn’t Start
Check the fuel level and add fuel if
necessary.
If the engine still does not start, have
your vehicle checked by an authorized
HYUNDAI dealer.
Page 440 of 546
07
7-5
Jump starting procedure
1. Position the vehicles close enough that the jumper cables will reach, but
do not allow the vehicles to touch.
2.
A
void fans or any moving parts in the
engine compartment at all times, even
when the vehicles are turned off.
3.
T
urn off all electrical devices such as
radios, lights, air conditioning, etc.
Put the vehicles in P (Park) and set
the parking brakes. Turn both vehicles
OFF.
ODN8A079022
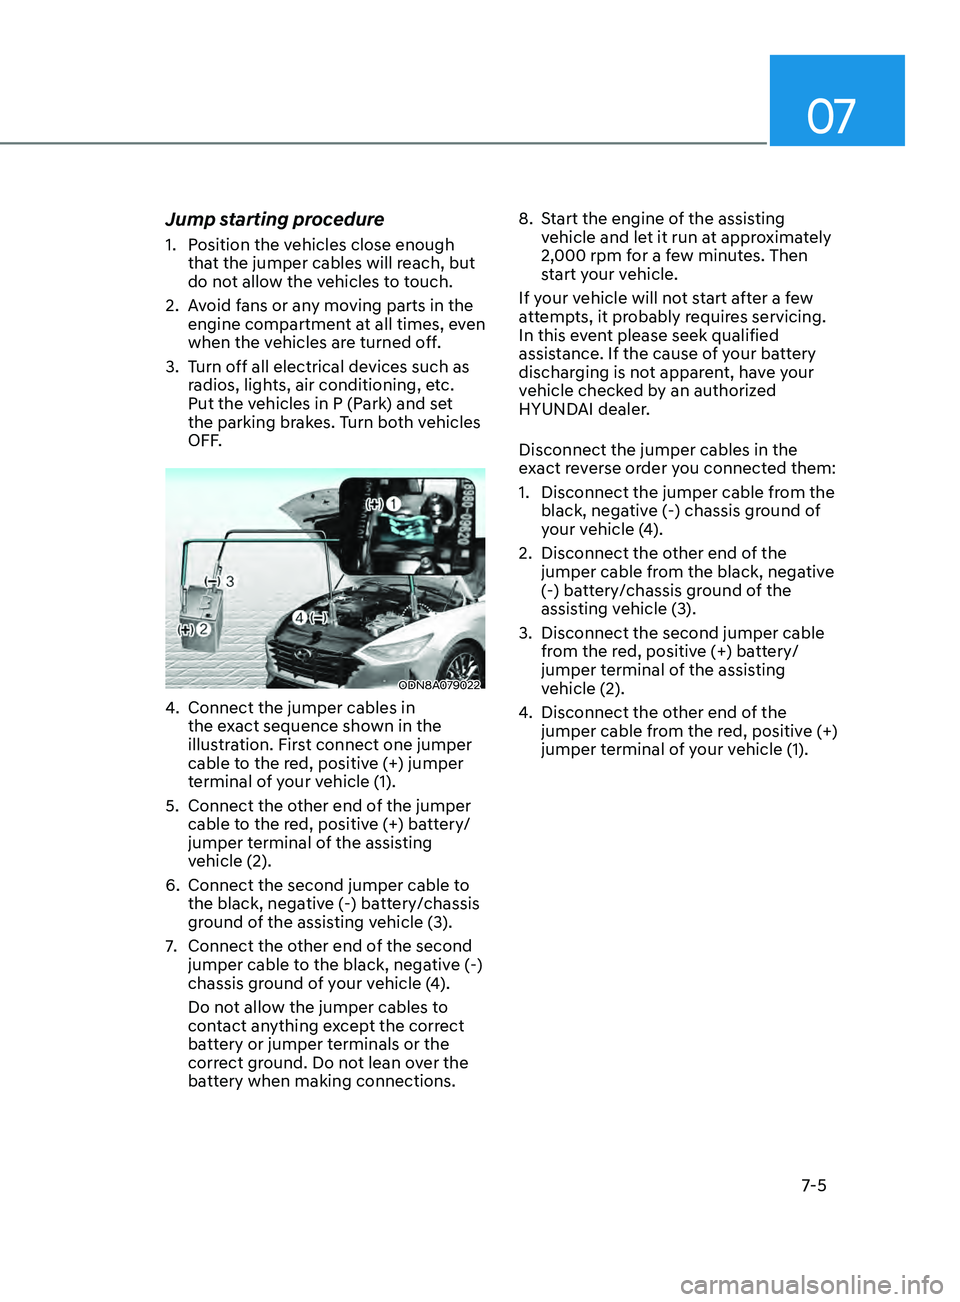
4. Connect the jumper cables in
the e xact sequence shown in the
illustration. First connect one jumper
cable to the red, positive (+) jumper
terminal of your vehicle (1).
5.
Connect the o
ther end of the jumper
cable to the red, positive (+) battery/
jumper terminal of the assisting
vehicle (2).
6.
Connect the second jumper cable t
o
the black, negative (-) battery/chassis
ground of the assisting vehicle (3).
7.
Connect the o
ther end of the second
jumper cable to the black, negative (-)
chassis ground of your vehicle (4).
Do not allow the jumper cables to
contact anything except the correct
battery or jumper terminals or the
correct ground. Do not lean over the
battery when making connections. 8.
S
tart the engine of the assisting
vehicle and let it run at approximately
2,000 rpm for a few minutes. Then
start your vehicle.
If your vehicle will not start after a few
attempts, it probably requires servicing.
In this event please seek qualified
assistance. If the cause of your battery
discharging is not apparent, have your
vehicle checked by an authorized
HYUNDAI dealer.
Disconnect the jumper cables in the
exact reverse order you connected them:
1.
Disconnect the jumper cable fr
om the
black, negative (-) chassis ground of
your vehicle (4).
2.
Disconnect the o
ther end of the
jumper cable from the black, negative
(-) battery/chassis ground of the
assisting vehicle (3).
3.
Disconnect the second jumper cable
fr
om the red, positive (+) battery/
jumper terminal of the assisting
vehicle (2).
4. Disconnect the o ther end of the
jumper cable from the red, positive (+)
jumper terminal of your vehicle (1).
Page 457 of 546
8-3
08
Tires and Wheels ........................................................................\
..................8-34Tire Care ........................................................................\
.......................................... 8-34
Recommended Cold Tire Inflation Pressures ....................................................... 8-34
Check Tire Inflation Pressure ........................................................................\
......... 8-35
Tire Rotation ........................................................................\
................................... 8-36
Wheel Alignment and Tire Balance ....................................................................... 8-37
Tire Replacement ........................................................................\
........................... 8-38
Wheel Replacement ........................................................................\
....................... 8-39
Tire Traction ........................................................................\
.................................... 8-39
Tire Maintenance........................................................................\
............................ 8-39
Tire Sidewall Labeling ........................................................................\
.................... 8-39
Tire Terminology and Definitions ........................................................................\
.. 8-43
All Season Tires ........................................................................\
............................... 8-46
Summer Tires ........................................................................\
................................. 8-46
Snow Tires........................................................................\
.......................................8-46
Radial-Ply Tires ........................................................................\
............................... 8-46
Low Aspect Ratio Tires ........................................................................\
................... 8-47
Fuses ........................................................................\
....................................8-48Instrument Panel Fuse Replacement .................................................................... 8-49
Engine Compartment Panel Fuse Replacement .................................................. 8-50
Fuse/Relay Panel Description........................................................................\
.........8-51
Light Bulbs ........................................................................\
............................ 8-57Headlamp, Parking Lamp, Daytime Running Light, Turn Signal Lamp,
Cornering Lamp and Side Marker ........................................................................\
. 8-57
Side Repeater Lamp Replacement ...................................................................... 8-58
Rear Combination Light Bulb Replacement ......................................................... 8-58
High Mounted Stop Lamp Replacement ............................................................. 8-60
License Plate Light Bulb Replacement ................................................................ 8-60
Interior Light Bulb Replacement ........................................................................\
... 8-61
Appearance Care ........................................................................\
................. 8-63Exterior Care ........................................................................\
................................... 8-63
Interior Care ........................................................................\
.................................... 8-67
Emission Control System ........................................................................\
.... 8-69
California perchlorate notice ...................................................................... 8-72
Consumer Information ........................................................................\
........ 8-73
Reporting Safety Defects ........................................................................\
.... 8 -74
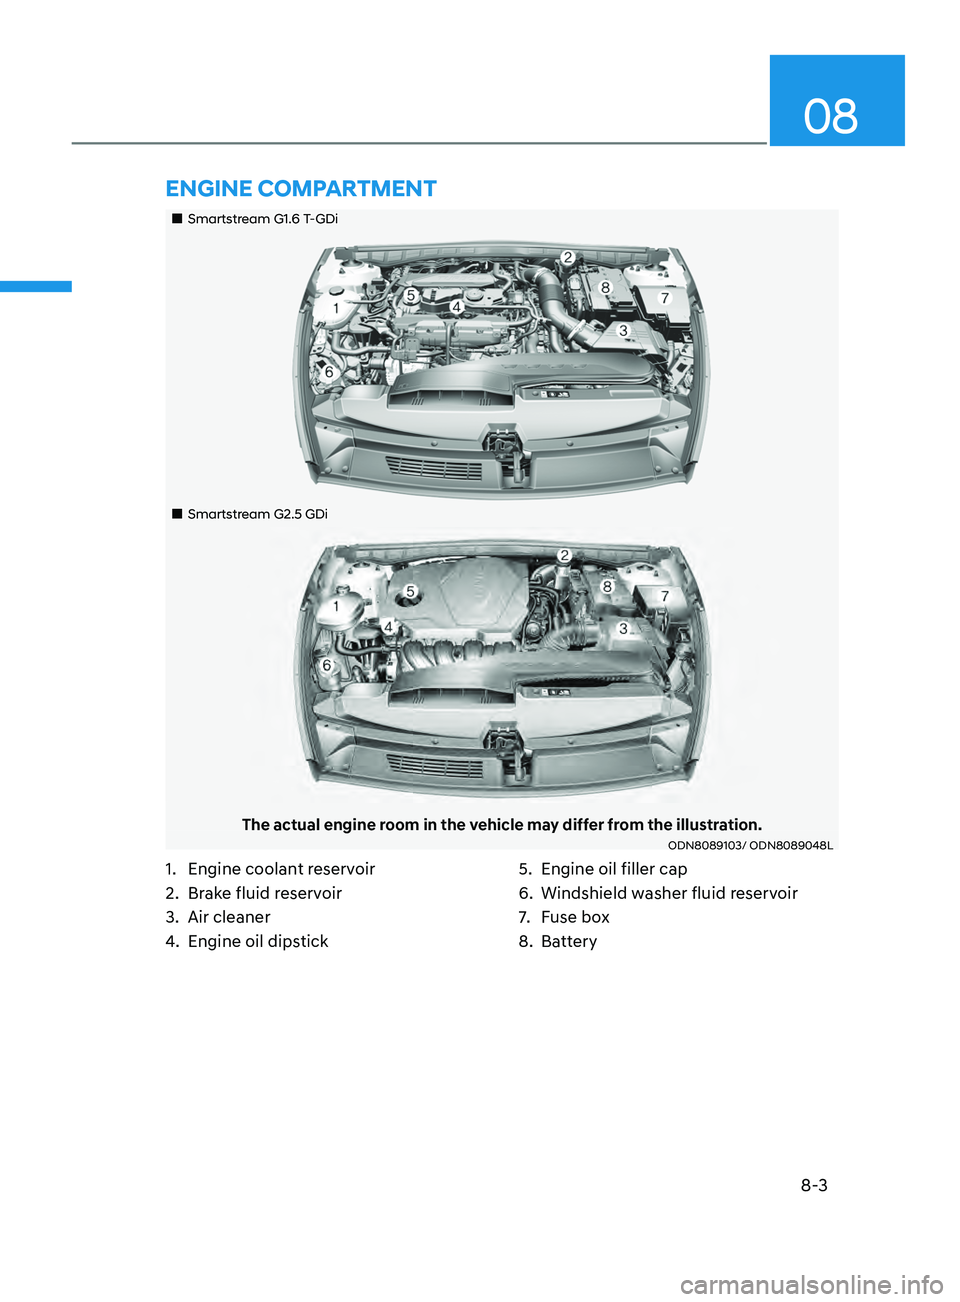
1. Engine coolant reservoir
2.
Br
ake fluid reservoir
3.
Air cleaner
4.
E
ngine oil dipstick 5.
E ngine oil filler cap
6.
Windshield w
asher fluid reservoir
7.
F
use box
8.
Ba
ttery
EnginE CompartmEnt
„„Smartstream G1.6 T-GDi
„„Smartstream G2.5 GDi
The actual engine room in the vehicle may differ from the illustration.ODN8089103/ ODN8089048L
Page 460 of 546
Maintenance
8-6
While operating your vehicle:
• Note any changes in the sound of the
exhaust or any smell of exhaust fumes
in the vehicle.
• Check for vibrations in the steering
wheel. Notice if there is any increased
steering effort or looseness in the
steering wheel, or change in its
straight-ahead position.
• Notice if your vehicle constantly turns
slightly or “pulls” to one side when
traveling on smooth, level road.
• When stopping, listen and check for
unusual sounds, pulling to one side,
increased brake pedal travel or “hard-
to-push” brake pedal.
• If any slipping or changes in the
operation of your transmission occurs,
check the transmission fluid level.
• Check the automatic transmission P
(Park) function.
• Check the parking brake.
• Check for fluid leaks under your
vehicle (water dripping from the air
conditioning system during or after
use is normal).
At least monthly:
• Check coolant level in the engine
coolant reservoir.
• Check the operation of all exterior
lights, including the brake lights, turn
signals and hazard warning flashers.
• Check the inflation pressures of all
tires including the spare for tires that
are worn, show uneven wear, or are
damaged.
• Check for loose wheel lug nuts.
At least twice a year:
(i.e., every Spring and Autumn)
• Check radiator, heater and air
conditioning hoses for leaks or
damage.
• Check windshield washer spray and
wiper operation. Clean wiper blades
with a clean cloth dampened with
washer a fluid.
• Check headlamp alignment.
• Check muffler, exhaust pipes, shields
and clamps.
• Check the seat belts for wear and
function.
At least once a year:
• Clean body and door drain holes.
• Lubricate door hinges and hood
hinges.
• Lubricate door and hood locks and
latches.
• Lubricate door rubber weather strips.
• Lubricate door checker.
• Check the air conditioning system.
• Inspect and lubricate automatic
transmission linkage and controls.
• Clean the battery and terminals.
• Check the brake fluid level.
Page 502 of 546
Maintenance8-48
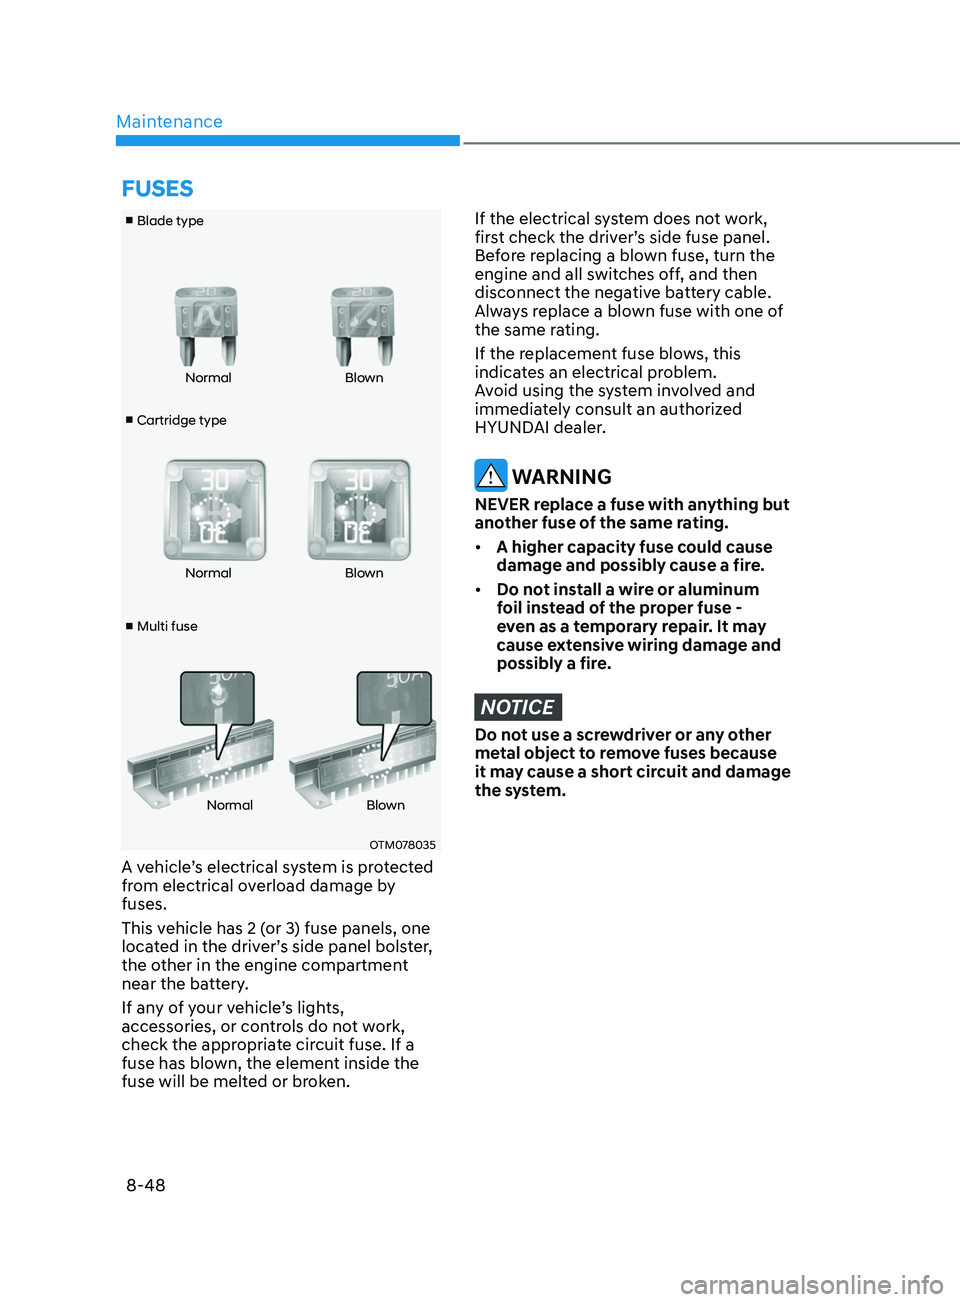
■ Cartridge type
■ Blade type
■ Multi fuse Normal
Blown
Normal Blown
Normal Blown
OTM078035
A vehicle’s electrical system is protected
from electrical overload damage by
fuses.
This vehicle has 2 (or 3) fuse panels, one
located in the driver’s side panel bolster,
the other in the engine compartment
near the battery.
If any of your vehicle’s lights,
accessories, or controls do not work,
check the appropriate circuit fuse. If a
fuse has blown, the element inside the
fuse will be melted or broken.
If the electrical system does not work,
first check the driver’s side fuse panel.
Before replacing a blown fuse, turn the
engine and all switches off, and then
disconnect the negative battery cable.
Always replace a blown fuse with one of
the same rating.
If the replacement fuse blows, this
indicates an electrical problem.
Avoid using the system involved and
immediately consult an authorized
HYUNDAI dealer.
WARNING
NEVER replace a fuse with anything but
another fuse of the same rating.
• A higher capacity fuse could cause
damage and possibly cause a fire.
• Do not install a wire or aluminum
foil instead of the proper fuse -
even as a temporary repair. It may
cause extensive wiring damage and
possibly a fire.
NOTICE
Do not use a screwdriver or any other
metal object to remove fuses because
it may cause a short circuit and damage
the system.
fuSES
Page 538 of 546
Index
I-10
L
LabelVehicle certification label
........................................................................\
........ 2-13
Tire specification and pressure label
............................................................... 2-14
Refrigerant label
........................................................................\
...................... 2-15
Lane change signals
........................................................................\
..................... 5-79
Lane Following Assist (LFA)
........................................................................\
.... 6-116
Lane Keeping Assist (LKA)
........................................................................\
........ 6-59
LCD display (T
ype A, B) ........................................................................\
............. 4-19
LCD display control
........................................................................\
................ 4-19
LCD display modes
........................................................................\
................. 4-20
Trip computer
........................................................................\
.......................... 4-31
LCD display (Type C)
........................................................................\
................. 4-34
LCD display control
........................................................................\
................ 4-34
View modes
........................................................................\
............................. 4-35
Utility view mode
........................................................................\
.................... 4-36
Option menu
........................................................................\
............................ 4-38
User settings mode
........................................................................\
.................. 4-39
LCD display messages
........................................................................\
................. 4-15
Shift to P
or N to start engine
........................................................................\
.. 4-15
Shift to P
........................................................................\
.................................. 4-15
Low key battery........................................................................\
....................... 4-15
Press brake pedal to start engine
..................................................................... 4-15
Key not in vehicle
........................................................................\
................... 4-16
Key not detected
........................................................................\
...................... 4-16
Press START button again
........................................................................\
...... 4-16
Press START button with key
........................................................................\
. 4-16
Battery discharging due to external electrical devices
....................................4-16
Check BRAKE SWITCH fuse
........................................................................\
4-16
Door, Hood, Trunk open indicator
.................................................................. 4-17
Sunroof open indicator
........................................................................\
............ 4-17
Lights mode
........................................................................\
............................. 4-17
Wiper mode
........................................................................\
............................. 4-18
Low pressure
........................................................................\
........................... 4-17