Cluster user setting HYUNDAI SONATA 2023 User Guide
[x] Cancel search | Manufacturer: HYUNDAI, Model Year: 2023, Model line: SONATA, Model: HYUNDAI SONATA 2023Pages: 555, PDF Size: 42.72 MB
Page 146 of 555
Instrument Cluster
4-60
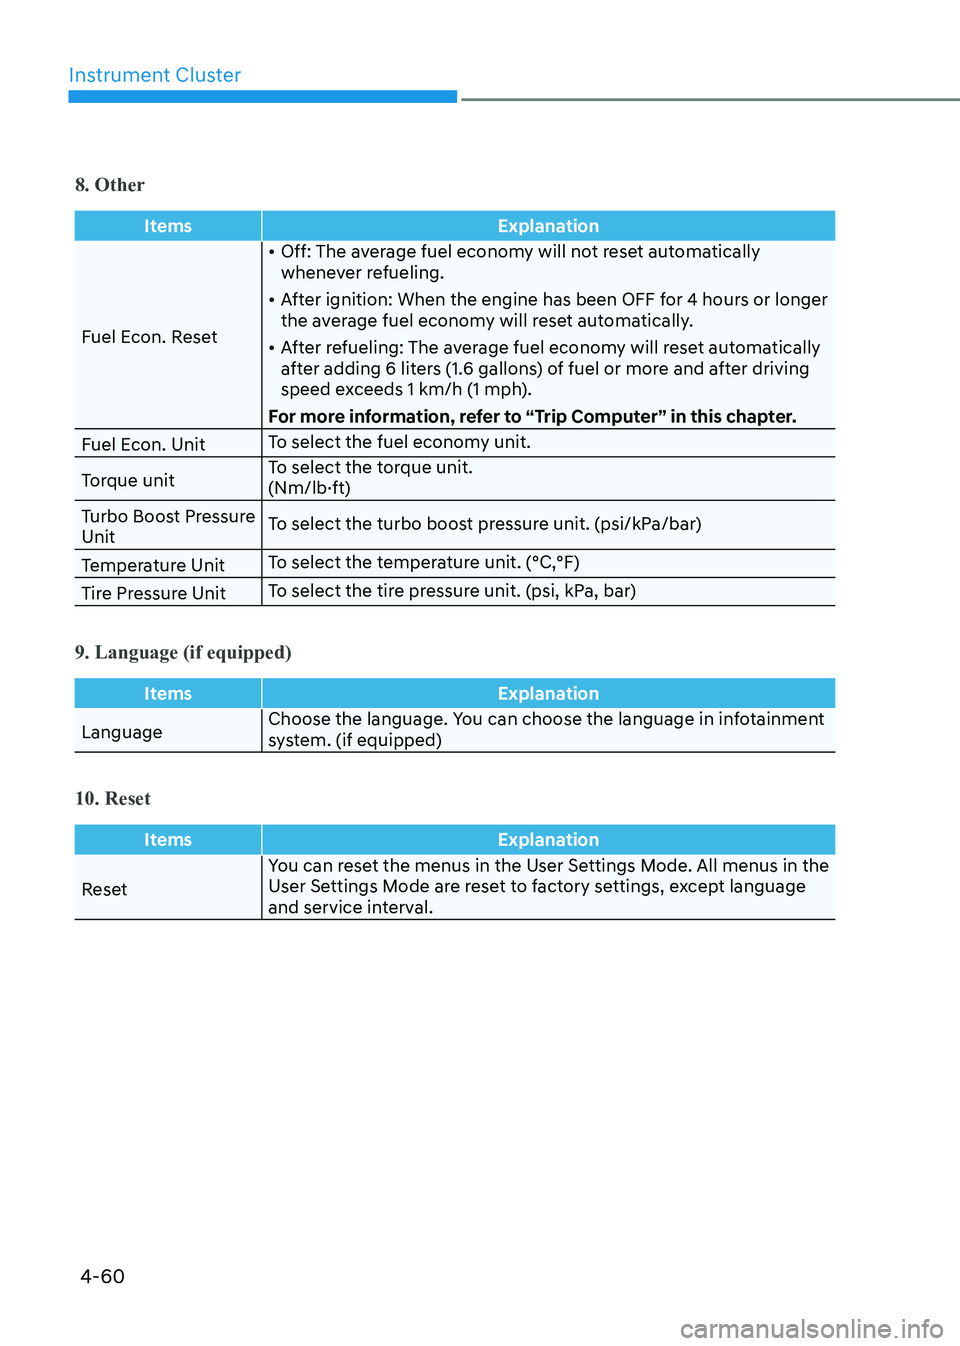
8. Other
ItemsExplanation
Fuel Econ. Reset•
Off: The average fuel economy will not reset automatically
whenever refueling.
• After ignition: When the engine has been OFF for 4 hours or longer
the average fuel economy will reset automatically.
• After refueling: The average fuel economy will reset automatically
after adding 6 liters (1.6 gallons) of fuel or more and after driving
speed exceeds 1 km/h (1 mph).
For more information, refer to “Trip Computer” in this chapter.
Fuel Econ. Unit To select the fuel economy unit.
Torque unit To select the torque unit.
(Nm/lb·ft)
Turbo Boost Pressure Unit To select the turbo boost pressure unit. (psi/kPa/bar)
Temperature Unit To select the temperature unit. (°C,°F)
Tire Pressure Unit To select the tire pressure unit. (psi, kPa, bar)
9. Language (if equipped)
Items
Explanation
LanguageChoose the language. You can choose the language in infotainment
system. (if equipped)
10. Reset
Items
Explanation
ResetYou can reset the menus in the User Settings Mode. All menus in the
User Settings Mode are reset to factory settings, except language
and service interval.
Page 150 of 555
Convenience Features
5-4
Remote Key (if equipped)
OIG046001
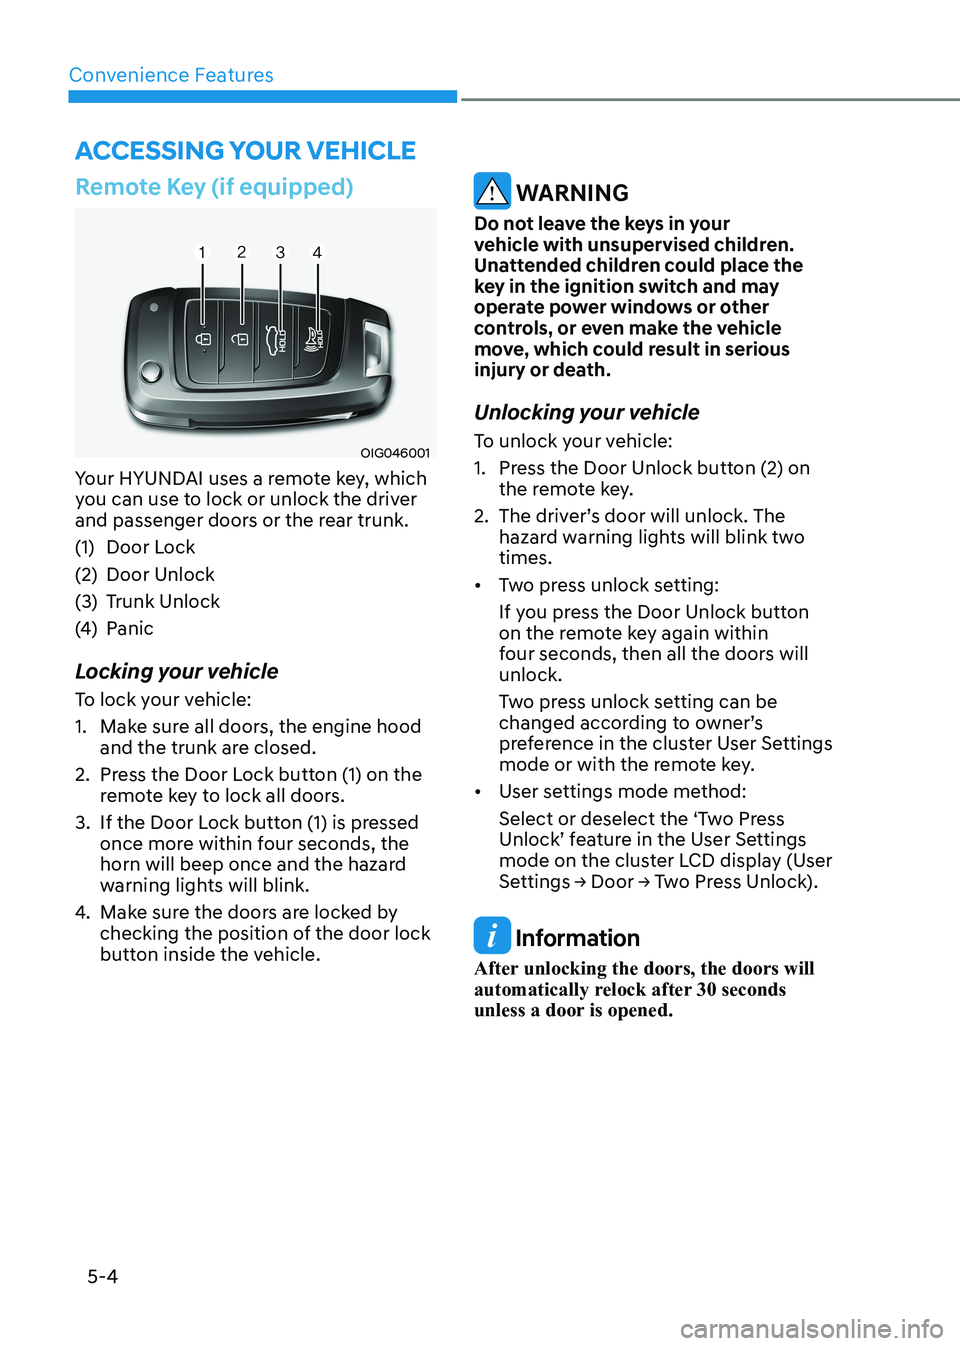
Your HYUNDAI uses a remote key, which
you can use to lock or unlock the driver
and passenger doors or the rear trunk.
(1) Door Lock
(2) Door Unlock
(3) Trunk Unlock
(4) Panic
Locking your vehicle
To lock your vehicle:
1. Make sure all doors, the engine hood and the trunk are closed.
2. Press the Door Lock button (1) on the remote key to lock all doors.
3. If the Door Lock button (1) is pressed once more within four seconds, the
horn will beep once and the hazard
warning lights will blink.
4. Make sure the doors are locked by
checking the position of the door lock
button inside the vehicle.
WARNING
Do not leave the keys in your
vehicle with unsupervised children.
Unattended children could place the
key in the ignition switch and may
operate power windows or other
controls, or even make the vehicle
move, which could result in serious
injury or death.
Unlocking your vehicle
To unlock your vehicle:
1. Press the Door Unlock button (2) on the remote key.
2. The driver’s door will unlock. The hazard warning lights will blink two times.
• Two press unlock setting:
If you press the Door Unlock button
on the remote key again within
four seconds, then all the doors will unlock.
Two press unlock setting can be
changed according to owner’s
preference in the cluster User Settings
mode or with the remote key.
• User settings mode method:
Select or deselect the ‘Two Press
Unlock’ feature in the User Settings
mode on the cluster LCD display (User
Settings → Door → Two Press Unlock).
Information
After unlocking the doors, the doors will
automatically relock after 30 seconds
unless a door is opened.
Accessing Your Vehicle
Page 156 of 555
Convenience Features
5-10
Two Press Unlock Feature
The priority for unlocking the driver door
only, or unlocking all the doors with
one press may be adjusted in the User
Settings mode in the cluster LCD display.
The Two Press Unlock feature, when
enabled, will require the user to press
the door unlock button once for driver
door only and twice for unlocking all the
doors.
Select or Deselect the Two Press Unlock
feature in the User Settings mode in the
cluster LCD display. The option can be
found under the following menu:
User Settings → Door → Two Press Unlock
The Two Press Unlock feature can also be
enabled or disabled by pressing the door
lock and unlock buttons simultaneously
on the Key FOB:
Press and hold both the Door Lock
button and the Door Unlock button
simultaneously until the hazard warning
lights blink.
This will enable or disable the Two Press
Unlock feature. Repeat this procedure to enable/disable the mode again.
Information
If you press the front passenger outside
door handle with the smart key in your possession, all the doors will unlock. Smart Key Reminder
If the smart key is in the vehicle and
any door is opened, the doors will not
lock even though the lock button of the
central door lock switch is pressed.
Trunk opening
To open:
1. Make sure you have the smart key
in your possession and either press
inside the trunk emblem or press the
Trunk Unlock button (3) on the smart
key for more than one second.
2. Once the trunk is opened, the hazard warning lights will blink two times.
• The trunk handle button will only
operate when the smart key is within
0.7~1 m (28~40 inches) from the outside door handle.
• Once the trunk is opened and then
closed, the trunk will automatically
re-lock and the hazard warning will blink once.
• If you leave the smart key and close
the trunk, the chime will sound for 5
seconds. In the case, the trunk cannot
be locked so open it with the trunk
handle button.
Panic button
Press and hold the Panic button (4) for
more than one second. The horn sounds
and hazard warning lights blink for about
30 seconds. To cancel the panic mode,
press any button on the Smart Key.
Page 162 of 555
Convenience Features
5-16
Door locks
Operating Door Locks from
Outside the Vehicle
Mechanical key
ODN8059011
If you lock the driver’s door with a
mechanical key, all vehicle doors will
lock. If you unlock the driver’s door with
a mechanical key, you can open and
close the driver’s door only.
Once the doors are unlocked, they may
be opened by pulling the door handle.
When closing the door, push the door by
hand. Make sure that doors are closed
securely.
Remote key
ODN8059279L
To lock the doors, press the Door Lock
button (1) on the remote key.
Press the Door Unlock button (2) on the
remote key, the driver’s door will unlock.
If you press the Door Unlock button
on the remote key again within four
seconds, then all the doors will unlock.
Once the doors are unlocked, they may
be opened by pulling the door handle. When closing the door, push the door by
hand. Make sure that doors are closed
securely.
Smart key
ODN8059001
Press the button on the driver’s outside
door handle while carrying the Smart Key
with you or press the Door Unlock button
on the Smart Key, the driver’s door will unlock.
If you press the button on the front
passenger’s outside door, all doors will unlock.
Once the doors are unlocked, they may
be opened by pulling the door handle.
When closing the door, push the door by
hand. Make sure that doors are closed
securely.
Information
• In cold and wet climates, door lock
and door mechanisms may not work
properly due to freezing conditions.
• If the door is locked/unlocked multiple
times in rapid succession with either
the vehicle key or door lock switch, the system may stop operating temporarily
in order to protect the circuit and
prevent damage to system components.
• Two press unlock setting can be
changed in the User Settings mode on
the cluster.
Page 172 of 555
Convenience Features
5-26
NOTICE
• Reattempt to do the resetting procedure again, when the resetting
procedure incompletely stops or the
notification sound do not stop.
• Make sure that there is no obstacle around the driver’s seat in advance
of resetting the driver’s seat memory
system.
Easy Access Function
The system will move the driver’s seat
automatically as follows: • It will move the driver’s seat rearward
when the Engine Start/Stop button is
pressed to the OFF position.
• It will move the driver’s seat forward
when the Engine Start/Stop button is
pressed to the ACC or START position.
You can activate or deactivate the Easy
Access Function from the User Settings
mode in the cluster LCD display.
‘Convenience → Seat Easy Access →
Off/Normal/Extended’.
For more information, refer to “LCD
Display” in chapter 4.If your vehicle is
equipped with additional navigation,
please refer to the infotainment system
manual separately supplied.
CAUTION
Driver should be cautious when using
this function to assure no injury to
passenger or child on the back seat.
In case of emergency the driver has to
stop movement of front seat (when easy
access feature is activated) by pressing
SET button or any of the driver seat
control switches.
Page 205 of 555
05
5-59
heAD Up DiSplAy (hUD) (if eQUippeD)
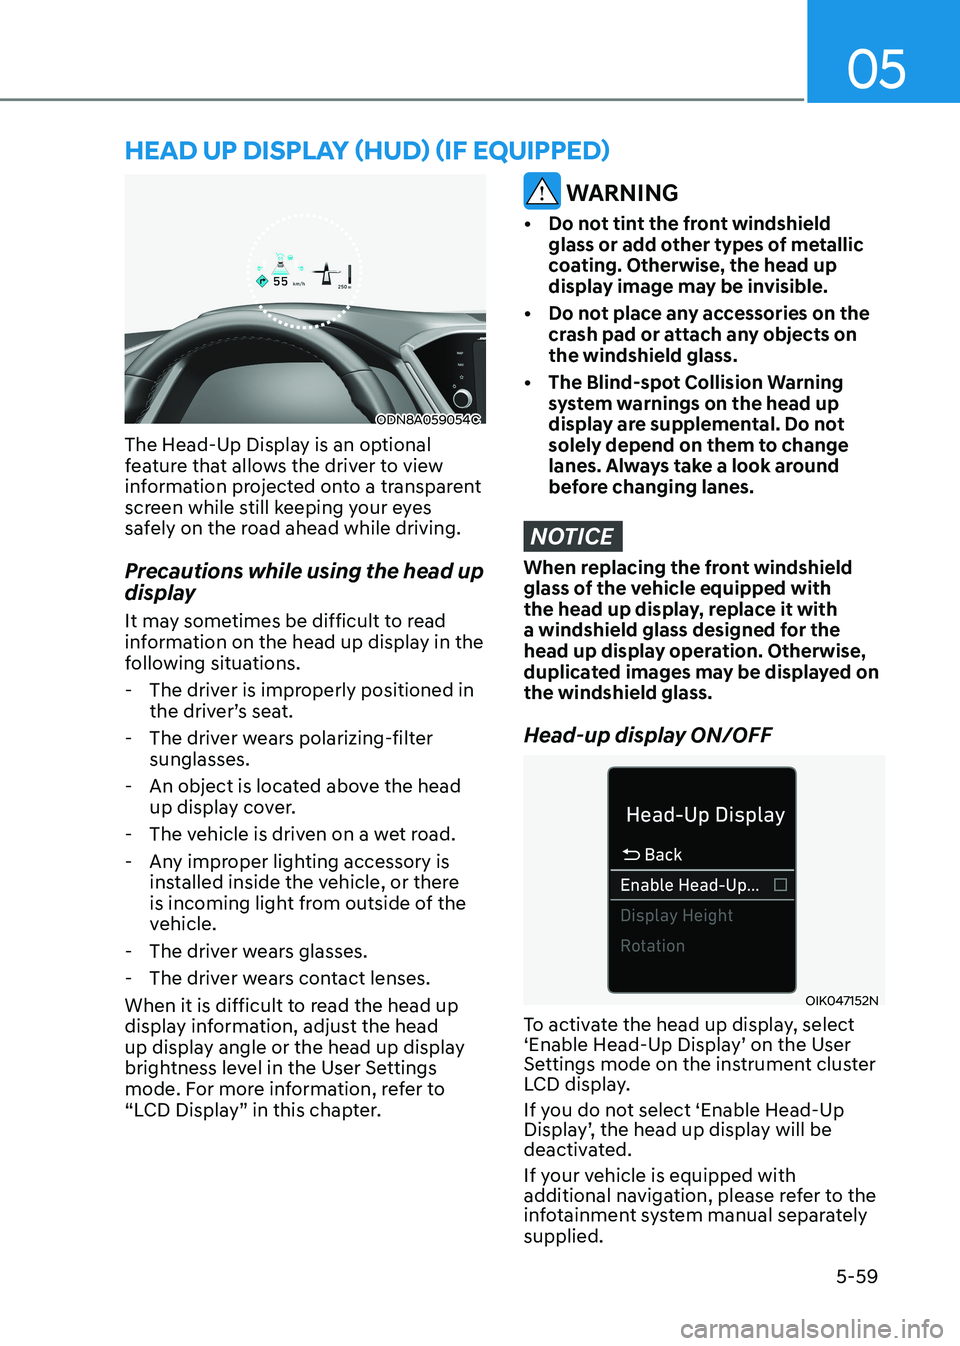
ODN8A059054C
The Head-Up Display is an optional
feature that allows the driver to view
information projected onto a transparent
screen while still keeping your eyes
safely on the road ahead while driving.
Precautions while using the head up
display
It may sometimes be difficult to read
information on the head up display in the
following situations.
- The driver is improperly positioned in the driver’s seat.
- The driver wears polarizing-filter sunglasses.
- An object is located above the head up display cover.
- The vehicle is driven on a wet road.
- Any improper lighting accessory is installed inside the vehicle, or there
is incoming light from outside of the
vehicle.
- The driver wears glasses.
- The driver wears contact lenses.
When it is difficult to read the head up
display information, adjust the head
up display angle or the head up display
brightness level in the User Settings
mode. For more information, refer to
“LCD Display” in this chapter.
WARNING
• Do not tint the front windshield glass or add other types of metallic
coating. Otherwise, the head up
display image may be invisible.
• Do not place any accessories on the crash pad or attach any objects on the windshield glass.
• The Blind-spot Collision Warning system warnings on the head up
display are supplemental. Do not
solely depend on them to change
lanes. Always take a look around
before changing lanes.
NOTICE
When replacing the front windshield
glass of the vehicle equipped with
the head up display, replace it with
a windshield glass designed for the
head up display operation. Otherwise,
duplicated images may be displayed on the windshield glass.
Head-up display ON/OFF
OIK047152N
To activate the head up display, select
‘Enable Head-Up Display’ on the User
Settings mode on the instrument cluster
LCD display.
If you do not select ‘Enable Head-Up
Display’, the head up display will be
deactivated.
If your vehicle is equipped with
additional navigation, please refer to the
infotainment system manual separately supplied.
Page 266 of 555
Convenience Features
5-120
Temperature conversion
If the battery has been discharged or
disconnected, the temperature mode
display will reset to Centigrade.
To change the temperature unit from °C
to °F or °F to °C :
- Automatic climate control system
Press the AUTO button for 3 seconds while pressing the OFF button.
- Instrument cluster
Go to User Settings → Other → Temperature Unit.
The temperature unit on both the cluster
LCD display and the climate control
screen will change.
Air intake control
This is used to select the outside (fresh)
air position or recirculated air position.
To change the air intake control position,
push the control button.
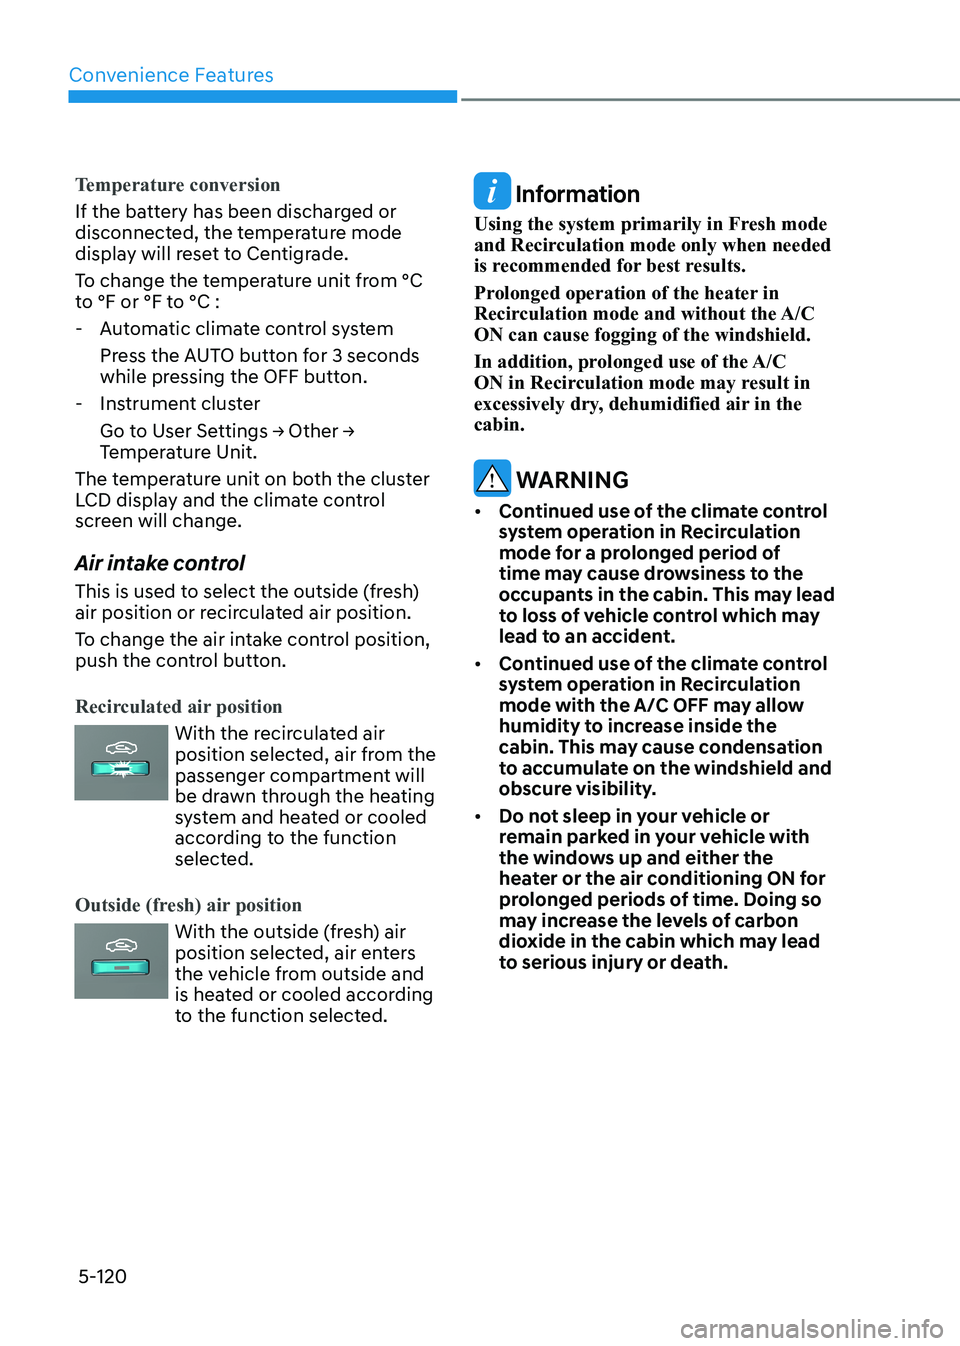
Recirculated air position
With the recirculated air
position selected, air from the
passenger compartment will
be drawn through the heating
system and heated or cooled
according to the function
selected.
Outside (fresh) air position
With the outside (fresh) air
position selected, air enters
the vehicle from outside and
is heated or cooled according
to the function selected.
Information
Using the system primarily in Fresh mode
and Recirculation mode only when needed
is recommended for best results.
Prolonged operation of the heater in
Recirculation mode and without the A/C ON can cause fogging of the windshield.
In addition, prolonged use of the A/C
ON in Recirculation mode may result in
excessively dry, dehumidified air in the cabin.
WARNING
• Continued use of the climate control
system operation in Recirculation
mode for a prolonged period of
time may cause drowsiness to the
occupants in the cabin. This may lead
to loss of vehicle control which may
lead to an accident.
• Continued use of the climate control
system operation in Recirculation
mode with the A/C OFF may allow
humidity to increase inside the
cabin. This may cause condensation
to accumulate on the windshield and
obscure visibility.
• Do not sleep in your vehicle or
remain parked in your vehicle with
the windows up and either the
heater or the air conditioning ON for
prolonged periods of time. Doing so
may increase the levels of carbon
dioxide in the cabin which may lead
to serious injury or death.
Page 281 of 555
![HYUNDAI SONATA 2023 User Guide 05
5-135
Wireless Cellular Phone
Charging System (if equipped)
ODN8059223
[A]: Indicator light, [B]: Charging pad
On certain models, the vehicle comes
equipped with a wireless cellular phone
cha HYUNDAI SONATA 2023 User Guide 05
5-135
Wireless Cellular Phone
Charging System (if equipped)
ODN8059223
[A]: Indicator light, [B]: Charging pad
On certain models, the vehicle comes
equipped with a wireless cellular phone
cha](/img/35/56185/w960_56185-280.png)
05
5-135
Wireless Cellular Phone
Charging System (if equipped)
ODN8059223
[A]: Indicator light, [B]: Charging pad
On certain models, the vehicle comes
equipped with a wireless cellular phone
charger.
The system is available when all doors
are closed, and when the ignition switch is ON.
To charge a cellular phone
The wireless cellular phone charging
system charges only the Qi-enabled
cellular phones. Read the label on the
cellular phone accessory cover or visit
your cellular phone manufacturer’s
website to check whether your cellular
phone supports the Qi technology.
The wireless charging process starts
when you put a Qi-enabled cellular
phone on the wireless charging unit.
1. Remove other items, including the smart key, from the wireless charging
unit. If not, the wireless charging
process may be interrupted. Place
the cellular phone on the center of
the charging pad (
).
2. The indicator light is orange when the cellular phone is charging. The
indicator light turns green when
phone charging is complete.
3. You can turn ON or OFF the wireless charging function in the user settings
mode on the instrument cluster. For
further information, refer to the “LCD
Display Modes” in this chapter.
If your cellular phone is not charging:
- Slightly change the position of the cellular phone on the charging pad.
- Make sure the indicator light is orange.
The indicator light will blink orange for 10
seconds if there is a malfunction in the
wireless charging system.
In this case, temporarily stop the
charging process, and re-attempt to
charge your cellular phone again.
The system warns you with a message
on the LCD display if the cellular phone
is still on the wireless charging unit after
the engine is turned OFF and the front door is opened.
Information
For some manufacturers’ cellular phones, the system may not warn you even though
the cellular phone is left on the wireless
charging unit. This is due to the particular
characteristic of the cellular phone and
not a malfunction of the wireless charging.
NOTICE
• The wireless cellular phone charging system may not support certain
cellular phones, which are not
verified for the Qi specification (
).
• When placing your cellular phone on the charging mat, position the
phone in the middle of the mat for
optimal charging performance. If
your cellular phone is off to the side,
the charging rate may be less and in
some cases the cellular phone may
experience higher heat conduction.
• In some cases, the wireless charging may stop temporarily when the
Remote Key or Smart Key is used,
either when starting the vehicle or
locking/unlocking the doors, etc.
• When charging certain cellular phones, the charging indicator
may not change to green when the
cellular phone is fully charged.
Page 338 of 555
06
6-51
•
The warning light illuminates
on the instrument cluster,
when you cancel FCA
system.
The driver can monitor the FCA ON/OFF
status on the LCD display or infotainment
system display (if equipped). Also, the
warning light illuminates when ESC
(Electronic Stability Control) is turned
off. If the warning light remains ON
when FCA is activated, have the vehicle
inspected by an authorized HYUNDAI
dealer.
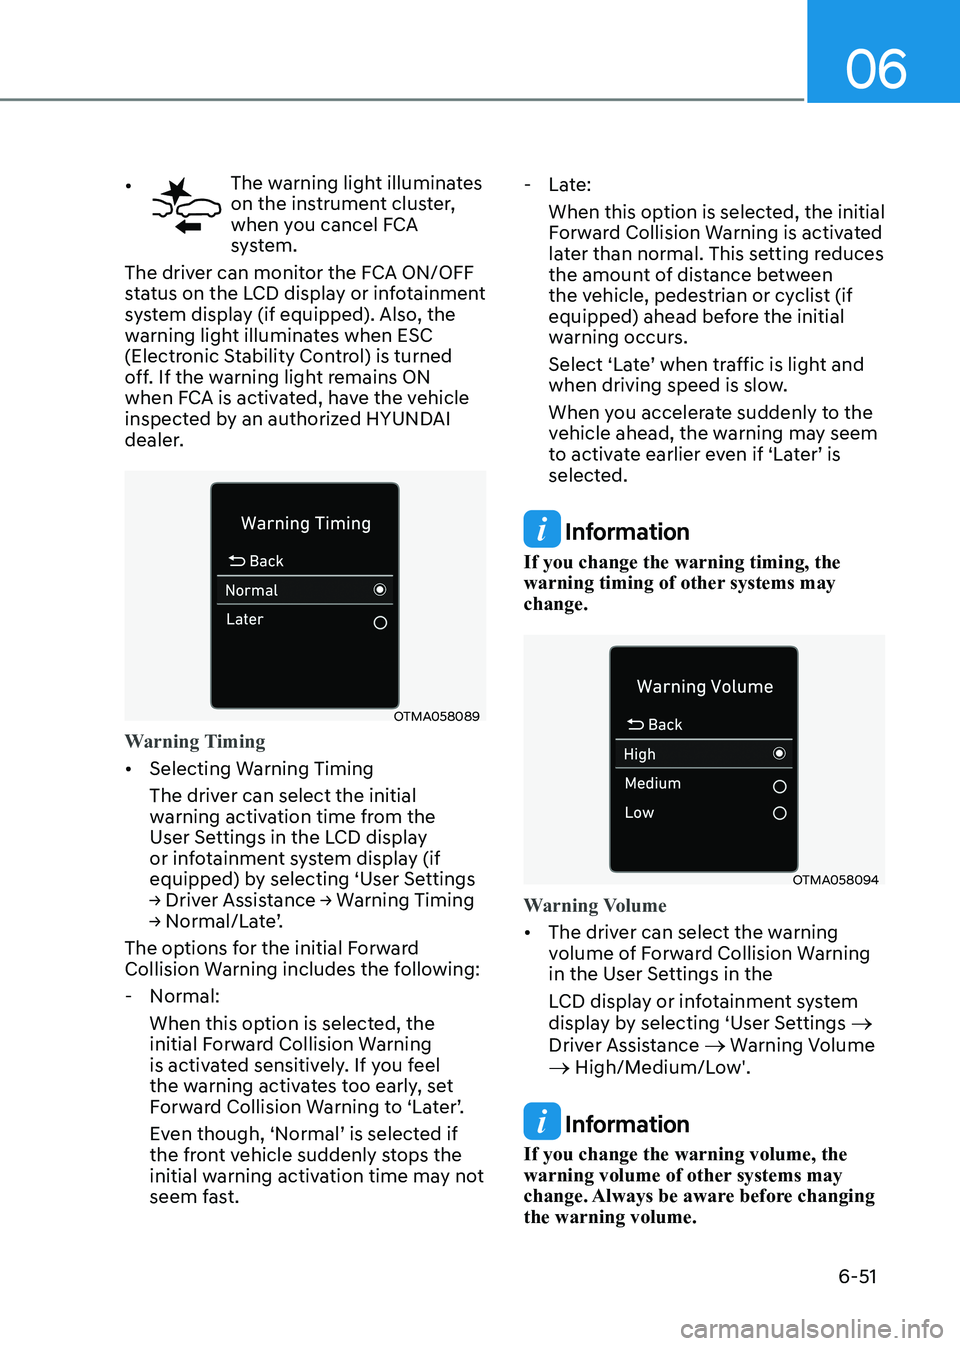
OTMA058089
Warning Timing
• Selecting Warning Timing
The driver can select the initial
warning activation time from the
User Settings in the LCD display
or infotainment system display (if
equipped) by selecting ‘User Settings
→ Driver Assistance → Warning Timing
→ Normal/Late’.
The options for the initial Forward
Collision Warning includes the following: - Normal: When this option is selected, the
initial Forward Collision Warning
is activated sensitively. If you feel
the warning activates too early, set
Forward Collision Warning to ‘Later’.
Even though, ‘Normal’ is selected if
the front vehicle suddenly stops the
initial warning activation time may not
seem fast. - Late:
When this option is selected, the initial
Forward Collision Warning is activated
later than normal. This setting reduces
the amount of distance between
the vehicle, pedestrian or cyclist (if
equipped) ahead before the initial
warning occurs.
Select ‘Late’ when traffic is light and
when driving speed is slow.
When you accelerate suddenly to the
vehicle ahead, the warning may seem
to activate earlier even if ‘Later’ is
selected.
Information
If you change the warning timing, the
warning timing of other systems may change.
OTMA058094
Warning Volume
• The driver can select the warning
volume of Forward Collision Warning
in the User Settings in the
LCD display or infotainment system
display by selecting ‘User Settings →
Driver Assistance → Warning Volume
→ High/Medium/Low'.
Information
If you change the warning volume, the
warning volume of other systems may
change. Always be aware before changing the warning volume.
Page 359 of 555
While Driving
6-72
LKA System Function Change
The driver can change LKA to
Lane Departure Warning or Lane
Keeping Assist from the LCD display
or infotainment system display(if
equipped). Go to the ‘User Settings →
Driver Assistance → Lane Safety → Lane
Keeping Assist/Lane Departure Warning/
Off'. The system is automatically set to
Lane Keeping Assist if a function is not changed.
Lane Keeping Assist
The LKA mode guides the driver to help
keep the vehicle within the lanes. It
rarely controls the steering wheel, when
the vehicle drives well inside the lanes.
However, it starts to control the steering
wheel, when the vehicle is about to
deviate out of the lanes.
Lane Departure Warning
LDW alerts the driver with a visual
warning and a warning alarm when the
system detects the vehicle departing
the lane. The steering wheel will not be
controlled.LKA system operation
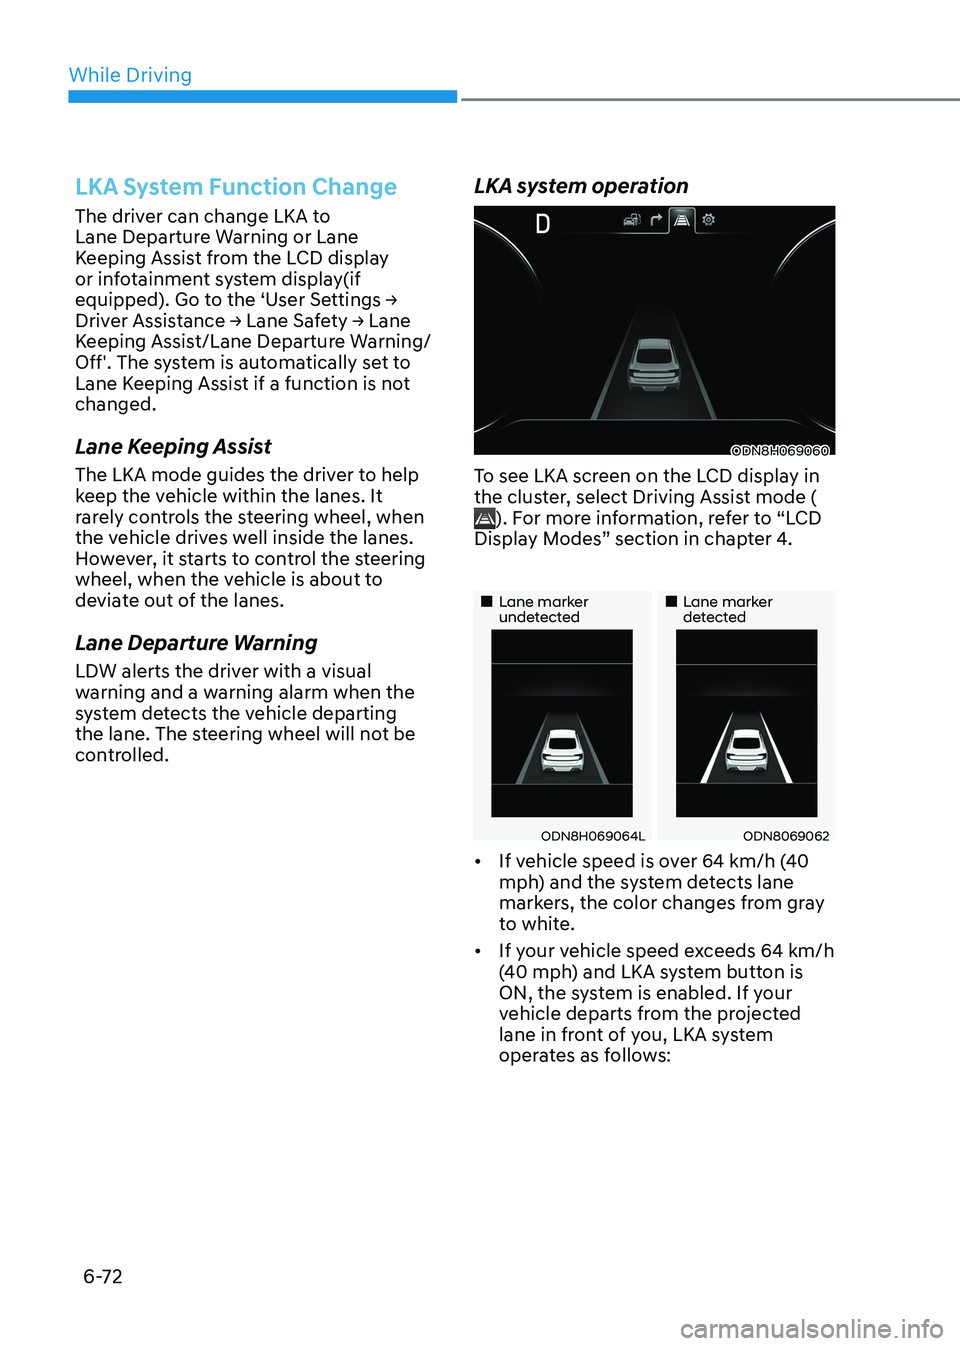
ODN8H069060
To see LKA screen on the LCD display in
the cluster, select Driving Assist mode (
). For more information, refer to “LCD
Display Modes” section in chapter 4.
„„Lane marker undetected „„Lane marker detected
ODN8H069064LODN8069062
• If vehicle speed is over 64 km/h (40
mph) and the system detects lane
markers, the color changes from gray
to white.
• If your vehicle speed exceeds 64 km/h
(40 mph) and LKA system button is
ON, the system is enabled. If your
vehicle departs from the projected
lane in front of you, LKA system
operates as follows: