instrument panel HYUNDAI SONATA 2023 User Guide
[x] Cancel search | Manufacturer: HYUNDAI, Model Year: 2023, Model line: SONATA, Model: HYUNDAI SONATA 2023Pages: 555, PDF Size: 42.72 MB
Page 85 of 555
Seats & Safety System
3-56
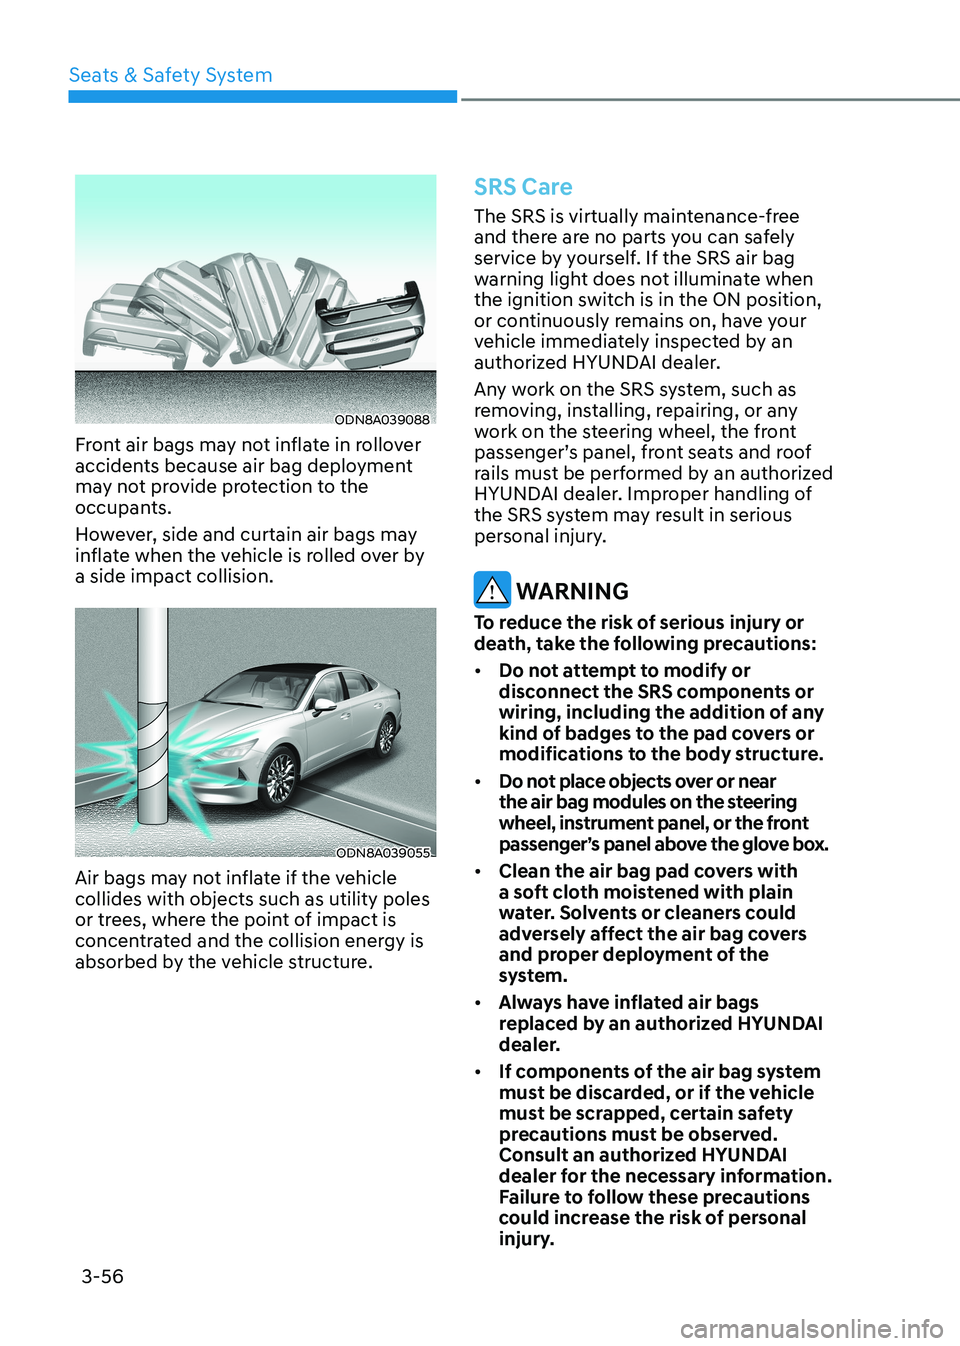
ODN8A039088
Front air bags may not inflate in rollover
accidents because air bag deployment
may not provide protection to the
occupants.
However, side and curtain air bags may
inflate when the vehicle is rolled over by a side impact collision.
ODN8A039055
Air bags may not inflate if the vehicle collides with objects such as utility poles
or trees, where the point of impact is
concentrated and the collision energy is
absorbed by the vehicle structure.
SRS Care
The SRS is virtually maintenance-free
and there are no parts you can safely
service by yourself. If the SRS air bag
warning light does not illuminate when
the ignition switch is in the ON position,
or continuously remains on, have your
vehicle immediately inspected by an
authorized HYUNDAI dealer.
Any work on the SRS system, such as
removing, installing, repairing, or any
work on the steering wheel, the front
passenger’s panel, front seats and roof
rails must be performed by an authorized
HYUNDAI dealer. Improper handling of
the SRS system may result in serious
personal injury.
WARNING
To reduce the risk of serious injury or
death, take the following precautions: • Do not attempt to modify or
disconnect the SRS components or
wiring, including the addition of any
kind of badges to the pad covers or
modifications to the body structure.
• Do not place objects over or near
the air bag modules on the steering
wheel, instrument panel, or the front
passenger’s panel above the glove box.
• Clean the air bag pad covers with
a soft cloth moistened with plain
water. Solvents or cleaners could
adversely affect the air bag covers
and proper deployment of the
system.
• Always have inflated air bags
replaced by an authorized HYUNDAI
dealer.
• If components of the air bag system
must be discarded, or if the vehicle
must be scrapped, certain safety
precautions must be observed.
Consult an authorized HYUNDAI
dealer for the necessary information.
Failure to follow these precautions
could increase the risk of personal
injury.
Page 90 of 555
Instrument Cluster
4-4
Instrument Cluster Control
Adjusting instrument cluster
illumination
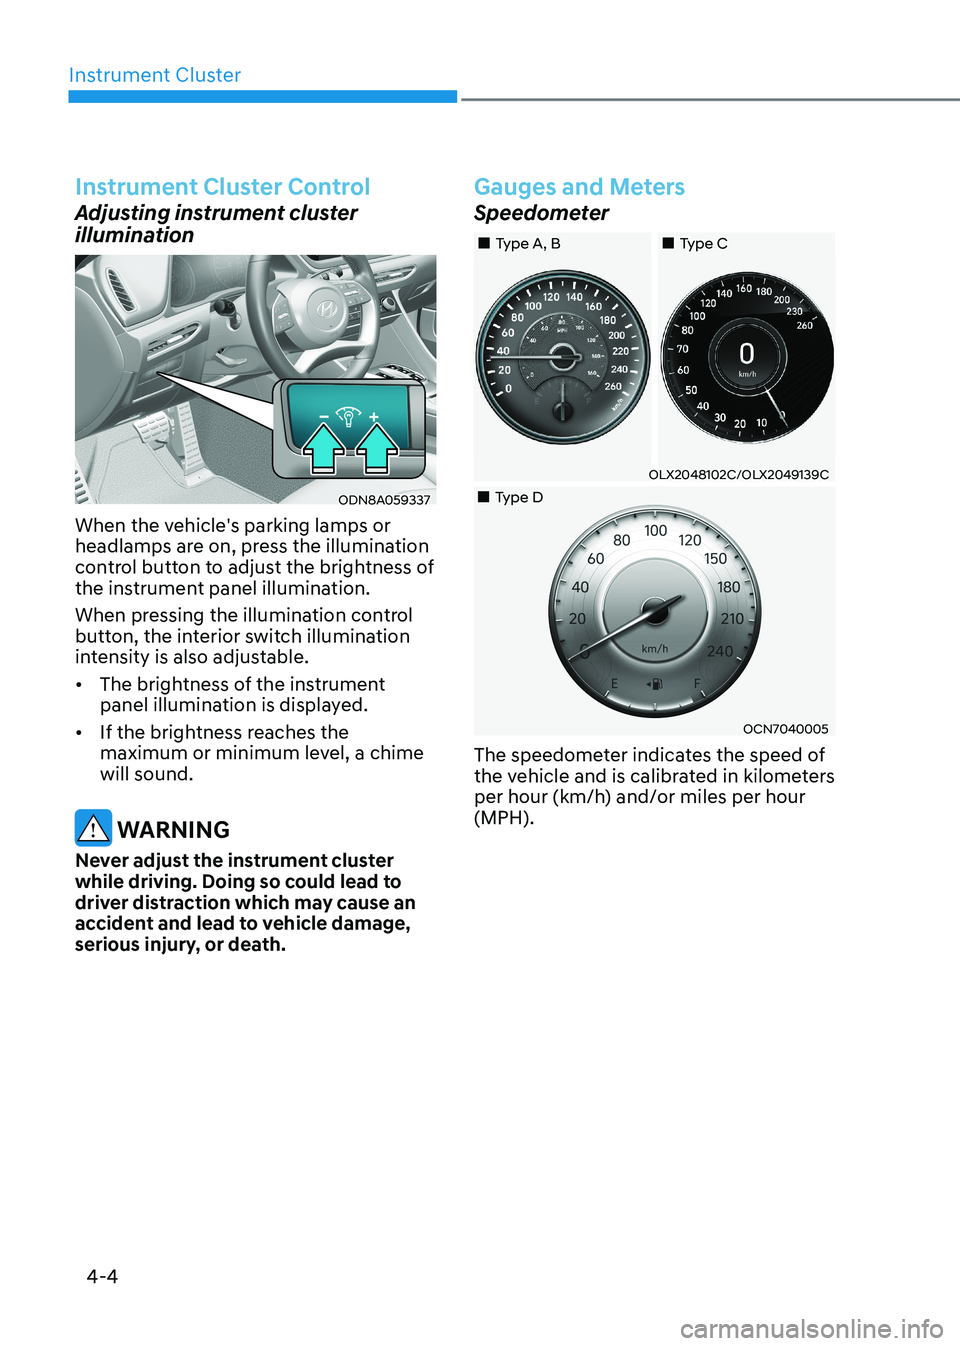
ODN8A059337
When the vehicle's parking lamps or
headlamps are on, press the illumination
control button to adjust the brightness of
the instrument panel illumination.
When pressing the illumination control
button, the interior switch illumination
intensity is also adjustable. • The brightness of the instrument
panel illumination is displayed.
• If the brightness reaches the
maximum or minimum level, a chime will sound.
WARNING
Never adjust the instrument cluster
while driving. Doing so could lead to
driver distraction which may cause an
accident and lead to vehicle damage,
serious injury, or death.
Gauges and Meters
Speedometer
„„Type C
„„Type A, B
„
„Type D
OLX2048102C/OLX2049139C
OCN7040005
The speedometer indicates the speed of
the vehicle and is calibrated in kilometers
per hour (km/h) and/or miles per hour (MPH).
Page 107 of 555
04
4-21
Instrument panel illumination
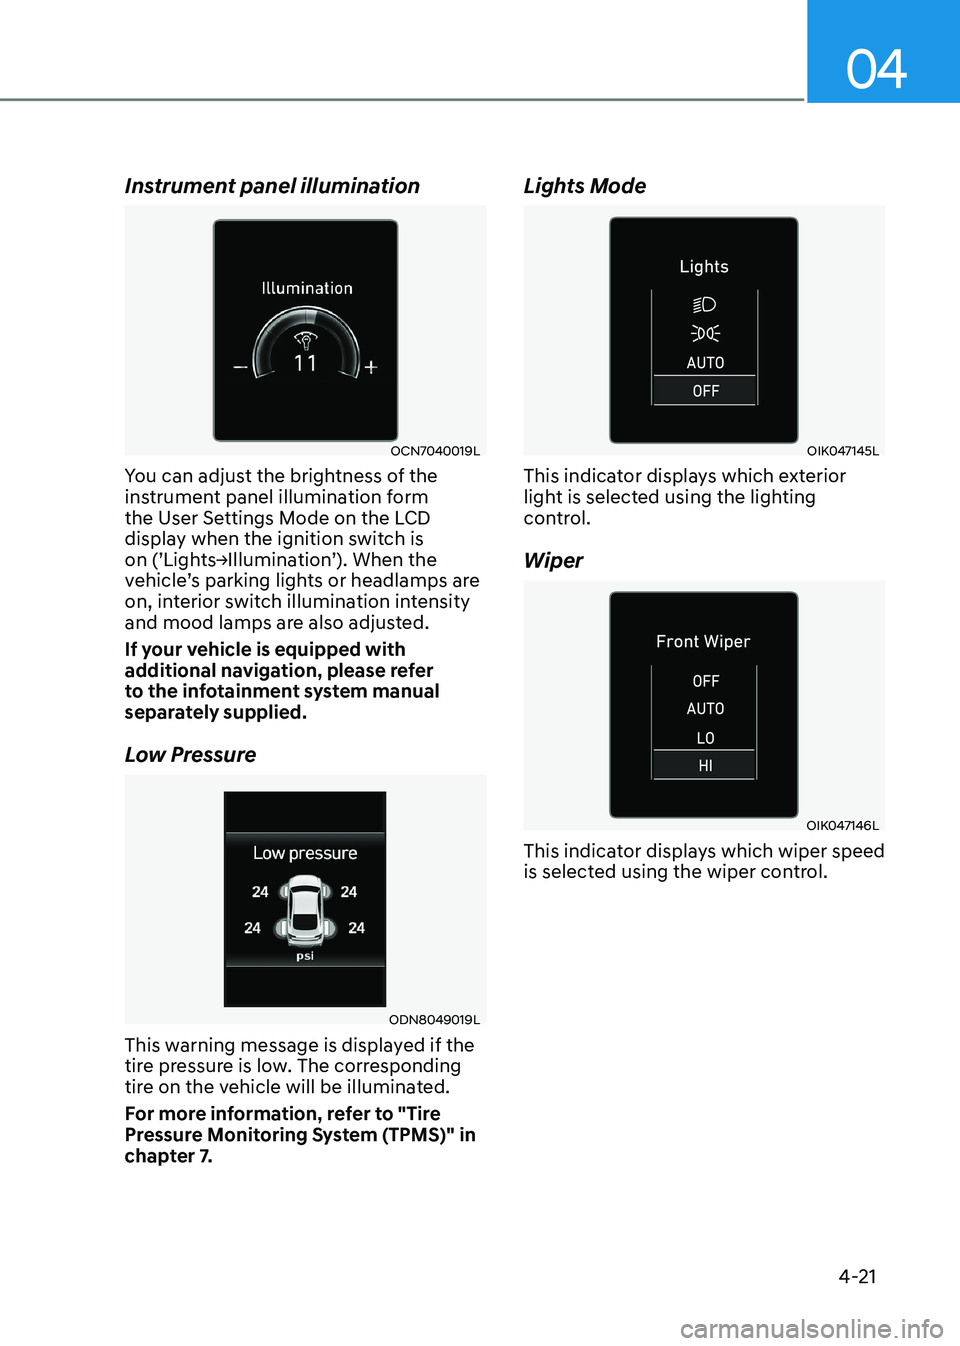
OCN7040019L
You can adjust the brightness of the
instrument panel illumination form
the User Settings Mode on the LCD
display when the ignition switch is
on (’Lights→Illumination’). When the
vehicle’s parking lights or headlamps are
on, interior switch illumination intensity
and mood lamps are also adjusted.
If your vehicle is equipped with
additional navigation, please refer
to the infotainment system manual
separately supplied.
Low Pressure
ODN8049019L
This warning message is displayed if the
tire pressure is low. The corresponding
tire on the vehicle will be illuminated.
For more information, refer to "Tire
Pressure Monitoring System (TPMS)" in
chapter 7. Lights Mode
OIK047145L
This indicator displays which exterior
light is selected using the lighting
control. Wiper
OIK047146L
This indicator displays which wiper speed
is selected using the wiper control.
Page 170 of 555
Convenience Features
5-24
Driver poSiTion memory SySTem (if eQUippeD)
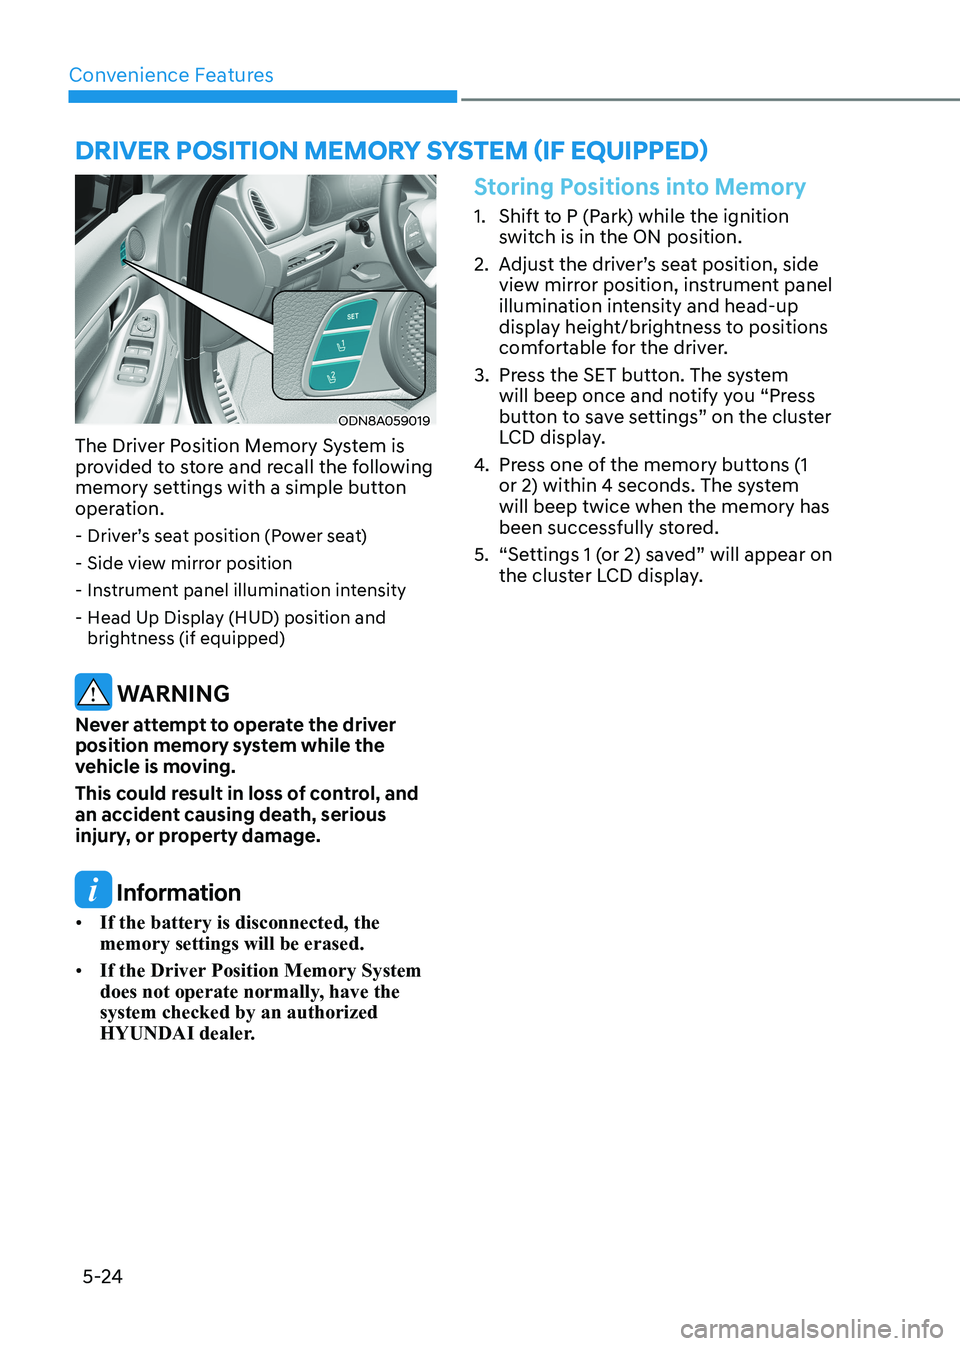
ODN8A059019
The Driver Position Memory System is
provided to store and recall the following
memory settings with a simple button
operation. - Driver’s seat position (Power seat)
- Side view mirror position
- Instrument panel illumination intensity
- Head Up Display (HUD) position and brightness (if equipped)
WARNING
Never attempt to operate the driver
position memory system while the
vehicle is moving.
This could result in loss of control, and
an accident causing death, serious
injury, or property damage.
Information
• If the battery is disconnected, the memory settings will be erased.
• If the Driver Position Memory System
does not operate normally, have the system checked by an authorized
HYUNDAI dealer.
Storing Positions into Memory
1. Shift to P (Park) while the ignition
switch is in the ON position.
2. Adjust the driver’s seat position, side view mirror position, instrument panel
illumination intensity and head-up
display height/brightness to positions
comfortable for the driver.
3. Press the SET button. The system will beep once and notify you “Press
button to save settings” on the cluster
LCD display.
4. Press one of the memory buttons (1
or 2) within 4 seconds. The system will beep twice when the memory has
been successfully stored.
5. “Settings 1 (or 2) saved” will appear on the cluster LCD display.
Page 171 of 555
05
5-25
Recalling Positions from Memory
1. Shift to P (Park) while the ignition switch is in the ON position.
2. Press the desired memory button (1 or 2). The system will beep once,
and then the driver’s seat position,
side view mirror position, instrument
panel illumination intensity and
head-up display height/brightness
will automatically adjust to the stored positions.
3. “Settings 1 (or 2) applied” will appear on the cluster LCD display.
If your vehicle is equipped with
additional navigation, please refer to the
infotainment system manual separately supplied.
Information
• While recalling the “1” memory
position, pressing the SET or 1 button temporarily stops the adjustment of
the recalled memory position. Pressing
the 2 button recalls the “2” memory position.
• While recalling the “2” memory
position, pressing the SET or 2 button temporarily stops the adjustment of
the recalled memory position. Pressing
the 1 button recalls the “1” memory position.
• While recalling the stored positions,
pressing one of the control buttons
for the driver’s seat, side view mirror,
instrument panel illumination or head-up display will cause the movement of that component to stop and move in
the direction that the control button is
pressed.
Resetting the Driver’s Seat
Memory System
Take the following procedures to reset
the driver’s seat memory system, when it
does not operate properly.
To reset the driver’s seat memory
system
1. Place the ignition switch to the ON
position, shift to P (Park), and open
the driver’s door.
2. Operate the control switch to set the driver’s seat and seatback to the
foremost position.
3. Simultaneously press the SET button and push forward the seat movement
switch over 2 seconds.
While resetting the driver’s seat
memory system
1. It starts with the notification sound.
2. The driver’s seat and seatback is adjusted to the rearward position with
the notification sound.
3. The driver’s seat and seatback is re-adjusted to the default position
(central position) with the notification sound.
However, in the following cases, the
resetting procedure and the notification
sound may stop.
- The memory button is pressed.
- The control switch is operated.
- The gear is shifted out of P (Park) .
- The driving speed exceeds 3 km/h (2 mph).
- The driver’s door is closed.
Page 207 of 555
05
5-61
lighting
Exterior Lights
Lighting control
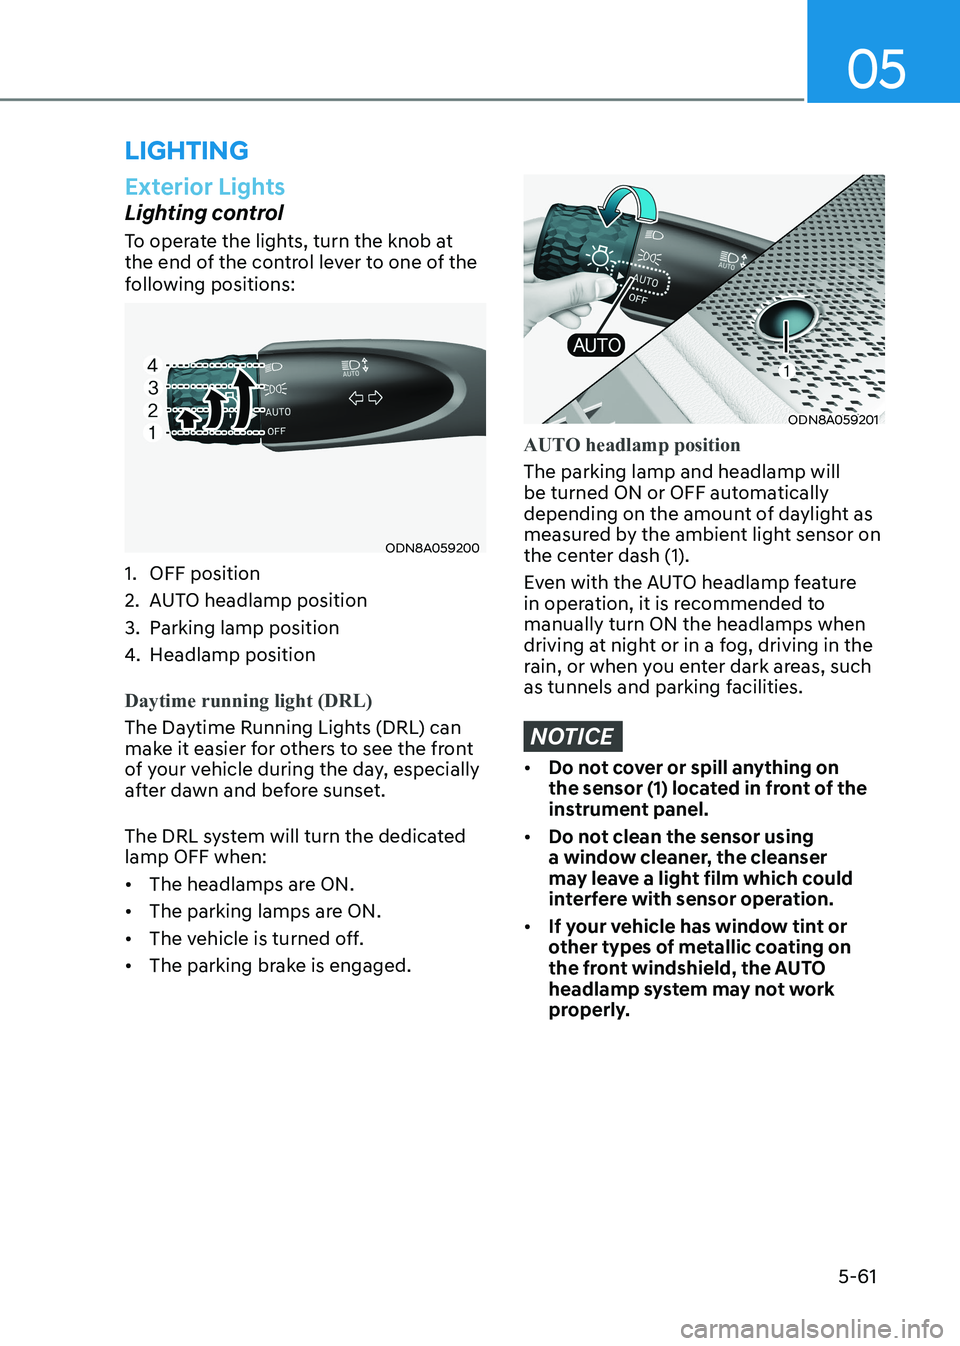
To operate the lights, turn the knob at
the end of the control lever to one of the
following positions:
ODN8A059200
1. OFF position
2. AUTO headlamp position
3. Parking lamp position
4. Headlamp position
Daytime running light (DRL)
The Daytime Running Lights (DRL) can
make it easier for others to see the front
of your vehicle during the day, especially
after dawn and before sunset.
The DRL system will turn the dedicated lamp OFF when: • The headlamps are ON.
• The parking lamps are ON.
• The vehicle is turned off.
• The parking brake is engaged.
ODN8A059201
AUTO headlamp position
The parking lamp and headlamp will
be turned ON or OFF automatically
depending on the amount of daylight as
measured by the ambient light sensor on
the center dash (1).
Even with the AUTO headlamp feature
in operation, it is recommended to manually turn ON the headlamps when
driving at night or in a fog, driving in the
rain, or when you enter dark areas, such
as tunnels and parking facilities.
NOTICE
• Do not cover or spill anything on
the sensor (1) located in front of the
instrument panel.
• Do not clean the sensor using
a window cleaner, the cleanser
may leave a light film which could
interfere with sensor operation.
• If your vehicle has window tint or
other types of metallic coating on
the front windshield, the AUTO
headlamp system may not work
properly.
Page 208 of 555
Convenience Features
5-62
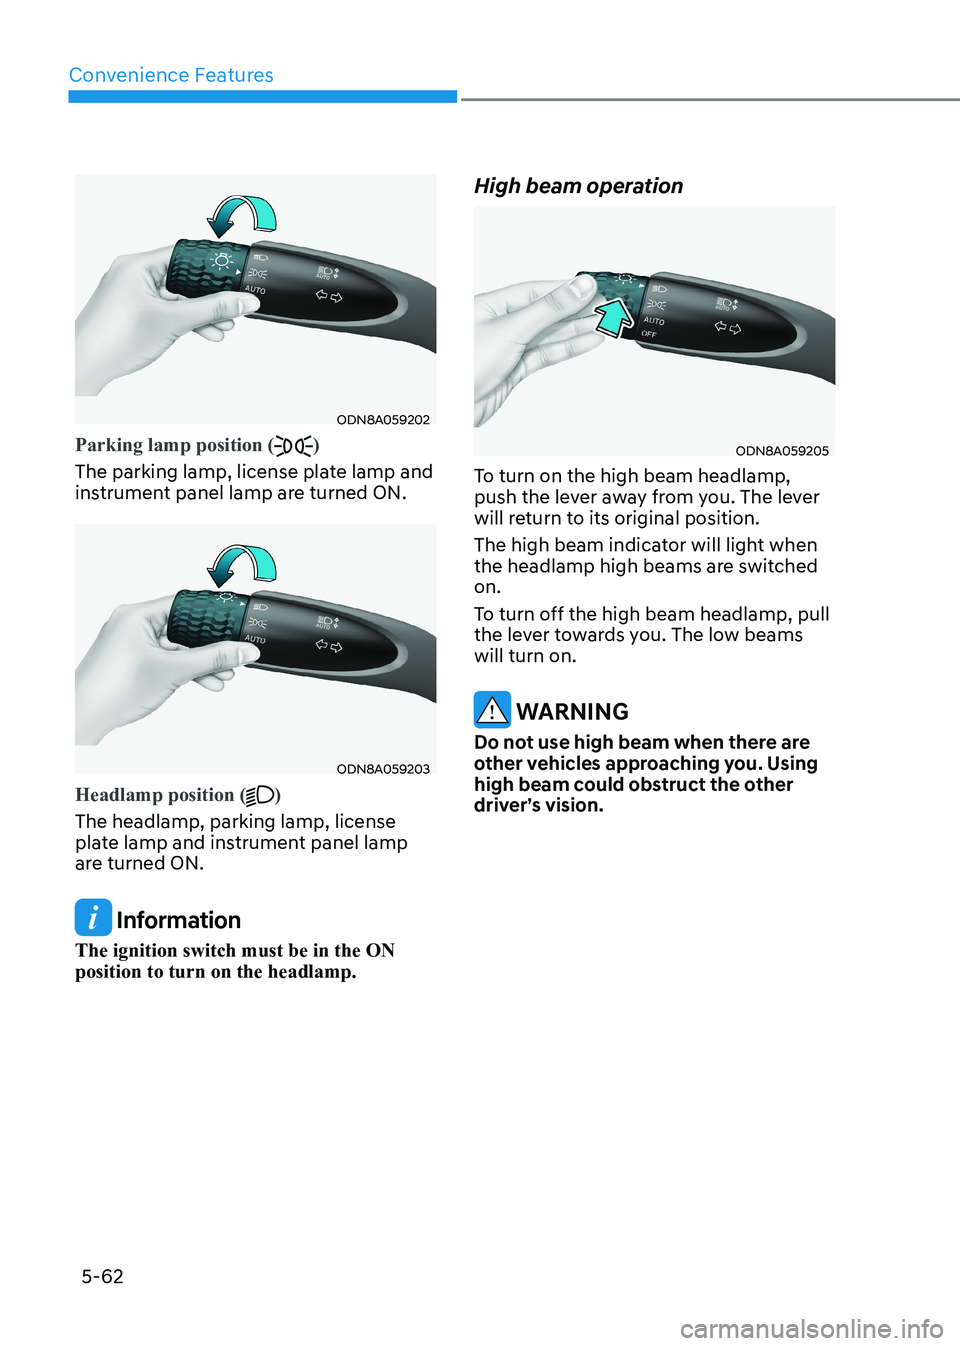
ODN8A059202
Parking lamp position ()
The parking lamp, license plate lamp and
instrument panel lamp are turned ON.
ODN8A059203
Headlamp position ()
The headlamp, parking lamp, license
plate lamp and instrument panel lamp
are turned ON.
Information
The ignition switch must be in the ON position to turn on the headlamp. High beam operation
ODN8A059205
To turn on the high beam headlamp,
push the lever away from you. The lever
will return to its original position.
The high beam indicator will light when
the headlamp high beams are switched on.
To turn off the high beam headlamp, pull
the lever towards you. The low beams will turn on.
WARNING
Do not use high beam when there are
other vehicles approaching you. Using
high beam could obstruct the other
driver’s vision.
Page 255 of 555
05
5-109
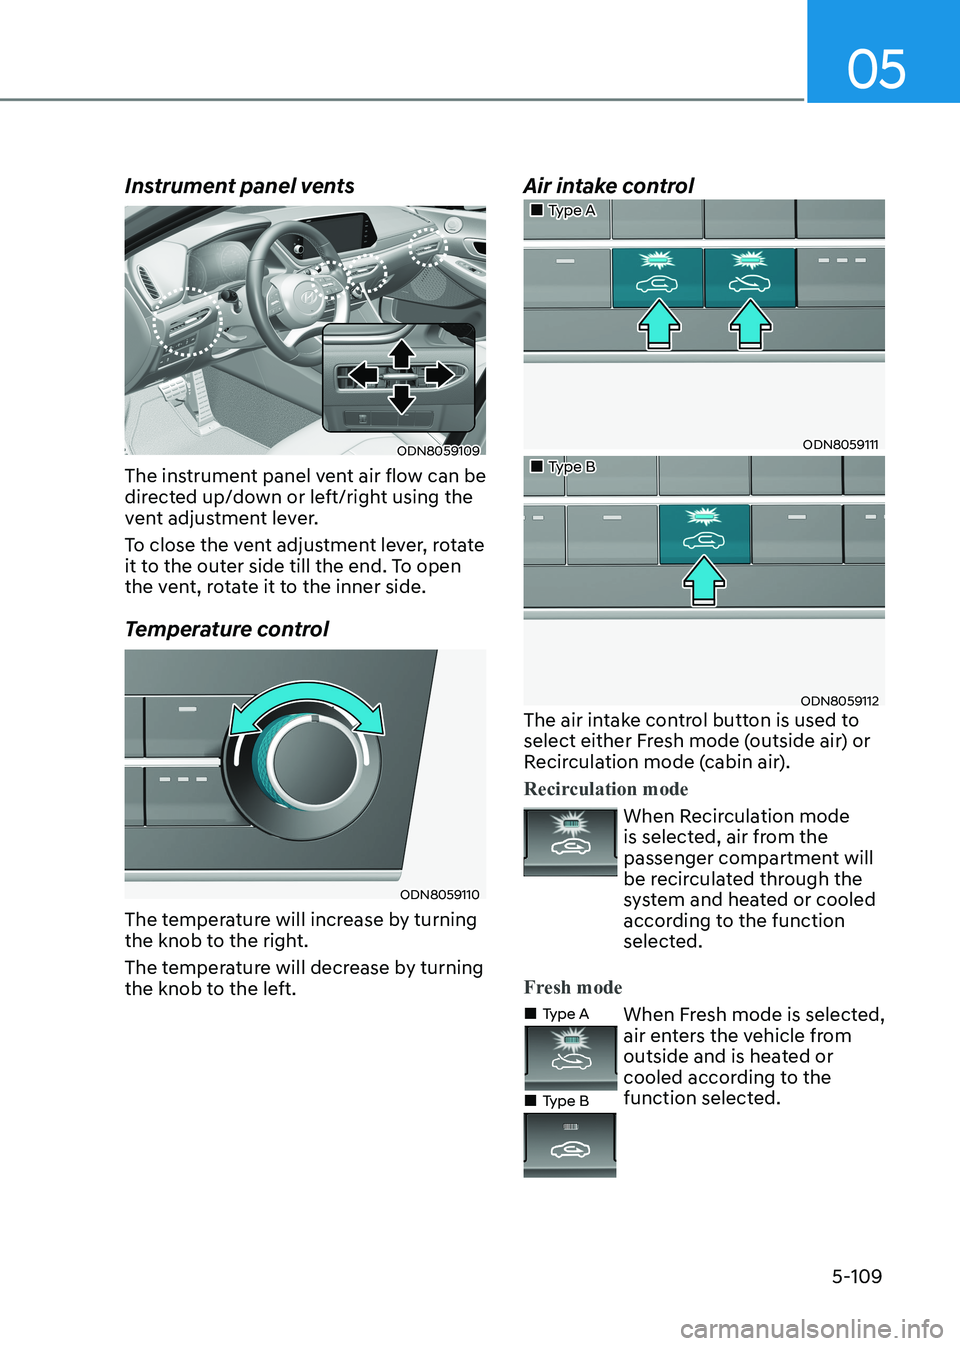
Instrument panel vents
ODN8059109
The instrument panel vent air flow can be
directed up/down or left/right using the
vent adjustment lever.
To close the vent adjustment lever, rotate
it to the outer side till the end. To open
the vent, rotate it to the inner side.
Temperature control
ODN8059110
The temperature will increase by turning
the knob to the right.
The temperature will decrease by turning
the knob to the left. Air intake control
„„Type A
ODN8059111
„„Type B
ODN8059112
The air intake control button is used to
select either Fresh mode (outside air) or
Recirculation mode (cabin air).
Recirculation mode
When Recirculation mode
is selected, air from the
passenger compartment will
be recirculated through the
system and heated or cooled
according to the function
selected.
Fresh mode
„„Type A
„
„Type B When Fresh mode is selected,
air enters the vehicle from
outside and is heated or
cooled according to the
function selected.
Page 265 of 555
05
5-119
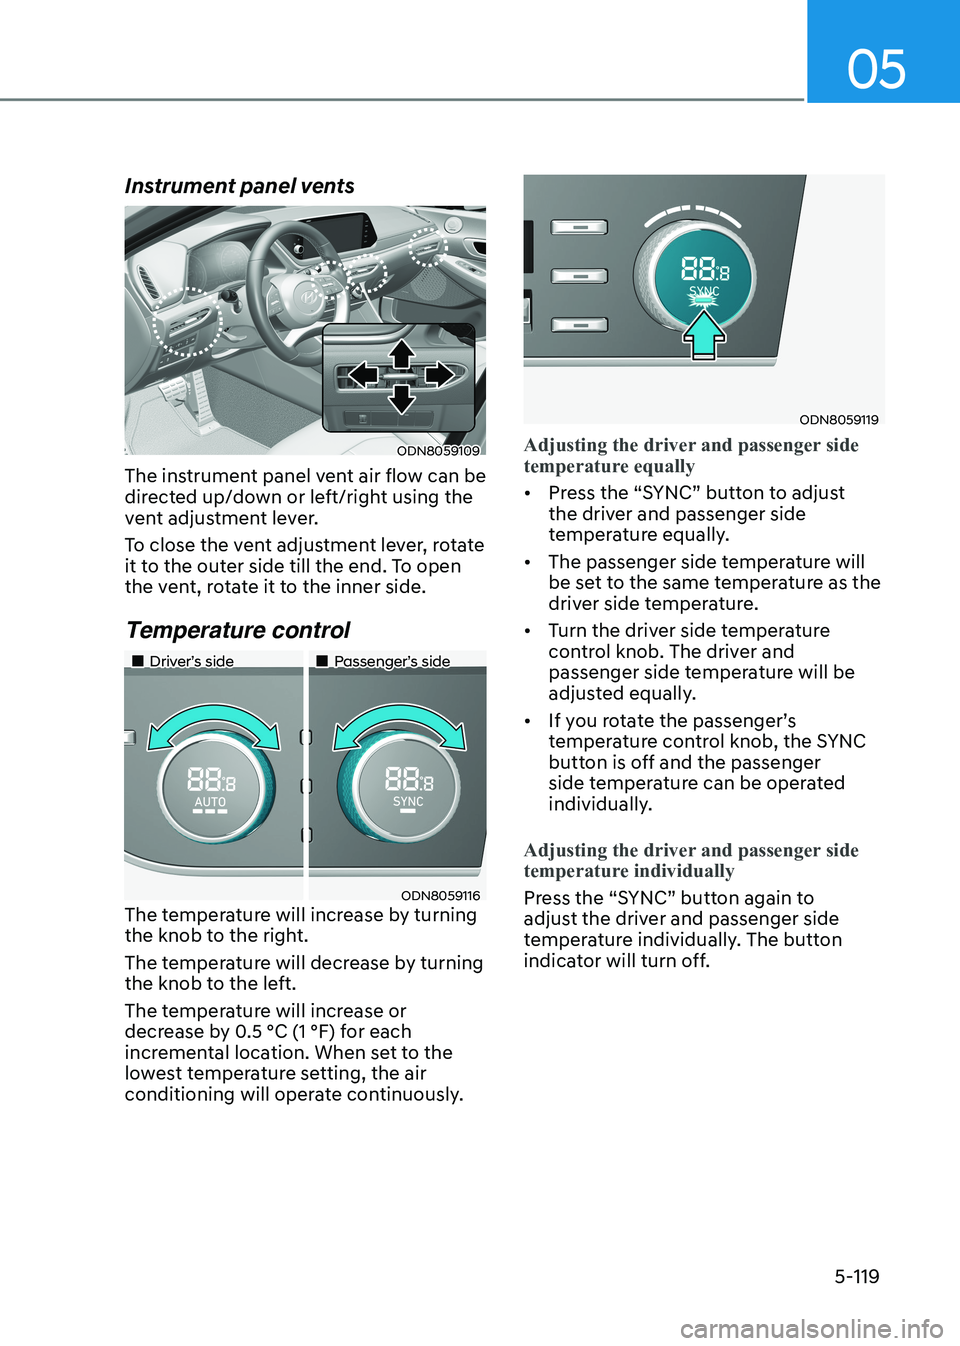
Instrument panel vents
ODN8059109
The instrument panel vent air flow can be
directed up/down or left/right using the
vent adjustment lever.
To close the vent adjustment lever, rotate
it to the outer side till the end. To open
the vent, rotate it to the inner side. Temperature control
„„Driver’s side „„Passenger’s side
ODN8059116
The temperature will increase by turning
the knob to the right.
The temperature will decrease by turning
the knob to the left.
The temperature will increase or
decrease by 0.5 °C (1 °F) for each
incremental location. When set to the
lowest temperature setting, the air
conditioning will operate continuously.
ODN8059119
Adjusting the driver and passenger side
temperature equally
• Press the “SYNC” button to adjust
the driver and passenger side
temperature equally.
• The passenger side temperature will
be set to the same temperature as the
driver side temperature.
• Turn the driver side temperature
control knob. The driver and
passenger side temperature will be
adjusted equally.
• If you rotate the passenger’s
temperature control knob, the SYNC
button is off and the passenger
side temperature can be operated
individually.
Adjusting the driver and passenger side
temperature individually
Press the “SYNC” button again to
adjust the driver and passenger side
temperature individually. The button
indicator will turn off.
Page 275 of 555
05
5-129
Defroster
NOTICE
To prevent damage to the conductors
bonded to the inside surface of the rear
window, never use sharp instruments or
window cleaners containing abrasives
to clean the window.
Information
If you want to defrost and defog the
front windshield, refer to “Windshield
Defrosting and Defogging” in this chapter.
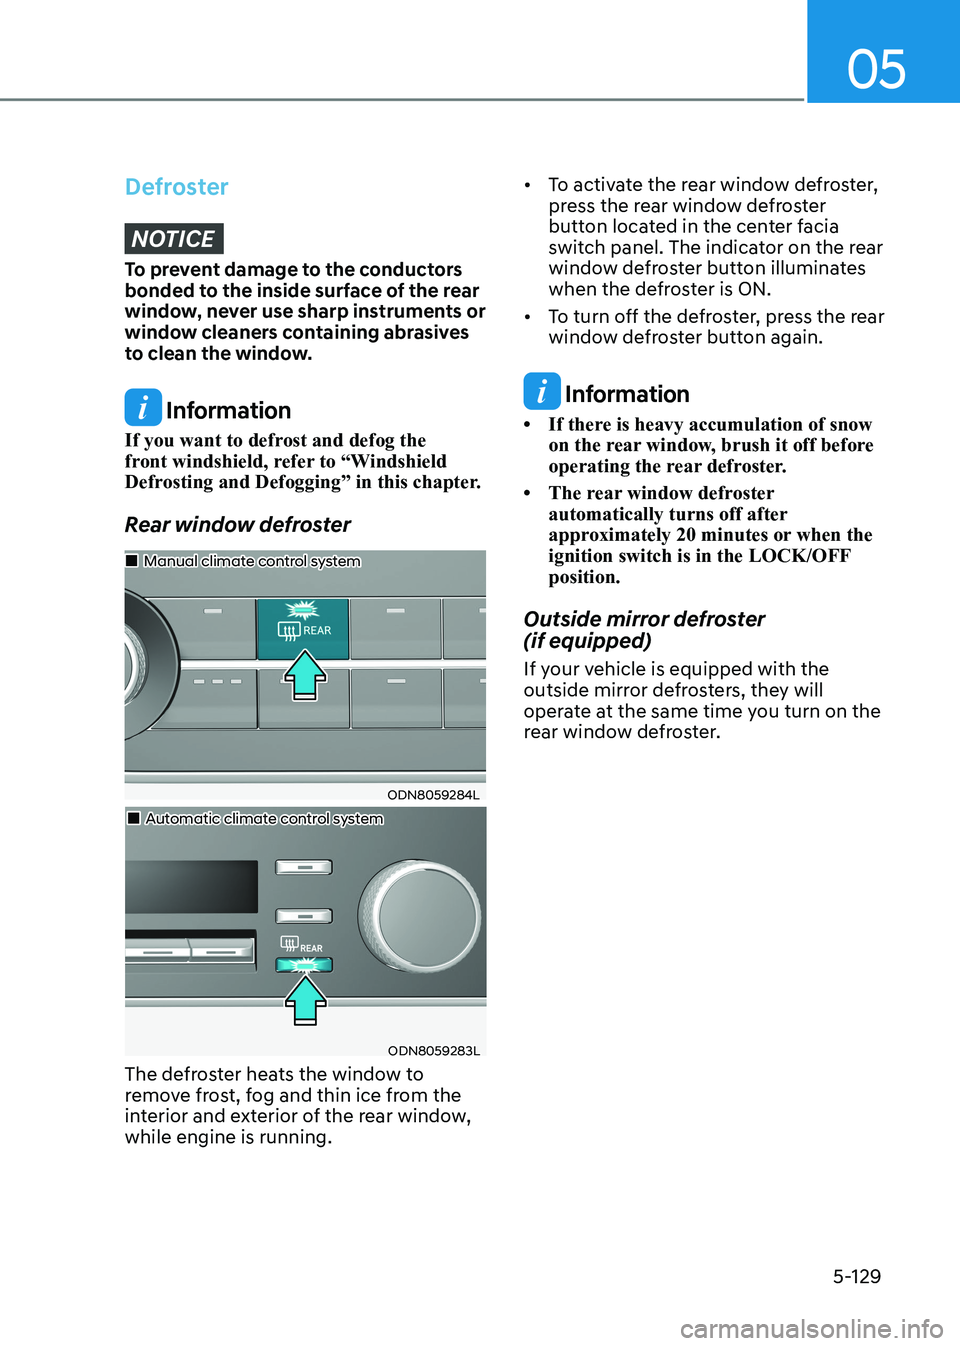
Rear window defroster
ODN8059284L
„
„Manual climate control system
„„Automatic climate control system
ODN8059283L
The defroster heats the window to
remove frost, fog and thin ice from the
interior and exterior of the rear window, while engine is running. • To activate the rear window defroster,
press the rear window defroster
button located in the center facia
switch panel. The indicator on the rear
window defroster button illuminates
when the defroster is ON.
• To turn off the defroster, press the rear window defroster button again.
Information
• If there is heavy accumulation of snow on the rear window, brush it off before
operating the rear defroster.
• The rear window defroster automatically turns off after
approximately 20 minutes or when the
ignition switch is in the LOCK/OFF position.
Outside mirror defroster (if equipped)
If your vehicle is equipped with the
outside mirror defrosters, they will
operate at the same time you turn on the
rear window defroster.