sensor HYUNDAI SONATA 2023 User Guide
[x] Cancel search | Manufacturer: HYUNDAI, Model Year: 2023, Model line: SONATA, Model: HYUNDAI SONATA 2023Pages: 555, PDF Size: 42.72 MB
Page 83 of 555
Seats & Safety System
3-54
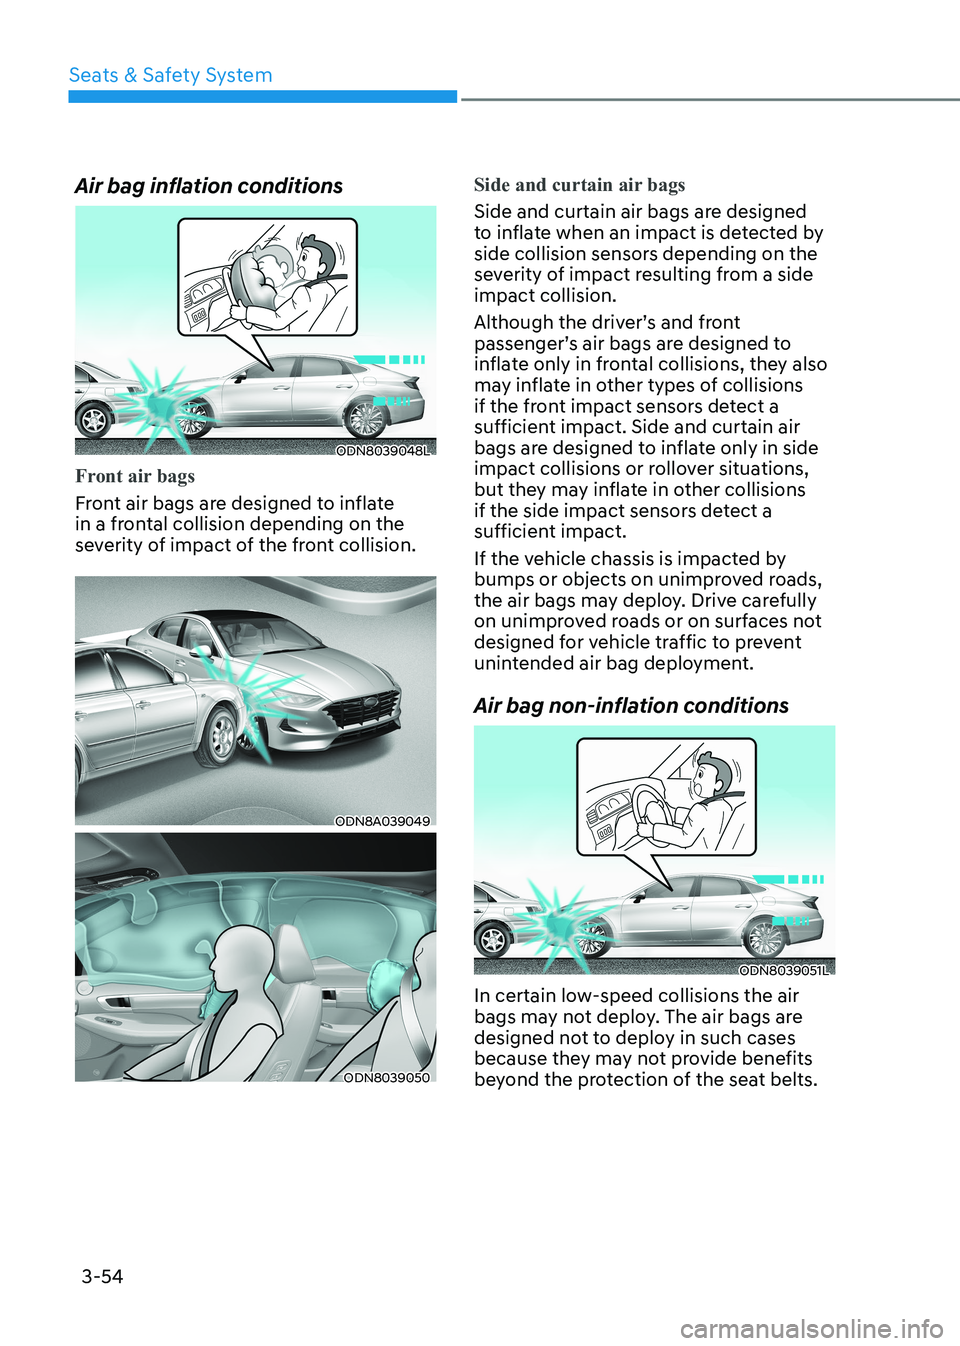
Air bag inflation conditions
ODN8039048L
Front air bags
Front air bags are designed to inflate
in a frontal collision depending on the
severity of impact of the front collision.
ODN8A039049
ODN8039050
Side and curtain air bags
Side and curtain air bags are designed
to inflate when an impact is detected by
side collision sensors depending on the
severity of impact resulting from a side impact collision.
Although the driver’s and front
passenger’s air bags are designed to
inflate only in frontal collisions, they also
may inflate in other types of collisions
if the front impact sensors detect a
sufficient impact. Side and curtain air
bags are designed to inflate only in side
impact collisions or rollover situations,
but they may inflate in other collisions
if the side impact sensors detect a
sufficient impact.
If the vehicle chassis is impacted by
bumps or objects on unimproved roads,
the air bags may deploy. Drive carefully
on unimproved roads or on surfaces not
designed for vehicle traffic to prevent
unintended air bag deployment.
Air bag non-inflation conditions
ODN8039051L
In certain low-speed collisions the air
bags may not deploy. The air bags are
designed not to deploy in such cases
because they may not provide benefits
beyond the protection of the seat belts.
Page 84 of 555
03
3-55
ODN8039052L
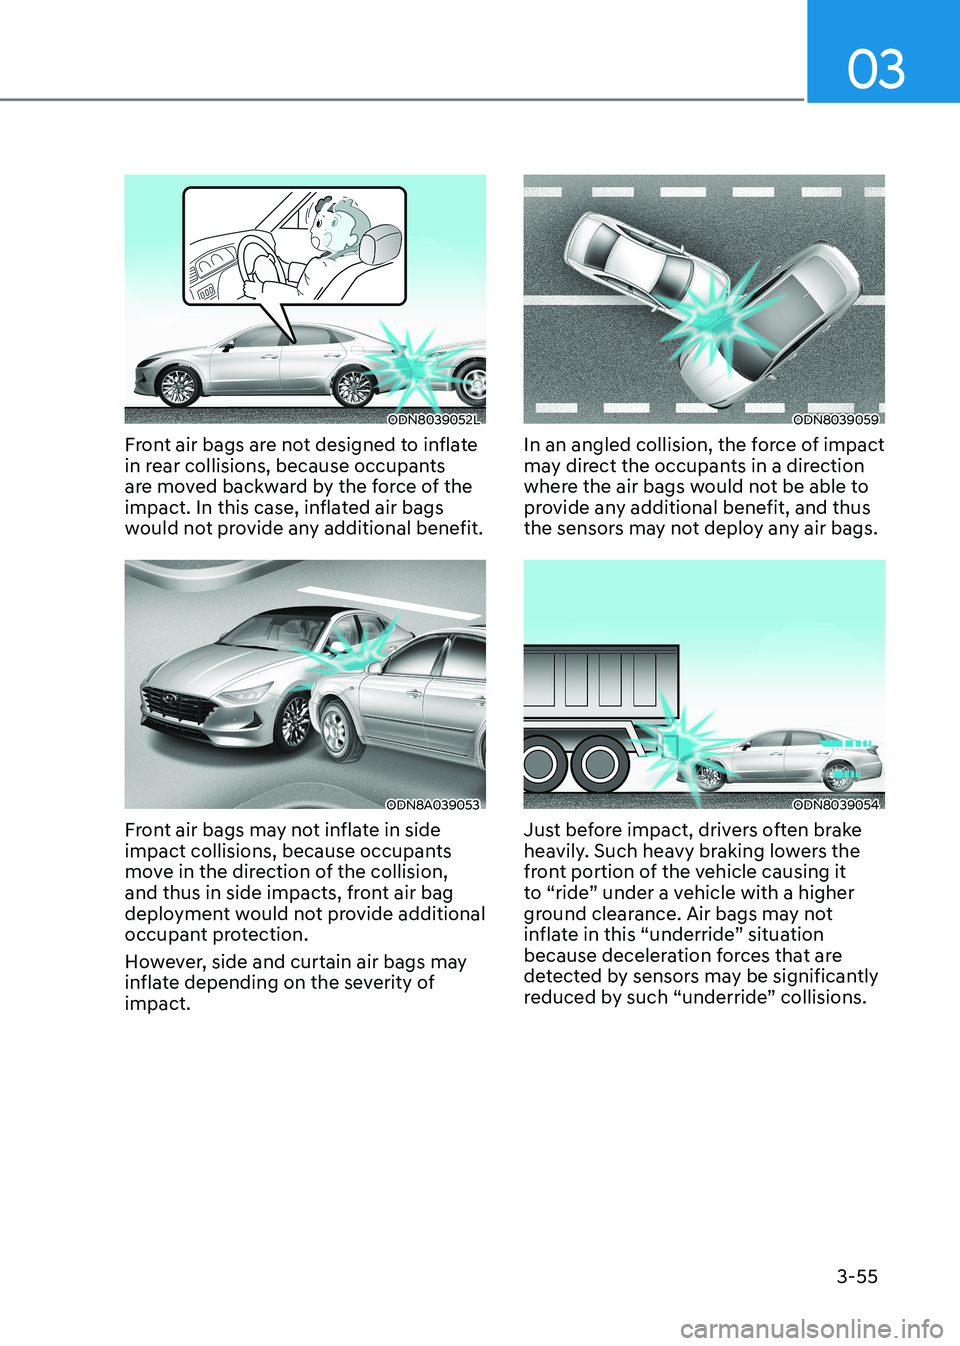
Front air bags are not designed to inflate
in rear collisions, because occupants
are moved backward by the force of the
impact. In this case, inflated air bags
would not provide any additional benefit.
ODN8A039053
Front air bags may not inflate in side
impact collisions, because occupants
move in the direction of the collision,
and thus in side impacts, front air bag
deployment would not provide additional
occupant protection.
However, side and curtain air bags may
inflate depending on the severity of impact.
ODN8039059
In an angled collision, the force of impact
may direct the occupants in a direction
where the air bags would not be able to
provide any additional benefit, and thus
the sensors may not deploy any air bags.
ODN8039054
Just before impact, drivers often brake
heavily. Such heavy braking lowers the
front portion of the vehicle causing it
to “ride” under a vehicle with a higher
ground clearance. Air bags may not
inflate in this “underride” situation
because deceleration forces that are
detected by sensors may be significantly
reduced by such “underride” collisions.
Page 104 of 555
Instrument Cluster
4-18
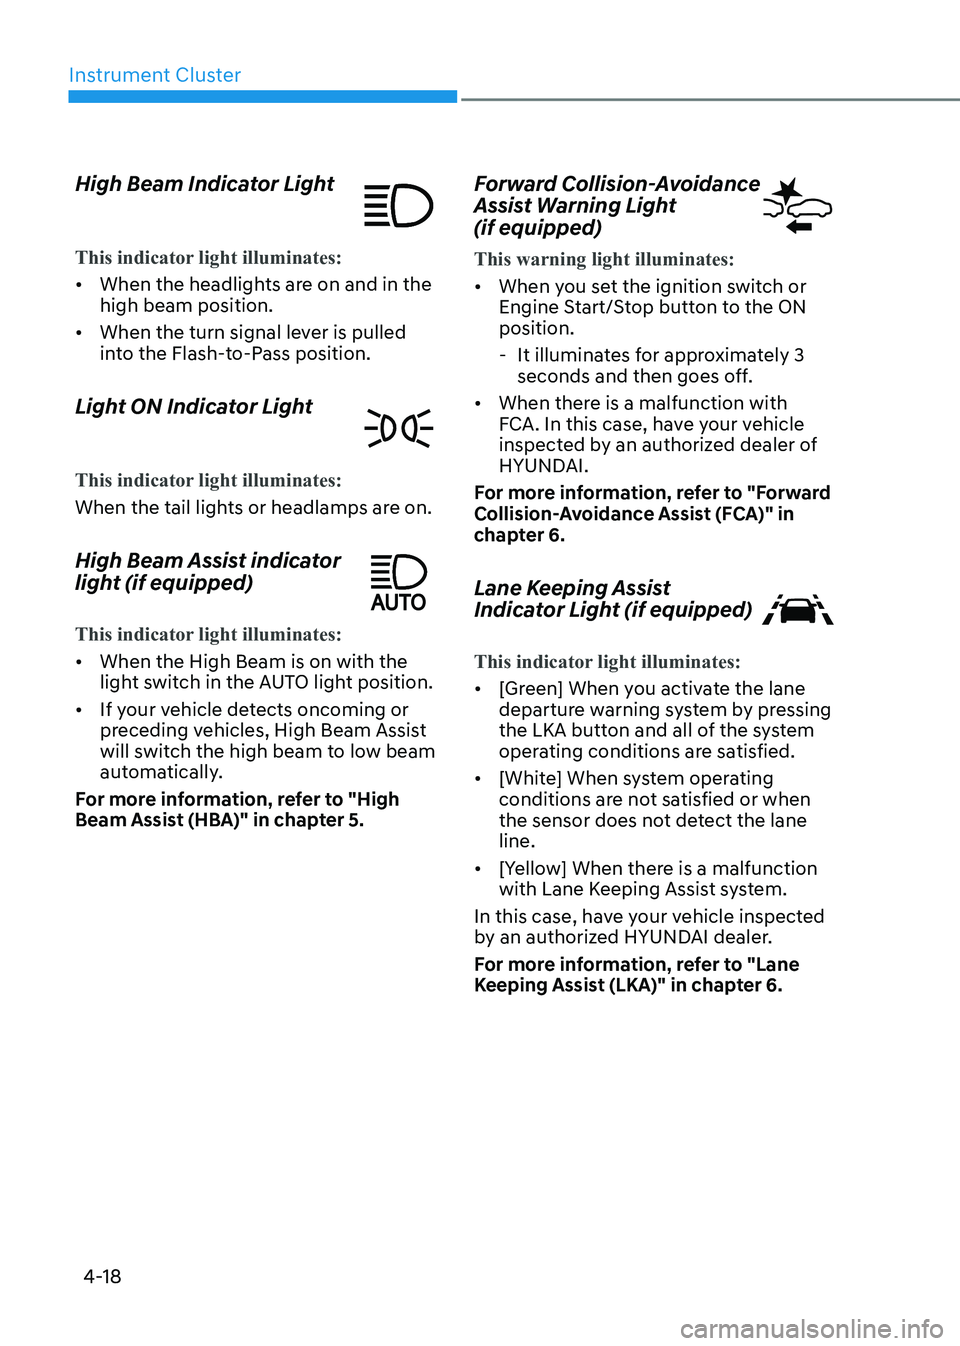
High Beam Indicator Light
This indicator light illuminates:
•
When the headlights are on and in the high beam position.
• When the turn signal lever is pulled
into the Flash-to-Pass position.
Light ON Indicator Light
This indicator light illuminates:
When the tail lights or headlamps are on.
High Beam Assist indicator
light (if equipped)
This indicator light illuminates:
• When the High Beam is on with the
light switch in the AUTO light position.
• If your vehicle detects oncoming or
preceding vehicles, High Beam Assist
will switch the high beam to low beam
automatically.
For more information, refer to "High
Beam Assist (HBA)" in chapter 5. Forward Collision-Avoidance
Assist Warning Light (if equipped)
This warning light illuminates:
•
When you set the ignition switch or
Engine Start/Stop button to the ON position.
- It illuminates for approximately 3 seconds and then goes off.
• When there is a malfunction with
FCA. In this case, have your vehicle
inspected by an authorized dealer of
HYUNDAI.
For more information, refer to "Forward
Collision-Avoidance Assist (FCA)" in
chapter 6.
Lane Keeping Assist
Indicator Light (if equipped)
This indicator light illuminates:
• [Green] When you activate the lane
departure warning system by pressing
the LKA button and all of the system
operating conditions are satisfied.
• [White] When system operating
conditions are not satisfied or when
the sensor does not detect the lane line.
• [Yellow] When there is a malfunction
with Lane Keeping Assist system.
In this case, have your vehicle inspected
by an authorized HYUNDAI dealer.
For more information, refer to "Lane
Keeping Assist (LKA)" in chapter 6.
Page 148 of 555
Exterior Features .......................................................................................... 5-50
Hood ........................................................................................................................ 5-50
Trunk ......................................................................................................................... 5-51
Emergency Trunk Safety Release .......................................................................... 5-52
Fuel Filler Door ....................................................................................................... 5-56
Head Up Display (HUD) ............................................................................... 5-59
Lighting ......................................................................................................... 5-61
Exterior Lights ......................................................................................................... 5-61
Interior Lights ......................................................................................................... 5-67
Welcome System .................................................................................................... 5-70
Wipers and Washers ..................................................................................... 5-71
Windshield Wipers .................................................................................................. 5-71
Windshield Washers ................................................................................................ 5-72
Rear View Monitor (RVM) ............................................................................ 5-73
Rear View Monitor with Parking Guidance ............................................................5-73
Rear View Monitor - Top View ............................................................................... 5-73
Surround View Monitor (SVM) .................................................................... 5-75
Reverse Parking Collision-Avoidance Assist .............................................5 -76
System Setting and Operation .............................................................................. 5 -76
Warning and System Control .................................................................................. 5-77
Detecting Sensor .................................................................................................... 5-79
System Malfunction ............................................................................................... 5-80
Limitations of the System ...................................................................................... 5-80
Reverse Parking Distance Warning (PDW) ................................................5-82
Operation of Reverse Parking Distance Warning System ....................................5-82
To Turn off Reverse Parking Distance Warning System ......................................5-84
Non-Operational Conditions of Reverse Parking Distance Warning System .....5-84
Reverse Parking Distance Warning System Precautions .....................................5-85
Forward/Reverse Parking Distance Warning (PDW) .................................5-86
Operation of Forward/Reverse Parking Distance Warning System ....................5-87
Non-Operational Conditions of Forward/
Reverse Parking Distance Warning System ..........................................................5-89
Forward/Reverse Parking Distance Warning System Precautions .....................5-90
Remote smart parking assist (RSPA) ..........................................................5-91
Operating Condition .............................................................................................. 5-92
How Remote Smart Parking Assist System Works ...............................................5-95
Additional Instructions ......................................................................................... 5-100
Display Operation Status ...................................................................................... 5-101
How the Remote Moving Forward/Backward System Works ............................5-102
5
Page 155 of 555
05
5-9
Unlocking your vehicle
(When the Two Press Unlock feature
is off)
ODN8059001
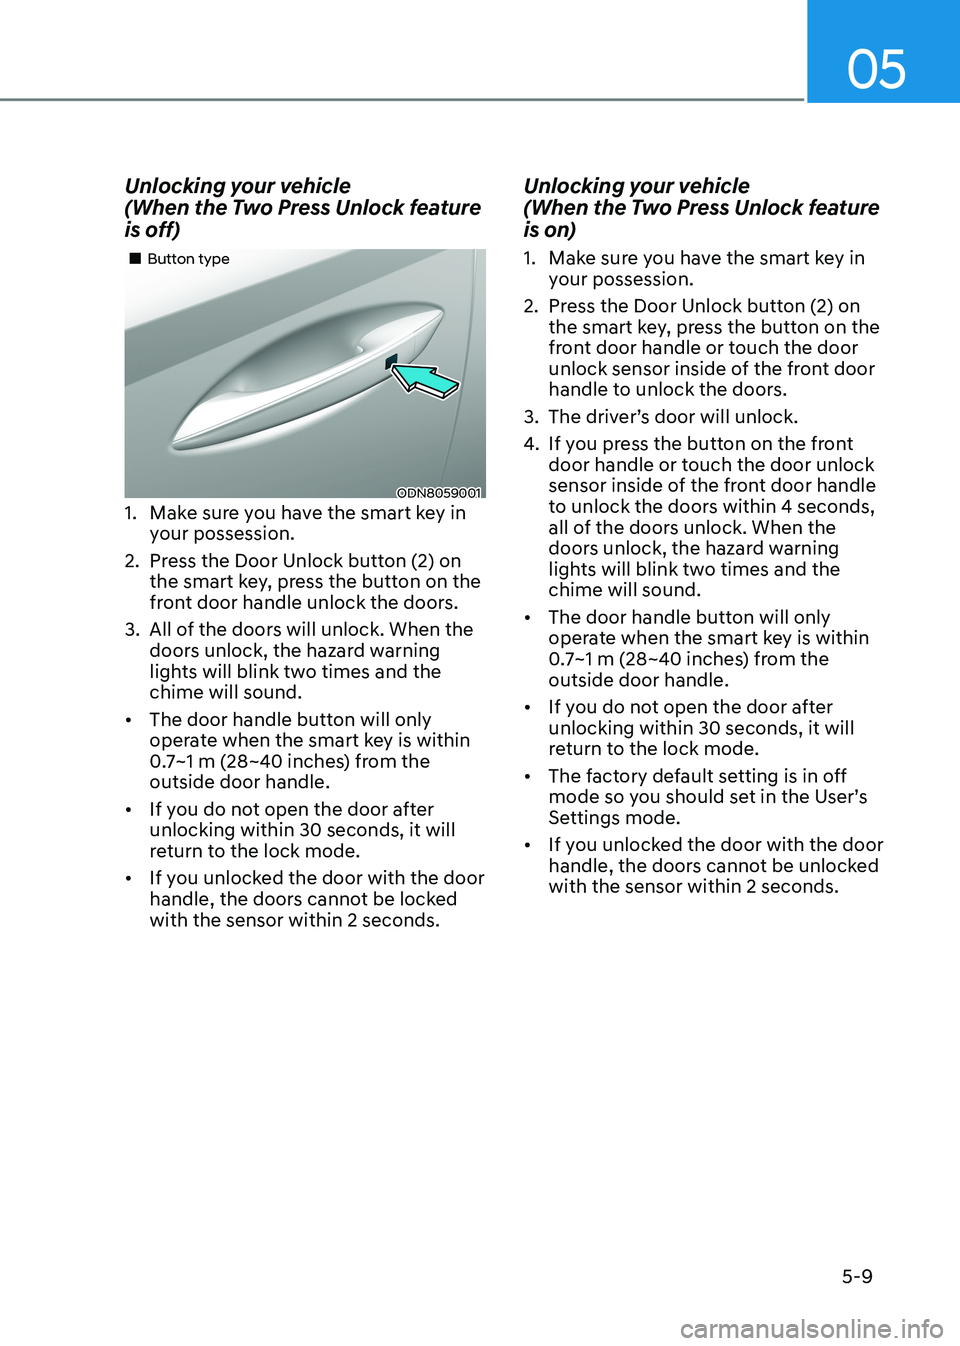
„
„Button type
1. Make sure you have the smart key in your possession.
2. Press the Door Unlock button (2) on the smart key, press the button on the
front door handle unlock the doors.
3. All of the doors will unlock. When the doors unlock, the hazard warning
lights will blink two times and the chime will sound.
• The door handle button will only
operate when the smart key is within
0.7~1 m (28~40 inches) from the outside door handle.
• If you do not open the door after unlocking within 30 seconds, it will
return to the lock mode.
• If you unlocked the door with the door
handle, the doors cannot be locked with the sensor within 2 seconds. Unlocking your vehicle
(When the Two Press Unlock feature
is on)
1. Make sure you have the smart key in
your possession.
2. Press the Door Unlock button (2) on the smart key, press the button on the
front door handle or touch the door
unlock sensor inside of the front door
handle to unlock the doors.
3. The driver’s door will unlock.
4. If you press the button on the front
door handle or touch the door unlock
sensor inside of the front door handle
to unlock the doors within 4 seconds,
all of the doors unlock. When the
doors unlock, the hazard warning
lights will blink two times and the chime will sound.
• The door handle button will only
operate when the smart key is within
0.7~1 m (28~40 inches) from the outside door handle.
• If you do not open the door after unlocking within 30 seconds, it will
return to the lock mode.
• The factory default setting is in off
mode so you should set in the User’s
Settings mode.
• If you unlocked the door with the door
handle, the doors cannot be unlocked with the sensor within 2 seconds.
Page 157 of 555
05
5-11
Start-up
You can start the vehicle without
inserting the key.
For information, refer to the “Engine
Start/Stop Button” section in chapter 6.
NOTICE
To prevent damaging the smart key: • Keep the smart key in a cool,
dry place to avoid damage or
malfunction. Exposure to moisture
or high temperature may cause
the internal circuit of the smart key
to malfunction which may not be
covered under warranty.
• Avoid dropping or throwing the
smart key.
• Protect the smart key from extreme
temperatures. Remote start
You can start the vehicle using the
Remote Start button (7) of the smart key.
To start the vehicle remotely:•
Lock the doors by pressing the door
lock button within 10 m (32 feet)
distance from the vehicle.
• Press the remote start button for over
2 seconds within 4 seconds after
locking the doors and the hazard
warning will blink.
To turn off the remote start function,
press the remote start button once.
In case of the manual operation,
the climate control system will be
maintained even when the engine is
turned OFF. However, the automatic
operation is set to 22°C (72°F).
Remote smart parking assist (RSPA) (if equipped)
The Remote smart parking assist (RSPA)
system helps the drivers park their
vehicle by using sensors to measure
parking spaces and control the steering
wheel, gear shift and vehicle speed to
semi-automatically park the vehicle.
With the smart key, the driver can move
the vehicle forward or backward using
the rearward /forward buttons (5, 6) on
the smart key.
For information, refer to “Remote smart
parking assist (RSPA)” in this chapter.
Page 167 of 555
05
5-21
Rear Occupant Alert (ROA)
System
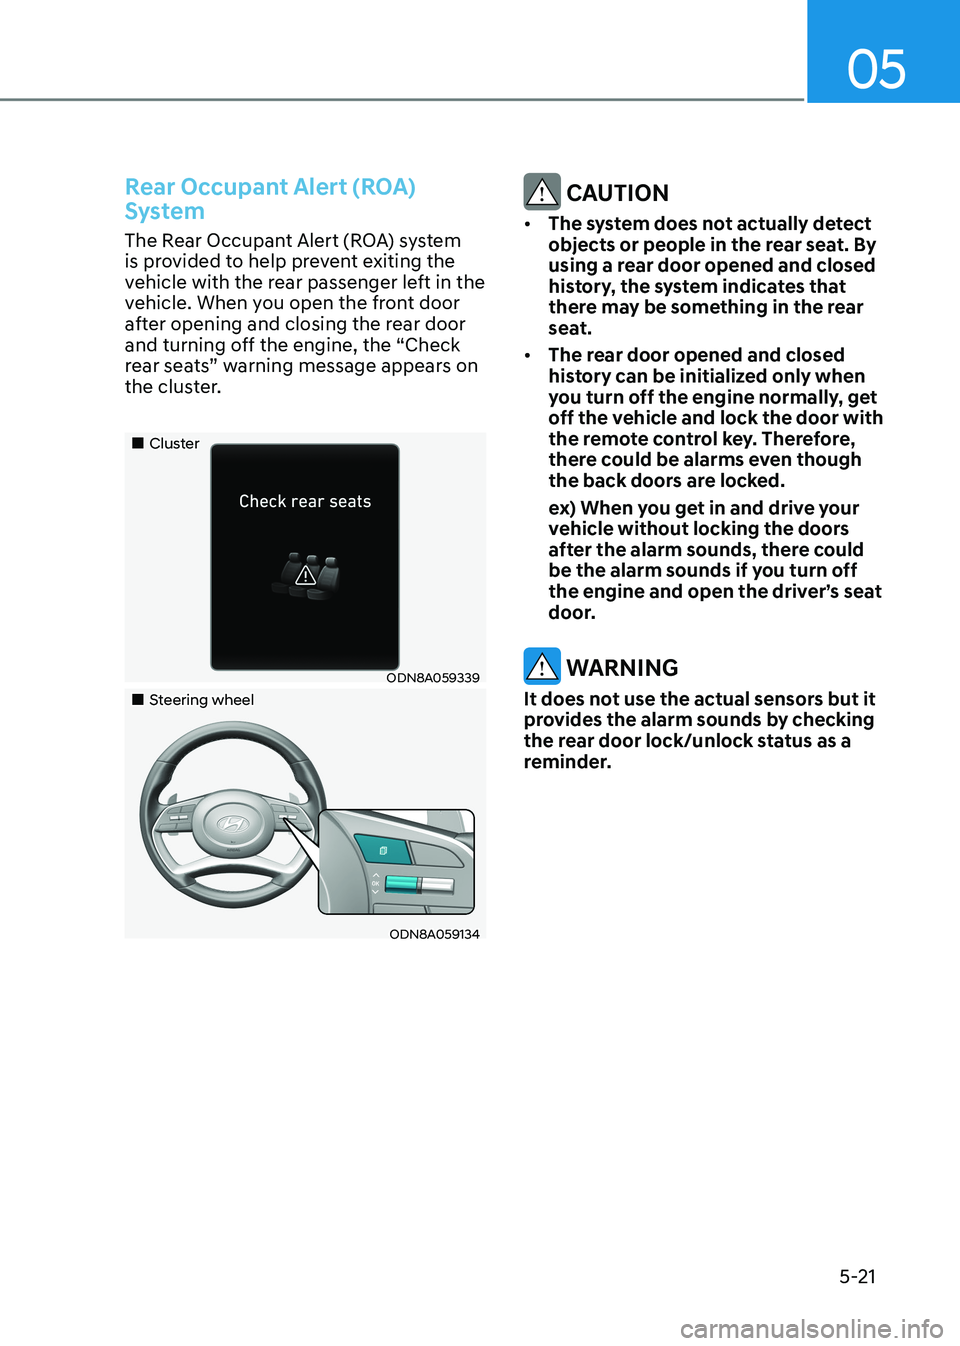
The Rear Occupant Alert (ROA) system
is provided to help prevent exiting the
vehicle with the rear passenger left in the
vehicle. When you open the front door
after opening and closing the rear door
and turning off the engine, the “Check
rear seats” warning message appears on
the cluster.
„„Cluster
ODN8A059339
„„Steering wheel
ODN8A059134
CAUTION
• The system does not actually detect
objects or people in the rear seat. By
using a rear door opened and closed
history, the system indicates that
there may be something in the rear
seat.
• The rear door opened and closed
history can be initialized only when
you turn off the engine normally, get
off the vehicle and lock the door with
the remote control key. Therefore,
there could be alarms even though
the back doors are locked.
ex) When you get in and drive your vehicle without locking the doors
after the alarm sounds, there could
be the alarm sounds if you turn off
the engine and open the driver’s seat
door.
WARNING
It does not use the actual sensors but it
provides the alarm sounds by checking
the rear door lock/unlock status as a
reminder.
Page 178 of 555
Convenience Features
5-32
Electrochromic Mirror (ECM) (if equipped)
ODN8059023L
The electric rearview mirror automatically
controls the glare from the headlamp of
the vehicle behind you in nighttime or low
light driving conditions.
When the engine is running, the glare is
automatically controlled by the sensor
mounted in the rearview mirror. The
sensor detects the light level around the
vehicle, and automatically adjusts to
control the headlamp glare from vehicles
behind you.
Whenever the shift button is placed in R
(Reverse), the mirror will automatically
go to the brightest setting in order to
improve the driver’s view behind the
vehicle. Electrochromic mirror (ECM) with
HomeLink® system (if equipped)ODN8A059135
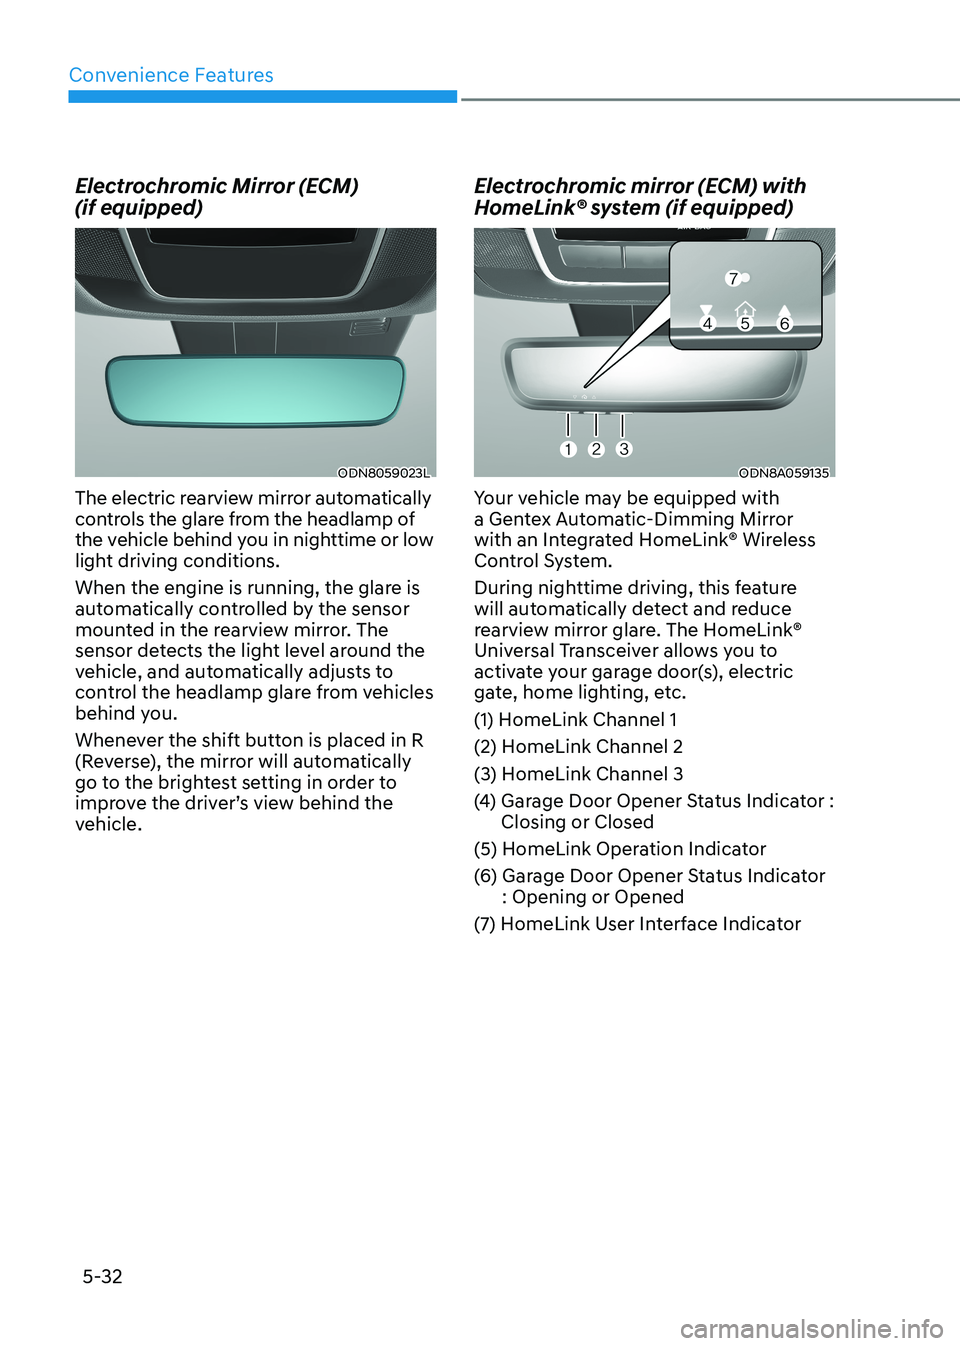
Your vehicle may be equipped with
a Gentex Automatic-Dimming Mirror
with an Integrated HomeLink® Wireless
Control System.
During nighttime driving, this feature
will automatically detect and reduce
rearview mirror glare. The HomeLink®
Universal Transceiver allows you to
activate your garage door(s), electric
gate, home lighting, etc.
(1) HomeLink Channel 1
(2) HomeLink Channel 2
(3) HomeLink Channel 3
(4) Garage Door Opener Status Indicator : Closing or Closed
(5) HomeLink Operation Indicator
(6) Garage Door Opener Status Indicator : Opening or Opened
(7) HomeLink User Interface Indicator
Page 179 of 555
05
5-33
Automatic-Dimming Night Vision Safety™ (NVS®
) Mirror (if equipped)
The NVS® Mirror automatically reduces
glare by monitoring light levels in the
front and the rear of the vehicle. Any
object that obstructs either light sensor
will degrade the automatic dimming
control feature.
For more information regarding NVS®
mirrors and other applications, please
refer to the Gentex website:
www.gentex.com
Your mirror will automatically dim
upon detecting glare from the vehicles
traveling behind you.
The mirror defaults to the ON position
each time the vehicle is started. Integrated HomeLink ®
Wireless Control
System
The HomeLink® Wireless Control System
can replace up to three hand-held
radio-frequency (RF) transmitters with
a single built-in device. This innovative
feature will learn the radio frequency
codes of most current transmitters to
operate devices such as gate operators,
garage door openers, entry door locks,
security systems, even home lighting.
Both standard and rolling code-equipped
transmitters can be programmed by
following the outlined procedures.
Additional HomeLink® information can
be found at: www.homelink.com, www.
youtube.com/HomeLinkGentex or by
calling 1-800-355-3515.
Retain the original transmitter of the
RF device you are programming for use
in other vehicles as well as for future
HomeLink® programming. It is also
suggested that upon the sale of the
vehicle, the programmed HomeLink®
buttons be erased for security purposes.
WARNING
Before programming HomeLink® to a
garage door opener or gate operator,
make sure people and objects are out
of the way of the device to prevent
potential harm or damage. Do not
use the HomeLink® with any garage
door opener that lacks the safety
stop and reverse features required by
federal safety standards (this includes
any garage door opener model
manufactured before April 1, 1982).
A garage door that cannot detect an
object - signaling the door to stop
and reverse does not meet current
federal safety standards.Using a garage
door opener without these features
increases the risk of serious injury or
death.
Programming HomeLink ®
Please note the following:
• When programming a garage door opener, it is advised to park the
vehicle outside of the garage.
• It is recommended that a new battery be placed in the hand-held transmitter
of the device being programmed to
HomeLink® for quicker training and
accurate transmission of the radio-
frequency signal.
• Some vehicles may require the Engine Start/Stop button to be in the
ACC (or “Accessories”) position for
programming and/or operation of
HomeLink®.
• In the event that there are still programming difficulties or questions
after following the programming steps
listed below, contact HomeLink® at:
www.homelink.com, www.youtube.
com/HomeLinkGentex or by calling
1-800-355-3515.
Page 207 of 555
05
5-61
lighting
Exterior Lights
Lighting control
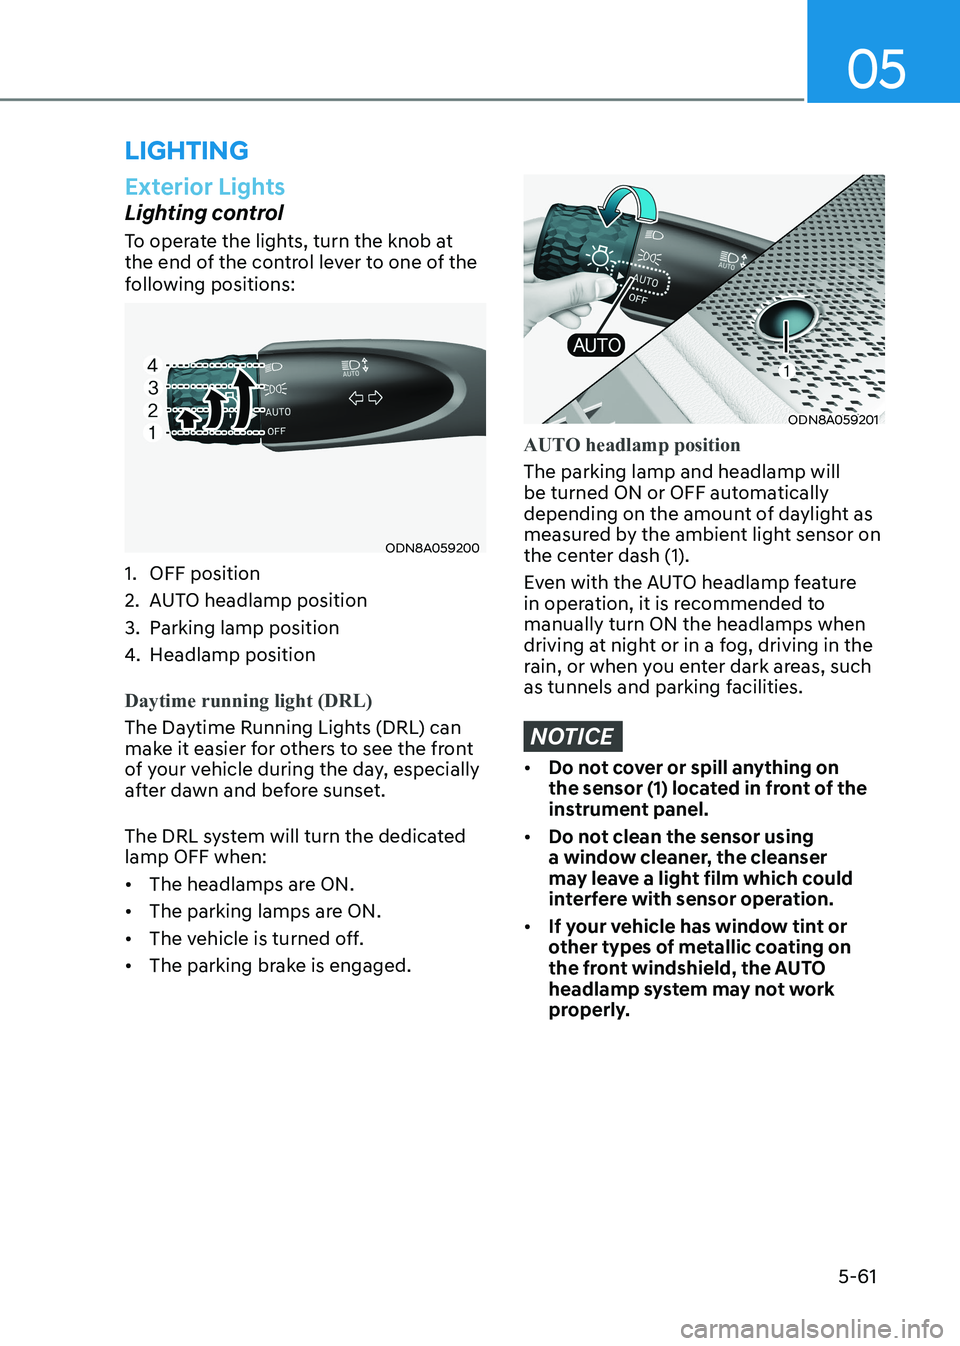
To operate the lights, turn the knob at
the end of the control lever to one of the
following positions:
ODN8A059200
1. OFF position
2. AUTO headlamp position
3. Parking lamp position
4. Headlamp position
Daytime running light (DRL)
The Daytime Running Lights (DRL) can
make it easier for others to see the front
of your vehicle during the day, especially
after dawn and before sunset.
The DRL system will turn the dedicated lamp OFF when: • The headlamps are ON.
• The parking lamps are ON.
• The vehicle is turned off.
• The parking brake is engaged.
ODN8A059201
AUTO headlamp position
The parking lamp and headlamp will
be turned ON or OFF automatically
depending on the amount of daylight as
measured by the ambient light sensor on
the center dash (1).
Even with the AUTO headlamp feature
in operation, it is recommended to manually turn ON the headlamps when
driving at night or in a fog, driving in the
rain, or when you enter dark areas, such
as tunnels and parking facilities.
NOTICE
• Do not cover or spill anything on
the sensor (1) located in front of the
instrument panel.
• Do not clean the sensor using
a window cleaner, the cleanser
may leave a light film which could
interfere with sensor operation.
• If your vehicle has window tint or
other types of metallic coating on
the front windshield, the AUTO
headlamp system may not work
properly.