sensor Hyundai Sonata Hybrid 2011 User Guide
[x] Cancel search | Manufacturer: HYUNDAI, Model Year: 2011, Model line: Sonata Hybrid, Model: Hyundai Sonata Hybrid 2011Pages: 404, PDF Size: 11.04 MB
Page 91 of 404

359
Safety features of your vehicle
Just before impact, drivers often brake
heavily. Such heavy braking lowers the
front portion of the vehicle causing it to
“ride” under a vehicle with a higher
ground clearance. Air bags may not
inflate in this "under-ride" situation
because deceleration forces that are
detected by sensors may be signifi-
cantly reduced by such “under-ride”
collisions. Front air bags may not inflate in
rollover accidents because air bag
deployment would not provide protec-
tion to the occupants.
Side impact and curtain air bags may
inflate when the vehicle is rolled over
by a side impact collision. Air bags may not inflate if the vehicle
collides with object such as utility poles
or trees, where the point of impact is
concentrated to one area, the collision
energy is absorbed by the vehicle
structure, and the full force of the
impact is not delivered to the sensors.
1JBA35181JBA35171JBA3522
Page 92 of 404

Safety features of your vehicle
60 3
SRS Care
The SRS is virtually maintenance-free
and so there are no parts you can safely
service by yourself. If the SRS air bag
warning light " " does not illuminate,
when you turn the ignition on, or continu-
ously remains on, have your vehicle
immediately inspected by an authorized
HYUNDAI dealer.
Any work on the SRS system, such as
removing, installing, repairing, or any
work on the steering wheel, the front
passenger's panel, front seats and roof
rails must be performed by an authorized
HYUNDAI dealer. Improper handling of
the SRS system may result in serious
personal injury.WARNING
Modification to SRS components
or wiring, including the addition
of any kind of badges to the pad
covers or modifications to the
body structure, can adversely
affect SRS performance and lead
to possible injury.
Modification of the components
where the SRS sensors are
installed and also modification of
other components of the vehicle
may affect SRS performance and
lead to possible injury.
For cleaning the air bag pad cov-
ers, use only a soft, dry cloth or
one which has been moistened
with plain water. Solvents or
cleaners could adversely affect
the air bag covers and proper
deployment of the system.
No objects should be placed over
or near the air bag modules on the
steering wheel, instrument panel,
and the front passenger's panel
above the glove box, because any
such object could cause harm if the
vehicle is in a crash severe enough
to cause the air bags to inflate.
(Continued)
(Continued)
If the air bags inflate, they must
be replaced by an authorized
HYUNDAI dealer.
Do not tamper with or disconnect
SRS wiring, or other components
of the SRS system. Doing so
could result in injury, due to acci-
dental inflation of the air bags or
by rendering the SRS inopera-
tive.
If components of the air bag sys-
tem must be discarded, or if the
vehicle must be scrapped, certain
safety precautions must be
observed. An authorized
HYUNDAI dealer knows these
precautions and can give you the
necessary information. Failure to
follow these precautions and pro-
cedures could increase the risk
of personal injury.
If your car was flooded and has
soaked carpeting or water on the
flooring, you shouldn't try to start
the hybrid system have the car
towed to an authorized HYUNDAI
dealer.
Page 107 of 404
413
Features of your vehicle
If the smart key is in the vehicle and
any door is open, the doors will not
lock even though the front portion(1) of
central door lock switch is pressed.Impact sensing door unlock system
(if equipped)
All doors will be automatically unlocked
when a significant impact is sensed by
the impact sensors while the engine start
/stop button is ON. However, the doors
may not automatically unlock if mechani-
cal damage is sustained by the door lock
system or battery.
✽ ✽
NOTICE
You can activate or deactivate some auto
door lock/unlock features as follows:
• Speed sensing auto door lock
• Auto door unlock by unlocking the
driver's door
• Auto door unlock when the smart key
is removed from the smart key holder.
• Auto door lock/unlock by shifting the
transmission shift lever out of P
(Park) or into P (Park)
If you want to activate or deactivate a
door lock/unlock feature, refer to the
"vehicle setting" in this chapter.
WARNING- Unlocked
vehicles
Leaving your vehicle unlocked can
invite theft or possible harm to you
or others from someone hiding in
your vehicle while you are gone.
Always remove the smart key,
engage the parking brake, close all
windows and lock all doors when
leaving your vehicle unattended.
WARNING- Unattended
children
An enclosed vehicle can become
extremely hot, causing death or
severe injury to unattended chil-
dren or animals who cannot escape
the vehicle. Furthermore, children
might operate features of the vehi-
cle that could injure them, or they
could encounter other harm, possi-
bly from someone gaining entry to
the vehicle. Never leave children or
animals unattended in your vehicle.
WARNING - Doors
The doors should always be fully
closed and locked while the vehi-
cle is in motion to prevent acci-
dental opening of the door.
Locked doors will also discour-
age potential intruders when the
vehicle stops or slows.
Be careful when opening doors
and watch for vehicles, motorcy-
cles, bicycles or pedestrians
approaching the vehicle in the
path of the door. Opening a door
when something is approaching
can cause damage or injury.
Page 126 of 404

Features of your vehicle
32 4
(1) Channel 1 button
(2) Channel 2 button
(3) Status indicator LED
(4) Channel 3 button
(5) Rear light sensor
(6) Dimming ON/OFF button
(7) Compass control button
(8) Compass display Automatic-Dimming Night Vision
Safety™ (NVS
®) Mirror
The NVS®Mirror in your vehicle is the
most advanced way to reduce annoying
glare in the rearview mirror during any
driving situation. For more information
regarding NVS
®mirrors and other appli-
cations, please refer to the Gentex web-
site:
www.gentex.comAutomatic-dimming function
Your mirror will automatically dim upon
detecting glare from the vehicles travel-
ing behind you. The auto-dimming func-
tion can be controlled by the Dimming
ON/OFF Button:
1. Pressing the button turns the auto-
dimming function OFF which is indicat-
ed by the green Status Indicator LED
turning off.
2. Pressing the button again turns the
auto-dimming function ON which is
indicated by the green Status Indicator
LED turning on.
✽ ✽
NOTICE
The mirror defaults to the ON position
each time the vehicle is started.
CAUTION
The NVS®Mirror automatically
reduces glare during driving condi-
tions based upon light levels moni-
tored in front of the vehicle and
from the rear of the vehicle. These
light sensors are visible through
openings in the front and rear of the
mirror case. Any object that
obstructs either light sensor will
degrade the automatic dimming
control feature.OYF049230C
Page 165 of 404

471
Features of your vehicle
Auto light position (if equipped)
When the light switch is in the AUTO light
position, the taillights and headlights will
be turned ON or OFF automatically
depending on the amount of light outside
the vehicle.
High beam operation
To turn on the high beam headlights,
push the lever away from you. Pull it back
for low beams.
The high beam indicator will light when
the headlight high beams are switched
on.
To prevent the battery from being dis-
charged, do not leave the lights on for a
prolonged time while the engine is not
running.
OYFH041906N
CAUTION
Never place anything over sensor
(1) located on the instrument
panel. This will ensure better
auto-light system control.
Don’t clean the sensor using a
window cleaner. The cleaner may
leave a light film which could
interfere with sensor operation.
If your vehicle has window tint or
other types of metallic coating on
the front windshield, the Auto
light system may not work prop-
erly.
OYFH041904N
Page 175 of 404
481
Features of your vehicle
Automatic heating and air condi-
tioning
The automatic climate control system is
controlled by simply setting the desired
temperature.
The Full Automatic Temperature Control
(FATC) system automatically controls the
heating and cooling system as follows;
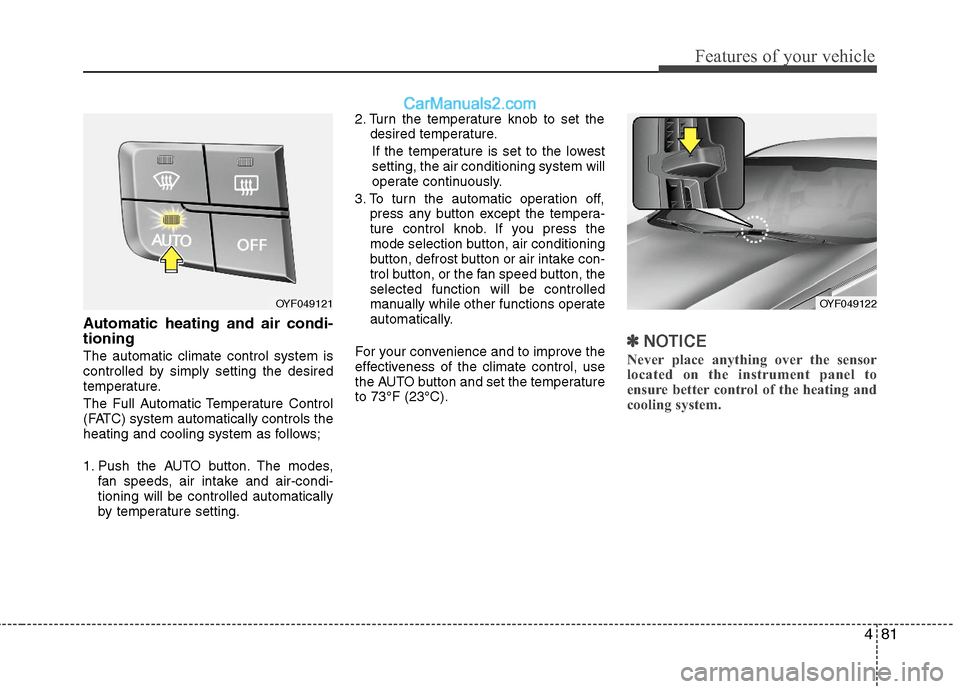
1. Push the AUTO button. The modes,
fan speeds, air intake and air-condi-
tioning will be controlled automatically
by temperature setting.2. Turn the temperature knob to set the
desired temperature.
If the temperature is set to the lowest
setting, the air conditioning system will
operate continuously.
3. To turn the automatic operation off,
press any button except the tempera-
ture control knob. If you press the
mode selection button, air conditioning
button, defrost button or air intake con-
trol button, or the fan speed button, the
selected function will be controlled
manually while other functions operate
automatically.
For your convenience and to improve the
effectiveness of the climate control, use
the AUTO button and set the temperature
to 73°F (23°C).✽ ✽
NOTICE
Never place anything over the sensor
located on the instrument panel to
ensure better control of the heating and
cooling system.
OYF049122OYF049121
Page 186 of 404

Features of your vehicle
92 4
Automatic heating and air condi-
tioning
The automatic climate control system is
controlled by simply setting the desired
temperature.
The Full Automatic Temperature Control
(FATC) system automatically controls the
heating and cooling system as follows;
1. Push the AUTO button. The modes,
fan speeds, air intake and air-condi-
tioning will be controlled automatically
by temperature setting.2. Turn the temperature knob to set the
desired temperature.
If the temperature is set to the lowest
setting, the air conditioning system will
operate continuously.
3. To turn the automatic operation off,
press any button except the tempera-
ture control knob. If you press the
mode selection button, air conditioning
button, defrost button or air intake con-
trol button, or the fan speed button, the
selected function will be controlled
manually while other functions operate
automatically.
For your convenience and to improve the
effectiveness of the climate control, use
the AUTO button and set the temperature
to 73°F (23°C).✽ ✽
NOTICE
Never place anything over the sensor
located on the instrument panel to
ensure better control of the heating and
cooling system.
OYF049122OYFH041345A
Page 290 of 404

611
What to do in an emergency
Changing a tire with TPMS
If you have a flat tire, the Low Tire
Pressure telltale will come on. Have
the flat tire repaired by an authorized
HYUNDAI dealer as soon as possi-
ble or replace the flat tire with the
spare tire.
Each wheel is equipped with a tire
pressure sensor mounted inside the
tire behind the valve stem. You must
use TPMS specific wheels. It is rec-
ommended that you always have
your tires serviced by an authorized
HYUNDAI dealer.Even if you replace the low pressure
tire with the compact spare tire, the
Low Tire Pressure Telltale will blink or
remain on until the low pressure tire
is repaired and placed on the vehicle.
After you replace the low pressure tire
with the compact spare tire, the Low
Tire Pressure Telltale may blink or illu-
minate because the compact spare
tire does not have a TPMS sensor.
Once the low pressure tire is reinflat-
ed to the recommended pressure
and installed on the vehicle or the
TPMS sensor mounted on the
replaced spare wheel is initiated by
an authorized HYUNDAI dealer, the
TPMS malfunction indicator and the
low tire pressure telltale will extin-
guish within a few minutes of driving.
If the indicator is not extinguished
after a few minutes of driving, please
visit an authorized HYUNDAI dealer.CAUTION
If original mounted tire is
replaced with the spare tire, the
TPMS sensor on the replaced
spare wheel should be initiated
and the TPMS sensor on the
original mounted wheel should
be deactivated. If the TPMS sen-
sor on the original mounted
wheel located in the spare tire
carrier still activates, the tire
pressure monitoring system
may not operate properly. Have
the tire with TPMS serviced or
replaced by an authorized
HYUNDAI dealer.
CAUTION
Never use a puncture-repairing
agent not approved by HYUNDAI
to repair and/or inflate a low
pressure tire. The tire sealant
not approved by HYUNDAI may
damage the tire pressure sen-
sor. The sealant on the tire pres-
sure sensor and wheel shall be
eliminated when you replace the
tire with a new one.
WARNING
If you do not use the authorized
tires or wheels, the malfunction
of TPMS may occur.
Page 291 of 404

What to do in an emergency
12 6
You may not be able identify a low
tire by simply looking at it. Always
use a good quality tire pressure
gauge to measure the tire's inflation
pressure. Please note that a tire that
is hot (from being driven) will have a
higher pressure measurement than a
tire that is cold.
A cold tire means the vehicle has
been sitting for 3 hours and driven for
less than 1 mile (1.6 km) in that 3
hour period.
Allow the tire to cool before measur-
ing the inflation pressure. Always be
sure the tire is cold before inflating to
the recommended pressure.This device complies with Part 15
of the FCC rules.
Operation is subject to the following
two conditions:
1.This device may not cause harmful
interference, and
2.This device must accept any inter-
ference received, including inter-
ference that may cause undesired
operation.
CAUTION
Do not use any tire sealant
except the Tire Mobility Kit
approved by HYUNDAI if your
vehicle is equipped with a Tire
Pressure Monitoring System.
The liquid sealant can damage
the tire pressure sensors.
WARNING - Protecting
TPMS
Tampering with, modifying, or
disabling the Tire Pressure
Monitoring System (TPMS) com-
ponents may interfere with the
system's ability to warn the driv-
er of low tire pressure condi-
tions and/or TPMS malfunctions.
Tampering with, modifying, or
disabling the Tire Pressure
Monitoring System (TPMS) com-
ponents may void the warranty
for that portion of the vehicle.
WARNING- TPMS
The TPMS cannot alert you to
severe and sudden tire dam-
age caused by external fac-
tors such as nails or road
debris.
If you feel any vehicle instabil-
ity, immediately take your foot
off the accelerator, apply the
brakes gradually and with
light force, and slowly move to
a safe position off the road.
WARNING
Changes or modifications not
expressly approved by the party
responsible for compliance
could void the user’s authority
to operate the equipment.
Page 301 of 404

What to do in an emergency
22 6
Notes on the safe use of the Tire
Mobility Kit
Park your car at the side of the
road so that you can work with the
Tire Mobility Kit away from moving
traffic. Place your warning triangle
in a prominent place to make pass-
ing vehicles aware of your location.
To be sure your vehicle will not
move, even when you're on fairly
level ground, always set your park-
ing brake.
Only use the Tire Mobility Kit for
sealing/inflation passenger car
tires. Do not use on motorcycles,
bicycles or any other type of tires.
Do not remove any foreign objects
such as nails or screws that have
penetrated the tire.
Before using the Tire Mobility Kit,
read the precautionary advice
printed on the sealant bottle! Provided the car is outdoors, leave
the engine running. Otherwise
operating the compressor may
eventually drain the car battery.
Never leave the Tire Mobility Kit
unattended while it is being used.
Do not leave the compressor run-
ning for more than 10 min. at a time
or it may overheat.
Do not use the Tire Mobility Kit if the
ambient temperature is below -22°F
(-30°C).
Do not use the sealing compound
after its expiration date which can
be found on the label of the bottle.
Keep away from children.
WARNING
Have your tire repaired as soon
as possible. The tire may loose
air pressure at any time after
inflating with the TMK.
CAUTION
The Tire Mobility Kit is a tempo-
rary fix to the tire and the tire
should be inspected by an
authorized HYUNDAI dealer as
soon as possible.
CAUTION
When using Tire Mobility Kit, the
tire sealant can damage the tire
pressure sensor. After using the
Tire Mobility Kit, have the tire
pressure sensor checked by an
authorized HYUNDAI dealer.