headlights Hyundai Sonata Hybrid 2013 Owner's Manual
[x] Cancel search | Manufacturer: HYUNDAI, Model Year: 2013, Model line: Sonata Hybrid, Model: Hyundai Sonata Hybrid 2013Pages: 425, PDF Size: 36.95 MB
Page 111 of 425
431
Features of your vehicle
MIRRORS
Inside rearview mirror
Adjust the rearview mirror so that the
center view through the rear window is
seen. Make this adjustment before you
start driving.
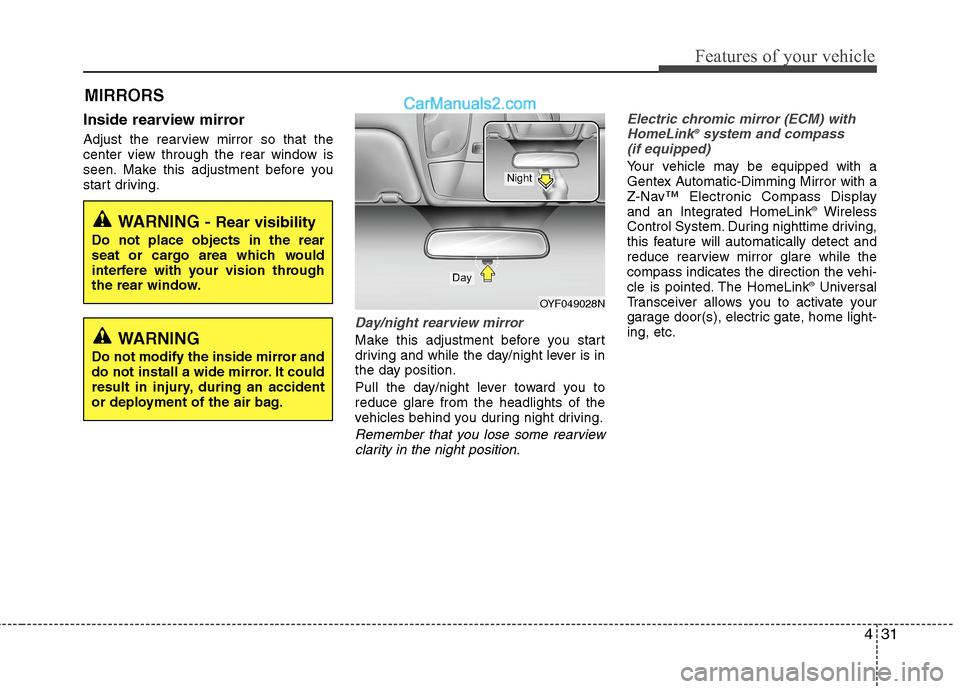
Day/night rearview mirror
Make this adjustment before you start
driving and while the day/night lever is in
the day position.
Pull the day/night lever toward you to
reduce glare from the headlights of the
vehicles behind you during night driving.
Remember that you lose some rearview
clarity in the night position.Electric chromic mirror (ECM) with
HomeLink
®system and compass
(if equipped)
Your vehicle may be equipped with a
Gentex Automatic-Dimming Mirror with a
Z-Nav™ Electronic Compass Display
and an Integrated HomeLink
®Wireless
Control System. During nighttime driving,
this feature will automatically detect and
reduce rearview mirror glare while the
compass indicates the direction the vehi-
cle is pointed. The HomeLink
®Universal
Transceiver allows you to activate your
garage door(s), electric gate, home light-
ing, etc.
WARNING - Rear visibility
Do not place objects in the rear
seat or cargo area which would
interfere with your vision through
the rear window.
OYF049028N
Day
Night
WARNING
Do not modify the inside mirror and
do not install a wide mirror. It could
result in injury, during an accident
or deployment of the air bag.
Page 151 of 425
471
Features of your vehicle
Battery saver function
The purpose of this feature is to pre-
vent the battery from being dis-
charged. The system automatically
turns off the parking lights when the
driver turns off the hybrid system and
opens the driver-side door.
With this feature, the parking lights will
be turned off automatically if the driver
parks on the side of the road at night.
If necessary, to keep the lights on
when the vehicle is off, perform the fol-
lowing:
1) Open the driver-side door.
2) Turn the parking lights OFF and ON
again using the light switch on the
steering column.
Headlamp delay (if equipped)
If you press the engine start/stop button
to the ACC or OFF position with the
headlights ON, the headlights (and/or tail
lights) remain on for about 20 minutes.
However, if the driver’s door is opened
and closed, the headlights are turned off
after 30 seconds.
The headlights can be turned off by
pressing the lock button on the smart key
twice or turning the light switch to the
OFF or Auto position.
However, if you turn the light switch to the
Auto position when it is dark outside, the
headlights will not be turned off.
Headlamp welcome function
When the headlight switch is in the ON or
AUTO position and all doors (and trunk)
are closed and locked, if you press the
door unlock button on the smart key, the
headlights will come on for about 15 sec-
onds. At this time, if you press the door
lock button on the smart key, the head-
lights will turn off immediately.
Daytime running light
(if equipped)
Daytime Running Lights (DRL) can make
it easier for others to see the front of your
vehicle during the day. DRL can be help-
ful in many different driving conditions,
and it is especially helpful after dawn and
before sunset.
The DRL system will turn OFF when:
1. The headlight is ON.
2. Engine stops.
3. If the multifuntion switch is on “DRL
OFF” position.
4. Parking brake ON.
LIGHTING
CAUTION
If the driver gets out of the vehicle
through doors other than the (dri-
ver's door), the battery saver func-
tion does not operate and the head
lamp delay does not turn off auto-
matically. Therefore, the battery may
become discharged. In this case,
make sure to turn off the lamps
before getting out of the vehicle.
Page 153 of 425
473
Features of your vehicle
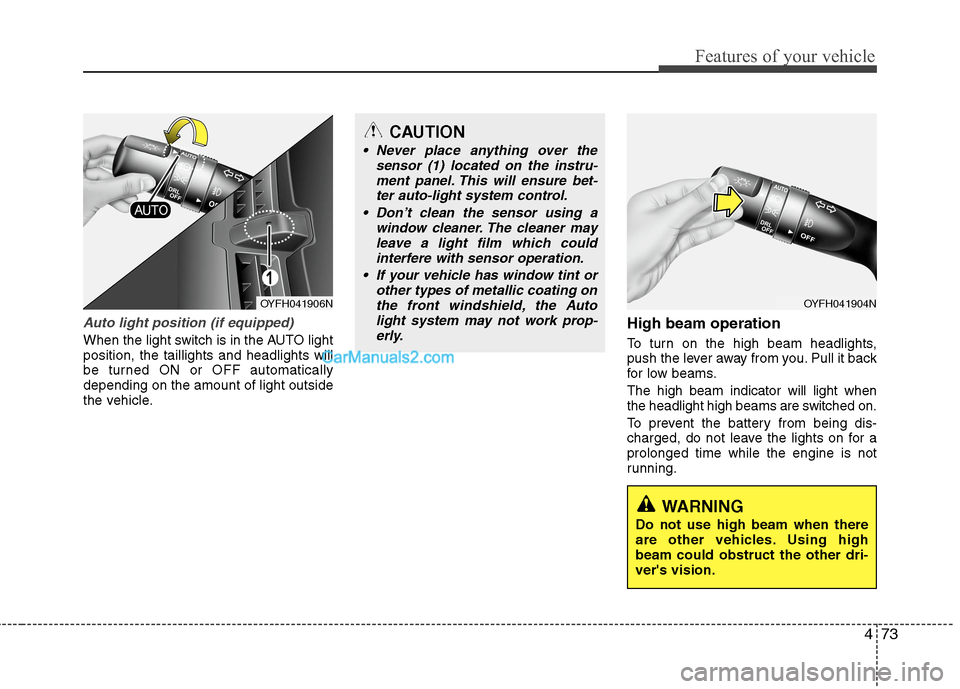
Auto light position (if equipped)
When the light switch is in the AUTO light
position, the taillights and headlights will
be turned ON or OFF automatically
depending on the amount of light outside
the vehicle.
High beam operation
To turn on the high beam headlights,
push the lever away from you. Pull it back
for low beams.
The high beam indicator will light when
the headlight high beams are switched on.
To prevent the battery from being dis-
charged, do not leave the lights on for a
prolonged time while the engine is not
running.
OYFH041906N
CAUTION
Never place anything over the
sensor (1) located on the instru-
ment panel. This will ensure bet-
ter auto-light system control.
Don’t clean the sensor using a
window cleaner. The cleaner may
leave a light film which could
interfere with sensor operation.
If your vehicle has window tint or
other types of metallic coating on
the front windshield, the Auto
light system may not work prop-
erly.
OYFH041904N
WARNING
Do not use high beam when there
are other vehicles. Using high
beam could obstruct the other dri-
ver's vision.
Page 154 of 425
Features of your vehicle
74 4
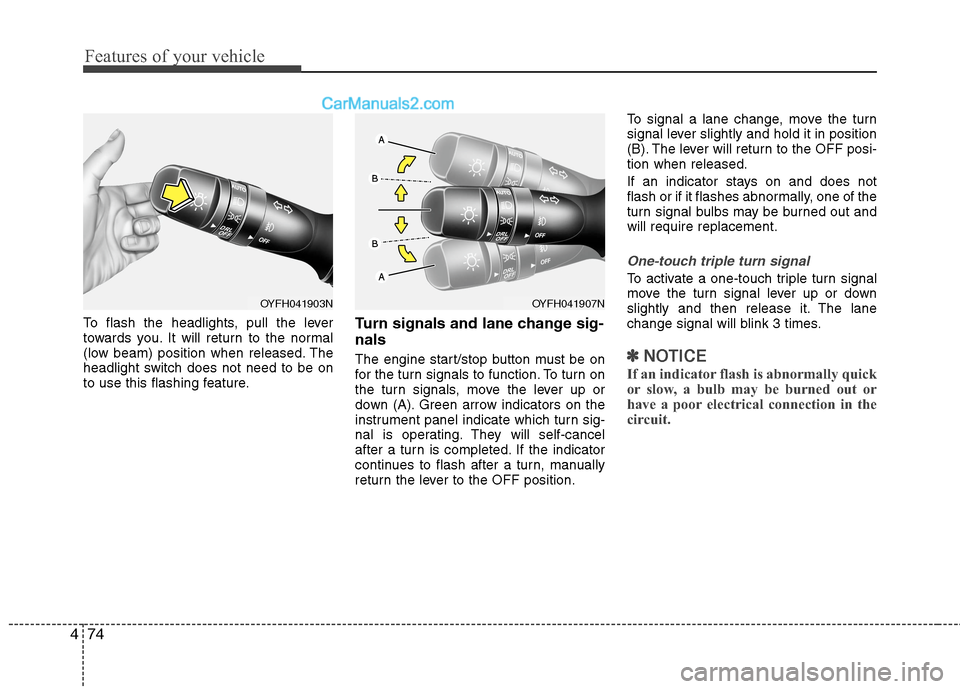
To flash the headlights, pull the lever
towards you. It will return to the normal
(low beam) position when released. The
headlight switch does not need to be on
to use this flashing feature.Turn signals and lane change sig-
nals
The engine start/stop button must be on
for the turn signals to function. To turn on
the turn signals, move the lever up or
down (A). Green arrow indicators on the
instrument panel indicate which turn sig-
nal is operating. They will self-cancel
after a turn is completed. If the indicator
continues to flash after a turn, manually
return the lever to the OFF position.To signal a lane change, move the turn
signal lever slightly and hold it in position
(B). The lever will return to the OFF posi-
tion when released.
If an indicator stays on and does not
flash or if it flashes abnormally, one of the
turn signal bulbs may be burned out and
will require replacement.
One-touch triple turn signal
To activate a one-touch triple turn signal
move the turn signal lever up or down
slightly and then release it. The lane
change signal will blink 3 times.
✽ ✽
NOTICE
If an indicator flash is abnormally quick
or slow, a bulb may be burned out or
have a poor electrical connection in the
circuit.
OYFH041903NOYFH041907N
Page 155 of 425
475
Features of your vehicle
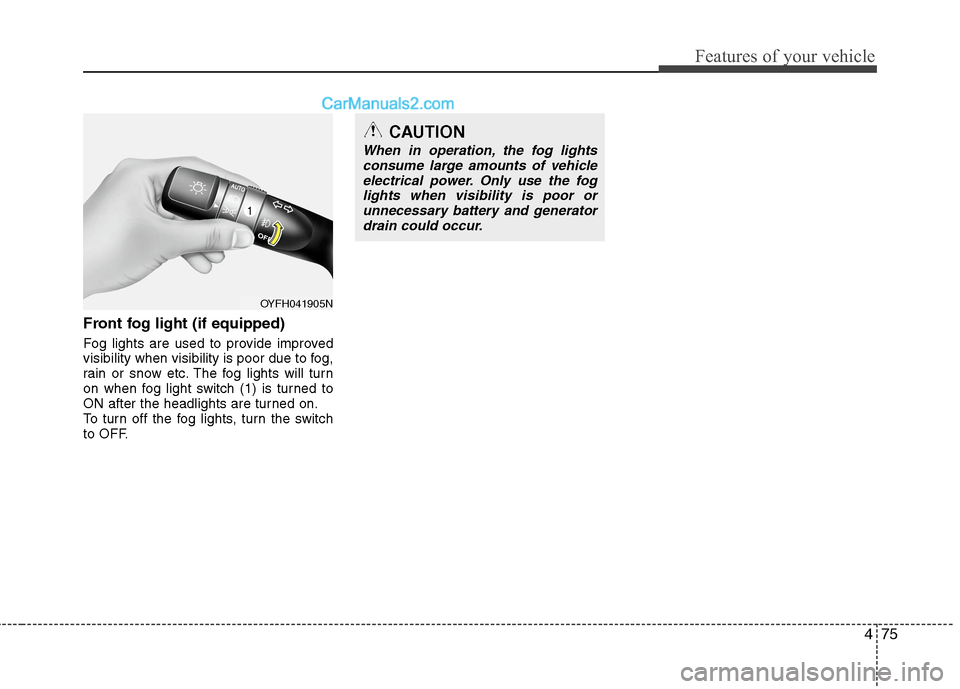
Front fog light (if equipped)
Fog lights are used to provide improved
visibility when visibility is poor due to fog,
rain or snow etc. The fog lights will turn
on when fog light switch (1) is turned to
ON after the headlights are turned on.
To turn off the fog lights, turn the switch
to OFF.
CAUTION
When in operation, the fog lights
consume large amounts of vehicle
electrical power. Only use the fog
lights when visibility is poor or
unnecessary battery and generator
drain could occur.
OYFH041905N
Page 274 of 425
Driving your vehicle
32 5
Adjust your mirrors to reduce the glare
from other driver's headlights.
Keep your headlights clean and prop-
erly aimed on vehicles not equipped
with the automatic headlight aiming
feature. Dirty or improperly aimed
headlights will make it much more diffi-
cult to see at night.
Avoid staring directly at the headlights
of oncoming vehicles. You could be
temporarily blinded, and it will take
several seconds for your eyes to read-
just to the darkness.Driving in the rain
Rain and wet roads can make driving dan-
gerous, especially if you’re not prepared
for the slick pavement. Here are a few
things to consider when driving in the rain:
A heavy rainfall will make it harder to
see and will increase the distance need-
ed to stop your vehicle, so slow down.
Keep your windshield wiping equip-
ment in good shape. Replace your
windshield wiper blades when they
show signs of streaking or missing
areas on the windshield.
If your tires are not in good condition,
making a quick stop on wet pavement
can cause a skid and possibly lead to
an accident. Be sure your tires are in
good shape.
Turn on your headlights to make it eas-
ier for others to see you.
Driving too fast through large puddles
can affect your brakes. If you must go
through puddles, try to drive through
them slowly.
If you believe you may have gotten
your brakes wet, apply them lightly
while driving until normal braking oper-
ation returns.
Keep the interior surface of the wind-
shield clean by wiping it with a clean
cloth and glass cleaner. This will help
reduce the tendency of the glass fog-
ging and also improve visibility.
Driving in flooded areas
Avoid driving through flooded areas
unless you are sure the water is no high-
er than the bottom of the wheel hub.
Drive through any water slowly. Allow
adequate stopping distance because
brake performance may be affected.
After driving through water, dry the
brakes by gently applying them several
times while the vehicle is moving slowly.
Driving off-road
Drive carefully off-road because your
vehicle may be damaged by rocks of
roots of trees. Become familiar with the
off-road conditions where you are going
to drive before you begin driving.
Page 349 of 425
735
Maintenance
12V Battery recharging
Your vehicle has a maintenance-free,
calcium-based battery.
If the 12V battery becomes discharged
in a short time (because, for example,
the headlights or interior lights were
left on while the vehicle was not in
use), jump start it from another vehi-
cle’s 12V battery or recharge it by slow
charging (trickle) for 10 hours.
If the 12V battery gradually discharges
because of high electric load while the
vehicle is being used, recharge it at 20-
30A for two hours.CALIFORNIA PROPOSI-
TION 65 WARNING
Battery posts, terminals, and relat-
ed accessories contain lead and
lead compounds, chemicals known
to the State of California to cause
cancer, birth defects and reproduc-
tive harm. Batteries also contain
other chemicals known to the State
of California to cause cancer. Wash
hands after handling.
CAUTION
When you don’t use the vehicle
for a long time in the low temper-
ature, remove the 12V battery and
store it indoors.
Always charge the 12V battery
fully to prevent 12V battery case
damage in low temperatures.
If you connect unauthorized elec-
tronic devices to the 12V battery,
the 12V battery may be dis-
charged. Never use unauthorized
devices.
(Continued)
When lifting a plastic-cased bat-
tery, excessive pressure on the
case may cause battery acid to
leak, resulting in personal injury.
Lift with a battery carrier or with
your hands on opposite corners.
Never attempt to recharge the
battery when the battery cables
are connected.
The electrical ignition system
works with high voltage. Never
touch these components with the
engine running or the engine
start/stop button positioned on.
Failure to follow the above warn-
ings can result in serious bodily
injury or death.
Page 365 of 425
751
Maintenance
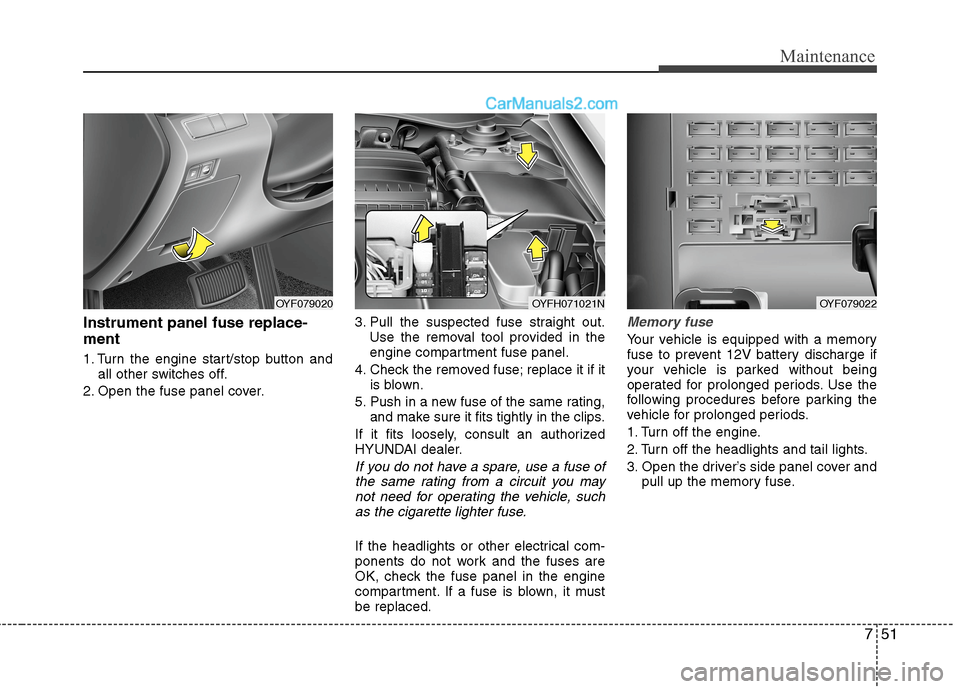
Instrument panel fuse replace-
ment
1. Turn the engine start/stop button and
all other switches off.
2. Open the fuse panel cover.3. Pull the suspected fuse straight out.
Use the removal tool provided in the
engine compartment fuse panel.
4. Check the removed fuse; replace it if it
is blown.
5. Push in a new fuse of the same rating,
and make sure it fits tightly in the clips.
If it fits loosely, consult an authorized
HYUNDAI dealer.
If you do not have a spare, use a fuse of
the same rating from a circuit you may
not need for operating the vehicle, such
as the cigarette lighter fuse.
If the headlights or other electrical com-
ponents do not work and the fuses are
OK, check the fuse panel in the engine
compartment. If a fuse is blown, it must
be replaced.
Memory fuse
Your vehicle is equipped with a memory
fuse to prevent 12V battery discharge if
your vehicle is parked without being
operated for prolonged periods. Use the
following procedures before parking the
vehicle for prolonged periods.
1. Turn off the engine.
2. Turn off the headlights and tail lights.
3. Open the driver’s side panel cover and
pull up the memory fuse.
OYF079020OYFH071021NOYF079022
Page 374 of 425
Maintenance
60 7
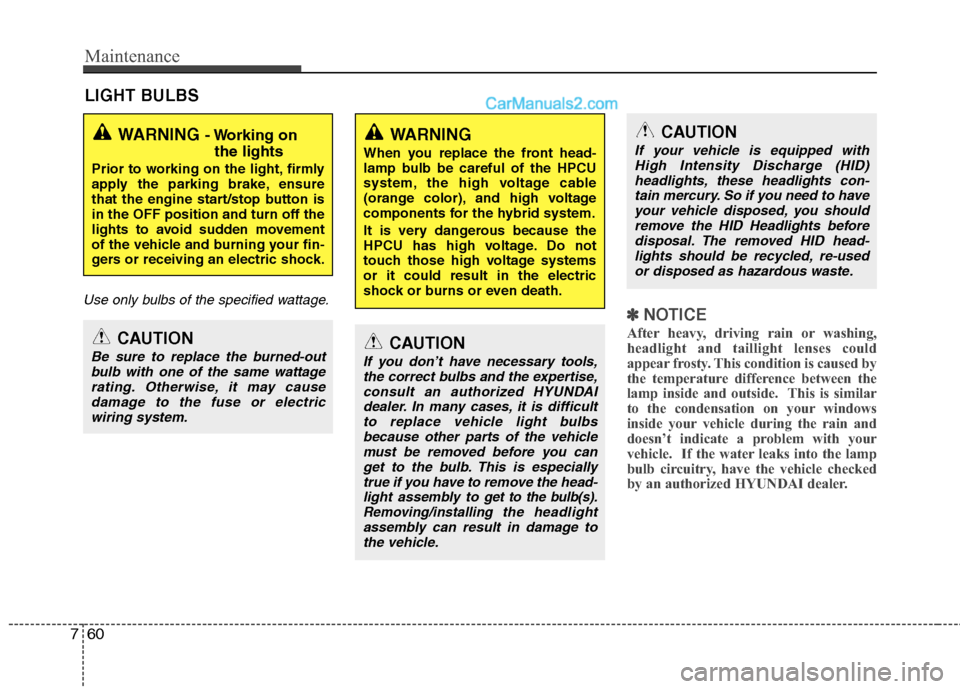
LIGHT BULBS
Use only bulbs of the specified wattage.
✽
✽
NOTICE
After heavy, driving rain or washing,
headlight and taillight lenses could
appear frosty. This condition is caused by
the temperature difference between the
lamp inside and outside. This is similar
to the condensation on your windows
inside your vehicle during the rain and
doesn’t indicate a problem with your
vehicle. If the water leaks into the lamp
bulb circuitry, have the vehicle checked
by an authorized HYUNDAI dealer.
WARNING - Working on
the lights
Prior to working on the light, firmly
apply the parking brake, ensure
that the engine start/stop button is
in the OFF position and turn off the
lights to avoid sudden movement
of the vehicle and burning your fin-
gers or receiving an electric shock.
CAUTION
Be sure to replace the burned-out
bulb with one of the same wattage
rating. Otherwise, it may cause
damage to the fuse or electric
wiring system.CAUTION
If you don’t have necessary tools,
the correct bulbs and the expertise,
consult an authorized HYUNDAI
dealer. In many cases, it is difficult
to replace vehicle light bulbs
because other parts of the vehicle
must be removed before you can
get to the bulb. This is especially
true if you have to remove the head-
light assembly to
get to the bulb(s).
Removing/installingthe headlight
assembly can result in damage to
the vehicle.
WARNING
When you replace the front head-
lamp bulb be careful of the HPCU
system, the high voltage cable
(orange color), and high voltage
components for the hybrid system.
It is very dangerous because the
HPCU has high voltage. Do not
touch those high voltage systems
or it could result in the electric
shock or burns or even death.
CAUTION
If your vehicle is equipped with
High Intensity Discharge (HID)
headlights, these headlights con-
tain mercury. So if you need to have
your vehicle disposed, you should
remove the HID Headlights before
disposal. The removed HID head-
lights should be recycled, re-used
or disposed as hazardous waste.
Page 395 of 425
83
Specifications, Consumer information, Reporting safety defects
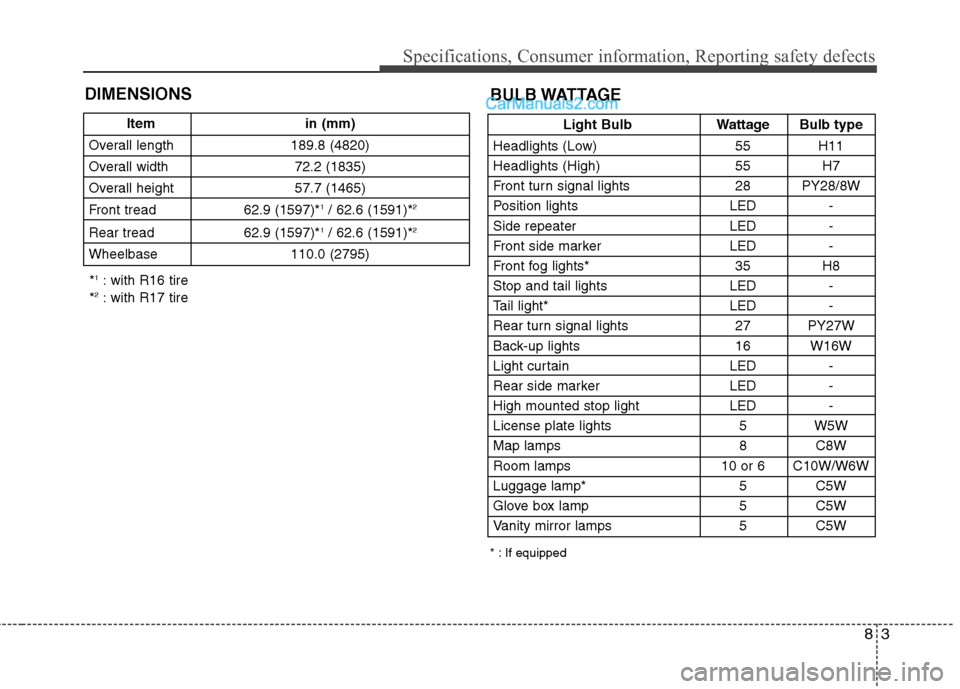
DIMENSIONS
Light Bulb Wattage Bulb type
Headlights (Low) 55 H11
Headlights (High) 55 H7
Front turn signal lights 28 PY28/8W
Position lights LED -
Side repeater LED -
Front side marker LED -
Front fog lights* 35 H8
Stop and tail lights LED -
Tail light* LED -
Rear turn signal lights 27 PY27W
Back-up lights 16 W16W
Light curtain LED -
Rear side marker LED -
High mounted stop light LED -
License plate lights 5 W5W
Map lamps 8 C8W
Room lamps 10 or 6 C10W/W6W
Luggage lamp* 5 C5W
Glove box lamp 5 C5W
Vanity mirror lamps 5 C5W
BULB WATTAGE
* : If equipped
Item in (mm)
Overall length 189.8 (4820)
Overall width 72.2 (1835)
Overall height 57.7 (1465)
Front tread 62.9 (1597)*
1/ 62.6 (1591)*2
Rear tread 62.9 (1597)*1/ 62.6 (1591)*2
Wheelbase 110.0 (2795)
*1: with R16 tire
*2: with R17 tire