height Hyundai Sonata Hybrid 2015 Owner's Manual
[x] Cancel search | Manufacturer: HYUNDAI, Model Year: 2015, Model line: Sonata Hybrid, Model: Hyundai Sonata Hybrid 2015Pages: 543, PDF Size: 25.53 MB
Page 21 of 543
Safety features of your vehicle
23
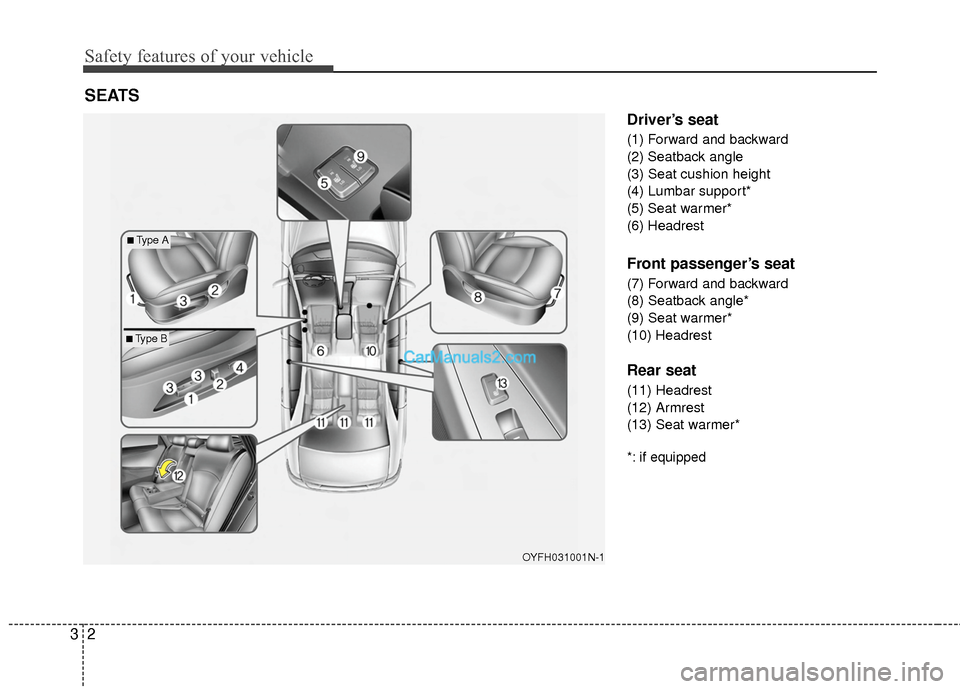
Driver’s seat
(1) Forward and backward
(2) Seatback angle
(3) Seat cushion height
(4) Lumbar support*
(5) Seat warmer*
(6) Headrest
Front passenger’s seat
(7) Forward and backward
(8) Seatback angle*
(9) Seat warmer*
(10) Headrest
Rear seat
(11) Headrest
(12) Armrest
(13) Seat warmer*
*: if equipped
SEATS
OYFH031001N-1
■Type A
■Type B
Page 24 of 543
35
Safety features of your vehicle
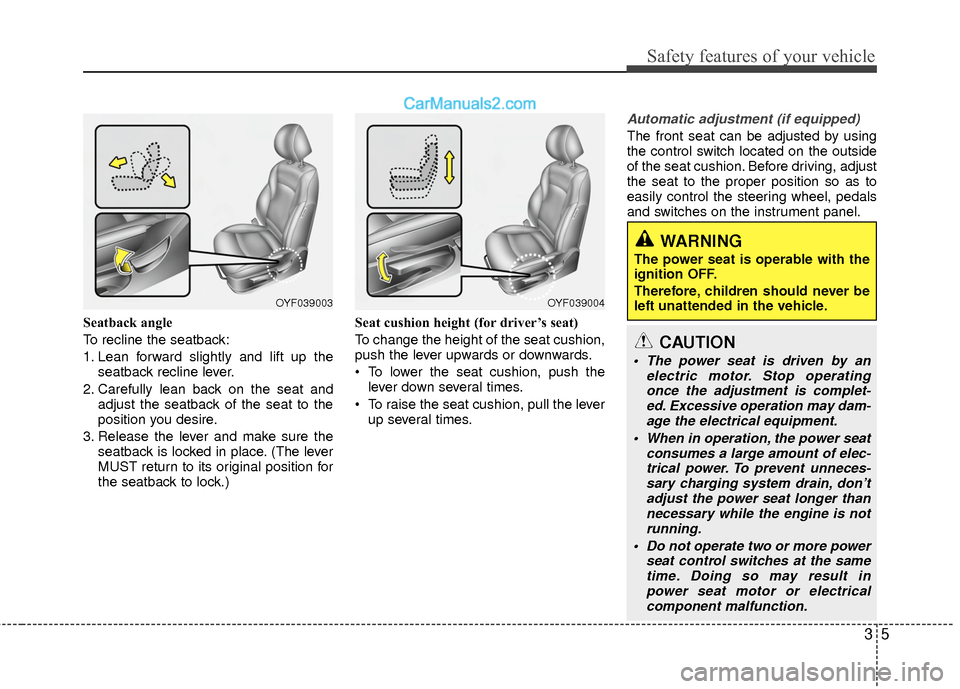
Seatback angle
To recline the seatback:
1. Lean forward slightly and lift up theseatback recline lever.
2. Carefully lean back on the seat and adjust the seatback of the seat to the
position you desire.
3. Release the lever and make sure the seatback is locked in place. (The lever
MUST return to its original position for
the seatback to lock.) Seat cushion height (for driver’s seat)
To change the height of the seat cushion,
push the lever upwards or downwards.
• To lower the seat cushion, push the
lever down several times.
To raise the seat cushion, pull the lever up several times.
Automatic adjustment (if equipped)
The front seat can be adjusted by using
the control switch located on the outside
of the seat cushion. Before driving, adjust
the seat to the proper position so as to
easily control the steering wheel, pedals
and switches on the instrument panel.
WARNING
The power seat is operable with the
ignition OFF.
Therefore, children should never be
left unattended in the vehicle.
OYF039003OYF039004
CAUTION
The power seat is driven by an electric motor. Stop operatingonce the adjustment is complet-ed. Excessive operation may dam-age the electrical equipment.
When in operation, the power seat consumes a large amount of elec-trical power. To prevent unneces- sary charging system drain, don’tadjust the power seat longer than necessary while the engine is notrunning.
Do not operate two or more power seat control switches at the sametime. Doing so may result in power seat motor or electricalcomponent malfunction.
Page 25 of 543
Safety features of your vehicle
63
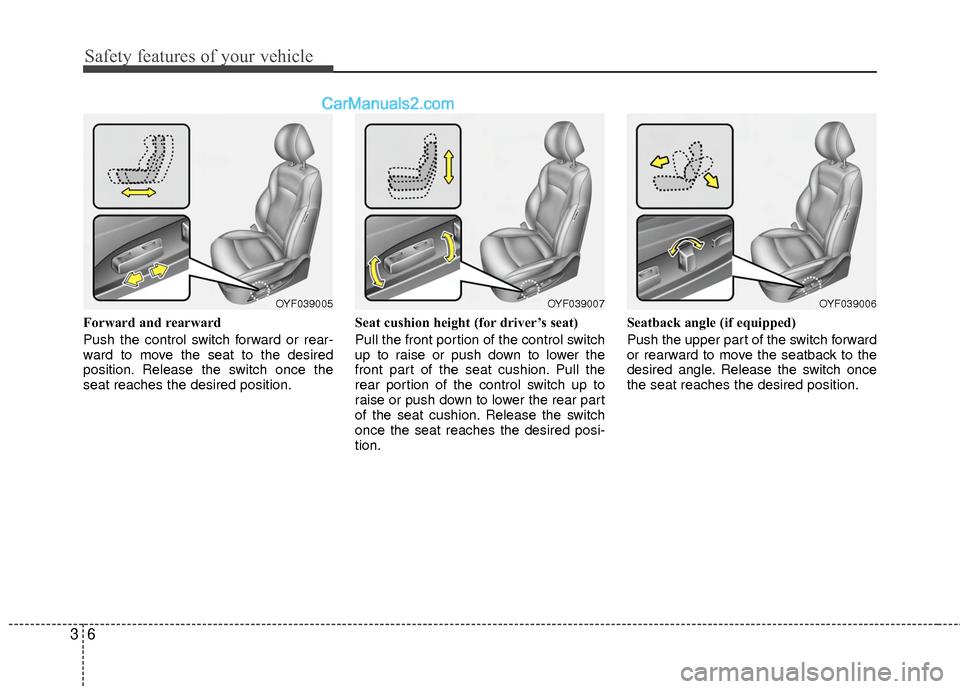
Forward and rearward
Push the control switch forward or rear-
ward to move the seat to the desired
position. Release the switch once the
seat reaches the desired position.Seat cushion height (for driver’s seat)
Pull the front portion of the control switch
up to raise or push down to lower the
front part of the seat cushion. Pull the
rear portion of the control switch up to
raise or push down to lower the rear part
of the seat cushion. Release the switch
once the seat reaches the desired posi-
tion.Seatback angle (if equipped)
Push the upper part of the switch forward
or rearward to move the seatback to the
desired angle. Release the switch once
the seat reaches the desired position.
OYF039005OYF039007OYF039006
Page 26 of 543
37
Safety features of your vehicle
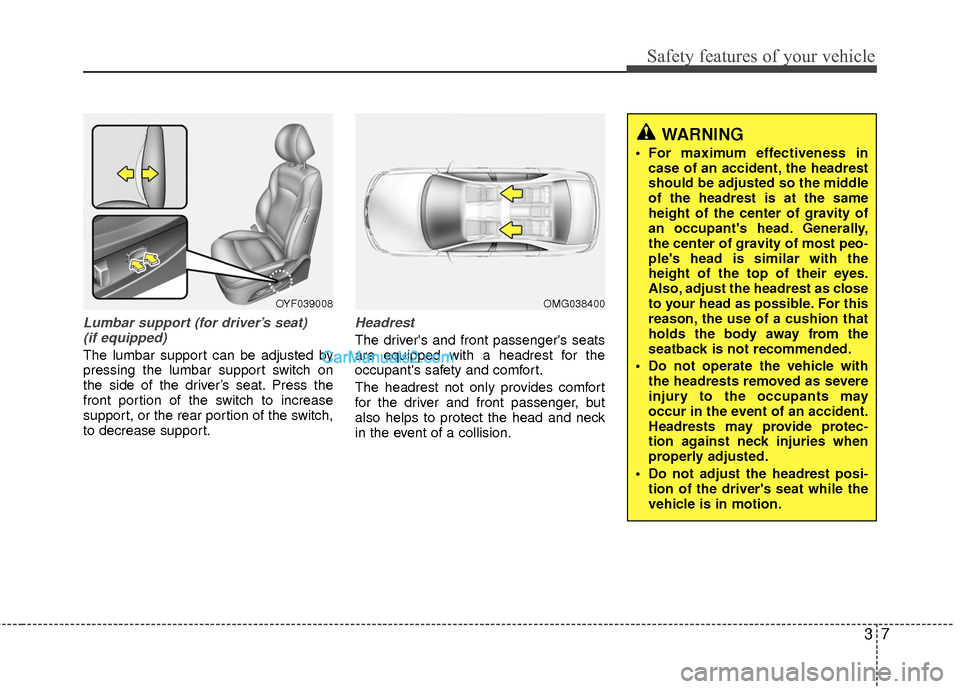
Lumbar support (for driver’s seat)(if equipped)
The lumbar support can be adjusted by
pressing the lumbar support switch on
the side of the driver’s seat. Press the
front portion of the switch to increase
support, or the rear portion of the switch,
to decrease support.
Headrest
The driver's and front passenger's seats
are equipped with a headrest for the
occupant's safety and comfort.
The headrest not only provides comfort
for the driver and front passenger, but
also helps to protect the head and neck
in the event of a collision.
OYF039008OMG038400
WARNING
For maximum effectiveness in case of an accident, the headrest
should be adjusted so the middle
of the headrest is at the same
height of the center of gravity of
an occupant's head. Generally,
the center of gravity of most peo-
ple's head is similar with the
height of the top of their eyes.
Also, adjust the headrest as close
to your head as possible. For this
reason, the use of a cushion that
holds the body away from the
seatback is not recommended.
Do not operate the vehicle with the headrests removed as severe
injury to the occupants may
occur in the event of an accident.
Headrests may provide protec-
tion against neck injuries when
properly adjusted.
Do not adjust the headrest posi- tion of the driver's seat while the
vehicle is in motion.
Page 27 of 543
Safety features of your vehicle
83
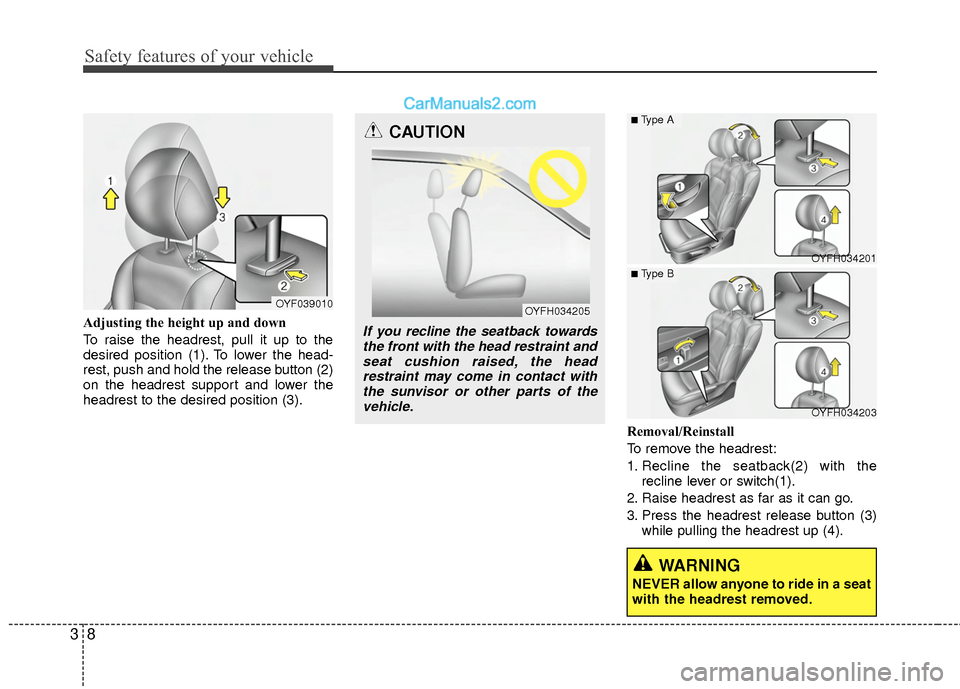
Adjusting the height up and down
To raise the headrest, pull it up to the
desired position (1). To lower the head-
rest, push and hold the release button (2)
on the headrest support and lower the
headrest to the desired position (3).Removal/Reinstall
To remove the headrest:
1. Recline the seatback(2) with therecline lever or switch(1).
2. Raise headrest as far as it can go.
3. Press the headrest release button (3) while pulling the headrest up (4).
OYF039010
WARNING
NEVER allow anyone to ride in a seat
with the headrest removed.
OYFH034201
OYFH034203
■Type A
■ Type B
CAUTION
If you recline the seatback towardsthe front with the head restraint andseat cushion raised, the headrestraint may come in contact withthe sunvisor or other parts of the vehicle.
OYFH034205
Page 28 of 543
39
Safety features of your vehicle
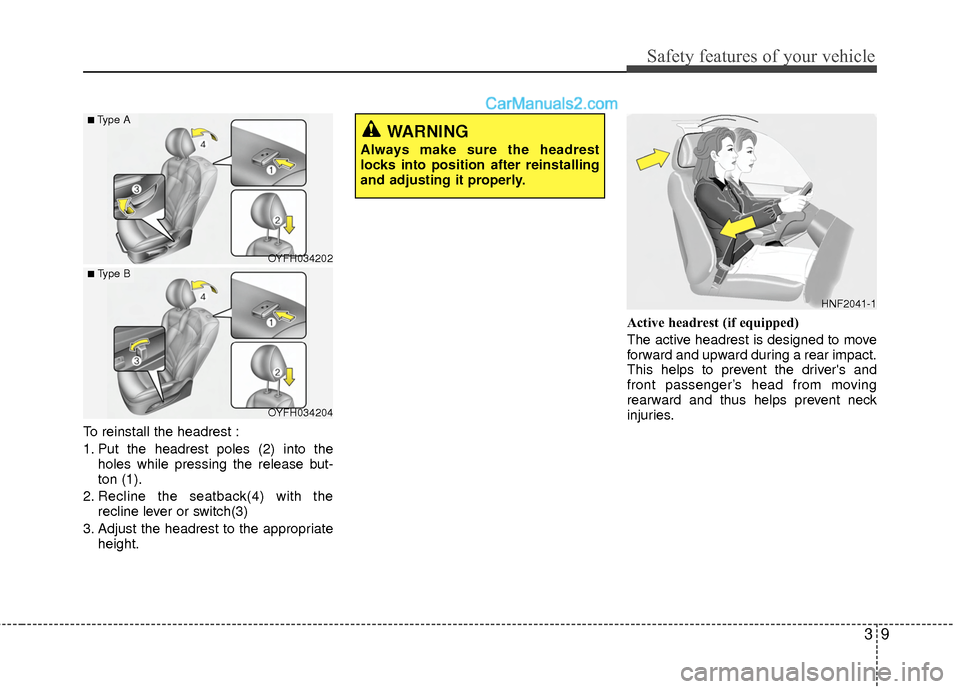
To reinstall the headrest :
1. Put the headrest poles (2) into theholes while pressing the release but-
ton (1).
2. Recline the seatback(4) with the recline lever or switch(3)
3. Adjust the headrest to the appropriate height. Active headrest (if equipped)
The active headrest is designed to move
forward and upward during a rear impact.
This helps to prevent the driver's and
front passenger’s head from moving
rearward and thus helps prevent neck
injuries.
HNF2041-1
WARNING
Always make sure the headrest
locks into position after reinstalling
and adjusting it properly.
OYFH034202
OYFH034204
■Type A
■ Type B
Page 31 of 543
Safety features of your vehicle
12
3
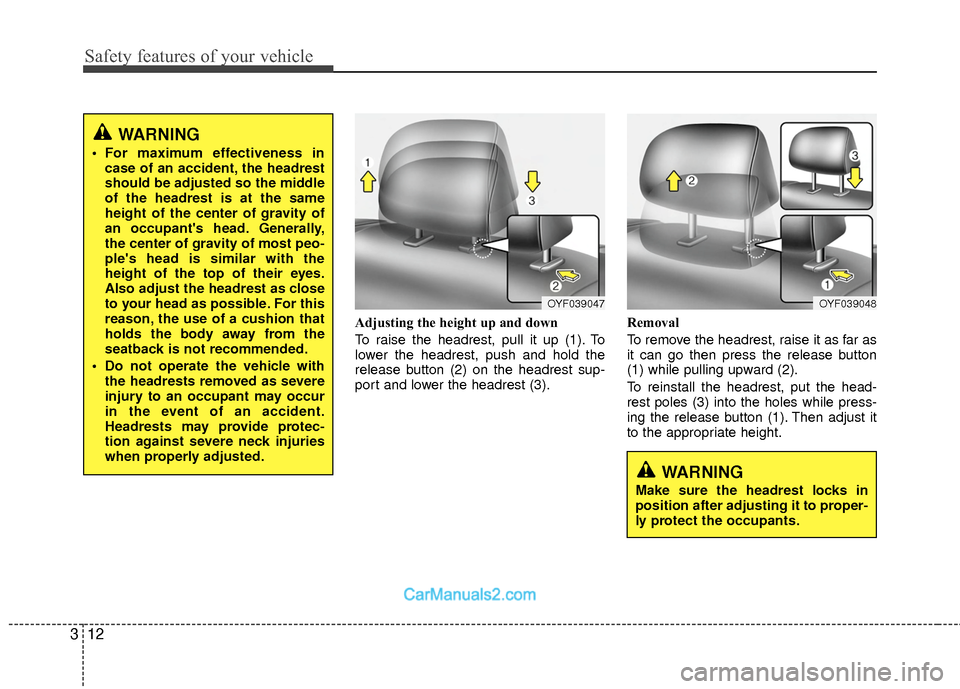
Adjusting the height up and down
To raise the headrest, pull it up (1). To
lower the headrest, push and hold the
release button (2) on the headrest sup-
port and lower the headrest (3). Removal
To remove the headrest, raise it as far as
it can go then press the release button
(1) while pulling upward (2).
To reinstall the headrest, put the head-
rest poles (3) into the holes while press-
ing the release button (1). Then adjust it
to the appropriate height.
OYF039047OYF039048
WARNING
Make sure the headrest locks in
position after adjusting it to proper-
ly protect the occupants.
WARNING
For maximum effectiveness in
case of an accident, the headrest
should be adjusted so the middle
of the headrest is at the same
height of the center of gravity of
an occupant's head. Generally,
the center of gravity of most peo-
ple's head is similar with the
height of the top of their eyes.
Also adjust the headrest as close
to your head as possible. For this
reason, the use of a cushion that
holds the body away from the
seatback is not recommended.
Do not operate the vehicle with the headrests removed as severe
injury to an occupant may occur
in the event of an accident.
Headrests may provide protec-
tion against severe neck injuries
when properly adjusted.
Page 37 of 543
Safety features of your vehicle
18
3
Seat belt - Driver's 3-point system
with emergency locking retractor
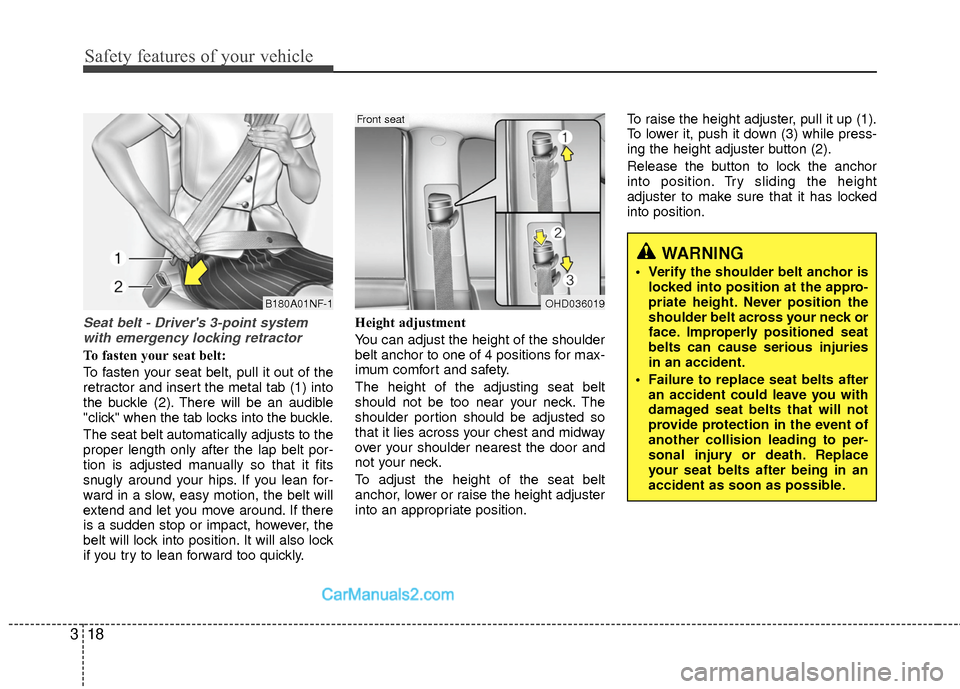
To fasten your seat belt:
To fasten your seat belt, pull it out of the
retractor and insert the metal tab (1) into
the buckle (2). There will be an audible
"click" when the tab locks into the buckle.
The seat belt automatically adjusts to the
proper length only after the lap belt por-
tion is adjusted manually so that it fits
snugly around your hips. If you lean for-
ward in a slow, easy motion, the belt will
extend and let you move around. If there
is a sudden stop or impact, however, the
belt will lock into position. It will also lock
if you try to lean forward too quickly. Height adjustment
You can adjust the height of the shoulder
belt anchor to one of 4 positions for max-
imum comfort and safety.
The height of the adjusting seat belt
should not be too near your neck. The
shoulder portion should be adjusted so
that it lies across your chest and midway
over your shoulder nearest the door and
not your neck.
To adjust the height of the seat belt
anchor, lower or raise the height adjuster
into an appropriate position.To raise the height adjuster, pull it up (1).
To lower it, push it down (3) while press-
ing the height adjuster button (2).
Release the button to lock the anchor
into position. Try sliding the height
adjuster to make sure that it has locked
into position.
WARNING
Verify the shoulder belt anchor is
locked into position at the appro-
priate height. Never position the
shoulder belt across your neck or
face. Improperly positioned seat
belts can cause serious injuries
in an accident.
Failure to replace seat belts after an accident could leave you with
damaged seat belts that will not
provide protection in the event of
another collision leading to per-
sonal injury or death. Replace
your seat belts after being in an
accident as soon as possible.
OHD036019
Front seat
B180A01NF-1
Page 43 of 543
Safety features of your vehicle
24
3
Infant or small child
All 50 states have child restraint laws. You
should be aware of the specific require-
ments in your state. Child and/or infant
seats must be properly placed and
installed in the rear seat. For more infor-
mation about the use of these restraints,
refer to “Child restraint system” in this
section.✽ ✽
NOTICE
Small children are best protected from
injury in an accident when properly
restrained in the rear seat by a child
restraint system that meets the require-
ments of the Federal Motor Vehicle
Safety Standards. Before buying any
child restraint system, make sure that it
has a label certifying that it meets
Federal Motor Vehicle Safety Standard
213. The restraint must be appropriate
for your child's height and weight.
Check the label on the child restraint for
this information. Refer to “Child
restraint system” in this section.
Larger children
Children who are too large for child
restraint systems should always occupy
the rear seat and use the available
lap/shoulder belts. The lap portion should
be fastened snug on the hips and as low
as possible. Check belt fit periodically. A
child's squirming could put the belt out of
position. Children are afforded the most
safety in the event of an accident when
they are restrained by a proper restraint
system in the rear seat. If a larger child
(over age 12) must be seated in the front
seat, the child should be securely
restrained by the available lap/shoulder
belt and the seat should be placed in the
rearmost position. Children age 12 and
under should be restrained securely in
the rear seat. NEVER place a child age
12 and under in the front seat. NEVER
place a rear facing child seat in the front
seat of a vehicle.
WARNING
Every person in your vehicle needs
to be properly restrained at all
times, including infants and chil-
dren. Never hold a child in your
arms or lap when riding in a vehi-
cle. The violent forces created dur-
ing a crash will tear the child from
your arms and throw the child
against the interior. Always use a
child restraint appropriate for your
child's height and weight.
Page 80 of 543
361
Safety features of your vehicle
Additional safety precautions
Never let passengers ride in the
cargo area or on top of a folded-
down back seat. All occupants should
sit upright, fully back in their seats with
their seat belts on and their feet on the
floor.
Passengers should not move out of
or change seats while the vehicle is
moving. A passenger who is not wear-
ing a seat belt during a crash or emer-
gency stop can be thrown against the
inside of the vehicle, against other
occupants, or out of the vehicle.
Each seat belt is designed to
restrain one occupant. If more than
one person uses the same seat belt,
they could be seriously injured or killed
in a collision.
Do not use any accessories on seat
belts. Devices claiming to improve
occupant comfort or reposition the seat
belt can reduce the protection provided
by the seat belt and increase the
chance of serious injury in a crash.
Passengers should not place hard
or sharp objects between them-
selves and the air bags. Carrying
hard or sharp objects on your lap or in
your mouth can result in injuries if an
air bag inflates.
Keep occupants away from the air
bag covers. All occupants should sit
upright, fully back in their seats with
their seat belts on and their feet on the
floor. If occupants are too close to the
air bag covers, they could be injured if
the air bags inflate.
Do not attach or place objects on or
near the air bag covers. Any object
attached to or placed on the front or
side air bag covers could interfere with
the proper operation of the air bags.
Do not modify the front seats.
Modification of the front seats could
interfere with the operation of the sup-
plemental restraint system sensing
components or side air bags.
Do not place items under the front
seats. Placing items under the front
seats could interfere with the operation
of the supplemental restraint system
sensing components and wiring har-
nesses.
Never hold an infant or child on your
lap. The infant or child could be seri-
ously injured or killed in the event of a
crash. All infants and children should
be properly restrained in appropriate
child safety seats or seat belts in the
rear seat.
Adding equipment to or modifying
your air bag-equipped vehicle
If you modify your vehicle by changing
your vehicle's frame, bumper system,
front end or side sheet metal or ride
height, this may affect the operation of
your vehicle's air bag system.
WARNING
Sitting improperly or out of posi- tion can cause occupants to be
shifted too close to a deploying
air bag, strike the interior struc-
ture or be thrown from the vehicle
resulting in serious injury or
death.
Always sit upright with the seat- back in an upright position, cen-
tered on the seat cushion with
your seat belt on, legs comfort-
ably extended and your feet on
the floor.
Be careful not to forcefully close or slam the doors when the igni-
tion is ON. The air bags may
inflate.