run flat HYUNDAI SONATA HYBRID 2022 Owners Manual
[x] Cancel search | Manufacturer: HYUNDAI, Model Year: 2022, Model line: SONATA HYBRID, Model: HYUNDAI SONATA HYBRID 2022Pages: 527, PDF Size: 64.14 MB
Page 89 of 527
03
3-43
SRS warning light
The SRS (Supplement Restraint System)
air bag warning light on the instrument
panel displays the air bag symbol
depicted in the illustration. The system
checks the air bag electrical system for
malfunctions. The light indicates that
there is a potential malfunction with your
air bag system, which could include your
side and curtain air bags used for rollover
protection.
WARNING
If your SRS malfunctions, the air bag
may not inflate properly during an
accident increasing the risk of serious
injury or death.
If any of the following conditions occur,
your SRS is malfunctioning:
• The light does not turn on for
approximately six seconds when the
Engine Start/Stop button is in the ON
position.
• The light stays on after illuminating
for approximately six seconds.
• The light comes on while the vehicle
is in motion.
• The light blinks when the engine is
running.
Have an authorized HYUNDAI dealer
inspect the SRS as soon as possible if
any of these conditions occur. During a frontal collision, sensors will
detect the vehicle’s deceleration. If the
rate of deceleration is high enough, the
control unit will inflate the front air bags.
The front air bags help protect the driver
and front passenger by responding to
frontal impacts in which seat belts alone
cannot provide adequate restraint. When
needed, the side air bags help provide
protection in the event of a side impact
or rollover.
•
Air bags are activated (able to inflate
if necessary) when the Engine Start/
Stop button is in the ON position or
approximately within 3 minutes after
ignition off.
• Air bags inflate in the event of certain
frontal or side collisions to help
protect the occupants from serious
physical injury.
• Generally, air bags are designed to
inflate based upon the severity of
a collision, its direction, etc. These
two factors determine whether
the sensors produce an electronic
deployment/inflation signal.
• The front air bags will completely
inflate and deflate in an instant. It is
virtually impossible for you to see the
air bags inflate during an accident. It is
much more likely that you will simply
see the deflated air bags hanging out
of their storage compartments after
the collision.
Page 181 of 527
05
5-33
Child-Protector Rear Door Locks
ODN8059015L
The child safety lock is provided to help
prevent children seated in the rear from
accidentally opening the rear doors. The
rear door safety locks should be used
whenever children are in the vehicle.
The child safety lock is located on the
edge of each rear door. When the child
safety lock is in the lock position, the
rear door will not open if the inner door
handle is pulled.
To lock the child safety lock, insert a
small flat blade tool (like a screwdriver or
similar) (1) into the slot and turn it to the
lock position as shown.
To allow a rear door to be opened from
inside the vehicle, unlock the child safety
lock.
WARNING
If children accidently open the rear
doors while the vehicle is in motion,
they could fall out of the vehicle. The
rear door safety locks should always
be used whenever children are in the
vehicle.
Vehicle Auto-Shut Off Function
If your parked vehicle in a garage is on
for a period of time, the engine turns
off automatically to prevent carbon
monoxide poisoning.
System setting
Select ‘User Settings → Convenience → Vehicle Auto-Shut Off’ in the LCD display.
ODN8A059340
Operating conditions
Vehicle Auto-Shut Off timer activates
when the following conditions are met.
• Ignition [ON] or engine running
• Shift button is in P (Park) position
• Unfastened driver’s seat belt
• Even one of the doors opens
Deactivations
• In case of selecting “Disable” for
Vehicle Auto-Shut Off in the User
Settings mode (30 min. based timer is
reset automatically if you restart.)
• Gear shift other than P
• Fastened driver’s seat belt
• Step on the brake or accelerator
System operation
At the set time on Vehicle Auto-Shut Off
timer, the engine turns off automatically.
Page 404 of 527
While Driving
6-128
• The vehicle height gets lower or
higher due to heavy loading in a trunk,
abnormal tire pressure, etc.
• When the temperature of the rear
bumper is high.
• When the sensors are blocked by
other vehicles, walls or parking-lot
pillars.
• The vehicle drives on a curved road.
• The road pavement (or the peripheral
ground) abnormally contains metallic
components (i.e. possibly due to
subway construction).
• There is a fixed object near the
vehicle, such as a guardrail.
• While going down or up a steep
road where the height of the lane is
different.
• Driving on a narrow road where trees
or grass or overgrown.
• Driving in rural areas where the sensor
does not detect another vehicle for an
extended period of time.
• Driving on a wet road.
• Driving on a road where the guardrail
or wall is in double structure.
• A big vehicle is near such as a bus or
truck.
• When the other vehicle approaches
very close.
• When the other vehicle passes at a
very fast speed.
• While changing lanes. •
If the vehicle has started at the same
time as the vehicle next to you and
has accelerated.
• When the vehicle in the next lane
moves two lanes away from you or
when the vehicle two lanes away
moves to the next lane from you.
• A motorcycle or bicycle is near.
• A flat trailer is near.
• If there are small objects in the
detecting area such as a shopping
cart or a baby stroller.
• If there is a low height vehicle such as
a sports car.
• The brake pedal is depressed.
• ESC (Electronic Stability Control) is
activated.
• ESC (Electronic Stability Control)
malfunctions.
• The tire pressure is low or a tire is
damaged.
• The brake is reworked.
• The vehicle sharply stops.
• Temperature is extremely low around
the vehicle.
• The vehicle severely vibrates while
driving over a bumpy road, uneven/
bumpy road, or concrete patch.
• The vehicle drives on a slippery
surface due to snow, water puddle,
or ice.
• If the vehicle moves backward after
the vehicle is parked with a diagonal
line
Page 441 of 527
07
7-21
WARNING
Do not use the TMK if a tire is severely
damaged by driving run flat or with
insufficient air pressure.
Only punctured areas located within the
tread region of the tire can be sealed
using the TMK.
Notes on the Safe Use of the Tire
Mobility Kit
• Park your car at the side of the road
so that you can work with the Tire
Mobility Kit away from moving traffic.
• To be sure your vehicle will not move,
even when you’re on fairly level
ground, always set your parking brake.
• Only use the Tire Mobility Kit for
sealing/inflation passenger car tires.
Only punctured areas located within
the tread region of the tire can be
sealed using the tire mobility kit.
• Do not use on motorcycles, bicycles
or any other type of tires.
• When the tire and wheel are
damaged, do not use Tire Mobility Kit
for your safety.
• Use of the Tire Mobility Kit may not be
effective for tire damage larger than
approximately 0.24 inch (6 mm).
Please contact the nearest HYUNDAI
dealership if the tire cannot be made
roadworthy with the Tire Mobility Kit. •
Do not use the Tire Mobility Kit if a tire
is severely damaged by driving run flat
or with insufficient air pressure.
• Do not remove any foreign objects
such as nails or screws that have
penetrated the tire.
• Provided the car is outdoors, leave
the vehicle in the ready (
) mode.
Otherwise operating the compressor
may eventually drain the car battery.
• Never leave the Tire Mobility Kit
unattended while it is being used.
• Do not leave the compressor running
for more than 10 minutes at a time or
it may overheat.
• Do not use the Tire Mobility Kit if the
ambient temperature is below -22°F
(-30°C).
• In case of skin contact with the
sealant, wash the area thoroughly
with plenty of water. If the irritation
persists, seek medical attention.
• In case of eye contact with the
sealant, flush your eyes for at least 15
minutes. If the irritation persists, seek
medical attention.
• In case of swallowing the sealant,
rinse the mouth and drink plenty of
water. However, never give anything
to an unconscious person and seek
medical attention immediately.
• Long time exposure to the sealant
may cause damage to bodily tissue
such as kidney, etc.
Page 444 of 527
Emergency situations
7-24
ODN8079008
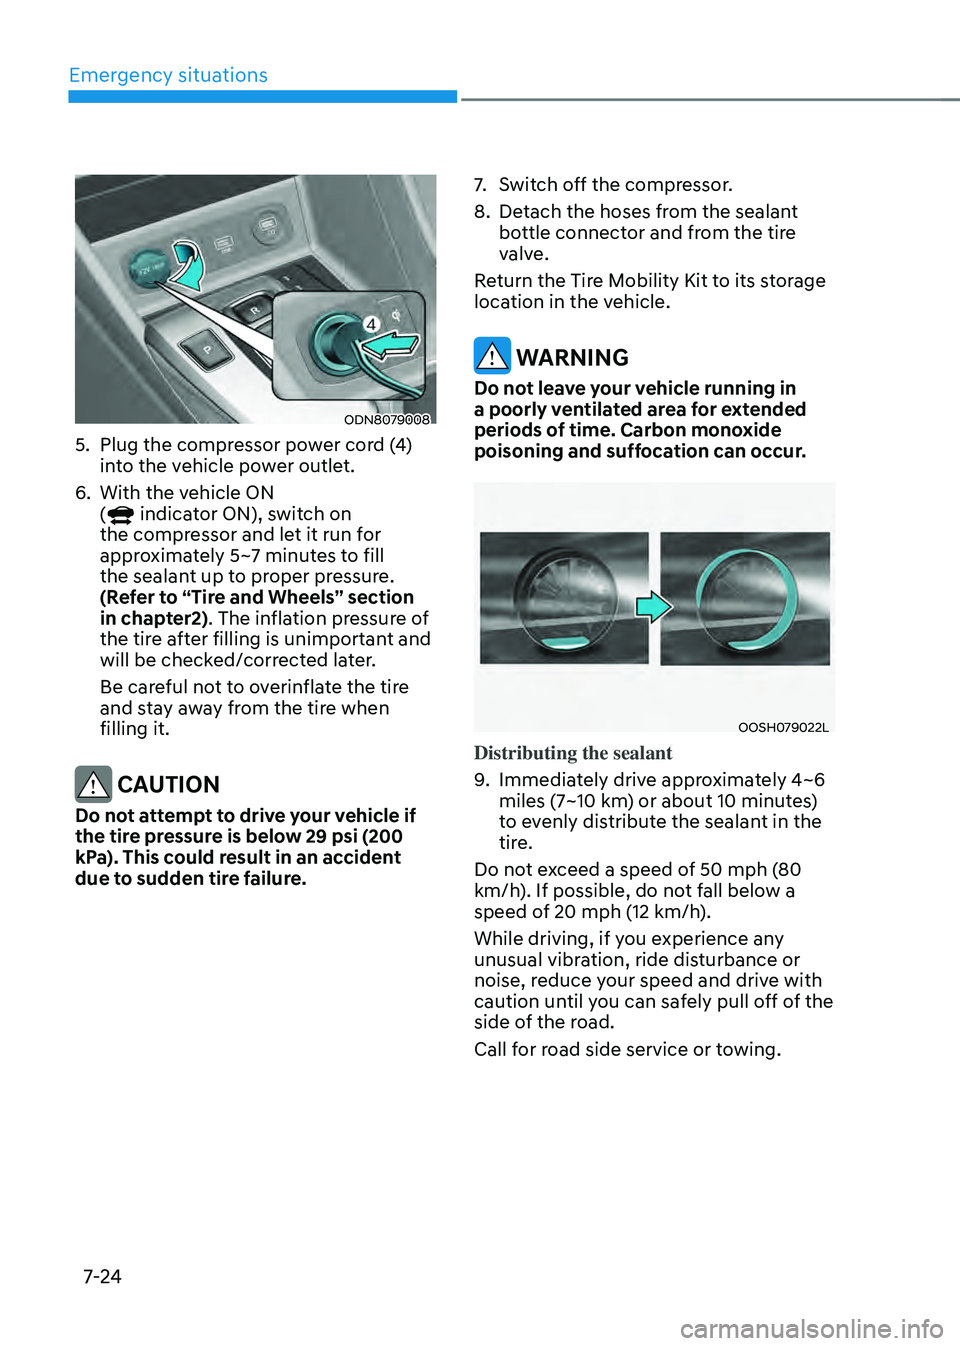
5. Plug the compressor power cord (4)
into the vehicle power outlet.
6. With the vehicle ON
( indicator ON), switch on
the compressor and let it run for
approximately 5~7 minutes to fill
the sealant up to proper pressure.
(Refer to “Tire and Wheels” section
in chapter2). The inflation pressure of
the tire after filling is unimportant and
will be checked/corrected later.
Be careful not to overinflate the tire
and stay away from the tire when
filling it.
CAUTION
Do not attempt to drive your vehicle if
the tire pressure is below 29 psi (200
kPa). This could result in an accident
due to sudden tire failure.
7. Switch off the compressor.
8. Detach the hoses from the sealant
bottle connector and from the tire
valve.
Return the Tire Mobility Kit to its storage
location in the vehicle.
WARNING
Do not leave your vehicle running in
a poorly ventilated area for extended
periods of time. Carbon monoxide
poisoning and suffocation can occur.
OOSH079022L
Distributing the sealant
9. Immediately drive approximately 4~6
miles (7~10 km) or about 10 minutes)
to evenly distribute the sealant in the
tire.
Do not exceed a speed of 50 mph (80
km/h). If possible, do not fall below a
speed of 20 mph (12 km/h).
While driving, if you experience any
unusual vibration, ride disturbance or
noise, reduce your speed and drive with
caution until you can safely pull off of the
side of the road.
Call for road side service or towing.
Page 445 of 527
07
7-25
Checking the Tire Inflation
Pressure
ODN8H070009N
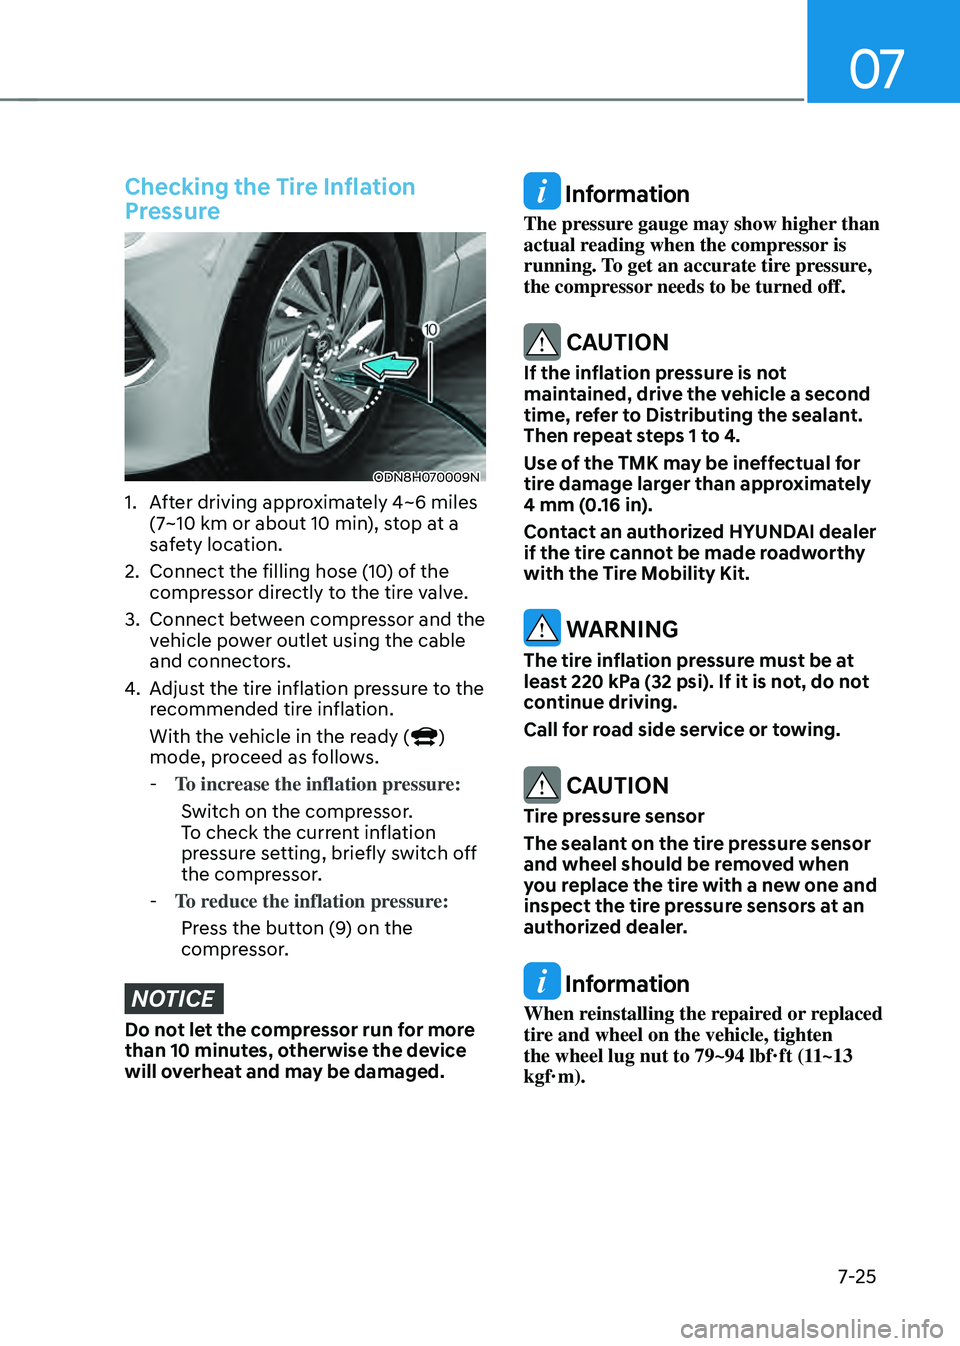
1. After driving approximately 4~6 miles
(7~10 km or about 10 min), stop at a
safety location.
2. Connect the filling hose (10) of the
compressor directly to the tire valve.
3. Connect between compressor and the
vehicle power outlet using the cable
and connectors.
4. Adjust the tire inflation pressure to the
recommended tire inflation.
With the vehicle in the ready (
)
mode, proceed as follows.
- To increase the inflation pressure:
Switch on the compressor.
To check the current inflation
pressure setting, briefly switch off
the compressor.
- To reduce the inflation pressure:
Press the button (9) on the
compressor.
NOTICE
Do not let the compressor run for more
than 10 minutes, otherwise the device
will overheat and may be damaged.
Information
The pressure gauge may show higher than
actual reading when the compressor is
running. To get an accurate tire pressure,
the compressor needs to be turned off.
CAUTION
If the inflation pressure is not
maintained, drive the vehicle a second
time, refer to Distributing the sealant.
Then repeat steps 1 to 4.
Use of the TMK may be ineffectual for
tire damage larger than approximately
4 mm (0.16 in).
Contact an authorized HYUNDAI dealer
if the tire cannot be made roadworthy
with the Tire Mobility Kit.
WARNING
The tire inflation pressure must be at
least 220 kPa (32 psi). If it is not, do not
continue driving.
Call for road side service or towing.
CAUTION
Tire pressure sensor
The sealant on the tire pressure sensor
and wheel should be removed when
you replace the tire with a new one and
inspect the tire pressure sensors at an
authorized dealer.
Information
When reinstalling the repaired or replaced
tire and wheel on the vehicle, tighten
the wheel lug nut to 79~94 lbf·ft (11~13
kgf·m).
Page 451 of 527
Tires and Wheels ........................................................................\
.....................8-25Tire Care ........................................................................\
..............................................8-26
Recommended Cold Tire Inflation Pressures ...........................................................8-26
Check Tire Inflation Pressure ........................................................................\
.............8-27
Tire Rotation ........................................................................\
.......................................8-27
Wheel Alignment and Tire Balance ........................................................................\
...8-28
Tire Replacement ........................................................................\
...............................8-28
Wheel Replacement ........................................................................\
..........................8-30
Tire Traction ........................................................................\
.......................................8-30
Tire Maintenance ........................................................................\
............................... 8-30
Tire Sidewall Labeling
........................................................................\
.......................8-30
Tire Terminology and Definitions ........................................................................\
......8-33
All Season Tires ........................................................................\
..................................8-36
Summer Tires ........................................................................\
....................................8-36
Snow Tires ........................................................................\
.......................................... 8-36
Radial-Ply Tires
........................................................................\
..................................8-36
Low Aspect Ratio Tires ........................................................................\
.......................8-37
Fuses ........................................................................\
........................................8-38Instrument Panel Fuse Replacement .......................................................................8-39
Engine Compartment Panel Fuse Replacement .....................................................8-40
Fuse/Relay Panel Description ........................................................................\
............ 8-41
Light Bulbs ........................................................................\
...............................8-43Headlamp, Parking Lamp, Daytime Running Light,
Turn Signal Lamp and Side Marker Replacement ...................................................8-44
Side Repeater Lamp Replacement ........................................................................\
..8-45
Rear Combination Lamp Replacement ...................................................................8-45
High Mounted Stop Lamp Replacement ..................................................................8-47
License Plate Light Bulb Replacement ....................................................................8-48
Interior Lamp Replacement ........................................................................\
..............8-48
Appearance Care ........................................................................\
....................8-50Exterior Care ........................................................................\
......................................8-50
Interior Care ........................................................................\
.......................................8-54
Emission Control System ........................................................................\
........8-57Crankcase Emission Control System ........................................................................\
8-57
Evaporative Emission Control System Including
Onboard Refueling Vapor Recovery (ORVR)
............................................................8-57
Exhaust Emission Control System ........................................................................\
....8-58
8
Page 454 of 527
08
8-5
WARNING
Performing maintenance work on a
vehicle can be dangerous. If you lack
sufficient knowledge and experience or
the proper tools and equipment to do
the work, have it done by an authorized
HYUNDAI dealer.
ALWAYS follow these precautions for
performing maintenance work:
• Park your vehicle on level ground,
shift the gear to P (Park), apply
the parking brake, and press the
Engine Start/Stop button to the OFF
position.
• Block the tires (front and back) to
prevent the vehicle from moving.
Remove loose clothing or jewelry
that can become entangled in
moving parts.
• If you must run the engine during
maintenance, do so out doors or in
an area with plenty of ventilation.
• Keep flames, sparks, or smoking
materials away from the battery and
fuel-related parts. The following lists are vehicle checks and
inspections that should be performed
by the owner or an authorized HYUNDAI
dealer at the frequencies indicated to
help ensure safe, dependable operation
of your vehicle.
Any adverse conditions should be
brought to the attention of your dealer as
soon as possible.
These Owner Maintenance vehicle
checks are generally not covered by
warranties and you may be charged for
labor, parts and lubricants used.
Owner Maintenance Schedule
When you stop for fuel:
•
Check the engine oil level.
• Check the coolant level in the engine
coolant reservoir.
• Check the windshield washer fluid
level.
• Check for low or under-inflated tires.
WARNING
Be careful when checking your engine
coolant/inverter coolant level when the
engine is hot. This may result in coolant
being blown out of the opening and
cause serious burns and other injuries.
OWNER MAINTENANCE
Page 498 of 527
08
8-49
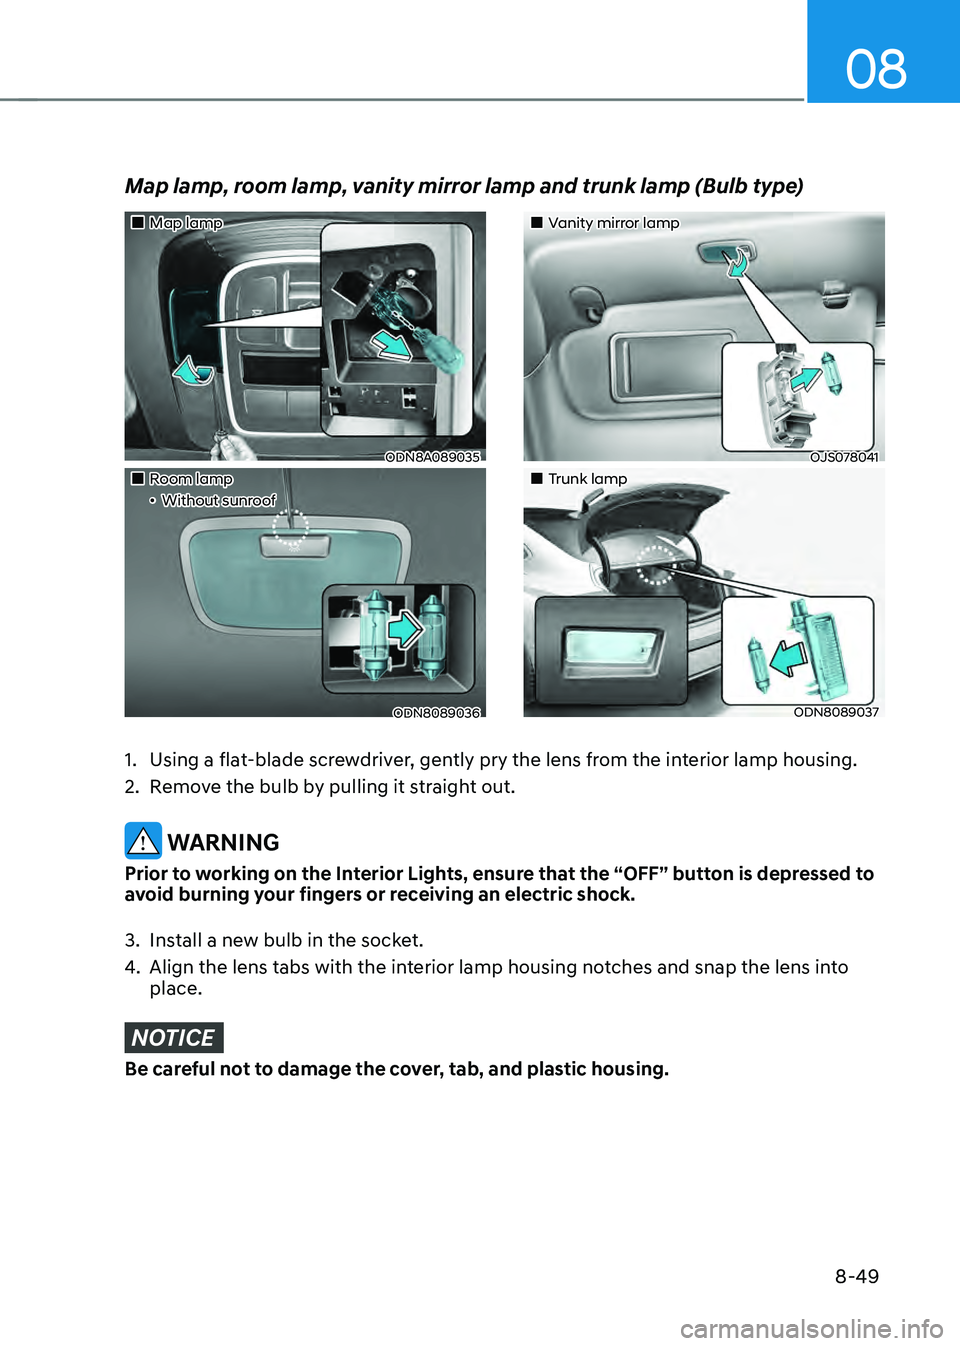
„„Map lamp
ODN8A089035
„„Room lamp„ǴWithout sunroof
ODN8089036
„„Vanity mirror lamp
OJS078041
„„Trunk lamp
ODN8089037
Map lamp, room lamp, vanity mirror lamp and trunk lamp (Bulb type)
1. Using a flat-blade screwdriver, gently pry the lens from the interior lamp housing.
2. Remove the bulb by pulling it straight out.
WARNING
Prior to working on the Interior Lights, ensure that the “OFF” button is depressed to
avoid burning your fingers or receiving an electric shock.
3. Install a new bulb in the socket.
4. Align the lens tabs with the interior lamp housing notches and snap the lens into
place.
NOTICE
Be careful not to damage the cover, tab, and plastic housing.
Page 512 of 527
Index
I-4
Electronic Stability Control (ESC).................................................................. 6-28
Vehicle Stability Management (VSM)
...........................................................6-31
Hill-start assist control (HAC)
........................................................................\
6-32
Good braking practices
........................................................................\
..........6-32
Bulb replacement
........................................................................\
.........................8-43
Headlamp
........................................................................\
...............................8-44
Parking lamp
........................................................................\
..........................8-44
Daytime running light
........................................................................\
............8-44
Turn signal lamp
........................................................................\
.....................8-44
Cornering lamp ........................................................................\
....................... 8-44
Side marker
........................................................................\
............................8-44
Auxiliary lamp
........................................................................\
.......................8-44
Side repeater lamp
........................................................................\
..................8-45
Rear combination light bulb
........................................................................\
...8-45
High mounted stop lamp
........................................................................\
........8-47
License plate light
........................................................................\
..................8-48
Interior light
........................................................................\
...........................8-48
Bulb wattage
........................................................................\
..................................2-8
C
Cabin air filter
........................................................................\
..............................8-23
California perchlorate notice
........................................................................\
.........1-9
Capacities (Lubricants)
........................................................................\
................2-11
Center console storage
........................................................................\
...............5-118
Central door lock/unlock switch
........................................................................\
..5-30
Certification label
........................................................................\
........................2-13
Check tire inflation pressure
........................................................................\
........8-27
Child restraint system (CRS)
........................................................................\
.......3-29
Selecting a child restraint system (CRS)
........................................................3-30
Rearward-facing child restraint system
..........................................................3-30
Forward-facing child restraint system
............................................................3-31
Booster seats ........................................................................\
............................ 3-31
Installing a child restraint system (CRS)
.......................................................3-31
Lower anchors and tether for Children (LATCH System)
.............................3-32
Lower anchors
........................................................................\
........................3-32
Tether anchors
........................................................................\
........................3-32
Lap/shoulder belt
........................................................................\
....................3-35