spare wheel HYUNDAI SONATA HYBRID 2022 Owners Manual
[x] Cancel search | Manufacturer: HYUNDAI, Model Year: 2022, Model line: SONATA HYBRID, Model: HYUNDAI SONATA HYBRID 2022Pages: 527, PDF Size: 64.14 MB
Page 41 of 527
02
2-9
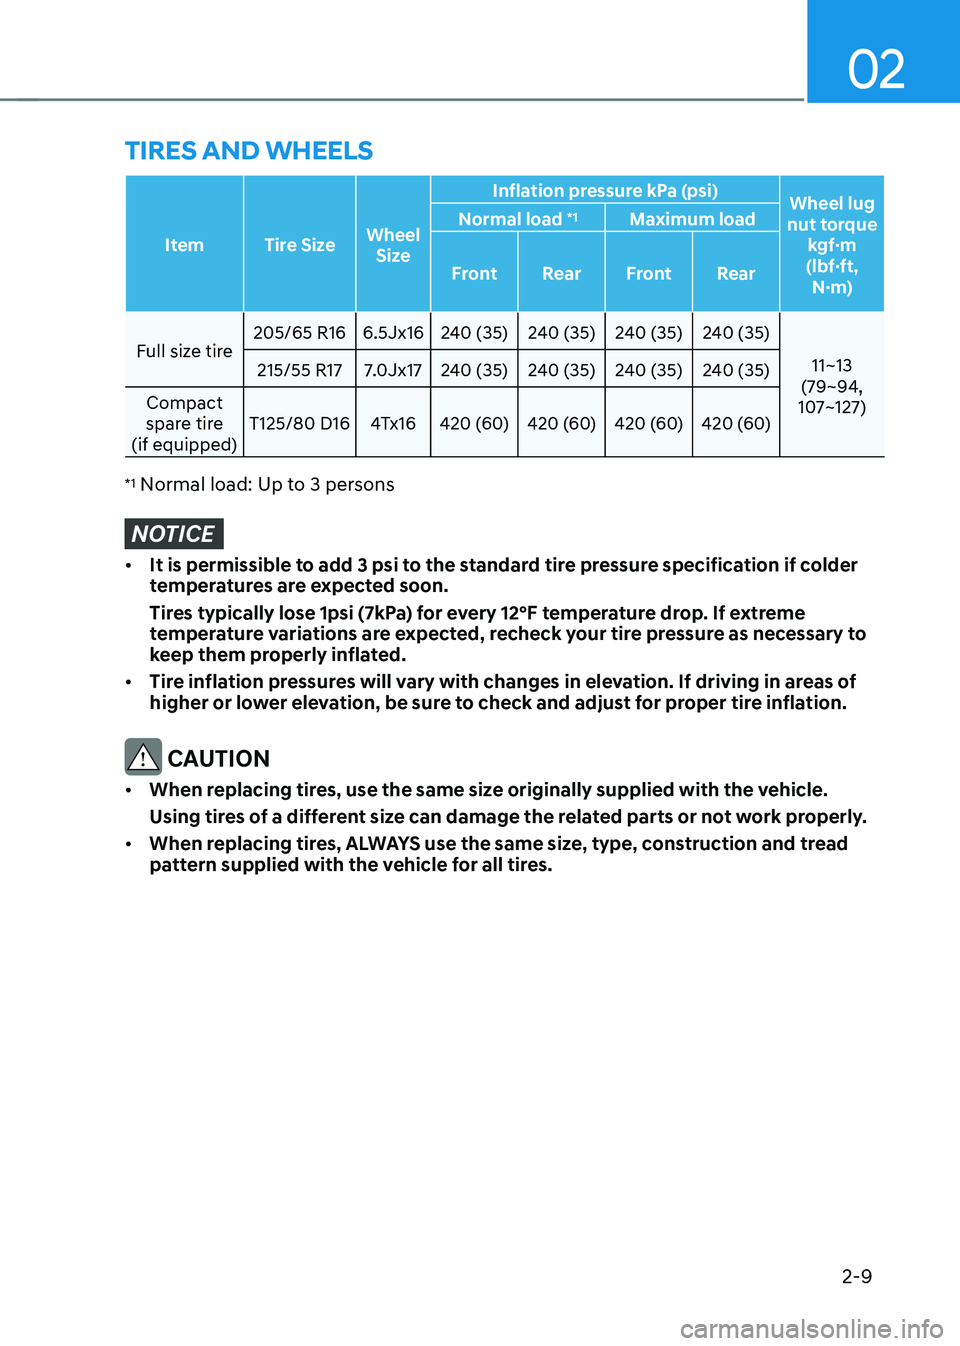
TIRES AND WHEELS
ItemTire Size Wheel
Size Inflation pressure kPa (psi)
Wheel lug
nut torque kgf·m
(lbf·ft, N·m)
Normal load
*1Maximum load
Front RearFront Rear
Full size tire 205/65 R16
6.5Jx16240 (35) 240 (35)240 (35)240 (35)
11~13
(79~94,
107~127)
215/55 R17
7.0Jx17240 (35) 240 (35)240 (35)240 (35)
Compact
spare tire
(if equipped) T125/80 D16
4Tx16420 (60) 420 (60)420 (60)420 (60)
*1 Normal load: Up to 3 persons
NOTICE
• It is permissible to add 3 psi to the standard tire pressure specification if colder
temperatures are expected soon.
Tires typically lose 1psi (7kPa) for every 12°F temperature drop. If extreme
temperature variations are expected, recheck your tire pressure as necessary to
keep them properly inflated.
• Tire inflation pressures will vary with changes in elevation. If driving in areas of
higher or lower elevation, be sure to check and adjust for proper tire inflation.
CAUTION
• When replacing tires, use the same size originally supplied with the vehicle.
Using tires of a different size can damage the related parts or not work properly.
• When replacing tires, ALWAYS use the same size, type, construction and tread
pattern supplied with the vehicle for all tires.
Page 430 of 527
Emergency situations
7-10
Tire Pressure Monitoring System
WARNING
Over-inflation or under-inflation can
reduce tire life, adversely affect vehicle
handling, and lead to sudden tire failure
that may cause loss of vehicle control
resulting in an accident.
Each tire, including the spare (if
provided), should be checked monthly
when cold and inflated to the inflation
pressure recommended by the vehicle
manufacturer on the vehicle placard
or tire inflation pressure label. (If your
vehicle has tires of a different size than
the size indicated on the vehicle placard
or tire inflation pressure label, you should
determine the proper tire inflation
pressure for those tires.)
As an added safety feature, your
vehicle has been equipped with a tire
pressure monitoring system (TPMS)
that illuminates a low tire pressure
telltale when one or more of your tires is
significantly under-inflated. Accordingly,
when the low tire pressure telltale
illuminates, you should stop and check
your tires as soon as possible, and inflate
them to the proper pressure. Driving on
a significantly under-inflated tire causes
the tire to overheat and can lead to tire
failure.
Under-inflation also reduces fuel
efficiency and tire tread life, and may
affect the vehicle’s handling and
stopping ability.
Please note that the TPMS is not a
substitute for proper tire maintenance,
and it is the driver’s responsibility to
maintain correct tire pressure, even if
under-inflation has not reached the level
to trigger illumination of the TPMS low
tire pressure telltale.
Your vehicle has also been equipped with
a TPMS malfunction indicator to indicate
when the system is not operating
properly. The TPMS malfunction
indicator is combined with the low
tire pressure telltale. When the system
detects a malfunction, the telltale will
flash for approximately one minute and
then remain continuously illuminated.
This sequence will continue upon
subsequent vehicle start-ups as long as
the malfunction exists.
When the malfunction indicator is
illuminated, the system may not be able
to detect or signal low tire pressure as
intended. TPMS malfunctions may occur
for a variety of reasons, including the
installation of replacement or alternate
tires or wheels on the vehicle that
prevent the TPMS from functioning
properly.
Always check the TPMS malfunction
telltale after replacing one or more tires
or wheels on your vehicle to ensure that
the replacement or alternate tires and
wheels allow the TPMS to continue to
function properly.
NOTICE
If any of the below happens, have
the system checked by an authorized
HYUNDAI dealer.
1. The Low Tire Pressure Telltale/TPMS
Malfunction Indicator does not
illuminate for 3 seconds when the
Engine Start/Stop button is pressed
to the ON position or the vehicle is in
the ready (
) mode.
2. The TPMS Malfunction Indicator
remains illuminated after blinking for
approximately 1 minute.
3. The Low Tire Pressure Position
Telltale remains illuminated.
Page 432 of 527
Emergency situations
7-12
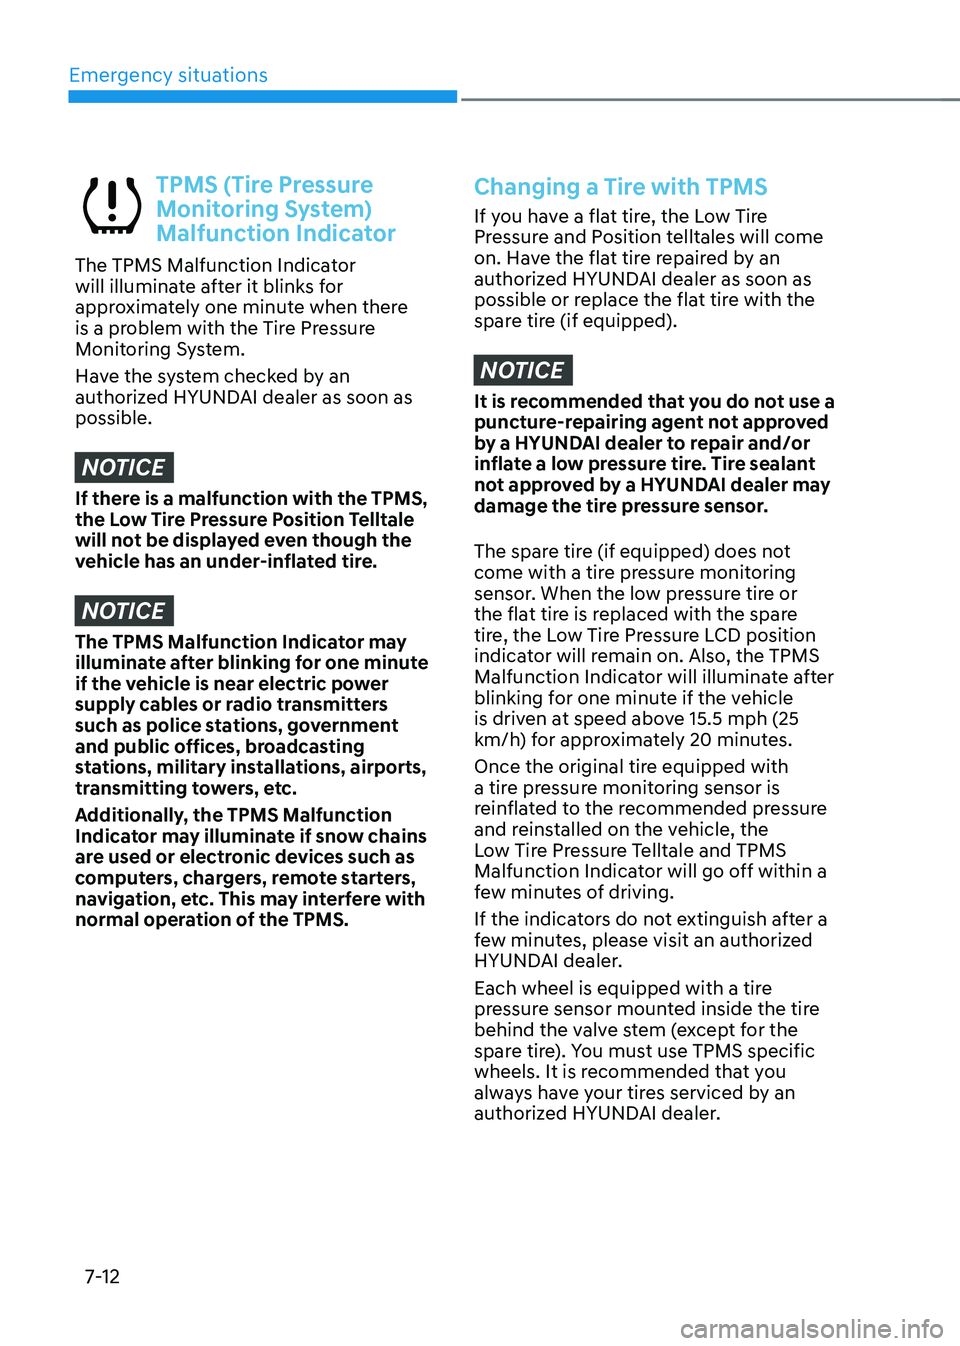
TPMS (Tire Pressure
Monitoring System)
Malfunction Indicator
The TPMS Malfunction Indicator
will illuminate after it blinks for
approximately one minute when there
is a problem with the Tire Pressure
Monitoring System.
Have the system checked by an
authorized HYUNDAI dealer as soon as
possible.
NOTICE
If there is a malfunction with the TPMS,
the Low Tire Pressure Position Telltale
will not be displayed even though the
vehicle has an under-inflated tire.
NOTICE
The TPMS Malfunction Indicator may
illuminate after blinking for one minute
if the vehicle is near electric power
supply cables or radio transmitters
such as police stations, government
and public offices, broadcasting
stations, military installations, airports,
transmitting towers, etc.
Additionally, the TPMS Malfunction
Indicator may illuminate if snow chains
are used or electronic devices such as
computers, chargers, remote starters,
navigation, etc. This may interfere with
normal operation of the TPMS.
Changing a Tire with TPMS
If you have a flat tire, the Low Tire
Pressure and Position telltales will come
on. Have the flat tire repaired by an
authorized HYUNDAI dealer as soon as
possible or replace the flat tire with the
spare tire (if equipped).
NOTICE
It is recommended that you do not use a
puncture-repairing agent not approved
by a HYUNDAI dealer to repair and/or
inflate a low pressure tire. Tire sealant
not approved by a HYUNDAI dealer may
damage the tire pressure sensor.
The spare tire (if equipped) does not
come with a tire pressure monitoring
sensor. When the low pressure tire or
the flat tire is replaced with the spare
tire, the Low Tire Pressure LCD position
indicator will remain on. Also, the TPMS
Malfunction Indicator will illuminate after
blinking for one minute if the vehicle
is driven at speed above 15.5 mph (25
km/h) for approximately 20 minutes.
Once the original tire equipped with
a tire pressure monitoring sensor is
reinflated to the recommended pressure
and reinstalled on the vehicle, the
Low Tire Pressure Telltale and TPMS
Malfunction Indicator will go off within a
few minutes of driving.
If the indicators do not extinguish after a
few minutes, please visit an authorized
HYUNDAI dealer.
Each wheel is equipped with a tire
pressure sensor mounted inside the tire
behind the valve stem (except for the
spare tire). You must use TPMS specific
wheels. It is recommended that you
always have your tires serviced by an
authorized HYUNDAI dealer.
Page 434 of 527
Emergency situations
7-14
IF YOU HAVE A FLAT TIRE (WITH SPARE TIRE, IF EQUIPPED)
WARNING
Changing a tire can be dangerous.
Follow the instructions in this section
when changing a tire to reduce the risk
of serious injury or death.
CAUTION
Be careful as you use the jack handle to
stay clear of the flat end. The flat end
has sharp edges that could cause cuts.
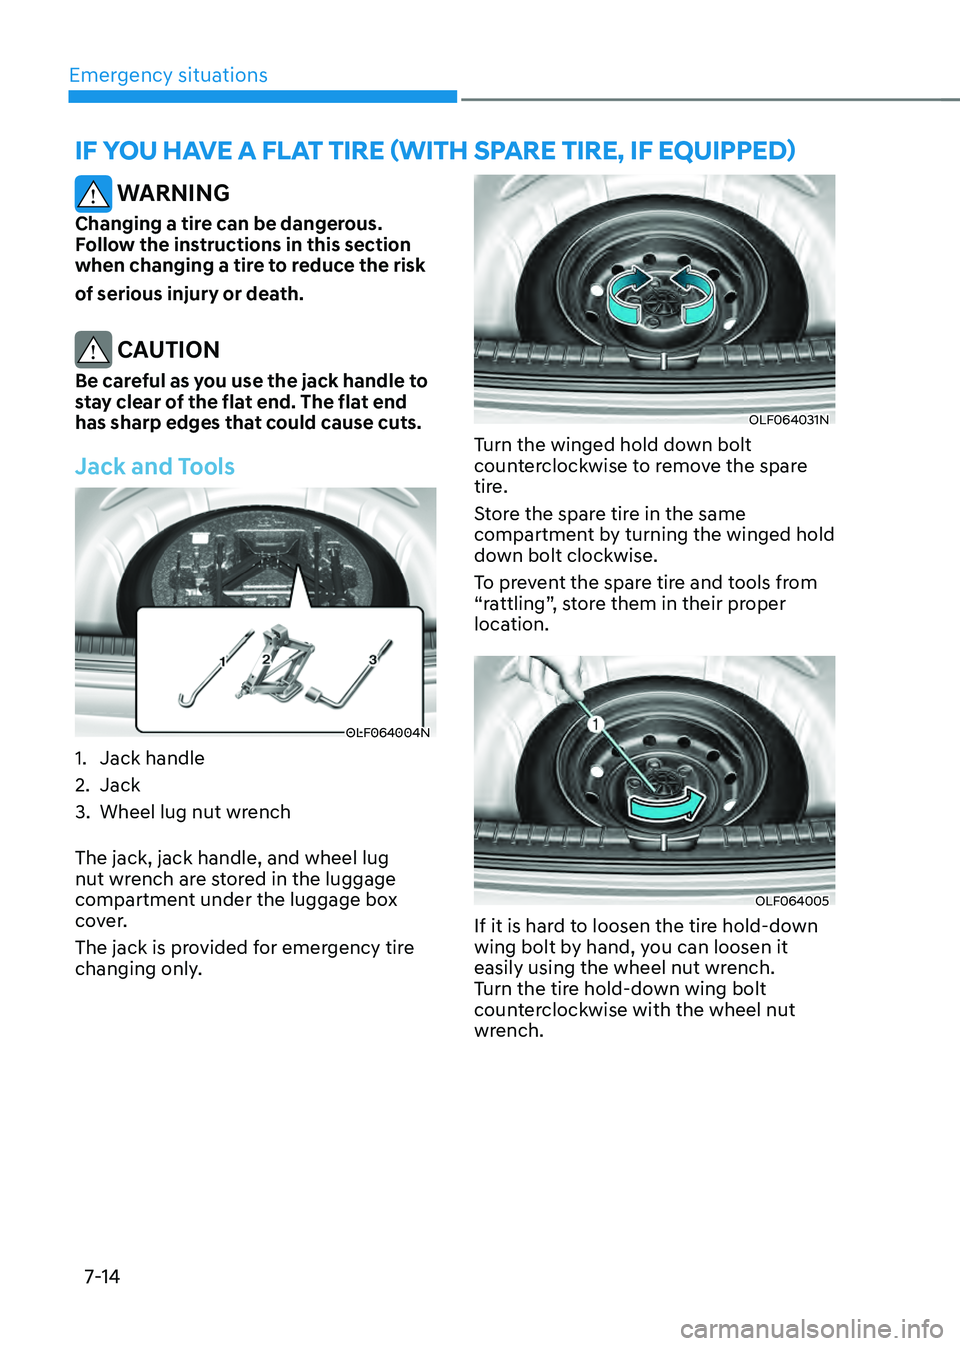
Jack and Tools
OLF064004N
1. Jack handle
2. Jack
3. Wheel lug nut wrench
The jack, jack handle, and wheel lug
nut wrench are stored in the luggage
compartment under the luggage box
cover.
The jack is provided for emergency tire
changing only.
OLF064031N
Turn the winged hold down bolt
counterclockwise to remove the spare
tire.
Store the spare tire in the same
compartment by turning the winged hold
down bolt clockwise.
To prevent the spare tire and tools from
“rattling”, store them in their proper
location.
OLF064005
If it is hard to loosen the tire hold-down
wing bolt by hand, you can loosen it
easily using the wheel nut wrench.
Turn the tire hold-down wing bolt
counterclockwise with the wheel nut
wrench.
Page 435 of 527
07
7-15
Changing Tires
WARNING
A vehicle can slip or roll off of a jack
causing serious injury or death to you or
those nearby. Take the following safety
precautions:
• Do not get under a vehicle that is
supported by a jack.
• NEVER attempt to change a tire in
the lane of traffic. ALWAYS move the
vehicle completely off the road on
level, firm ground away from traffic
before trying to change a tire. If you
cannot find a level, firm place off
the road, call a towing service for
assistance.
• Be sure to use the jack provided with
the vehicle.
• ALWAYS place the jack on the
designated jacking positions on the
vehicle and NEVER on the bumpers
or any other part of the vehicle for
jacking support.
• Do not start or run the engine while
the vehicle is on the jack.
• Do not allow anyone to remain in the
vehicle while it is on the jack.
• Keep children away from the road
and the vehicle. Follow these steps to change your
vehicle’s tire:
1. Park on a level, firm surface.
2. Shift the gear to P (Park), apply the
parking brake, and press the Engine
Start/Stop button to the OFF position.
3. Press the hazard warning flasher
button.
4. Remove the wheel lug nut wrench,
jack, jack handle, and spare tire from
the vehicle.
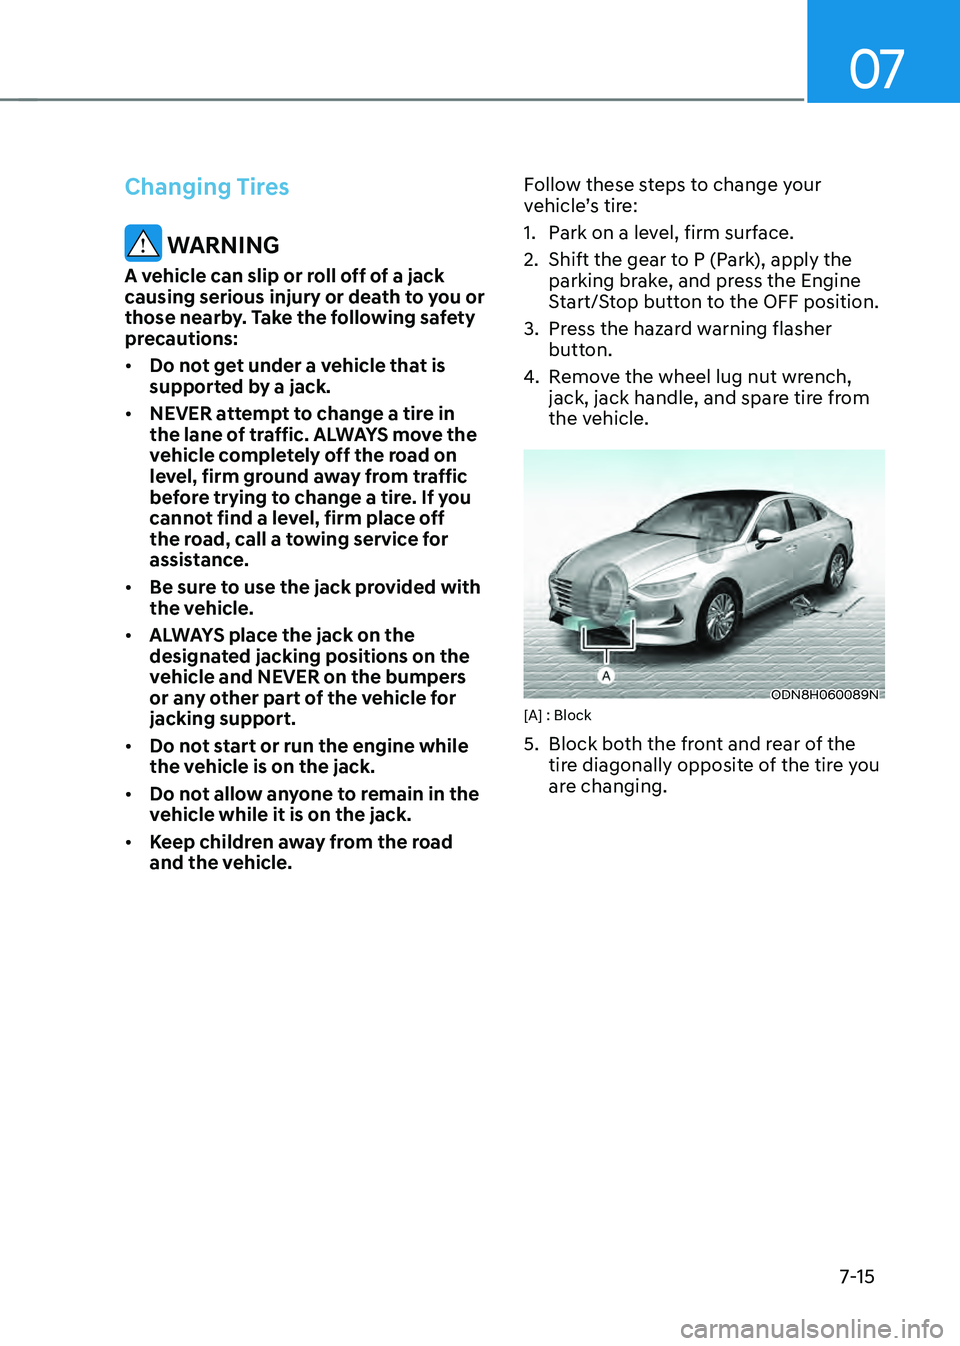
ODN8H060089N[A] : Block
5. Block both the front and rear of the
tire diagonally opposite of the tire you
are changing.
Page 436 of 527
Emergency situations
7-16
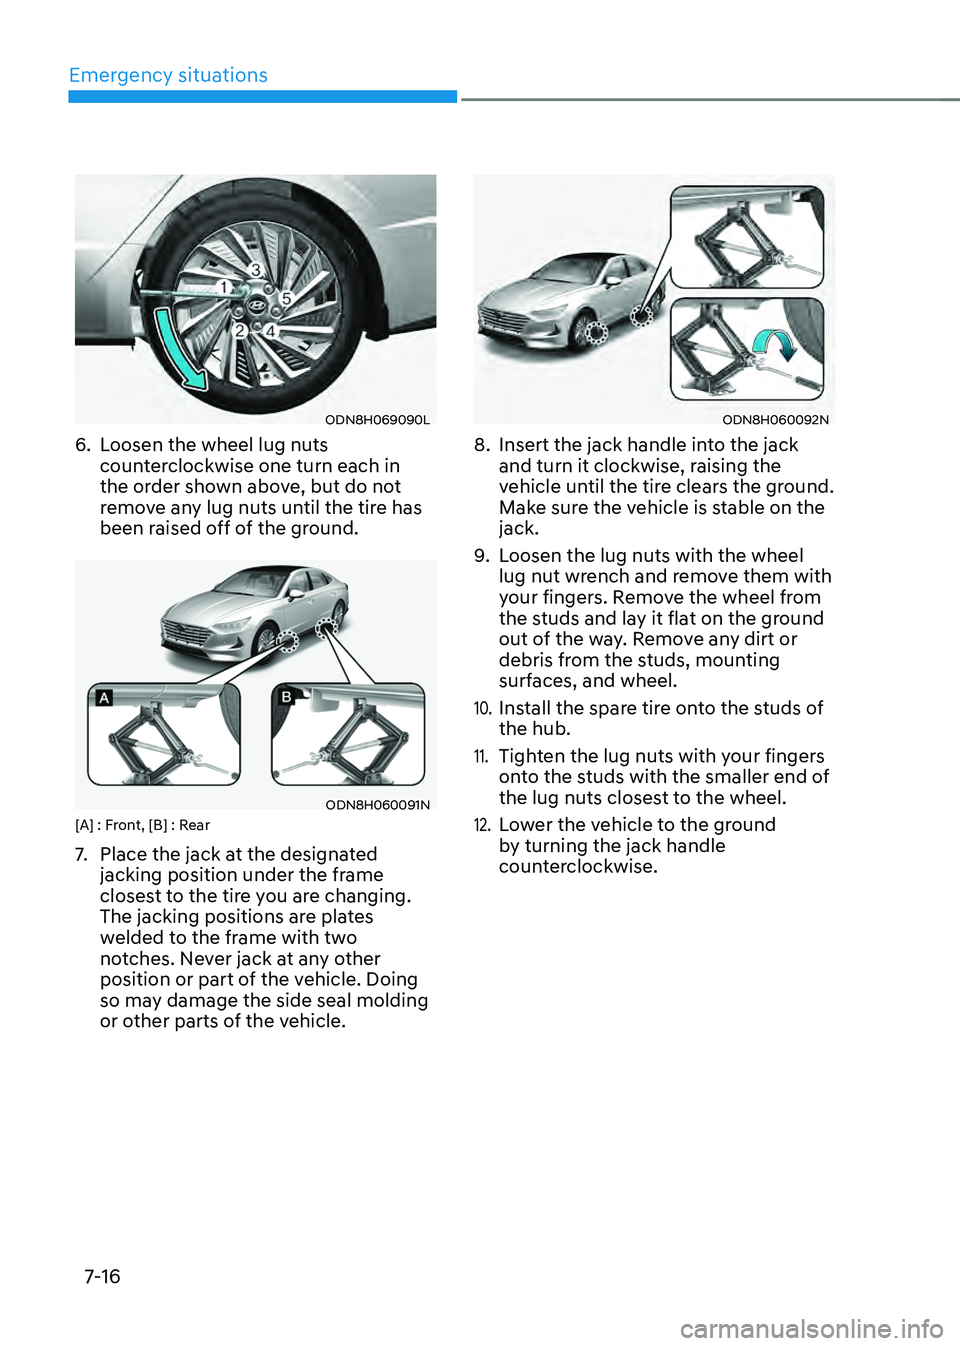
ODN8H069090L
6. Loosen the wheel lug nuts
counterclockwise one turn each in
the order shown above, but do not
remove any lug nuts until the tire has
been raised off of the ground.
ODN8H060091N[A] : Front, [B] : Rear
7. Place the jack at the designated
jacking position under the frame
closest to the tire you are changing.
The jacking positions are plates
welded to the frame with two
notches. Never jack at any other
position or part of the vehicle. Doing
so may damage the side seal molding
or other parts of the vehicle.
ODN8H060092N
8. Insert the jack handle into the jack
and turn it clockwise, raising the
vehicle until the tire clears the ground.
Make sure the vehicle is stable on the
jack.
9. Loosen the lug nuts with the wheel
lug nut wrench and remove them with
your fingers. Remove the wheel from
the studs and lay it flat on the ground
out of the way. Remove any dirt or
debris from the studs, mounting
surfaces, and wheel.
10. Install the spare tire onto the studs of
the hub.
11. Tighten the lug nuts with your fingers
onto the studs with the smaller end of
the lug nuts closest to the wheel.
12. Lower the vehicle to the ground
by turning the jack handle
counterclockwise.
Page 437 of 527
07
7-17
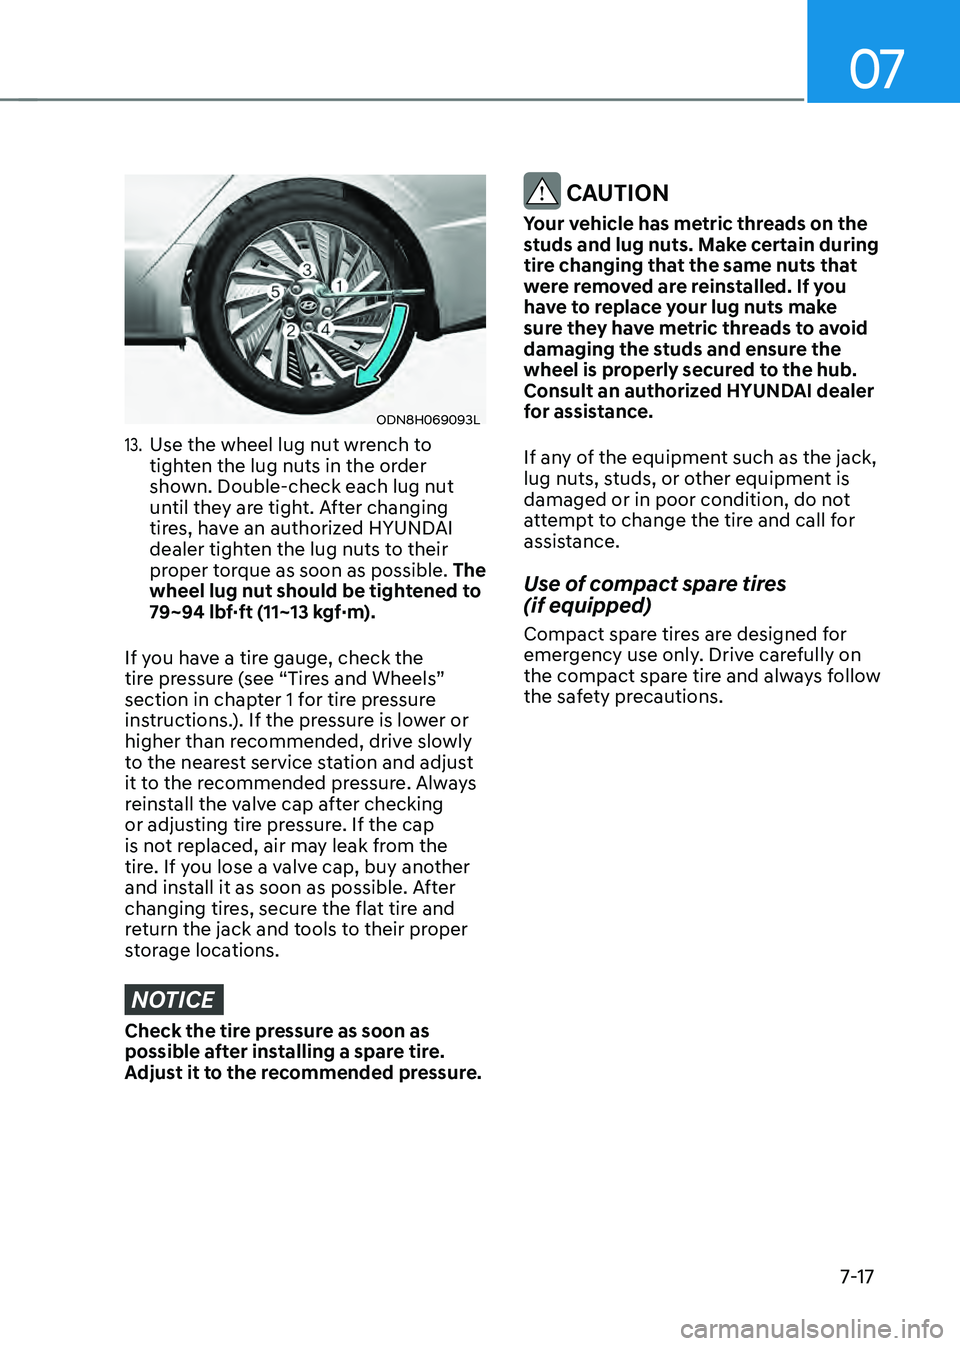
ODN8H069093L
13. Use the wheel lug nut wrench to
tighten the lug nuts in the order
shown. Double-check each lug nut
until they are tight. After changing
tires, have an authorized HYUNDAI
dealer tighten the lug nuts to their
proper torque as soon as possible. The
wheel lug nut should be tightened to
79~94 lbf·ft (11~13 kgf·m).
If you have a tire gauge, check the
tire pressure (see “Tires and Wheels”
section in chapter 1 for tire pressure
instructions.). If the pressure is lower or
higher than recommended, drive slowly
to the nearest service station and adjust
it to the recommended pressure. Always
reinstall the valve cap after checking
or adjusting tire pressure. If the cap
is not replaced, air may leak from the
tire. If you lose a valve cap, buy another
and install it as soon as possible. After
changing tires, secure the flat tire and
return the jack and tools to their proper
storage locations.
NOTICE
Check the tire pressure as soon as
possible after installing a spare tire.
Adjust it to the recommended pressure.
CAUTION
Your vehicle has metric threads on the
studs and lug nuts. Make certain during
tire changing that the same nuts that
were removed are reinstalled. If you
have to replace your lug nuts make
sure they have metric threads to avoid
damaging the studs and ensure the
wheel is properly secured to the hub.
Consult an authorized HYUNDAI dealer
for assistance.
If any of the equipment such as the jack,
lug nuts, studs, or other equipment is
damaged or in poor condition, do not
attempt to change the tire and call for
assistance.
Use of compact spare tires
(if equipped)
Compact spare tires are designed for
emergency use only. Drive carefully on
the compact spare tire and always follow
the safety precautions.
Page 438 of 527
Emergency situations
7-18
WARNING
To prevent compact spare tire failure
and loss of control possibly resulting in
an accident:
• Use the compact spare tire only in an
emergency.
• NEVER operate your vehicle over
50 mph (80 km/h).
• Do not exceed the vehicle’s
maximum load rating or the load
carrying capacity shown on the
sidewall of the compact spare tire.
• Do not use the compact spare tire
continuously. Repair or replace the
original tire as soon as possible to
avoid failure of the compact spare
tire.
When driving with the compact spare tire
mounted to your vehicle:
• Check the tire pressure after installing
the compact spare tire. The compact
spare tire should be inflated to 60 psi
(420 kPa).
• Do not take this vehicle through
an automatic car wash while the
compact spare tire is installed.
• Do not use the compact spare tire on
any other vehicle because this tire
has been designed especially for your
vehicle.
• The compact spare tire’s tread life is
shorter than a regular tire. Inspect
your compact spare tire regularly and
replace worn compact spare tires with
the same size and design, mounted on
the same wheel.
• Do not use more than one compact
spare tire at a time.
• Do not tow a trailer while the compact
spare tire is installed.
Information
When the original tire and wheel are
repaired and reinstalled on the vehicle,
the lug nut torque must be set correctly.
The correct lug nut tightening torque is
79~94 lbf·ft (11~13 kgf·m).
NOTICE
To prevent damaging the compact
spare tire and your vehicle:
• Drive slowly enough for the road
conditions to avoid all hazards, such
as a potholes or debris.
• Avoid driving over obstacles. The
compact spare tire diameter is
smaller than the diameter of a
conventional tire and reduces the
ground clearance approximately
1 inch (25 mm).
• Do not use tire chains on the
compact spare tire. Because of the
smaller size, a tire chain will not fit
properly.
• Do not use the compact spare tire
on any other wheels, nor should
standard tires, snow tires, wheel
covers or trim rings be used with the
compact spare wheel.
Page 455 of 527
Maintenance
8-6
While operating your vehicle:
• Note any changes in the sound of the
exhaust or any smell of exhaust fumes
in the vehicle.
• Check for vibrations in the steering
wheel. Notice if there is any increased
steering effort or looseness in the
steering wheel, or change in its
straight-ahead position.
• Notice if your vehicle constantly turns
slightly or “pulls” to one side when
traveling on smooth, level road.
• When stopping, listen and check for
unusual sounds, pulling to one side,
increased brake pedal travel or “hard-
to-push” brake pedal.
• If any slipping or changes in the
operation of your transmission occurs,
check the transmission fluid level.
• Check the automatic transmission P
(Park) function.
• Check the parking brake.
• Check for fluid leaks under your
vehicle (water dripping from the air
conditioning system during or after
use is normal).
At least monthly:
• Check coolant level in the engine
coolant reservoir.
• Check the operation of all exterior
lights, including the stoplights, turn
signals and hazard warning flashers.
• Check the inflation pressures of all
tires including the spare for tires that
are worn, show uneven wear, or are
damaged.
• Check for loose wheel lug nuts.
At least twice a year: (i.e., every
Spring and Autumn)
• Check radiator, heater and air
conditioning hoses for leaks or
damage.
• Check windshield washer spray and
wiper operation. Clean wiper blades
with a clean cloth dampened with
washer fluid.
• Check headlamp alignment.
• Check muffler, exhaust pipes, shields
and clamps.
• Check the seat belts for wear and
function.
At least once a year:
• Clean body and door drain holes.
• Lubricate door hinges and hood
hinges.
• Lubricate door and hood locks and
latches.
• Lubricate door rubber weather strips.
• Check the air conditioning system.
• Inspect and lubricate automatic
transmission linkage and controls.
• Clean the battery and terminals.
• Check the brake fluid level.
Page 474 of 527
08
8-25
OLF074018
3. Lift up the wiper blade clip. Then pull
down the blade assembly and remove
it.
OLF074019
4. Install the new blade assembly.
5. Gently put the wipers back down onto
the windshield.
6. With the Engine Start/Stop button in
the ON position, turn the wiper switch
to any ON position to return the
wipers to the bottom resting position.
TIRES AND WHEELS
WARNING
Tire failure may cause loss of
vehicle control resulting in an
accident. To reduce risk of SERIOUS
INJURY or DEATH, take the
following precautions:
• Inspect your tires monthly for
proper inflation as well as wear
and damage.
• The recommended cold tire
pressure for your vehicle can be
found in this manual and on the
tire label located on the driver’s
side center pillar. Always use a
tire pressure gauge to measure
tire pressure. Tires with too
much or too little pressure wear
unevenly causing poor handling.
• Check the pressure of the spare
tire every time you check the
pressure of the other tires on
your vehicle.
• Replace tires that are worn, show
uneven wear, or are damaged.
Worn tires can cause loss of
braking effectiveness, steering
control, or traction.
• ALWAYS replace tires with the
same size, type, construction and
tread pattern as each tire that
was originally supplied with this
vehicle. Using tires and wheels
other than the recommended
sizes could cause unusual
handling characteristics, poor
vehicle control, or negatively
affect your vehicle’s Anti-Lock
Brake System (ABS) resulting in a
serious accident.