transmission Hyundai Sonata Plug-in Hybrid 2017 Owner's Manual
[x] Cancel search | Manufacturer: HYUNDAI, Model Year: 2017, Model line: Sonata Plug-in Hybrid, Model: Hyundai Sonata Plug-in Hybrid 2017Pages: 744, PDF Size: 27.87 MB
Page 4 of 744
F4
INTRODUCTION
Congratulations, and thank you for choosing HYUNDAI. We are pleased to welcome you to the growing number of dis-
criminating people who drive HYUNDAIS. We are very proud of the advanced engineering and high-quality construc-
tion of each HYUNDAI we build.
Your Owner’s Manual will introduce you to the features and operation of your new HYUNDAI. To become familiar with
your new HYUNDAI, so that you can fully enjoy it, read this Owner’s Manual carefully before driving your new vehicle.
This manual contains important safety information and instructions intended to familiarize you with your vehicle’s con-
trols and safety features so you can safely operate your vehicle.
This manual also contains information on maintenance designed to enhance safe operation of the vehicle. It is recom-
mended that all service and maintenance on your car be performed by an authorized HYUNDAI dealer. HYUNDAI deal-
ers are prepared to provide high-quality service, maintenance and any other assistance that may be required.
This Owner’s Manual should be considered a permanent part of your vehicle, and should be kept in the vehicle so you
can refer to it at any time. The manual should stay with the vehicle if you sell it to provide the next owner with impor-
tant operating, safety and maintenance information.
HYUNDAI MOTOR AMERICA
Copyright 2017 HYUNDAI Motor America. All rights reserved. No part of this publication may be reproduced, stored
in any retrieval system or transmitted in any form or by any means without the prior written permission of HYUNDAI
Motor America.Severe engine and transmission damage may result from the use of poor quality fuels and lubricants that
do not meet HYUNDAI specifications. You must always use high quality fuels and lubricants that meet the
specifications listed on Page 8-6 in the Vehicle Specifications section of the Owner’s Manual.
CAUTION
Page 32 of 744
2-15
Safety system of your vehicle
Carrying long/narrow cargo (if equipped)
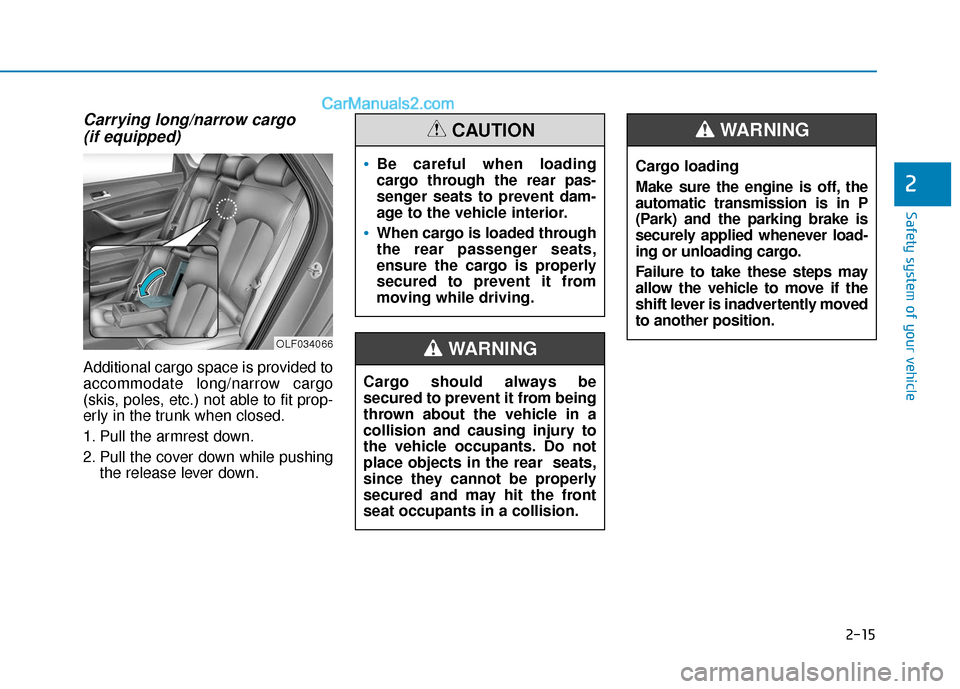
Additional cargo space is provided to
accommodate long/narrow cargo
(skis, poles, etc.) not able to fit prop-
erly in the trunk when closed.
1. Pull the armrest down.
2. Pull the cover down while pushing
the release lever down.
2
Cargo should always be
secured to prevent it from being
thrown about the vehicle in a
collision and causing injury to
the vehicle occupants. Do not
place objects in the rear seats,
since they cannot be properly
secured and may hit the front
seat occupants in a collision.
WARNING
Be careful when loading
cargo through the rear pas-
senger seats to prevent dam-
age to the vehicle interior.
When cargo is loaded through
the rear passenger seats,
ensure the cargo is properly
secured to prevent it from
moving while driving.
CAUTION
OLF034066
Cargo loading
Make sure the engine is off, the
automatic transmission is in P
(Park) and the parking brake is
securely applied whenever load-
ing or unloading cargo.
Failure to take these steps may
allow the vehicle to move if the
shift lever is inadvertently moved
to another position.
WARNING
Page 111 of 744
3-24
Convenient features of your vehicle
Programming HomeLink®
Please note the following:
When programming a garage dooropener, it is advised to park the
vehicle outside of the garage.
It is recommended that a new bat- tery be placed in the hand-held
transmitter of the device being pro-
grammed to HomeLink
®for quicker
training and accurate transmission
of the radio-frequency signal.
Some vehicles may require the engine Start/Stop button to be
placed in the ACC position for pro-
gramming and/or operation of
HomeLink
®.
In the event that there are still pro- gramming difficulties or questions
after following the programming
steps listed below, contact
HomeLink
®at: www.homelink.com
or by calling 1-800-355-3515.
Programming
To train most devices, follow these
instructions:
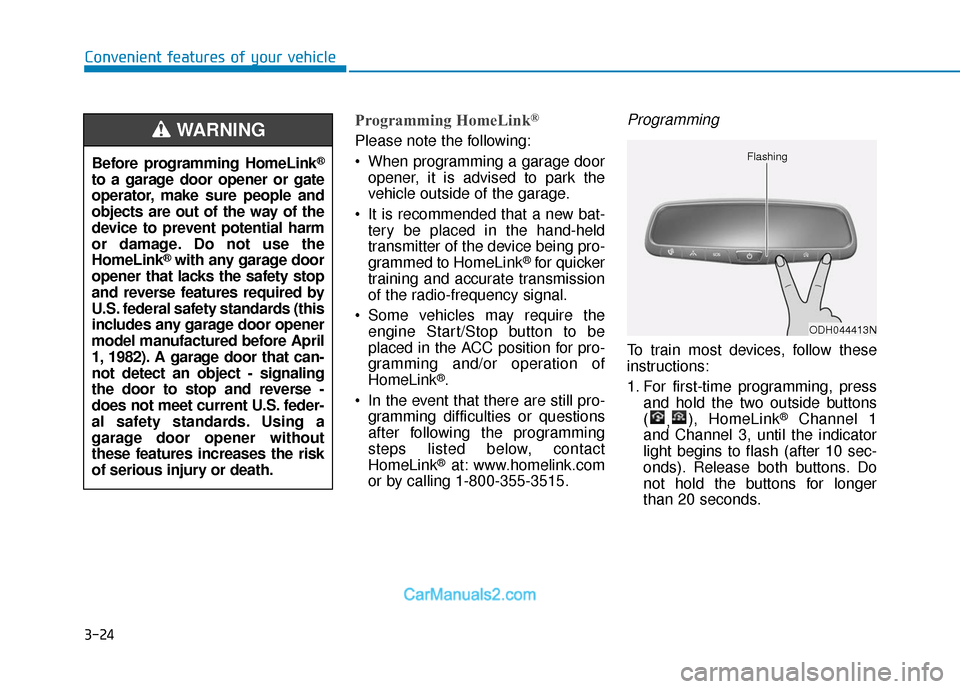
1. For first-time programming, press and hold the two outside buttons
( ,), HomeLink
®Channel 1
and Channel 3, until the indicator
light begins to flash (after 10 sec-
onds). Release both buttons. Do
not hold the buttons for longer
than 20 seconds.
ODH044413N
Flashing
Before programming HomeLink®
to a garage door opener or gate
operator, make sure people and
objects are out of the way of the
device to prevent potential harm
or damage. Do not use the
HomeLink
®with any garage door
opener that lacks the safety stop
and reverse features required by
U.S. federal safety standards (this
includes any garage door opener
model manufactured before April
1, 1982). A garage door that can-
not detect an object - signaling
the door to stop and reverse -
does not meet current U.S. feder-
al safety standards. Using a
garage door opener without
these features increases the risk
of serious injury or death.
WARNING
Page 118 of 744
3-31
Convenient features of your vehicle
3
Programming HomeLink®
Please note the following:
When programming a garage dooropener, it is advised to park the
vehicle outside of the garage.
It is recommended that a new bat- tery be placed in the hand-held
transmitter of the device being pro-
grammed to HomeLink
®for quicker
training and accurate transmission
of the radio-frequency signal.
Some vehicles may require the engine Start/Stop button to be
placed in the ACC position for pro-
gramming and/or operation of
HomeLink
®.
In the event that there are still pro- gramming difficulties or questions
after following the programming
steps listed below, contact
HomeLink
®at: www.homelink.com
or by calling 1-800-355-3515.
Rolling code programming
Rolling code devices which are
"code-protected" and manufactured
after 1996 may be determined by the
following:
Reference the device owner’s manual for verification.
The handheld transmitter appears to program the HomeLink
®
Universal Transceiver but does not
activate the device.
Press and hold the trained HomeLink button. The device has
the rolling code feature if the indi-
cator light flashes rapidly and then
turns solid after 2 seconds.
Before programming HomeLink
®
to a garage door opener or gate
operator, make sure people and
objects are out of the way of the
device to prevent potential harm
or damage. Do not use the
HomeLink
®with any garage door
opener that lacks the safety stop
and reverse features required by
U.S. federal safety standards (this
includes any garage door opener
model manufactured before April
1, 1982). A garage door that can-
not detect an object - signaling
the door to stop and reverse -
does not meet current U.S. feder-
al safety standards. Using a
garage door opener without
these features increases the risk
of serious injury or death.
WARNING
Page 162 of 744
3-75
Convenient features of your vehicle
3
Immobilizer Indicator
This indicator illuminates up to 30
seconds:
When the vehicle detects thesmart key in the vehicle with the
Engine Start/Stop button in the
ACC or ON position.
- You can start the vehicle.
- The indicator light goes off afterstarting the vehicle.
This indicator blinks for a few sec-
onds:
When the smart key is not in the vehicle.
- You cannot start the vehicle.
This indicator illuminates for 2 sec-
onds and goes off:
When the Smart Key is not detect-ed inside the vehicle, when the
Engine Start/Stop button is in the
ON position.
In this case, have the vehicle
inspected by an authorized
HYUNDAI dealer.
This indicator blinks:
When the Smart Key battery isweak.
- In this case, you cannot start theengine. However, by pressing the
Engine Start/Stop button with the
smart key, you may start the
engine. (For more information,
refer to "Starting the Vehicle"
in the chapter 5).
When there is a malfunction with the immobilizer system.
In this case, have the vehicle
inspected by an authorized
HYUNDAI dealer.
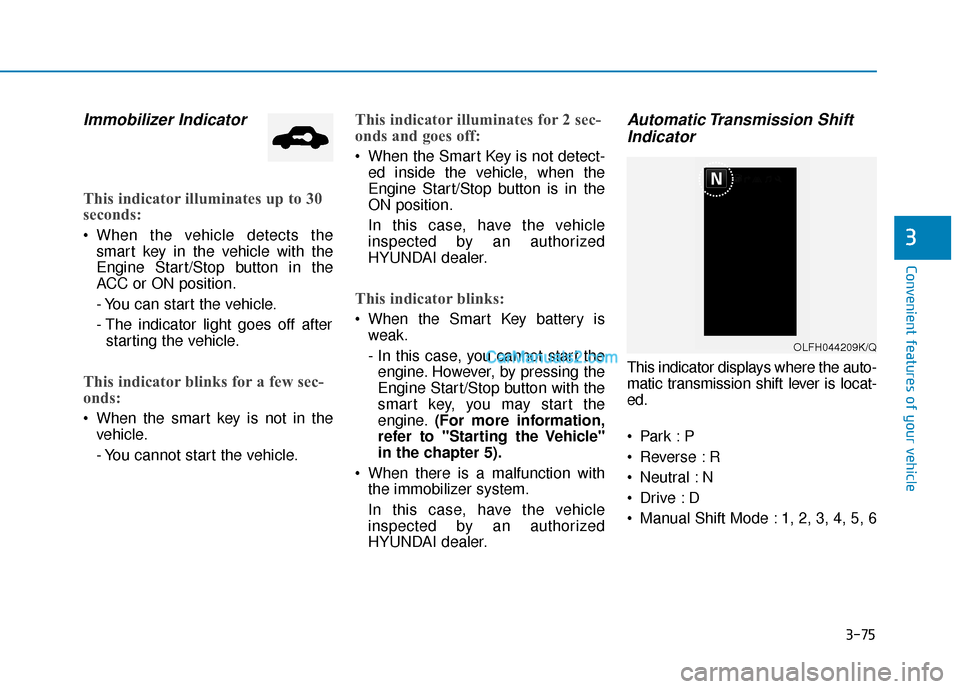
Automatic Transmission ShiftIndicator
This indicator displays where the auto-
matic transmission shift lever is locat-
ed.
Reverse : R
Neutral : N
Manual Shift Mode : 1, 2, 3, 4, 5, 6
OLFH044209K/Q
Page 188 of 744

3-101
Convenient features of your vehicle
3
ItemsExplanation
Automatically Lock
Disable : The auto door lock function is deactivated.
Enable on Speed: All doors will be automatically locked when the vehicle speed exceeds 9.3mph(15 km/h).
Enable on Shift: All doors will be automatically locked when the automatic transmission shift lever is shifted from P (Park) to the R (Reverse), N (Neutral), or D (Drive).
Automatically Unlock
Disable : The auto door unlock function is deactivated.
Vehicle Off: All doors will be automatically unlocked when the Engine Start/Stop button is placedto the OFF position.
Driver Door Unlock: All doors will be automatically unlocked when the driver's door is unlocked.
On Shift to P: All doors will be automatically unlocked when the automatic transmission shift lever is shifted to P (Park).
Two Press Unlock
The two press unlock function will be deactivated. Therefore, all doors will unlock if the door is unlocked.
The driver’s door will unlock if the door is unlocked. When the door is unlocked again within 4 seconds, all doors will unlock.
Smart Trunk
The Smart Trunk function will be deactivated.
The Smart Trunk function will be activated
For more information, refer to "Smart Trunk" in this chapter.
Door
Page 448 of 744
Driving your vehicle
Before driving.........................................................5-4
Before entering the vehicle ...........................................5-4
Before starting...................................................................5-4
Engine start/stop button ......................................5-5
Illuminated Engine Start/Stop button ..........................5-6
Engine Stop/Start button positions ..............................5-7
Starting the hybrid system .............................................5-9
Automatic transmission .......................................5-12
Automatic transmission operation ..............................5-12
Parking ........................................................................\
.......5-17
Good driving practices ...................................................5-17
Braking system.....................................................5-19
Power brakes ...................................................................5-19
Disc brakes wear indicator ...........................................5-20
Foot parking brake .........................................................5-20
Electronic Parking Brake (EPB)...................................5-22
AUTO HOLD ......................................................................5-\
28
Anti-lock Brake System (ABS) ....................................5-32
Electronic Stability Control (ESC)................................5-34
Vehicle Stability Management (VSM).........................5-38
Hill-Start Assist Control (HAC) ....................................5-39
Good braking practices..................................................5-40
Drive mode integrated control system .............5-41
Hybrid vehicle ..................................................................5-41
Plug-in hybrid vehicle....................................................5-43
Forward Collision Warning (FCW) system........5-45
FCW operation .................................................................5-45
Limitations of the system .............................................5-47
Blind Spot Detection system (BSD) ..................5-48
BSD (Blind Spot Detection) /
LCA (Lane Change Assist) .............................................5-49
RCTA (Rear Cross Traffic Alert) ..................................5-52
Limitations of the system .............................................5-55
Lane Departure Warning System (LDWS) ........5-56
LDWS operation...............................................................5-57
Warning light and message ..........................................5-58
Limitations of the system .............................................5-58
Cruise Control .......................................................5-60
Cruise Control Operation...............................................5-60
Smart cruise control system ..............................5-65
To adjust the sensitivity of Smart Cruise Control ..5-66
To convert to Cruise Control Mode ............................5-67
Smart Cruise Control speed ..........................................5-67
Smart Cruise Control vehicle-to-vehicle distance..5-72
SCC front radar sensor..................................................5-74
Limitations of the system .............................................5-76
5
Page 459 of 744
5-12
Driving your vehicle
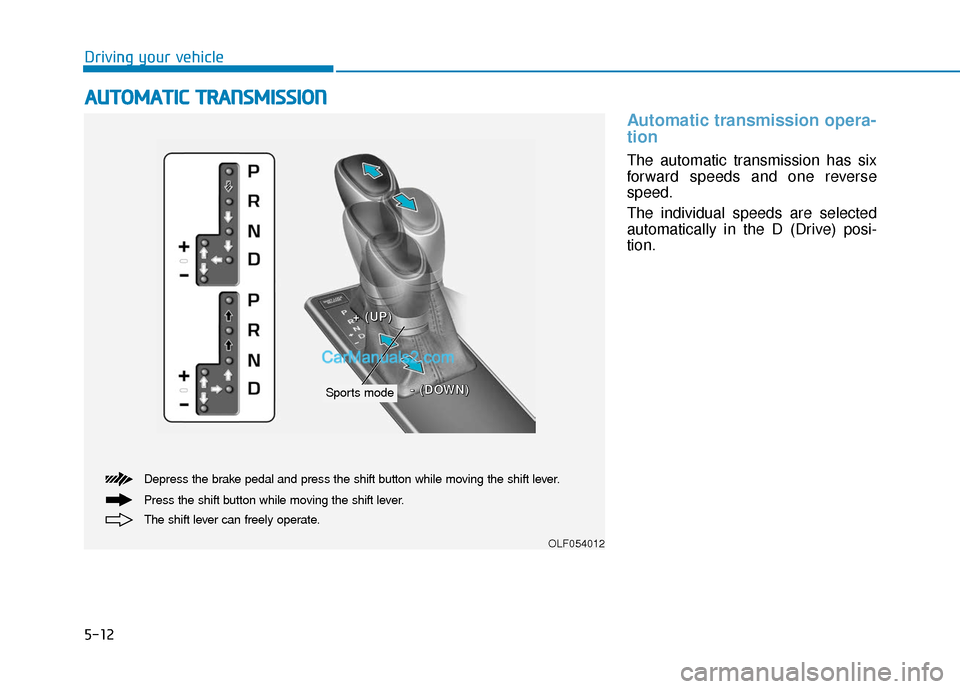
Automatic transmission opera-
tion
The automatic transmission has six
forward speeds and one reverse
speed.
The individual speeds are selected
automatically in the D (Drive) posi-
tion.
A AU
U T
TO
O M
M A
AT
TI
IC
C
T
T R
R A
A N
N S
SM
M I
IS
S S
SI
IO
O N
N
The shift lever can freely operate. Depress the brake pedal and press the shift button while moving the shift lever.
Press the shift button while moving the shift lever.
Sports mode
+
+
+
+
(
(
(
(
U
U
U
U
P
P
P
P
)
)
)
)
-
-
-
-
(
(
(
(
D
D
D
D
O
O
O
O
W
W
W
W
N
N
N
N
)
)
)
)
OLF054012
Page 461 of 744
5-14
Driving your vehicle
R (Reverse)
Use this position to drive the vehicle
backward.
Always come to a complete stop
before shifting into or out of R
(Reverse); you may damage the
transmission if you shift into R
(Reverse) while the vehicle is in
motion.
N (Neutral)
The wheels and transmission are not
engaged. The vehicle will roll freely
even on the slightest incline unless
the parking brake or service brakes
are applied.
D (Drive)
This is the normal driving position.
The transmission will automatically
shift through a 6-gear sequence, pro-
viding the best fuel economy and
power.
For extra power when passing anoth-
er vehicle or driving uphill, depress
the accelerator fully. The transmis-
sion will automatically downshift to
the next lower gear (or gears, as
appropriate).
The DRIVE MODE switch, located on
the shift lever console, allows the driv-
er to switch from NORMAL mode to
SPORT or ECO mode.
For more information, refer to
"Drive Mode Integrated Control
System" later in this chapter.
NOTICE
Page 462 of 744
5-15
Driving your vehicle
5
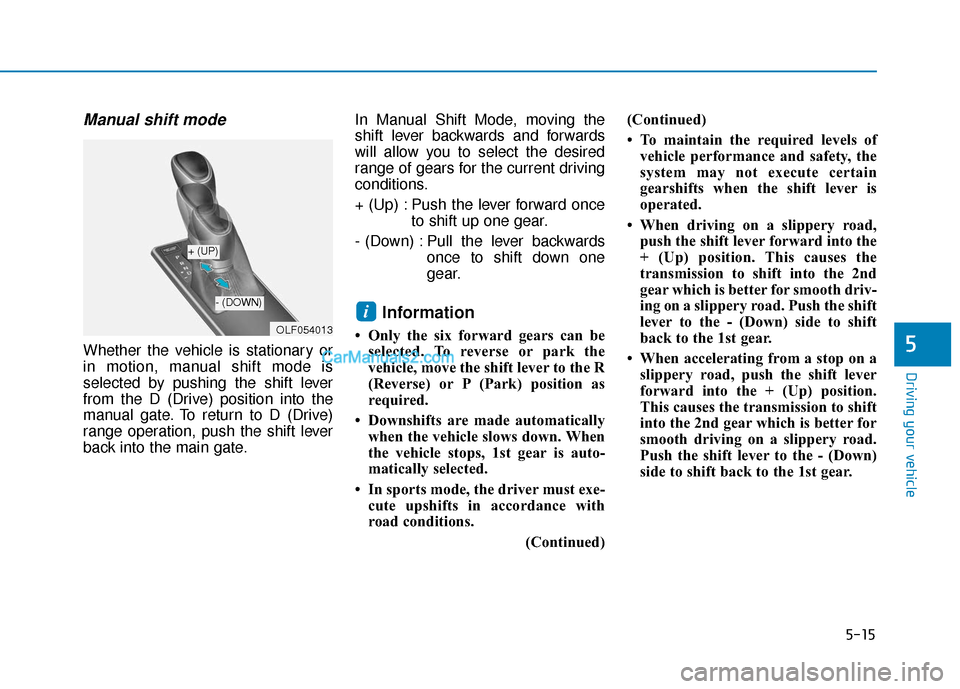
Manual shift mode
Whether the vehicle is stationary or
in motion, manual shift mode is
selected by pushing the shift lever
from the D (Drive) position into the
manual gate. To return to D (Drive)
range operation, push the shift lever
back into the main gate.In Manual Shift Mode, moving the
shift lever backwards and forwards
will allow you to select the desired
range of gears for the current driving
conditions.
+ (Up) : Push the lever forward once
to shift up one gear.
- (Down) : Pull the lever backwards once to shift down one
gear.
Information
• Only the six forward gears can beselected. To reverse or park the
vehicle, move the shift lever to the R
(Reverse) or P (Park) position as
required.
• Downshifts are made automatically when the vehicle slows down. When
the vehicle stops, 1st gear is auto-
matically selected.
• In sports mode, the driver must exe- cute upshifts in accordance with
road conditions.
(Continued)(Continued)
• To maintain the required levels of
vehicle performance and safety, the
system may not execute certain
gearshifts when the shift lever is
operated.
• When driving on a slippery road, push the shift lever forward into the
+ (Up) position. This causes the
transmission to shift into the 2nd
gear which is better for smooth driv-
ing on a slippery road. Push the shift
lever to the - (Down) side to shift
back to the 1st gear.
• When accelerating from a stop on a slippery road, push the shift lever
forward into the + (Up) position.
This causes the transmission to shift
into the 2nd gear which is better for
smooth driving on a slippery road.
Push the shift lever to the - (Down)
side to shift back to the 1st gear.
i
OLF054013
+ (UP)
- (DOWN)