headrest Hyundai Terracan 2003 Owner's Manual
[x] Cancel search | Manufacturer: HYUNDAI, Model Year: 2003, Model line: Terracan, Model: Hyundai Terracan 2003Pages: 349, PDF Size: 4.56 MB
Page 20 of 349
FEATURES OF YOUR HYUNDAI
1- 12
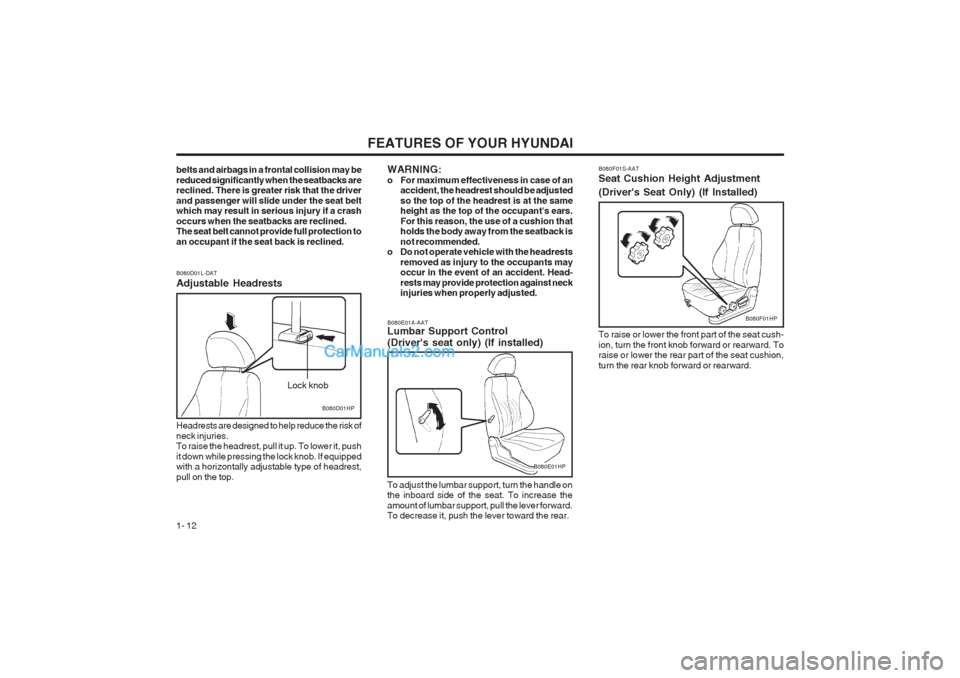
B080F01S-AAT Seat Cushion Height Adjustment (Driver's Seat Only) (If Installed) To raise or lower the front part of the seat cush- ion, turn the front knob forward or rearward. To raise or lower the rear part of the seat cushion, turn the rear knob forward or rearward.
B080F01HP
B080E01A-AAT Lumbar Support Control (Driver's seat only) (If installed)
B080E01HP
To adjust the lumbar support, turn the handle on the inboard side of the seat. To increase the amount of lumbar support, pull the lever forward. To decrease it, push the lever toward the rear.
B080D01L-DAT Adjustable Headrests
B080D01HP
Lock knob
Headrests are designed to help reduce the risk of neck injuries. To raise the headrest, pull it up. To lower it, push it down while pressing the lock knob. If equipped with a horizontally adjustable type of headrest, pull on the top.
belts and airbags in a frontal collision may bereduced significantly when the seatbacks are reclined. There is greater risk that the driver and passenger will slide under the seat belt which may result in serious injury if a crash occurs when the seatbacks are reclined. The seat belt cannot provide full protection to an occupant if the seat back is reclined.
WARNING:
o For maximum effectiveness in case of an
accident, the headrest should be adjustedso the top of the headrest is at the same height as the top of the occupant's ears. For this reason, the use of a cushion that holds the body away from the seatback is not recommended.
o Do not operate vehicle with the headrests
removed as injury to the occupants may occur in the event of an accident. Head- rests may provide protection against neck injuries when properly adjusted.
Page 23 of 349
FEATURES OF YOUR HYUNDAI 1- 15
HHP231-2
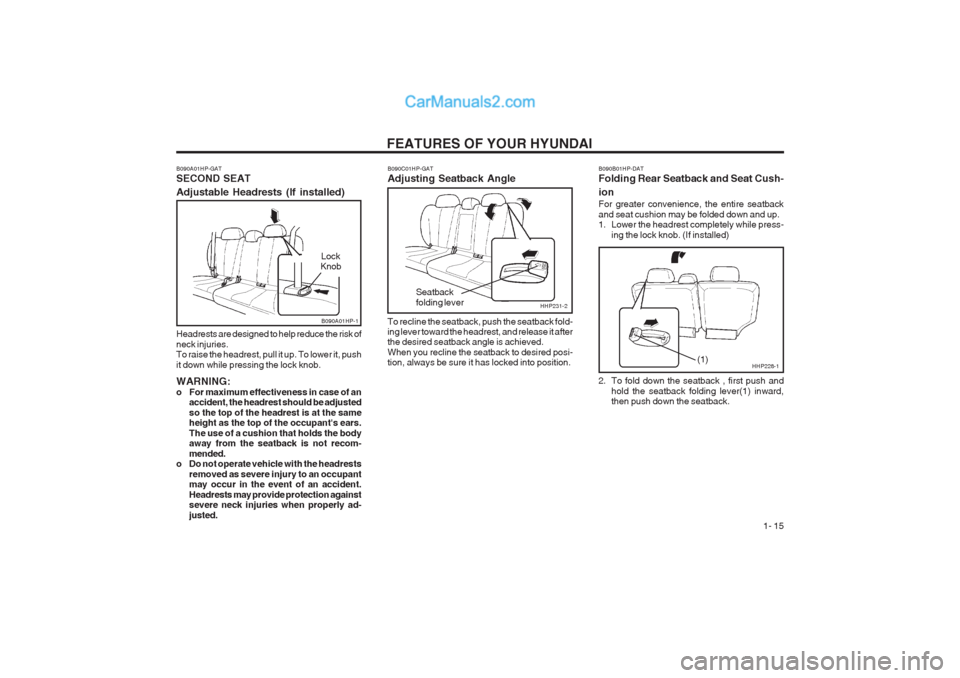
B090A01HP-GAT SECOND SEAT Adjustable Headrests (If installed) Headrests are designed to help reduce the risk of neck injuries. To raise the headrest, pull it up. To lower it, push it down while pressing the lock knob. WARNING:
o For maximum effectiveness in case of anaccident, the headrest should be adjustedso the top of the headrest is at the same height as the top of the occupant's ears.
The use of a cushion that holds the body away from the seatback is not recom- mended.
o Do not operate vehicle with the headrests
removed as severe injury to an occupant may occur in the event of an accident. Headrests may provide protection against severe neck injuries when properly ad- justed. B090C01HP-GAT Adjusting Seatback Angle To recline the seatback, push the seatback fold- ing lever toward the headrest, and release it afterthe desired seatback angle is achieved. When you recline the seatback to desired posi- tion, always be sure it has locked into position.
Seatback folding lever
B090A01HP-1
Lock
Knob
B090B01HP-DAT Folding Rear Seatback and Seat Cush- ion For greater convenience, the entire seatback and seat cushion may be folded down and up.
1. Lower the headrest completely while press-
ing the lock knob. (If installed)
2. To fold down the seatback , first push and hold the seatback folding lever(1) inward,
then push down the seatback.
HHP228-1(1)
Page 24 of 349
FEATURES OF YOUR HYUNDAI
1- 16 o When you return the seatback to its upright
position, always be sure it is locked into position by pulling and pushing on the top of seatback.
WARNING: o The purpose of the fold-down rear seat back and the fold-up rear seat cushion isto allow you to carry more objects than could be accommodated. Never allow pas- sengers to sit on the cargo area while the car is moving. This is not a proper seating position and no seat belts are available for use when the seat back is folded down. This could result in serious injury or death in case of an accident or a sudden stop. Objects should not extend higher than the top of the front seatbacks. This could allow cargo to slide forward and cause injury or damage during sud- den stops.
o When you return the rear seatback to its upright position after being folded down, be careful not to damage the seatbelt web- bing or buckle. In addition, do not allow the seatbelt webbing or buckle to get caught or pinched in the rear seat.
o Do not allow passengers to fold down and up the seatback and seat cushion while the car is moving.
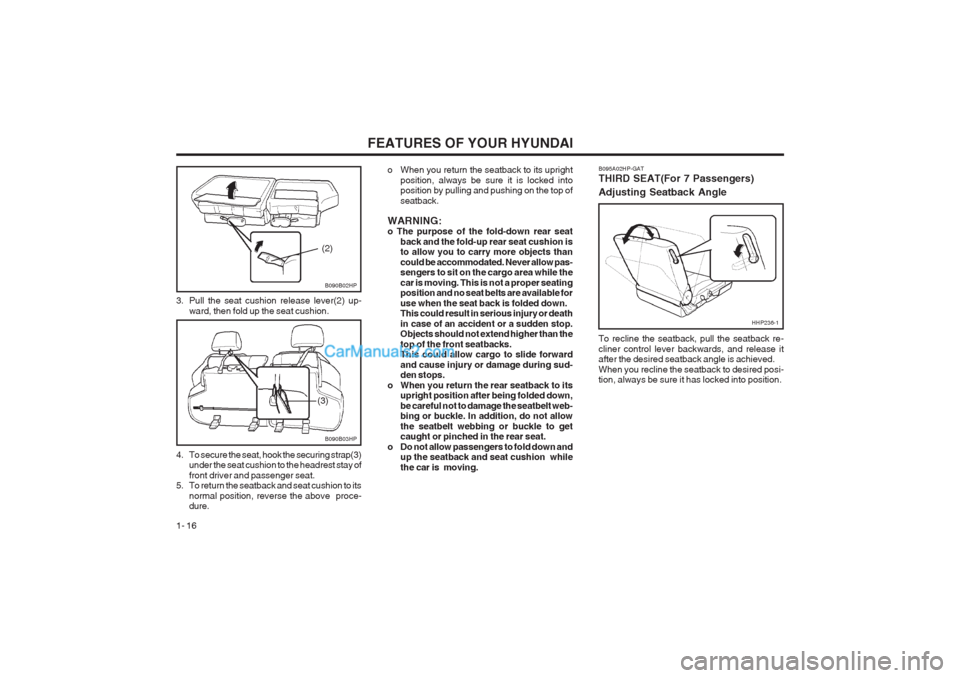
3. Pull the seat cushion release lever(2) up-
ward, then fold up the seat cushion.
B090B02HP
(2)
B090B03HP
(3)
4. To secure the seat, hook the securing strap(3) under the seat cushion to the headrest stay of front driver and passenger seat.
5. To return the seatback and seat cushion to its
normal position, reverse the above proce- dure. B095A02HP-GAT THIRD SEAT(For 7 Passengers) Adjusting Seatback Angle To recline the seatback, pull the seatback re- cliner control lever backwards, and release it after the desired seatback angle is achieved. When you recline the seatback to desired posi- tion, always be sure it has locked into position.
HHP236-1
Page 25 of 349
FEATURES OF YOUR HYUNDAI 1- 17
B095B02HP-1
(2)
B095B01HP-1
(1)
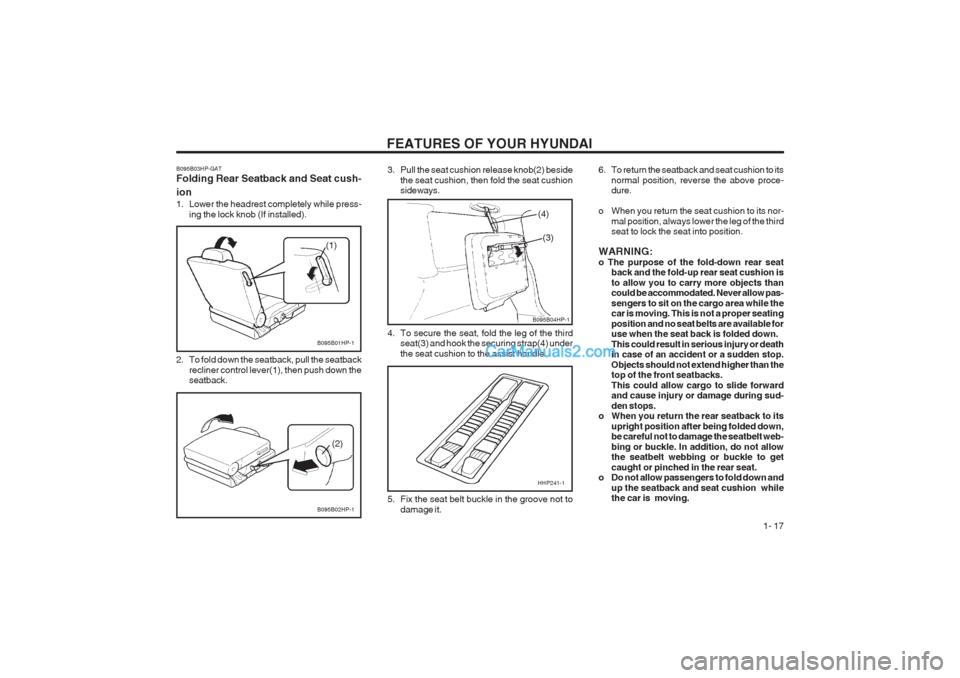
2. To fold down the seatback, pull the seatback recliner control lever(1), then push down the seatback.
B095B03HP-GAT Folding Rear Seatback and Seat cush- ion
1. Lower the headrest completely while press-
ing the lock knob (If installed). 3. Pull the seat cushion release knob(2) beside
the seat cushion, then fold the seat cushion sideways.
4. To secure the seat, fold the leg of the third seat(3) and hook the securing strap(4) under the seat cushion to the assist handle.
(4)
(3)
HHP241-1
B095B04HP-1
5. Fix the seat belt buckle in the groove not to damage it. 6. To return the seatback and seat cushion to its
normal position, reverse the above proce- dure.
o When you return the seat cushion to its nor- mal position, always lower the leg of the thirdseat to lock the seat into position.
WARNING: o The purpose of the fold-down rear seat back and the fold-up rear seat cushion isto allow you to carry more objects than could be accommodated. Never allow pas- sengers to sit on the cargo area while the car is moving. This is not a proper seating position and no seat belts are available for use when the seat back is folded down. This could result in serious injury or death in case of an accident or a sudden stop. Objects should not extend higher than the top of the front seatbacks. This could allow cargo to slide forward and cause injury or damage during sud- den stops.
o When you return the rear seatback to its
upright position after being folded down, be careful not to damage the seatbelt web- bing or buckle. In addition, do not allow the seatbelt webbing or buckle to get caught or pinched in the rear seat.
o Do not allow passengers to fold down and
up the seatback and seat cushion while the car is moving.
Page 26 of 349
FEATURES OF YOUR HYUNDAI
1- 18
B150A02A-GAT SEAT BELT PRECAUTIONSAll occupants of the vehicle should wear their seat belts at all times. Indeed, your province's laws may require that some or all occupants of the vehicle use seat belts. The possibility of injury or the severity of injury in
an accident will be decreased if this elementary safety precaution is observed. In addition, the following recommendations are made:
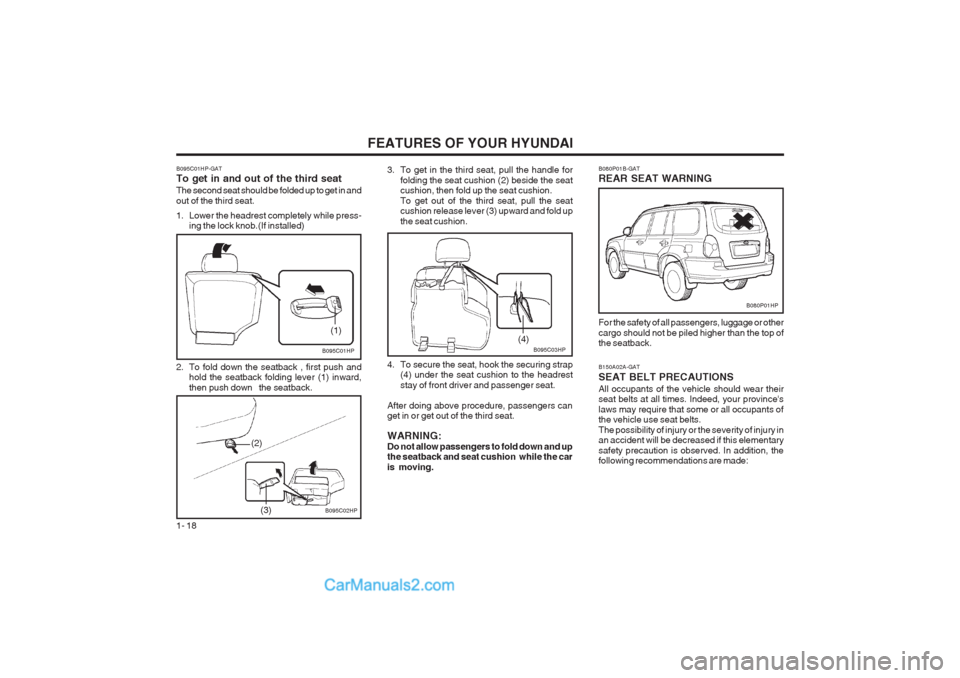
3. To get in the third seat, pull the handle for
folding the seat cushion (2) beside the seatcushion, then fold up the seat cushion. To get out of the third seat, pull the seat cushion release lever (3) upward and fold up the seat cushion.
4. To secure the seat, hook the securing strap (4) under the seat cushion to the headreststay of front driver and passenger seat.
After doing above procedure, passengers can get in or get out of the third seat. WARNING: Do not allow passengers to fold down and up the seatback and seat cushion while the car is moving.
B095C03HP
(4)
B080P01B-GAT REAR SEAT WARNING
B080P01HP
For the safety of all passengers, luggage or other cargo should not be piled higher than the top of the seatback.
B095C01HP-GAT To get in and out of the third seat The second seat should be folded up to get in and out of the third seat.
1. Lower the headrest completely while press- ing the lock knob.(If installed)
2. To fold down the seatback , first push and hold the seatback folding lever (1) inward, then push down the seatback.
B095C01HP
B095C02HP
(1)
(3)
(2)
Page 33 of 349
FEATURES OF YOUR HYUNDAI 1- 25
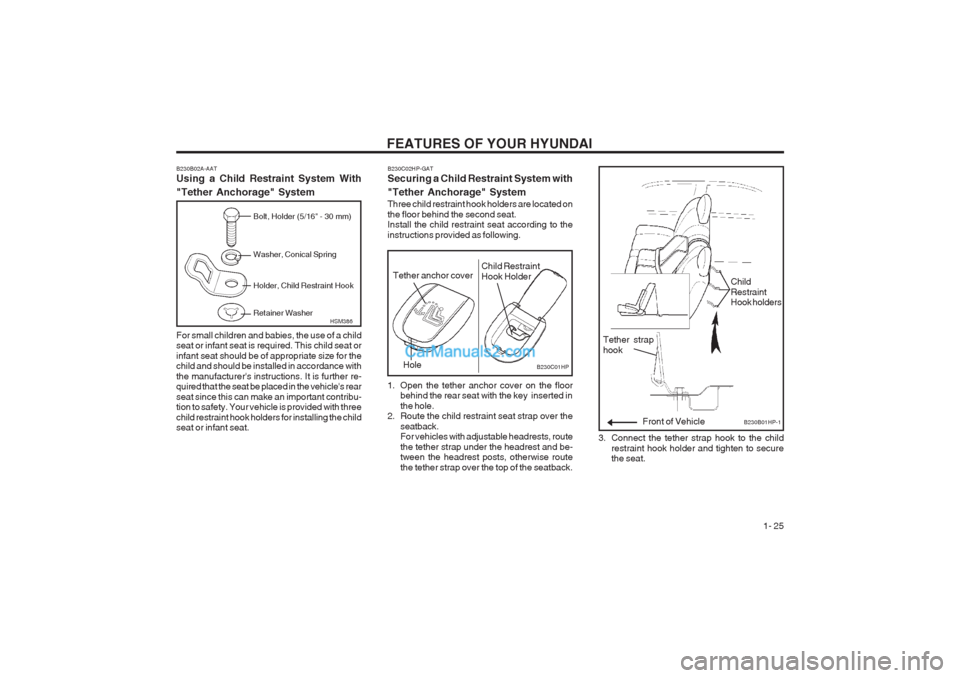
Bolt, Holder (5/16" - 30 mm) Washer, Conical Spring Holder, Child Restraint Hook Retainer Washer
HSM386
B230B02A-AAT Using a Child Restraint System With "Tether Anchorage" System For small children and babies, the use of a child seat or infant seat is required. This child seat or infant seat should be of appropriate size for the child and should be installed in accordance with the manufacturer's instructions. It is further re- quired that the seat be placed in the vehicle's rear seat since this can make an important contribu- tion to safety. Your vehicle is provided with three child restraint hook holders for installing the child seat or infant seat.
B230C01HP
Child Restraint Hook holders
Front of Vehicle
Tether strap hook
Child Restraint Hook Holder
Hole
B230B01HP-1
Tether anchor cover
B230C02HP-GAT Securing a Child Restraint System with "Tether Anchorage" System Three child restraint hook holders are located on the floor behind the second seat. Install the child restraint seat according to the instructions provided as following.
1. Open the tether anchor cover on the floor
behind the rear seat with the key inserted in the hole.
2. Route the child restraint seat strap over the
seatback. For vehicles with adjustable headrests, route the tether strap under the headrest and be- tween the headrest posts, otherwise route the tether strap over the top of the seatback. 3. Connect the tether strap hook to the child
restraint hook holder and tighten to secure the seat.
Page 108 of 349
DRIVING YOUR HYUNDAI
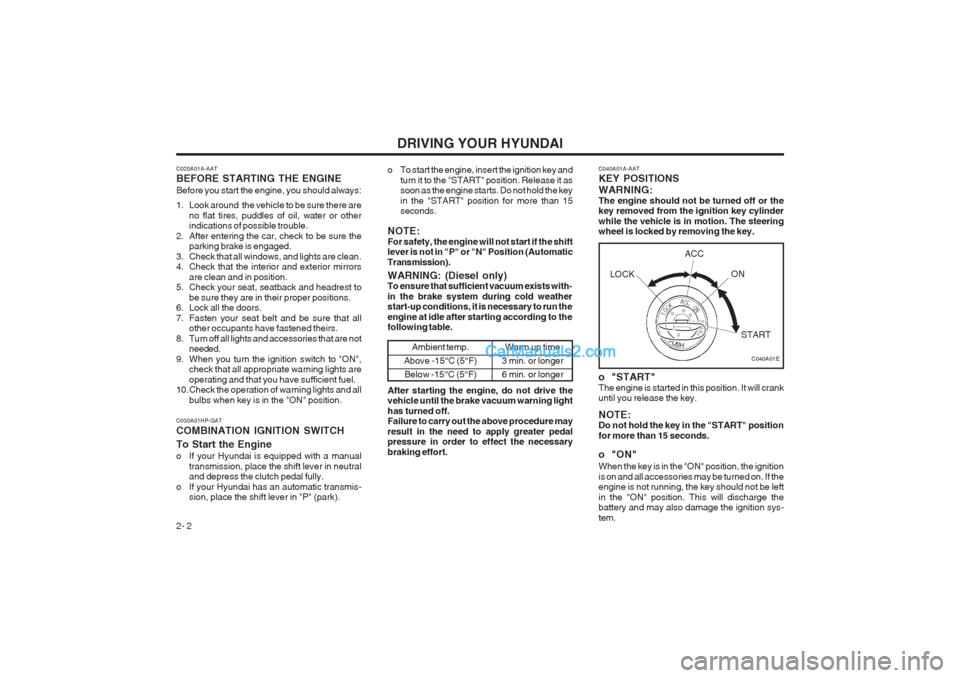
2- 2 C040A01A-AAT KEY POSITIONS WARNING: The engine should not be turned off or the key removed from the ignition key cylinder while the vehicle is in motion. The steering wheel is locked by removing the key.
o "START" The engine is started in this position. It will crank until you release the key. NOTE: Do not hold the key in the "START" position for more than 15 seconds.
o "ON" When the key is in the "ON" position, the ignition is on and all accessories may be turned on. If the engine is not running, the key should not be left in the "ON" position. This will discharge the battery and may also damage the ignition sys- tem.
C020A01A-AAT BEFORE STARTING THE ENGINE Before you start the engine, you should always:
1. Look around the vehicle to be sure there are
no flat tires, puddles of oil, water or other indications of possible trouble.
2. After entering the car, check to be sure the parking brake is engaged.
3. Check that all windows, and lights are clean.
4. Check that the interior and exterior mirrors are clean and in position.
5. Check your seat, seatback and headrest to
be sure they are in their proper positions.
6. Lock all the doors.
7. Fasten your seat belt and be sure that all other occupants have fastened theirs.
8. Turn off all lights and accessories that are not needed.
9. When you turn the ignition switch to "ON", check that all appropriate warning lights areoperating and that you have sufficient fuel.
10. Check the operation of warning lights and all
bulbs when key is in the "ON" position. o To start the engine, insert the ignition key and
turn it to the "START" position. Release it as soon as the engine starts. Do not hold the key in the "START" position for more than 15 seconds.
NOTE: For safety, the engine will not start if the shift lever is not in "P" or "N" Position (Automatic Transmission).
C030A01HP-GAT COMBINATION IGNITION SWITCH To Start the Engine
o If your Hyundai is equipped with a manual transmission, place the shift lever in neutral and depress the clutch pedal fully.
o If your Hyundai has an automatic transmis- sion, place the shift lever in "P" (park).
C040A01E
WARNING: (Diesel only) To ensure that sufficient vacuum exists with- in the brake system during cold weather start-up conditions, it is necessary to run the engine at idle after starting according to the following table.
Ambient temp.
Above -15°C (5°F) Below -15°C (5°F)Warm up time
3 min. or longer 6 min. or longer
After starting the engine, do not drive the vehicle until the brake vacuum warning light has turned off. Failure to carry out the above procedure may result in the need to apply greater pedal pressure in order to effect the necessary braking effort. LOCK
ACC
ON
START
Page 183 of 349
INDEX
10-2
D Defrosting/Defogging
......................................................................... 1-70
Door
Locking, unlocking front door with a key ........................................ 1-6
Drink Holder ...................................................................................... 1-52
Drive Belts ............................................................................... 6-15, 6-18
Driving
Driving for economy ...................................................................... 2-13
Smooth cornering .......................................................................... 2-14
Winter driving ................................................................................ 2-14
E
Emission Control System ................................................................... 7-1
Engine
Before starting the engine ............................................................... 2-2
Compartment (3.5 V6) ..................................................................... 6-1
Compartment (2.5 TCI) ................................................................... 6-2
Compartment (2.9 CRDi) ................................................................ 6-3
Coolant ............................................................................................ 6-7
Coolant temperature gauge ........................................................... 1-42
If the engine overheats ................................................................... 3-2
Number ............................................................................................ 8-1
Oil .................................................................................................... 6-4Starting ............................................................................................ 2-3
Engine Exhaust Can Be Dangerous ................................................... 2-1
FFan Speed Control ................................................................... 1-66, 1-75 Fog Light
Front .............................................................................................. 1-47
Rear .............................................................................................. 1-47
Front Seats Adjustable front seats ................................................................... 1-11
Adjustable headrests ..................................................................... 1-12
Adjusting seat forward and rearward ............................................1-11
Adjusting seatback angle .............................................................. 1-11
Fuel Capacity .......................................................................................... 9-1
Gauge ............................................................................................ 1-42
Unleaded gasoline ........................................................................... 1-1
Fuel Filler Lid Remote release ............................................................................. 1-61
Full-time 4WD Operation ....................................................... 2-10 ~ 2-12
Fuses ................................................................................................ 6-18
GGeneral Checks .................................................................................. 6-4
Glove Box ......................................................................................... 1-55
HHazard Warning System ................................................................... 1-50
Headlight Aiming Adjustment ............................................................ 6-24
Headlight Leveling Device System ...................................................1-64
Heating and Ventilation Air flow control ......................................................... 1-67 ~ 1-68, 1-76
Temperature control ...................................................................... 1-68
Page 185 of 349
INDEX
10-4
Power Outlet .....................................................................................
1-51
Power Steering Fluid Level ............................................................... 6-20
R
Rear Seat Warning ...... ..................................................................... 1-18
Rear Window Defroster Switch ......................................................... 1-50
Roof Rack ......................................................................................... 1-60
SSeat Belts 3-Point system ................................................................... 1-20 ~ 1-21
2-Point Sta tic Type ....................................................................... 1-22
Adjusting your se at belt ................................................................ 1-21
Care of seat belts ......................................................................... 1-19
Precautions ................................................................................... 1-18
Pretensioner Seat Belt ................ ..................................................1-27
Seat Warmer ..................................................................................... 1-14
Second Seat
Adjustable Headrests .................................................................... 1-15
Folding Rear Seatback and Seat Cushion ........................1-15 ~ 1-16
Side Under View Mirror .................................................................... 1-57
Sound
Brake Pad Wear Warning Sound .................................................1-42
Spark Plugs ...................................................................................... 6-10
Speedometer ..................................................................................... 1-42
Starting Procedure .............................................................................. 2-3Steering Wheel Free play ....................................................................................... 6-17Steering Wheel Tilt
Lever ................................................................. 1-63
Stereo Radio Operation (H240, H280) ............. 1-81 ~ 1-83, 1-86 ~ 1-88
Stereo Sound System ............................................................ 1-79 ~ 1-80
Sun roof ................................................................................. 1-53 ~ 1-54
Sun visor ........................................................................................... 1-62
Sunshade .......................................................................................... 1-53
T Tachometer ....................................................................................... 1-43
Tail Gate ........................................................................................... 1-58
Theft-Alarm system .................................................................. 1-8 ~ 1-10
Third Seat Adjusting Seatback Angle ............................................................. 1-16
Folding Rear Seatback and seat cushion .....................................1-18
To get in and out of the third seat ................................................ 1-17
Tires
Balancing ......................................................................................... 8-2
Chains ............................................................................................. 8-2
Changing a flat tire ................................................................. 3-4 ~ 3-8
If you have a fl at tire ....................................................................... 3-4
Information ....................................................................................... 8-1
Pressure .......................................................................................... 8-1
Replacement ................................................................................... 8-3
Rotation ........................................................................................... 8-2
Snow tires ....................................................................................... 8-2
Spare tire ......................................................................................... 3-3
Traction ........................................................................................... 8-2
Page 196 of 349
CONTROLS AND EQUIPMENT
1- 2 YB020A1-E BEFORE ENTERING THE VEHICLE
o Ensure that all windows, mirrors and lamps are clean.
o Check condition of all tyres.
o Ensure that no fluid leaks are evident.
o Ensure that the area around the vehicle is clear before driving off.
YB020B1-E AFTER ENTERING THE VEHICLE
o Ensure that all occupants fasten and cor- rectly adjust seat belts.
o Ensure that seat and headrestraint positions are adjusted for optimum safety, control and comfort.
o Adjust interior and exterior rear view mir- rors.
o Verify correct operation of lamps, horn and other electrical equipment.
o Ensure that warning lamps illuminate when ignition is turned on.
NOTE: Fluid levels such as engine oil, engine cool- ant, brake and windscreen washer fluidshould be checked daily or at each refuel-ling, whichever occurs sooner. B020A01FC-EAT RUNNING IN YOUR NEW HYUNDAIThe longevity and performance of the vehicle are greatly affected by the care exercised dur-ing the first 1000 miles of motoring. Because ofmodern manufacturing techniques, rigid guide-lines regarding maximum road speeds havebecome unnecessary. However, certain pre-cautions should be observed in order to obtainthe best possible performance and useful lifefrom the vehicle.
1) Do not race the engine without a load (i.e revving the engine in neutral).
2) During the first 500 miles the maximum engine speed should be restricted to 3000rpm and gradually increased thereafter.
3) Avoid prolonged constant speed operation. The internal components of the engine willbecome run-in more quickly if the operation
speed is varied during the running in period.
4) Never allow the engine to labour. Use the gearbox freely and avoid large throttle open-ings when the engine speed is below 1500rpm.
5) Avoid rapid acceleration and maximum throttle openings.
6) Avoid harsh braking during the first 100 miles of urban motoring or 1000 miles ofmotorway driving to allow the friction facingsof the brake pads and shoes to bed againstthe discs and drums properly.
7) No trailer towing should be undertaken dur- ing the running-in period. B880A01HP-EAT IMMOBILISER SYSTEM
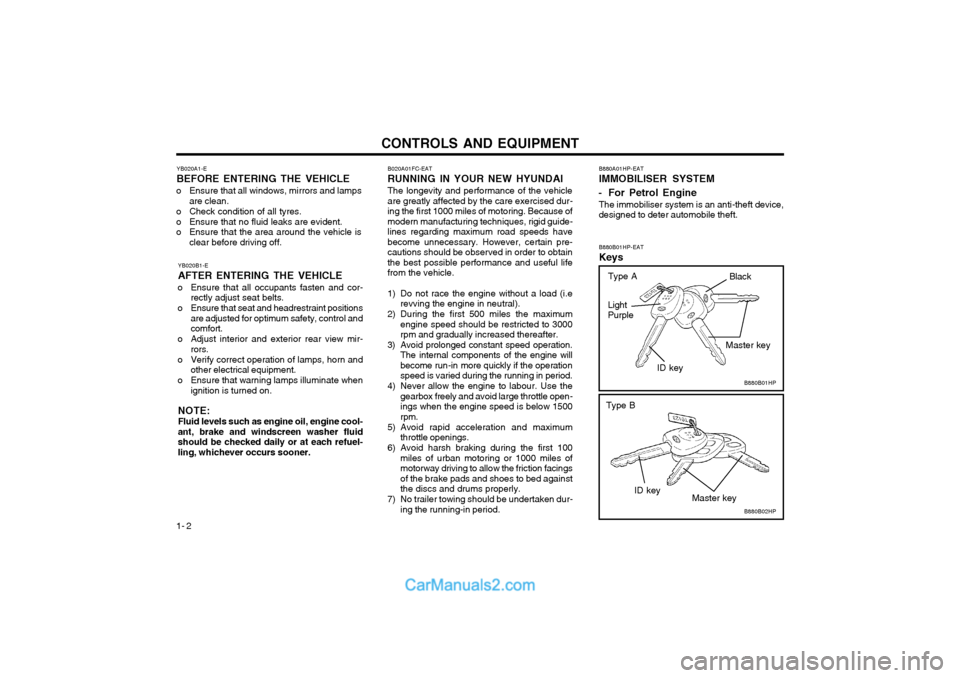
- For Petrol Engine The immobiliser system is an anti-theft device, designed to deter automobile theft. B880B01HP-EAT Keys
B880B01HP
B880B02HP
Light Purple
ID key
ID key Master key
Master key
Type B
Black
Type A