parking brake Hyundai Terracan 2003 Owner's Manual
[x] Cancel search | Manufacturer: HYUNDAI, Model Year: 2003, Model line: Terracan, Model: Hyundai Terracan 2003Pages: 349, PDF Size: 4.56 MB
Page 43 of 349
FEATURES OF YOUR HYUNDAI 1- 35
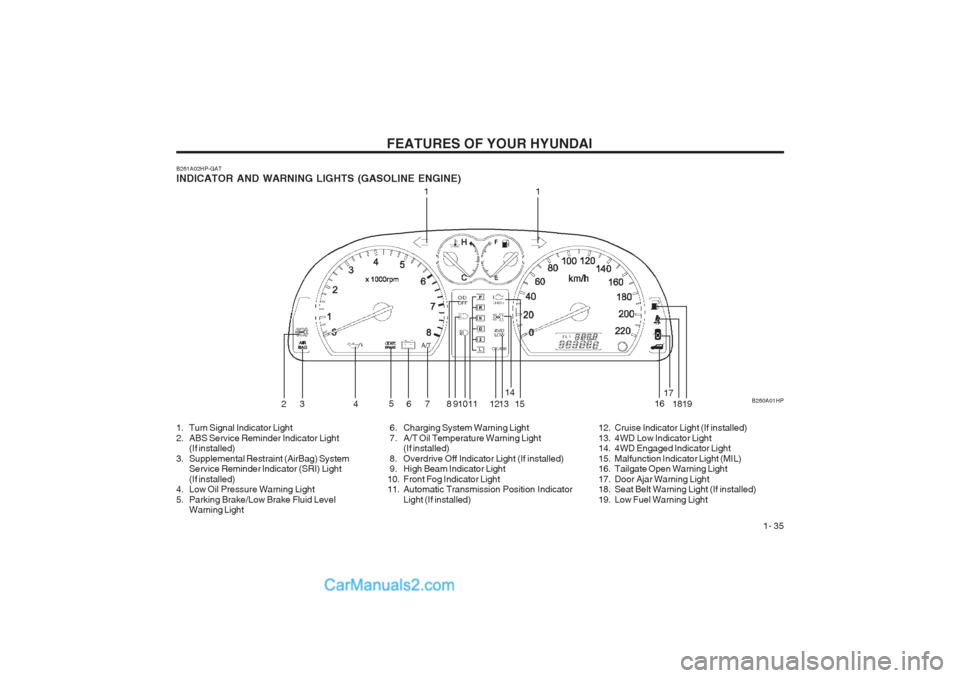
B261A02HP-GAT INDICATOR AND WARNING LIGHTS (GASOLINE ENGINE) B260A01HP
11
23 4 5
6 7 8 910 11 1213 14
15 1617
18
19
1. Turn Signal Indicator Light
2. ABS Service Reminder Indicator Light (If installed)
3. Supplemental Restraint (AirBag) System Service Reminder lndicator (SRI) Light(If installed)
4. Low Oil Pressure Warning Light
5. Parking Brake/Low Brake Fluid Level Warning Light 6. Charging System Warning Light
7. A/T Oil Temperature Warning Light
(If installed)
8. Overdrive Off Indicator Light (If installed)
9. High Beam Indicator Light
10. Front Fog Indicator Light
11. Automatic Transmission Position Indicator Light (If installed) 12. Cruise Indicator Light (If installed)
13. 4WD Low Indicator Light
14. 4WD Engaged Indicator Light
15. Malfunction Indicator Light (MIL)
16. Tailgate Open Warning Light
17. Door Ajar Warning Light
18. Seat Belt Warning Light (If installed)
19. Low Fuel Warning Light
Page 45 of 349
FEATURES OF YOUR HYUNDAI 1- 37
B260A02HP
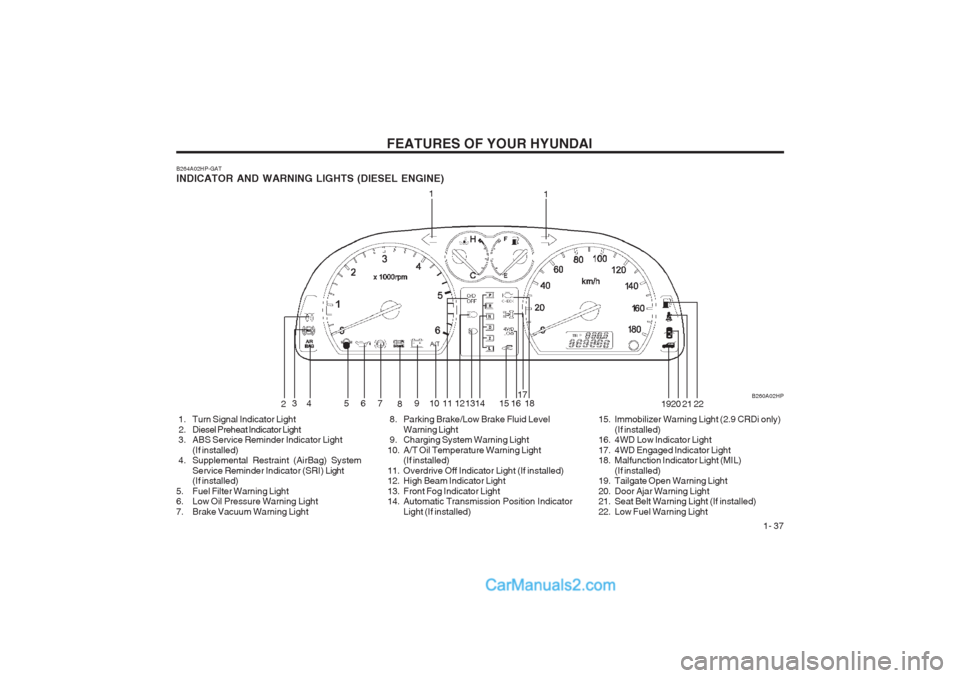
B264A02HP-GAT INDICATOR AND WARNING LIGHTS (DIESEL ENGINE)
1
2 34 5 6
7
8910111213 15 17
18 1920 21
1
22
1416
1. Turn Signal Indicator Light
2. Diesel Preheat Indicator Light
3. ABS Service Reminder Indicator Light(If installed)
4. Supplemental Restraint (AirBag) System
Service Reminder Indicator (SRI) Light
(If installed)
5. Fuel Filter Warning Light
6. Low Oil Pressure Warning Light
7. Brake Vacuum Warning Light 8. Parking Brake/Low Brake Fluid Level
Warning Light
9. Charging System Warning Light
10. A/T Oil Temperature Warning Light (If installed)
11. Overdrive Off Indicator Light (If installed)
12. High Beam Indicator Light
13. Front Fog Indicator Light
14. Automatic Transmission Position Indicator Light (If installed) 15. Immobilizer Warning Light (2.9 CRDi only)
(If installed)
16. 4WD Low Indicator Light
17. 4WD Engaged Indicator Light
18. Malfunction Indicator Light (MIL)
(If installed)
19. Tailgate Open Warning Light
20. Door Ajar Warning Light
21. Seat Belt Warning Light (If installed)
22. Low Fuel Warning Light
Page 46 of 349
FEATURES OF YOUR HYUNDAI
1- 38
B260P02Y-GAT
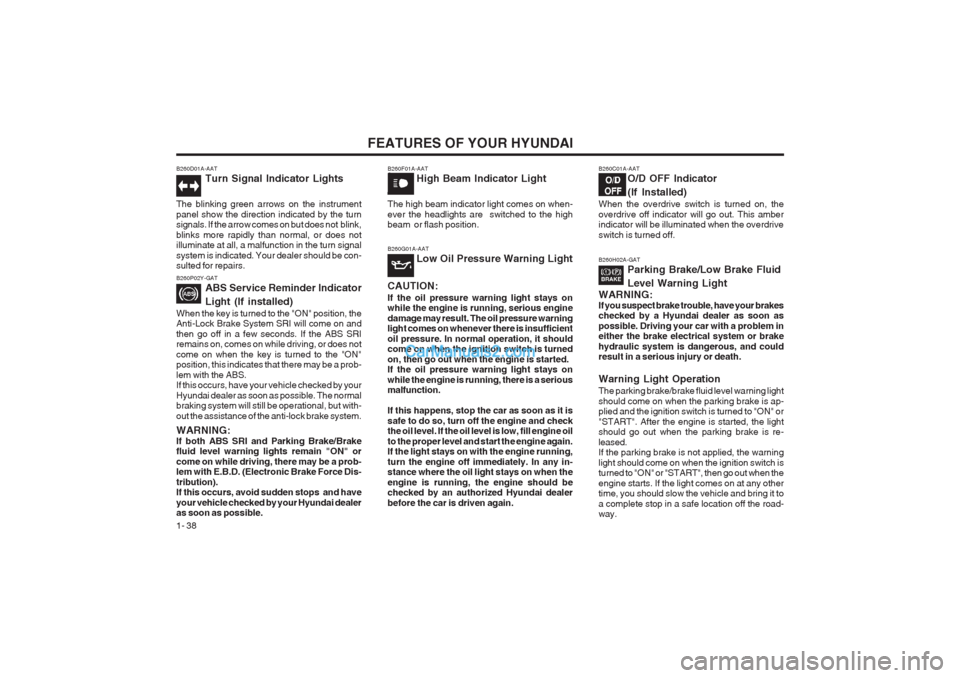
ABS Service Reminder Indicator Light (If installed)
When the key is turned to the "ON" position, the Anti-Lock Brake System SRI will come on and then go off in a few seconds. If the ABS SRI remains on, comes on while driving, or does not come on when the key is turned to the "ON" position, this indicates that there may be a prob- lem with the ABS. If this occurs, have your vehicle checked by your Hyundai dealer as soon as possible. The normal braking system will still be operational, but with- out the assistance of the anti-lock brake system. WARNING: If both ABS SRI and Parking Brake/Brake fluid level warning lights remain "ON" or come on while driving, there may be a prob-
lem with E.B.D. (Electronic Brake Force Dis- tribution). If this occurs, avoid sudden stops and have your vehicle checked by your Hyundai dealer as soon as possible. B260F01A-AAT
High Beam Indicator Light
The high beam indicator light comes on when- ever the headlights are switched to the high beam or flash position.
B260D01A-AAT Turn Signal Indicator Lights
The blinking green arrows on the instrument panel show the direction indicated by the turn signals. If the arrow comes on but does not blink, blinks more rapidly than normal, or does not illuminate at all, a malfunction in the turn signal system is indicated. Your dealer should be con- sulted for repairs. B260G01A-AAT
Low Oil Pressure Warning Light
CAUTION: If the oil pressure warning light stays on while the engine is running, serious engine damage may result. The oil pressure warning light comes on whenever there is insufficient oil pressure. In normal operation, it should come on when the ignition switch is turned on, then go out when the engine is started. If the oil pressure warning light stays on while the engine is running, there is a serious malfunction. If this happens, stop the car as soon as it is safe to do so, turn off the engine and check the oil level. If the oil level is low, fill engine oil to the proper level and start the engine again. If the light stays on with the engine running, turn the engine off immediately. In any in- stance where the oil light stays on when the engine is running, the engine should be checked by an authorized Hyundai dealer before the car is driven again.B260C01A-AAT O/D OFF Indicator
(If Installed)
When the overdrive switch is turned on, the overdrive off indicator will go out. This amber indicator will be illuminated when the overdrive switch is turned off.
B260H02A-GAT Parking Brake/Low Brake Fluid Level Warning Light
WARNING: If you suspect brake trouble, have your brakes checked by a Hyundai dealer as soon as possible. Driving your car with a problem in either the brake electrical system or brake hydraulic system is dangerous, and could result in a serious injury or death. Warning Light Operation The parking brake/brake fluid level warning light should come on when the parking brake is ap- plied and the ignition switch is turned to "ON" or "START". After the engine is started, the light should go out when the parking brake is re- leased. If the parking brake is not applied, the warning light should come on when the ignition switch is turned to "ON" or "START", then go out when the engine starts. If the light comes on at any other time, you should slow the vehicle and bring it to a complete stop in a safe location off the road- way.
Page 56 of 349
FEATURES OF YOUR HYUNDAI
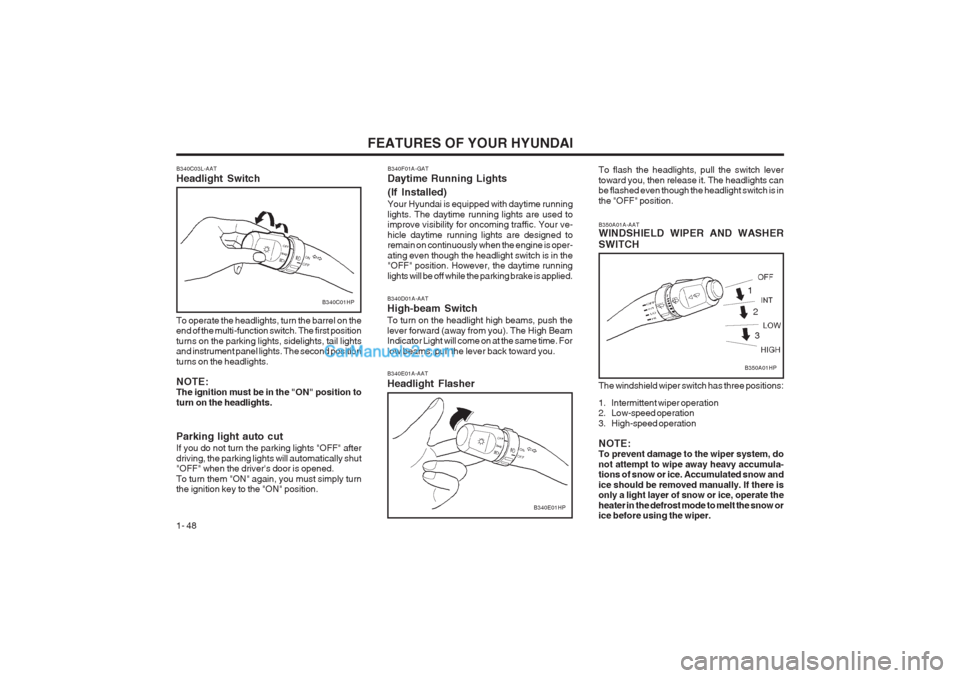
1- 48 B340D01A-AAT High-beam Switch To turn on the headlight high beams, push the lever forward (away from you). The High Beam Indicator Light will come on at the same time. For low beams, pull the lever back toward you. B340E01A-AAT Headlight Flasher
B340E01HP
B340C03L-AAT Headlight Switch
B340C01HP
To operate the headlights, turn the barrel on the end of the multi-function switch. The first position turns on the parking lights, sidelights, tail lights and instrument panel lights. The second position turns on the headlights. NOTE: The ignition must be in the "ON" position to turn on the headlights. Parking light auto cut If you do not turn the parking lights "OFF" after driving, the parking lights will automatically shut "OFF" when the driver's door is opened. To turn them "ON" again, you must simply turn the ignition key to the "ON" position. B340F01A-GAT Daytime Running Lights (If Installed) Your Hyundai is equipped with daytime running lights. The daytime running lights are used to improve visibility for oncoming traffic. Your ve- hicle daytime running lights are designed to remain on continuously when the engine is oper- ating even though the headlight switch is in the "OFF" position. However, the daytime running lights will be off while the parking brake is applied.
To flash the headlights, pull the switch levertoward you, then release it. The headlights can be flashed even though the headlight switch is in the "OFF" position. The windshield wiper switch has three positions:
1. Intermittent wiper operation
2. Low-speed operation
3. High-speed operation NOTE: To prevent damage to the wiper system, do not attempt to wipe away heavy accumula- tions of snow or ice. Accumulated snow and ice should be removed manually. If there is only a light layer of snow or ice, operate the heater in the defrost mode to melt the snow or ice before using the wiper.
B350A01A-AAT WINDSHIELD WIPER AND WASHER SWITCH
B350A01HP
1
2
3
Page 66 of 349
FEATURES OF YOUR HYUNDAI
1- 58
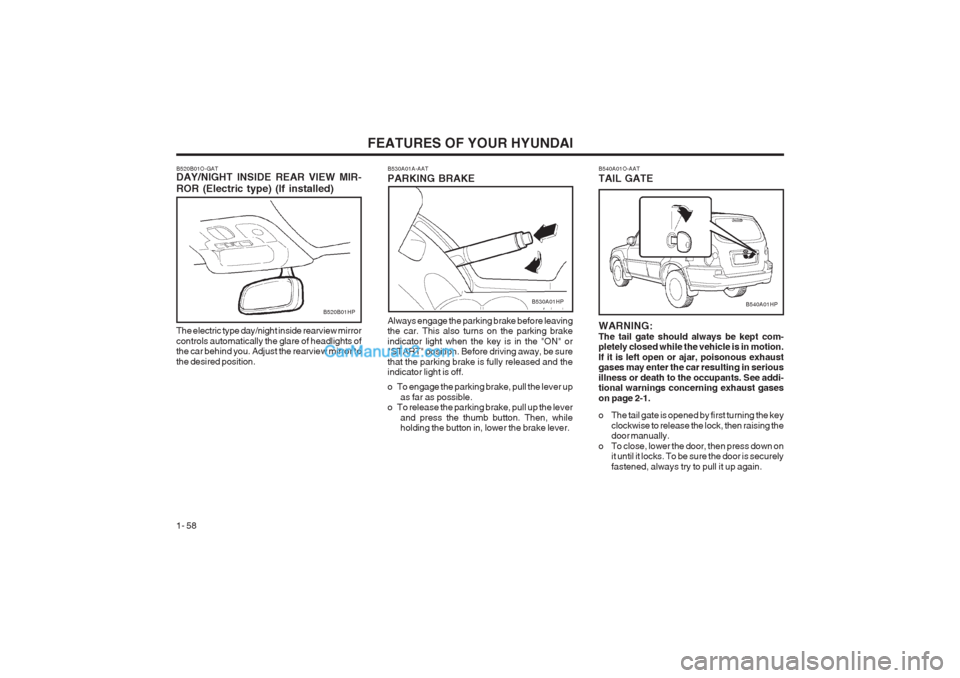
Always engage the parking brake before leaving the car. This also turns on the parking brake indicator light when the key is in the "ON" or "START" position. Before driving away, be sure that the parking brake is fully released and the indicator light is off.
o To engage the parking brake, pull the lever up as far as possible.
o To release the parking brake, pull up the lever
and press the thumb button. Then, while holding the button in, lower the brake lever.
B530A01A-AAT PARKING BRAKE
B520B01O-GAT DAY/NIGHT INSIDE REAR VIEW MIR- ROR (Electric type) (If installed)
B520B01HP
The electric type day/night inside rearview mirror controls automatically the glare of headlights of the car behind you. Adjust the rearview mirror to the desired position.B530A01HP
B540A01O-AAT TAIL GATE
B540A01HP
WARNING: The tail gate should always be kept com- pletely closed while the vehicle is in motion. If it is left open or ajar, poisonous exhaust gases may enter the car resulting in serious illness or death to the occupants. See addi- tional warnings concerning exhaust gases on page 2-1.
o The tail gate is opened by first turning the key clockwise to release the lock, then raising the door manually.
o To close, lower the door, then press down on it until it locks. To be sure the door is securely fastened, always try to pull it up again.
Page 108 of 349
DRIVING YOUR HYUNDAI
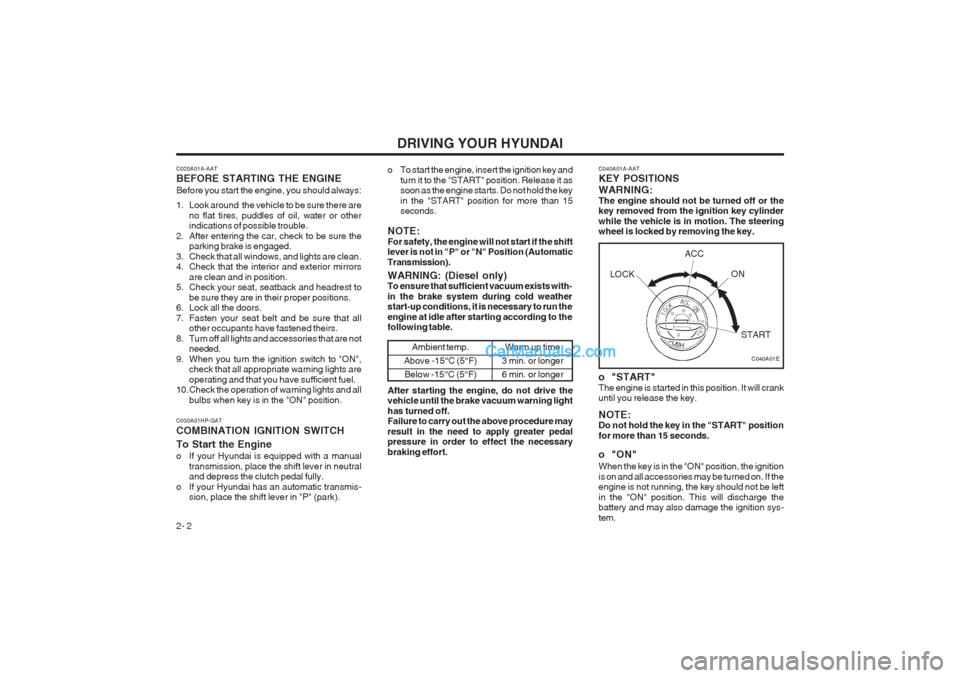
2- 2 C040A01A-AAT KEY POSITIONS WARNING: The engine should not be turned off or the key removed from the ignition key cylinder while the vehicle is in motion. The steering wheel is locked by removing the key.
o "START" The engine is started in this position. It will crank until you release the key. NOTE: Do not hold the key in the "START" position for more than 15 seconds.
o "ON" When the key is in the "ON" position, the ignition is on and all accessories may be turned on. If the engine is not running, the key should not be left in the "ON" position. This will discharge the battery and may also damage the ignition sys- tem.
C020A01A-AAT BEFORE STARTING THE ENGINE Before you start the engine, you should always:
1. Look around the vehicle to be sure there are
no flat tires, puddles of oil, water or other indications of possible trouble.
2. After entering the car, check to be sure the parking brake is engaged.
3. Check that all windows, and lights are clean.
4. Check that the interior and exterior mirrors are clean and in position.
5. Check your seat, seatback and headrest to
be sure they are in their proper positions.
6. Lock all the doors.
7. Fasten your seat belt and be sure that all other occupants have fastened theirs.
8. Turn off all lights and accessories that are not needed.
9. When you turn the ignition switch to "ON", check that all appropriate warning lights areoperating and that you have sufficient fuel.
10. Check the operation of warning lights and all
bulbs when key is in the "ON" position. o To start the engine, insert the ignition key and
turn it to the "START" position. Release it as soon as the engine starts. Do not hold the key in the "START" position for more than 15 seconds.
NOTE: For safety, the engine will not start if the shift lever is not in "P" or "N" Position (Automatic Transmission).
C030A01HP-GAT COMBINATION IGNITION SWITCH To Start the Engine
o If your Hyundai is equipped with a manual transmission, place the shift lever in neutral and depress the clutch pedal fully.
o If your Hyundai has an automatic transmis- sion, place the shift lever in "P" (park).
C040A01E
WARNING: (Diesel only) To ensure that sufficient vacuum exists with- in the brake system during cold weather start-up conditions, it is necessary to run the engine at idle after starting according to the following table.
Ambient temp.
Above -15°C (5°F) Below -15°C (5°F)Warm up time
3 min. or longer 6 min. or longer
After starting the engine, do not drive the vehicle until the brake vacuum warning light has turned off. Failure to carry out the above procedure may result in the need to apply greater pedal pressure in order to effect the necessary braking effort. LOCK
ACC
ON
START
Page 109 of 349
DRIVING YOUR HYUNDAI 2- 3
C070C01A-AAT
To Remove The Ignition Key
1. Turn the ignition key to the "ACC" position. C050A01A-AAT STARTING
C050A01E
WARNING: Never run the engine in a closed or poorly ventilated area any longer than is needed to move your car in or out of the area. The carbon monoxide gas emitted is odorless and can cause serious injury or death.
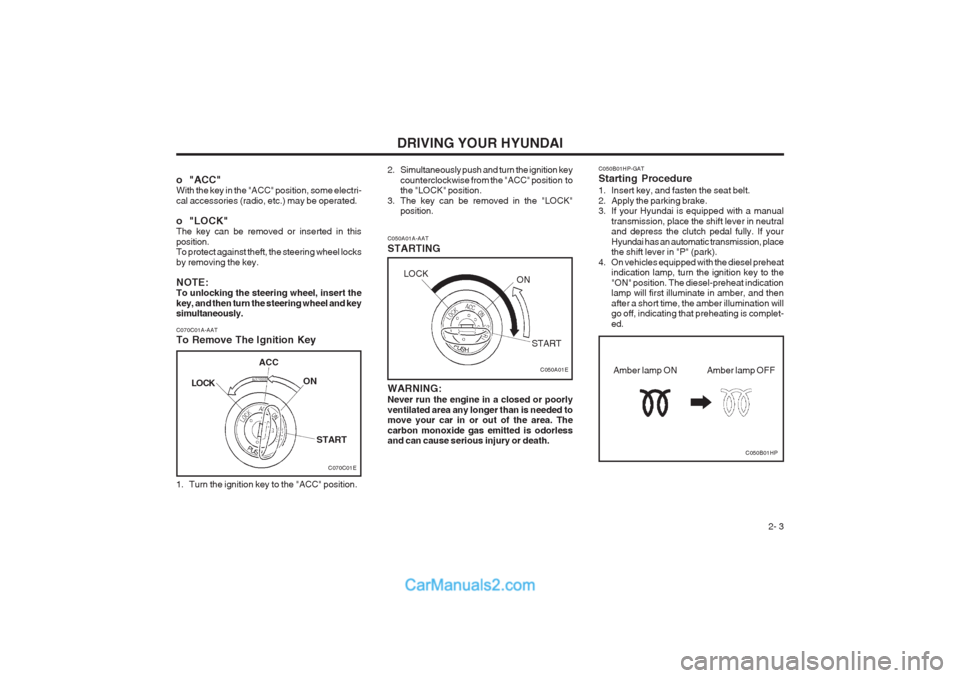
o "ACC"With the key in the "ACC" position, some electri- cal accessories (radio, etc.) may be operated.
o "LOCK" The key can be removed or inserted in this position. To protect against theft, the steering wheel locks by removing the key. NOTE: To unlocking the steering wheel, insert the key, and then turn the steering wheel and key simultaneously.
2. Simultaneously push and turn the ignition key
counterclockwise from the "ACC" position to the "LOCK" position.
3. The key can be removed in the "LOCK" position. C050B01HP-GAT Starting Procedure
1. Insert key, and fasten the seat belt.
2. Apply the parking brake.
3. If your Hyundai is equipped with a manual
transmission, place the shift lever in neutraland depress the clutch pedal fully. If your Hyundai has an automatic transmission, place the shift lever in "P" (park).
4. On vehicles equipped with the diesel preheat indication lamp, turn the ignition key to the "ON" position. The diesel-preheat indication lamp will first illuminate in amber, and then after a short time, the amber illumination will go off, indicating that preheating is complet- ed.
C050B01HP
Amber lamp OFF
Amber lamp ON
C070C01E
LOCK
ACC
ON
START
LOCK ON
START
Page 111 of 349
DRIVING YOUR HYUNDAI 2- 5
C070B01A-AAT Using the Clutch The clutch should be pressed all the way to the floor before shifting, then released slowly. The clutch pedal should always be used after fully returning to the original position. Do not rest your foot on the clutch pedal while driving. This can cause unnecessary wear. Do not partially en- gage the clutch to hold the car on an incline. This causes unnecessary wear. Use the parking brake to hold the car on an incline. Do not operate the clutch pedal rapidly and repeatedly. shift lever in N(Neutral) position and re-lease the clutch. Press the clutch pedal back down, and then shift into 1st or R(Reverse) gear position.
o Do not use the shift lever as a handrest
during driving, as this can result in prema- ture wear of the transmission shift forks.
CAUTION: When downshifting from fifth gear to fourth gear, caution should be taken not to inadvert- ently press the gear shift lever sideways in such a manner that second gear is engaged. Such a drastic downshift may cause the en- gine speed to increase to the point that the tachometer will enter the red-zone. Such over- revving of the engine may possibly cause engine damage. C070D02O-AAT Good Driving Practices
o Never take the car out of gear and coast down
a hill. This is extremely hazardous. Always leave the car in gear.
o Don't "ride" the brakes. This can cause them
to overheat and malfunction. Instead, when you are driving down a long hill, slow down and shift to a lower gear. When you do this, engine braking will help slow the car.
o Slow down before shifting to a lower gear. This will help avoid over-revving the engine, which can cause damage.
o Slow down when you encounter cross winds.
This gives you much better control of your car.
o Be sure the car is completely stopped before you attempt to shift into reverse. The trans- mission can be damaged if you do not. To shift into reverse, depress the clutch, move the shift lever to neutral, wait three seconds, then shift to the reverse position.
o Exercise extreme caution when driving on a slippery surface. Be especially careful when braking, accelerating or shifting gears. On a slippery surface, an abrupt change in vehicle speed can cause the drive wheels to lose traction and the vehicle to go out of control.
WARNING:
o Avoid high cornering speeds.
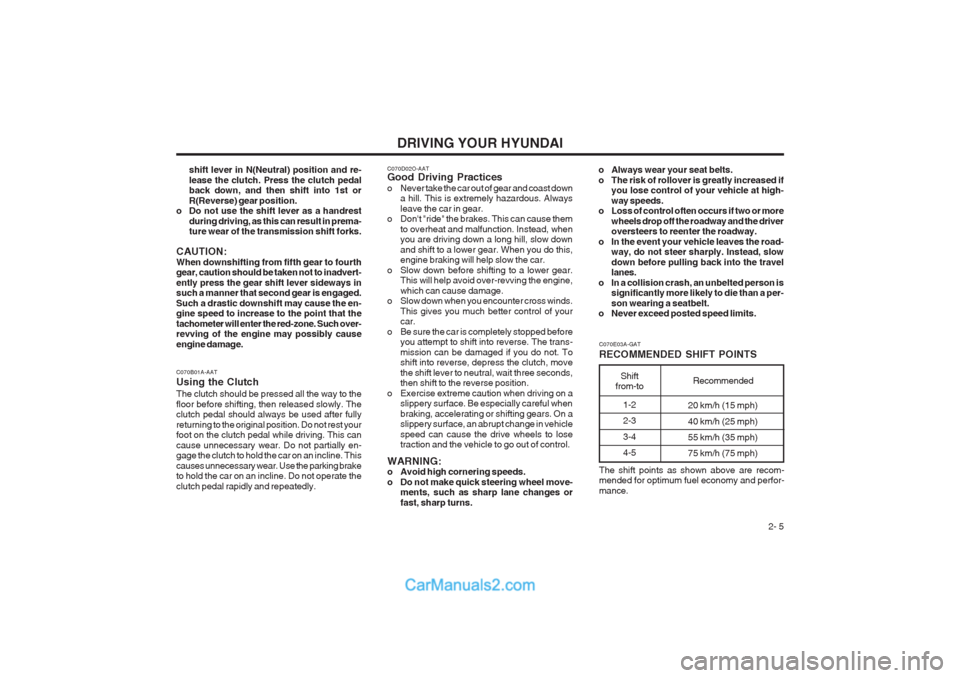
o Do not make quick steering wheel move- ments, such as sharp lane changes orfast, sharp turns. C070E03A-GAT RECOMMENDED SHIFT POINTS
1-2 2-3 3-4 4-5
Shift
from-to Recommended
20 km/h (15 mph) 40 km/h (25 mph) 55 km/h (35 mph)75 km/h (75 mph)
The shift points as shown above are recom- mended for optimum fuel economy and perfor- mance.
o Always wear your seat belts.
o The risk of rollover is greatly increased if
you lose control of your vehicle at high-way speeds.
o Loss of control often occurs if two or more
wheels drop off the roadway and the driver oversteers to reenter the roadway.
o In the event your vehicle leaves the road- way, do not steer sharply. Instead, slow down before pulling back into the travel lanes.
o In a collision crash, an unbelted person is significantly more likely to die than a per- son wearing a seatbelt.
o Never exceed posted speed limits.
Page 112 of 349
DRIVING YOUR HYUNDAI
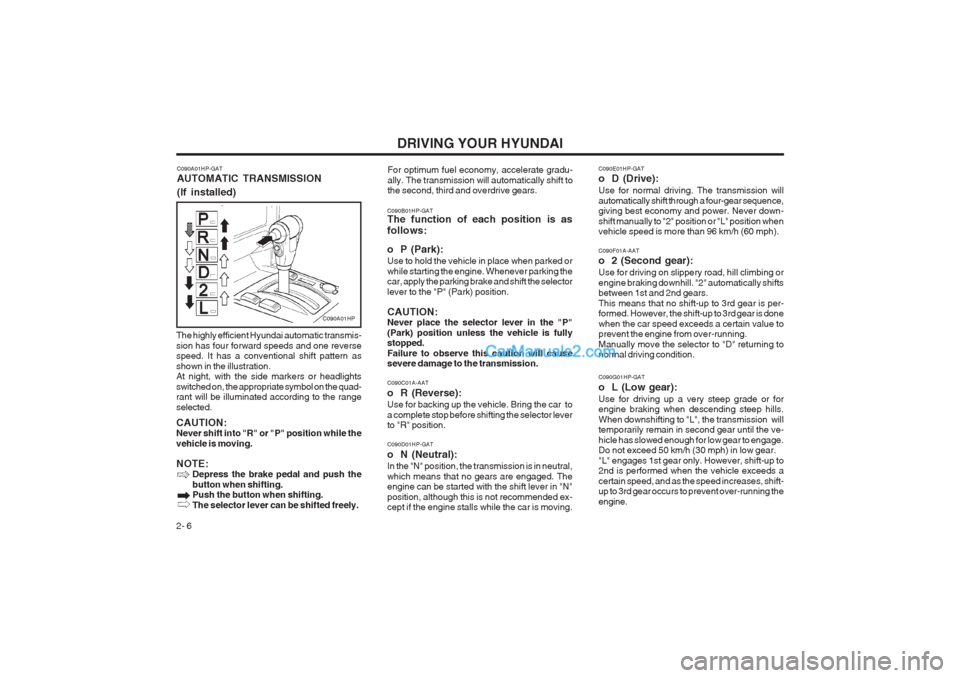
2- 6 C090B01HP-GAT The function of each position is as follows:
o P (Park): Use to hold the vehicle in place when parked or while starting the engine. Whenever parking the car, apply the parking brake and shift the selector lever to the "P" (Park) position. CAUTION: Never place the selector lever in the "P" (Park) position unless the vehicle is fully stopped. Failure to observe this caution will cause severe damage to the transmission. C090C01A-AAT
o R (Reverse): Use for backing up the vehicle. Bring the car to a complete stop before shifting the selector lever to "R" position. C090D01HP-GAT
o N (Neutral): In the "N" position, the transmission is in neutral, which means that no gears are engaged. The engine can be started with the shift lever in "N" position, although this is not recommended ex- cept if the engine stalls while the car is moving. C090E01HP-GAT
o D (Drive): Use for normal driving. The transmission will automatically shift through a four-gear sequence, giving best economy and power. Never down- shift manually to "2" position or "L" position when vehicle speed is more than 96 km/h (60 mph). C090F01A-AAT
o 2 (Second gear): Use for driving on slippery road, hill climbing or engine braking downhill. "2" automatically shifts between 1st and 2nd gears. This means that no shift-up to 3rd gear is per- formed. However, the shift-up to 3rd gear is done when the car speed exceeds a certain value to prevent the engine from over-running. Manually move the selector to "D" returning to normal driving condition. C090G01HP-GAT
o L (Low gear):Use for driving up a very steep grade or for engine braking when descending steep hills. When downshifting to "L", the transmission will temporarily remain in second gear until the ve- hicle has slowed enough for low gear to engage. Do not exceed 50 km/h (30 mph) in low gear. "L" engages 1st gear only. However, shift-up to 2nd is performed when the vehicle exceeds a certain speed, and as the speed increases, shift- up to 3rd gear occurs to prevent over-running the engine.
The highly efficient Hyundai automatic transmis-sion has four forward speeds and one reverse speed. It has a conventional shift pattern as shown in the illustration. At night, with the side markers or headlights switched on, the appropriate symbol on the quad- rant will be illuminated according to the range selected. CAUTION: Never shift into "R" or "P" position while the vehicle is moving. NOTE:
Depress the brake pedal and push the button when shifting. Push the button when shifting. The selector lever can be shifted freely.
C090A01HP-GAT AUTOMATIC TRANSMISSION (If installed)
C090A01HP
For optimum fuel economy, accelerate gradu- ally. The transmission will automatically shift to the second, third and overdrive gears.
Page 113 of 349
DRIVING YOUR HYUNDAI 2- 7
C090H01HP-DAT CAUTION:
o P (Park): Use this range to park the vehicle. This range is also used when engine is started and warmed up.
o N (Neutral): The engine can be started in this range, but the use of "P" range is recommended for safer start up. NOTE:
o For smooth operation, depress the brake
pedal when shifting from NEUTRAL orPARK to a forward or reverse gear.
o The ignition key must be in the "ON" position and the brake pedal fully de- pressed in order to move the shift lever from the "P" (Park)position to any of the other positions.
o It is always possible to shift from "R", "N",
"D", "2", "L" positions to "P" position. However, the vehicle must be fully stopped to avoid transmission damage.
C090I01HP-GAT CAUTION:
o Shift into "R" and "P" position only when the vehicle has completely stopped.
o Do not accelerate the engine in the re-
verse or any of the forward positions withthe brakes applied. o Always apply the footbrake when shifting
from "P" or "N" to "R", "D", "2" or "L"position.
o Do not use the P(Park) position in place of the parking brake. Always set the parking brake, shift the transmission into P(Park) and turn off the ignition when you leave the vehicle, even momentarily. Never leave the vehicle unattended while the engine is running.
o Check the automatic transmission fluid
level regularly, and add fluid as neces- sary.
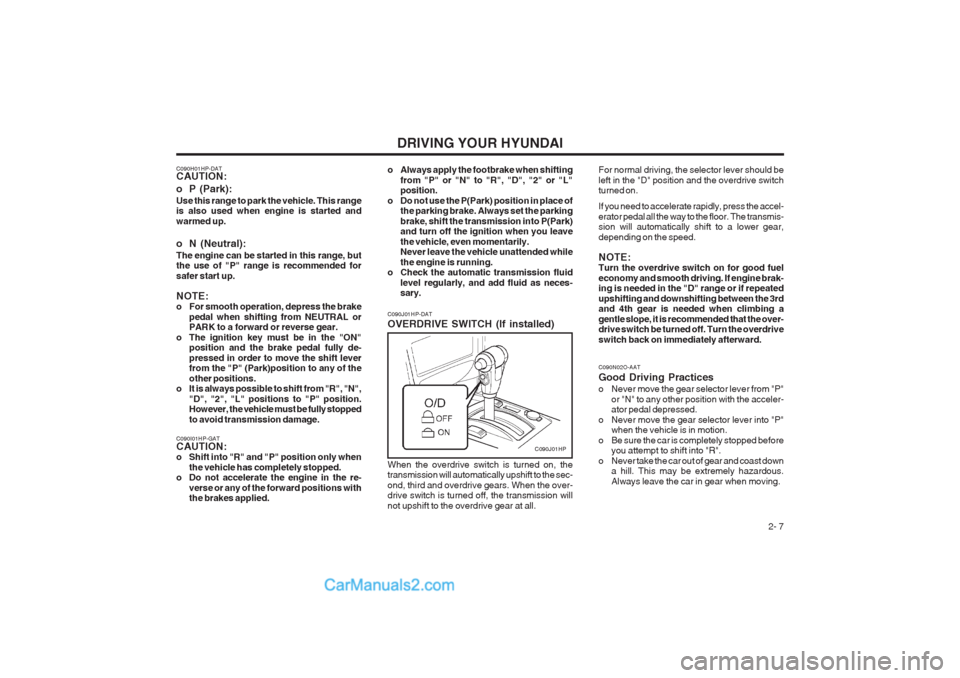
When the overdrive switch is turned on, thetransmission will automatically upshift to the sec- ond, third and overdrive gears. When the over- drive switch is turned off, the transmission will not upshift to the overdrive gear at all.
C090J01HP-DAT OVERDRIVE SWITCH (If installed)
C090J01HP
C090N02O-AAT Good Driving Practices
o Never move the gear selector lever from "P"
or "N" to any other position with the acceler- ator pedal depressed.
o Never move the gear selector lever into "P" when the vehicle is in motion.
o Be sure the car is completely stopped before you attempt to shift into "R".
o Never take the car out of gear and coast down a hill. This may be extremely hazardous. Always leave the car in gear when moving.
For normal driving, the selector lever should beleft in the "D" position and the overdrive switch turned on. If you need to accelerate rapidly, press the accel- erator pedal all the way to the floor. The transmis- sion will automatically shift to a lower gear, depending on the speed. NOTE: Turn the overdrive switch on for good fuel economy and smooth driving. If engine brak- ing is needed in the "D" range or if repeated upshifting and downshifting between the 3rd and 4th gear is needed when climbing a gentle slope, it is recommended that the over- drive switch be turned off. Turn the overdrive switch back on immediately afterward.