high beam Hyundai Terracan 2005 User Guide
[x] Cancel search | Manufacturer: HYUNDAI, Model Year: 2005, Model line: Terracan, Model: Hyundai Terracan 2005Pages: 539, PDF Size: 18.03 MB
Page 265 of 539

6
DO-IT-YOURSELF MAINTENANCE
43BULB WATTAGES
Wattage55/55 5
21 8
10 55 55
Part Name
Headlight (Low/High Beam)Front Position Light Front Turn Signal Light Map Light Interior Light Front Fog Light Side Repeater Light Front Door Edge Warning Light (If Installed) Wattage
1016
21/5 2116 215
No.
9
1011 12 Part Name
Luggage Compartment Light High Mounted Rear Stop Light (If Installed) Rear Combination Light Stop/Tail Light Turn Signal Light Back-up Light Rear Fog Light (If Installed) License Plate Light
No.
1 2 3 4 5 6 7 8
G280A03HP-GAT
G280A01HP
Socket Type S8.5/8.5W-2
BAY 15d BA 15s
W2.1 x 9.5D
BA 15s
W2.1 x 9.5D
Socket Type
Px26d/P14.5S W2.1x9.5D
BA 15s
S8.5/8.5 S8.5/8.5 P22d
W2.1 x 9.5D W2.1 x 4.6D
Page 268 of 539
6 DO-IT-YOURSELF MAINTENANCE
46
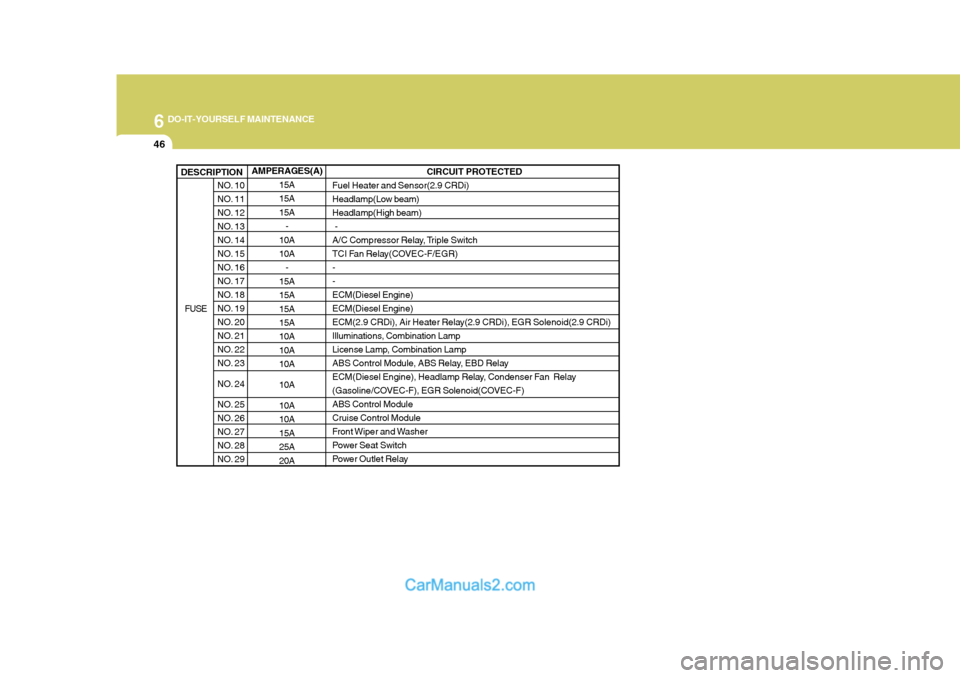
AMPERAGES(A)15A 15A15A-
10A 10A
-
15A 15A15A15A 10A 10A10A 10A 10A 10A15A25A20A
NO. 10
NO. 11
NO. 12
NO. 13
NO. 14
NO. 15
NO. 16
NO. 17
NO. 18
NO. 19
NO. 20
NO. 21
NO. 22
NO. 23
NO. 24
NO. 25
NO. 26
NO. 27
NO. 28
NO. 29
DESCRIPTION
CIRCUIT PROTECTED
Fuel Heater and Sensor(2.9 CRDi)
Headlamp(Low beam)Headlamp(High beam) -
A/C Compressor Relay, Triple Switch
TCI Fan Relay(COVEC-F/EGR)--ECM(Diesel Engine)ECM(Diesel Engine)
ECM(2.9 CRDi), Air Heater Relay(2.9 CRDi), EGR Solenoid(2.9 CRDi)
Illuminations, Combination Lamp
License Lamp, Combination Lamp
ABS Control Module, ABS Relay, EBD Relay
ECM(Diesel Engine), Headlamp Relay, Condenser Fan Relay
(Gasoline/COVEC-F), EGR Solenoid(COVEC-F)ABS Control Module
Cruise Control Module
Front Wiper and Washer
Power Seat Switch
Power Outlet Relay
FUSE
Page 289 of 539
10INDEX
2
A Air bag ....................................................................... 1-47
Air Cleaner Filter ....................................................... 6-15
Air Conditioning Care ....................................................................... 6-24
Filter ........................................................... 1-118, 6-26 Operation ................................................... 1-110, 6-25
Switch ................................................................... 1-110
Antenna ................................................................... 1-140
Ashtray ...................................................................... 1-81
Audio Fault Code .................................................... 1-137
Automatic Heating and Cooling Control System .... 1-112
B
Battery ............................................................. 2-26, 6-32 Bi-Level Heating ...................................................... 1-108
Brake
Anti-lock brake system (ABS) ................................ 2-21
Checking the brakes .............................................. 6-22
Fluid ....................................................................... 6-23
Pedal clearance ..................................................... 6-29
Pedal free-play ....................................................... 6-28
Practices ................................................................ 2-22
Breaking-In your New Hyundai ................................... 1-3C
Care of Cassette Tapes ....................
..................... 1-139
Care of Discs .......................................................... 1-138
Cargo Security Screen.............................................. 1-94
Cassette Tape Player Operation (H240) ................1-124
Cassette Tape Player Operation (H280) ................1-129
Catalytic Converter ..................................................... 7-3
CD Auto changer (H 280) .............................. 1-92, 1-134
Center Console Compartment ..................................1-87
Center console armrest .................... ..................... 1-88
Center console box ................................................ 1-87
Child Restraint System............................................. 1-39
Child-Protector Rear Door Lock ...............................1-12
Cigarette Lighter ....................................................... 1-80
Clock ......................................................................... 1-79
Clutch Checking fluid ........................................................ 6-24
Pedal free-play ....................................................... 6-28
Combination Light
Daytime running lights .... .......................................1-74
Headlight flasher .................................................... 1-75
Headlight swi tch ..................................................... 1-73
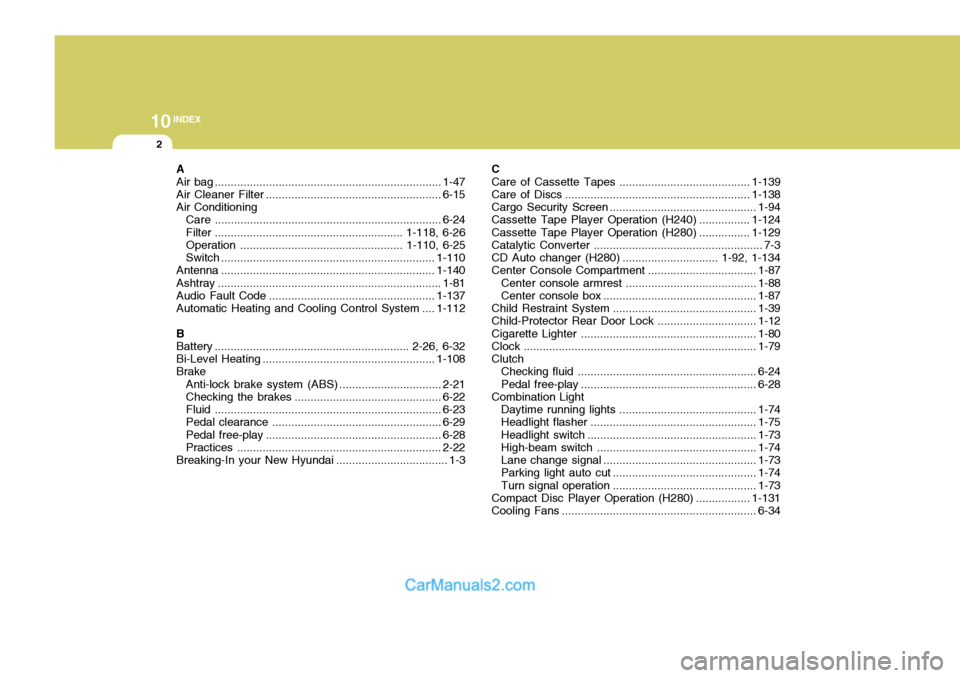
High-beam swi tch .................................................. 1-74
Lane change si gnal ................................................ 1-73
Parking light auto cut ............................................. 1-74
Turn signal oper ation............................................. 1-73
Compact Disc Player Operation (H 280) .................1-131
Cooling Fans ............................................................. 6-34
Page 305 of 539
YOUR VEHICLE AT A GLANCE
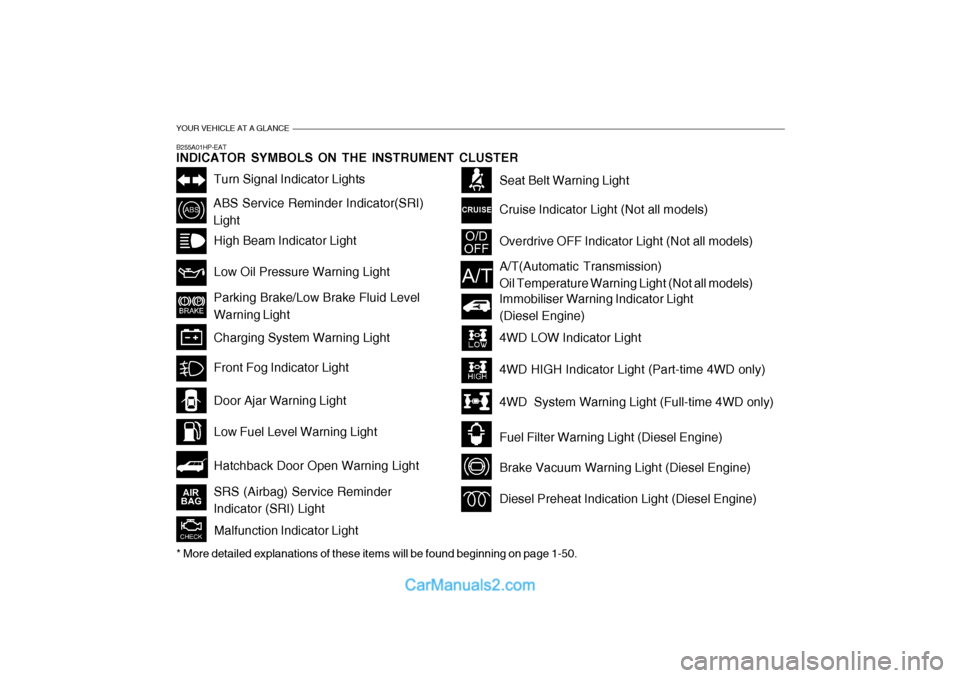
B255A01HP-EAT INDICATOR SYMBOLS ON THE INSTRUMENT CLUSTER
Turn Signal Indicator Lights
ABS Service Reminder Indicator(SRI) LightHigh Beam Indicator Light Low Oil Pressure Warning Light Parking Brake/Low Brake Fluid Level Warning Light Charging System Warning Light
Hatchback Door Open Warning Light
Door Ajar Warning Light Low Fuel Level Warning Light
Front Fog Indicator Light
Overdrive OFF Indicator Light (Not all models)
Immobiliser Warning Indicator Light (Diesel Engine)
Seat Belt Warning Light Cruise Indicator Light (Not all models)
Malfunction Indicator Light
A/T(Automatic Transmission) Oil Temperature Warning Light (Not all models)
4WD LOW Indicator Light 4WD HIGH Indicator Light (Part-time 4WD only)
4WD System Warning Light (Full-time 4WD only)
Fuel Filter Warning Light (Diesel Engine)
Brake Vacuum Warning Light (Diesel Engine)
Diesel Preheat Indication Light (Diesel Engine)
* More detailed explanations of these items will be found beginning on page 1-50.SRS (Airbag) Service Reminder Indicator (SRI) Light
Page 352 of 539
1
CONTROLS AND EQUIPMENT
47
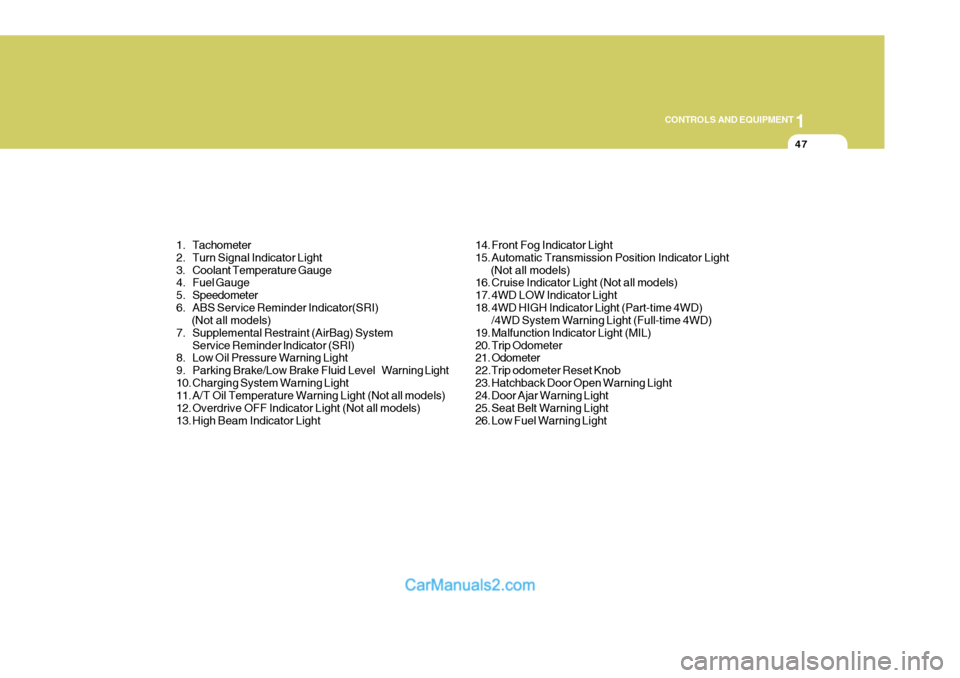
1. Tachometer
2. Turn Signal Indicator Light
3. Coolant Temperature Gauge
4. Fuel Gauge
5. Speedometer
6. ABS Service Reminder Indicator(SRI) (Not all models)
7. Supplemental Restraint (AirBag) System Service Reminder lndicator (SRI)
8. Low Oil Pressure Warning Light
9. Parking Brake/Low Brake Fluid LevelWarning Light
10. Charging System Warning Light
11. A/T Oil Temperature Warning Light (Not all models)
12. Overdrive OFF Indicator Light (Not all models)
13. High Beam Indicator Light 14. Front Fog Indicator Light
15. Automatic Transmission Position Indicator Light (Not all models)
16. Cruise Indicator Light (Not all models)
17. 4WD LOW Indicator Light
18. 4WD HIGH Indicator Light (Part-time 4WD)
/4WD System Warning Light (Full-time 4WD)
19. Malfunction Indicator Light (MIL)
20. Trip Odometer
21. Odometer 22.Trip odometer Reset Knob
23. Hatchback Door Open Warning Light
24. Door Ajar Warning Light
25. Seat Belt Warning Light
26. Low Fuel Warning Light
Page 354 of 539
1
CONTROLS AND EQUIPMENT
49
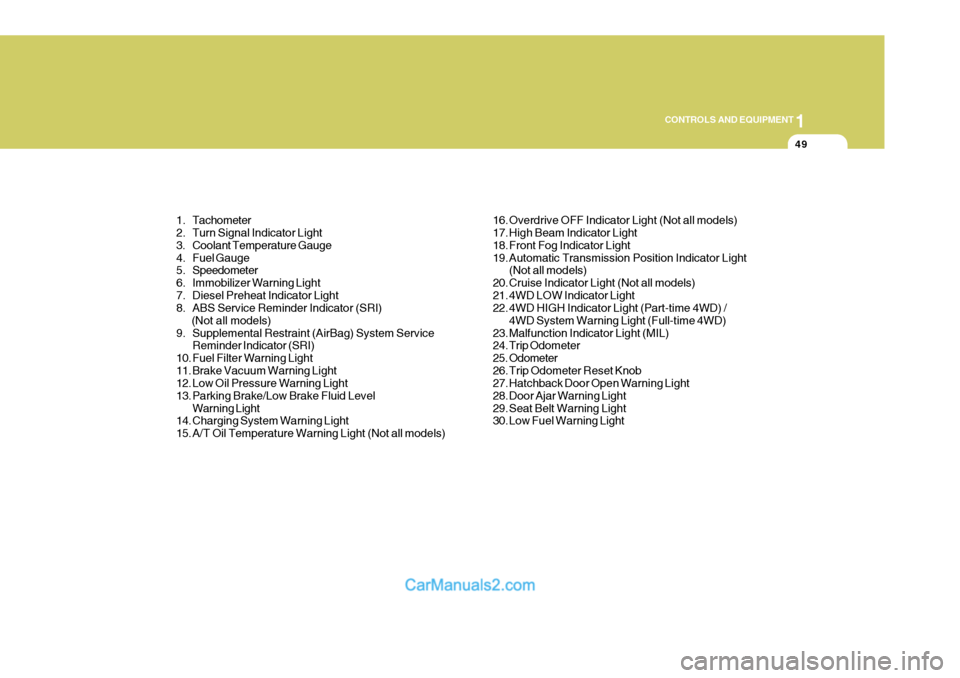
1. Tachometer
2. Turn Signal Indicator Light
3. Coolant Temperature Gauge
4. Fuel Gauge
5. Speedometer
6. Immobilizer Warning Light
7. Diesel Preheat Indicator Light
8. ABS Service Reminder Indicator (SRI) (Not all models)
9. Supplemental Restraint (AirBag) System Service Reminder Indicator (SRI)
10. Fuel Filter Warning Light
11. Brake Vacuum Warning Light
12. Low Oil Pressure Warning Light
13. Parking Brake/Low Brake Fluid Level Warning Light
14. Charging System Warning Light
15. A/T Oil Temperature Warning Light (Not all models) 16. Overdrive OFF Indicator Light (Not all models)
17. High Beam Indicator Light
18. Front Fog Indicator Light
19. Automatic Transmission Position Indicator Light
(Not all models)
20. Cruise Indicator Light (Not all models)
21. 4WD LOW Indicator Light
22. 4WD HIGH Indicator Light (Part-time 4WD) / 4WD System Warning Light (Full-time 4WD)
23. Malfunction Indicator Light (MIL)
24. Trip Odometer
25. Odometer
26. Trip Odometer Reset Knob
27. Hatchback Door Open Warning Light
28. Door Ajar Warning Light
29. Seat Belt Warning Light
30. Low Fuel Warning Light
Page 355 of 539
1CONTROLS AND EQUIPMENT
50
!!
!
B260P02Y-EAT
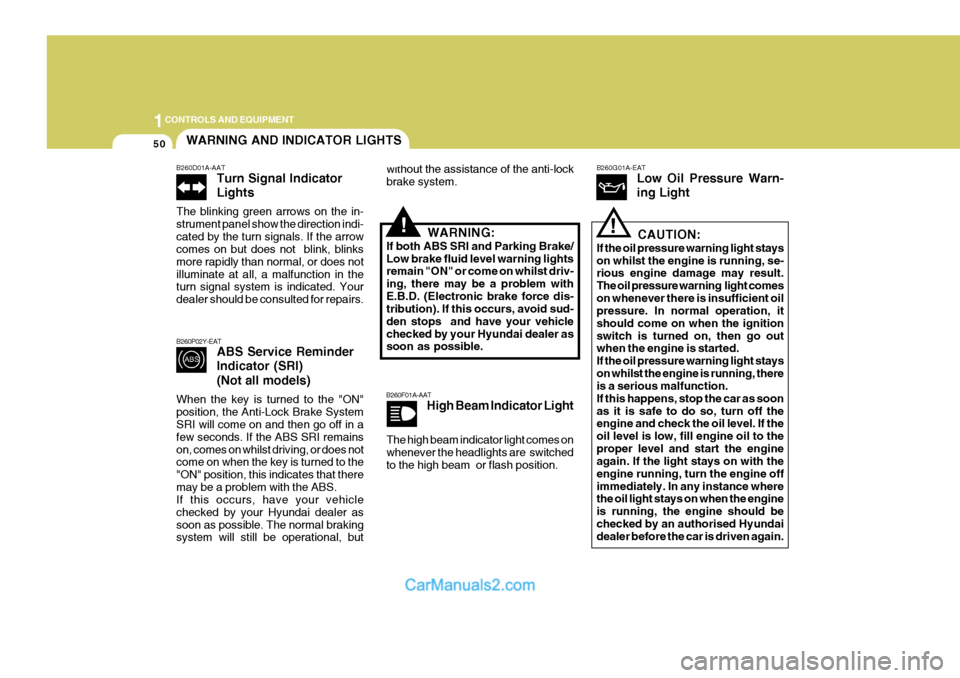
ABS Service Reminder Indicator (SRI) (Not all models)
When the key is turned to the "ON" position, the Anti-Lock Brake System SRI will come on and then go off in a few seconds. If the ABS SRI remainson, comes on whilst driving, or does not come on when the key is turned to the "ON" position, this indicates that theremay be a problem with the ABS. If this occurs, have your vehicle checked by your Hyundai dealer assoon as possible. The normal braking system will still be operational, but without the assistance of the anti-lock brake system.
WARNING:
If both ABS SRI and Parking Brake/Low brake fluid level warning lights remain "ON" or come on whilst driv- ing, there may be a problem withE.B.D. (Electronic brake force dis- tribution). If this occurs, avoid sud- den stops and have your vehiclechecked by your Hyundai dealer as soon as possible.
B260F01A-AAT High Beam Indicator Light B260G01A-EAT
Low Oil Pressure Warn- ing Light
CAUTION:
If the oil pressure warning light stays on whilst the engine is running, se- rious engine damage may result. The oil pressure warning light comeson whenever there is insufficient oil pressure. In normal operation, it should come on when the ignitionswitch is turned on, then go out when the engine is started. If the oil pressure warning light stayson whilst the engine is running, there is a serious malfunction. If this happens, stop the car as soonas it is safe to do so, turn off the engine and check the oil level. If the oil level is low, fill engine oil to theproper level and start the engine again. If the light stays on with the engine running, turn the engine offimmediately. In any instance where the oil light stays on when the engine is running, the engine should bechecked by an authorised Hyundai dealer before the car is driven again.
WARNING AND INDICATOR LIGHTS
B260D01A-AAT Turn Signal Indicator Lights
The blinking green arrows on the in- strument panel show the direction indi-cated by the turn signals. If the arrow comes on but does not blink, blinks more rapidly than normal, or does notilluminate at all, a malfunction in the turn signal system is indicated. Your dealer should be consulted for repairs.
The high beam indicator light comes on whenever the headlights are switched to the high beam or flash position.
Page 366 of 539
1
CONTROLS AND EQUIPMENT
61
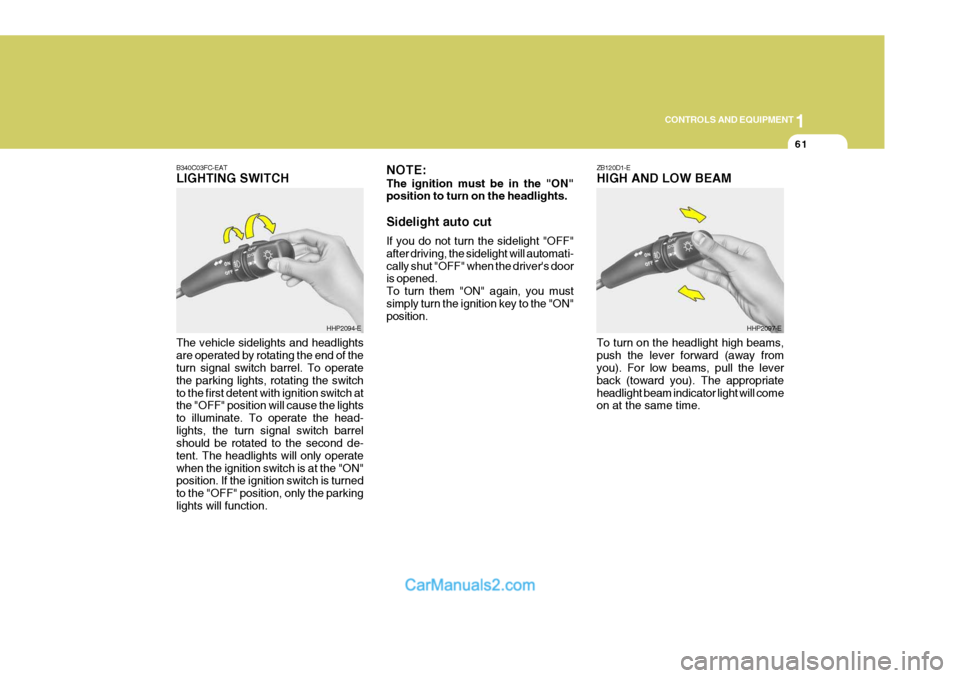
ZB120D1-E HIGH AND LOW BEAM
B340C03FC-EATLIGHTING SWITCH The vehicle sidelights and headlights are operated by rotating the end of the turn signal switch barrel. To operate the parking lights, rotating the switchto the first detent with ignition switch at the "OFF" position will cause the lights to illuminate. To operate the head-lights, the turn signal switch barrel should be rotated to the second de- tent. The headlights will only operatewhen the ignition switch is at the "ON" position. If the ignition switch is turned to the "OFF" position, only the parkinglights will function.
HHP2094-E NOTE: The ignition must be in the "ON" position to turn on the headlights. Sidelight auto cut If you do not turn the sidelight "OFF" after driving, the sidelight will automati-cally shut "OFF" when the driver's door is opened. To turn them "ON" again, you mustsimply turn the ignition key to the "ON" position.HHP2097-E
To turn on the headlight high beams, push the lever forward (away from you). For low beams, pull the lever back (toward you). The appropriateheadlight beam indicator light will come on at the same time.
Page 390 of 539
1
CONTROLS AND EQUIPMENT
85
This armrest is located in the centre of rear seat back. A storage box and two drink holders are included for your con- venience.PACKAGE ARMREST
HPB830A1-E
HHP2048
!
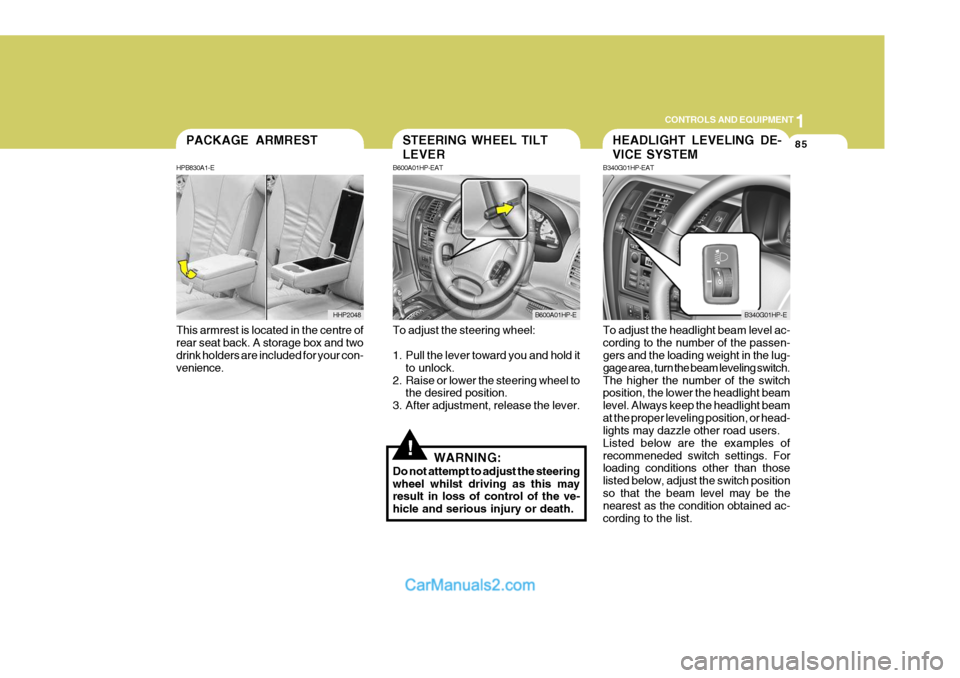
To adjust the steering wheel:
1. Pull the lever toward you and hold it to unlock.
2. Raise or lower the steering wheel to the desired position.
3. After adjustment, release the lever.
WARNING:
Do not attempt to adjust the steering wheel whilst driving as this may result in loss of control of the ve- hicle and serious injury or death. To adjust the headlight beam level ac-cording to the number of the passen- gers and the loading weight in the lug- gage area, turn the beam leveling switch.The higher the number of the switch position, the lower the headlight beam level. Always keep the headlight beamat the proper leveling position, or head- lights may dazzle other road users. Listed below are the examples ofrecommeneded switch settings. For loading conditions other than those listed below, adjust the switch positionso that the beam level may be the nearest as the condition obtained ac- cording to the list.
STEERING WHEEL TILT LEVER
B600A01HP-EAT
B600A01HP-E
HEADLIGHT LEVELING DE- VICE SYSTEM
B340G01HP-EAT
B340G01HP-E
Page 510 of 539
6
OWNER MAINTENANCE
33
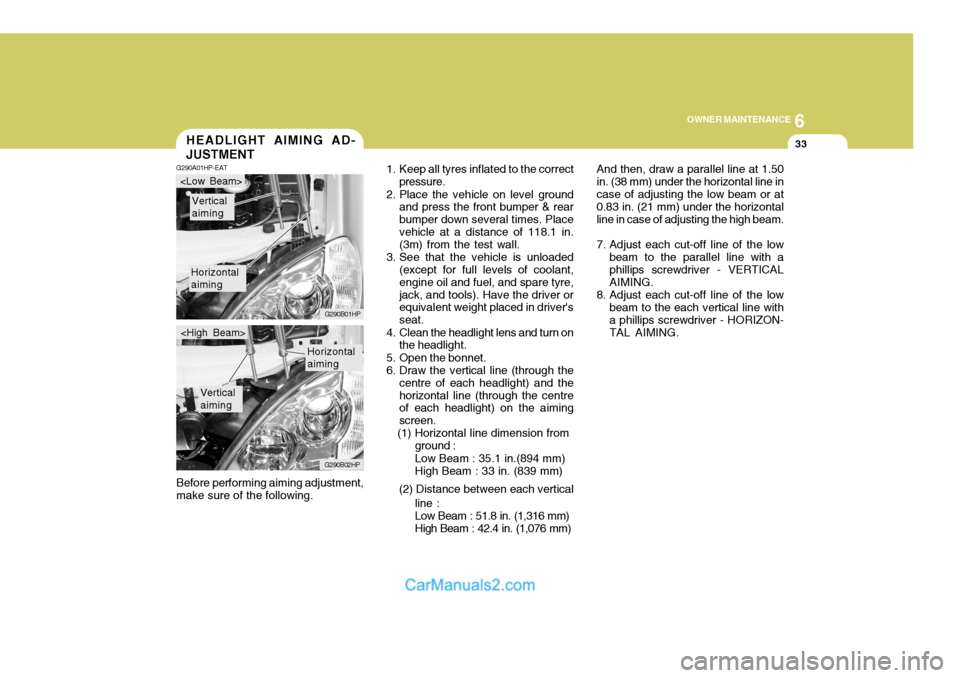
And then, draw a parallel line at 1.50 in. (38 mm) under the horizontal line incase of adjusting the low beam or at 0.83 in. (21 mm) under the horizontal line in case of adjusting the high beam.
7. Adjust each cut-off line of the low beam to the parallel line with a phillips screwdriver - VERTICAL AIMING.
8. Adjust each cut-off line of the low beam to the each vertical line witha phillips screwdriver - HORIZON-TAL AIMING.
Before performing aiming adjustment,make sure of the following.HEADLIGHT AIMING AD- JUSTMENT
G290A01HP-EAT
1. Keep all tyres inflated to the correct
pressure.
2. Place the vehicle on level ground and press the front bumper & rear bumper down several times. Placevehicle at a distance of 118.1 in. (3m) from the test wall.
3. See that the vehicle is unloaded (except for full levels of coolant, engine oil and fuel, and spare tyre,jack, and tools). Have the driver or equivalent weight placed in driver's seat.
4. Clean the headlight lens and turn on the headlight.
5. Open the bonnet.
6. Draw the vertical line (through the centre of each headlight) and thehorizontal line (through the centre of each headlight) on the aiming screen.
(1) Horizontal line dimension from
Horizontal aiming
Vertical aiming
G290B01HP
G290B02HP
Horizontal aiming
Vertical aiming
ground : Low Beam : 35.1 in.(894 mm) High Beam : 33 in. (839 mm)
(2) Distance between each vertical line :Low Beam : 51.8 in. (1,316 mm) High Beam : 42.4 in. (1,076 mm)