headlights Hyundai Tiburon 2004 Owner's Manual
[x] Cancel search | Manufacturer: HYUNDAI, Model Year: 2004, Model line: Tiburon, Model: Hyundai Tiburon 2004Pages: 224, PDF Size: 18.86 MB
Page 47 of 224
1FEATURES OF YOUR HYUNDAI
34
!
WARNING AND INDICATOR LIGHTS
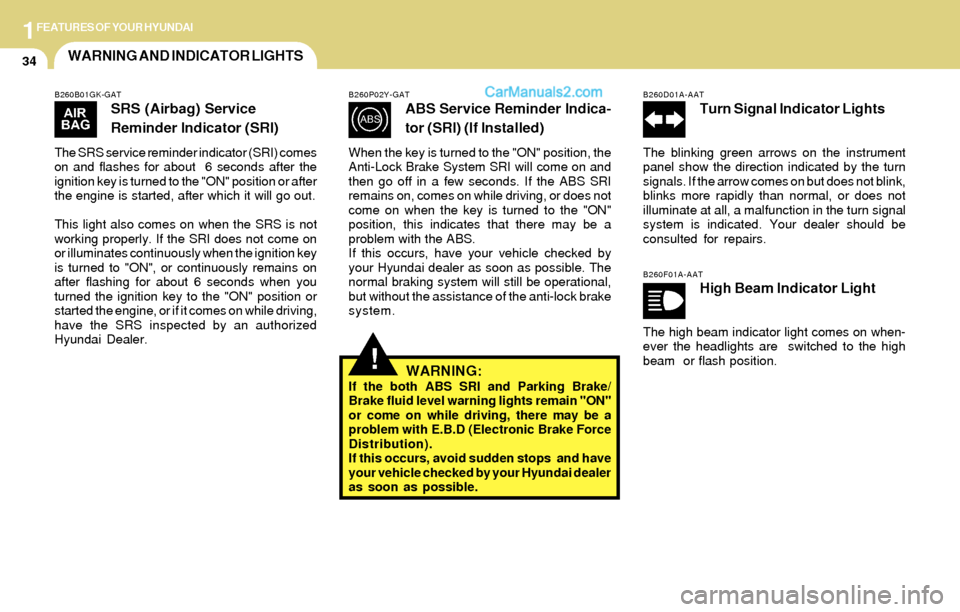
B260B01GK-GAT
SRS (Airbag) Service
Reminder Indicator (SRI)
The SRS service reminder indicator (SRI) comes
on and flashes for about 6 seconds after the
ignition key is turned to the "ON" position or after
the engine is started, after which it will go out.
This light also comes on when the SRS is not
working properly. If the SRI does not come on
or illuminates continuously when the ignition key
is turned to "ON", or continuously remains on
after flashing for about 6 seconds when you
turned the ignition key to the "ON" position or
started the engine, or if it comes on while driving,
have the SRS inspected by an authorized
Hyundai Dealer.
B260P02Y-GAT
ABS Service Reminder Indica-
tor (SRI) (If Installed)
When the key is turned to the "ON" position, the
Anti-Lock Brake System SRI will come on and
then go off in a few seconds. If the ABS SRI
remains on, comes on while driving, or does not
come on when the key is turned to the "ON"
position, this indicates that there may be a
problem with the ABS.
If this occurs, have your vehicle checked by
your Hyundai dealer as soon as possible. The
normal braking system will still be operational,
but without the assistance of the anti-lock brake
system.
WARNING:If the both ABS SRI and Parking Brake/
Brake fluid level warning lights remain "ON"
or come on while driving, there may be a
problem with E.B.D (Electronic Brake Force
Distribution).
If this occurs, avoid sudden stops and have
your vehicle checked by your Hyundai dealer
as soon as possible.
B260D01A-AAT
Turn Signal Indicator Lights
The blinking green arrows on the instrument
panel show the direction indicated by the turn
signals. If the arrow comes on but does not blink,
blinks more rapidly than normal, or does not
illuminate at all, a malfunction in the turn signal
system is indicated. Your dealer should be
consulted for repairs.
B260F01A-AATHigh Beam Indicator Light
The high beam indicator light comes on when-
ever the headlights are switched to the high
beam or flash position.
Page 54 of 224
1FEATURES OF YOUR HYUNDAI
41MULTI-FUNCTION LIGHT SWITCH
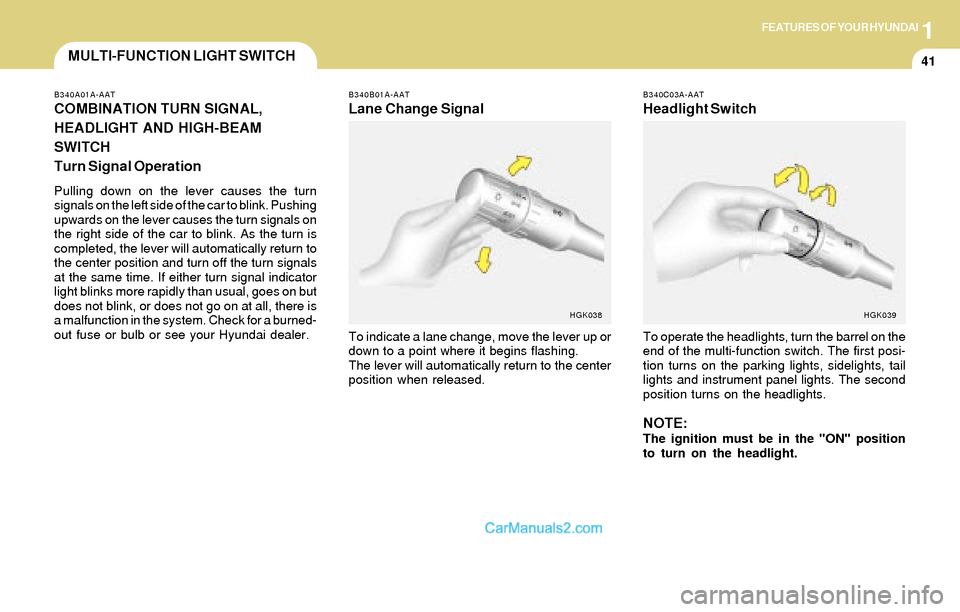
B340A01A-AAT
COMBINATION TURN SIGNAL,
HEADLIGHT AND HIGH-BEAM
SWITCH
Turn Signal Operation
Pulling down on the lever causes the turn
signals on the left side of the car to blink. Pushing
upwards on the lever causes the turn signals on
the right side of the car to blink. As the turn is
completed, the lever will automatically return to
the center position and turn off the turn signals
at the same time. If either turn signal indicator
light blinks more rapidly than usual, goes on but
does not blink, or does not go on at all, there is
a malfunction in the system. Check for a burned-
out fuse or bulb or see your Hyundai dealer.
B340B01A-AAT
Lane Change Signal
To indicate a lane change, move the lever up or
down to a point where it begins flashing.
The lever will automatically return to the center
position when released.
HGK038B340C03A-AAT
Headlight Switch
To operate the headlights, turn the barrel on the
end of the multi-function switch. The first posi-
tion turns on the parking lights, sidelights, tail
lights and instrument panel lights. The second
position turns on the headlights.
NOTE:The ignition must be in the "ON" position
to turn on the headlight.
HGK039
Page 55 of 224
1FEATURES OF YOUR HYUNDAI
42
Parking light auto cut
If you do not turn the parking lights "OFF" after
driving, the parking lights will automatically shut
"OFF" when the driver's door is opened.
To turn them "ON" again you must simply turn
the ignition key to the "ON" position.
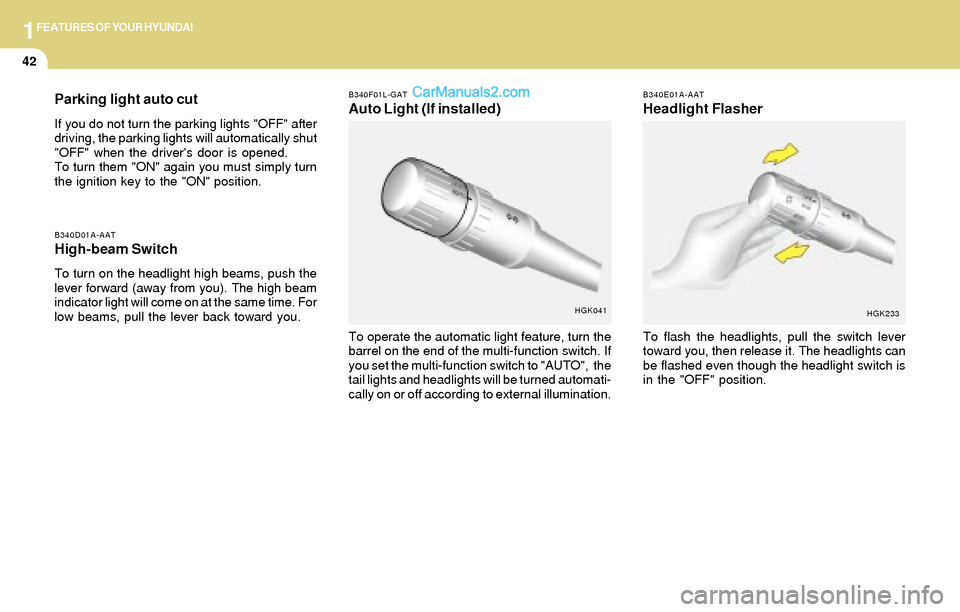
B340D01A-AATHigh-beam Switch
To turn on the headlight high beams, push the
lever forward (away from you). The high beam
indicator light will come on at the same time. For
low beams, pull the lever back toward you.
B340F01L-GAT
Auto Light (If installed)
To operate the automatic light feature, turn the
barrel on the end of the multi-function switch. If
you set the multi-function switch to "AUTO", the
tail lights and headlights will be turned automati-
cally on or off according to external illumination.
HGK041B340E01A-AAT
Headlight Flasher
To flash the headlights, pull the switch lever
toward you, then release it. The headlights can
be flashed even though the headlight switch is
in the "OFF" position.
HGK233
Page 65 of 224
1FEATURES OF YOUR HYUNDAI
52PARKING BRAKE
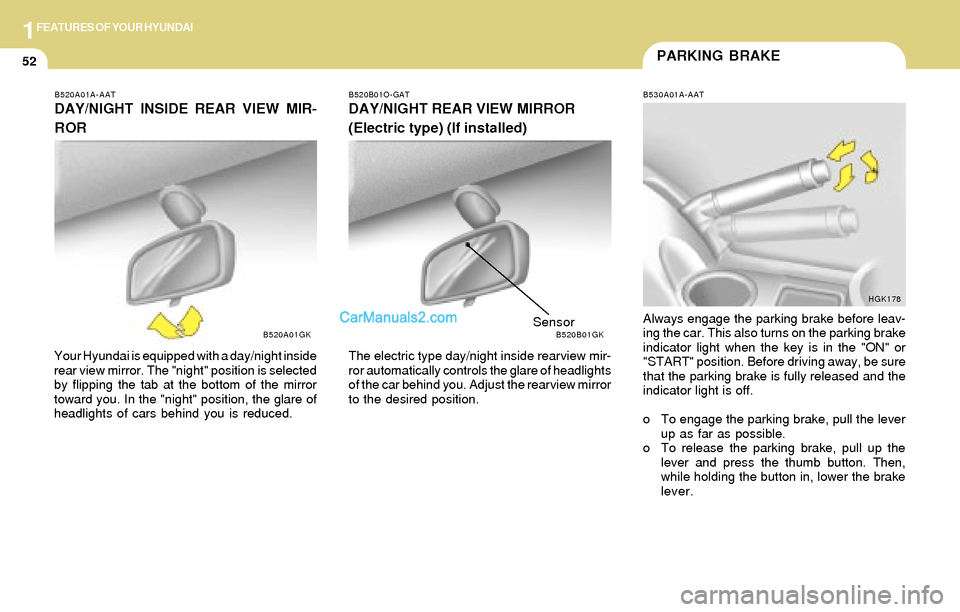
B530A01A-AAT
Always engage the parking brake before leav-
ing the car. This also turns on the parking brake
indicator light when the key is in the "ON" or
"START" position. Before driving away, be sure
that the parking brake is fully released and the
indicator light is off.
o To engage the parking brake, pull the lever
up as far as possible.
o To release the parking brake, pull up the
lever and press the thumb button. Then,
while holding the button in, lower the brake
lever.
HGK178
B520A01A-AAT
DAY/NIGHT INSIDE REAR VIEW MIR-
ROR
Your Hyundai is equipped with a day/night inside
rear view mirror. The "night" position is selected
by flipping the tab at the bottom of the mirror
toward you. In the "night" position, the glare of
headlights of cars behind you is reduced.
B520A01GKB520B01O-GAT
DAY/NIGHT REAR VIEW MIRROR
(Electric type) (If installed)
The electric type day/night inside rearview mir-
ror automatically controls the glare of headlights
of the car behind you. Adjust the rearview mirror
to the desired position.
B520B01GKSensor
Page 66 of 224
1FEATURES OF YOUR HYUNDAI
53FRONT FOG LIGHT SWITCHFRONT DOOR EDGE WARNING
LIGHT
B620A01S-AAT
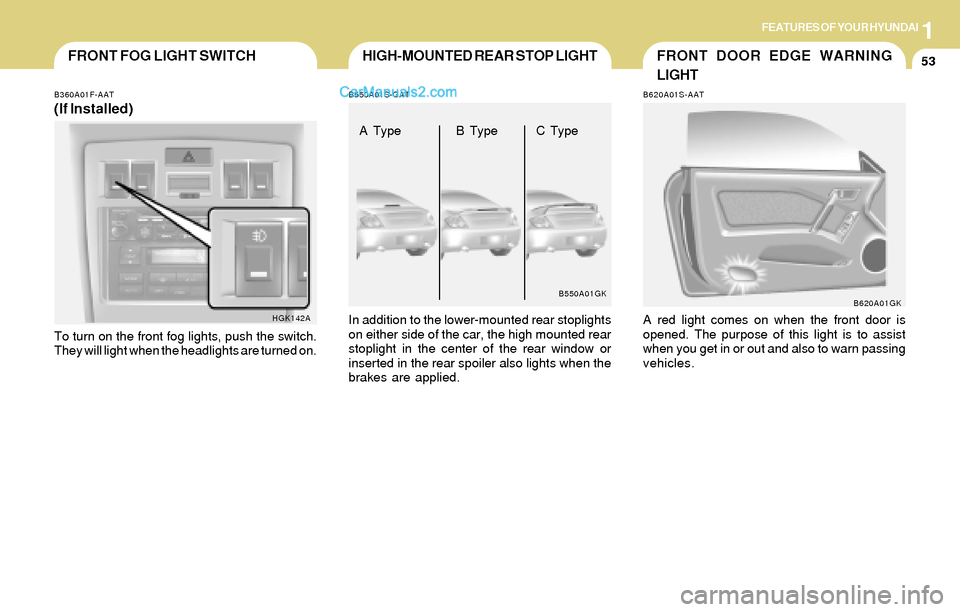
A red light comes on when the front door is
opened. The purpose of this light is to assist
when you get in or out and also to warn passing
vehicles.
B620A01GK
HIGH-MOUNTED REAR STOP LIGHT
B360A01F-AAT
(If Installed)
To turn on the front fog lights, push the switch.
They will light when the headlights are turned on.
HGK142AB550A01S-GATIn addition to the lower-mounted rear stoplights
on either side of the car, the high mounted rear
stoplight in the center of the rear window or
inserted in the rear spoiler also lights when the
brakes are applied.
B550A01GK
A Type B Type C Type
Page 135 of 224
2DRIVING YOUR HYUNDAI
18TRAILER OR VEHICLE TOWING
C170A01A-AAT
HIGHER SPEED MOTORING
Pre-Trip Inspections
1. Tires:
Adjust the tire inflation pressures to specifica-
tion. Low tire inflation pressures will result in
overheating and possible failure of the tires.
Avoid using worn or damaged tires which may
result in reduced traction or tire failure.
NOTE:Never exceed the maximum tire inflation
pressure shown on the tires.
2. Fuel, engine coolant and engine oil: High
speed travel consumes more fuel than urban
motoring. Do not forget to check both engine
coolant and engine oil.
3. Drive belt:
A loose or damaged drive belt may result in
overheating of the engine.
C180A01A-AATUSE OF LIGHTS
Check your lights regularly for correct opera-
tion and always keep them clean. When driving
during the day in conditions of poor visibility, it
is helpful to drive with headlights on low beam.
This enables you to be seen as well as to see.
C190A02S-AAT
If you are considering towing with your car, you
should first check with your State's Department
of Motor Vehicles to determine their legal re-
quirements.
Since laws vary from State to State, the require-
ments for towing trailers, cars, other types of
vehicles, or apparatus may differ. Ask your
Hyundai dealer for further details before towing.
CAUTION:Do not do any towing with your car during
its first 1,200 miles (2,000 km) in order to
allow the engine to properly break in. Fail-
ure to heed this caution may result in seri-
ous engine or transaxle damage.
!
C190B01S-AAT
Trailer Hitches
Select the proper hitch and ball combination,
making sure that its location is compatible with
that of the trailer or vehicle being towed. Use a
quality non-equalizing hitch which distributes
the tongue load uniformly throughout the chas-
sis.
The hitch should be bolted securely to the car
and installed by a qualified technician. DO NOT
USE A HITCH DESIGNED FOR TEMPORARY
INSTALLATION AND NEVER USE ONE THAT
ATTACHES ONLY TO THE BUMPER.
Page 191 of 224
6DO-IT-YOURSELF MAINTENANCE
25HEADLIGHT AIMING ADJUSTMENT
G290A03GK G290A02GK-AAT
Before performing aiming adjustment, make
sure of the following.
1. Keep all tires inflated to the correct pressure.
2. Place the vehicle on level ground and press
the front bumper & rear bumper down sev-
eral times. Place vehicle at a distance of 118
in. (3m) from the test wall.
3. See that the vehicle is unloaded (except for
full levels of coolant, engine oil and fuel, and
spare tire, jack, and tools).
4. Clean the head light lenses and turn on the
headlights (low beam).
5. Open the hood.
!
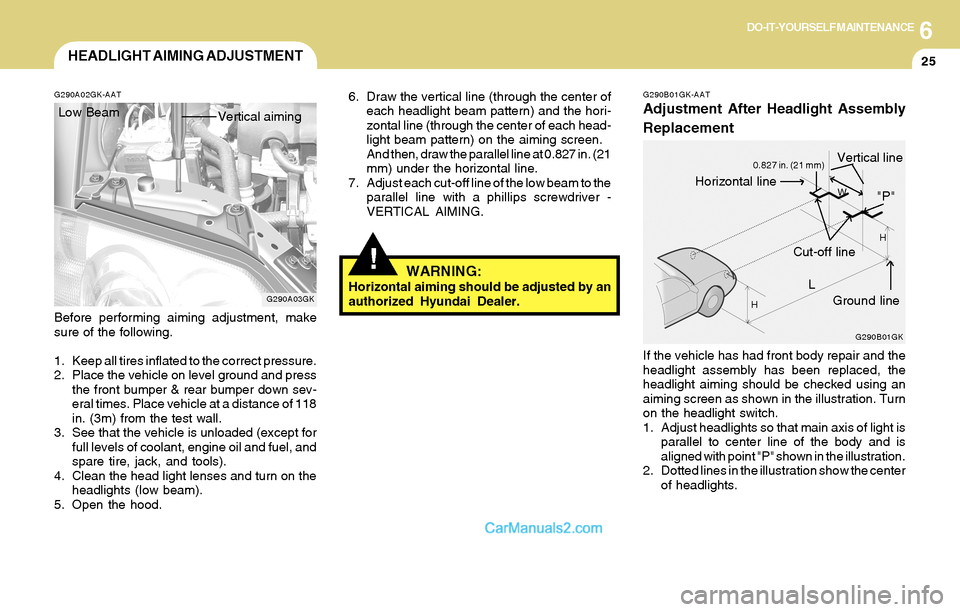
6. Draw the vertical line (through the center of
each headlight beam pattern) and the hori-
zontal line (through the center of each head-
light beam pattern) on the aiming screen.
And then, draw the parallel line at 0.827 in. (21
mm) under the horizontal line.
7. Adjust each cut-off line of the low beam to the
parallel line with a phillips screwdriver -
VERTICAL AIMING.
WARNING:Horizontal aiming should be adjusted by an
authorized Hyundai Dealer. Low Beam
Vertical aiming
G290B01GK-AAT
Adjustment After Headlight Assembly
Replacement
If the vehicle has had front body repair and the
headlight assembly has been replaced, the
headlight aiming should be checked using an
aiming screen as shown in the illustration. Turn
on the headlight switch.
1. Adjust headlights so that main axis of light is
parallel to center line of the body and is
aligned with point "P" shown in the illustration.
2. Dotted lines in the illustration show the center
of headlights.
G290B01GK
L
W
H
H
Cut-off line
Ground line
"P"Horizontal line
Vertical line0.827 in. (21 mm)
Page 192 of 224
6DO-IT-YOURSELF MAINTENANCE
26
SPECIFICATION:"H"
Horizontal center line of headlights from ground:
Low Beam: 26.7 in. (679mm)
High Beam: 26.5 in. (672mm)
"W"
Distance between each headlight center :
Low Beam: 47.3 in. (1,202mm)
High Beam: 38.0 in. (966mm)
"L"
Distance between the headlights and the wall
that the lights are tested against : 118 in. (3,000
mm)
REPLACEMENT OF LIGHT BULBS
!
G260A02A-AAT
Before attempting to replace a light bulb, be sure
the switch is turned to the "OFF" position.
The next paragraph shows how to reach the
light bulbs so they may be changed. Be sure to
replace the burned-out bulb with one of the
same number and wattage rating.
See page 6-35 for the wattage description.
CAUTION:Keep the lamps out of contact with petro-
leum products, such as oil, gasoline, etc.
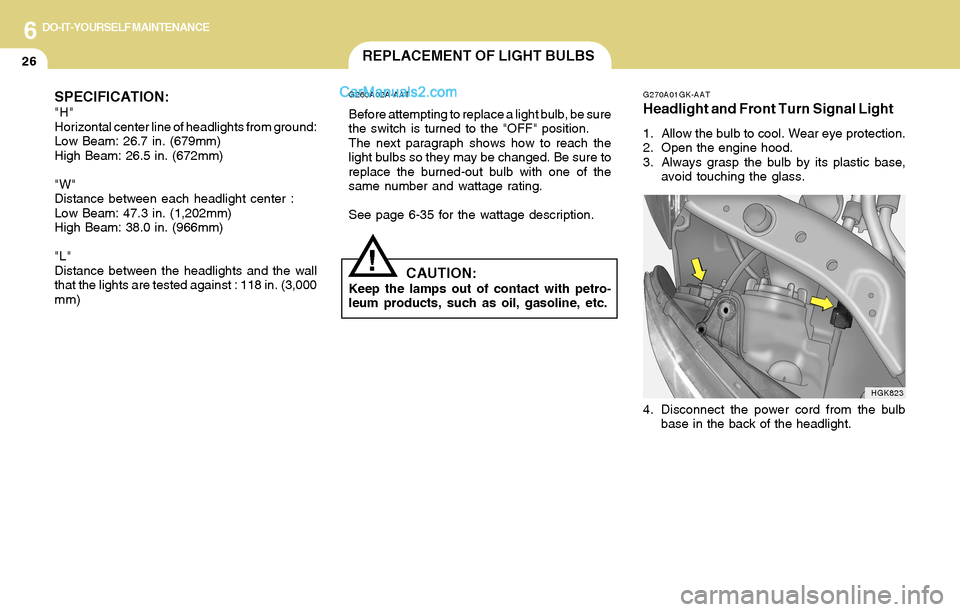
G270A01GK-AAT
Headlight and Front Turn Signal Light
1. Allow the bulb to cool. Wear eye protection.
2. Open the engine hood.
3. Always grasp the bulb by its plastic base,
avoid touching the glass.
4. Disconnect the power cord from the bulb
base in the back of the headlight.
HGK823