boot Hyundai Tiburon 2008 Owner's Manual
[x] Cancel search | Manufacturer: HYUNDAI, Model Year: 2008, Model line: Tiburon, Model: Hyundai Tiburon 2008Pages: 268, PDF Size: 9.93 MB
Page 142 of 268

2
DRIVING YOUR HYUNDAI
3
BEFORE STARTING THE ENGINEC020A02A-AATBefore you start the engine, you should always:
1. Look around the vehicle to be sure there are
no flat tires, puddles of oil, water or other
indications of possible trouble.
2. After entering the car, check to be sure the
parking brake is engaged.
3. Check that all windows, and lights are clean.
4. Check that the interior and exterior mirrors
are clean and in position.
5. Check your seat, seatback and headrest to
be sure they are in their proper positions.
6. Close all the doors.
7. Fasten your seat belt and be sure that all
other occupants have fastened theirs.
8. Turn off all lights and accessories that are
not needed.
9. When you turn the ignition switch to "ON",
check that all appropriate warning lights are
operating and that you have sufficient fuel.
10.Check the operation of warning lights and all
bulbs when key is in the "ON" position.
TO START THE ENGINEC030A01A-AATCombination Ignition Switcho If your Hyundai is equipped with a manual
transaxle, place the shift lever in neutral and
depress the clutch pedal fully.
o If your Hyundai has an automatic transaxle,
place the shift lever in "P" (park).
o To start the engine, insert the ignition key and
turn it to the "START" position. Release it as
soon as the engine starts. Do not hold the
key in the "START" position for more than 15
seconds.NOTE:o For safety, the engine will not start if the
clutch pedal is not depressed fully
(Manual transaxle) or the shift lever is
not in "P" or "N" Position (Automatic
transaxle).
o The ignition key cannot be turned from
"ACC" position to "LOCK" position un-
less the shift lever is in the "P" (Park)
position or the negative battery terminal
is disconnected from the battery. To
remove the key, always confirm that the
shift lever is securely positioned in "P"
(Park) (For Automatic transaxle)
!
WARNING:
o All passengers must be properly belted
whenever the vehicle is moving. Refer to
pages: 1-16 through 1-20 for more infor-
mation on their proper use.
o Always check the surrounding areas near
your vehicle for people, especially chil-
dren, before putting a car into 'drive.'
o Always wear appropriate shoes when
operating your vehicle.
Unsuitable shoes (high heels, ski boots,
etc.) may interfere with your ability to
use the brake and accelerator pedal, and
the clutch (if installed).
Page 189 of 268

4
CORROSION PREVENTION AND APPEARANCE CARE
5
CLEANING THE INTERIORE040A01A-AATTo Clean the Vinyl UpholsteryTo clean the vinyl upholstery, first remove loose
dirt and dust with a vacuum cleaner. Then apply
a solution of mild soap or detergent and water
using a clean sponge or soft cloth. Allow this to
stay on the surface to loosen the dirt, then wipe
with a clean damp sponge or cloth. If all the dirt
stains are not removed, repeat this procedure
until the upholstery is clean. Do not use gaso-
line, solvent, paint thinner or other strong clean-
ers.
E030E01A-AATMaintaining BumpersSpecial precautions must be observed to pre-
serve the appearance of the bumpers on your
Hyundai. They are:
o Be careful not to spill battery electrolyte or
hydraulic brake fluid on the bumpers. If you
do, wash it off immediately with clear water.
o Be gentle when cleaning the bumper sur-
faces. They are made of soft plastic and the
surface can be damaged if mistreated. Do
not use abrasive cleaners. Use warm water
and mild soap or car-washing solution.
o Do not expose the bumpers to high tem-
peratures. For example, if you have your car
repainted, do not leave the bumpers on the
car if the car is going to be placed in a high-
temperature paint booth.
E030D01A-AATWhen to Wax AgainYou should polish and wax the car again when
water no longer beads on a clean surface but
spreads out over a larger area.E030C01A-AATPolishing and WaxingAlways wash and dry the car before polishing
or waxing or using a combination cleaner and
wax. Use a good quality commercial product
and follow the manufacturer’s directions on the
container. Polish and wax the bright trim pieces
as well as the paint.E030B01A-AATSpot CleaningDon’t use gasoline, strong solvents or corro-
sive cleaning agents. These can damage the
finish of the car. To remove road tar, use
turpentine on a clean, soft cloth or commercially
available bug and tar remover. Be gentle.
To remove dead insects or tree sap, use warm
water and mild soap or car-washing solution.
Soak the spot and rub gently. If the paint has lost
its luster, use a commercial car-cleaning polish.
Page 195 of 268

5
VEHICLE MAINTENANCE REQUIREMENTS
5
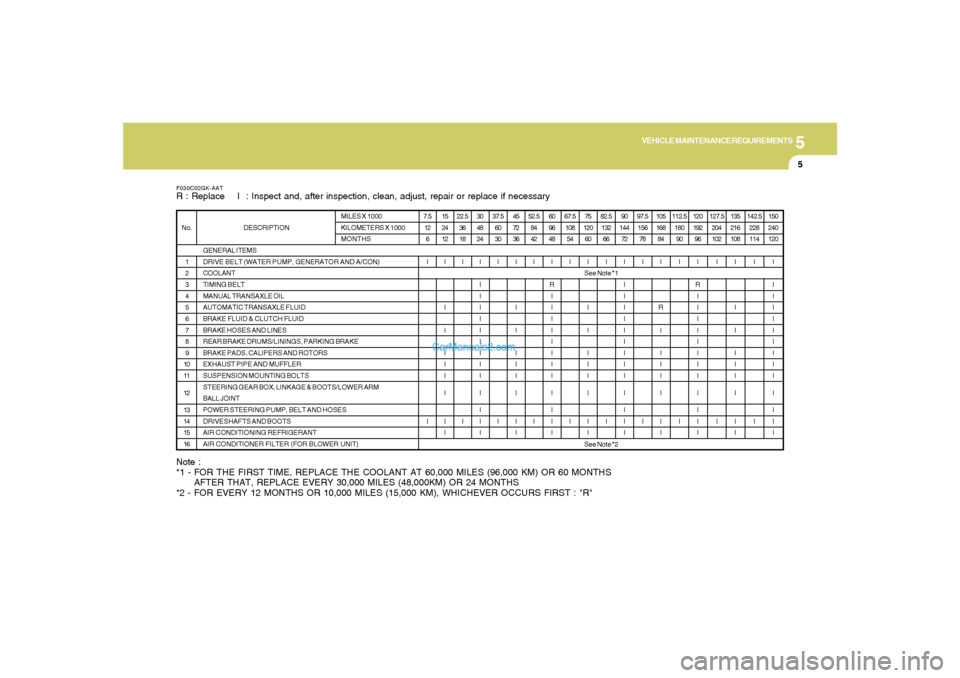
Note :
*1 - FOR THE FIRST TIME, REPLACE THE COOLANT AT 60,000 MILES (96,000 KM) OR 60 MONTHS
AFTER THAT, REPLACE EVERY 30,000 MILES (48,000KM) OR 24 MONTHS
*2 - FOR EVERY 12 MONTHS OR 10,000 MILES (15,000 KM), WHICHEVER OCCURS FIRST : "R"
F030C02GK-AATR : Replace I : Inspect and, after inspection, clean, adjust, repair or replace if necessaryNo.
1
2
3
4
5
6
7
8
9
10
11
12
13
14
15
16DESCRIPTION
GENERAL ITEMS
DRIVE BELT (WATER PUMP, GENERATOR AND A/CON)
COOLANT
TIMING BELT
MANUAL TRANSAXLE OIL
AUTOMATIC TRANSAXLE FLUID
BRAKE FLUID & CLUTCH FLUID
BRAKE HOSES AND LINES
REAR BRAKE DRUMS/LININGS, PARKING BRAKE
BRAKE PADS, CALIPERS AND ROTORS
EXHAUST PIPE AND MUFFLER
SUSPENSION MOUNTING BOLTS
STEERING GEAR BOX, LINKAGE & BOOTS/LOWER ARM
BALL JOINT
POWER STEERING PUMP, BELT AND HOSES
DRIVESHAFTS AND BOOTS
AIR CONDITIONING REFRIGERANT
AIR CONDITIONER FILTER (FOR BLOWER UNIT)MILES X 1000
KILOMETERS X 1000
MONTHS7.5
12
6
I
I15
24
12
I
I
I
I
I
I
I
I
I22.5
36
18
I
I30
48
24
I
I
I
I
I
I
I
I
I
I
I
I
I
I37.5
60
30
I
I45
72
36
I
I
I
I
I
I
I
I
I52.5
84
42
I
I60
96
48
I
R
I
I
I
I
I
I
I
I
I
I
I
I67.5
108
54
I
I
75
120
60
I
I
I
I
I
I
I
I
I82.5
132
66
I
I90
144
72
I
I
I
I
I
I
I
I
I
I
I
I
I
I97.5
156
78
I
I105
168
84
I
R
I
I
I
I
I
I
I112.5
180
90
I
I120
192
96
I
R
I
I
I
I
I
I
I
I
I
I
I
I127.5
204
102
I
I135
216
108
I
I
I
I
I
I
I
I
I142.5
228
114
I
I150
240
120
I
I
I
I
I
I
I
I
I
I
I
I
I
ISee Note *2See Note *1
Page 196 of 268

5
VEHICLE MAINTENANCE REQUIREMENTS6
MAINTENANCE UNDER SEVERE USAGE CONDITIONSF040A04GK-AATThe following items must be serviced more frequently on cars normally used under severe driving conditions. Refer to the chart below for the appropriate
maintenance intervals.
R : Replace I : Inspect and, after inspection, clean, adjust, repair or replace if necessaryENGINE OIL AND FILTER
TIMING BELT
AIR CLEANER FILTER
SPARK PLUGS
BRAKE PADS, CALIPERS AND ROTORS
REAR BRAKE DRUMS/LININGS/PADS,
PARKING BRAKE
STEERING GEAR BOX, LINKAGE & BOOTS/
LOWER ARM BALL JOINT
DRIVESHAFTS AND BOOTS
MANUAL TRANSAXLE OIL
AUTOMATIC TRANSAXLE FLUID
AIR CONDITIONER FILTER (FOR BLOWER UNIT)
MAINTENANCE ITEM
R
R
R
R
I
I
I
I
R
R
R
EVERY 3,000 MILES (4,800 KM) OR 3 MONTHS
EVERY 40,000 MILES (64,000 KM) OR 48 MONTHS
MORE FREQUENTLY
MORE FREQUENTLY
MORE FREQUENTLY
MORE FREQUENTLY
MORE FREQUENTLY
EVERY 7,500 MILES (12,000 KM) OR 6 MONTHS
EVERY 60,000 MILES (96,000 KM)
EVERY 30,000 MILES (48,000 KM)
MORE FREQUENTLY
DRIVING
CONDITION MAINTENANCE
INTERVALS MAINTENANCE
OPERATION
A, B, C, D, E, F, G, H, I, K
B, C, D, E, F, G
C, E
B, H
C, D, G, H
C, D, G, H
C, D, E, F, G
C, D, E, F, G
A, C, D, E, F, G, H, I, J
A, C, E, F, G, H, I
C, E
SEVERE DRIVING CONDITIONSA - Repeatly driving short distance of less than 5miles(8km) in normal tempera
ture or less than 10miles(16km) in freezing temperature
B - Extensive engine idling or low speed driving for long distances
C - Driving on rough, dusty, muddy, unpaved, graveled or salt-spread roads
D - Driving in areas using salt or other corrosive materials or in very cold
weatherE - Driving in sandy areas
F - Driving in heavy traffic area over 90°F(32°C)
G - Driving on uphill, downhill, or mountain road
H - Towing a Trailer, or using a camper, or roof rack
I - Driving as a patrol car, taxi, other commercial use or vehicle towing
J - Driving over 100 MPH(170 Km/h)
K - Frequently driving in stop-and-go conditions
Page 199 of 268

5
VEHICLE MAINTENANCE REQUIREMENTS
9
F070J01A-AATo Brake Pads, Calipers and RotorsCheck the pads for excessive wear, discs for
run out and wear, and calipers for fluid leakage.F070K01A-AATo Exhaust Pipe and MufflerVisually inspect the exhaust pipes, muffler and
hangers for cracks, deterioration, or damage.
Start the engine and listen carefully for any
exhaust gas leakage. Tighten connections or
replace parts as necessary.F070L01A-AATo Suspension Mounting BoltsCheck the suspension connections for loose-
ness or damage. Retighten to the specified
torque.
F070M01A-AATo Steering gear box, linkage &
boots/lower arm ball jointWith the vehicle stopped and engine off, check
for excessive free-play in the steering wheel.
Check the linkage for bends or damage. Check
the dust boots and ball joints for deterioration,
cracks, or damage. Replace any damaged
parts.F070N01A-AATo Power Steering Pump, Belt and HosesCheck the power steering pump and hoses for
leakage and damage. Replace any damaged or
leaking parts immediately. Inspect the power
steering belt for evidence of cuts, cracks, ex-
cessive wear, oiliness and proper tension.
Replace or adjust it if necessary.F070P01A-AATo Drive Shafts and BootsCheck the drive shafts, boots and clamps for
cracks, deterioration, or damage. Replace any
damaged parts and, if necessary, repack the
grease.
F070Q01A-AATo Air Conditioning RefrigerantCheck the air conditioning lines and connec-
tions for leakage and damage. Check air con-
ditioning performance according to the relevant
shop manual if necessary.