battery HYUNDAI TUCSON 2007 Owners Manual
[x] Cancel search | Manufacturer: HYUNDAI, Model Year: 2007, Model line: TUCSON, Model: HYUNDAI TUCSON 2007Pages: 306, PDF Size: 11.82 MB
Page 20 of 306
1FEATURES OF YOUR HYUNDAI8
B070B01JM
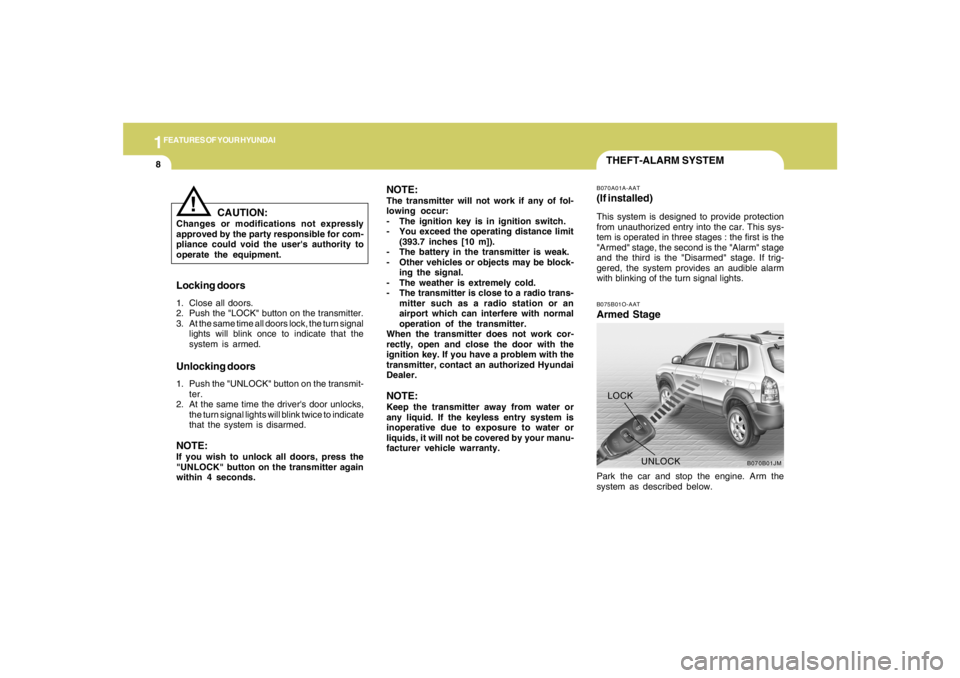
UNLOCK LOCK
THEFT-ALARM SYSTEMB075B01O-AATArmed StagePark the car and stop the engine. Arm the
system as described below.B070A01A-AAT(If installed)This system is designed to provide protection
from unauthorized entry into the car. This sys-
tem is operated in three stages : the first is the
"Armed" stage, the second is the "Alarm" stage
and the third is the "Disarmed" stage. If trig-
gered, the system provides an audible alarm
with blinking of the turn signal lights.
Locking doors1. Close all doors.
2. Push the "LOCK" button on the transmitter.
3. At the same time all doors lock, the turn signal
lights will blink once to indicate that the
system is armed.Unlocking doors1. Push the "UNLOCK" button on the transmit-
ter.
2. At the same time the driver's door unlocks,
the turn signal lights will blink twice to indicate
that the system is disarmed.NOTE:If you wish to unlock all doors, press the
"UNLOCK" button on the transmitter again
within 4 seconds.
CAUTION:
Changes or modifications not expressly
approved by the party responsible for com-
pliance could void the user's authority to
operate the equipment.
!
NOTE:The transmitter will not work if any of fol-
lowing occur:
- The ignition key is in ignition switch.
- You exceed the operating distance limit
(393.7 inches [10 m]).
- The battery in the transmitter is weak.
- Other vehicles or objects may be block-
ing the signal.
- The weather is extremely cold.
- The transmitter is close to a radio trans-
mitter such as a radio station or an
airport which can interfere with normal
operation of the transmitter.
When the transmitter does not work cor-
rectly, open and close the door with the
ignition key. If you have a problem with the
transmitter, contact an authorized Hyundai
Dealer.NOTE:Keep the transmitter away from water or
any liquid. If the keyless entry system is
inoperative due to exposure to water or
liquids, it will not be covered by your manu-
facturer vehicle warranty.
Page 22 of 306
1FEATURES OF YOUR HYUNDAI10
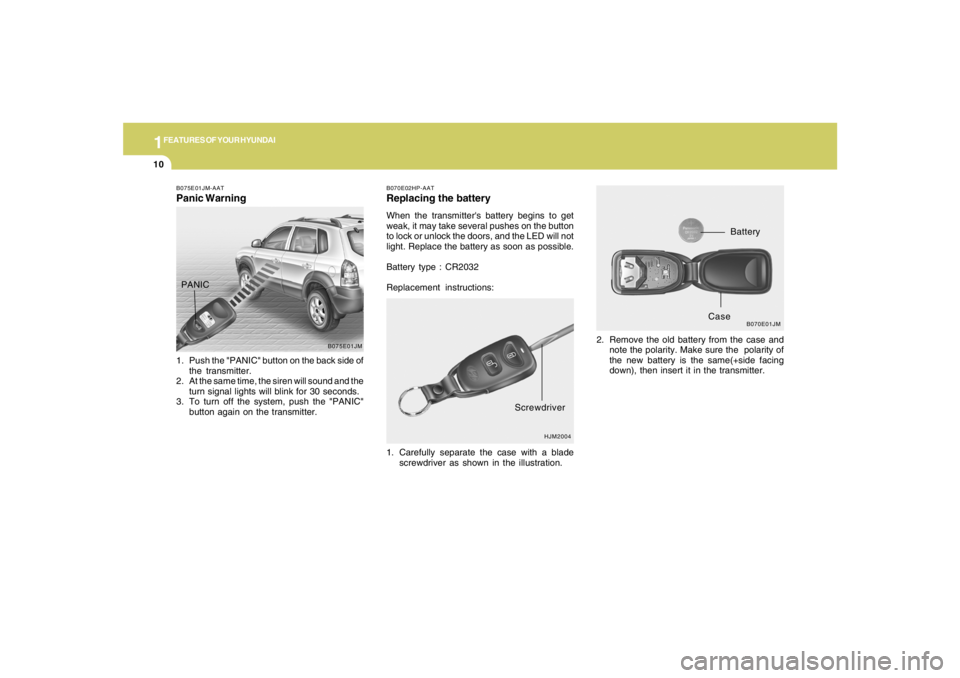
B070E02HP-AATReplacing the batteryWhen the transmitter's battery begins to get
weak, it may take several pushes on the button
to lock or unlock the doors, and the LED will not
light. Replace the battery as soon as possible.
Battery type : CR2032
Replacement instructions:
1. Carefully separate the case with a blade
screwdriver as shown in the illustration.2. Remove the old battery from the case and
note the polarity. Make sure the polarity of
the new battery is the same(+side facing
down), then insert it in the transmitter.
HJM2004
Screwdriver
B070E01JM
Battery
Case
B075E01JM-AATPanic Warning1. Push the "PANIC" button on the back side of
the transmitter.
2. At the same time, the siren will sound and the
turn signal lights will blink for 30 seconds.
3. To turn off the system, push the "PANIC"
button again on the transmitter.
B075E01JM
PANIC
Page 50 of 306
1FEATURES OF YOUR HYUNDAI38
!
WARNING:
o If an airbag deploys, there may be a loud
noise followed by a fine dust released in
the vehicle. These conditions are nor-
mal and are not hazardous - the airbags
are packed in this fine powder. The dust
generated during airbag deployment
may cause skin or eye irritation as well as
aggravate asthma for some persons.
Always wash all exposed skin areas thor-
oughly with lukewarm water and a mild
soap after an accident in which the
airbags were deployed.Passenger's Airbag
B240B05L
!
o The SRS can function only when the
ignition key is in the "ON" position. If the
SRS SRI does not illuminate or contin-
uously remains on after illuminating for
about 6 seconds when the ignition key
is turned to the "ON" position, or after
the engine is started, illuminates while
driving, the SRS is not working properly.
If this occurs, have your vehicle immedi-
ately inspected by your Hyundai dealer.
o Before you replace a fuse or disconnect
a battery terminal, turn the ignition key
to the "LOCK" position or remove the
ignition key. Never remove or replace the
air bag related fuse(s) when the ignition
key is in the "ON" position. Failure to
heed this warning will cause the SRS SRI
to illuminate.
WARNING:
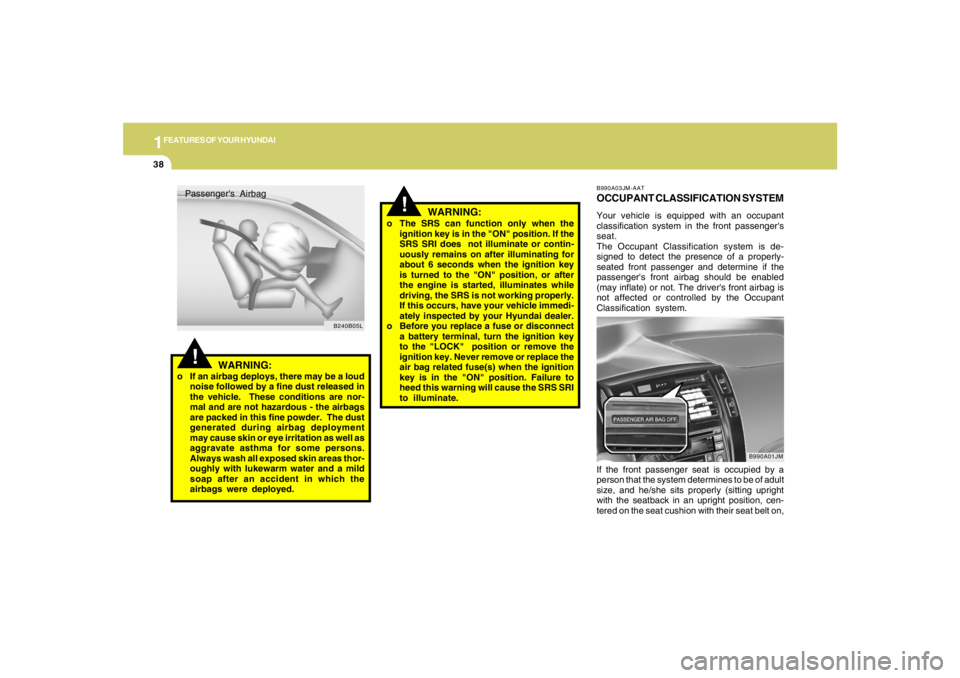
B990A03JM-AATOCCUPANT CLASSIFICATION SYSTEMYour vehicle is equipped with an occupant
classification system in the front passenger's
seat.
The Occupant Classification system is de-
signed to detect the presence of a properly-
seated front passenger and determine if the
passenger's front airbag should be enabled
(may inflate) or not. The driver's front airbag is
not affected or controlled by the Occupant
Classification system.
If the front passenger seat is occupied by a
person that the system determines to be of adult
size, and he/she sits properly (sitting upright
with the seatback in an upright position, cen-
tered on the seat cushion with their seat belt on,
B990A01JM
Page 68 of 306
1FEATURES OF YOUR HYUNDAI56
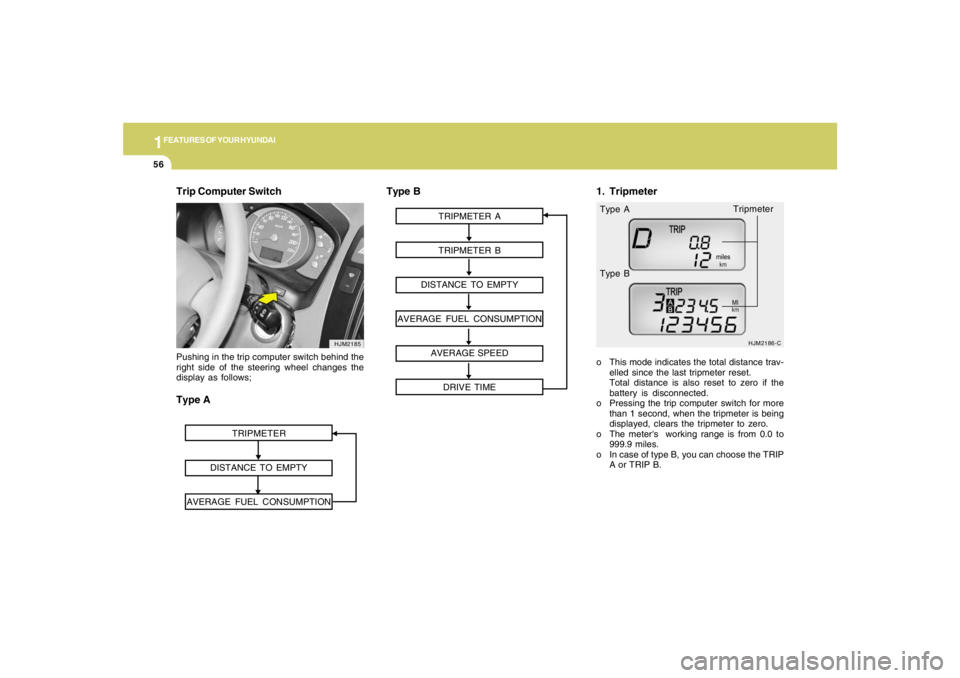
Trip Computer Switch
HJM2185
TRIPMETER
DISTANCE TO EMPTY
AVERAGE FUEL CONSUMPTION
Pushing in the trip computer switch behind the
right side of the steering wheel changes the
display as follows;Type A
TRIPMETER A
TRIPMETER B
DISTANCE TO EMPTY
AVERAGE FUEL CONSUMPTION
AVERAGE SPEED
DRIVE TIME
HJM2186-C
o This mode indicates the total distance trav-
elled since the last tripmeter reset.
Total distance is also reset to zero if the
battery is disconnected.
o Pressing the trip computer switch for more
than 1 second, when the tripmeter is being
displayed, clears the tripmeter to zero.
o The meter's working range is from 0.0 to
999.9 miles.
o In case of type B, you can choose the TRIP
A or TRIP B. Type A
Type B
Type B
1. Tripmeter
Tripmeter
Page 71 of 306
1
FEATURES OF YOUR HYUNDAI
59
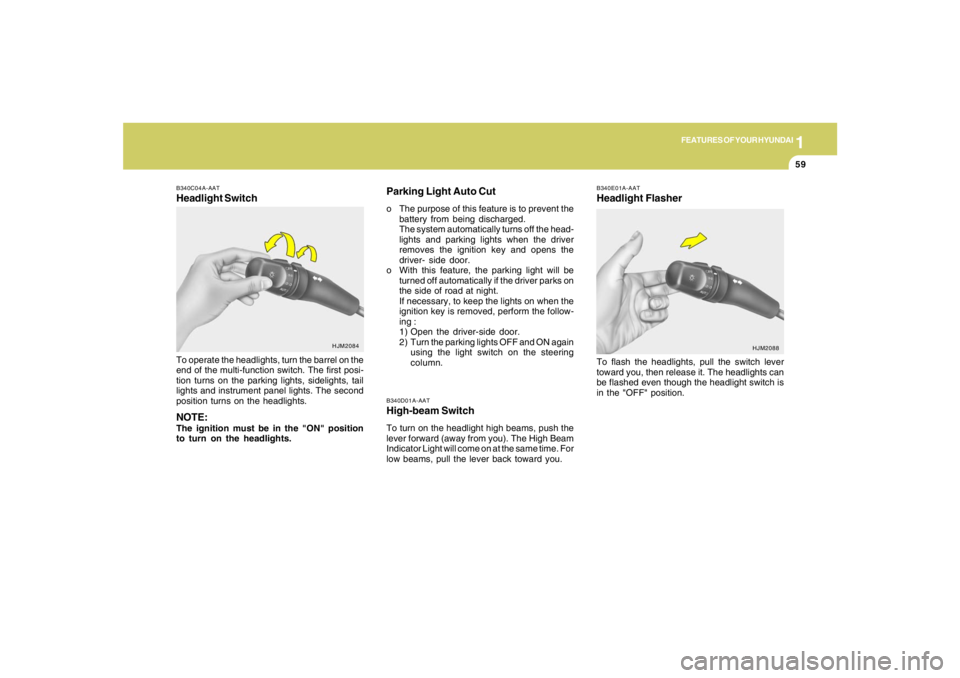
B340D01A-AATHigh-beam SwitchTo turn on the headlight high beams, push the
lever forward (away from you). The High Beam
Indicator Light will come on at the same time. For
low beams, pull the lever back toward you.
B340E01A-AATHeadlight FlasherTo flash the headlights, pull the switch lever
toward you, then release it. The headlights can
be flashed even though the headlight switch is
in the "OFF" position.
B340C04A-AATHeadlight SwitchTo operate the headlights, turn the barrel on the
end of the multi-function switch. The first posi-
tion turns on the parking lights, sidelights, tail
lights and instrument panel lights. The second
position turns on the headlights.NOTE:The ignition must be in the "ON" position
to turn on the headlights.
HJM2084
HJM2088
Parking Light Auto Cuto The purpose of this feature is to prevent the
battery from being discharged.
The system automatically turns off the head-
lights and parking lights when the driver
removes the ignition key and opens the
driver- side door.
o With this feature, the parking light will be
turned off automatically if the driver parks on
the side of road at night.
If necessary, to keep the lights on when the
ignition key is removed, perform the follow-
ing :
1) Open the driver-side door.
2) Turn the parking lights OFF and ON again
using the light switch on the steering
column.
Page 77 of 306
1
FEATURES OF YOUR HYUNDAI
65
!
CAUTION:
o Use when the engine is running and
remove a plug from the power outlet
after using the electric appliance. Using
when the engine stops or remaining the
electric appliance with plugged in for
many hours may cause the battery to be
discharged.
o Do not use the power outlet to connect
electric accessories or equipment other
than those designed to operate on 12
volts.
o Some electronic devices can cause elec-
tronic interference when plugged into
the power outlet. These devices may
cause excessive audio noise and mal-
functions in other electronic systems or
devices used in your vehicle.
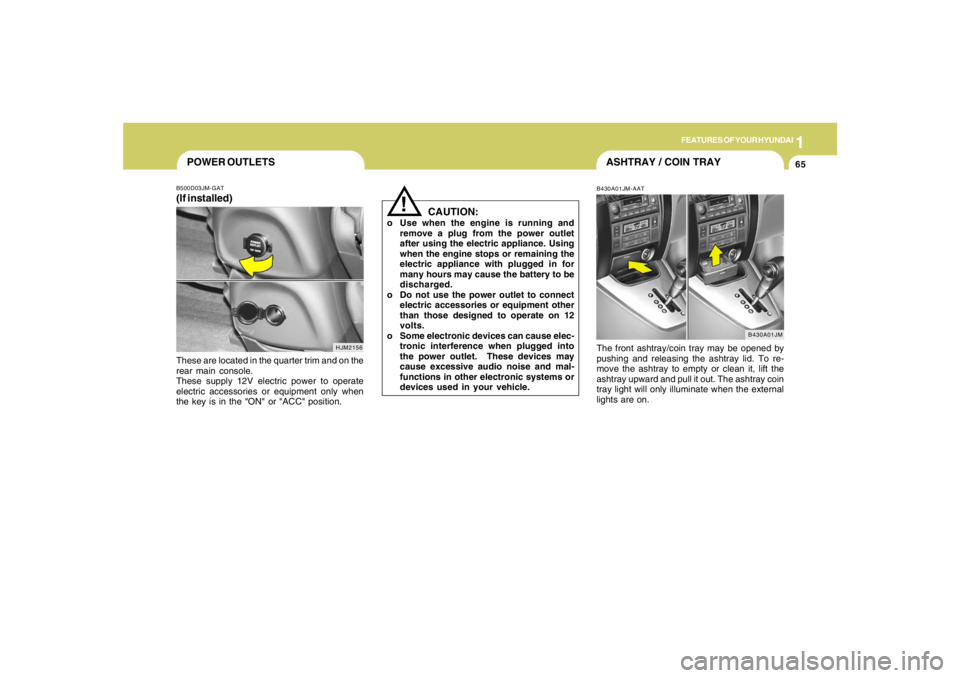
POWER OUTLETSB500D03JM-GAT(If installed)These are located in the quarter trim and on the
rear main console.
These supply 12V electric power to operate
electric accessories or equipment only when
the key is in the "ON" or "ACC" position.
HJM2156
ASHTRAY / COIN TRAYB430A01JM-AATThe front ashtray/coin tray may be opened by
pushing and releasing the ashtray lid. To re-
move the ashtray to empty or clean it, lift the
ashtray upward and pull it out. The ashtray coin
tray light will only illuminate when the external
lights are on.
B430A01JM
Page 81 of 306
1
FEATURES OF YOUR HYUNDAI
69
HJM2028
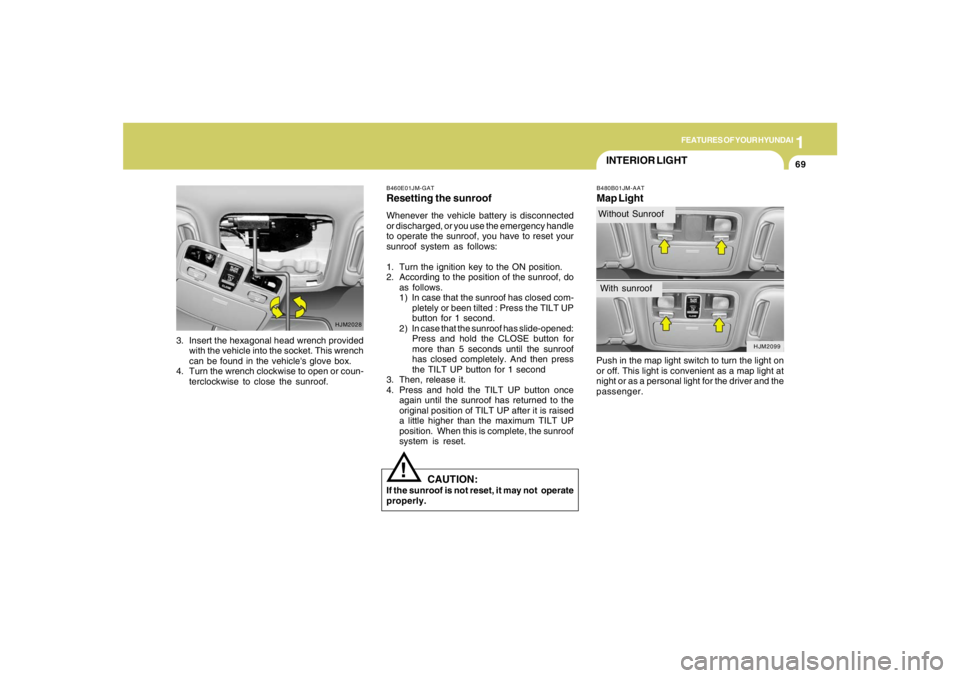
3. Insert the hexagonal head wrench provided
with the vehicle into the socket. This wrench
can be found in the vehicle's glove box.
4. Turn the wrench clockwise to open or coun-
terclockwise to close the sunroof.
INTERIOR LIGHTB480B01JM-AATMap LightPush in the map light switch to turn the light on
or off. This light is convenient as a map light at
night or as a personal light for the driver and the
passenger.
B460E01JM-GATResetting the sunroofWhenever the vehicle battery is disconnected
or discharged, or you use the emergency handle
to operate the sunroof, you have to reset your
sunroof system as follows:
1. Turn the ignition key to the ON position.
2. According to the position of the sunroof, do
as follows.
1) In case that the sunroof has closed com-
pletely or been tilted : Press the TILT UP
button for 1 second.
2) In case that the sunroof has slide-opened:
Press and hold the CLOSE button for
more than 5 seconds until the sunroof
has closed completely. And then press
the TILT UP button for 1 second
3. Then, release it.
4. Press and hold the TILT UP button once
again until the sunroof has returned to the
original position of TILT UP after it is raised
a little higher than the maximum TILT UP
position. When this is complete, the sunroof
system is reset.
CAUTION:
If the sunroof is not reset, it may not operate
properly.
!
HJM2099
Without SunroofWith sunroof
Page 111 of 306
1
FEATURES OF YOUR HYUNDAI
9999999999
Photo sensor
HJM2086
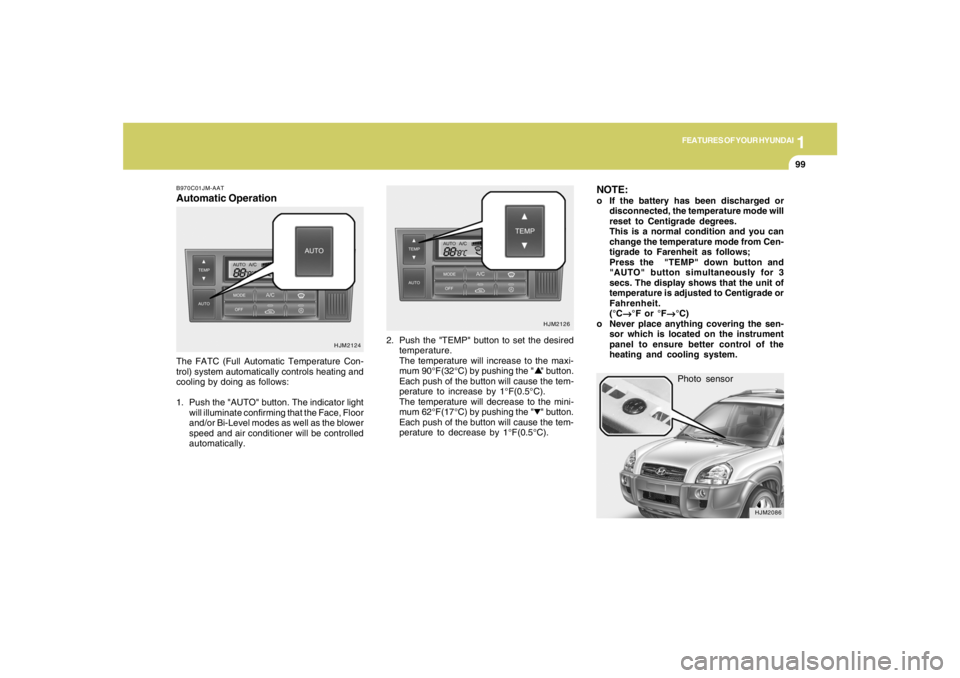
NOTE:o If the battery has been discharged or
disconnected, the temperature mode will
reset to Centigrade degrees.
This is a normal condition and you can
change the temperature mode from Cen-
tigrade to Farenheit as follows;
Press the "TEMP" down button and
"AUTO" button simultaneously for 3
secs. The display shows that the unit of
temperature is adjusted to Centigrade or
Fahrenheit.
(°C
→ →→ →
→°F or °F
→ →→ →
→°C)
o Never place anything covering the sen-
sor which is located on the instrument
panel to ensure better control of the
heating and cooling system.
B970C01JM-AATAutomatic OperationThe FATC (Full Automatic Temperature Con-
trol) system automatically controls heating and
cooling by doing as follows:
1. Push the "AUTO" button. The indicator light
will illuminate confirming that the Face, Floor
and/or Bi-Level modes as well as the blower
speed and air conditioner will be controlled
automatically.2. Push the "TEMP" button to set the desired
temperature.
The temperature will increase to the maxi-
mum 90°F(32°C) by pushing the " " button.
Each push of the button will cause the tem-
perature to increase by 1°F(0.5°C).
The temperature will decrease to the mini-
mum 62°F(17°C) by pushing the " " button.
Each push of the button will cause the tem-
perature to decrease by 1°F(0.5°C).
HJM2124HJM2126
Page 123 of 306

1
FEATURES OF YOUR HYUNDAI
111111111111111
B260D02O-AAT1. Playing CDo Insert the CD with the label facing upward.
o Insert the CD to start CD playback, during
radio operation.
o When a disc is in the CD deck, if you press
the play button, the CD player will begin
playing even if the radio is being used.
o The CD player can be used when the ignition
switch is in either the "ON" or "ACC" position.2. TRACK UP/DOWNo The desired track on the disc currently being
played can be selected using the track
number.
o Press once to skip forward to the beginning
of the next track. Press
once to skip back to the beginning of the
track.3. FF/REW ( / )If you want to fast forward or reverse through
the compact disc track, push and hold the FF
( ) or REW ( ) button. When you release
the button, the compact disc player will resume
playing.
4. REPEAT Buttono To repeat the track you are currently listen-
ing to, press the RPT button. To cancel ,
press again.
o If you do not release RPT operation when the
track ends, it will automatically be replayed.
This process will be continued until you push
the button again.5. SCAN Buttono Press the SCAN button to playback the first
10 seconds of each track.
o Press the SCAN button again within 10 sec.
when you have reached the desired track.6. EJECT ButtonWhen the EJECT button is pressed with
a CD loaded, the CD will eject.
NOTE:
o If the CD does not operate properly or if
the ER2 fault code is displayed, use one
of two methods to reset the CD deck
function.
- Remove the audio fuse for 5 minutes.
Then, reinstall the audio fuse.
- Diconnect the negative terminal of the
battery and wait 5 minutes. Then re-
connect the negative battery terminal.o To assure proper operation of the unit,
keep the vehicle interior temperature
within a normal range by using the
vehicle's air conditioning or heating
system.
o When replacing the fuse, replace it with
a fuse having the correct capacity.
o The preset station frequencies are all
erased when the car battery is discon-
nected. Therefore, all data will have to be
set again if this should occur.
o Do not add any oil to the rotating parts.
Keep magnets, screwdrivers and other
metallic objects away from the tape
mechanism and head.
o This equipment is designed to be used
only in a 12 volt DC battery system with
negative ground.
o This unit is made of precision parts. Do
not attempt to disassemble or adjust
any parts.
o When driving your vehicle, be sure to
keep the volume of the unit set low
enough to allow you to hear sounds
coming from the outside.
o Do not expose this equipment (includ-
ing the speakers) to water or excessive
moisture.
Page 129 of 306

1
FEATURES OF YOUR HYUNDAI
117117117117117
H290D01O-GAT1. FF/REWo Fast forward tape winding starts when the
FF ( ) button is pressed during PLAY or
REW mode.
o Tape PLAY starts when the FF ( ) button
is pressed again during FF mode.
o Tape rewinding starts when the REW ( )
button is pressed during PLAY or FF mode.
o Tape PLAY starts when the REW ( ) button
pressed again during REW mode.2. AUTO MUSIC SelectPress the button to find the starting point of each
song in a prerecorded music tape. The quiet
space between songs (must have at least 4
sec. gap) can be accepted by the AUTO MUSIC
Select button.
o Pressing the button will play the beginning
of the next music segment.
o Pressing the button will start replay at
the beginning of the music just listened to.
3. TAPE PROGRAM Buttono This allows you to play the reverse side of the
tape by merely depressing the program
button. An arrow will appear in the display to
show tape direction.
o Push the TAPE button to turn on that function
without pushing power ON
ˆOFF control knob.
4. REPEATo To repeat the track you are currently listen-
ing to, press the RPT button. To cancel,
press again.
o If you do not release RPT operation when the
track ends, it will automatically be replayed.
This process will be continued until you push
the button again.5. Equalizer (EQ)Press the EQ button to select the CLASSIC,
JAZZ, ROCK and DEFEAT MODE for the
desired tone quality. Each press of the button
changes the display as follows;
6. DOLBYIf you get background noise during tape PLAY,
you can reduce this considerably by merely
pressing the DOLBY button. If you want to
cancel the DOLBY feature, press the button
again.7. TAPE EJECTo When the button is pressed with a cassette
loaded, the cassette will eject.
o When the button is pressed during FF/
REW mode, the cassette will eject.NOTE:o To assure proper operation of the unit,
keep the vehicle interior temperature
within a normal range by using the
vehicle's air conditioning or heating
system.
o When replacing the fuse, replace it with
a fuse having the correct capacity.
o The preset station frequencies are all
erased when the car battery is discon-
nected. Therefore, all data will have to be
set again if this should occur.
o Do not add any oil to the rotating parts.
Keep magnets, screwdrivers and other
metallic objects away from the tape
mechanism and head.
CLASSIC → JAZZ → ROCK → DEFEAT