sensor HYUNDAI TUCSON 2010 Owner's Manual
[x] Cancel search | Manufacturer: HYUNDAI, Model Year: 2010, Model line: TUCSON, Model: HYUNDAI TUCSON 2010Pages: 382, PDF Size: 7.39 MB
Page 272 of 382
What to do in an emergency
8
6
✽
✽
NOTICE
If the TPMS, Low Tire Pressure indi-
cator do not illuminate for 3 seconds
when the ignition switch is turned to
the ON position or engine is running,
or if they remain illuminated after
coming on for approximately 3 sec-
onds, take your vehicle to your near-
est authorized HYUNDAI dealer and
have the system checked.
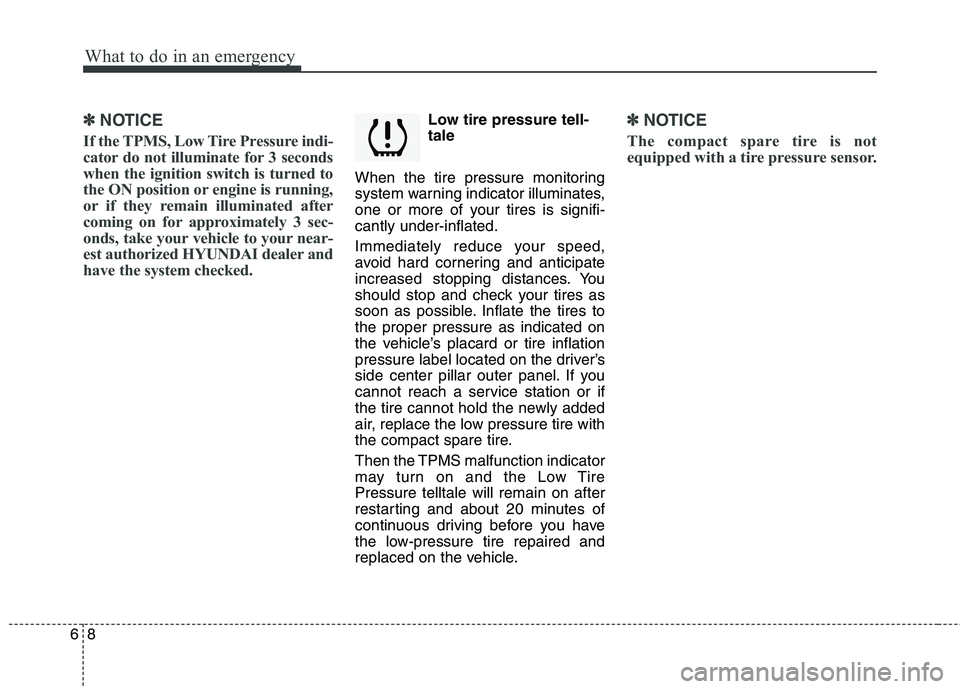
Low tire pressure tell-
tale
When the tire pressure monitoring
system warning indicator illuminates,
one or more of your tires is signifi-
cantly under-inflated.
Immediately reduce your speed,
avoid hard cornering and anticipate
increased stopping distances. You
should stop and check your tires as
soon as possible. Inflate the tires to
the proper pressure as indicated on
the vehicle’s placard or tire inflation
pressure label located on the driver’s
side center pillar outer panel. If you
cannot reach a service station or if
the tire cannot hold the newly added
air, replace the low pressure tire with
the compact spare tire.
Then the TPMS malfunction indicator
may turn on and the Low Tire
Pressure telltale will remain on after
restarting and about 20 minutes of
continuous driving before you have
the low-pressure tire repaired and
replaced on the vehicle.✽ ✽ NOTICE
The compact spare tire is not
equipped with a tire pressure sensor.
Page 274 of 382
What to do in an emergency
10
6
Changing a tire with TPMS
If you have a flat tire, the Low Tire
Pressure telltale will turn on. Have
the flat tire repaired by an authorized
HYUNDAI dealer as soon as possi-
ble or replace the flat tire with the
compact spare tire.
Each wheel is equipped with a tire
pressure sensor mounted inside the
tire behind the valve stem. You must
use TPMS specific wheels. It is rec-
ommended that you always have
your tires serviced by an authorized
HYUNDAI dealer.
Even if you replace the low pressure
tire with the compact spare tire, the
Low Tire Pressure telltale will remain
on until the low pressure tire is
repaired and placed on the vehicle. After you replace the low pressure
tire with the compact spare tire, the
TPMS malfunction indicator may be
illuminated after a few minutes
because the compact spare tire does
not have a sensor.
Once the low pressure tire is re-
inflated to the recommended pres-
sure and installed on the vehicle, the
TPMS malfunction indicator and the
low tire pressure telltale will extin-
guish within a few minutes.
If the indicators are not extinguished
after a few minutes, please visit an
authorized HYUNDAI dealer.
You may not be able identify a low
tire by simply looking at it. Always
use a good quality tire pressure
gauge to measure the tire's inflation
pressure. Please note that a tire that
is hot (from being driven) will have a
higher pressure measurement than a
tire that is cold (from sitting station-
ary for at least 3 hours and driven
less than 1 mile (1.6 km) during that
3 hour period).CAUTION
The TPMS malfunction indica-
tor may be illuminated if thevehicle is moving around elec-tric power supply cables orradios transmitter such as atpolice stations, governmentand public offices, broadcast-ing stations, military installa-tions, airports, or transmittingtowers, etc. This can interferewith normal operation of theTire Pressure MonitoringSystem (TPMS).
The TPMS malfunction indica- tor may be illuminated ifsome electronic devices, suchas notebook computers, areused in the vehicle. This caninterfere with normal opera-tion of the Tire PressureMonitoring System (TPMS).
CAUTION
NEVER use a puncture-repair-ing agent to repair and/or inflatea low pressure tire. The tiresealant can damage the tirepressure sensor. If used, youwill have to replace the tire pres-sure sensor.
Page 317 of 382
729
Maintenance
Filter inspection
The climate control air filter should be
replaced according to the Maintenance
Schedule. If the vehicle is operated in
severely air-polluted cities or on dusty
rough roads for a long period, it should
be inspected more frequently and
replaced earlier. When you replace the
climate control air filter, replace it per-
forming the following procedure, and be
careful to avoid damaging other compo-
nents.
Filter replacement
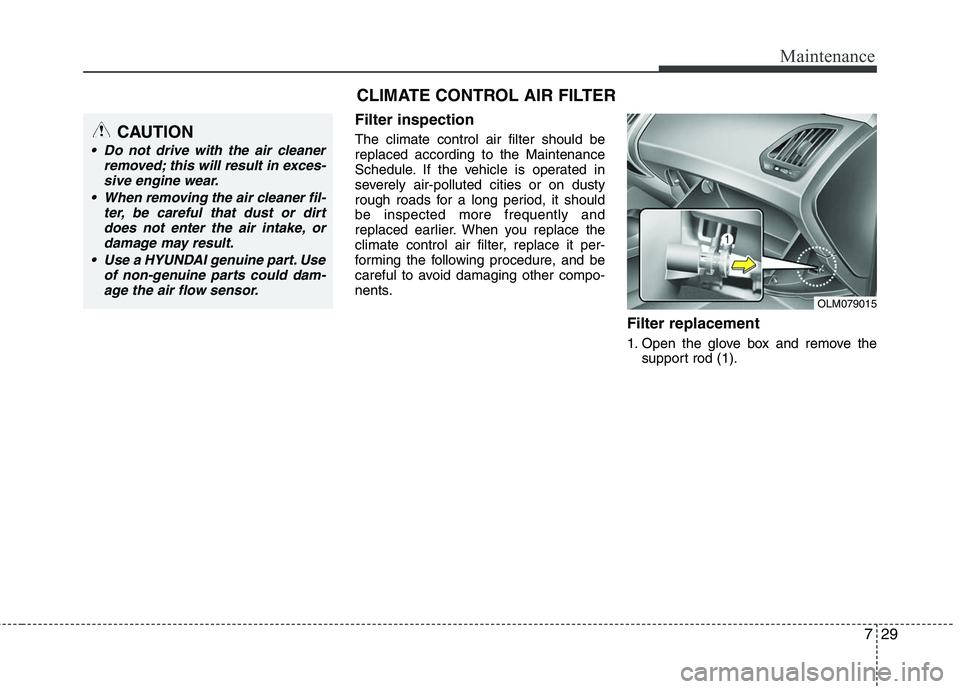
1. Open the glove box and remove thesupport rod (1).
CAUTION
Do not drive with the air cleaner removed; this will result in exces-sive engine wear.
When removing the air cleaner fil- ter, be careful that dust or dirtdoes not enter the air intake, ordamage may result.
Use a HYUNDAI genuine part. Use of non-genuine parts could dam-age the air flow sensor.
CLIMATE CONTROL AIR FILTER
OLM079015
Page 343 of 382
755
Maintenance
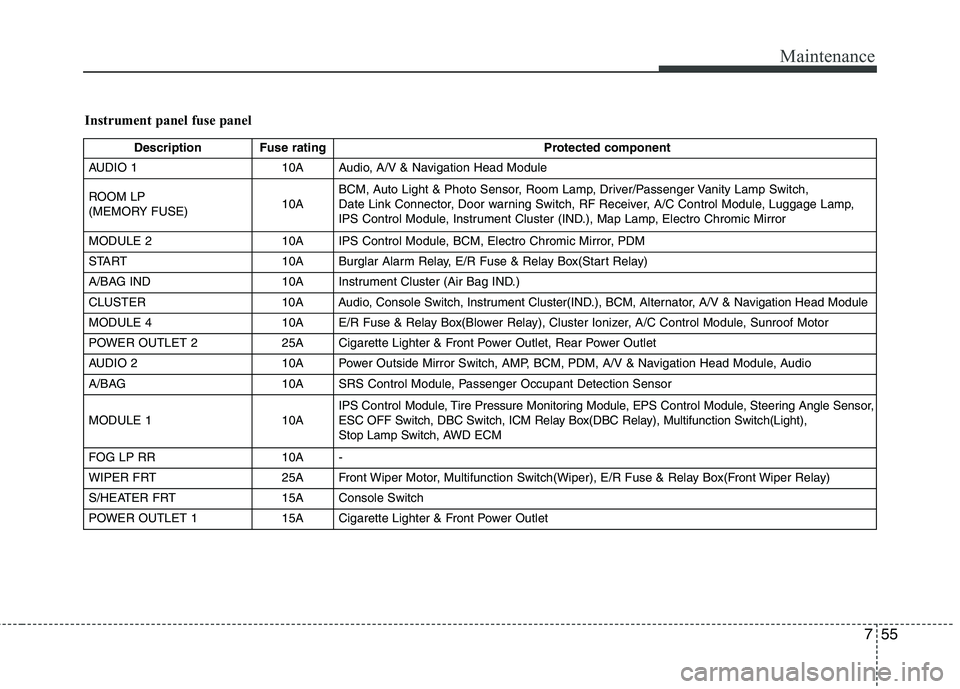
Instrument panel fuse panel
Description Fuse rating Protected component
AUDIO 1 10A Audio, A/V & Navigation Head Module
ROOM LP
(MEMORY FUSE) 10ABCM, Auto Light & Photo Sensor, Room Lamp, Driver/Passenger Vanity Lamp Switch,
Date Link Connector, Door warning Switch, RF Receiver, A/C Control Module, Luggage Lamp,
IPS Control Module, Instrument Cluster (IND.), Map Lamp, Electro Chromic Mirror
MODULE 2 10A IPS Control Module, BCM, Electro Chromic Mirror, PDM
START 10A Burglar Alarm Relay, E/R Fuse & Relay Box(Start Relay)
A/BAG IND 10A Instrument Cluster (Air Bag IND.)
CLUSTER 10A Audio, Console Switch, Instrument Cluster(IND.), BCM, Alternator, A/V & Navigation Head Module
MODULE 4 10A E/R Fuse & Relay Box(Blower Relay), Cluster Ionizer, A/C Control Module, Sunroof Motor
POWER OUTLET 2 25A Cigarette Lighter & Front Power Outlet, Rear Power Outlet
AUDIO 2 10A Power Outside Mirror Switch, AMP, BCM, PDM, A/V & Navigation Head Module, Audio
A/BAG 10A SRS Control Module, Passenger Occupant Detection Sensor
MODULE 1 10A IPS
Control Module, Tire Pressure Monitoring Module, EPS ControlModule, Steering Angle Sensor,
ESC OFF Switch, DBC Switch, ICM Relay Box(DBC Relay), Multifunction Switch(Light),
Stop Lamp Switch, AWD ECM
FOG LP RR 10A -
WIPER FRT 25A Front Wiper Motor, Multifunction Switch(Wiper), E/R Fuse & Relay Box(Front Wiper Relay)
S/HEATER FRT 15A Console Switch
POWER OUTLET 1 15A Cigarette Lighter & Front Power Outlet
Page 345 of 382
757
Maintenance
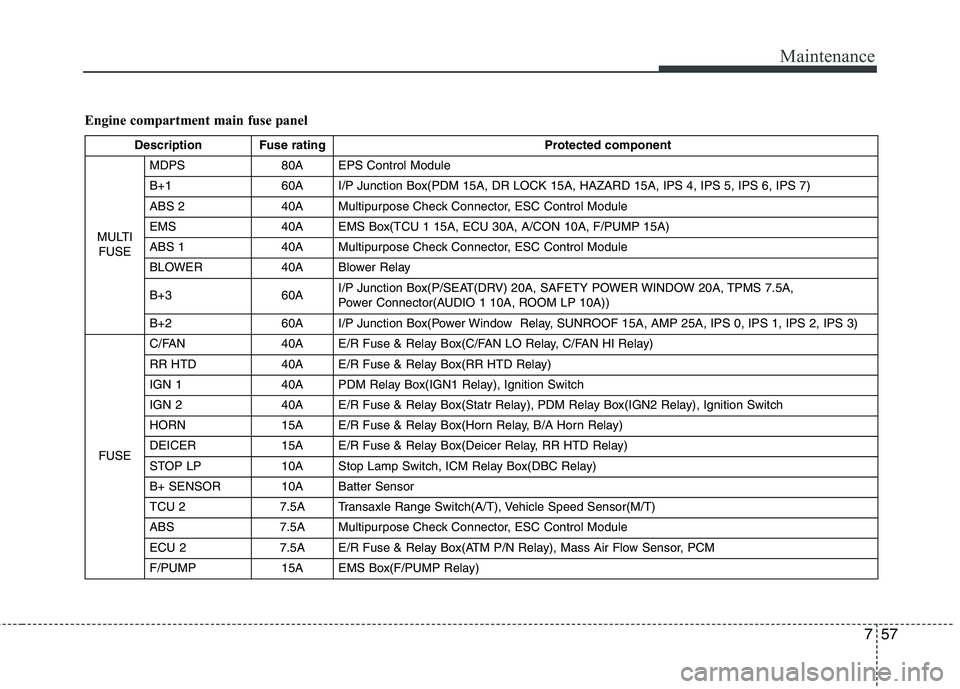
Engine compartment main fuse panel
Description Fuse rating Protected component
MULTI FUSE MDPS 80A EPS Control Module
B+1 60A I/P Junction Box(PDM 15A, DR LOCK 15A, HAZARD 15A, IPS 4, IPS 5, IPS 6, IPS 7)
ABS 2 40A Multipurpose Check Connector, ESC Control Module
EMS 40A EMS Box(TCU 1 15A, ECU 30A, A/CON 10A, F/PUMP 15A)
ABS 1 40A Multipurpose Check Connector, ESC Control Module
BLOWER 40A Blower Relay
B+3 60A
I/P Junction Box(P/SEAT(DRV) 20A, SAFETY POWER WINDOW 20A, TPMS 7.5A,
Power Connector(AUDIO 1 10A, ROOM LP 10A))
B+2 60A I/P Junction Box(Power Window Relay, SUNROOF 15A, AMP 25A, IPS 0, IPS 1, IPS 2, IPS 3)
FUSE C/FAN 40A E/R Fuse & Relay Box(C/FAN LO Relay, C/FAN HI Relay)
RR HTD 40A E/R Fuse & Relay Box(RR HTD Relay)
IGN 1 40A PDM Relay Box(IGN1 Relay), Ignition Switch
IGN 2 40A E/R Fuse & Relay Box(Statr Relay), PDM Relay Box(IGN2 Relay), Ignition Switch
HORN 15A E/R Fuse & Relay Box(Horn Relay, B/A Horn Relay)
DEICER 15A E/R Fuse & Relay Box(Deicer Relay, RR HTD Relay)
STOP LP 10A Stop Lamp Switch, ICM Relay Box(DBC Relay)
B+ SENSOR 10A Batter Sensor
TCU 2 7.5A Transaxle Range Switch(A/T), Vehicle Speed Sensor(M/T)
ABS 7.5A Multipurpose Check Connector, ESC Control Module
ECU 2 7.5A E/R Fuse & Relay Box(ATM P/N Relay), Mass Air Flow Sensor, PCM
F/PUMP 15A EMS Box(F/PUMP Relay)
Page 346 of 382
Maintenance
58
7
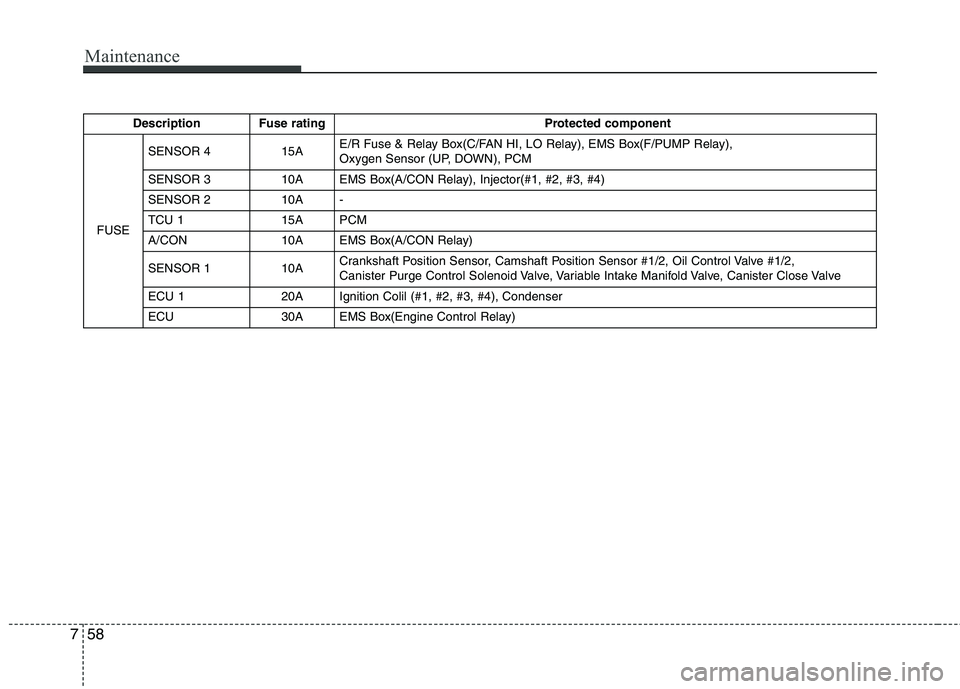
Description Fuse rating Protected component
FUSE SENSOR 4 15A
E/R Fuse & Relay Box(C/FAN HI, LO Relay), EMS Box(F/PUMP Relay),
Oxygen Sensor (UP, DOWN), PCM
SENSOR 3 10A EMS Box(A/CON Relay), Injector(#1, #2, #3, #4)
SENSOR 2 10A -
TCU 1 15A PCM
A/CON 10A EMS Box(A/CON Relay)
SENSOR 1 10A Crankshaft Position Sensor, Camshaft Position Sensor #1/2, Oil Control Valve #1/2,
Canister Purge Control Solenoid Valve, Variable Intake Manifold Valve, Canister Close Valve
ECU 1 20A Ignition Colil (#1, #2, #3, #4), Condenser
ECU 30A EMS Box(Engine Control Relay)