Start car HYUNDAI TUCSON 2014 Owners Manual
[x] Cancel search | Manufacturer: HYUNDAI, Model Year: 2014, Model line: TUCSON, Model: HYUNDAI TUCSON 2014Pages: 542, PDF Size: 7.59 MB
Page 6 of 542
F6
Introduction
We want to help you get the greatest
possible driving pleasure from your
vehicle. Your Owner’s Manual can
assist you in many ways. We strong-
ly recommend that you read the
entire manual. In order to minimize
the chance of death or injury, you
must read the WARNING and CAU-
TION sections in this manual.
Illustrations complement the words
in this manual to best explain how to
enjoy your vehicle. By reading your
manual, you will learn about fea-
tures, important safety information,
and driving tips under various road
conditions.
The general layout of the manual is
provided in the Table of Contents. A
good place to start is the index; it has
an alphabetical listing of all informa-
tion in your manual.Sections: This manual has eight
chapter plus an index. Each chapters
begins with a brief list of contents so
you can tell at a glance if that chap-
ter has the information you want.
You will find various WARNINGs,
CAUTIONs, and NOTICEs in this
manual. These WARNINGs were pre-
pared to enhance your personal safe-
ty. You should carefully read and fol-
low ALL procedures and recommen-
dations provided in these WARN-
INGS, CAUTIONS and NOTICES.
✽✽
NOTICE
A NOTICE indicates interesting or
helpful information is being provided.
HH OO WW TT OO UU SSEE TT HH IISS MM AANN UU AALL
A WARNING indicates a situation
in which harm, serious bodily
injury, or death could result if thewarning is ignored.
WARNING
A CAUTION indicates a situation
in which damage to your vehiclecould result if the caution isignored.
CAUTION
Page 8 of 542
F8
Introduction
Gasoline containing MMT
Some gasoline contains harmful man-
ganese-based fuel additives such as
MMT (Methylcyclopentadienyl
Manganese Tricarbonyl).
HYUNDAI does not recommend the
use of gasoline containing MMT.
This type of fuel can reduce vehicle
performance and affect your emis-sion control system. The malfunction indicator lamp on
the cluster may come on.
Do not use methanol
Fuels containing methanol (wood
alcohol) should not be used in your
vehicle. This type of fuel can reduce
vehicle performance and damagecomponents of the fuel system.
Fuel Additives
HYUNDAI recommends that you usegood quality gasolines treated with
detergent additives such as TOP TIER
Detergent Gasoline, which help pre-
vent deposit formation in the engine.These gasolines will help the engine
run cleaner and enhance performance
of the Emission Control System. For
more information on TOP TIER
Detergent Gasoline, please go to the
website (www
.toptiergas.com).
For customers who do not use TOP
Tier Detergent Gasoline regularly, and
have problems starting or the engine
does not run smoothly, additives that
you can buy separately may be added
to the gasoline. If TOP TIER Detergent
Gasoline is not available, one bottle of
additive added to the fuel tank at every
7,500 miles or every engine oil change
is recommended. Additives are avail-
able from your authorized HYUNDAI
dealer along with information on how
to use them. Do not mix other addi-
tives.
Your New Vehicle Limited
Warranty may not cover dam-
age to the fuel system and any
performance problems that are
caused by the use of fuels con-taining methanol.
CAUTION
Page 38 of 542
2-21
Safety system of your vehicle
2
This section describes how to use the
seat belts properly. It also describessome of the things not to do when
using seat belts.
Seat belt safety precautions
Always fasten your seat belt and
make sure all passengers have fas-
tened their seat belts before starting
any trip. Air bags are designed tosupplement the seat belt as an addi-
tional safety device, but they are not a
substitute. Most states require all
occupants of a vehicle to wear seat
belts.
SSEE AA TT BB EELLTT SS
Seat belts must be used by ALL
passengers whenever the vehi-
cle is moving. Take the followingprecautions when adjusting andwearing seat belts:
ALWAYS properly restrain
children under age 13 in therear seats.
NEVER allow children to ride
in the front passenger seat. If
a child age 13 or older must be
seated in the front seat, move
the seat as far back as possi-
ble and properly restrain themin the seat belt.
NEVER allow an infant or child
to be carried on an occupant’slap.
NEVER ride with the seatback
reclined when the vehicle is
moving.
Do not allow children to share a seat or seat belt.
Do not wear the shoulder belt
under your arm or behind your
back.
(Continued)
WARNING (Continued)
Do not use the seat belt if it is
twisted. A twisted seat belt
will not protect you properlyin an accident.
Do not use a seat belt if the
webbing or hardware is dam-
aged.
Do not latch the seat belt into
the buckles of other seats.
NEVER unfasten the seat belt
while driving. This may cause
loss of vehicle control result-ing in an accident.
Make sure there is nothing in
the buckle interfering with the
seat belt latch mechanism.
This may prevent the seat belt
from fastening securely.
No modifications or additions
should be made by the user
which will either prevent the
seat belt adjusting devices
from operating to remove
slack, or prevent the seat belt
assembly from being adjusted
to remove slack.
Page 93 of 542
3-7
Convenient features of your vehicle
3
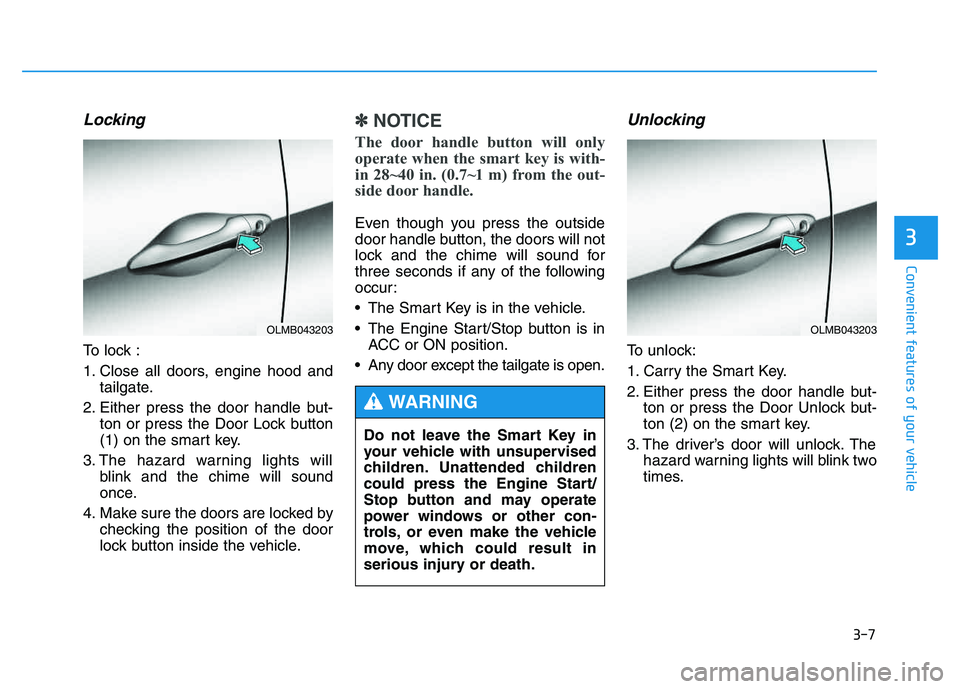
Locking
To lock :
1. Close all doors, engine hood andtailgate.
2. Either press the door handle but- ton or press the Door Lock button
(1) on the smart key.
3. The hazard warning lights will blink and the chime will sound
once.
4. Make sure the doors are locked by checking the position of the door
lock button inside the vehicle.
✽✽ NOTICE
The door handle button will only
operate when the smart key is with-
in 28~40 in. (0.7~1 m) from the out-
side door handle.
Even though you press the outside
door handle button, the doors will not
lock and the chime will sound for
three seconds if any of the following
occur:
The Smart Key is in the vehicle.
The Engine Start/Stop button is in ACC or ON position.
Any door except the tailgate is open.
Unlocking
To unlock:
1. Carry the Smart Key.
2. Either press the door handle but- ton or press the Door Unlock but-
ton (2) on the smart key.
3. The driver’s door will unlock. The hazard warning lights will blink two
times.
OLMB043203
Do not leave the Smart Key in
your vehicle with unsupervised
children. Unattended children
could press the Engine Start/
Stop button and may operate
power windows or other con-
trols, or even make the vehicle
move, which could result in
serious injury or death.
WARNING
OLMB043203
Page 116 of 542
3-30
Convenient features of your vehicle
Parking brake & brakefluid warning light
Parking brake warning
This light is illuminated when the
parking brake is applied with the igni-
tion switch in the START or ON posi-
tion. The warning light should go off
when the parking brake is released
while the engine is running.
The parking brake warning chime will
sound to remind you that the parking
brake is applied when you are driving
above 6 mph (10 km/h). Always
release the parking brake before you
drive.
Low brake fluid level warning
If the warning light remains on, it may
indicate that the brake fluid level in
the reservoir is low.
If the warning light remains on:
1. Drive carefully to the nearest safe location and stop your vehicle.
2. With the engine stopped, check the brake fluid level immediately
and add fluid as required. Then
check all brake components for
fluid leaks.
3. Do not drive the vehicle if leaks are found, the warning light
remains on or the brakes do not
operate properly. Have the vehicle
towed to any authorized HYUNDAI
dealer for a brake system inspec-
tion and for repairs if necessary. Your vehicle is equipped with a dual-
diagonal braking system. This means
you still have braking on two wheels
even if one of the brake circuits is
damaged or malfunctions. With only
one of the circuits working, more than
normal pedal travel and greater pedal
pressure are required to stop the car.
Also, the car will not stop in as short
a distance with only a portion of the
brake system working. If the brakes
fail while you are driving, shift to a
lower gear for additional engine brak-ing and stop the car as soon as it is
safe to do so.
To check bulb operation, check
whether the parking brake and brake
fluid warning light illuminates when
the ignition switch is in the ON posi-tion.
Page 118 of 542
3-32
Convenient features of your vehicle
Engine oil pressurewarning light
This warning light indicates the
engine oil pressure is low.
If the warning light illuminates while
driving:
1. Drive safely to the side of the road, park and turn the engine off.
2. Allow the vehicle to sit for five min- utes, then check the engine oil
level. If the level is low, add oil asrequired.
If the warning light remains on after
adding oil or if oil is not available, call
an authorized HYUNDAI dealer.
If the engine is not stopped
immediately after the engine oilpressure warning light is illumi-
nated, severe damage couldresult.
CAUTION
If the oil pressure warning light
stays on while the engine is
running, serious engine dam-
age may result. The oil pressurewarning light comes on when-
ever there is insufficient oil
pressure. In normal operation, itshould come on when the igni-
tion switch is turned on, then go
out when the engine is started. (Continued)
(Continued) If the oil pressure warning light
stays on while the engine is
running, there is a serious mal-function.
If this happens, stop the car as
soon as it is safe to do so, turn
off the engine and check the oil
level. If the oil level is low, fill
the engine oil to the proper level
and start the engine again. If the
light stays on with the engine
running, turn the engine off
immediately. In any instance
where the oil light stays on
when the engine is running, the
engine should be checked by an
authorized HYUNDAI dealer
before the car is driven again.
CAUTION
Page 130 of 542
3-44
Convenient features of your vehicle
Interior rearview mirrors
Before you start driving, adjust the
rearview mirror to the center on the
view through the rear window.
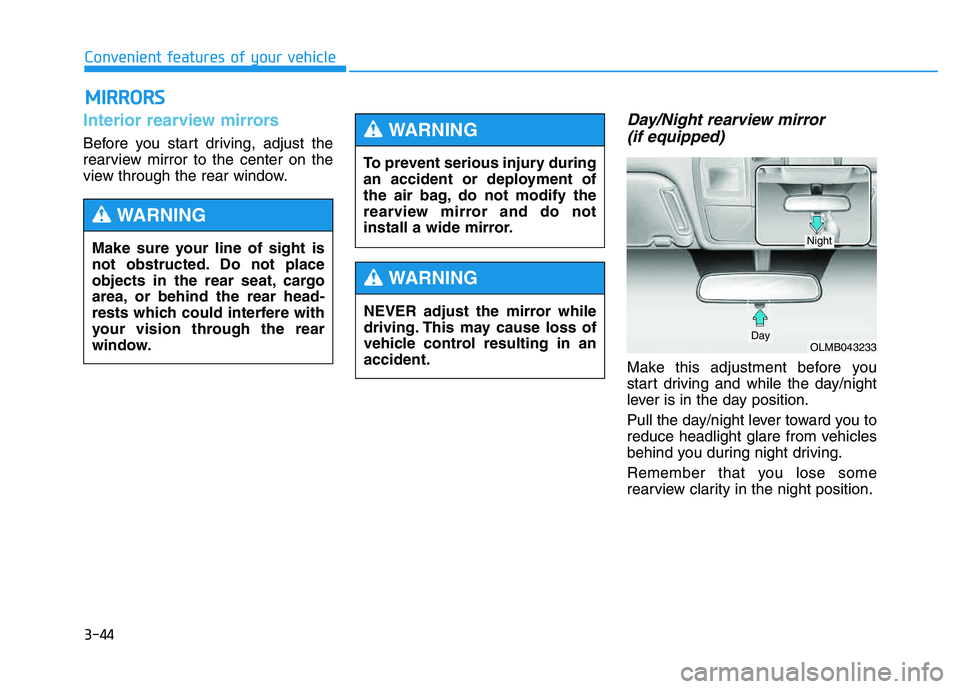
Day/Night rearview mirror (if equipped)
Make this adjustment before you
start driving and while the day/night
lever is in the day position.
Pull the day/night lever toward you to
reduce headlight glare from vehicles
behind you during night driving.
Remember that you lose some
rearview clarity in the night position.
MM IIRR RROO RRSS
Make sure your line of sight is
not obstructed. Do not place
objects in the rear seat, cargo
area, or behind the rear head-
rests which could interfere with
your vision through the rear
window.
WARNING
To prevent serious injury during
an accident or deployment of
the air bag, do not modify the
rearview mirror and do not
install a wide mirror.
WARNING
NEVER adjust the mirror while
driving. This may cause loss of
vehicle control resulting in anaccident.
WARNING
OLMB043233Day
Night
Page 133 of 542
3-47
Convenient features of your vehicle
3
Automatic-Dimming Night Vision
Safety™ (NVS®
) Mirror
(if equipped)
For more information regarding NVS ®
mirrors and other applications,
please refer to the Gentex website:
www.gentex.com The auto-dimming function can be
controlled by pressing the ON/OFF
button:
1. Pressing the button turns the auto-
dimming function OFF which is
indicated by the green Status
Indicator LED turning off.
2. Pressing the button again turns the auto-dimming function ON
which is indicated by the green
Status Indicator LED turning on.
The mirror defaults to the ON posi-
tion each time the vehicle is started.
Z-Nav™ Compass Display
The NVS™ Mirror in your vehicle is
also equipped with a Z-Nav™
Compass that shows the vehicle
Compass heading in the Display
Window using the 8 basic cardinalheadings (N, NE, E, SE, etc.).
The NVS ®
Mirror automatically
reduces glare by monitoring
light levels in the front and the
rear of the vehicle. Any objectthat obstructs either light sen-sor will degrade the automatic
dimming control feature.
CAUTION
Page 140 of 542
3-54
Convenient features of your vehicle
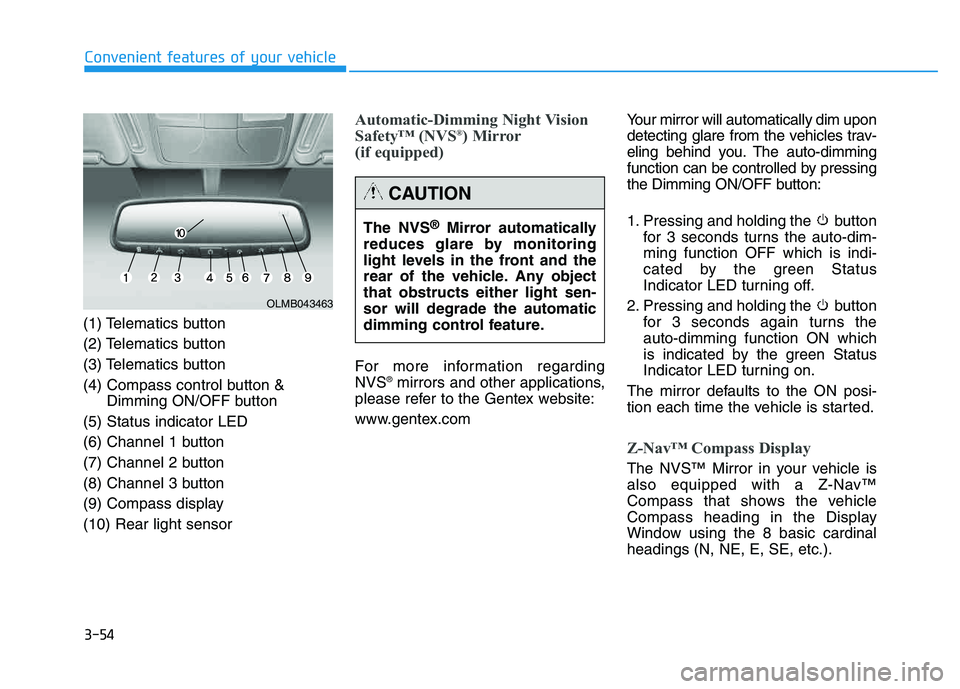
(1) Telematics button
(2) Telematics button
(3) Telematics button
(4) Compass control button &Dimming ON/OFF button
(5) Status indicator LED
(6) Channel 1 button
(7) Channel 2 button
(8) Channel 3 button
(9) Compass display(10) Rear light sensor
Automatic-Dimming Night Vision
Safety™ (NVS ®
) Mirror
(if equipped)
For more information regarding NVS ®
mirrors and other applications,
please refer to the Gentex website:
www.gentex.com Your mirror will automatically dim upon
detecting glare from the vehicles trav-
eling behind you. The auto-dimming
function can be controlled by pressing
the Dimming ON/OFF button:
1. Pressing and holding the button
for 3 seconds turns the auto-dim- ming function OFF which is indi-
cated by the green Status
Indicator LED turning off.
2. Pressing and holding the button for 3 seconds again turns theauto-dimming function ON which
is indicated by the green Status
Indicator LED turning on.
The mirror defaults to the ON posi-
tion each time the vehicle is started.
Z-Nav™ Compass Display
The NVS™ Mirror in your vehicle is
also equipped with a Z-Nav™
Compass that shows the vehicle
Compass heading in the Display
Window using the 8 basic cardinalheadings (N, NE, E, SE, etc.).
OLMB043463
The NVS ®
Mirror automatically
reduces glare by monitoring
light levels in the front and the
rear of the vehicle. Any objectthat obstructs either light sen-sor will degrade the automatic
dimming control feature.
CAUTION
Page 185 of 542
3-99
Convenient features of your vehicle
3
System operation
Ventilation
1. Set the mode to the position.
2. Set the air intake control to theoutside (fresh) air position.
3. Set the temperature control to the desired position.
4. Set the fan speed control to the desired speed.
Heating
1. Set the mode to the position.
2. Set the air intake control to theoutside (fresh) air position.
3. Set the temperature control to the desired position.
4. Set the fan speed control to the desired speed.
5. If dehumidified heating is desired, turn the air conditioning system on.
If the windshield fogs up, set the mode to the or position.
Operation Tips
To keep dust or unpleasant odorfrom entering the car through the
ventilation system, temporarily set
the air intake control to the recircu-
lated air position. Be sure to returnthe control to the fresh air positionwhen the unpleasant odor has
passed to keep fresh air in the
vehicle. This will help keep the driv-
er alert and comfortable.
Air for the heating/cooling system is drawn in through the grilles just
ahead of the windshield. Care
should be taken that the grille open-
ings are not blocked by leaves,
snow, ice or other obstructions.
To prevent the inside of the wind- shied from fogging, set the air intakecontrol to the fresh air position and
fan speed to the desired position,
turn on the air conditioning system,
and adjust the temperature control
to desired temperature.
Air conditioning
HYUNDAI Air Conditioning Systems
are filled with environmentally friendly
R-134a refrigerant.
1. Start the engine. Push the air con- ditioning button.
2. Set the mode to the position.
3. Set the air intake control to the out- side air or recirculated air position.
4. Adjust the fan speed control and temperature control to maintain
the desired comfort.
When maximum cooling is desired, set the temperature con-
trol to the extreme left position, setthe mode control to the MAX A/C
position, then set the fan speedcontrol to the highest speed.